- 2011 Hyundai Elantra Owners Manuals
- Hyundai Elantra Owners Manuals
- 2008 Hyundai Elantra Owners Manuals
- Hyundai Elantra Owners Manuals
- 2010 Hyundai Elantra Owners Manuals
- Hyundai Elantra Owners Manuals
- 2003 Hyundai Elantra Owners Manuals
- Hyundai Elantra Owners Manuals
- 2004 Hyundai Elantra Owners Manuals
- Hyundai Elantra Owners Manuals
- 2006 Hyundai Elantra Owners Manuals
- Hyundai Elantra Owners Manuals
- 2007 Hyundai Elantra Owners Manuals
- Hyundai Elantra Owners Manuals
- Download PDF Manual
-
2006
A010A03A-AAT
WARRANTIES FOR YOUR HYUNDAI VEHICLE
Please consult your Owner's Handbook & Warranty Information booklet for your vehicle's specific warranty coverage.
A020A01A-AAT
RESPONSIBILITY FOR MAINTENANCE
The maintenance requirements for your new Hyundai are found in Section 5. As the owner, it is your responsibility to see that all maintenance operations specified by the manufacturer are carried out at the appropriate intervals. When the vehicle is used in severe driving conditions, more frequent maintenance is required for some operations. Maintenance requirements for severe operating conditions are also included in Section 5.
OWNER'S MANUAL
A030A03E-AAT
Operation Maintenance Specifications
All information in this Owner's Manual is current at the time of publication. However, Hyundai reserves the right to make changes at any time so that our policy of continual product improvement may be carried out.
This manual applies to all Hyundai ELANTRA models and includes descriptions and explanations of optional as well as standard equipment. As a result, you may find material in this manual that does not apply to your specific vehicle.
HXDFL280
A070A01A-AAT
CAUTION: MODIFICATIONS TO YOUR HYUNDAI
Your Hyundai should not be modified in any way. Such modifications may adversely affect the performance, safety or durability of your Hyundai and may, in addition, violate conditions of the limited warranties covering the vehicle. Certain modifications may also be in violation of regulations established by the U.S. Department of Transportation and other federal or state agencies.
A080A01S-AAT
TWO-WAY RADIO OR CELLULAR TELEPHONE INSTALLATION
Your vehicle is equipped with electronic fuel injection and other electronic components. It is possible for an improperly installed/adjusted two-way radio or cellular telephone to adversely affect electronic systems. For this reason, we recommend that you carefully follow the radio manufacturer's instructions or consult your Hyundai dealer for precautionary measures or special instructions if you choose to install one of these devices.
A090A01A-AAT
SAFETY AND VEHICLE DAMAGE WARNING
This manual includes information titled as WARNING, CAUTION and NOTE. These titles indicate the following:
WARNING:
CAUTION:
This indicates that a condition may result in harm, serious injury or death to you or other persons if the warning is not heeded. Follow the advice provided with the warning.
This indicates that a condition may result in damage to your vehicle or its equipment if the caution is not heeded. Follow the advice provided with the caution.
NOTE: This indicates that interesting or helpful information is being provided.
A110A01A-AAT
VEHICLE DATA COLLECTION AND EVENT DATA RECORDERS
Your Hyundai vehicle is equipped with many high technology, electronically controlled systems that help to ensure your vehicle operates properly and provides the performance that you expect. These systems utilize computers to monitor the operation of various systems and components and help to control their operation. These computerized system operations are wide-ranging and involve components to reduce emissions, to continuously evaluate the readiness of the airbag and seat belt pretensioner systems, to determine when the airbag and seat belt pre-tensioner systems should be deployed and then to activate the deployment, and if equipped, to operate anti-lock braking, traction control and electrical stability control to assist the driver to control the vehicle in difficult driving situations. These systems electronically store information that is useful to service technicians when they need to diagnose and repair these systems. Additional information is stored only when a crash occurs that results in the deployment of the airbags or seat belt pre-tensioners. This type of data storage is done by devices called event data recorders(EDR).
After a crash event, the airbag and seat belt pre-tensioner computer system, known as the Supplemental Restraint System Control Module (SRSCM) or Airbag Control Unit (ACU), may record some information about the condition of the vehicle and how it was being operated. This information consists of data related to seat belt usage and if there was diagnostic information in the airbag or seat belt systems at the time that a crash occurred, and if the ACU sensed that a crash of sufficient severity occurred to require seat belt pre-tensioner or airbag deployment.
To retrieve this information, special equipment is needed and access to the vehicle or the device that stores the data is required. Hyundai will not access information about a crash event or share it with others except:
o in response to an official request of police or similar government office, or o with the consent of the vehicle owner or, if the vehicle is leased, with the consent of the lessee, or o as part of Hyundai’s defense of litigation, or o as required by law.
A040A01A-AAT
FOREWORD
Thank you for choosing Hyundai. We are pleased to welcome you to the growing number of discriminating people who drive Hyundais. The advanced engineering and high-quality construction of each Hyundai we build is something of which we're very proud.
Your Owner's Manual will introduce you to the features and operation of your new Hyundai. It is suggested that you read it carefully because the information it contains can contribute greatly to the satisfaction you receive from your new car.
The manufacturer also recommends that all service and maintenance on your car be performed by an authorized Hyundai dealer. Hyundai dealers are prepared to provide high-quality service, maintenance and any other assistance that may be required.
A050A05A-AAT
HYUNDAI MOTOR COMPANY
Note : Because future owners will also need the information included in this manual, if you sell this Hyundai, please leave
the manual in the vehicle for their use. Thank you.
CAUTION:
Severe engine and transaxle damage may result from the use of poor quality fuels and lubricants that do not meet Hyundai specifications. You must always use high quality fuels and lubricants that meet the specifica- tions listed on Page 9-4 in the Vehicle Specifications section of the Owner's Manual and which also appear in the Service Station Information on the back cover of the Owner's Manual.
Copyright 2006 Hyundai Motor Company. All rights reserved. No part of this publication may be reproduced, stored in any retrieval system or transmitted in any form or by any means without the prior written permission of Hyundai Motor Company.
A100A03A-AAT Guide to Hyundai Genuine Parts 1. What are Hyundai Genuine Parts?
Hyundai Genuine Parts are the same parts used by Hyundai Motor Company to manu- facture vehicles. They are designed and tested for the optimum safety, performance, and reliability to our customers.
2. Why should you use genuine parts?
Hyundai Genuine Parts are engineered and built to meet rigid manufacturing require- ments. Using imitation, counterfeit or used salvage parts is not covered under the Hyundai New Vehicle Limited Warranty or any other Hyundai warranty. In addition, any damage to or failure of Genuine Hyundai Parts caused by the installation or failure of
an imitation, counterfeit or used salvage part is not covered by any Hyundai Warranty.
To find the closest authorized dealer call 1-800-826-CARS
3. How can you tell if you are purchasing
Hyundai Genuine Parts?
Look for the Hyundai Genuine Parts Logo on the package (see below).
Hyundai Genuine Parts exported to the United States are packaged with labels written only in English.
Hyundai Genuine Parts are only sold through authorized Hyundai Dealerships.
A100A03L
A100A01L
A100A02L
A100A04L
TABLE OF CONTENTS
FEATURES OF YOUR HYUNDAI
DRIVING YOUR HYUNDAI
WHAT TO DO IN AN EMERGENCY
CORROSION PREVENTION & APPEARANCE CARE
VEHICLE MAINTENANCE REQUIREMENTS
DO-IT-YOURSELF MAINTENANCE
EMISSION CONTROL SYSTEMS
CONSUMER INFORMATION, REPORTING SAFETY DEFECTS & BINDING ARBITRATION OF WARRANTY CLAIMS
VEHICLE SPECIFICATIONS
INDEX
10
SECTION
B250A03E-AAT
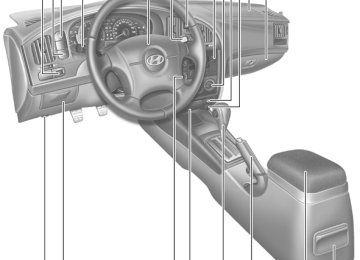
INSTRUMENTS AND CONTROLS
HXDFL002-A
1. Panel Brightness Control Knob 2. TCS Switch (If installed) 3. Trip Computer Switch (If installed) 4. Multi-Function Light Switch 5. Horn and Driver's Airbag 6. Windshield Wiper/Washer Switch 7. Digital Clock 8. Audio System 9. Heating/Air Conditioning Control Panel 10.Cigarette Lighter
11.Power Outlet 12.Passenger's Airbag 13.Glove Box 14.Hood Release Lever 15.Storage compartment 16.Cruise Control Switch (If installed) 17.Front Ashtray 18.Shift Lever 19.Parking Brake 20.Console Box (If installed) 21.Rear Ashtray
CAUTION:
When installing a container of liquid air freshener inside the vehicle, do not place it near the instrument cluster nor on the instrument panel surface. If there is any leakage from the air freshener onto these areas (Instrument cluster, instrument panel or air ventilator), it may damage these parts. If the liquid from the air freshener does leak onto these areas, wash them with water immediately.
YOUR VEHICLE AT A GLANCE
B255A01E-AAT INDICATOR SYMBOLS ON THE INSTRUMENT PANEL
SRS (Airbag) Service Reminder Indicator
ABS Service Reminder Indicator
Trunk Lid /Tail Gate Open Warning Light
Door Ajar Warning Light and Chime
Turn Signal Indicator Lights
Low Fuel Level Warning Light
High Beam Indicator Light
Cruise Indicator Light (If installed)
Low Oil Pressure Warning Light
SET Indicator Light (If installed)
Parking Brake/Low Brake Fluid Level Warning Light
Front Fog Indicator Light (If installed)
Charging System Warning Light
Malfunction Indicator Light
Seat Belt Warning Light
Traction Control Indicator Light (If installed)
* More detailed explanations of these items will be found beginning on page 1-48.
FEATURES OF YOUR HYUNDAI
Fuel Recommendations ................................................ 1-2
Breaking in Your New Hyundai ..................................... 1-3
Keys .............................................................................. 1-3
Door .............................................................................. 1-4
Theft-Alarm System ...................................................... 1-7
Window ....................................................................... 1-10
Seat ............................................................................. 1-11
Seat Belts.................................................................... 1-17
Child Restraint System ............................................... 1-24
Supplemental Restraint (AIRBAG) System ................ 1-33
Instrument Cluster and Indicator ................................. 1-44
Warning and Indicator Lights ...................................... 1-48
Multi-Function Light Switch ......................................... 1-57
Windshield Wiper/Washer Switch ............................... 1-59
Sunroof ....................................................................... 1-66
Mirror ........................................................................... 1-71
Hood Release ............................................................. 1-74
Cruise Control ............................................................. 1-80
Heating and Cooling Control ....................................... 1-83
Stereo Sound System ............................................... 1-101
Audio System ............................................................ 1-103
Antenna ..................................................................... 1-1311FEATURES OF YOUR HYUNDAI
FUEL RECOMMENDATIONS
B010A04A-AAT Use Unleaded Gasoline
B010B01A-AAT What About Gasohol?
B010D01A-AAT Do Not Use Methanol
Gasohol (a mixture of 90% unleaded gasoline and 10% ethanol or grain alcohol) may be used in your Hyundai. However, if your engine devel- ops driveability problems, the use of 100% unleaded gasoline is recommended. Fuels with unspecified quantities of alcohol, or alcohols other than ethanol, should not be used.
B010C01A-AAT Use of MTBE
Hyundai recommends that fuels containing MTBE (Methyl Tertiary Butyl Ether) over 15.0% vol. (Oxygen Content 2.7% weight) should not be used in your Hyundai. Fuel containing MTBE over 15.0% vol. (Oxygen Content 2.7% weight) may reduce vehicle per- formance and produce vapor lock or hard starting.
UNLEADED FUEL ONLY
B010A03E
Unleaded gasoline with a Pump Octane Rating of 87 (Research Octane Number 91) or higher must be used in your Hyundai.
WARNING:
o Do not "top off" after the nozzle auto-
matically shuts off when refueling.
o Tighten the cap until it clicks, otherwise
the "
" light will illuminate.
o Always check that the fuel cap is in- stalled securely to prevent fuel spillage in the event of an accident.
Fuels containing methanol (wood alcohol) should not be used in your Hyundai. This type of fuel can reduce vehicle performance and damage components of the fuel system.
CAUTION:
Your Hyundai's New Vehicle Limited War- ranty may not cover damage to the fuel system and any performance problems that are caused by the use of fuels containing methanol or fuels containing MTBE (Methyl Tertiary Butyl Ether) over 15.0% vol. (Oxy- gen Content 2.7% weight.).
BREAKING IN YOUR NEW HYUNDAI
KEYS
FEATURES OF YOUR HYUNDAI
B010E01A-AAT Gasolines for Cleaner Air
B020A01S-AAT During the First 1,200 Miles (2,000 Km)
B030A01A-AAT
To help contribute to cleaner air, Hyundai rec- ommends that you use gasolines treated with detergent additives, which help prevent deposit formation in the engine. These gasolines will help the engine run cleaner and enhance per- formance of the Emission Control System.
No formal "break-in" procedure is required with your new Hyundai. However, you can contrib- ute to the economical operation and durability of your Hyundai by observing the following recom- mendations during the first 1,200 miles (2,000
km).B010F01A-AAT Operation in Foreign Countries
If you are going to drive your Hyundai in another country, be sure to:
o Observe all regulations regarding registra-
tion and insurance.
o Determine that acceptable fuel is available.
o Don't drive faster than 55 MPH (88 km/h). o While driving, keep your engine speed (rpm, or revolutions per minute) between 2,000
rpm and 4,000 rpm.o Use moderate acceleration. Don't start quickly or depress the accelerator pedal fully.
o For the first 200 miles (300 km), try to avoid
hard braking.
o Don't lug the engine (in other words, don't drive so slowly in too high a gear that the engine "bucks"-shift to a lower gear).
o Whether going fast or slow, vary your speed
o Don't let the engine idle longer than 3 minutes
from time to time.
at one time.
o Don't tow a trailer during the first 1,200 miles
(2,000 km) of operation.
B030A01E For greater convenience, the same key oper- ates all the locks in your Hyundai. However, because the doors can be locked without a key, carrying a spare key is recommended in case you accidentally lock one key inside the car.
1FEATURES OF YOUR HYUNDAI
ILLUMINATED IGNITION SWITCH
DOOR
B030B01A-AAT Record Your Key Number
B030C01Y-AAT (If installed)
B040A01A-AAT DOOR LOCKS
WARNING:
o Unlocked doors can be dangerous. Be- fore you drive away (especially if there are children in the car), be sure that all the doors are securely closed and locked so that the doors cannot be opened from the inside. This helps ensure that the doors will not be opened accidentally. Also, when combined with the proper use of seat belts, locking the doors helps keep occupants from being ejected from the car in case of an accident.
o Before opening the door, always look for
and avoid oncoming traffic.
B030B01E A code number is stamped on the number plate that came with the keys to your Hyundai. This key number plate should not be left with the keys but kept in a safe place, not in the vehicle. The key number should also be recorded in a place where it can be found in an emergency.
If you need additional keys, or if you should lose your keys, your authorized Hyundai dealer can make new keys if you can supply the key number.
B030C01E-1
Whenever a door is opened, the ignition switch will be illuminated for your convenience, pro- vided the ignition switch is not in the "ON" position. The light will go off approximately 10 seconds after closing the door or when the ignition switch is turned on.
B040B01A-AAT Locking and Unlocking Front Doors With a Key
B040C02O-AAT Locking From the Outside (Driver's side)
UNLOCK
LOCK
HXDFL2003
o The door can be locked or unlocked with a
key.
o Lock the door by turning the key toward the front of the vehicle and unlock it by turning the key toward the rear.
NOTE: The driver's door can be unlocked by turn- ing the key once toward the rear. If you wish to unlock all doors, turn the key again toward the rear within 4 seconds.
Red Mark
B040C01E-A The doors can be locked without a key. To lock the doors, first push the inside lock switch to the "LOCK" position so that the red mark on the switch is not visible, then close the door. If your vehicle is equipped with central door locking system, the door will not lock if the key is left in the ignition switch when the front doors are closed. This is normal operation.
NOTE: o When pushing the lock switch of the driver's door to the "LOCK" position, only the driver's door can be locked.
FEATURES OF YOUR HYUNDAI
o When locking the door this way, be care- ful not to lock the door with the ignition key left in the vehicle.
o To reduce the chances of theft, always remove the ignition key, close all win- dows, and lock all doors when leaving your vehicle unattended.
B040D01E-AAT Locking From the Inside (Driver's side)
Red Mark
UNLOCK
LOCK
HXD530-A o To lock the door from the inside, simply close the door and push the lock switch to the "LOCK" position. When this is done, neither the outside nor the inside door handles can be used.
1FEATURES OF YOUR HYUNDAI
o The driver's door can be opened by pulling the inside door handle even if the lock switch is depressed.
NOTE: o When pushing the lock switch of the driver's door to the "LOCK" position, only the driver's door can be locked.
o When the door is locked, the red mark on
the switch is not visible.
B045C02O-AAT Locking From the Outside (Passenger's side)
Red Mark
B040C02E-R
The doors can be locked without a key. To lock the doors, first push the inside lock switch to the "LOCK" position so that the red mark on the switch is not visible, then close the door. If your vehicle is equipped with central door locking system, the door will not lock if the key is left in the ignition switch when the front doors are closed. This is normal.
B045D01O-AAT Locking From the Inside (Passenger's side)
Red Mark
NOTE: o When pushing the lock switch of the passenger's door to the "LOCK" posi- tion, all doors can be locked.
o When locking the door this way, be care- ful not to lock the door with the key left in the vehicle.
o To reduce the chances of theft, always remove the ignition key, close all win- dows, and lock all doors when leaving your vehicle unattended.
UNLOCK
LOCK
HXD531-R
To lock the doors from the inside, simply close the door and push the lock switch to the "LOCK" position. When this is done, neither the outside nor the passenger's inside door handles can be used.
NOTE: o When pushing the lock switch of the passenger's door to the "LOCK" posi- tion all doors can be locked.
o When the door is locked, the red mark on
the switch is not visible.
CENTRAL DOOR LOCK
THEFT-ALARM SYSTEM
FEATURES OF YOUR HYUNDAI
B040E04A-AAT Child-Protector Rear Door Lock
B040G02Y-AAT (If installed)
B070A01A-AAT (If installed)
This system is designed to provide protection from unauthorized entry into the car. This sys- tem is operated in three stages : the first is the "Armed" stage, the second is the "Alarm" stage and the third is the "Disarmed" stage. If trig- gered, the system provides an audible alarm with blinking of the turn signal lights.
B070B03E-AAT Armed Stage
UNLOCK
PANIC
LOCK
Park the car and stop the engine. Arm the system as described below.
HXD200-A
B040E01E
B040G02E
Your Hyundai is equipped with left and right side "child-protector" rear door locks. When the lock mechanism is engaged, the rear door cannot be opened from the inside. Its use is recommended whenever there are small children in the rear seat.
To engage the child-protector feature so that the door cannot be opened from the inside, move the child-protector lever to the " " position and close the door. Move the lever to the " " position when normal door operation is desired.
To open the door from the outside, pull the outside door handle.
The central door locking switch is located on the driver's arm rest. It is operated by depressing the door lock switch. If any door is open when the switch is depressed to the lock position, the door will remain locked when closed.
NOTE: o When pushing the front portion of the driver's door lock switch, all vehicle doors will lock.
o When pushing the rear portion of these switches, all vehicle doors will unlock. o If the door is locked/unlocked multiple times in rapid succession with either the vehicle key or door lock switch, the sys- tem may stop operating temporarily in order to protect the circuit and prevent damage to system components.
1FEATURES OF YOUR HYUNDAI
1) Remove the ignition key from the ignition
switch.
2) Make sure that the hood and trunk lid/ tail
gate are closed and latched.
3) Lock the doors using the transmitter of the
keyless entry system.
After completion of the steps above, the turn signal lights will blink once to indicate that the system is armed.
NOTE: o If any door, the trunk lid/tail gate or hood remains open, the system will not be armed. If this happens, rearm the system as described previous.
o If the "LOCK" button is pressed once more within 4 seconds after pushing the "LOCK" button on the transmitter, the siren will sound once to indicate that the system is armed.
o Do not arm the system until all passen- gers have left the car. If the system is armed while a passenger(s) remains in the car, the alarm may be activated when the remaining passenger(s) leaves the car.
B070C01O-AAT Alarm Stage
B070D03O-AAT Disarmed Stage
The alarm will be activated if any of the following occurs while the car is parked and the system is armed.
1) A front or rear door is opened without using
the transmitter or the ignition key.
2) The trunk lid or tail gate is opened without
using the transmitter or the ignition key.
3) The hood is opened.
The siren will sound and the turn signal lights will blink continuously for about 30 seconds (This will repeat 3 times). To turn off the system, unlock the door or trunk lid/tail gate using the transmitter or the ignition key.
CAUTION:
Avoid trying to start the engine while the system is armed.
The system will be disarmed by using the transmitter or the ignition key.
The driver's door is unlocked by depressing once the "UNLOCK" button on the transmitter. If you wish to unlock all doors, press the "UN- LOCK" button on the transmitter again within 4
seconds.Whenever the step above is completed, the turn signal lights will blink twice to indicate that the system is disarmed.
B070E01O-AAT Panic Warning
1. Push the "PANIC" button on the transmitter. 2. At the same time, the siren will sound and the turn signal lights will blink for 30 seconds. 3. To turn off the system, push the "PANIC"
button again on the transmitter.
B070F03O-AAT KEYLESS ENTRY SYSTEM (If installed) NOTE: This device complies with Part 15 of the FCC rules. Operation is subject to the fol- lowing two conditions:
FEATURES OF YOUR HYUNDAI
B070E02HP-AAT Replacing the battery
When the transmitter's battery becomes, it may take several pushes on the button to lock or unlock the doors, and the LED will not light. Replace the battery as soon as possible.
Battery type : CR2032
Replacement instructions:
NOTE: The transmitter will not work if any of fol- lowing occur: - The ignition key is in ignition switch. - You exceed the operating distance limit
(10 m).
- The battery in the transmitter is weak. - Other vehicles or objects may be block-
ing the signal.
- The weather is extremely cold. - The transmitter is close to a radio trans- mitter such as a radio station or an airport which can interfere with normal operation of the transmitter.
When the transmitter does not work cor- rectly, open and close the door with the ignition key. If you have a problem with the transmitter, contact an authorized Hyundai Dealer.
NOTE: Keep the transmitter away from water or any liquid. If the keyless entry system is inoperative due to exposure to water or liquids, it will not be covered by your manu- facturer vehicle warranty.
Screwdriver
1. Carefully separate the case with a blade
screwdriver as shown in the illustration.
HXD327
(1) This device may not cause harmful in- terference, and (2) this device must accept any interference received, including inter- ference that may cause undesired opera- tion.
CAUTION:
Changes or modifications not expressly approved by the party responsible for com- pliance could void the user's authority to operate the equipment.
Locking doors
1. Close all doors. 2. Push the "LOCK" button on the transmitter. 3. At the same time all doors lock, the turn signal lights will blink once to indicate that the system is armed.
Unlocking doors
1. Push the "UNLOCK" button on the transmit-
ter.
2. At the same time the driver's door unlocks, the turn signal lights will blink twice to indicate that the system is disarmed.
NOTE: If you wish to unlock all doors, press the "UNLOCK" button on the transmitter again within 4 seconds.
1FEATURES OF YOUR HYUNDAI 10
WINDOW
Case
B050A01A-AAT WINDOW GLASS
B060A02E-AAT POWER WINDOWS (If installed)
Battery
B070E02A-1
2. Remove the old battery from the case and note the polarity. Make sure the polarity of the new battery is the same(+side facing down), then insert it in the transmitter.
To raise or lower the window, turn the window regulator handle clockwise or counterclock- wise.
B050A01E
WARNING:
When opening or closing the windows, make sure your passenger's arms, hands and body are safely out of the way.
(1)
Open
Close
B060A01E The power windows operate when the ignition key is in the "ON" position. The main switches are located on the driver's armrest and control the front and rear windows on both sides of the vehicle. The windows may be opened by de- pressing the appropriate window switch and closed by pulling up the switch. To open the window on the driver's side, press the switch(1) down. The window moves as long as the switch is operated.
SEAT
FEATURES OF YOUR HYUNDAI
11
B080A02A-AAT ADJUSTABLE FRONT SEATS
WARNING:
o Never adjust the driver’s seat while the vehicle is moving. Any sudden or unex- pected movement of the seat could cause you to lose control of the vehicle result- ing in an accident. Only adjust the driver’s seat when the vehicle is station- ary.
o Do not sit or lean unnecessarily close to the airbag. Position the seat so that you can sit as far back as possible from the airbag and still comfortably reach all controls.
WARNING:
1) Be careful that someone's head, hands or body are not trapped by a closing window.
2) Never try to operate the main switch on the driver's door and the individual door window switch in opposing directions at the same time. If this is done, the window will stop and cannot be opened or closed.
3) Do not leave children alone in the car. Always remove the ignition key for their safety.
B060B01E In order to prevent operation of the passenger front and rear windows, a window lock switch is provided on the armrest of the driver's door. To disable the power windows, press the window lock switch. To return to normal operation, press the window lock switch a second time.
Auto-Down Window (Driver's Side) The Auto-Down window is moved to its fully open position by pushing the switch. To stop at the desired location, the switch must be pulled up.
1FEATURES OF YOUR HYUNDAI 12
B080B03FC-AAT Adjusting Seat Forward and Rearward
B080C02A-AAT Adjusting Seatback Angle
! WARNING:
After adjusting the seat, always check that it is securely locked into place by attempt- ing to move the seat forward or reverse without using the lock release lever. Sud- den or unexpected movement of the driver's seat could cause you to lose control of the vehicle resulting in an accident.
B080B01E
To move the seat toward the front or rear, pull the lock release lever upward. This will release the seat on its track so you can move it forward or rearward to the desired position. When you find the position you want, release the lever and slide the seat forward or rearward on its track until it locks into the desired position and cannot be moved further.
B080C01E
To recline the seatback, lean forward to take your weight off it, then pull up on the recliner control lever at the outside edge of the seat. Now lean back until the desired seatback angle is achieved. To lock the seatback into position, release the recliner control lever.
!
WARNING:
Riding with a reclined seatback increases your chance of serious or fatal injuries in the event of a collision or sudden stop. The protection of your restraint system (seat belts and airbags) is greatly reduced by reclining your seat. Seat belts must be snug against your hips and chest to work prop- erly. The more the seatback is reclined, the greater the chance that an occupant's hips will slide under the lap belt or the occupant's neck will strike the shoulder belt. Drivers and passengers should always sit well back in their seats, properly belted, and with the seatbacks upright.
FEATURES OF YOUR HYUNDAI
13
B080D03A-AAT Adjustable Headrests
WARNING:
Lock Knob
HXDFL114
Headrests are designed to help reduce the risk of neck injuries. To raise the headrest, pull it up. To lower the headrest, push it down while pressing the lock knob.
B080D01JM
o For maximum effectiveness in case of an accident, the headrest should be ad- justed so the middle of the headrest is at the same height as the top of the occupant's eyes. The use of a cushion that holds the body away from the seatback is not recommended.
o Do not operate the vehicle with the head- rests removed as severe injury to an occupant may occur in the event of an accident. Headrests may provide pro- tection against severe neck injuries when properly adjusted.
o Do not adjust the headrest height while
the vehicle is in motion.
1FEATURES OF YOUR HYUNDAI 14
B080E01O-AAT Lumbar Support Control (Driver's Seat Only) (If installed)
B080F01S-AAT Seat Cushion Height Adjustment (Driver's Seat Only) (If installed)
B110A03E-AAT Folding Rear Seatbacks (If installed)
B080E01E To adjust the lumbar support, turn the handle on the outboard or left side of the seat. To increase the amount of lumbar support, pull the lever forward. To decrease it, push the lever toward the rear.
1. Minimum support 2. Maximum support
B080F01E
B110A01E
To raise or lower the front part of the seat cushion, turn the front knob forward or rear- ward. To raise or lower the rear part of the seat cushion, turn the rear knob forward or rear- ward.
The rear seatbacks may be folded to facilitate carrying long items or to increase the luggage capacity of the vehicle.
o To unlock the seatback, pull up the seatback locking knob, then fold seat toward the front of the vehicle.
o When you return the seatback to its upright position, always be sure it has locked into position by pushing on the top of the seatback.
!
WARNING:
When you return the rear seatback to its upright position after being folded down, be careful not to damage the seat belt webbing or buckle. In addition, do not allow the seat belt webbing or buckle to get caught or pinched in the rear seat.
FEATURES OF YOUR HYUNDAI
15
B080G01E-AAT Folding Rear Seatback and Seat Cushion (5 DOOR)
Strap
B110B01E
WARNING:
The purpose of the fold-down rear seatbacks is to allow you to carry larger items than could otherwise be accommo- dated. Never allow passengers to sit on top of the folded down seat back while the car is moving as this is not a proper seating position and no seat belts are available for use. This could result in serious injury or death in case of an accident or sudden stop. Objects carried on the folded down seatback should not extend higher than the top of the front seats. This could allow cargo to slide forward and cause injury or damage during sudden stops.
B080G01E
For convenience, the seat cushion may be folded forward and the entire seatback folded down.
1. Remove the headrest. 2. Pull the strap of the seat cushion (A) upward
to fold up the seat cushion.
3. Pull the seatback locking knob (B) on the
seatback to fold-down the seatback.
1FEATURES OF YOUR HYUNDAI 16
B080H01E-AAT Returning The Rear Seatback to an Upright Position (5 DOOR)
Buckle clips
Warning label
Red color
B080H01E-1
B080I01E
4. Then, pull forward on the seatback panel.
CAUTION:
After folding the rear seatback and seat cushion, store the headrests in the luggage room so that they will not be thrown for- ward in the case of a sudden stop or an accident.
B080J01E When you return the seatback to its upright position, always be sure it has locked into position by pulling and pushing on the top of the seatback. If the seatback is locked completely, the red color in the seatback locking knob is not visible.
WARNING:
o Before folding the seatback, place the rear seat belt buckles in the buckle clips on the seatback. This will prevent the seat belt buckles from becoming cov- ered by the seat cushion when it is returned to the seating position.
o When you return the folded down seat back to its upright position, make sure the seat belts are in position to be acces- sible and to function properly.
o When returning the seat cushion to the seating position, place the seat belt buckles on top of the cushion.
REAR SEAT WARNING
SEAT BELTS
FEATURES OF YOUR HYUNDAI
17
B140A01S-AAT
B150A02E-AAT SEAT BELT PRECAUTIONS
WARNING:
All occupants of the vehicle must wear their seat belts at all times. Seat belts and child restraints reduce the risk of serious or fatal injuries for all occupants in the event of a collision or sudden stop. Without a seat belt, occupants could be shifted too close to a deploying airbag, strike the interior structure or be thrown from the vehicle. Properly worn seat belts greatly reduce these hazards. Even with advanced airbags, unbelted occupants can be severely in- jured by a deploying airbag. Always follow the precautions about seat belts, airbags and occupant safety contained in this manual.
B140A01E For the safety of all passengers, luggage or other cargo should not be piled higher than the top of the seatback. In addition, do not place objects on the rear shelf as they may move forward during braking or in an accident and may strike and injure vehicle passengers.
WARNING:
o The purpose of the fold down rear seat back and the fold forward rear seat cush- ion is to increase cargo space. Do not allow passengers to sit in the cargo area while the car is moving. This is not a proper seating position and no seat belts are available for use when the seat back is folded down. Passengers who are not properly seated and wearing seat belts could sustain serious injuries or death in case of an accident or a sudden stop. o Objects should not extend higher than the top of the front seatbacks. This could allow cargo to slide forward and cause injury or damage during sudden stops. o When you return the folded down seat back to its upright position, always be sure to place the rear seat belt buckles on the seat cushion below the seatback.
o When you return the folded down seatback to its upright position, always be sure to install the headrests in their proper positions. Headrests are impor- tant to the safety of occupants in a rear collision. If the headrests are not in- stalled in their proper position, serious injury or death could result if a rear end collision occurs.
1FEATURES OF YOUR HYUNDAI 18
B150B04Y-AAT Infant or Small Child All 50 states have child restraint laws. You should be aware of the specific requirements in your state. Child and/or infant safety seats must be properly placed and installed in the rear seat. Information about the use of these restraints begins on page 1-24.
WARNING:
Every person in your vehicle needs to be properly restrained at all times, including infants and children. Never hold a child in your arms or lap when riding in a vehicle. The violent forces created during a crash will tear the child from your arms and throw the child against the interior. Always use a child restraint appropriate for your child's height and weight, see page 1-24.
NOTE: Small children are best protected from in- jury in an accident when properly restrained in the rear seat by a child restraint system that meets the requirements of the Federal Motor Vehicle Safety Standards. Before buying any child restraint system, make sure that it has a label certifying that it meets Federal Motor Vehicle Safety Stan- dard 213. The restraint must be appropriate for your child's height and weight. Check the label on the child restraint for this information. See page 1-24.
B150C03A-AAT Larger Children
Children who are too large for child restraint systems should always occupy the rear seat and use the available lap/shoulder belts. The lap portion should be fastened snug on the hips and as low as possible. Check belt fit periodically. A child's squirming could put the belt out of posi- tion. Children are afforded the most safety in the event of an accident when they are restrained by a proper restraint system in the rear seat. If a larger child (over age 13) must be seated in the front seat, the child should be securely restrained by the available lap/shoulder belt and the seat should be placed in the rearmost position. Children under the age of 13 should be restrained securely in the rear seat. NEVER
place a child under the age of 13 in the front seat. NEVER place a rear facing child seat in the front seat of a vehicle.
B150D01S-AAT Pregnant Women
The use of a seat belt is recommended for pregnant women to lessen the chance of injury in an accident. When a seat belt is used, it should be placed as low and snugly as possible on the hips, not across the abdomen. For specific recommendations, consult a physician.
B150E01A-AAT Injured Person
A seat belt should be used when an injured person is being transported. When this is nec- essary, you should consult a physician for recommendations.
B150F01A-AAT One Person Per Belt Two people (including children) should never attempt to use a single seat belt. This could increase the severity of injuries in case of an accident.
B150G02A-AAT Do Not Lie Down To reduce the chance of injuries in the event of an accident and to achieve maximum effective- ness of the restraint system, all passengers should be sitting up and the front seats should be in an upright position when the car is moving. A seat belt cannot provide proper protection if the person is lying down in the rear seat or if the front seat is in a reclined position.
WARNING:
Riding with a reclined seatback increases your chance of serious or fatal injuries in the event of a collision or sudden stop. The protection of your restraint system (seat belts and airbags) is greatly reduced by reclining your seat. Seat belts must be snug against your hips and chest to work prop- erly. The more the seatback is reclined, the greater the chance that an occupant's hips will slide under the lap belt causing serious internal injuries or the occupant's neck could strike the shoulder belt. Drivers and passengers should always sit well back in their seats, properly belted (see page 1-21), and with the seatbacks upright.
FEATURES OF YOUR HYUNDAI
19
B160A02A-AAT CARE OF SEAT BELTS
B160B01A-AAT Periodic Inspection
Seat belt systems should never be disassembled or modified. In addition, care should be taken to assure that seat belts and belt hardware are not damaged by seat hinges, doors or other abuse.
It is recommended that all seat belts be in- spected periodically for wear or damage of any kind. Parts of the system that are damaged should be replaced as soon as possible.
WARNING:
When you return the rear seatback to its upright position after the rear seatback was folded down, be careful not to damage the seat belt webbing or buckle. Be sure that the webbing or buckle does not get caught or pinched in the rear seat. A seat belt with damaged webbing or buckle will not be as strong and could possibly fail during a collision or sudden stop, resulting in seri- ous injury.
B160C01A-AAT Keep Belts Clean and Dry
Seat belts should be kept clean and dry. If belts become dirty, they can be cleaned by using a mild soap solution and warm water. Bleach, dye, strong detergents or abrasives should not be used because they may damage and weaken the fabric.
B160D01A-AAT When to Replace Seat Belts
Entire in-use seat belt assembly or assemblies should be replaced if the vehicle has been involved in an accident. This should be done even if no damage is visible. Additional ques- tions concerning seat belt operation should be directed to your Hyundai Dealer.
1FEATURES OF YOUR HYUNDAI 20
B170A05A-AAT HEIGHT ADJUSTABLE FRONT SEAT SHOULDER BELT
Release the button to lock the anchor into position. Try sliding the height adjuster to make sure that it has locked into position.
WARNING:
o Verify the shoulder belt anchor is locked into position at the appropriate height. Never position the shoulder belt across your neck or face. Improperly posi- tioned seat belts can cause serious inju- ries in an accident.
o Failure to replace seat belts after an accident could leave you with damaged seat belts that will not provide protec- tion in the event of another collision leading to personal injury or death. Replace your seat belts after being in an accident as soon as possible.
B170A01E
You can adjust the height of the shoulder belt anchor to one of 4 positions for maximum comfort and safety. If the height of the adjusting seat belt is too near your neck, you will not be getting the most effective protection. The shoulder portion should be adjusted so that it lies across your chest and midway over your shoulder nearest the door and not your neck. To adjust the height of the seat belt anchor, lower or raise the height adjuster into an appro- priate position. To raise the height adjuster, pull it up. To lower it, push it down while pressing the height adjuster button.
B180A01L-AAT SEAT BELT-Driver's 3-Point System with Emergency Locking Retractor
To fasten your seat belt, pull it out of the retractor and insert the metal tab into the buckle. There will be an audible "click" when the tab locks into the buckle. The seat belt automatically adjusts to the proper length only after the lap belt portion is adjusted manually so that it fits snugly around your hips. If you lean forward in a slow, easy motion, the belt will extend and let you move around. If there is a sudden stop or impact, the belt will lock into position. It will also lock if you try to lean forward too quickly. Check to make sure that the belt is properly locked and that the belt is not twisted.
NOTE: If the driver's seat belt is not fastened when the ignition key is in the "ON" position, the seat belt warning light will come on and the warning chime will sound for about 6 sec- onds.
FEATURES OF YOUR HYUNDAI
21
B190A02Y-AAT SEAT BELTS-Front Passenger and Rear Seat 3-Point System with Combination Locking Retractor
B180A01L
Combination retractor type seat belts are in- stalled in the rear seat outboard positions to help accommodate the installation of child restraint systems. Although a combination retractor is also installed in the front passenger seat posi- tion, Hyundai strongly recommends that chil- dren always be seated in the rear seat. NEVER place any infant restraint system in the front seat of the vehicle.
This type of seat belt combines the features of both an emergency locking retractor seat belt and an automatic locking retractor seat belt. To fasten your seat belt, pull it out of the retractor and insert the metal tab into the buckle. There will be an audible "click" when the tab locks into the buckle. When not securing a child restraint, the seat belt operates in the same way as the driver's seat belt (Emergency Locking Retrac- tor Type). It automatically adjusts to the proper length only after the lap belt portion of the seat belt is adjusted manually so that it fits snugly around your hips. When the seat belt is fully extended from the retractor to allow the instal- lation of a child restraint system, the seat belt operation changes to allow the belt to retract, but not to extend. (Automatic Locking Retractor Type). See page 1-28.
NOTE: Although the combination retractor pro- vides the same level of protection for seated passengers in either emergency or auto- matic locking modes, it is recommended that seated passengers use the emergency locking feature for improved convenience. The automatic locking function is intended to facilitate child restraint installation. To convert from the automatic locking feature to the emergency locking operation mode, allow the unbuckled seat belt to fully re- tract.
WARNING:
o For maximum restraint system protec- tion, seat belts must always be used whenever the car is moving.
o Seat belts are most effective when
seatbacks are in the upright position.
o Children age 12 and younger must al- ways be properly restrained in the rear seat. Never allow children to ride in the front passenger seat. If a child over 13
must be seated in the front seat, he/she must be properly belted and the seat should be moved as far back as possible. o Never wear the shoulder belt under your arm or behind your back. An improperly positioned shoulder belt can cause se- rious injuries in a crash. The shoulder belt should be positioned midway over your shoulder across your collarbone. o Avoid wearing twisted seat belts. A twisted belt can't do its job as well. In a collision, it could even cut into you. Be sure the belt webbing is straight and not twisted.o Be careful not to damage the belt web- bing or hardware. If the belt webbing or hardware is damaged, replace it.
1FEATURES OF YOUR HYUNDAI 22
B200A01A-AAT Adjusting Your Seat Belt
B210A01A-AAT To Release the Seat Belt
B220A03E-AAT SEAT BELTS - Center Rear Seat 3-Point System With Combination Locking Retractor 4DOOR
B200A01L
B210A01L
The seat belt is released by pressing the re- lease button in the locking buckle. When it is released, the belt should automatically draw back into the retractor. If this does not happen, check the belt to be sure it is not twisted, then try again.
5DOOR
WARNING:
You should place the lap belt portion as low as possible and snugly across your hips, not on your waist. If the lap belt is located too high on your waist, it may increase the chance of injury in the event of a collision. Both arms should not be under or over the belt. Rather, one should be over and the other under, as shown in the illustration. Never wear the seat belt under the arm nearest the door.
(c)
(a)
(b)
(d)
(c)
(d)
B220A01E
B220B01E
1. Before fastening the rear seat center belt, confirm the metal tab (a) and buckle (b) are latched together.
2. After confirming that (a) and (b) are latched, pull the seat belt out of the retractor and insert the metal tab (c) into the buckle (d).
There will be an audible "click" when the tab locks in the buckle. The seat belt automatically adjusts to the proper length only after the lap belt is adjusted manually so that it fits snugly around your hips. If you lean forward in a slow, easy motion, the belt will extend and let you move around. If there is a sudden stop or impact, the belt will lock into position. It will also lock if you try to lean forward too quickly.
WARNING:
o Never let anyone ride in the rear center seat without fastening all metal tabs and buckles as described in this section. This seat belt is designed to function as a typical 3-point restraint (lap/shoulder belt). Using only the shoulder portion or lap portion of the belt can result in seri- ous or fatal injuries in the event of a collision or sudden stop.
o Never unlock the metal tab (a) and the buckle (b) with the following excep- tions. 1) In case of folding rear seatbacks
down.
2) If transporting an object on the rear seat may cause damage to the rear seat center belt.
o Always lock metal tab (a) into buckle (b) immediately after returning the rear seatbacks to an upright position. This portion of the rear center seat belt should only be unbuckled when the rear seatback is folded down.
To disconnect the metal tab (a) from the buckle (b), insert a narrow-ended tool into the groove located on the buckle (b). (4 DOOR only)
B220A02Y
FEATURES OF YOUR HYUNDAI
23
B220C01Y-AAT To Release the Seat Belt
B220C01E When you want to release the seat belt, press the button in the locking buckle.
WARNING:
The rear seat center belt latching mecha- nism is different from those for the out- board rear seat shoulder belts. When fas- tening the outboard rear seat shoulder belts or the rear seat center belt, make sure they are inserted into the correct buckles to obtain maximum protection from the seat belt system and assure proper operation.
1FEATURES OF YOUR HYUNDAI 24
CHILD RESTRAINT SYSTEM
B230A04A-AAT Children riding in the car should sit in the rear seat and must always be properly restrained to minimize the risk of injury in an accident, sudden stop or sudden maneuver. According to acci- dent statistics provided by the National High- way Traffic Safety Administration (NHTSA), children are safer when properly restrained in the rear seats than in the front seat. Larger children not in a child restraint should use one of the seat belts provided. All 50 states have child restraint laws. You should be aware of the specific requirements in your state. Child and/or infant safety seats must be properly placed and installed in the rear seat. You must use a commercially available child restraint system that meets the requirements of the Federal Motor Vehicle Safety Standards (FMVSS). Children could be injured or killed in a crash if their restraints are not properly secured. For small children and babies, a child seat or infant seat must be used. Before buying a particular child restraint system, make sure it fits your car and seat belts, and fits your child. Follow all the instructions provided by the manufacturer when installing the child restraint system.
WARNING:
o A child restraint system must be placed in the rear seat. Never install a child or infant seat on the front passenger's seat. Should an accident occur and cause the passenger side airbag to deploy, it could severely injure or kill an infant or child seated in an infant or child seat. Thus, only use a child restraint in the rear seat of your vehicle.
o A safety belt or child restraint system can become very hot if it is left in a closed vehicle on a sunny day, even if the out- side temperature does not feel hot. Be sure to check the seat cover and buckles before placing a child there.
o When the child restraint system is not in use, store it in the trunk or fasten it with a safety belt so that it will not be thrown forward in the case of a sudden stop or an accident.
o Children may be seriously injured or killed by an inflating airbag. All children, even those too large for child restraints, must ride in the rear seat.
WARNING:
To reduce the chance or serious or fatal injuries: o Children of all ages are safer when re- strained in the rear seat. A child riding in the front passenger seat can be force- fully struck by an inflating airbag result- ing in serious or fatal injuries.
o Always follow the instructions for in- stallation and use of the child restraint maker.
o Always make sure the child seat is se- cured properly in the car and your child is securely restrained in the child seat. o Never hold a child in your arms or lap when riding in a vehicle. The violent forces created during a crash will tear the child from your arms and throw the child against the car’s interior.
o Never put a seat belt over yourself and a child. During a crash, the belt could press deep into the child causing seri- ous internal injuries.
o Never leave children unattended in a vehicle – not even for a short time. The car can heat up very quickly, resulting in serious injuries to children inside. Even very young children may inadvertently cause the vehicle to move, entangle them- selves in the windows, or lock them- selves or others inside the vehicle.
FEATURES OF YOUR HYUNDAI
25
B230C03A-AAT Installing a Child Restraint System with "Tether Anchorage" System(4 Door)
Three child restraint hook holders are located on the rear seat package tray.
WARNING:
o Seat belts can become very hot, espe- cially when the car is parked in direct sunlight. Always check seat belt buck- les before fastening them over a child. o Always store or secure a child seat, even when it is not in use. During a collision or sudden stop, the child seat could be thrown inside the vehicle.
B230B03A-AAT Using a Child Restraint System with the "Tether Anchorage" System
For small children and babies, the use of a child seat or infant seat is strongly recommanded and may be required in your state. This child seat or infant seat should be of appropriate size for the child and should be installed in accor- dance with the manufacturer's instructions. It is further recommanded that the seat be placed in the vehicle's rear seat. Your vehicle is provided with three child restraint hook holders for install- ing the child seat or infant seat.
Tether anchor cover
Child Restraint Hook Holder
G230C02E
1. Open the tether anchor cover on the rear
seat package tray.
WARNING:
o If the seat belt will not properly fit the child, Hyundai recommends the use of an approved booster seat in the rear seat in order to raise the child's seating height so that the seat belt will properly fit the child. Before purchasing a booster seat, make sure that it meets applicable Fed- eral Motor Vehicle Safety Standards (FMVSS) and that it is satisfactory for use with this vehicle.
o Never allow two children, or any two
persons, to use the same seat belt.
o Children often squirm and reposition themselves improperly. Never let a child ride with the shoulder belt under their arm or behind their back. Always prop- erly position and secure children in rear seat.
o Never allow a child to stand-up or kneel on the seat or floorboard of a moving vehicle. During a collision or sudden stop, the child can be violently thrown against the vehicles interior, resulting in serious injury.
o Never use an infant carrier or a child safety seat that "hooks" over a seatback, it may not provide adequate security in an accident.
1FEATURES OF YOUR HYUNDAI 26
REAR SEAT PACKAGE TRAY
Child restraint hook holders
2. Route the child restraint seat strap over the
seatback. For vehicles with adjustable headrests, route the tether strap under the headrest and between the headrest posts, otherwise route the tether strap over the top of the seatback. 3. Connect the tether strap hook to the child restraint hook holder and tighten to secure the seat.
B230E03E-AAT Installing a Child Restraint System with "Tether Anchorage" System (5 Door)
Three child restraint hook holders are located on the rear luggage compartment floor.
WARNING:
o A child can be seriously injured or killed in a collision if the child restraint is not properly anchored. Always follow the child seat manufacturer’s instructions for installation and use.
o Never mount more than one child re- straint to a single tether or to a single lower anchorage point. The increased load caused by multiple seats may cause the tethers or anchorage points to break, causing serious injury or death.
This symbol indicates the location of each user ready tether anchorage.
B230E03E
Tether strap hook
Front of Vehicle
B230C01E
REAR LUGGAGE COMPARTMENT FLOOR
FEATURES OF YOUR HYUNDAI
27
For vehicles with adjustable headrests, route the tether strap under the headrest and between the headrest posts, otherwise route the tether strap over the top of the seatback. 3. Connect the tether strap hook to the child restraint hook holder and tighten to secure the seat.
Child restraint hook holders
WARNING:
o A child can be seriously injured or killed in a collision if the child restraint is not properly anchored. Always follow the child seat manufacturer’s instructions for installation and use.
o Never mount more than one child re- straint to a single tether or to a single lower anchorage point. The increased load caused by multiple seats may cause the tethers or anchorage points to break, causing serious injury or death.
Tether anchor cover
Child Restraint Hook Holder
G230C02E-1
1. Open the tether anchor cover on the rear
luggage compartment floor.
Tether strap hook
Front of Vehicle
B230C02E-2
2. Route the child restraint seat strap over the
seatback.
1FEATURES OF YOUR HYUNDAI 28
B230G04Y-AAT Child Restraint System Installation on Rear Seats
B230G01E
To install a child restraint system in the rear seats, extend the shoulder/lap belt entirely from its retractor until a "click" is felt. This will engage the seat belt retractor automatic locking feature, which allows the seat belt to retract but not extend. Install the child restraint system, buckle the seat belt and allow the seat belt to take up any slack. Make sure that the lap portion of the belt is tight around the child restraint system and the shoulder portion of the belt is positioned so that it cannot interfere with the child's head or neck. Also, double check to be sure that the retractor has engaged the Automatic Locking feature by trying to extend webbing out of the
retractor. If the retractor is in the Automatic Locking mode, the belt will be locked. After installation of the child restraint system, try to move it in all directions to be sure the child restraint system is securely installed. If you need to tighten the belt, pull more webbing toward the retractor. When you unbuckle the seat belt and allow it to retract, the retractor will automatically revert back to its normal seated passenger Emergency Locking usage condi- tion.
NOTE: o Before installing the child restraint sys- tem in any seating position, read the instructions supplied by the child re- straint system manufacturer.
o If the seat belt does not operate as de- scribed, have the system checked imme- diately by your authorized Hyundai dealer.
WARNING:
o If the retractor is not in the Automatic Locking mode, the child restraint can move when your vehicle turns or stops suddenly. A child can be seriously in- jured or killed if the child restraint is not properly anchored to the car, including setting the retractor to the Automatic Locking mode.
o Do not install any child restraint system in the front passenger seat. Should an accident occur and cause the passenger side airbag to deploy, it could severely injure or kill an infant or child seated in an infant or child seat. Therefore, only use a child restraint system in the rear seat of your vehicle.
FEATURES OF YOUR HYUNDAI
29
WARNING:
o When using the vehicle’s “ISOFIX” sys- tem to install a child restraint system in the rear seat, all unused vehicle rear seat belt metal latch plates or tabs must be latched securely in their seat belt buck- les and the seat belt webbing must be retracted behind the child restraint to prevent the child from reaching and tak- ing hold of unretracted seat belts. Un- latched metal latch plates or tabs may allow the child to reach the unretracted seat belts which may result in strangu- lation and a serious injury or death to the child in the child restraint.
B230D05E-AAT Securing the child Restraint seat with the "ISOFIX" system
B230F01E
Some child seat manufacturers make safety seats that are labeled as ISOFIX or ISOFIX- compatible child seats. These seats include two rigid or webbing mounted attachments that connect to two ISOFIX anchors at specific seating positions in your vehicle. This type of child seat eliminates the need to use seat belts to attach the child seat for forward-facing child seats. ISOFIX anchors have been provided in your vehicle. The ISOFIX anchors are located in the left and right outboard rear seating positions. Their locations are shown in the illustration.
There is no ISOFIX anchor provided for the center rear seating position.
WARNING:
o A child can be seriously injured or killed in a collision if the child restraint is not properly anchored. Always follow the child seat manufacturer’s instructions for installation and use.
o Never install a child restraint using the ISOFIX anchors at the center position of the rear seat. In a crash, the ISOFIX anchors may break if a car seat is improp- erly placed in the center position result- ing in serious or fatal injuries. Only place a ISOFIX or ISOFIX-compatible child seat in the left or right out-board rear seating positions (as shown) to the appropriate ISOFIX anchors provided.
o Never mount more than one child re- straint to a single tether or to a single lower anchorage point. The increased load caused by multiple seats may cause the tethers or anchorage points to break, causing serious injury or death.
1FEATURES OF YOUR HYUNDAI 30
ISOFIX Anchor
ISOFIX Anchor Position Indicator
The ISOFIX anchors are located between the seatback and the seat cushion of the rear seat left and right outboard seating positions.
Follow the child seat manufacturer's instruc- tions to properly install safety seats with ISOFIX or ISOFIX-compatible attachments.
B230D02E
B230D03E
Once you have installed the ISOFIX child re- straint seat, assure that the seat is properly attached to the ISOFIX and tether anchors. Also, test the safety seat before you place the child in it. Tilt the seat from side to side. Also try to tug the seat forward. Check to see if the anchors hold the seat in place.
WARNING:
A child can be seriously injured or killed in a collision if the child restraint is not prop- erly anchored to the car and the child is not properly restrained in the child restraint. Always follow the child seat manufacturer’s instructions for installation and use.
FEATURES OF YOUR HYUNDAI
31
WARNING:
To obtain maximum benefit from a pre- tensioner seat belt: o The seatbelt must be work correctly and adjusted to the proper position (see pages 1-20 and 1-21). Please read and follow all of the important information and precautions about your vehicle’s occupant safety features – including seat belts and advanced airbags – that are provided in this manual.
o Be sure you and your passengers always wear seat belts and wear them properly.
Driver's airbag
Passenger's airbag
B180B01E
The seat belt pre-tensioner system consists mainly of the following components. Their loca- tions are shown in the illustration.
1. SRS airbag warning light 2. Seat belt pre-tensioner assembly 3. SRS control module
B180C02E-AAT Pre-Tensioner Seat Belt
Your Hyundai vehicle is equipped with driver's and front passenger's pre-tensioner seat belts. The purpose of the pre-tensioner is to make sure that the seat belts fit tightly against the occupant's body in certain frontal collisions. The pre-tensioner seat belts can be activated alone or, where the frontal collision is severe enough, together with the airbags.
HXG229
When the vehicle stops suddenly, or if the occupant tries to lean forward too quickly, the seat belt retractor will lock into position. In certain frontal collisions, the pre-tensioner will activate and pull the seat belt into tighter contact against the occupant's body.
1FEATURES OF YOUR HYUNDAI 32
NOTE: o Both the driver's and front passenger's pre-tensioner seat belts will be activated in certain frontal collisions. The pre- tensioner seat belts can be activated alone or, where the frontal collision is severe enough, together with the airbags. The pre-tensioners will not be activated if the seat belts are not being worn at the time of the collision.
o When the pre-tensioner seat belts are activated, a loud noise may be heard and