- Download PDF Manual
-
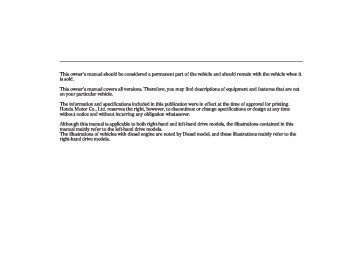
AUTO SELECT BUTTON
POWER/VOLUME KNOB
SEEK/SKIP BAR
Left-hand drive model is shown.
SCAN BUTTON
PRESET BUTTONS
TUNE KNOB
Features
213
06/12/06 10:56:56 32SMR600_217
Audio System (on vehicles without navigation system)
To Select a Station You can use any of five methods to find radio stations on the selected band: tune, seek, scan, the preset buttons, and auto select.
−
Use the TUNE knob to
TUNE tune the radio to a desired frequency. Turn the knob right to tune to a higher frequency, or left to tune to a lower frequency.
−
The seek function
SEEK searches up and down from the current frequency to find a station with a strong signal. To activate it, press the side of the SEEK bar, then release it.
or
−
SCAN The scan function samples all stations with strong signals on the selected band. To activate it, press the SCAN button, then release it. You will see SCAN in the display. The system will scan for a station with a strong signal. When it finds one, it will stop and play that station for about 10 seconds.
If you do nothing, the system will then scan for the next strong station and play it for 10 seconds. When it plays a station you want to listen to, press the SCAN button again.
To Play the Radio The ignition switch must be in the ACCESSORY (I) or ON (II) position. Turn the system on by pushing the power/volume knob or the AM/FM button. Adjust the volume by turning the power/volume knob.
The band and frequency that the radio was last tuned to are displayed. To change bands, press the AM/FM button. On the FM band, ST will be displayed if the station is broadcasting in stereo. Stereo reproduction in AM is not available.
On the AM band, AM noise reduction turns on automatically.
214
Features
06/12/06 10:57:05 32SMR600_218
−
Preset Each preset button can store one frequency on AM or LW, and two frequencies on FM.
1.
2.
3.
4.
Select the desired band, AM, LW or FM. FM1 and FM2 let you store two frequencies with each preset button.
Use the tune, seek, or scan function to tune the radio to a desired station.
Pick a preset button (1
hold it until you hear a beep.−
6), and
Repeat steps 1 through 3 to store a total of 6 stations on each AM and LW, and 12 stations on FM.
Audio System (on vehicles without navigation system)
−
If you are
AUTO SELECT travelling far from home and can no longer receive your preset stations, you can use the auto select feature to find stations in the local area.
Press the A. SEL button. You will see A. SEL flashing in the display, and the system goes into scan mode for several seconds. The system stores the frequencies of 6 FM stations in the preset buttons.
You will see a ‘‘0’’ displayed after pressing a preset button if auto select cannot find a strong station for that preset button.
If you do not like the stations auto select has stored, you can store other frequencies on the preset buttons as previously described.
, press the
Toturnoffautoselect A. SEL (auto select) button. This restores the presets you originally set.
Features 215
06/12/06 10:57:10 32SMR600_219
Audio System (on vehicles without navigation system)
With Radio Data System (RDS)
TA/PTY BUTTON
POWER/VOLUME KNOB
Left-hand drive model is shown.
216
Features
PRESET BUTTONS
TUNE KNOB
06/12/06 10:57:19 32SMR600_220
Radio Data System (RDS) With your audio system, you can utilize many convenient features provided by the radio data system (RDS).
With the FM band selected, you can keep listening to the same station even if its frequency changes as you enter different regions while you are travelling.
The RDS functions turns on automatically when you turn the system on. If the station you are listening to is an RDS stations, the frequency is displayed in the information display and the station name will be displayed in the audio display. Then, the system will automatically keep selecting the frequency with the strongest signal from the frequencies that carry the same programs. This can save you the trouble of retuning to obtain the same station as long as you are in the
Audio System (on vehicles without navigation system)
same RDS network area.
You can turn on or off the RDS function and select the RDS programs. To switch the function and select the program, press the power/volume knob for more than 2
seconds with the audio system on. You will hear a beep. Press any of the preset buttons (1 through 6) to select the function. Each preset button has the following function. Pressing the preset button switches the function between on and off (24
H and 12H on the clock mode).Preset 1: AF ON/OFF Alternative frequency function on or off
−
Preset 2: REG ON/OFF Regional program on or off
−
Preset 3: PS ON/OFF Program service function on or off
−
Preset 4 A-TP ON/OFF: Automatic traffic program on or off
Preset 5: NEWS ON/OFF News program on or off
−
Preset 6: CLOCK 24H/12H
CONTINUED
Features 217
06/12/06 10:57:27 32SMR600_221
Audio System (on vehicles without navigation system)
AF (Alternative Frequency) This function automatically selects a frequency with the same program in the RDS network area.
−
REG (Regional Program) This function keeps the regional program and does not change the frequency even if the signal becomes too weak.
−
PS (Program Service Display) This function shows the radio station name which you are listening to.
−
A-TP (Automatic Traffic Information Program) − function automatically tunes to the radio station which is broadcasting the traffic information.
This
NEWS (News Program) This function automatically tunes to the radio station which is broadcasting the newscast.
−
To turn on the RDS, select 1 AF ON by pressing the preset 1. To turn off the RDS, select 1 AF OFF. Press the power/volume knob again to store the setting.
218
Features
−
With this function, you
CLOCK can switch the clock display between 24-hours and 12-hours.
When the signals of the RDS station become so weak that the system can no longer follow the station, the system will hold the last tuned frequency and the display will change from the station name to the frequency.
In some countries, you cannot utilize features provided by RDS as the RDS function is not provided for all stations.
06/12/06 10:57:35 32SMR600_222
ProgramServiceNameDisplay If the station you are listening to is an RDS station, the frequency display will disappear and the station name or PTY information will be displayed. Press the TA/PTY button for more than 2 seconds to switch the display between the name of network/station and the PTY information. For more information on the PTY, see page
220
Audio System (on vehicles without navigation system)
You can receive traffic information while you are listening to a disc or tape (if equipped). If the system is tuned to a TP station before playing a disc or tape, the system will stand by for traffic announcements with the TA/PTY button pressed (TA indicator is on) and the system will switch from disc or tape to the traffic announcement when it begins. You will see TA-INFO in the display. The system will return to the disc or tape mode when the traffic information is finished.
TA(TrafficAnnouncement)Standby Function When you press and release the TA/ PTY button, TA comes on in the display and the system stands by for traffic announcements.
When the automatic traffic information program (A-TP ON) is selected, TP will come on in the display. This indicates that the traffic reports can be received from the traffic information broadcasting station.
A-TP cross-references other program services that broadcast traffic information, and the traffic reports can be received through another program service in the RDS network area.
CONTINUED
Features 219
06/12/06 10:57:42 32SMR600_223
Audio System (on vehicles without navigation system)
If you use seek or auto select with the TA function on, the system searches only TP stations.
PTY(ProgramType)Display Function When the TA/PTY button is pressed for more than 2 seconds until you hear a beep, the PTY display function comes on. This function shows you the program type of the selected RDS station. For example, if the station is broadcasting drama, DRAMA is shown in the display. If it is a station of scientific programs, SCIENCE is shown. The principal PTYs are shown as follows.
NEWS: Short accounts of facts, events, publicly expressed views, reportage, etc. AFFAIRS: Topical programs expanding upon the news.
To adjust the volume of the traffic announcement, turn the power/ volume knob while the announcement is broadcasting. The adjusted volume level will be stored, then that level will be used on the next time traffic announcement. If you adjust the volume below the minimum level, the default level (level 9) will be used on the next time. The volume of the PTY NEWS or the PTY ALARM function can also be adjusted (see page ).
222
If your vehicle’s battery goes dead, or is disconnected, the traffic announcement volume level will be reset to the default setting (level 9).
To turn off the TA function, press the TA/PTY button again. TA will go out from the display.
220
Features
06/12/06 10:57:59 32SMR600_224
Audio System (on vehicles without navigation system)
RELIGION: Programs concerned
DOCUMENTARY: Documentary
with religion.
programs.
LEISURE: Programs about hobbies
and recreational activities.
INFORMATION: General information and advice. SPORT: Programs concerned with any aspect of sports. EDUCATION: Educational programs. DRAMA: All radio plays and serials. CULTURES: Programs concerned with any aspect of national or regional culture. SCIENCE: Programs about nature, science, and technology. VARIED: Light entertainment programs. POP MUSIC: Commercial music of popular appeal. ROCK MUSIC: Contemporary modern music. EASY: Light music.
LIGHT MUSIC: Light classics; classical music for non-specialist appreciation. CLASSICS: Traditional classics. OTHER MUSIC: Other types of music, such as R & B, Reggae. WEATHER: Weather information. FINANCE: Programs concerned with economy. CHILDREN: Programs for children. PHONE IN: Programs consisting of listener’s message TRAVEL: Programs concerned with travel. JAZZ MUSIC: Jazz music. COUNTRY: Country music. NATION M: National music. OLDIES M: Oldies music, ‘‘Golden age’’ based programs. FOLK MUSIC: Folk music. SOCIAL: Social affairs programs.
CONTINUED
Features 221
06/12/06 10:58:08 32SMR600_225
Audio System (on vehicles without navigation system)
If the selected RDS station does not transmit PTY data, NO PTY is displayed. When the selected station is not an RDS station, NO RDS is displayed for about 5 seconds.
The PTY setting mode is cancelled if no further steps are taken within 5
seconds after selecting the desired PTY with the TUNE knob.Some stations may broadcast the programs with different contents from their PTY code.
In the PTY search mode, the tuning step is set to 50 kHz while searching on the FM band. This step changes to 100 kHz when the AF or TA function is activated.
When you turn the TUNE knob, the display will show different PTYs (see the PTYs list on the previous column).
After you select the desired program type, the system will search for a station with the same PTY code as the selected program type. When you use this function for the first time, NEWS will appear as it was preset at the factory.
After your desired PTY is displayed, press either side of the SEEK/SKIP button within 5 seconds. The system will go into the PTY search mode and search for a station of the selected PTY. If there is no station available in the selected PTY, NO PTY is displayed for about 5 seconds and the PTY search mode is cancelled.
222
Features
PTY/NewsInterruptFunction To activate this function, press the TA/PTY button for more than 2
seconds and select NEWS. The system will hold the last tuned FM station/network PTY while you are listening to the disc. With this function on, playing disc is interrupted and the system switches from disc mode to the FM newscast when the newscast is broadcasting from the FM station.You can change the volume level of the interrupted newscast. Refer to page volume level.
for how to adjust the
220
When the program is changed to another program or the frequency cannot be received for 10 seconds due to a weak signal, the system will return to the disc mode automatically.
06/12/06 10:58:13 32SMR600_226
Audio System (on vehicles without navigation system)
Your audio system has another interrupt function (including TA function). The first activated interrupt function has priority over the others and the indication of the other interrupt function goes out. To activate the other interrupt function, turn off the current interrupt function.
PTYAlarm PTY code ‘‘ALARM’’ is used for emergency announcements, such as natural disasters. When this code is received, ‘‘ALARM’’ comes on the display and the volume is changed. When the alarm is cancelled, the system will return to the normal operation mode.
Features 223
06/12/06 10:58:23 32SMR600_227
Audio System (on vehicles without navigation system)
Audio System Lighting You can use the instrument panel brightness control knob to adjust the illumination of the audio control panel (see page ). The audio system illuminates when you turn the ignition switch to the ON (II) position, even if the radio is off.
144
The system will return to the audio display about 5 seconds after you stop adjusting a mode.
Speed-sensitiveVolume Compensation(SVC)System This audio system has the speed sensitive volume compensation (SVC) system. There are four compensation levels; LOW, MID (medium), HIGH and OFF. The system monitors the vehicle speed and changes the volume level as the vehicle speed goes up. The faster you go, the louder the audio volume becomes. As you slow down, the audio volume decreases.
If your vehicle’s battery is disconnected or goes dead, the SVC may be reset to the default setting ‘‘MID’’.
Adjusting the Sound Press the SOUND (TUNE) knob repeatedly to display the BASS, TREBLE, FADER, BALANCE, and SVC (speed-sensitive volume compensation) settings.
BASS
−
Adjusts the bass.
TREBLE
−
Adjusts the treble.
FADER strength of the sound.
−
Adjusts the front-to-back
BALANCE Adjusts the balance, or side-to-side strength of the sound.
−
−
SVC according to the vehicle speed.
Adjusts the volume level
Each mode is shown in the display as it changes. Turn the power/volume knob to adjust the setting to your liking. When the level reaches centre, you will see a ‘‘C’’ in the display.
224
Features
06/12/06 10:58:29 32SMR600_228
Playing a Disc
Audio System (on vehicles without navigation system)
EJECT BUTTON
DISC SLOT
SCAN BUTTON
CD BUTTON POWER/VOLUME KNOB
SEEK/SKIP BAR
Left-hand drive model is shown.
DISP BUTTON
RANDOM BUTTON
REPEAT BUTTON
TUNE KNOB
Features 225
06/12/06 10:58:42 32SMR600_229
Audio System (on vehicles without navigation system)
To Play a Disc To load or play discs, the ignition switch must be in the ACCESSORY (I) or ON (II) position.
You operate the disc player with the same controls used for the radio. To select the disc player, press the CD button. You will see ‘‘CD’’ in the display. The number of the track playing and the elapsed time are shown in the display. You can also select the displayed information with the DISP button (see page ). The system will continuously play a disc until you change modes.
227
Do not use discs with adhesive labels. The label can curl up and cause the disc to jam in the unit.
226
Features
This audio system can also play CD-Rs and CD-RWs compressed in MP3 or WMA standard. When playing a disc in MP3, you will see ‘‘MP3’’ in the display. In WMA format, ‘‘WMA’’ will appear in the display. The numbers of the folder and track playing are shown in the display on the disc player. You can select up to 255 tracks or folders.
Video CDs and DVD discs will not work in this unit.
The specifications of the compatible MP3 file are: −
Sampling frequency: 32/44.1/48 kHz
Bit rate: 32/40/48/56/64/80/96/
−
112/128/160/192/224/ 256/320 kbps
−
−
Compatible with variable bit rate and multi-session Maximum layers (including ROOT): 8 layers
The specifications of the compatible WMA file are: −
Sampling frequency: 32/44.1/48 kHz Bit rate: 48/64/80/96/128/160/
−
192 kbps
−
−
Compatible with variable bit rate and multi-session Maximum layers (including ROOT): 8 layers
In a disc compressed in WMA standard, DRM (digital rights management) files cannot be played. If the system finds the DRM file in a disc, you will see ‘‘CD FORMAT’’ in the display for a few seconds. The system searches the next available folder or file and plays it.
06/12/06 10:58:52 32SMR600_230
ToLoadaDisc Insert a disc about halfway into the disc slot. The drive will pull the disc in the rest of the way and begin to play it. The number of the track playing is shown in the display. The system will continuously play a disc until you change modes.
You cannot load and play 8-cm (3-inch) discs in this system.
Audio System (on vehicles without navigation system)
DISPButton When you press and release the DISP button while a disc without text data is playing, you will see ‘‘NO INFO’’ on the display.
If a disc (CD-DA) has text data, you can see the disc name, the track name, and the artist tag in the display. Each time you press the DISP button, the display changes.
If a disc is compressed in MP3 or WMA format, you can see the folder name, the file name, the artist tag, the album tag and the track tag in the display. Each time you press the DISP button, the display changes.
The display shows the first 11
characters of the selected text data (the current folder, file name, etc.). With the folder or file name, you will see the FOLDER or TRACK indicator in the display.If the text data has more than 11
characters, you will see the first 10
characters and the indicator in the display. Press and hold the DISP button until the display shows the next 11 characters. You can see up to about 21 characters of the text data.>
If you press and hold the DISP button again, the display shows the first 11 characters again.
If any letter is not available, it is replaced with ‘‘ . ’’ (dot) in the display.
When the disc has no text data, you will see ‘‘NO INFO’’ on the display.
CONTINUED
Features 227
06/12/06 10:59:02 32SMR600_231
Audio System (on vehicles without navigation system)
You will also see the text data in the following conditions.
When the folder or the file is changed.
When you change the audio mode to play discs in MP3 or WMA and the system begins to play.
When you insert a disc with text data or compressed in MP3 or WMA, and the system begins to play.
The display can show you up to the 11 characters at a time, but depending on the letter size, you may not see all 11 characters.
When you turn on the audio system next time, the system keeps your selection with the DISP button.
228
Features
ToChangeorSelectTracks/Files You can use the SEEK/SKIP bar while a disc is playing to select passages and change tracks (files in MP3/WMA mode).
In MP3 or WMA mode, use the TUNE knob to select folders in the disc and use the SEEK/SKIP bar to change files.
−
side of
Each time you
SEEK/SKIP press and release the the SEEK/SKIP bar, the player skips forward to the beginning of the next track (file in MP3 or WMA mode). Press and release the side to skip backward to the beginning of the current track. Press it again to skip to the beginning of the previous track.
To move rapidly within a track or file, press and hold the side of the SEEK/SKIP bar.
or
−
InMP3orWMAmode To FOLDER SELECTION select a different folder, turn the TUNE knob to move to the beginning of the next folder. Turn the knob to the right until it clicks once to skip to the next folder, and to the left to move to the beginning of the current folder. Turn it again to skip to the beginning of the previous folder. Turning the TUNE knob more than two clicks skips several folders.
06/12/06 10:59:09 32SMR600_232
−
REPEAT (TRACK/FILE REPEAT) To continuously replay a track (file in MP3 or WMA mode), press and release the RPT button. You will see RPT in the display. Press the RPT button again to turn it off.
Pressing either side of the SEEK/ SKIP bar also turns off the repeat feature.
Audio System (on vehicles without navigation system)
−
This feature,
InMP3orWMAmode FOLDER-REPEAT when activated, replays all the files on the selected folder in the order they are compressed in MP3 or WMA. To activate folder repeat mode, press the RPT button. You will see F-RPT in the display. The system continuously replays the current folder. Press the RPT button again to turn it off. Pressing the RDM button, or selecting a different folder with the TUNE knob also turns off the repeat feature.
Each time you press and release the RPT button, the mode changes from file repeat to folder repeat, then to normal playing.
−
RANDOM (Random within a disc) This feature plays the tracks (all files in each holder in MP3 or WMA mode) within a disc in random order. To activate random play, press and release the RDM button. In MP3 or WMA mode, press the RDM button repeatedly to select Within a Disc Random Play. You will see RDM in the display. Press the RDM button again to return to normal play.
CONTINUED
Features
229
06/12/06 10:59:16 32SMR600_233
Audio System (on vehicles without navigation system)
−
This
InMP3orWMAmode FOLDER-RANDOM feature, when activated, plays the files within a folder in random order, rather than in the order they are compressed in MP3 or WMA. To activate folder random play, press the RDM button. You will see F-RDM in the display. The system will then select and play files randomly. This continues until you deactivate folder random play by pressing the RDM button again, or you select a different folder with the TUNE knob.
Each time you press and release the RDM button, the mode changes from Folder Random Play to Within a Disc Random Play, then to normal playing.
230
Features
−
The SCAN function
SCAN samples all the tracks on the disc in the order they are recorded on the disc (all files in the selected folder in MP3 or WMA mode). To activate the scan feature, press and hold the SCAN button until you hear a beep. You will see SCAN in the display. You will get a 10 second sampling of each track/file on the disc/folder. Press the SCAN button again to get out of scan mode and play the last track sampled.
Pressing either side of the SEEK/ SKIP bar also turns off the scan feature.
−
This feature, when
InMP3orWMAmode F-SCAN activated, samples all the first files in each folder on the disc in the recorded order from the main folders. To activate the folder scan feature, press and release the SCAN button. You will see F-SCAN in the display. The system will then play the first file in the highest level folder for about 10 seconds. If you do nothing, the system will then play the following first files for 10
seconds each. When it plays a file that you want to continue listening to, press the SCAN button again.Pressing either side of the SEEK/ SKIP bar, or selecting a different folder with the TUNE knob also turns off the scan feature.
Each time you press and release the SCAN button, the mode changes from file scan to folder scan, then to normal playing.
06/12/06 10:59:25 32SMR600_234
) to
To Stop Playing a Disc Press the eject button ( remove the disc. If you eject the disc, but do not remove it from the slot, the system will automatically reload the disc after 10 seconds and put it in pause mode. To begin playing, press the CD button.
You can also eject the disc when the ignition switch is off.
To play the radio when a disc is playing, press the AM/FM button. Press the CD button again to switch back to the disc player.
To play the tape when a disc is playing, insert a tape in the player (optional). If a tape is in the player, press the AUX button. Press the CD button again to switch back to the disc player.
Audio System (on vehicles without navigation system)
If you turn the system off while a disc is playing, either with the power/volume knob or by turning off the ignition switch, the disc will stay in the drive. When you turn the system back on, the disc will begin playing where it left off.
Operating the Optional Disc Changer An optional six disc changer is available for your vehicle. This disc changer uses the same controls used for the in-dash disc player or the radio.
Load the desired discs in the magazine, and load the magazine in the changer according to the instructions that came with the unit.
To select the disc changer, press the CD/AUX button. The disc and track numbers will be displayed. To select a different disc, use the preset 1
(DISC ) button or the preset 2
(DISC ) button. To select the previous disc, press the preset 1
(DISC ), or the preset 2 (DISC ) + to select the next disc in sequence.− +
−
CONTINUED
Features
231
06/12/06 10:59:31 32SMR600_235
Audio System (on vehicles without navigation system)
If you select an empty slot in the magazine, the changer will search for the next available disc to load and play.
Protecting Discs For information on how to handle and protect compact discs, see page 268
Operating the Optional MD Player/Changer (For some types) An MD player or changer is available for your vehicle as optional equipment. This MD player/changer uses the same controls used for the in-dash disc player or the radio. Follow the instructions that came with the unit.
232
Features
06/12/06 10:59:40 32SMR600_236
Disc Player Error Messages The chart on the right explains the error messages you may see in the display while playing a disc.
If you see an error message in the display while playing a disc, press the eject button. After ejecting the disc, check it for damage or deformation. If there is no damage, insert the disc again.
If there is still a problem, the error message will appear again. Press the eject button, and pull out the disc.
Insert a different disc. If the new disc plays, there is a problem with the first disc. If the error message cycle repeats and you cannot clear it, take your vehicle to a dealer.
Audio System (on vehicles without navigation system)
Error
Message
Cause
Solution
FOCUS Error
Mechanical Error
Press the eject button, and pull out the disc. Check if it is inserted correctly in the disc player. Make sure the disc is not scratched or damaged. Press the eject button, and pull out the disc. Check the disc for damage or deformation. If the disc cannot be pulled out, or the error message does not disappear after the disc is ejected, see your dealer.
Features
233
06/12/06 10:59:48 32SMR600_237
Audio System (on vehicles without navigation system)
Error
Message
Cause
Solution
FOCUS error
Mechanical error
Press the magazine eject button and pull it out. If the message does not disappear or the magazine cannot be pulled out, see your dealer. Press the magazine eject button and pull it out. Check for an error message, and insert the magazine again. If the message does not disappear or the magazine cannot be pulled out, see your dealer.
Optional Disc Changer Error Messages The chart on the right explains the error messages you may see in the display while playing a disc.
If you see an error message in the display while playing a disc, press the eject button. After ejecting the disc, check it for damage or deformation. If there is no damage, insert the disc again.
If there is still a problem, the error message will appear again. Press the eject button, and pull out the disc.
Insert a different disc. If the new disc plays, there is a problem with the first disc. If the error message cycle repeats and you cannot clear it, take your vehicle to a dealer.
234
Features
06/12/06 10:59:54 32SMR600_238
Playing a Tape (Optional for some types)
Audio System (on vehicles without navigation system)
POWER/VOLUME KNOB
SEEK/SKIP BAR
Left-hand drive model is shown.
REPEAT BUTTON
PRESET BUTTONS
Features
235
06/12/06 11:00:03 32SMR600_239
Audio System (on vehicles without navigation system)
To Play a Tape (Optional for some types) The ignition switch must be in the ACCESSORY (I) or ON (II) position. Make sure the open side of the tape is facing right, then insert the tape most of the way into the slot. The system will pull the tape in the rest of the way, and begin to play it.
△
indicates the
The tape direction indicator comes on to show you which side of the tape is playing. The side you inserted upward is now playing. If you want to play the other side, press the preset 5 ( button. When the player reaches the end of the tape, it will automatically reverse direction and play the other side.
236
Features
*
Dolby noise reduction turns on when you insert a tape. The
indicator will come on in the
display. If the tape was not recorded in Dolby, turn it off by pressing the NR button. Dolby remains off until you press the NR button again.
*
Dolby noise reduction is manufactured under
license from Dolby Laboratories Licensing Corporation. ‘‘DOLBY’’ and the double-D symbol
are trademarks of Dolby Laboratories
Licensing Corporation.
To Stop Playing a Tape To remove the tape, press the eject button on the tape player. If you want to turn the player off, press the power/volume knob or turn off the ignition switch. The tape will remain in the drive. When you turn the system back on, the tape player will be in pause mode. Press the preset 5
) button to resume play.
To switch to the radio or disc player while a tape is playing, press the AM/FM or CD/AUX button. To change back to the tape player, press the CD/AUX button again.
You can remove the tape with the ignition switch in any position, even if the audio system is off.
−
To rewind the tape, ) button.
Tape Search Functions FF/REW push the preset 4 ( You will see REW in the display. To fast forward the tape, push the preset 6 ( FF displayed. Press the preset 4, 5, or 6 button to take the system out of rewind or fast forward.
) button. You will see
06/12/06 11:00:11 32SMR600_240
−
Press the
side of the
SKIP SEEK/SKIP bar to find the beginning of the current song or passage. Press the the beginning of the next song or passage. When the system reaches the beginning of a song or passage, it begins to play it.
side to find
−
Press the RPT button
REPEAT to continuously play a song or passage. You will see RPT displayed. The track will repeat until you press the RPT button again.
The skip and repeat
NOTE: functions use silent periods on the tape to find the end of a song or passage. These features may not work if there is almost no gap between selections, a high noise level, or a silent period in the middle of a selection.
Audio System (on vehicles without navigation system)
Caring for the Tape Player The tape player picks up dirt and oxides from the tape. This contamination builds up over time and causes the sound quality to degrade. To prevent this, you should clean the player after every 30 hours of use.
Store tapes in their cases to protect them from dust and moisture. Never place tapes where they will be exposed to direct sunlight, high heat, or high humidity. If a tape is exposed to extreme heat or cold, let it reach a moderate temperature before inserting it into the player.
Never try to insert a foreign object into the tape player.
If you do not clean the tape player regularly, it may eventually become impossible to remove the contamination with a normal cleaning kit.
Use 100-minute or shorter tapes. Tapes longer than that may break or jam in the drive.
If the tape is loose, tighten it by turning the hub with a pencil or your finger. If the label is peeling off, remove it or it could cause the tape to jam in the player. Never try to insert a warped or damaged tape in the player.
Features 237
06/12/06 11:00:19 32SMR600_241
Audio System (on vehicles with navigation system)
Voice Control System Onvehicleswithnavigationsystem In addition to the standard audio controls, the audio system in your vehicle can be operated using the voice control system. See the navigation system manual for complete details.
Playing the Radio
SIDE DISPLAY
AUDIO DISPLAY
PRESET BUTTONS
POWER/ VOLUME KNOB
Left-hand drive model is shown.
TUNE BAR
AM/FM BUTTON
AUDIO BUTTON
238
Features
06/12/06 11:00:29 32SMR600_242
To Play the Radio The ignition switch must be in the ACCESSORY (I) or ON (II) position. Turn the system on by pushing the power/volume knob or the AM/FM button. Adjust the volume by turning the power/volume knob.
Pushing the AUDIO button on the control panel will also turn on the system.
You can operate the audio system with the control buttons on the audio panel without displaying the audio control display on the navigation screen. The audio setting will be shown in the side display. When the navigation system is activated, you will also see the audio setting on the side display.
Audio System (on vehicles with navigation system)
On the audio display of the navigation screen, you can scroll the display and enter the setting with the interface dial. You will see the indicator , or on the lower display. This
indicates the direction to move the selector on the interface dial. For the information of how to use the interface dial, see page
188
The band and frequency that the radio was last tuned to are displayed. On the audio control display of the navigation system and the side display, the broadcasting station name may also be displayed if the RDS is turned on (see page ).
243
To change bands, press the AM/FM button, or push up the selector on the interface dial. Each time you press the button or push up the selector, the band will change to FM1, FM2, AM (MW) and LW. On the FM band, STEREO will be
displayed if the station is broadcasting in stereo (you will see ST on the side display).
Stereo reproduction on AM is not available. On the AM band, AM noise reduction turns on automatically.
To Select a Station You can use any of five methods to find radio stations on the selected band: tune, seek, scan, the preset buttons, and auto select.
CONTINUED
Features 239
−
The SEEK function
SEEK searches up and down from the current frequency to find a station with a strong signal. To activate it, press and release the
or
side of the SEEK bar. With the
interface dial, push the selector to the right or to the left.
06/12/06 11:00:35 32SMR600_243
Audio System (on vehicles with navigation system)
−
Use the TUNE bar to tune
TUNE the radio to a desired frequency. Press the to a higher frequency, and the ▼ side to tune to a lower frequency.
side of the bar to tune
▲
To tune the radio with the interface dial, push the selector down, then turn the dial to select the tune mode. Press the ENT on the interface dial, then turn the selector to the desired frequency. To exit the tune mode, press the ENT on the interface dial.
240
Features
06/12/06 11:00:43 32SMR600_244
Audio System (on vehicles with navigation system)
If you do nothing, the system will scan for the next strong station and play it for 10 seconds. When it plays a station that you want to listen to, press the SCAN button again or push the selector on the interface dial to the right again.
−
Each preset button/icon
Preset can store one frequency on AM (MW) and LW, and two frequencies on FM. To view the preset frequencies, push the AUDIO button.
1.
Select the desired band, AM (MW), LW or FM. FM1 and FM2
let you store two frequencies with each the preset button.2.
Use the tune, seek, or scan function to tune the radio to a desired station.
3.
Pick a preset button, and hold it until you hear a beep.
To store the frequency on a preset icon, push the AUDIO button to view the audio control display, then turn the interface dial to select a desired preset icon. The selected preset icon will be highlighted. Press and hold the ENT on the dial for more than 2
seconds to enter the setting.4.
Repeat steps 1 through 3 to store a total of 6 stations on AM (MW) and LW, and 12 stations on FM.
CONTINUED
Features 241
−
SCAN The scan function samples all stations with strong signals on the selected band. To activate it, press the SCAN button, then release it. You will see SCAN in the display. With the interface dial, push the selector down, then push it to the right to select the scan mode.
The system will scan for a station with a strong signal. When it finds one, it will stop and play that station for about 10 seconds.
06/12/06 11:00:49 32SMR600_245
Audio System (on vehicles with navigation system)
− If you are
AUTO SELECT travelling far from home and can no longer receive your preset stations, you can use the auto select feature to find stations in the local area.
Press the A.SEL button on the audio control panel. You will see A. SEL on the side display, and the system goes into the scan mode for several seconds. It stores the frequencies of six FM stations in the preset buttons/icons.
To activate the auto select with the interface dial, press the AUDIO button to view the audio control display, then push down the interface dial, then turn it to select A. SEL icon. Press the ENT on the dial to enter the setting. You will see AUTO SEL flashing in the display, and the system goes into scan mode for several seconds.
You will see a ‘‘0’’ displayed after pressing a preset button if auto select cannot find a strong station for that preset button.
If you do not like the stations auto select has stored, you can store other frequencies on the preset buttons as previously described.
press the
Toturnoffautoselect, A.SEL button or the ENT on the interface dial. This restores the presets you originally set.
242
Features
06/12/06 11:00:58 32SMR600_246
With Radio Data System (RDS)
Audio System (on vehicles with navigation system)
Radio Data System (RDS) With your audio system, you can utilize many convenient features provided by the radio data system (RDS).
With the FM band selected, you can keep listening to the same station even if its frequency changes as you enter different regions while you are travelling.
The RDS function turns on automatically when you turn the system on. If the station you are listening to is an RDS station, the frequency is displayed in the side display, and the station name will be displayed in the audio display on the navigation screen.
CONTINUED
Features 243
TA/PTY BUTTON
AUDIO BUTTON
Left-hand drive model is shown.
INTERFACE DIAL
06/12/06 11:01:05 32SMR600_247
Audio System (on vehicles with navigation system)
Then, the system will automatically keep selecting the frequency with the strongest signal from the frequencies that carry the same programs. This can save you the trouble of retuning to obtain the same station as long as you are in the same RDS network area.
RDS SETTING
You can turn the RDS function on or off and select the RDS programs. To use the function and select the program, press the AUDIO button on the control panel to view the audio display. Push down the selector on the interface dial, then turn the dial to select RDS.
TA ON is selected.
Press the ENT on the dial to enter the RDS setting. You will see the six selectable RDS settings on the display. Turn the interface dial to select any of the RDS functions, then press the ENT on the dial to enter your setting.
Selectable settings are described in the following. Pushing the selector or turning the dial to the left or right switches the function between on and off.
244
Features
06/12/06 11:01:15 32SMR600_248
AF ON/OFF: function on or off
Alternative frequency
NEWS ON/OFF: or off
News program on
TA ON/OFF: announcement on or off
Traffic
REG ON/OFF: on or off
Regional program
PS ON/OFF: function on or off
Program service
A-TP ON/OFF: program on or off
Automatic traffic
Audio System (on vehicles with navigation system)
NEWS (News Program) This function automatically tunes to the radio station which is broadcasting the newscast.
−
AF ON
To turn on the RDS, select AF ON by turning the interface dial. To turn off the RDS, select AF OFF. Press the ENT on the interface dial to store the setting.
AF (Alternative Frequency) This function automatically selects a frequency with the same program in the RDS network area.
−
−
This function will make
TA (Traffic Announcement Standby) the system stand by for traffic announcements. This function can also be turned on or off by pressing the TA/PTY button on the audio control panel.
REG (Regional Program) This function keeps the regional program and does not change the frequency even if the signal becomes too weak.
−
PS (Program Service Display) This function shows the radio station name which you are listening to.
−
CONTINUED
Features 245
06/12/06 11:01:24 32SMR600_249
Audio System (on vehicles with navigation system)
A-TP (Automatic Traffic Information Program) function automatically tunes to the radio station which is broadcasting the traffic information.
− This
The system will return to the audio display about 5 seconds after you stop selecting the function. Pushing down the selector also cancels this selecting mode.
When the signals of the RDS station become so weak that the system can no longer follow the station, the system will hold the last tuned frequency and the display will change from the station name to the frequency.
In some countries, you cannot utilize features provided by RDS as the RDS function is not provided for all stations.
246
Features
ProgramServiceNameDisplay If the station you are listening to is an RDS station, the frequency display will disappear and the station name or PTY information will be displayed. Press the TA/PTY button for more than 2 seconds to switch the display between the name of network/station and the PTY information. For more information on the PTY, see page
247
TA(TrafficAnnouncement)Standby Function When you press and release the TA/ PTY button on the audio control panel, TA comes on in the display and the system stands by for traffic announcements.
When the automatic traffic information program (A-TP ON) is selected, TP will come on in the display. This indicates that the traffic reports can be received from the traffic information broadcasting
station.
A-TP cross-references other program services that broadcast traffic information, and the traffic reports can be received through another program service in the RDS network area.
You can receive traffic information while you are listening to a disc or tape (if equipped). If the system is tuned to a TP station before playing a disc or tape, the system will stand by for traffic announcements by pressing the TA/PTY button (TA indicator is on) and the system will switch from disc or tape to the traffic announcement when it begins. You will also see ‘‘TA INFO’’ in the display. The system will return to the disc or tape mode when the traffic information is finished.
06/12/06 11:01:32 32SMR600_250
To adjust the volume of the traffic announcement, turn the power/ volume knob while the announcement is broadcasting. The adjusted volume level will be stored, then that level will be used on the next traffic announcement. You cannot adjust the volume below the minimum level. The volume of the PTY NEWS or the PTY ALARM function can also be adjusted (see page
251
).
If your vehicle’s battery goes dead, or is disconnected, the traffic announcement volume level will be reset to the default setting (level 9).
To turn off the TA function, press the TA/PTY button again. TA will go out from the display. You can also turn the TA function on or off on the audio display on the navigation screen (see page
244
).
Audio System (on vehicles with navigation system)
If you use seek or auto select with the TA function on, the system searches only TP stations.
PTY(ProgramType)Display Function This function shows you the program type of the selected RDS station. For example, if the station is broadcasting drama, DRAMA is shown in the display. If it is a station of scientific programs, SCIENCE is shown. The principal PTYs are shown on page
249
Press the AUDIO button on the control panel to view the audio display on the navigation screen, then push down the selector on the interface dial to select the function display. Turn the dial to select the PTY, then press the ENT on the interface dial.
CONTINUED
Features
247
06/12/06 11:01:39 32SMR600_251
Audio System (on vehicles with navigation system)
LIST MODE
GROUP MODE
You will see the PTY setting: Group and List. You can select the desired PTY program either of the group or the list. Select the setting by turning the interface dial or pushing the selector to the right or left.
When the TA/PTY button on the audio control panel is pressed for more than 2 seconds, the PTY display function also comes on.
Select the list or group mode, then press the ENT on the interface dial to enter the setting. You will see the selectable items on the display. Push the selector up to move to the next display, and down to go back to the previous display. Turn the interface dial to select the desired PTY program. Press the ENT on the dial to enter your selection.
248
Features
06/12/06 11:01:58 32SMR600_252
Audio System (on vehicles with navigation system)
The principal PTYs are shown as follows.
NEWS: Short accounts of facts, events, publicly expressed views, reportage, etc. CURRENT AFFAIRS: Topical programs expanding upon the news. INFORMATION: General information and advice. SPORT: Programs concerned with any aspect of sports. EDUCATION: Educational programs. DRAMA: All radio plays and serials. CULTURES: Programs concerned with any aspect of national or regional culture. SCIENCE: Programs about nature, science, and technology. VARIED SPEECH: Light entertainment programs. POP MUSIC: Commercial music of popular appeal.
ROCK MUSIC: Contemporary modern music. EASY LISTENING: Light music. LIGHT CLASSICS M: Light classics; classical music for non-specialist appreciation. SERIOUS CLASSICS: Traditional classics. OTHER MUSIC: Other types of music, such as R & B, Reggae. WEATHER/METR: Weather information. FINANCE: Programs concerned with economy. CHILDREN’S PROGS: Programs for children. PHONE IN: Programs consisting of listener’s message TRAVEL/TOURING: Programs concerned with travel.
JAZZ MUSIC: Jazz music. COUNTRY: Country music. NATION M: National music. OLDIES M: Oldies music, ‘‘Golden age’’ based programs. FOLK MUSIC: Folk music. SOCIAL: Social affairs programs. RELIGION: Programs concerned with religion. DOCUMENTARY: Documentary programs. LEISURE: Programs about hobbies and recreational activities.
CONTINUED
Features 249
06/12/06 11:02:08 32SMR600_253
Audio System (on vehicles with navigation system)
PTYGroup INFORMATION: General information and advice. CULTURE: Programs concerned with any aspect of national or regional culture. VARIED: Light entertainment programs. POP MUSIC: Commercial music of popular appeal. CLASSICS: Traditional classics. OTHER MUSIC: Other types of music, such as R & B, Reggae.
The PTY setting mode is cancelled if no further steps are taken within 5
seconds after selecting the desired PTY with the interface dial.Some stations may broadcast the programs with different contents from their PTY code.
In the PTY search mode, the tuning step is set to 50 kHz while searching on the FM band. This step changes to 100 kHz when the AF or TA function is activated.
After you select the desired program type, the system will search for a station with the same PTY code as the selected program type. When you use this function for the first time, NEWS will appear as it was preset at the factory.
After your desired PTY is displayed, press either side of the SEEK/SKIP bar within 5 seconds. The system will go into the PTY search mode and search for a station of the selected PTY. If there is no station available in the selected PTY, NO PTY is displayed for about 5 seconds and the PTY search mode is cancelled.
If the selected RDS station does not transmit PTY data, NO PTY is displayed. When the selected station is not an RDS station, NO RDS is displayed for about 5 seconds.
250
Features
06/12/06 11:02:16 32SMR600_254
PTY/NewsInterruptFunction To activate this function, press the AUDIO button on the control panel to view the audio display on the navigation screen, then push down the selector on the interface dial to select the function display. Turn the dial to select the PTY, then press the ENT on the interface dial.
The PTY display function also comes on by pressing and holding the TA/ PTY button on the audio control panel for more than 2 seconds.
Turn the interface dial to select NEWS, then press the ENT to enter the selection. Push the selector or turn the dial to select ON, then press the ENT to enter the setting. You will see NEWS in the audio display and the side display.
Audio System (on vehicles with navigation system)
The system will hold the last tuned FM station/network PTY while you are listening to the disc. With this function on, playing disc is interrupted and the system switches from disc mode to the FM newscast when the newscast is broadcasting from the FM station.
You can change the volume level of the interrupted newscast. Refer to page volume level.
for how to adjust the
247
When the program is changed to another program or the frequency cannot be received for 10 seconds due to a weak signal, the system will return to the disc mode automatically.
Your audio system has another interrupt function (including TA function). The first activated interrupt function has priority over the others and the indication of the other interrupt function goes out. To activate the other interrupt function, turn off the current interrupt function.
PTYAlarm PTY code ‘‘ALARM’’ is used for emergency announcements, such as natural disasters. When this code is received, ‘‘ALARM’’ comes on the display and the volume is changed. When the alarm is cancelled, the system will return to the normal operation mode.
Features
251
06/12/06 11:02:25 32SMR600_255
Audio System (on vehicles with navigation system)
Adjusting the Sound
You can adjust the sound on the navigation screen. To adjust the sound, push the AUDIO button on the control panel, then push down the selector. Turn the interface dial to select the (sound mode), then press the ENT on the dial to enter the sound grid.
BASS
−
Adjusts the bass.
TREBLE
−
Adjusts the treble.
FADER strength of the sound.
−
Adjusts the front-to-back
BALANCE side strength of the sound.
Adjusts the side-to-
−
To adjust each setting, turn the interface dial to select the setting you want to adjust, then press the ENT on the dial. The current setting is shown on the display.
252
Features
06/12/06 11:02:33 32SMR600_256
In balance and fader setting, the right lower display shows you the current setting of the sound strength coming from each speaker. In bass and treble setting, the display shows you the setting with the vertical bars.
Turn the interface dial to the right or the left to adjust the sound level, then press ENT to enter your setting.
−
SVC according to the vehicle speed.
Adjusts the volume level
Speed-sensitiveVolume Compensation(SVC)System