- 2008 Ford Taurus Owners Manuals
- Ford Taurus Owners Manuals
- 2010 Ford Taurus Owners Manuals
- Ford Taurus Owners Manuals
- 2011 Ford Taurus Owners Manuals
- Ford Taurus Owners Manuals
- 1999 Ford Taurus Owners Manuals
- Ford Taurus Owners Manuals
- 2004 Ford Taurus Owners Manuals
- Ford Taurus Owners Manuals
- 2009 Ford Taurus Owners Manuals
- Ford Taurus Owners Manuals
- 2005 Ford Taurus Owners Manuals
- Ford Taurus Owners Manuals
- 2015 Ford Taurus Owners Manuals
- Ford Taurus Owners Manuals
- 1996 Ford Taurus Owners Manuals
- Ford Taurus Owners Manuals
- 2016 Ford Taurus Owners Manuals
- Ford Taurus Owners Manuals
- 2014 Ford Taurus Owners Manuals
- Ford Taurus Owners Manuals
- 2007 Ford Taurus Owners Manuals
- Ford Taurus Owners Manuals
- 2006 Ford Taurus Owners Manuals
- Ford Taurus Owners Manuals
- 1998 Ford Taurus Owners Manuals
- Ford Taurus Owners Manuals
- 2013 Ford Taurus Owners Manuals
- Ford Taurus Owners Manuals
- 2000 Ford Taurus Owners Manuals
- Ford Taurus Owners Manuals
- 1997 Ford Taurus Owners Manuals
- Ford Taurus Owners Manuals
- 2012 Ford Taurus Owners Manuals
- Ford Taurus Owners Manuals
- Download PDF Manual
-
to replace the entire power antenna assembly. A replacement mast can be obtained from your dealership for a nominal fee.
q Occasionally, the power antenna mast should be wiped clean with mild soap and water or denatured alcohol. This prevents debris from accumulating on the mast which can cause excessive wear and decrease the power antenna life. Never use petroleum-based products to clean your antenna mast.
176
File:09fcast.ex Update:Mon Jan 22 15:58:04 1996
%*[AS15100(ALL)08/95] *[AS15150(ALL)08/95]
*[AS15200(ALL)08/95] *[AS15250(ALL)08/95]
*[AS15300(ALL)08/95] *[AS15350(ALL)08/95]
*[AS15400(ALL)04/95] *[AS15450(ALL)08/95]
%*[AS15600(ALL)08/95]
[AS15700(ALL)09/95]
[AS15800(ALL)09/95]
Common Radio Reception Conditions
Several conditions prevent FM reception from being completely clear and noise-free, such as the following:
1. Distance/Strength
The strength of the FM signal is directly related to the distance the signal must travel. The listenable range of an average FM signal is approximately 25 miles (40 kilometers). Beyond this distance, the radio is operating in a fringe area and the signal becomes weaker.
2. Terrain
The terrain (hilly, mountainous, tall buildings) of the area over which the signal travels may prevent the FM signal from being noise-free.
3. Rounded off frequencies
Some FM radio stations advertise a “rounded-off” frequency which is not the frequency they actually broadcast on. For example, a radio station that is assigned a frequency of 98.7 MHz may call itself “Radio 99” even though 99.0 MHz is not an allowable FM broadcast frequency. Using the Controls of Your Cassette Tape Player
NOTE: Radio power must be on to use the
cassette tape player.
NOTE: Adjust the volume, treble, bass, balance
and fade controls in the same manner as for radio stations.
177
File:09fcast.ex Update:Mon Jan 22 15:58:04 1996
*[AS15900(ALL)08/95] [AS16025(ALL)12/95]
[AS16050(ALL)09/95]
[AS16300(ALL)12/95]
*[AS16350(ALL)08/95]
*[AS16400(ALL)09/95] [AS16525(ALL)04/95]
*[AS16535(ALL)01/95]
How to insert a tape
Your cassette player is equipped with power loading. Once you insert a tape and push slightly (with the open edge to the right), the loading mechanism draws the tape the rest of the way in and play will begin after a momentary tape tightening process. Display indicates “TAPE” while tape is playing. If the “TAPE” button is pressed when the cassette tape player is empty, “NO” and “TAPE” will flash in the display and radio play will continue.
NOTE: A cassette tape can be loaded with the ignition on whether the radio is on or off. However, if the radio is off, the cassette tape will be loaded and stored.
How to locate a desired selection on the tape
There are four ways to quickly locate a desired selection on the tape. You can use the fast forward, rewind, “SEEK” or “SCAN” function. Following are brief descriptions of each.
Fast forwarding the tape
To fast forward the tape, press the “FF” button. The radio will automatically begin playing until fast forward is manually stopped (by pressing the “TAPE”, “EJ”, “REW” or “FF” button) or the end of the tape is reached. The display will show a flashing X to indicate fast forward.
At the end of the tape, the direction automatically reverses and plays the other side of the tape.
178
File:09fcast.ex Update:Mon Jan 22 15:58:04 1996
*[AS16600(ALL)08/95] [AS16725(ALL)04/95]
*[AS17000(ALL)08/95]
[AS17125(ALL)04/95]
*[AS17135(ALL)09/95]
*[AS17200(ALL)08/95]
[AS17325(ALL)02/95]
[AS17345(ALL)04/95]
[AS17348(ALL)02/95]
[AS17350(ALL)02/95]
q Rewinding the tape
To rewind the tape, press the “REW” button. The radio will automatically begin playing until rewind is manually stopped (by pressing the “TAPE”, “EJ”, “REW” or “FF” button) or the beginning of the tape is reached. The display will show a flashing X to indicate rewind.
q Using the “SEEK” function with your cassette
tape player
While in the tape mode, press the right (a) side of the “SEEK” button to seek forward to the next selection on the tape (display indicates “SEEK”). Press the left (b) side to seek the previous tape selection.
NOTE: If you want to restart a currently
playing tape selection, press the left (b) side of the “SEEK” button after approximately three seconds into the current selection.
q Using the “SCAN” function with your
cassette tape player
Press the “SCAN” button to begin the forward scan mode on the tape currently playing, stopping on each tape selection for approximately an eight-second sampling (display flashes “SCAN”).
To stop the scan mode on the presently sampled tape selection press “SCAN” a second time.
How to change the side of the tape being played
The alternate side of the tape can be selected at any time by pressing the “SIDE 1-2” button.
179
File:09fcast.ex Update:Mon Jan 22 15:58:04 1996
*[AS17400(ALL)08/95] [AS17525(ALL)04/95]
*[AS17550(ALL)08/95] [AS17575(ALL)04/95]
*[AS17600(ALL)08/95] *[AS17700(ALL)08/95]
*[AS17825(ALL)04/95]
*[AS18260(ALL)08/95] *[AS18280(ALL)08/95]
[AS18325(ALL)04/95]
[AS18330(ALL)04/95]
How to eject the tape
To stop the tape and eject the cassette, press the “EJ” button. The radio will resume playing if the power is on. The tape cartridge can be ejected with radio power (and/or ignition) on or off.
How to store the tape
Press the “AM” or “FM” button (or “CD”, if equipped) to stop the tape player and resume radio play (or CD-DJ). Using the Dolby쑓 B noise reduction feature
NOTE: Noise reduction system manufactured
under license from Dolby Labs Licensing Corporation. “Dolby” and double-D symbol are trademarks of Dolby Laboratories Licensing Corporation.
Push the k button to activate Dolby B Noise Reduction. Push again to deactivate.
Tape error messages
Your cassette tape player is equipped to diagnose certain problems you may experience. Error codes are as follows:
TD E1 — Possible problem tape cartridge. The cassette player will automatically eject the tape. Insert the tape again. If the same error code appears in the display, try a different tape. If the problem persists, refer the problem to qualified personnel for service.
TD E2 — Radio cannot eject tape. If tape is not ejected when the “EJ” button is pressed, refer the problem to qualified personnel for service.
180
File:09fcast.ex Update:Mon Jan 22 15:58:04 1996
[AS18350(ALL)12/95]
*[AS18500(ALL)08/95]
*[AS18600(ALL)08/95]
*[AS18700(ALL)08/95]
*[AS18800(ALL)08/95]
*[AS18900(ALL)08/95]
*[AS19000(ALL)08/95]
*[AS19100(ALL)08/95]
*[AS19200(ALL)08/95]
TD E3 — Radio cannot insert tape properly. The cassette player will automatically eject the tape. Insert tape again. If the same error code appears in the display, try a different tape. If the problem persists, refer the problem to qualified personnel for service. Tips on Caring for the Cassette Player and Tapes
In order to keep your cassette tape player performing the way it was meant to, read and follow these simple precautions: q Using a Ford Cassette Cleaning Cartridge to clean the tape player head after 10-12 hours of play will help maintain the best playback sound and proper tape operation.
q Only cassettes that are 90 minutes long or less should be used. Tapes longer than 90
minutes are thinner and subject to breakage or may jam the tape player mechanism. q Protect cassettes from exposure to directsunlight, high humidity and extreme heat or cold. If they are exposed to extreme conditions, allow them to reach a moderate temperature before playing.
If a tape is loose inside the cassette, tighten it before playing by putting your finger or a pencil into one of the holes and turning the hub until the tape is tight.
q Loose labels on cassette tapes can become
lodged in the mechanism. Remove any loose label material before inserting cassette. q Do not leave a tape in the cassette tape
player. High heat in the vehicle can cause the cassette to warp.
181
File:09fcast.ex Update:Mon Jan 22 15:58:04 1996
%*[AS29351(ALL)02/95] [AS29401(ALL)04/95]
*[AS29450(ALL)02/95] [AS29500(ALL)04/95]
[AS29550(ALL)04/95]
one third page art:0001464-A
[AS29601(ALL)02/95]
[AS29650(ALL)04/95]
one third page art:0001465-A
Ford 6-CD Changer The Ford 6-CD Changer is in the left of the trunk or the right of the cargo area. It is controlled by the audio system buttons. Loading Instructions
1. Open the cover door. Open Compact Disc Changer trunk unit by sliding door to the front (sedan) or rear (wagon) (Figure 1).
Figure 1
2. Press the orange Eject button to eject the disc
“magazine” (holds 6 discs) (Figure 2).
Figure 2
182
File:09fcast.ex Update:Mon Jan 22 15:58:04 1996
[AS29701(ALL)02/95]
[AS29750(ALL)10/95]
one third page art:0001466-B
[AS29775(ALL)04/95]
[AS29800(ALL)02/95]
[AS29850(ALL)04/95]
quarter page art:0001467-A
[AS29950(ALL)02/95]
3. Load discs into the disc magazine slots
(numbered 1 through 6 on the window) one at a time with labeled surfaces upward, starting with bottom slot number 1
(Figure 3).Figure 3
To remove a compact disc from the disc magazine, slide the corresponding lever on the opposite side of the magazine window. The disc will partially eject. Insert loaded disc magazine into changer unit with the arrow on top of the disc magazine pointing toward the changer (Figure 4). Make sure magazine is fully inserted into changer.
4.
Figure 4
5. Close unit by sliding changer panel door tothe rear (sedan) or front (wagon).
183
File:09fcast.ex Update:Mon Jan 22 15:58:04 1996
[AS30001(ALL)02/95]
*[AS30050(ALL)02/95]
[AS30101(ALL)02/95]
*[AS30150(ALL)05/95]
*[AS30201(ALL)02/95] *[AS30250(ALL)02/95]
[AS30301(ALL)04/95]
[AS30325(ALL)04/95]
*[AS30350(ALL)02/95] [AS30401(ALL)02/95]
The Compact Disc Changer unit is now ready to play using the controls of your audio system. How to Operate the Ford 6-CD Changer Using the Controls on the Radio
If your vehicle is equipped with the Ford 6-CD Changer System, you can operate it through the controls of your audio system.
Several of the controls on the radio operate in the same manner in CD mode as they do in radio or cassette mode: turning the power on, volume control and adjusting the bass, treble, speaker balance or fade.
How to begin CD Changer play
NOTE: Radio power must be on to operate the
Compact Disc Changer.
Push the “CD” button to begin CD play. If the disc magazine has just been installed, the CD Changer will automatically begin playing the first track (selection) of the first disc loaded in the unit. After that, the CD Changer will start on the disc and track where it was stopped. The display will indicate “CD-##” for disc number, then display “TR-##” for track number, then “DD-TT” for disc number and track number.
If the CD Changer is empty, “NO” and “CD” will flash in the display and radio play will continue.
How to change the disc being played
When in the CD mode, you can change discs by pressing the right (a) side of the “TUNE/DISC” button (to select the next disc) or the left (b) side of the “TUNE/DISC” button (to select the previous disc). Play will begin on the first track of the selected disc.
184
File:09fcast.ex Update:Mon Jan 22 15:58:04 1996
*[AS30450(ALL)02/95]
*[AS30501(ALL)10/95] *[AS30550(ALL)02/95]
*[AS30601(ALL)02/95]
[AS30625(ALL)04/95]
[AS30651(ALL)04/95]
*[AS30800(ALL)02/95] *[AS30851(ALL)02/95]
[AS30900(ALL)02/95]
When either side of the button is pressed and held, the CD changer will continue fast-forwarding or reversing through the discs in the disc magazine. During these functions, the display will indicate the disc number.
How to change the track being played
Press the right (a) side of the “SEEK” button to seek forward to the next track of current disc. After the last track has been completed, the CD player automatically wraps back to the first track of the current disc.
Press the left (b) side of the SEEK button to seek in reverse to the previous track on the current disc. If a selection has been playing for three seconds or more and you press the left (b) side of the SEEK button, the CD Changer will replay that selection from the beginning.
Using fast forward or reverse
To quickly search for a particular point in a selection, press and hold the “FF” or “REW” button. Find the desired point by watching the elapsed playing time in the display or listening to the sound, then release the button.
Operating the Shuffle feature
The shuffle feature on your CD player allows you to listen to your disc selections in a different order. When this feature is activated, your CD player will randomly select and play tracks on the disc.
Press the “SHUFFLE” button to turn on, press it again to turn off. When on, the display will indicate “SHUF” then the disc and track number (dd-tt).
185
File:09fcast.ex Update:Mon Jan 22 15:58:04 1996
*[AS30951(ALL)02/95] *[AS31000(ALL)02/95]
*[AS31051(ALL)02/95]
*[AS31101(ALL)02/95]
*[AS31110(ALL)04/95] *[AS31120(ALL)04/95]
[AS31130(ALL)04/95]
*[AS31150(ALL)02/95] [AS31200(ALL)04/95]
Operating the “SCAN” function
Press the “SCAN” button to enter the scan mode. The CD player will begin scanning the disc, stopping on each listenable track for approximately an eight second sampling. This continues until you press the “SCAN” button a second time.
Operating the Shuffle and Scan features simultaneously
Both the shuffle and scan features can be activated simultaneously. In this mode, the player will randomly pick a selection and play the first eight seconds. This process is continued until either the “SCAN” button or “SHUFFLE” button is pressed a second time.
Operating the CD Compression feature
The compression feature will bring soft and loud passages closer together for a more consistent listening level.
To turn the compression on, press the “COMP” button. When the compression feature is activated, the display will indicate “C”. Press again to deactivate.
How to stop CD play
While in CD Changer mode, press the “AM” or “FM” button to stop CD play and resume radio play. Loading a cassette into the cassette deck (or pressing “TAPE” if a cassette is already loaded) will stop CD play and begin cassette play.
186
File:09fcast.ex Update:Mon Jan 22 15:58:04 1996
%*[AS32310(ALL)08/95]
*[AS32312(ALL)08/95]
*[AS32314(ALL)08/95]
*[AS32316(ALL)08/95]
*[AS32318(ALL)08/95]
*[AS32320(ALL)08/95]
*[AS32322(ALL)08/95] *[AS32324(ALL)08/95]
*[AS32326(ALL)08/95]
How To Take Care of and Clean Your CD Player and Discs
To ensure the continued performance of your Ford Compact Disc Player, carefully read the following precautions: q Always handle the disc by its edge. Never
touch the playing surface.
q Before playing, inspect the disc for any
contamination. If needed, clean the disc with an approved disc cleaner, such as the Discwasher쑓 Compact Disc Cleaner or the Allsop 3쑓 Compact Disc Cleaner, by wiping from the center out to the edges. Do not use a circular motion to clean.
q Do not clean discs with solvents such as benzine, thinner, commercially available cleaners or antistatic spray intended for analog records.
q Do not expose the disc to direct sunlight or
heat sources such as defroster and floor heating ducts. Do not leave any discs in a parked car in direct sunlight where there may be a considerable rise in temperature or damage may result.
q After playing, store the disc in its case.
If a disc has already been inserted, do not try to insert another disc. Doing so may damage the disc player.
q Do not insert anything other than a disc into
the disc player.
187
File:09fcast.ex Update:Mon Jan 22 15:58:04 1996
*[AS32328(ALL)08/95]
*[AS32330(ALL)08/95] *[AS32332(ALL)08/95]
*[AS32336(ALL)08/95] *[AS32338(ALL)08/95] *[AS32340(ALL)08/95]
*[AS32342(ALL)08/95]
*[AS32344(ALL)09/95] *[AS32345(ALL)08/95] [AS32346(ALL)02/95]
*[AS32348(ALL)08/95]
CAUTION: The use of optical instruments with this product will increase eye hazard as the laser beam used in this compact disc player is harmful to the eyes. Do not attempt to disassemble the case. Refer servicing to qualified personnel only. Common Operating Conditions of Your CD Player The following information is designed to help you recognize typical situations that could be mistakenly interpreted as mechanical malfunctions of the disc player. q The disc is inserted with the label surface
downward.
q The disc is dusty or defective. q The player’s internal temperature is above 140˚F (60˚C). Allow the player to cool off before operating.
q Different manufacturers of compact discs may
produce discs with different dimensions or tolerances, some of which may not be within industry standards or in accordance with the CD format. Because of this, a new disc that is free of dust and scratches could be defective and may not play on your Ford Compact Disc Player.
If play does not begin after the CD button is pushed: q The radio is not on. q The disc magazine is not fully seated in
changer.
q Moisture may have condensed on the lenses
within the unit. If this occurs, remove the disc and wait approximately an hour until the moisture evaporates.
188
File:09fcast.ex Update:Mon Jan 22 15:58:04 1996
*[AS32350(ALL)08/95] *[AS32352(ALL)08/95]
*[AS32400(ALL)02/95] [AS32500(ALL)02/95]
[AS32600(ALL)02/95]
[AS32700(ALL)02/95]
[AS32800(ALL)04/95]
If the sound skips: q Badly scratched discs or extremely rough
roads will cause the sound to skip. Skipping will not damage the disc player or scratch the discs.
CD Error Messages
Your system is equipped to diagnose certain problems you may experience. The displayed error codes are:
NO then CD — Empty slot or magazine, mechanical error, disc(s) unreadable, or mechanism focus error. Check all discs in the magazine for scratches and proper insertion. If problem persists, refer problem to qualified personnel for service.
NO then DJ — CD Changer not connected or not communicating to audio system. Refer problem to qualified personnel for service.
TOO then HOT — The changer’s internal temperature is above 140˚F (60˚C). Allow the player to cool before operating.
189
File:09fcast.ex Update:Mon Jan 22 15:58:04 1996
%*[AS37000(ALL)08/95]
*[AS37050(ALL)07/90] *[AS37100(ALL)08/95]
*[AS37150(ALL)07/90] *[AS37200(ALL)08/95]
Important Warranty and Service Information q Warranty Your sound system is warranted for three years or 36,000 miles (60,000 kilometers), whichever comes first. Consult your vehicle warranty booklet for further information. Ask your dealer for a copy of this limited warranty.
Service
At Ford Electronics, we stand behind our audio systems with a comprehensive service and repair program. If anything should go wrong with your Ford audio system, return to your dealer for service. There is a nationwide network of qualified Ford authorized repair centers to assist you.
190
File:10fcdrt.ex Update:Mon Jan 22 15:59:33 1996
*[DR00300(ALL)07/95]
*[DR00500(ALL)11/94] [DR00510(ALL)02/95]
*[DR00700(ALL)11/94]
*[DR00800(ALL)04/95]
% [DR03510(ALL)04/95]
%*[DR03600(ALL)04/95]
Driving Your Taurus
Your vehicle will have one of the following types of transaxles:
an automatic overdrive transaxle, or
an automatic overdrive transaxle with Overdrive Off (O/D OFF) switch
If you are not sure which transaxle your vehicle has, talk to your dealer.
Your vehicle is equipped with an Electronic Powertrain Control Module that limits engine and/or vehicle speeds with a cut-out mode to promote durability. Driving with an Automatic Overdrive Transaxle (Column Gearshift without O/D OFF Switch) Your automatic overdrive transaxle provides fully automatic operation in either j (Overdrive) or D (Drive). Driving with the shift selector in j (Overdrive) gives the best fuel economy for normal driving conditions. For manual control, start in 1 (First) and then shift manually.
191
File:10fcdrt.ex Update:Mon Jan 22 15:59:33 1996
%*[DR03800(ALL)01/95] *[DR04001(ALL)05/95]
*[DR04050(ALL)03/95] *[DR04101(ALL)01/95] *[DR04150(ALL)01/95] *[DR04201(ALL)01/95] %*[DR04250(ALL)04/95]
*[DR04300(ALL)01/95]
[DR04350(ALL)11/94]
[DR04400(ALL)11/94]
*[DR04425(ALL)07/95]
Putting Your Vehicle in Gear
RWARNING
Hold the brake pedal down while you move the gearshift lever from position to position. If you do not hold the brake pedal down, your vehicle may move unexpectedly and injure someone.
To operate:
1. Start the engine.
2. Depress and hold the brake pedal.
3. Move the gearshift lever out of P (Park).
Your vehicle is equipped with a Brake Shift Interlock safety feature. This feature prevents the gearshift from being moved from the P (Park) position until the brake pedal is depressed. This feature is active when the ignition is in the ON position. If the gearshift lever CANNOT be moved from P (Park) with the brake pedal depressed:
1. Turn the engine off and remove the ignition
key.
2. Reinsert the ignition key and turn clockwise
to the first position (OFF).
3. Depress the brake pedal, move the gearshift
lever to N (Neutral) and start the engine.
If you need to shift out of P (Park) by using the alternate procedure described above, it is possible that a fuse has blown and that your brakelamps may also not be functional. Please refer to the chapter titled Servicing Your Taurus in this Owner Guide for instructions on checking and replacing fuses.
192
File:10fcdrt.ex Update:Mon Jan 22 15:59:33 1996
*[DR04451(ALL)09/95]
%*[DR04501(ALL)11/94] *[DR04550(ALL)04/95]
[DR04601(ALL)11/94]
one third page art:0000491-E
*[DR04650(ALL)01/95]
%*[DR05100(ALL)01/95] *[DR05200(ALL)08/95]
*[DR05250(ALL)01/95] *[DR05275(ALL)01/95]
RWARNING
DO NOT DRIVE YOUR VEHICLE UNTIL YOU VERIFY THAT THE BRAKELAMPS ARE WORKING.
Using a column-mounted gearshift
If your gearshift is on the column, you can use any of the following positions:
The column-mounted gearshift
Once you place the gearshift securely into position, gradually release the brake pedal and use the accelerator as necessary. R (Reverse)
With the gearshift in the R (Reverse) position, the vehicle will move backward. You should always come to a complete stop before shifting into or out of R (Reverse). N (Neutral)
With the gearshift in the N (Neutral) position, the vehicle can be started and is free to roll. Hold the brake pedal down while in this position.
193
File:10fcdrt.ex Update:Mon Jan 22 15:59:33 1996
%*[DR05300(ALL)01/95] %*[DR05400(ALL)04/95] *[DR05500(ALL)04/95]
*[DR05600(ALL)04/95]
*[DR05800(ALL)06/95] [DR06000(ALL)12/95]
*[DR06100(ALL)06/95] *[DR06200(ALL)11/94]
*[DR06220(ALL)11/94]
[DR06300(ALL)04/95]
*[DR06400(ALL)01/95] *[DR06500(ALL)11/94]
Driving When to use j (Overdrive) j (Overdrive) is the usual driving position for an automatic overdrive transaxle. It works the same way D (Drive) works, automatically upshifting or downshifting as the vehicle speeds or slows. However, j (Overdrive) also shifts into a fourth gear — an overdrive gear — when your vehicle cruises at a consistent speed for any length of time. This fourth gear will increase your fuel economy when you travel at cruising speeds. When to use D (Drive) D (Drive) eliminates the excessive shifting between third and fourth gears that your vehicle sometimes does when you are traveling through hilly terrain in j (Overdrive). It also provides more engine braking than j (Overdrive) for descending hills or city driving. When to use 1 (First) Use 1 (First) when added engine braking is desired when descending steep hills. The automatic transaxle will shift to the proper gear to ascend any grade without any need to shift to 1 (First). Do not go faster than 38 mph (61 km/h) in this gear. You can upshift from 1 (First) to D (Drive) or from 1 (First) to j (Overdrive) at any speed. P (Park) Always come to a complete stop before you shift into P (Park). Make sure that the gearshift is securely latched in P (Park). This locks the transaxle and prevents the front wheels from rotating.
194
File:10fcdrt.ex Update:Mon Jan 22 15:59:33 1996
*[DR06600(ALL)06/95]
*[DR06625(ALL)06/95]
[DR06700(ALL)11/94]
% [DR06705(ALL)04/95]
[DR06710(ALL)02/95]
%*[DR06730(ALL)01/95] [DR06735(ALL)04/95]
[DR06740(ALL)02/95]
RWARNING
Always set the parking brake fully and make sure the gearshift is securely latched in P (Park).
RWARNING
Never leave your vehicle unattended while it is running.
You can tell a column-mounted gearshift is securely latched in P (Park) if you cannot move it without pulling it toward you and rotating it downward. Driving with an Automatic Overdrive Transaxle (Column or Console Gearshift with O/D OFF Switch) Your automatic overdrive transaxle provides fully automatic operation in either D (Overdrive) or with the O/D OFF Switch depressed. Driving with the shift selector in D (Overdrive) gives the best fuel economy for normal driving conditions. For manual control, start in 1 (First) and then shift manually. Putting Your Vehicle in Gear
You must push in the thumb button to move the console-mounted gearshift to the position you choose.
To move the gearshift out of P (Park), the ignition must be turned from the locked position to either the OFF or the ON position.
195
File:10fcdrt.ex Update:Mon Jan 22 15:59:33 1996
*[DR06745(ALL)03/95] *[DR06750(ALL)01/95] *[DR06755(ALL)01/95] *[DR06760(ALL)01/95] %*[DR06765(ALL)04/95]
*[DR06770(ALL)01/95]
[DR06775(ALL)11/94]
[DR06780(ALL)11/94]
*[DR06781(ALL)07/95]
*[DR06783(ALL)09/95]
To operate:
1. Start the engine.
2. Depress and hold the brake pedal.
3. Move the gearshift lever out of P (Park).
Your vehicle is equipped with a Brake Shift Interlock safety feature. This feature prevents the gearshift from being moved from the P (Park) position until the brake pedal is depressed. This feature is active when the ignition is in the ON position. If the gearshift lever CANNOT be moved from P (Park) with the brake pedal depressed:
1. Turn the engine off and remove the ignition
key.
2. Reinsert the ignition key and turn clockwise
to the first position (OFF).
3. Depress the brake pedal, move the gearshift
lever to N (Neutral) and start the engine.
If you need to shift out of P (Park) by using the alternate procedure described above, it is possible that a fuse has blown and that your brakelamps may also not be functional. Please refer to the chapter titled Servicing Your Taurus in this Owner Guide for instructions on checking and replacing fuses.
RWARNING
DO NOT DRIVE YOUR VEHICLE UNTIL YOU VERIFY THAT THE BRAKELAMPS ARE WORKING.
196
File:10fcdrt.ex Update:Mon Jan 22 15:59:33 1996
[DR06785(ALL)04/95] *[DR06787(ALL)04/95]
% [DR06788(ALL)04/95]
half page art:0001435-A
Using the gearshift
If your gearshift is on the column, you can use any of the following positions:
The column-mounted gearshift
197
File:10fcdrt.ex Update:Mon Jan 22 15:59:33 1996
[DR06789(ALL)04/95]
% [DR06790(ALL)04/95]
half page art:0001028-D
*[DR06791(ALL)04/95]
*[DR06793(ALL)11/94]
%*[DR06795(ALL)01/95] *[DR06800(ALL)08/95]
If your gearshift is on the console, you can use any of the following positions:
The console-mounted gearshift
The console-mounted gearshift will lock when you turn the key to the LOCK position. When the gearshift is in any position except P (Park), the ignition key cannot be turned to LOCK or removed from the steering column. TO REMOVE THE KEY, the gearshift lever must be in P (Park).
Once the gearshift is secure in the desired position, release the brake pedal and use the accelerator as necessary. R (Reverse)
With the gearshift in the R (Reverse) position, the vehicle will move backward. You should always come to a complete stop before shifting into or out of R (Reverse).
198
File:10fcdrt.ex Update:Mon Jan 22 15:59:33 1996
*[DR06802(ALL)01/95] *[DR06804(ALL)01/95]
%*[DR06805(ALL)01/95] %*[DR06825(ALL)05/95] *[DR06830(ALL)11/94]
*[DR06835(ALL)11/94]
[DR07025(ALL)04/95]
[DR07050(ALL)12/95]
[DR07075(ALL)04/95]
N (Neutral) With the gearshift in the N (Neutral) position, the vehicle can be started and is free to roll. Hold the brake pedal down while in this position. Driving When to use D (Overdrive) D (Overdrive) is the usual driving position for an automatic overdrive transaxle. It automatically upshifts or downshifts as the vehicle speeds or slows. However, D (Overdrive) also shifts into a fourth gear — an overdrive gear — when your vehicle cruises at a consistent speed for any length of time. This fourth gear will increase your fuel economy when you travel at cruising speeds. When to use D (O/D OFF) You will notice that there is only one drive position on your gearshift indicator (instead of Drive and Overdrive). However, you will find a switch labeled O/D located on the gearshift lever. Push in the switch and the O/D OFF light in the instrument cluster will illuminate. With the O/D OFF light illuminated, the transaxle will operate in first, second and third gears and will not shift into fourth gear. Operating in D (O/D OFF) eliminates the excessive shifting between third and fourth gears that your vehicle sometimes does when you are traveling through hilly terrain in D (Overdrive). It also provides more engine braking than D (Overdrive) for descending hills or city driving. To return the transaxle to the normal Overdrive operation, press the O/D OFF switch again. Use this switch to select Overdrive or D (O/D OFF) whenever you drive your vehicle.
199
File:10fcdrt.ex Update:Mon Jan 22 15:59:33 1996
[DR08050(ALL)09/95]
*[DR08075(ALL)10/95]
*[DR09025(ALL)01/95] [DR09050(ALL)11/94]
*[DR09075(ALL)06/95] *[DR10025(ALL)11/94] *[DR10050(ALL)11/94]
[DR10075(ALL)11/94]
*[DR10125(ALL)01/95] *[DR10150(ALL)11/94]
[DR10160(ALL)04/95]
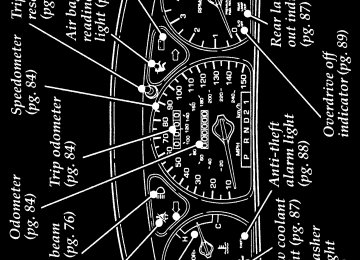
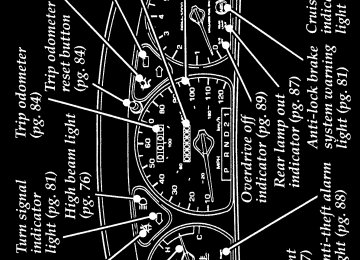
NOTE: If the O/D OFF indicator light is
flashing on and off repeatedly when the vehicle is started or does not come on when the O/D OFF switch is pushed, it means that there is a transaxle electronic system malfunction. You should contact your dealer as soon as possible or damage to the transaxle could occur.
The transaxle will be in the “overdrive on” mode when the vehicle is started even if the O/D OFF mode was selected when the vehicle was last shut off. When to use 2 (Second) Use Second for start-up on slippery roads or to give you more engine braking to slow your vehicle on downgrades. When to use 1 (First) Use 1 (First) when added engine braking is desired when descending steep hills. The automatic transaxle will shift to the proper gear to ascend any grade without any need to shift to 1 (First). Do not go faster than 38 mph (61 km/h) in this gear. You can upshift from 1 (First) to D (Overdrive) at any speed. P (Park) Always come to a complete stop before you shift into P (Park). Make sure that the gearshift is securely latched in P (Park). This locks the transaxle and prevents the front wheels from rotating. If your vehicle has a console mounted gearshift, the gearshift indicator in the cluster is illuminated in P (Park) only when the gearshift button is released.
200
File:10fcdrt.ex Update:Mon Jan 22 15:59:33 1996
*[DR10175(ALL)06/95]
*[DR10225(ALL)06/95]
[DR10275(ALL)11/94]
%*[DR15600(ALL)01/95] %*[DR15800(ALL)01/95]
[DR15970(ALL)11/94]
%*[DR16100(ALL)04/95]
*[DR16150(ALL)01/95]
RWARNING
Always set the parking brake fully and make sure the gearshift is securely latched in P (Park).
RWARNING
Never leave your vehicle unattended while it is running.
You can tell a console-mounted gearshift is securely latched in P (Park) if you cannot move it without pushing in the thumb button. Steering Your Vehicle Your vehicle comes with power steering. Power steering uses energy from the engine to help steer your vehicle.
Your vehicle has variable-assist steering. This system provides light power steering efforts for parking and heavier power steering efforts for highway driving. If you notice that the power steering effort does not change according to the speed you are traveling, or if the power steering system is not working, have the system checked.
If the amount of effort needed to steer your vehicle changes at a constant vehicle speed, have the power steering system checked. If the power steering system breaks down (or if the engine is turned off), you can steer the vehicle manually but it takes more effort.
Never hold the steering wheel to the extreme right or left for more than five seconds if the engine is running. This can damage the power steering pump.
201
File:10fcdrt.ex Update:Mon Jan 22 15:59:33 1996
[DR16170( T)10/95]
[DR16190( T)12/95]
%*[DR16200(ALL)03/95] %*[DR16300(ALL)01/95] *[DR16450(ALL)05/95]
*[DR16500(ALL)05/95]
*[DR16700(ALL)05/95]
*[DR16800(ALL)05/95]
*[DR16900(ALL)05/95]
Semi-Active Ride Control (SHO only) Your vehicle is equipped with a semi-active ride control suspension system. Ride and handling is enhanced by firm shock absorber performance during certain road conditions and handling maneuvers. The shock absorber is returned to a softer performance when driver or road surface induced motion ceases. This system is automatic with no direct driver input required. Brakes Applying the Brakes
Your vehicle may have four-wheel power anti-lock disc brakes which adjust automatically through everyday use.
Some models have power front disc brakes and rear drum brakes which automatically adjust as the brake pads and linings wear down.
If your vehicle does not have anti-lock brakes, apply the brake pedal gradually. Use the “squeeze” technique — push on the brake pedal with a steadily increasing force. This allows the wheels to continue to roll while you are slowing down, which lets you steer properly.
If your vehicle does not have anti-lock brakes, extreme braking can make the wheels lock and slide, causing you to lose control of the steering. If the wheels lock, release the brake pedal and repeat the “squeeze” technique.
Do not drive with your foot resting on the brake pedal; you will wear out the linings and increase your vehicle’s stopping distance. Brake rotor damage may also eventually occur.
202
File:10fcdrt.ex Update:Mon Jan 22 15:59:33 1996
*[DR17000(ALL)09/95]
%*[DR17100(ALL)10/95]
% [DR17350(ALL)02/95]
*[DR17450(ALL)05/95]
*[DR17500(ALL)05/95]
NOTE: If you are driving down a long or
steep hill, shift to a lower gear and do not apply your brakes continuously. If you apply your brakes continuously, they may overheat and become less effective.
Occasional brake squeal during light to moderate stops does not affect the function of the brake system and is normal. However, if the squeal becomes louder or more frequent, have your brakes inspected by your dealer or a qualified service technician. Anti-lock Brake System (ABS) (If equipped)
If your vehicle is equipped with the anti-lock brake system (ABS), the wheels will not lock and slide when you press down hard on the brake pedal. The ABS automatically starts releasing and reapplying the front brakes independently and the rear brakes together whenever your vehicle’s wheels start to lock. When this happens, you will feel the brake pedal pulsate. This is an indication that the ABS is working correctly and is normal.
If the brake pedal is applied while the vehicle is driven over uneven road surfaces, the ABS may cycle and the driver may sense a pulsation in the brake pedal, accompanied by a slight up and down movement of the pedal height and a clicking sound. This may also happen when driving on an inclined surface such as a driveway while making a sharp turn. This is a normal condition.
203
File:10fcdrt.ex Update:Mon Jan 22 15:59:33 1996
*[DR17600(ALL)05/95]
*[DR17650(ALL)05/95]
[DR17675(ALL)02/95]
*[DR17700(ALL)08/95]
Each time you turn the ignition key to the ON position, the ABS will function through one test cycle. When this happens, the ABS light will come on for up to five seconds. If the light stays on longer than five seconds, shut off the engine and restart. If it remains on, it means the ABS is disabled and should be serviced immediately to restore the benefits of the anti-lock feature. Normal braking is not affected unless the red BRAKE system warning light is also lit.
ABS has self-check capabilities. As described above, the system turns on the ABS light each time you start your engine. After the engine is started and the ABS light turns off, the system performs another test the first time the vehicle reaches 4-9 mph (6-15 km/h). The system turns on the ABS pump motor for approximately 1/2
second. At this time, a mechanical noise may be heard. This is a normal part of the self-check feature. If a malfunction is found during this check the ABS light will come on.Vehicles with ABS are identified with a label on the front door pillar.
Ford Motor Company has not found any negative effects of mobile radio transmitting equipment installed on vehicles with the ABS system providing that the radio is installed according to the radio manufacturer’s instructions. However, if you have had a mobile radio transmitter installed and the ABS light comes on (at any time other than immediately after turning the key to the ON position) have your mobile radio dealer inspect the radio installation. Also, if the ABS system is activated other than during maximum braking, have your mobile radio installation checked.
204
File:10fcdrt.ex Update:Mon Jan 22 15:59:33 1996
%*[DR17800(ALL)03/95] *[DR17900(ALL)01/95]
[DR18000(ALL)01/95]
[DR18300(ALL)11/94]
one third page art:0001391-A
*[DR18420(ALL)06/95]
*[DR18700(ALL)01/93]
*[DR18750(ALL)11/91]
Parking Brake
The parking brake should be used whenever you park your vehicle.
This brake is suspended just below the bottom of the instrument panel to the left of the brake pedal.
The parking brake and parking brake release
RWARNING
Always set the parking brake fully and make sure the gearshift is securely latched in P (Park).
RWARNING
If the parking brake is fully released, but the Brake System light remains on, have the brakes checked immediately. They may not be working properly.
RWARNING
To prevent personal injury, do not release the parking brake while outside the vehicle.
205
File:10fcdrt.ex Update:Mon Jan 22 15:59:33 1996
*[DR19000(ALL)06/95]
*[DR19050(ALL)03/95]
%*[DR19100(ALL)01/95] %*[DR19200(ALL)01/95] *[DR19300(ALL)07/95]
*[DR19400(ALL)03/95]
%*[DR19750(ALL)01/95] %*[DR19800(ALL)01/95] *[DR19900(ALL)03/95]
The parking brake is not designed to stop a moving vehicle, but you can use the parking brake to stop your vehicle in an emergency if the normal brakes fail. However, since the parking brake applies only the rear brakes, the stopping distance will increase greatly and the handling of your vehicle will be adversely affected.
Always check the Brake Warning Light each time you start your engine. Driving with the parking brake on will cause the brakes to wear out quickly and will reduce the fuel economy. Driving Under Special Conditions Tips for Safe Driving
As with any new vehicle, yours may drive and handle differently from your previous vehicle. Use care until you become accustomed to its various features and driving characteristics.
Operate your vehicle within reasonable limits. Sudden acceleration, deceleration, turning, or combinations of these maneuvers can cause a vehicle to behave differently than anticipated. Driving in Bad Weather
Slippery roads
On some slippery road surfaces, front-wheel drive may provide better acceleration than rear-wheel drive. However, this does not mean that your vehicle can stop any faster or any better than a vehicle with rear-wheel drive. Exercise the same caution while driving on slippery roads with your front-wheel drive vehicle as you would with a rear-wheel drive vehicle.
206
File:10fcdrt.ex Update:Mon Jan 22 15:59:33 1996
*[DR20100(ALL)03/95]
*[DR20200(ALL)01/95] *[DR20400(ALL)01/95] *[DR20500(ALL)03/92]
*[DR20600(ALL)02/93] *[DR20750(ALL)07/95]
*[DR20775(ALL)03/95]
*[DR20850(ALL)01/95]
*[DR20900(ALL)05/95]
q Do not quickly move the steering wheel
unless necessary.
q Drive slower than you normally would. q Give your vehicle more distance to stop. q Pump the brake pedal steadily and evenly to avoid locking your wheels. (Does not apply to vehicles with anti-lock brakes.)
q Consider using one of the lower gears.
RWARNING
To avoid skidding and losing control on slippery roads, do not downshift into 1
(First) when you are moving faster than 20 mph (30 km/h).RWARNING
If your vehicle has speed control, do not use it on slippery roads. You could lose control of your vehicle and could injure someone.
If your vehicle gets stuck (for example, in mud or snow), you may try to “rock” it out of the spot. Shift, in a steady rhythm, between forward and reverse gears. While in each gear, press lightly on the accelerator and release.
RWARNING
Do not spin the wheels at over 35 mph (55 km/h). The tires may fail and injure a passenger or bystander.
207
File:10fcdrt.ex Update:Mon Jan 22 15:59:33 1996
*[DR21000(ALL)03/95]
%*[DR21200(ALL)01/95] *[DR21300(ALL)01/95]
*[DR21400(ALL)04/94]
*[DR21500(ALL)01/95]
%*[DR21600(ALL)03/95] *[DR21700(ALL)01/95]
%*[DR21800(ALL)01/95]
By moving the vehicle backward and forward, you may gain enough momentum to move out of the spot. Do not rock the vehicle for more than a few minutes. This may overheat the engine, damage the transaxle, or damage the tires. If you are still stuck after a minute or two of rocking, call for a tow truck.
High water
Do not drive through flooded areas unless you are sure that the water is below the bottom of the wheel rims.
If you must drive through high water, drive slowly. You may have limited traction or wet brakes, so allow extra stopping distance because your vehicle will not stop as quickly as usual.
After you drive through the standing water, apply your brakes gently several times as your vehicle moves slowly. This helps to dry the brakes. Driving With a Heavy Load There are limits to the amount of weight your vehicle can carry or tow. The total weight of your vehicle, plus the weight of the passengers and cargo, should never be more than the Gross Vehicle Weight Rating (GVWR). Also, the weight that your vehicle carries over the front axle and rear axle should never be more than the Gross Axle Weight Rating (GAWR) for the respective axle.
You can find your vehicle’s GVWR and GAWR on the Safety Compliance Certification Label on the left front door lock facing or on the door latch post pillar.
208
File:10fcdrt.ex Update:Mon Jan 22 15:59:33 1996
*[DR21900(ALL)08/95]
*[DR22000(ALL)02/95]
%*[DR22005(ALL)01/95] *[DR22010(ALL)01/95]
*[DR22015(ALL)01/95]
*[DR22020(ALL)01/95] *[DR22025(ALL)01/95]
*[DR22030(ALL)01/95] *[DR22035(ALL)01/95]
The weight limits of your vehicle’s tires affect the GVWR or GAWR limitations. Usage of replacement tires with higher weight limits than originals does not increase GVWR or GAWR. Usage of lower capacity replacement tires may lower GVWR and GAWR limitations.
RWARNING
If the GVWR or the GAWR specified on the Safety Compliance Certification Label is exceeded, your vehicle may be damaged or you may lose control and injure someone.
Limiting Your Vehicle’s Load
The load that you add to your vehicle must not exceed the maximum load stated on the Safety Compliance Certification Decal attached to the left front door pillar.
To figure the weight of your vehicle’s load, add the weights of:
the driver and passengers
luggage and any other items that you put in your vehicle
the tongue load of the loaded trailer
the weight of any equipment that has been added to your vehicle since it was delivered to your dealer
209
File:10fcdrt.ex Update:Mon Jan 22 15:59:33 1996
*[DR22040(ALL)01/95]
*[DR22045(ALL)01/95]
*[DR22050(ALL)01/95]
*[DR22055(ALL)01/95]
*[DR22060(ALL)01/95]
*[DR22065(ALL)01/95]
*[DR22070(ALL)01/95]
If you do not know the actual weights of these items, use the following procedure to figure the weight of a load:
1. Weigh your vehicle without the driver,
passengers and luggage. You might take your vehicle to a shipping company or an inspection station for trucks.
2. Then weigh your vehicle with the driver,
passengers and luggage.
3. Subtract the first reading from the second to
figure the total weight of the load.
After determining this load, you must also make sure that the total weight of your vehicle, plus the load it carries, is less than its GVWR. Also, make sure that the weight your vehicle carries over each axle is less than the GAWR for the respective axle.
You can find the GVWR and GAWR on the Safety Compliance Certification Label on the left front door lock facing or the door latch post pillar.
If your vehicle exceeds the GVWR, remove cargo from your vehicle accordingly. If your vehicle exceeds the GAWR for either axle, shift the load or remove cargo accordingly.
210
File:10fcdrt.ex Update:Mon Jan 22 15:59:33 1996
%*[DR22100(ALL)04/95] [DR22125(ALL)04/95]
[DR22150(ALL)04/95]
sixteen pica chart:0000489-H
[DR22190(ALL)10/95]
fourteen pica chart:0001436-C
Trailer Towing Your vehicle is classified as a light duty towing vehicle. The amount of weight that you can safely tow depends on the type of engine in your vehicle. See the following charts:
211
File:10fcdrt.ex Update:Mon Jan 22 15:59:33 1996
*[DR22200(ALL)01/95]
*[DR22300(ALL)01/95]
*[DR25800(ALL)11/92]
*[DR25900(ALL)01/95]
*[DR26000(ALL)01/95]
*[DR26100(ALL)01/95]
*[DR26150(ALL)05/94]
Your vehicle does not come from the factory fully equipped to tow. No towing packages are available through Ford or Lincoln/Mercury dealers.
Because towing a trailer puts extra strain on your vehicle, you must follow certain precautions for your safety and the good of your vehicle:
Stay within the load limits when you tow. (See Knowing Your Vehicle’s Load Limits.) q Carefully and thoroughly prepare your
vehicle for towing, making sure to use the right equipment and to attach it properly. (See Preparing to Tow in this chapter.)
q Use extra caution when driving your vehicle while you tow. (See Driving while you tow in this chapter.)
Service your vehicle more frequently if you tow a trailer. (See Servicing your vehicle if you tow in this chapter.)
Do not tow a trailer until your vehicle has been driven at least 500 miles (800 km).
212
File:10fcdrt.ex Update:Mon Jan 22 15:59:33 1996
*[DR26500(ALL)06/95]
*[DR26580(ALL)05/95]
*[DR26600(ALL)01/95]
*[DR28500(ALL)01/95] *[DR28600(ALL)01/95]
*[DR28700(ALL)01/95]
RWARNING
Towing trailers beyond the maximum recommended gross trailer weight exceeds the limits of the vehicle and could result in engine damage, transaxle/axle damage, structural damage, loss of control, and personal injury.
RWARNING
Do not tow a trailer when the temporary spare tire is being used.
Ten to 15% of the loaded trailer’s weight should be on the tongue. However, the tongue load should never exceed 10% of the maximum weight that your vehicle can safely tow. Preparing to Tow
For your safety and for the good of your vehicle, use the right equipment for the type of trailer you tow. Also, make sure that all towing equipment is properly attached to your vehicle. If you are not certain that you are using the right equipment in the proper manner, see your Ford or Lincoln-Mercury dealer.
Do not use hitches that clamp onto your vehicle’s bumper. The bumper is not designed to bear the load.
213
File:10fcdrt.ex Update:Mon Jan 22 15:59:33 1996
%*[DR28750(ALL)01/95] *[DR28800(ALL)05/94]
*[DR28900(ALL)01/95]
%*[DR28950(ALL)01/95] *[DR29000(ALL)01/95]
*[DR29100(ALL)01/95] *[DR29200(ALL)01/95]
*[DR29300(ALL)01/95]
*[DR29400(ALL)01/95]
Using the hitch
Your vehicle uses a load carrying hitch. Because this type of hitch places the tongue load of a trailer on the rear wheels of your vehicle, you must distribute the load in your trailer so that 10 to 15% of the total weight of the trailer is on the tongue.
Tie down the load so that it does not shift and change the weight on the hitch. This will prevent damage to your vehicle and make your vehicle easier to handle.
Connecting the safety chains
Always attach the trailer’s safety chains to your vehicle. They help protect your trailer if the hitch breaks.
To connect the trailer’s safety chains:
1. Cross the chains under the trailer tongue
and attach them to your vehicle’s frame or hook retainers. Never attach the safety chains to your vehicle’s bumper. The bumper is not designed to bear the weight of a trailer.
2. Make sure that you leave enough slack in
the chains to allow you to turn corners.
If you use a rental trailer, follow the instructions that the rental agency gives you.
214
File:10fcdrt.ex Update:Mon Jan 22 15:59:33 1996
%*[DR29450(ALL)01/95] *[DR29500(ALL)01/95]
*[DR29600(ALL)05/95]
%*[DR29650(ALL)01/95] *[DR29700(ALL)01/95]
*[DR29800(ALL)01/95]
Connecting the trailer’s brakes Electric brakes and manual, automatic, or surge-type hydraulic brakes are safe if you install them properly and adjust them according to the manufacturer’s instructions. Be sure that your trailer’s brakes meet local and federal regulations.
RWARNING
Do not connect a trailer’s hydraulic brake system directly to your vehicle’s brake system. Your vehicle may not have enough braking power and your chances of having a collision greatly increase.
Connecting the trailer’s lights Do not connect a trailer’s lighting system wiring directly to your vehicle’s lighting system wiring. To get the proper equipment for hooking up your trailer’s lights, see your local trailer dealer and your Ford dealer. Be sure to follow their instructions carefully. If you do not install trailer lights correctly, you may cause damage to the vehicle’s lighting system.
215
File:10fcdrt.ex Update:Mon Jan 22 15:59:33 1996
%*[DR29900(ALL)01/95] *[DR30000(ALL)05/95]
[DR30175(ALL)04/95]
[DR30200(ALL)04/95]
%*[DR30300(ALL)01/95]
% [DR30400(ALL)04/95] *[DR30500(ALL)08/93]
Driving While You Tow Be especially careful when driving while you tow a trailer. Never drive faster than 45 mph (70 km/h) when you tow in hilly country on hot days. Also, anticipate stops so that you can brake gradually. When you tow in steep hills, move the automatic transaxle to 1 (First) (vehicles without O/D OFF switch) or 2 (Second) (vehicles with O/D OFF switch) when descending. This will give more engine braking on downgrades. The automatic transaxle will automatically downshift to the proper gear on upgrades. If you tow in Overdrive while riding through hilly country, your vehicle may frequently shift between Overdrive and Third gears. To prevent your vehicle from shifting too much, move the gearshift to D (Drive) (column shift without O/D OFF switch) or push the O/D OFF switch (column or console shift). This will also give better braking going down hills. If you use the speed control while you are towing on very long, steep grades, the speed control may shut off. Servicing Your Vehicle When You Tow If you tow a trailer for a long distance, your vehicle will need to be serviced more frequently than usual. Refer to the Maintenance Schedule and Record booklet for additional information.
216
File:12fcret.ex Update:Mon Jan 22 16:01:15 1996
%*[RE00310(ALL)03/95]
*[RE00320(ALL)08/95]
*[RE00400(ALL)02/95]
*[RE00500(ALL)02/95]
%*[RE00700(ALL)06/95]
%*[RE00800(ALL)07/95]
Roadside Emergencies
If Your Vehicle Needs a Jump-Start Your vehicle’s battery may die if you leave the lights on or any electrical equipment on after you turn the engine off. If this happens, you may be able to jump-start your vehicle with a booster battery.
RWARNING
The gases around the battery can explode if exposed to flames, sparks, or lit cigarettes. An explosion could result in injury or vehicle damage.
RWARNING
To protect yourself when charging a battery, always shield your face and eyes. Make sure that you can breathe fresh air.
RWARNING
Applying too much pressure on the ends when lifting a battery could cause acid to spill. Lift the battery with a carrier or with your hands on the opposite corners.
RWARNING
Batteries contain sulfuric acid which burns skin, eyes, and clothing.
217
File:12fcret.ex Update:Mon Jan 22 16:01:15 1996
*[RE00850(ALL)07/95]
*[RE00900(ALL)03/95]
*[RE01000(ALL)03/95] *[RE01100(ALL)03/95]
*[RE01200(ALL)03/95]
*[RE01300(ALL)04/95]
*[RE01400(ALL)03/95]
[RE01500(ALL)04/95]
If the acid touches someone’s skin, eyes, or clothing, immediately flush the area with water for at least 15 minutes. If someone swallows the acid, have him or her drink lots of milk or water first, then Milk of Magnesia, a beaten egg, or vegetable oil. Call a doctor immediately.
To avoid damaging your vehicle or your battery, and to avoid injury to yourself, follow these directions for preparing your vehicle to jump-start and connecting the jumper cables in the order they are given. If in doubt, call for road service. Preparing Your Vehicle
1. Your vehicle has a 12-volt starting system, so
you need to use a 12-volt jumper system. You will damage your starting motor, ignition system, and other electrical parts if you connect them to a 24-volt power supply (either two 12-volt batteries in series or a 24-volt generator set).
2. Do not disconnect the battery of the disabled
vehicle. You could damage the vehicle’s electrical system.
3. Park the booster vehicle close to the hood of the disabled vehicle. Make sure the vehicles do not touch each other. Set the parking brake on both vehicles and stay clear of the engine cooling fan and other moving parts.
4. Check all battery terminals and remove any
excessive corrosion before you attach the jumper cables.
5. Turn on the heater fan in both vehicles. If
you have electronic climate control, press the V F-DEF button. Turn off all other switches and lights.
218
File:12fcret.ex Update:Mon Jan 22 16:01:15 1996
%*[RE01700(ALL)05/95] *[RE02500(ALL)03/95]
*[RE02600(ALL)04/95]
*[RE02700(ALL)07/95]
*[RE02800(ALL)04/95]
*[RE02900(ALL)07/95]
Connecting the jumper cables
1. Connect one end of the first jumper cable to
the positive (+) terminal of the discharged battery. (You can connect either jumper cable to the positive (+) terminal, as long as you use the same cable for both positive terminals.) Most jumper cables have a red cable and a black cable. The red cable is generally used for the positive terminals and the black for the negative ones.
2. Connect the other end of the first cable to
the positive (+) terminal of the booster battery.
3. Connect one end of the second cable to the negative (앥) terminal of the booster battery — NOT to the discharged battery.
4. Connect the other end of the second cable to
a good metallic surface on the engine or frame of the disabled vehicle.
RWARNING
Do not connect the end of the second cable to the negative (앥) terminal of the battery to be jumped. A spark may cause an explosion of the gases that surround the battery.
219
File:12fcret.ex Update:Mon Jan 22 16:01:15 1996
[RE03100(ALL)04/95]
one third page art:0000388-D
[RE03200( T)02/95]
Jumper cable connections
half page art:0000390-C
The 3.4L SHO engine
220
File:12fcret.ex Update:Mon Jan 22 16:01:15 1996
*[RE03400(ALL)03/95] *[RE03600(ALL)03/95]
*[RE03700(ALL)03/95]
*[RE03800(ALL)03/95]
%*[RE03900(ALL)03/95] *[RE04000(ALL)03/95]
*[RE04100(ALL)06/95]
*[RE04200(ALL)06/95]
*[RE04300(ALL)05/95]
*[RE04400(ALL)11/95]
Jump-Starting
1. Make sure that the jumper cables are not in the way of moving engine parts, then start the booster vehicle. Run the engine at a moderate speed.
2. Let the discharged battery charge for a few minutes and then start the disabled vehicle. It may take a couple of tries before the vehicle starts. If the vehicle does not start after several attempts, there may be a different problem.
3. When both vehicles are running, let them
idle for a few minutes to charge the discharged battery.
Removing jumper cables
1. Always remove the jumper cables in the
reverse order. Remove the negative (앥) end of the jumper cable from the metallic surface on the engine or frame of the disabled vehicle.
2. Remove the negative (앥) cable from the
booster battery.
3. Remove the positive (+) cable from the
booster battery.
4. Remove the other end of the positive (+)
cable from the discharged battery.
After the vehicle is started, let it idle for a while to let the engine “relearn” its idle conditions. Drive it around for a while with all electrical accessories turned off to let the battery recharge. Driveability may be deteriorated slightly until all drive modes are “relearned.” You may need to use a battery charger to fully recharge the battery.
221
File:12fcret.ex Update:Mon Jan 22 16:01:15 1996
*[RE04450(ALL)03/95]
%*[RE04500(ALL)03/95] *[RE04600(ALL)01/95]
[RE04610(ALL)01/95]
%*[RE04700(ALL)03/95] *[RE04800(ALL)03/95]
*[RE04900(ALL)01/93]
If you need to replace your battery, see Battery in the Servicing Your Vehicle chapter. Changing a Tire If you get a flat tire while you are driving, do not apply the brake heavily. Instead, gradually decrease the speed. Hold the steering wheel firmly and slowly move to a safe place on the side of the road. Park on a level spot, turn off the ignition, set the parking brake, and turn on the hazard flashers.
NOTE: Tire sealants that are injected through
the valve stem are not to be used to service punctured tires because they can produce wheel rust and tire imbalance.
The Temporary Spare Tire
You may have a high pressure temporary spare tire. This spare tire is smaller than a regular tire and is designed for emergency use only. Use it only when you get a flat tire and replace it as soon as you can. This spare tire is marked with the words “TEMPORARY USE ONLY” so that you can easily identify it.
RWARNING
If you use the temporary spare tire continuously or do not follow these precautions, the tire could fail, causing you to lose control of the vehicle, possibly injuring yourself or others.
222
File:12fcret.ex Update:Mon Jan 22 16:01:15 1996
*[RE05000(ALL)01/95]
*[RE05100(ALL)01/95]