- Download PDF Manual
-
when the vehicle is in motion and block your vision. Failure to follow this warning could result in serious injury or death.
CAUTION!
To prevent possible damage, do not slam the hood to close it. Lower the hood until it is open approxi- mately 8 in (20 cm) and then drop it. This should secure both latches. Never drive your vehicle unless the hood is fully closed, with both latches engaged.
100 UNDERSTANDING THE FEATURES OF YOUR VEHICLE LIGHTS Multifunction Lever The multifunction lever, located on the left side of the steering wheel, controls the operation of the headlights, headlight beam selection, passing light and turn signals. NOTE: The external lights can only be turned on with the ignition in the ON/RUN position. Headlights
Rotate the end of the multifunction lever up- ward to the first detent for headlight operation.
Headlight Operation
NOTE: When the headlights are turned on, the Daytime Running Lights will be deactivated.
High Beams
With the low beams activated, push the multifunc- tion lever towards the instrument panel to turn on the high beams. Pull the multifunction lever toward the steering wheel to turn off the high beams. Flash-To-Pass You can signal another vehicle with your headlights by lightly pulling the multifunction lever toward the steer- ing wheel. This will turn on the high beams until the lever is released. Parking Lights
To turn on the parking lights, remove the key or turn the ignition to OFF/LOCK position and turn on the headlights.
UNDERSTANDING THE FEATURES OF YOUR VEHICLE 101
Daytime Running Lights — If Equipped To activate the Daytime Running Lights (DRL), rotate the end of the multifunction lever to the O symbol. NOTE: The low beams and side/taillights will not be on with DRL. The DRL function can be turned on or off using the display menus. Refer to “Electronic Vehicle Information Center (EVIC)” in “Understanding Your Instrument Panel” for further information.
102 UNDERSTANDING THE FEATURES OF YOUR VEHICLE Turn Signals Push the multifunction lever upward to signal a right turn or downward to signal a left turn. The correspond- ing indicator in the instrument cluster will blink to indicate the operation of the turn signal.
Turn Signal Operation
NOTE: The indicators will automatically turn off when the turn has been completed and the steering wheel is returned to a straight position. Lane Change Assist Tap the lever up or down once, without moving beyond the detent, and the turn signal (right or left) will flash three times then automatically turn off. Follow Me Home/Headlight Delay When this feature is selected the driver can choose to have the headlights remain on for a preset period of time. Activation Remove the key or turn the ignition to the OFF/LOCK position, and pull the multifunction lever toward the steering wheel, within two minutes. Each time the lever is pulled, the activation of the lights will be extended by 30 seconds. The activation of the lights can be extended to a maximum of 210 seconds.
Deactivation Pull the multifunction lever toward the steering wheel and hold it for more than two seconds. Interior Lights The interior light switches are located in the overhead console. The interior lights can be set to three different positions (Off/Left Position, Center Position, On/Right Position). Using the switch on the left overhead, press the switch to the right from its center position and the lights are always on. Press the switch to the left from its center position and the lights are always off. Leave the switch in the center position, and the lights are turned on and off when the doors are opened or closed. The switch on the right side of the overhead console controls the map or reading function of the lights. Press the switch to the right to turn on the right light and press the switch to the left to turn on the left light.
UNDERSTANDING THE FEATURES OF YOUR VEHICLE 103
CAUTION!
Before getting out of the vehicle be sure that the switch is in the center position or that the lights are off to avoid draining the battery.
Interior Light Timing (Center Position) There are four different modes of operation that can be activated in this position: • When one door is opened a 3 minute timer is activated. • When the key is removed from the ignition (within two minutes of the ignition being turned off), a 10 second timer is activated.
• When the doors are unlocked with Key Fob a 10 sec-
ond timer is activated.
• When the doors are locked with the Key Fob the lights
will turn off.
104 UNDERSTANDING THE FEATURES OF YOUR VEHICLE Interior Light Timing (On/Right Position) • When all doors are closed a 15 minute timer is
activated.
NOTE: The timer is deactivated when the key is moved into the ON/RUN position. Front Fog Lights — If Equipped The fog light switch is located on the center stack of the instrument panel, just below the radio.
Fog Light Switch
Press the switch once to turn the front fog lights on. Press the switch a second time to turn the front fog lights off.
WINDSHIELD WIPERS AND WASHERS The windshield wiper/washer lever is located on the right side of the steering column. NOTE: The windshield wipers/washers will only oper- ate with the ignition in the ON/RUN position. Front Windshield Wiper Operation There are five different modes of operation for the front windshield wipers. The windshield wiper lever can be raised or lowered to access these modes:
UNDERSTANDING THE FEATURES OF YOUR VEHICLE 105
Windshield Wiper Operation
Windshield Wiper Off This is the normal position of the wiper lever. Intermittent Wiper Operation Push the lever downward to the first detent. The wipers will operate intermittently.
106 UNDERSTANDING THE FEATURES OF YOUR VEHICLE NOTE: The Intermittent function only has one detent but wiper delay will vary with changes in vehicle speed. As vehicle speed increases the delay time will decrease. Low Speed Push the lever downward to the second detent. The wipers will operate at low speed. High Speed Push the lever downward to the third detent. The wipers will operate at high speed. Manual High Speed/Mist Push the lever upward from the off position. The wipers will operate at high speed to clear off road mist or spray from a passing vehicle. This operation will continue until the lever is released. When the lever is released, the wipers will return to the off position and automatically shut off.
Front Windshield Washer Operation Pull the windshield wiper/washer lever toward the steering wheel to activate the washers. The wipers will activate automatically for three cycles after the lever is released.
CAUTION!
• Turn the windshield wipers off when driving through an automatic car wash. Damage to the windshield wipers may result if the wiper control is left in any position other than off.
• In cold weather, always turn off the wiper switch and allow the wipers to return to the “Park” position before turning off the engine. If the wiper switch is left on and the wipers freeze to the windshield, damage to the wiper motor may occur when the vehicle is restarted.
(Continued)
CAUTION! (Continued)
• Always remove any buildup of snow that prevents the windshield wiper blades from returning to the off position. If the windshield wiper control is turned off and the blades cannot return to the off position, damage to the wiper motor may occur.
Rear Windshield Wiper Rotate the end of the windshield wiper/washer lever upward to the first detent past the intermittent settings for intermittent wipe operation. With the front wind- shield wiper active, rotate the end of the windshield wiper/washer lever upward. The rear wiper will operate in the same mode as the front windshield wipers, but at half the frequency. When the transmission is shifted into REVERSE, the rear wiper will automatically operate at Low Speed and return to normal operation when the transmission is shifted out of REVERSE.
UNDERSTANDING THE FEATURES OF YOUR VEHICLE 107
Rear Wiper Operation
NOTE: The windshield wipers/washers will only oper- ate with the ignition in the ON/RUN position.
108 UNDERSTANDING THE FEATURES OF YOUR VEHICLE Rear Windshield Washer Operation Push the windshield wiper/washer lever toward the instrument panel to activate the rear washer. Push and hold the lever for more than a half second and the wipers will activate automatically for three cycles after the lever is released. TILT STEERING COLUMN — IF EQUIPPED This feature allows you to tilt the steering column upward or downward. The tilt control lever is located on the left-side of the steering column, below the turn signal controls.
Tilt Control Lever
Push down on the lever to unlock the column. With one hand firmly on the steering wheel, move the steering column up or down as desired. Push the lever up to lock the column firmly in place.
WARNING!
Do not adjust the steering column while driving. Adjusting the steering column while driving or driv- ing with the steering column unlocked, could cause the driver to lose control of the vehicle. Be sure the steering column is locked before driving your ve- hicle. Failure to follow this warning may result in serious injury or death.
ELECTRONIC SPEED CONTROL When engaged, the Electronic Speed Control takes over accelerator operations at speeds greater than 25 mph (40 km/h). The Electronic Speed Control buttons are located on the right side of the steering wheel.
UNDERSTANDING THE FEATURES OF YOUR VEHICLE 109
Speed Control Buttons
In order to ensure proper operation, the Elec- NOTE: tronic Speed Control system has been designed to shut down if multiple Speed Control functions are operated at the same time. If this occurs, the Electronic Speed Control
110 UNDERSTANDING THE FEATURES OF YOUR VEHICLE system can be reactivated by pushing the Electronic Speed Control ON/OFF button and resetting the desired vehicle set speed. To Activate Push the ON/OFF button. The Cruise Indicator light in the instrument cluster will illuminate. To turn the system off, push the ON/OFF button a second time. The Cruise Indicator light will turn off. The system should be turned off when not in use.
WARNING!
Leaving the Electronic Speed Control system on when not in use is dangerous. You could accidentally set the system or cause it to go faster than you want. You could lose control and have an accident. Always leave the system OFF when you are not using it.
To Set A Desired Speed Turn the Electronic Speed Control ON. When the vehicle has reached the desired speed, press the SET (-) button and release. Release the accelerator and the vehicle will operate at the selected speed. NOTE: The vehicle should be traveling at a steady speed and on level ground before pressing the SET button. To Deactivate A soft tap on the brake pedal, pushing the CANC button, or normal brake pressure while slowing the vehicle will deactivate Electronic Speed Control without erasing the set speed memory. Pressing the ON/OFF button or turning the ignition switch OFF erases the set speed memory.
To Resume Speed To resume a previously set speed, push the RES (+) button and release. Resume can be used at any speed above 20 mph (32 km/h). To Vary The Speed Setting When the Electronic Speed Control is set, you can in- crease speed by pushing the RES (+) button. If the button is continually pressed, the set speed will continue to increase until the button is released, then the new set speed will be established. Pressing the RES (+) button once will result in a 1 mph (2 km/h) increase in set speed. Each subsequent tap of the button results in an increase of 1 mph (2 km/h).
UNDERSTANDING THE FEATURES OF YOUR VEHICLE 111
To decrease speed while the Electronic Speed Control is set, push the SET (-) button. If the button is continually held in the SET (-) position, the set speed will continue to decrease until the button is released. Release the button when the desired speed is reached, and the new set speed will be established. Pressing the SET (-) button once will result in a 1 mph (2 km/h) decrease in set speed. Each subsequent tap of the button results in a decrease of 1 mph (2 km/h). To Accelerate For Passing Press the accelerator as you would normally. When the pedal is released, the vehicle will return to the set speed.112 UNDERSTANDING THE FEATURES OF YOUR VEHICLE Using Electronic Speed Control On Hills The transmission may downshift on hills to maintain the vehicle set speed. NOTE: The Electronic Speed Control system maintains speed up and down hills. A slight speed change on moderate hills is normal. On steep hills, a greater speed loss or gain may occur so it may be preferable to drive without Electronic Speed Control.
WARNING!
Electronic Speed Control can be dangerous where the system cannot maintain a constant speed. Your ve- hicle could go too fast for the conditions, and you could lose control and have an accident. Do not use Electronic Speed Control in heavy traffic or on roads that are winding, icy, snow-covered or slippery.
REAR PARK ASSIST — IF EQUIPPED The Rear Park Assist system provides an audible indica- tion of the distance between the rear fascia/bumper and a detected obstacle when backing up, e.g. during a parking maneuver. Refer to the “Park Assist System Usage Precautions” for the limitations of this system and recommendations. Rear Park Assist is automatically activated when the transmission is placed into REVERSE. As the distance from an obstacle behind the vehicle decreases, the au- dible alert becomes more frequent.
Rear Park Assist Sensors The four Rear Park Assist sensors, located in the rear fascia/bumper, monitor the area behind the vehicle that is within the sensors’ field of view. The sensors can detect obstacles, in the horizontal direction, from approximately 12 in (30 cm) up to 55 in (140 cm) from the center of the rear fascia/bumper and up to 24 in (60 cm) from the corners of the rear fascia/bumper, depending on the location, type and orientation of the obstacle. If several obstacles are detected, the Rear Park Assist system indicates the nearest obstacle. The minimum height of a detectable obstacle corre- sponds to the maximum height of an obstacle that would clear the underside of the car during the parking maneuver.
UNDERSTANDING THE FEATURES OF YOUR VEHICLE 113
Rear Park Assist Alerts If an obstacle is behind the vehicle when REVERSE gear is engaged, an audible alert is activated. The tones emitted by the loudspeaker inform the driver that the vehicle is approaching an obstacle. The pauses between the tones are directly proportional to the dis- tance from the obstacle. Pulses emitted in quick succes- sion indicate the presence of a very close obstacle. A continuous tone indicates that the obstacle is less than 12 in (30 cm) away.
114 UNDERSTANDING THE FEATURES OF YOUR VEHICLE Audible And Visual Signals Supplied By The Rear Park Assist System.
SIGNAL
MEANING
INDICATION
Obstacle Distance
An obstacle is present within the
sensors’ field of view
Failure
Sensor or System failures
Audible signal (dashboard loudspeaker) • Sound pulses emitted at a rate that in- creases as the distance decreases. • Emits continuous tone at 12 in (30 cm) • Adjustable volume level. (Refer to “Menu Functions” for further information). Visual Signal (instrument panel) • Icon appears on display. • Message is displayed on multifunction display (where provided).
While audible signals are emitted, the audio system is not muted. The audible signal is cut out immediately if the distance increases. The tone cycle remains constant if the distance
measured by the inner sensors is constant. If this condi- tion occurs for the external sensors, the signal is cut off after 3 seconds (stopping warnings during maneuvers parallel to walls).
Failure Indications A malfunction of the Rear Park Assist sensors or system is indicated, during REVERSE gear engagement, by the instrument panel warning icon.
The warning icon is illuminated and a message is displayed on the multifunction display (if equipped). Refer to “Instrument Cluster De- scriptions” in “Understanding Your Instrument
Panel” for further information. The sensors and wiring are tested continuously when the ignition is in the ON/RUN position. Failures are indi- cated immediately if they occur when the system is ON. Even if the system is able to identify that a specific sensor is in failure condition, the instrument cluster display shall indicate that the Rear Park Assist system is unavail- able, without reference to the sensor in failure condition. If even a single sensor fails, the entire system must be disabled. The system is turned off automatically.
UNDERSTANDING THE FEATURES OF YOUR VEHICLE 115
Cleaning The Rear Park Assist System Clean the Rear Park Assist sensors with water, car wash soap and a soft cloth. Do not use rough or hard cloths. In washing stations, clean sensors quickly keeping the va- por jet/high pressure washing nozzles at least 4 in (10 cm) from the sensors. Do not scratch or poke the sensors. Otherwise, you could damage the sensors. Park Assist System Usage Precautions NOTE: • Ensure that the outer surface and the underside of the rear bumper is clean and clear of snow, ice, mud, dirt or other obstruction to keep the Rear Park Assist system operating properly.
• Jackhammers, large trucks, and other vibrations could
affect the performance of Rear Park Assist.
• Clean the Rear Park Assist sensors regularly, taking care not to scratch or damage them. The sensors must
116 UNDERSTANDING THE FEATURES OF YOUR VEHICLE
not be covered with ice, snow, slush, mud, dirt or debris. Failure to do so can result in the system not working properly. The Rear Park Assist system might not detect an obstacle behind the fascia/bumper, or it could provide a false indication that an obstacle is behind the fascia/bumper.
• Objects such as bicycle carriers, etc., must not be placed within 12 in (30 cm) from the rear fascia/ bumper while driving the vehicle. Failure to do so can result in the system misinterpreting a close object as a sensor problem, causing a failure indication to be displayed in the instrument cluster.
CAUTION!
• Rear Park Assist is only a parking aid and it is including unable to recognize every obstacle, small obstacles. Parking curbs might be temporar- ily detected or not detected at all. Obstacles lo- cated above or below the sensors will not be detected when they are in close proximity.
• The vehicle must be driven slowly when using Rear Park Assist in order to be able to stop in time when an obstacle is detected. It is recommended that the driver looks over his/her shoulder when using Rear Park Assist.
WARNING!
• Drivers must be careful when backing up even when using the Rear Park Assist system. Always check carefully behind your vehicle, look behind you, and be sure to check for pedestrians, animals, other vehicles, obstructions, and blind spots be- fore backing up. You are responsible for safety and must continue to pay attention to your surround- ings. Failure to do so can result in serious injury or death.
(Continued)
UNDERSTANDING THE FEATURES OF YOUR VEHICLE 117
WARNING! (Continued)
• Before using the Rear Park Assist system, it is strongly recommended that the ball mount and hitch ball assembly is disconnected from the ve- hicle when the vehicle is not used for towing. Failure to do so can result in injury or damage to vehicles or obstacles because the hitch ball will be much closer to the obstacle than the rear fascia when the loudspeaker sounds the continuous tone. Also, the sensors could detect the ball mount and hitch ball assembly, depending on its size and shape, giving a false indication that an obstacle is behind the vehicle.
118 UNDERSTANDING THE FEATURES OF YOUR VEHICLE POWER SUNROOF — IF EQUIPPED The power sunroof roof switch is located in the overhead console.
Power Sunroof Switch
WARNING!
• Never leave children in a vehicle with the key in the ignition switch. Occupants, particularly unat- tended children, can become entrapped by the power sunroof while operating the power sunroof switch. Such entrapment may result in serious injury or death.
• In a collision, there is a greater risk of being thrown from a vehicle with an open sunroof. You could also be seriously injured or killed. Always fasten your seat belt properly and make sure all passengers are properly secured.
• Do not allow small children to operate the sun- roof. Never allow your fingers, other body parts, or any object to project through the sunroof opening. Injury may result.
To Open Press and hold the power sunroof switch rearward for approximately one second and the sunroof will stop at the vented position. Press the switch a second time and hold for approximately one second and release, the sunroof will open fully, then stop automatically. This is called “Express Open”. During Express Open operation, any movement of the sunroof switch will stop the sunroof. To Close With the sunroof in the full open position, pull the power sunroof button and hold it for approximately one second, the sunroof will return to the vented position. Pull the switch a second time and hold for approximately one second to completely close the sunroof. Pinch Protect Override If a known obstruction (ice, debris, etc.) prevents the sunroof from closing, press the switch forward and hold
UNDERSTANDING THE FEATURES OF YOUR VEHICLE 119
for approximately one second after the reversal occurs. This allows the sunroof to move toward the closed position. NOTE: Pinch protection is disabled while the switch is pressed. Wind Buffeting Wind buffeting can be described as the perception of pressure on the ears or a helicopter-type sound in the ears. Your vehicle may exhibit wind buffeting with the windows down, or the sunroof (if equipped) is in certain open or partially open positions. This is a normal occur- rence and can be minimized. If the buffeting occurs with the rear windows open, open the front and rear windows together to minimize the buffeting. If the buffeting occurs with the sunroof open, adjust the sunroof opening to minimize the buffeting or open any window.120 UNDERSTANDING THE FEATURES OF YOUR VEHICLE Emergency Operation In case of electrical failure the sunroof can be operated with the hex wrench that is located in the glove box. There is a plug located in the rear of the sunroof opening at the center of the vehicle. Removing the plug reveals a hex opening in the motor assembly of the sunroof. Insert the hex wrench and turn, moving the sunroof to the desired location. Sun Shade — If Equipped For vehicles equipped with either a power sunroof or a fixed glass roof, there is a sun shade that can be open or closed. To open the sun shade press the tab and move the shade to a full open position.
Manual Sun Shade
ELECTRICAL POWER OUTLETS There is a standard 12 Volt (13 Amp) power outlet, located in the floor console, for added convenience. This power outlet can power mobile phones, electronics and other low power devices.
UNDERSTANDING THE FEATURES OF YOUR VEHICLE 121
Power is available when the ignition switch is in the ON/RUN or START position. Insert the cigar lighter or accessory plug into the outlet for use. To preserve the heating element, do not hold the lighter in the heating position.CAUTION!
• Do not exceed the maximum power of 160 Watts (13 Amps) at 12 Volts. If the 160 Watt (13 Amp) power rating is exceeded, the fuse protecting the system will need to be replaced.
• Power outlets are designed for accessory plugs only. Do not insert any other object in the power outlets as this will damage the outlet and blow the fuse. Improper use of the power outlet can cause damage not covered by your New Vehicle Limited Warranty.
Power Outlet
122 UNDERSTANDING THE FEATURES OF YOUR VEHICLE
Power Outlet Fuse Location Underhood
F15 Fuse 15 A Blue Cigar Lighter Front Console
WARNING! To avoid serious injury or death: • Only devices designed for use in this type of outlet should be inserted into any 12 Volt outlet. • Do not touch with wet hands. • Close the lid when not in use and while driving • If this outlet is mishandled, it may cause an
the vehicle.
electric shock and failure.
UNDERSTANDING THE FEATURES OF YOUR VEHICLE 123
CIGAR LIGHTER — IF EQUIPPED
WARNING!
When the cigar lighter is in use it becomes very hot. To avoid serious injury, handle the cigar lighter with care. Always check that the cigar lighter has turned off.
CAUTION!
• Many accessories that can be plugged in draw power from the vehicle’s battery, even when not in if use (i.e., cellular phones, etc.). Eventually, plugged in long enough, the vehicle’s battery will discharge sufficiently to degrade battery life and/or prevent the engine from starting.
• Accessories that draw higher power (i.e., coolers, vacuum cleaners, lights, etc.) will degrade the battery even more quickly. Only use these inter- mittently and with great caution.
• After the use of high power draw accessories, or long periods of the vehicle not being started (with accessories still plugged in), the vehicle must be driven a sufficient length of time to allow the generator to recharge the vehicle’s battery.
124 UNDERSTANDING THE FEATURES OF YOUR VEHICLE CUPHOLDERS For the driver and front passenger, cupholders are lo- cated on the floor console between the front seats.
For rear passengers, there are cupholders located on the floor between the front driver and passenger seats.
Front Cupholders
Rear Cupholders
STORAGE Glove Box Compartment The glove box is located on the right side of the instru- ment panel. Pull outward on the door latch to open the glove box. Push the glove box door upward to close it.
UNDERSTANDING THE FEATURES OF YOUR VEHICLE 125
Passenger Seat Storage — If Equipped Some models may be equipped with storage under the front passenger seat. Pull outward on the latch to open the storage compartment.
Glove Box Compartment
Passenger Seat Storage
126 UNDERSTANDING THE FEATURES OF YOUR VEHICLE CARGO AREA FEATURES The rear seatbacks have a fold down feature to allow increased cargo capacity. Push down the release button, located at the outboard top of the seatback and move the seatback to its folded- down position to provide a flat load floor cargo area. When returning the seatback to its upright position, push rearward until the seatback is properly latched.
Rear Seat Release Buttons
UNDERSTANDING THE FEATURES OF YOUR VEHICLE 127
window defroster is on. The rear window defroster automatically turns off after approximately 20 minutes. To manually shut the defroster off, push the button a second time. NOTE: To prevent excessive battery drain, use the rear window defroster only when the engine is operating.CAUTION!
Failure to follow these cautions can cause damage to the heating elements: • Use care when washing the inside of the rear window. Do not use abrasive window cleaners on the interior surface of the window. Use a soft cloth and a mild washing solution, wiping parallel to the heating elements. Labels can be peeled off after soaking with warm water.
(Continued)
Folded Rear Seats
REAR WINDOW FEATURES Rear Window Defroster
The rear window defroster button is located in the center of the instrument panel, below the radio. Press this button to turn on the rear window defroster. An indicator in the button will illuminate when the rear
128 UNDERSTANDING THE FEATURES OF YOUR VEHICLE
CAUTION! (Continued)
• Do not use scrapers, sharp instruments, or abra- sive window cleaners on the interior surface of the window.
• Keep all objects a safe distance from the window.
UNDERSTANDING YOUR INSTRUMENT PANEL
CONTENTS
䡵 Instrument Panel Features 䡵 Instrument Cluster 䡵 Instrument Cluster Descriptions 䡵 Electronic Vehicle Information Center (EVIC)
. . . . . . . . . . . . . . . 131
. . . . . . . . . . . . . . . . . . . . 132
. . . . . . . . . . . 133
. . 144
▫ EVIC Displays . . . . . . . . . . . . . . . . . . . . . . 146
▫ EVIC Control Buttons . . . . . . . . . . . . . . . . . 147
▫ Electronic Vehicle Information Center (EVIC)Setup Menu . . . . . . . . . . . . . . . . . . . . . . . . 147
▫ Change Engine Oil Indicator System . . . . . . . 149▫ Trip Computer . . . . . . . . . . . . . . . . . . . . . . 150
▫ Trip Button . . . . . . . . . . . . . . . . . . . . . . . . 150
▫ Trip Functions . . . . . . . . . . . . . . . . . . . . . . 151
▫ Values Displayed . . . . . . . . . . . . . . . . . . . . 151
▫ Personal Settings (Customer-ProgrammableFeatures)
. . . . . . . . . . . . . . . . . . . . . . . . . . 152
䡵 Sales Code (RAB) Radio . . . . . . . . . . . . . . . . . 161
▫ Introduction . . . . . . . . . . . . . . . . . . . . . . . . 161
▫ Suggestions . . . . . . . . . . . . . . . . . . . . . . . . 162130 UNDERSTANDING YOUR INSTRUMENT PANEL
▫ Technical Specifications . . . . . . . . . . . . . . . . 164
▫ Quick Guide . . . . . . . . . . . . . . . . . . . . . . . 165
▫ General Information . . . . . . . . . . . . . . . . . . 167
▫ Functions And Adjustments . . . . . . . . . . . . . 169
▫ Radio . . . . . . . . . . . . . . . . . . . . . . . . . . . . 176
▫ Sirius威 Satellite Radio — If Equipped . . . . . . 178
. . . . . . . . . . . . . . . . . . . . . . . . . 181
▫ CD Player ▫ CD MP3 Player . . . . . . . . . . . . . . . . . . . . . 183
▫ Troubleshooting . . . . . . . . . . . . . . . . . . . . . 185䡵 iPod威/USB/Media Player Control — If
Equipped . . . . . . . . . . . . . . . . . . . . . . . . . . . . 186
䡵 Steering Wheel Audio Controls . . . . . . . . . . . . 187▫ Radio Operation . . . . . . . . . . . . . . . . . . . . . 188
▫ CD Player Operation . . . . . . . . . . . . . . . . . . 188
▫ Operating Instructions — Hands-Free Phone(If Equipped)
. . . . . . . . . . . . . . . . . . . . . . . 189
䡵 CD/DVD Disc Maintenance . . . . . . . . . . . . . . 189
䡵 Radio Operation And Mobile Phones . . . . . . . 189
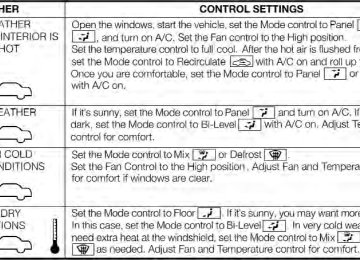
䡵 Climate Controls . . . . . . . . . . . . . . . . . . . . . . 190
▫ Manual Heating And Air Conditioning . . . . . 190
▫ Operating Tips Chart . . . . . . . . . . . . . . . . . 193
▫ Automatic Temperature Control (ATC) — IfEquipped . . . . . . . . . . . . . . . . . . . . . . . . . . 194
▫ Operating Tips . . . . . . . . . . . . . . . . . . . . . . 200INSTRUMENT PANEL FEATURES
UNDERSTANDING YOUR INSTRUMENT PANEL 131
13 — Storage Compartment 14 — Shift Lever 15 — Sport Button 16 — Horn/Driver Airbag
1 — Side Vent 2 — Multifunction Lever – Light Control 3 — Instrument Cluster And Warning Lights 4 — Windshield Wiper, Washer, Trip Computer 10 — Hazard Button 5 — Central Air Vents 6 — Storage Compartment/Radio
7 — Passenger Air Bag 8 — Glove Compartment 9 — Rear Defrost Button
11 — Climate Controls 12 — Power Windows Control
132 UNDERSTANDING YOUR INSTRUMENT PANEL INSTRUMENT CLUSTER
INSTRUMENT CLUSTER DESCRIPTIONS 1. Glow Plug Light — If Equipped
The Glow Plug light will flash during engine oil viscosity sensor measurement in cold weather. During this measurement (up to 10 seconds), the starter will be disabled. If the measured oil viscosity is OK, the light will turn off and the engine will be allowed to crank. If the measured oil viscosity is too high, engine cranking will be disabled and the light will blink repeatedly until the oil temperature is raised, preferably by an externally- powered electric engine block heater (available from your authorized dealer). The message ⬙Plug In Engine Heater⬙, will be displayed in the instrument cluster when the ambient temperature is below 5°F (-15°C) at the time the engine is shut off as a reminder to avoid possible crank delays at the next cold start.
UNDERSTANDING YOUR INSTRUMENT PANEL 133
2. Rear Defrost Button
Press and release this button to turn on the rear window defroster. This indicator will illuminate when the rear window defroster is on. The rear window defroster automatically turns off after 20 minutes.
CAUTION!
Failure to follow these cautions can cause damage to the heating elements: • Use care when washing the inside of the rear window. Do not use abrasive window cleaners on the interior surface of the window. Use a soft cloth and a mild washing solution, wiping parallel to the heating elements. Labels can be peeled off after soaking with warm water.
• Do not use scrapers, sharp instruments, or abra- sive window cleaners on the interior surface of the window.
• Keep all objects a safe distance from the window.
134 UNDERSTANDING YOUR INSTRUMENT PANEL 3. Front Fog Light Indicator — If Equipped
This indicator will illuminate when the front fog lights are on.
4. Low Fuel Light
When the fuel level reaches approximately 1.0 gal- lon (3.8L) this light will turn on, and remain on until fuel is added. 5. High Beam Indicator
This light indicates that the headlights are on high beam. Pull the turn signal lever toward the steer-
ing wheel to switch the headlights to low beam. 6. Park/Headlight ON Indicator / Follow Me Home (Headlight Delay) Indicator — If Equipped
This indicator will illuminate when the park lights or headlights are turned on. If the Follow Me Home feature is activated this indicator will illuminate and the EVIC will show how
long the function remains active. For further information, refer to “Follow Me Home” in “Understanding The Features of Your Vehicle”. 7. Turn Signal Indicators
The arrows will flash in unison with the exte- rior turn signal, when using the turn signal lever.
8. Generic Warning Light
The Generic Warning Light will illuminate if any of the following conditions occur: Oil Change Request, Engine Oil Pressure Sensor Failure, External Light Failure, Fuel Cut-Off Intervention, Fuel Cut-Off Not Available, Parking Sensor Failure.
9. Air Bag Warning Light
This light will turn on for four seconds as a bulb check when the ignition switch is first turned to ON/RUN. If the light is either not on during starting, stays on, or turns on while driving, have the system inspected at an authorized dealer as soon as possible. Refer to “Occupant Restraints” in “Things To Know Before Starting Your Vehicle” for further information. 10. Cruise Indicator — If Equipped
This indicator shows that the Speed Control system is on.
11. Seat Belt Reminder Light
When the ignition switch is first turned to ON/ RUN, this light will turn on if the driver’s seat belt is unbuckled, a chime will sound. When driving, if the driver’s seat belt remains unbuckled, the Seat Belt
UNDERSTANDING YOUR INSTRUMENT PANEL 135
Reminder Light will illuminate and the chime will sound. Refer to “Occupant Restraints” in “Things To Know Before Starting Your Vehicle” for further information. 12. Charging System LightThis light shows the status of the electrical charg- ing system. The light should come on when the ignition switch is first turned to ON/RUN and remain on briefly as a bulb check. If the light stays on or comes on while driving, turn off some of the vehicle’s non-essential electrical devices or increase engine speed (if at idle). If the charging system light remains on, it means that the vehicle is experiencing a problem with the charging system. Obtain SERVICE IMMEDIATELY. See an autho- rized dealer. If jump starting is required, refer to “Jump Starting Procedures” in “What To Do In Emergencies”.
136 UNDERSTANDING YOUR INSTRUMENT PANEL 13. Power Steering System Warning
This light is used to manage the electrical warning of the EPS (Power Steering System). Refer to “Power Steering” in “Starting and Operating” for further information.
14. Electronic Throttle Control (ETC) Light
This light informs you of a problem with the Electronic Throttle Control (ETC) system. If a problem is detected, the light will come on while the engine is running. Cycle the ignition key when the vehicle has completely stopped and the shift lever is placed in the NEUTRAL position. The light should turn off. If the light remains lit with the engine running, your vehicle will usually be drivable; however, see an authorized dealer for service as soon as possible. If the light is flashing when the engine is running, imme- diate service is required and you may experience reduced performance, an elevated/rough idle or engine stall and your vehicle may require towing. The light will come on
when the ignition is first turned to ON/RUN and remain on briefly as a bulb check. If the light does not come on during starting, have the system checked by an autho- rized dealer. 15. Tire Pressure Monitoring Telltale Light
Each tire, including the spare (if provided), should be checked monthly when cold and inflated to the inflation pressure recommended by the vehicle manufacturer on the vehicle placard or tire inflation pressure label. (If your vehicle has tires of a different size than the size indicated on the vehicle placard or tire inflation pressure label, you should determine the proper tire inflation pressure for those tires.) As an added safety feature, your vehicle has been equipped with a Tire Pressure Monitoring System (TPMS) that illuminates a low tire pressure telltale when one or more of your tires is significantly under-inflated.
Accordingly, when the low tire pressure telltale illumi- nates, you should stop and check your tires as soon as possible, and inflate them to the proper pressure. Driving on a significantly under-inflated tire causes the tire to overheat and can lead to tire failure. Under-inflation also reduces fuel efficiency and tire tread life, and may affect the vehicle’s handling and stopping ability. Please note that the TPMS is not a substitute for proper tire maintenance, and it is the driver’s responsibility to maintain correct tire pressure, even if under-inflation has not reached the level to trigger illumination of the TPMS low tire pressure telltale. Your vehicle has also been equipped with a TPMS malfunction indicator to indicate when the system is not operating properly. The TPMS malfunction indicator is
UNDERSTANDING YOUR INSTRUMENT PANEL 137
combined with the low tire pressure telltale. When the system detects a malfunction, the telltale will flash for approximately one minute and then remain continuously illuminated. This sequence will continue upon subse- quent vehicle start-ups as long as the malfunction exists. When the malfunction indicator is illuminated, the sys- tem may not be able to detect or signal low tire pressure as intended. TPMS malfunctions may occur for a variety of reasons, including the installation of replacement or alternate tires or wheels on the vehicle that prevent the TPMS from functioning properly. Always check the TPMS malfunction telltale after replacing one or more tires or wheels on your vehicle, to ensure that the replacement or alternate tires and wheels allow the TPMS to continue to function properly.138 UNDERSTANDING YOUR INSTRUMENT PANEL
CAUTION!
The TPMS has been optimized for the original equipment tires and wheels. TPMS pressures and warning have been established for the tire size equipped on your vehicle. Undesirable system opera- tion or sensor damage may result when using re- placement equipment that is not of the same size, type, and/or style. Aftermarket wheels can cause sensor damage. Do not use tire sealant from a can or balance beads if your vehicle is equipped with a TPMS, as damage to the sensors may result.
16. Automatic Gearbox Failure
This light will automatic transmission fault.
illuminate when there is an
17. Oil Pressure Warning Light
This light indicates low engine oil pressure. The light should turn on momentarily when the engine is started. If the light turns on while driving, stop the vehicle and shut off the engine as soon as possible. A chime will sound for four minutes when this light turns on. Do not operate the vehicle until the cause is corrected. This light does not indicate how much oil is in the engine. The engine oil level must be checked under the hood. 18. Malfunction Indicator Light (MIL)
The Malfunction Indicator Light (MIL) is part of an onboard diagnostic system, called OBDII, that monitors engine and automatic transmission con- trol systems. The light will illuminate when the key is in the ON/RUN position before engine start. If the bulb does not come on when turning the key from OFF/LOCK to ON/RUN, have the condition checked promptly.
Certain conditions, such as a loose or missing gas cap, poor fuel quality, etc., may illuminate the MIL after engine start. The vehicle should be serviced if the light stays on through several of your typical driving cycles. In most situations, the vehicle will drive normally and will not require towing.
CAUTION!
Prolonged driving with the MIL on could cause damage to the engine control system. It also could affect fuel economy and drivability. If the MIL is flashing, severe catalytic converter damage and power loss will soon occur. Immediate service is required.
UNDERSTANDING YOUR INSTRUMENT PANEL 139
WARNING!
A malfunctioning catalytic converter, as referenced above, can reach higher temperatures than in normal operating conditions. This can cause a fire if you drive slowly or park over flammable substances such as dry plants, wood, cardboard, etc. This could result in death or serious injury to the driver, occupants or others.
19. Engine Temperature Warning Light
This light warns of an overheated engine condi- tion. The engine coolant temperature indicator will illuminate and a single chime will sound after
reaching a set threshold.
140 UNDERSTANDING YOUR INSTRUMENT PANEL If the light turns on while driving, safely pull over and stop the vehicle. If the A/C system is on, turn it off. Also, shift the transmission into NEUTRAL and idle the ve- hicle. If the temperature reading does not return to normal, turn the engine off immediately and call for service. Refer to “If Your Engine Overheats” in “What To Do In Emergencies” for further information. 20. Brake Warning Light
This light monitors various brake functions, including brake fluid level and parking brake application. If the Brake Warning Light turns on it may indicate that the parking brake is applied, that the brake fluid level is low, or that there is a problem with the brake system reservoir. The light will remain on until the cause is corrected. If brake failure is indicated, immediate repair is neces- sary.
WARNING!
Driving a vehicle with the red brake light on is dangerous. You could have a collision. Have the vehicle checked immediately.
Vehicles equipped with the Anti-Lock Brake System (ABS), are also equipped with Electronic Brake Force Distribution (EBD). In the event of an EBD failure, the Brake Warning Light will turn on along with the ABS Light. Immediate repair to the ABS system is required. Operation of the Brake Warning Light can be checked by turning the ignition switch from the OFF/LOCK position to the ON/RUN position. The light should illuminate for approximately two seconds. The light should then turn off unless the parking brake is applied or a brake fault is detected. If the light does not illuminate, have the light inspected by an authorized dealer.
The light also will turn on when the parking brake is applied with the ignition switch in the ON/RUN posi- tion. NOTE: This light shows only that the parking brake is applied. It does not show the degree of brake application. 21. Electronic Stability Control OFF (ESC OFF) Indicator Light
This light indicates the Electronic Stability Con- trol system (ESC) has been turned off by the driver.
22. Electronic Stability Control (ESC) Activation / Malfunction Indicator Light
The ESC Activation/Malfunction Indicator Light in the instrument cluster will come on for four seconds when the ignition switch is turned to the ON/RUN position. If the ESC
UNDERSTANDING YOUR INSTRUMENT PANEL 141
Activation/Malfunction Indicator Light comes on con- tinuously with the engine running, a malfunction has been detected in the ESC system. If this light remains on, see your authorized dealer as soon as possible to have the problem diagnosed and corrected. NOTE: • The ESC Off Indicator Light and the ESC Activation/ Malfunction Indicator Light come on momentarily each time the ignition switch is turned to ON/RUN. • Each time the ignition is turned to ON/RUN, the ESC system will be on, even if it was turned off previously.23. Anti-Lock Brake (ABS) Light
This light monitors the Anti-Lock Brake System (ABS). The light will turn on when the ignition switch is turned to the ON/RUN position and may stay on for as long as four seconds.
142 UNDERSTANDING YOUR INSTRUMENT PANEL If the ABS light remains on or turns on while driving, it indicates that the Anti-Lock portion of the brake system is not functioning and that service is required. However, the conventional brake system will continue to operate normally if the BRAKE warning light is not on. If the ABS light is on, the brake system should be serviced as soon as possible to restore the benefits of Anti-Lock brakes. If the ABS light does not turn on when the ignition switch is turned to the ON/RUN position, have the light inspected by an authorized dealer. 24. Door Ajar
This light will turn on to indicate that one or more doors or the trunk may be ajar.
25. Temperature Gauge The temperature digital scale shows engine coolant tem- perature. Any reading within the normal range indicates that the engine cooling system is operating satisfactorily. The gauge pointer will likely indicate a higher tempera- ture when driving in hot weather, up mountain grades, or when towing a trailer. It should not be allowed to exceed the upper limits of the normal operating range.
CAUTION!
Driving with a hot engine cooling system could damage your vehicle. If all the segments of the temperature gauge are lit, pull over and stop the vehicle. Idle the vehicle with the air conditioner turned off until the pointer drops back into the normal range. If you hear continuous chimes, turn the engine off immediately and call an authorized dealership for service.
WARNING!
A hot engine cooling system is dangerous. You or others could be badly burned by steam or boiling coolant. You may want to call an authorized dealer- ship for service if your vehicle overheats. If you decide to look under the hood yourself, see “Main- taining Your Vehicle.” Follow the warnings under the “Cooling System Pressure Cap” paragraph.
26. Odometer / Trip Odometer / Electronic Vehicle Information Center (EVIC) Display Area This display indicates the total distance the vehicle has been driven. U.S. Federal regulations require that upon transfer of vehicle ownership, the seller certify to the purchaser the correct mileage that the vehicle has been driven. If your odometer needs to be repaired or serviced, the repair technician should leave the odometer reading the same
UNDERSTANDING YOUR INSTRUMENT PANEL 143
as it was before the repair or service. If s/he cannot do so, then the odometer must be set at zero, and a sticker must be placed in the door jamb stating what the mileage was before the repair or service. It is a good idea for you to make a record of the odometer reading before the repair/ service, so that you can be sure that it is properly reset, or that the door jamb sticker is accurate if the odometer must be reset at zero. If the vehicle is equipped with the Electronic NOTE: Vehicle Information Center (EVIC) in the instrument cluster, all warnings including “door” and “gate” and “Change Engine Oil” will only be displayed in the EVIC display. For additional information, refer to “Electronic Vehicle Information Center (EVIC).” Refer to the “Electronic Vehicle Information Center (EVIC)” for further information.144 UNDERSTANDING YOUR INSTRUMENT PANEL 27. Fuel Gauge / Fuel Door Reminder The fuel door reminder indicates that the fuel filler door is located on the right side of the vehicle. When the ignition switch is in the ON/RUN position, the digital scale will show the level of fuel remaining in the fuel tank. NOTE: The fuel gauge and range will not immediately update accurately when refueling with the engine on. 28. Tachometer The white area of the scale shows the permissible engine revolutions-per-minute (RPM x 1000) for each gear range. Before reaching the red area, ease up on the accelerator to prevent engine damage. 29. Speedometer The Speedometer shows the vehicle speed in miles per hour (mph) and/or kilometers per hour (km/h).
ELECTRONIC VEHICLE INFORMATION CENTER (EVIC) The Electronic Vehicle Information Center (EVIC) fea- tures a driver-interactive display that is located in the instrument cluster.
Electronic Vehicle Information Center (EVIC) Display
The EVIC consists of the following: • System Status • Vehicle Information Warning Message Displays • Personal Settings (Customer-Programmable Features) • Outside Temperature Display • Trip Computer Functions
UNDERSTANDING YOUR INSTRUMENT PANEL 145
146 UNDERSTANDING YOUR INSTRUMENT PANEL EVIC Displays
EVIC Display Manual Transmission 6 — Message Display 7 — Coolant Temperature Gauge 8 — Digital Speedometer 9 — Ice Warning Indicator 10 — Gear Shift Indicator (GSI)
1 — Temperature Indicator 2 — Fuel Level Gauge 3 — Clock 4 — Odometer 5 — Sport Mode
EVIC Display Automatic Transmission 6 — Message Display 7 — Coolant Temperature Gauge 8 — Digital Speedometer 9 — Autostick威 Gear Indicator 10 — Auto/Sport/ECO Indicator
1 — Ice Warning Indicator 2 — Temperature Indicator 3 — Fuel Level Gauge 4 — Clock 5 — Odometer
EVIC Control Buttons Press the MENU ESC button briefly to access the menu and/or go to next screen or to confirm the required menu option. Press and hold the MENU ESC button (approxi- mately one second) to return to the main screen. Press the + button to scroll upward through the dis- played menu and the related options or to increase the displayed value. Press the – button to scroll downward through the displayed menu and the related options or to decrease the value displayed. NOTE: Buttons + and – activate different functions according to the following situations: • To scroll the menu options upwards or downwards. • To increase or decrease values during settings.
UNDERSTANDING YOUR INSTRUMENT PANEL 147
NOTE: When opening one of the front doors, the EVIC display will turn on the clock and the miles or kilometers covered (for versions/markets, where provided) for a few seconds. Electronic Vehicle Information Center (EVIC) Setup Menu The menu comprises a series of functions arranged in a cycle. Press the + and – buttons to access the different options and settings (setup). The setup menu can be activated by pressing the MENU ESC button. Single presses on buttons + or – will scroll through the setup menu options. The menu includes the following functions: • Speed Beep • Trip B Data • Set Time148 UNDERSTANDING YOUR INSTRUMENT PANEL • Set Date • See Radio • Speed Display • Autoclose • Units • Language • Buzzer Volume • Button Volume • Daylights (D.R.L.) • Hill Start • Exit Menu
Selecting An Option Of The Main Menu Without Submenu 1. Briefly press the MENU ESC button to select the main menu option to set. 2. Press the + or – button (by single presses) to select the new setting. 3. Briefly press the MENU ESC button to store the new setting and go back to the main menu option previously selected. Selecting An Option Of The Main Menu With Submenu 1. Briefly press the MENU ESC button to display the first submenu option. 2. Press the + or – button (by single presses) to scroll through all the submenu options.
3. Briefly press the MENU ESC button to select the displayed submenu option and to open the relevant setup menu. 4. Press the + or – button (by single presses) to select the new setting for this submenu option. 5. Briefly press the MENU ESC button to store the new setting and go back to the previously selected submenu option. 6. Press and hold the MENU ESC button to return to the main menu (short hold) or the main screen (longer hold). Change Engine Oil Indicator System Change Engine Oil Your vehicle is equipped with an engine oil change indicator system. The “Change Engine Oil” message will flash in the EVIC display for approximately 10 seconds after a single chime has sounded to indicate the next scheduled oil change interval. The engine oil change
UNDERSTANDING YOUR INSTRUMENT PANEL 149
indicator system is duty cycle based, which means the engine oil change interval may fluctuate, dependent upon your personal driving style. Unless reset, this message will continue to display each time you turn the ignition switch to the ON/RUN position. To turn off the message temporarily, press and release the MENU/ESC button. To reset the oil change indicator system (after performing the scheduled main- tenance), refer to the following procedure. 1. Turn the ignition switch to the ON position.(Do not start the engine.) 2. Fully depress the accelerator pedal slowly, three times within 10 seconds. 3. Turn the ignition switch to the OFF/LOCK position. If the indicator message illuminates when you NOTE: start the vehicle, the oil change indicator system did not reset. If necessary, repeat this procedure.150 UNDERSTANDING YOUR INSTRUMENT PANEL Trip Computer The Trip Computer is located in the instrument cluster. It features a driver-interactive display (displays informa- tion such as; trip information, range, fuel consumption, average speed and travel time). Trip Button The TRIP button, located on the right steering column stalk, can be used to display and to reset the previously described values. • A short button press displays the different values. • A long button press resets the system and then starts a
new trip. New Trip To reset: • Press and hold the TRIP button to reset the system
manually.
• When the “Trip distance” reaches 9999.9 miles or kilometers or when the “Travel time” reaches 99.59
(99 hours and 59 minutes), the system is reset auto- matically.• Disconnecting/Reconnecting the battery resets the
system.
If the reset operation occurs in the presence of NOTE: the screens concerning Trip A or Trip B, only the infor- mation associated with Trip A or Trip B functions will be reset. Start Of Trip Procedure With the ignition on, press and hold the TRIP button for over one second to reset. Exit Trip To exit the Trip function, wait until all the values have been displayed or hold the MENU ESC button for longer than one second.
Briefly press the MENU ESC button to go back to the menu screen or press and hold the MENU ESC (approxi- mately one second) to go back to the main screen without storing settings. Trip Functions Both trip functions are resettable (reset — start of new trip). “Trip A” can be used to display the figures relating to: • Trip distance A • Average consumption • Instant consumption A • Average speed A • Travel time A (driving time). “Trip B” can be used to display the figures relating to: • Trip distance B
UNDERSTANDING YOUR INSTRUMENT PANEL 151
• Average consumption B • Average speed B • Travel time B (driving time). NOTE: “Trip B” functions may be excluded (see “Trip B Data”). “Range” and “Instantaneous consumption” can- not be reset. Values Displayed Range This indicates the distance which may be travelled with the fuel remaining in the tank, assuming that driving conditions will not change. The message “----” will appear on the display in the following cases: • Distance less than 30 miles (or 50 km). • The vehicle is parked for a long time with the engine
running.
152 UNDERSTANDING YOUR INSTRUMENT PANEL NOTE: The range depends on several factors: driving style, type of route (freeway, residential, mountain roads, etc.), conditions of use of the car (load, tire pressure, etc.). Trip planning must take into account the above notes. Distance Travelled This value shows the distance covered since the last reset. Average Consumption This value shows the approximate average consumption since the last reset. Instant Consumption This indicates the fuel consumption. The value is con- stantly updated. The message “----” will appear on the display if the car is parked with the engine running. Average Speed This value shows the vehicle’s average speed as a func- tion of the overall time elapsed since the last reset.
Travel Time This value shows the time elapsed since the last reset. Personal Settings (Customer-Programmable Features) Dimmer The EVIC display is provided with a light sensor capable of detecting environmental light conditions and adjust- ing the brightness of the instruments accordingly. NOTE: The brightness of the instrument panel may change while travelling following an event that causes switching from “day” to “night” conditions (or vice versa) in the passenger compartment (e.g. in a tunnel, on avenues in shadows, under bridges, etc.). To adjust the brightness, proceed as follows: 1. Press the + or – button to set the required brightness level.
2. Briefly press the MENU ESC button to go back to the menu screen or press and hold the MENU ESC (approxi- mately one second) to go back to the main screen without storing settings. Speed Beep (Speed Limit) With this function it is possible to set the car speed limit (mph or km/h); when this limit is exceeded the driver is immediately alerted. To set the speed limit, proceed as follows: 1. Briefly press the MENU ESC button. The display will show the message (Speed Beep). 2. Press the + or – button to select speed limit activation (On) or deactivation (Off). 3. When the function is activated (On), briefly press the MENU ESC button to display the presently set activation speed. Pressing the + or – buttons selects the speed limit. Press MENU ESC to confirm selection.
UNDERSTANDING YOUR INSTRUMENT PANEL 153
NOTE: Selection is possible between 20 and 125 mph or km/h, depending on the selected unit. The setting will increase/decrease by five units each time the +/– button is pressed. Press and hold the +/– button to increase/ decrease the setting rapidly. Save the setting by briefly pressing the button when you approach the required setting. • Briefly press the MENU ESC button to go back to the menu screen, or press and hold the MENU ESC button (approximately one second) to go back to the main screen without storing the settings.To cancel the setting, proceed as follows: 1. Briefly press the MENU ESC button. “On” will flash on the display. 2. Press the – button. “Off” will flash on the display.
154 UNDERSTANDING YOUR INSTRUMENT PANEL 3. Briefly press the MENU ESC button to go back to the menu screen, or press and hold the MENU ESC button (approximately one second) to go back to the main screen without storing the settings. Trip B Data (Trip B On) Through this option, it is possible to activate (On) or deactivate (Off) the Trip B (partial trip) display. For further information see “Trip Computer.” For activation / deactivation, proceed as follows: 1. Briefly press the MENU ESC button. “On” or “Off” will flash on the display (according to previous setting). 2. Press the + or – button to select the setting. 3. Briefly press the MENU ESC button to go back to the menu screen, or press and hold the MENU ESC button (approximately one second) to go back to the main screen without storing the settings.
Set Time (Clock) This function may be used to set the clock through two sub-menu items: “Time” and “Mode.” Proceed as follows: 1. Briefly press the MENU ESC button. The display will show the two sub-menu items “Time” and “Mode.” 2. Press the + or – button to navigate the two sub-menu items. 3. Select the required option and then press the MENU ESC button. 4. When accessing the “Time” sub-menu item, briefly press the MENU ESC button and “hours” will flash on the display. 5. Press the + or – button for setting. 6. Briefly press the MENU ESC button and “minutes” will flash on the display. 7. Press the + or – button for setting.
NOTE: • The setting will increase or decrease by one unit each time the + or – button is pressed. Press and hold the button to increase/decrease the setting rapidly. Save the setting by briefly pressing the button when you approach the required setting.
• Briefly press the MENU ESC button to return to the
“Time” sub-function.
• When accessing the “Mode” submenu, briefly press the MENU ESC button. The previously set display format will flash on the display.
• Press the + or – button to select “24h” or “12h.” When you have selected the required settings, briefly press the MENU ESC button to go back to the Time, Mode sub-menu screen, or press and hold the MENU ESC button (approximately one second) to go back to the main screen without storing the settings.
UNDERSTANDING YOUR INSTRUMENT PANEL 155
Set Date This function may be used to set the date (day - month - year). To change the date proceed as follows: 1. Briefly press the MENU ESC button and “year” will flash on the display. 2. Press the + or – button for setting. 3. Briefly press the MENU ESC button and “month” will flash on the display. 4. Press the + or – button for setting. 5. Briefly press the MENU ESC button and “day” will flash on the display. 6. Press the + or – button for setting. NOTE: The setting will increase or decrease by one unit each time the + or – button is pressed. Press and hold the
156 UNDERSTANDING YOUR INSTRUMENT PANEL + or – button to increase/decrease the setting rapidly. Save the setting by briefly pressing the button when you approach the required setting. • Briefly press the MENU ESC button to go back to the menu screen, or press and hold the MENU ESC button (approximately one second) to go back to the main screen without storing the settings.
See Radio (Repeat Audio Information) With this function active, the EVIC display shows infor- mation relevant to the sound system. • Radio: tuned radio station frequency, automatic tuning
activation or AutoSTore.
• CD audio, CD MP3: track number.
To activate (On) or to deactivate (Off) the sound system info displaying proceed as follows: 1. Briefly press the MENU ESC button “On” or “Off” will flash on the display (according to the previous setting). 2. Press the + or – button for setting. 3. Briefly press the MENU ESC button to go back to the menu screen, or press and hold the MENU ESC button (approximately one second) to go back to the main screen without storing the settings. If the radio has BLUE&ME™, refer to the appropriate “BLUE&ME™ User’s Manual” for further information. Speed Display When this function is activated the cluster will display the vehicle speed (MPH or km/h).
To activate (On) or to deactivate (Off) the speed display feature, proceed as follows: 1. Briefly press the MENU ESC button. “MPH”, “km/ h”, then “Off” will flash on the display (according to previous setting). 2. Press the + or – button to select display deactivation “Off”, “MPH” or “km/h”. 3. Briefly press the MENU ESC button to go back to the menu screen, or press and hold the MENU ESC button (approximately one second) to go back to the main screen. Autoclose With this function active, the doors will automatically lock at when the vehicle’s speed exceeds 15 mph (24 km/h).
UNDERSTANDING YOUR INSTRUMENT PANEL 157
To change the setting proceed as follows: 1. Briefly press the MENU ESC button “On” or “Off” will flash on the display (according to the previous setting). 2. Press the + or – button for setting. 3. Briefly press the MENU ESC button to go back to the menu screen, or press and hold the MENU ESC button (approximately one second) to go back to the main screen without storing the settings. Units (Set Units) This function may be used to set the measurement unit in three submenus: “Distance,” “Temperature” and “Fuel Economy.” To set the required unit, proceed as follows: 1. Briefly press the MENU ESC button to display the three sub-menus.
158 UNDERSTANDING YOUR INSTRUMENT PANEL 2. Press the + or – button to navigate the three sub- menus. 3. Select the required sub-menu and then briefly press the MENU ESC button. 4. When accessing the “Distance” submenu: briefly press the MENU ESC button. Either “mi” or “km” will appear on the display (according to the previous setting). 5. Press the + or – button for setting. 6. Briefly press the MENU ESC button to return to the sub-menu. 7. When accessing the “Fuel Economy” submenu, briefly press the MENU ESC button. Either “mpg,” “km/l ” or “l/100km” will appear on the display (according to the previous setting). If the distance unit set is “mi,” the fuel economy unit will be displayed in “mpg.”
If the distance unit set is “km,” the fuel economy unit will be displayed in either km/l or l/100km. 1. Press the + or – button for setting. 2. Briefly press the MENU ESC button to return to the sub-menu. 3. When accessing the “Temperature” submenu: briefly press the MENU ESC button. Either “°F” or “°C” will appear on the display (according to the previous setting). 4. Press the + or – button for setting. 5. Briefly press the MENU ESC button to return to the sub-menu. When you have made the required settings, briefly press the MENU ESC button to go back to the sub-menu screen, or press and hold the MENU ESC button (ap- proximately one second) to go back to the main screen without storing the settings.
Language (Selecting The Language) The messages can be displayed in the following lan- guages: Italian, English, German, Portuguese, Spanish, French, Dutch, Polish. To set the required language, proceed as follows: 1. Briefly press the MENU ESC button. The previously set “language” will flash on the display. 2. Press the + or – button for setting. 3. Briefly press the MENU ESC button to go back to the menu screen, or press and hold the MENU ESC button (approximately one second) to go back to the main screen without storing the settings. Buzzer Volume (Adjusting The Failure/Warning Buzzer Volume) With this function the volume of the buzzer accompany- ing any failure/warning indication can be adjusted to one of eight volume levels.
UNDERSTANDING YOUR INSTRUMENT PANEL 159
To adjust the volume proceed as follows: 1. Briefly press the MENU ESC button. The previously set volume “level” will flash on the display. 2. Press the + or – button for setting. 3. Briefly press the MENU ESC button to go back to the menu screen, or press and hold the MENU ESC button (approximately one second) to go back to the main screen without storing the settings. Button Volume (Button Volume Adjustment) This function may be used to adjust the volume of the beep accompanying the buttons. MENU ESC , + or – can be adjusted according to 8 levels. To adjust the volume, proceed as follows: 1. Briefly press the MENU ESC button. The previously set volume “level” will flash on the display. 2. Press the + or – button for setting.
160 UNDERSTANDING YOUR INSTRUMENT PANEL 3. Briefly press the MENU ESC button to go back to the menu screen, or press and hold the MENU ESC button (approximately one second) to go back to the main screen without storing the settings. Belt Buzzer (Buzzer Activation For S.B.R. Indication) This function will only be displayed after a FIAT Group Automobiles Dealership has deactivated the S.B.R. system. Daytime Running Lamps (DRL) This function may be used to activate / deactivate the Daytime Running Lamps. Proceed as follows to switch this function on or off: 1. Briefly press the MENU ESC button to display the three sub-menus. 2. Briefly press the MENU ESC button. “On” or “Off” will flash on the display (according to previous setting).
3. Press the + or – button for setting. 4. Briefly press the MENU ESC button to go back to the menu screen, or press and hold the button (approxi- mately one second) to go back to the main screen without storing the settings. Hill Start Assist This function is used when starting a vehicle from a stop on a hill. Hill Start Assist maintains the same level of brake pressure the driver applied for a short period of time after the foot has been removed from the brake pedal. Proceed as follows to switch this function on or off: 1. Briefly press the MENU ESC button. “On” or “Off” will flash on the display (according to previous setting). 2. Press the + or – button for setting.
3. Briefly press the MENU ESC button to go back to the menu screen, or press and hold the button (approxi- mately one second) to go back to the main screen without storing the settings. Exit Menu This function closes the initial menu screen. Briefly press the MENU ESC button to go back to the main screen. Press the – button to return to the first menu option (Speed Beep). Press the + button to return to the last menu option (Daylights).
UNDERSTANDING YOUR INSTRUMENT PANEL 161
SALES CODE (RAB) RADIO
Introduction The radio has been designed according to the specifica- tions of the passenger compartment, with a personalized design to match the style of the dashboard.
162 UNDERSTANDING YOUR INSTRUMENT PANEL If the radio has BLUE&ME™, refer to the appropriate “BLUE&ME™ User’s Manual” for further information. The instructions for use are given below and we recom- mend you to read them carefully. Suggestions Road Safety Please, learn how to use all different radio functions (e.g. store stations) before beginning to drive. Reception Conditions Reception conditions change constantly while driving. Reception may be interfered with by the presence of mountains, buildings or bridges, or when you are far away from the broadcaster.
WARNING!
Having the volume turned up high can cause the driver to no be able to hear important traffic sounds, i.e. sirens, horns, etc. This could cause an accident. Always adjust the volume so that you can still hear background noises.
Care And Maintenance Clean the cover with a soft antistatic cloth only. Cleaning and polishing products could damage the surface. CDs The presence of dirt, scratches or distortions on the CDs could cause skipping and poor sound quality while it is playing. For optimal playback conditions, follow these guidelines: • Only use branded CDs.
• Clean every CD thoroughly removing any finger marks or dust using a soft cloth. Hold CDs by the outside and clean them from the middle outwards.
• Never use chemicals (e.g. antistatics or thinners or sprays) for cleaning as they could damage the surface of the CDs.
• After listening to them place CDs back in their boxes
to prevent them from being damaged.
• Do not expose CDs to direct sunlight, high tempera-
tures or moisture for long periods.
• Do not stick labels on the CD surface or write on the
recorded surface with pencils or pens.
• Do not use CDs that are very scratched, flawed, distorted, etc. Using discs like these will result in malfunctions or damage to the player.
UNDERSTANDING YOUR INSTRUMENT PANEL 163
• The use of original CD media is required for the best quality audio production. Correct operation is not guaranteed when CD-R/RW media are used that were not correctly burned and/or with a maximum capacity above 650 Mb.• Do not use commercially available protective sheets for CDs or discs, with stabilizers, etc. as they could get stuck in the internal mechanism and damage the disc. • If a copy-protected CD is used, it may take a few seconds before the system starts to play it. The CD player cannot be guaranteed to play all protected discs. The fact that the CD is protected from being copied is often shown in very small letters or is difficult to read on the actual CD cover where it may be, for example, “COPY CONTROL”, “COPY PRO- TECTED”, “THIS CD CANNOT BE PLAYED ON A PC/MAC”.
164 UNDERSTANDING YOUR INSTRUMENT PANEL • The CD player is capable of reading most compression systems currently in use, following the development of these systems, the reading of all compression for- mats is not guaranteed. Technical Specifications The complete system consists of: • Two 165 mm diameter midwoofer speakers, one
speaker in each of the front doors.
• Two 22 mm diameter tweeter speakers, one speaker in
each of the front pillars.
• Two 100 mm diameter full range speakers, one speaker
in each of the rear side panels.
• Antenna on the car roof. • Radio with CD/MP3 player.
With Bose威 Premium Audio system (if equipped): • Two 165 mm diameter midwoofer speakers. • Two 11 mm tweeter speakers in the front pillars. • Two 100 mm full range speakers, one speaker in each
of the rear side panels.
• A subwoofer under the right front seat. • An amplifier in the trunk on the right-hand side panel. • Antenna on the car roof. • Radio with CD/MP3 player.
Quick Guide Radio Controls BUTTON
TUNER
A-B-C
MEDIA
BUTTON
(Mute/Pause Button)
AUDIO
UNDERSTANDING YOUR INSTRUMENT PANEL 165
GENERAL FUNCTIONS On Off AM, FM, SAT (if equipped) source se- lection Cycles A, B, C presets for AM, FM, SAT (if equipped) CD/AUX/Media Player (if equipped and present) source selection GENERAL FUNCTIONS Volume activation/deactivation (Mute/ Pause) Audio adjustments: low tones (BASS), high tones (TREBLE), left/right balance (BALANCE), front/rear balance (FADER)
MODE Short button press Long button press Short repeated button press
Short repeated button press
Short repeated button press
MODE Short button press
Menu activation: short button press Adjustment type selection: press or
Adjustment of values: press
or
166 UNDERSTANDING YOUR INSTRUMENT PANEL
BUTTON
(Information Button)
MENU
+Vol/–Vol
BUTTON
GENERAL FUNCTIONS Song, Artist, Album, Genre, Playlist, Folder information (if available) in CD, Media Player and Satellite (if so equipped); Toggles RBDS information in FM Advanced functions adjustment
Volume adjustment
RADIO FUNCTIONS Radio Station Search: • Automatic Search • Manual Search
MODE
Menu activation: short button press Adjustment type selection: press or
Adjustment of values: press
or
Press + button: volume increase Press – button: volume decrease MODE Automatic search: press buttons (long press for fast forward)
or
Manual search: press buttons
(long press for fast forward)
or
BUTTON 1 2 3 4 5
BUTTON
UNDERSTANDING YOUR INSTRUMENT PANEL 167
Stored station recall
RADIO FUNCTIONS Current radio station storing
MODE Long button press for memory preset 1
to 5 respectively Short button press for memory preset 1
to 5 respectively MODE CD FUNCTIONS Short button press CD ejection Short button press Previous/next track play CD track fast forward/rewind Long button press Previous/next folder play (for CD-MP3) Short button pressor or or
General Information The radio offers the following functions: Radio Section • PLL tuning with FM/AM/MW frequency bands • RBDS (Radio Broadcast Data System) • Automatic/manual station tuning
• FM Multipath detector • Manual storing of 25 stations (base radio) and 40
stations (if equipped with Satellite): 15 on FM band (5 on FMA, 5 on FMB, 5 on FMC), 10 on AM band (5 on AMA, 5 on AMB), 15 on Satellite Band - if equipped (5 on SATA, 5 on SATB, 5 on SATC)168 UNDERSTANDING YOUR INSTRUMENT PANEL • SPEED VOLUME function: Customer selectable auto- matic volume adjustment depending on the car speed
• Automatic Stereo/Mono selection CD Section • Track selection (forward/backward) • Fast forward/rewind through tracks • CD Display function: display of track number and on mp3 discs (song title, artist) and time elapsed since start of the track
• Playing Audio CD, CD-R and CD-RW
WARNING!
On multimedia CDs, besides audio tracks, there are data tracks too. Playing this type of CD could cause hissing at a volume that could jeopardize road safety as well as causing damage to the final stages and the speakers.
CD/MP3 Section • MP3-Info function (ID3-TAG) • Folder selection (previous/next) • Track selection (forward/backward) • Fast forward/rewind through tracks • MP3 Display function: display of folder name, ID3- TAG information, time elapsed since the start of the track, name of the file
• Playing audio or data CD, CD-R and CD-RW
Audio Section • Mute/pause function • Soft mute function • Loudness function • Graphic 7 band equalizer (if equipped) • Separate bass/treble tone adjustment • Right/left channel balancing • Front/rear fader Functions And Adjustments Turning The Car Radio On The car radio comes on when the is pressed briefly.
(ON/OFF) button
UNDERSTANDING YOUR INSTRUMENT PANEL 169
When the car radio is turned on and the on volume limit is on, the volume is limited to a setting of five even if it had been set higher when previously used. Turning The Car Radio Off Press and hold (approximately 2 seconds) the (ON/OFF) button to turn the radio off. Selecting The Radio Functions By pressing the TUNER button briefly and repeatedly, the following audio sources can be selected cyclically: • AM, FM and Satellite Bands (if equipped) Selecting The CD Function By briefly pressing the MEDIA button, the CD audio source can be selected (only if a CD is loaded). Volume Adjustment To adjust the volume, press the buttons +Vol or –Vol to increase/decrease the volume.170 UNDERSTANDING YOUR INSTRUMENT PANEL Mute/Pause Function Press the button briefly to activate the MUTE function. The volume will gradually decrease and the wording “TUNER Mute” will be shown on the display (in radio mode) or “CD Pause” (in CD mode). button again to deactivate the MUTE Press the function. The volume will gradually increase until it reaches the previously set level. When the volume level is changed using the dedicated controls, the Mute function is deactivated and the vol- ume is adjusted to the new level selected. Audio Adjustment The functions that can be selected from the audio menu change depending on the context: AM/FM/MEDIA/ SATELLITE. Press the AUDIO button briefly to change the Audio functions. After the AUDIO button is first pressed, the
or
or
buttons.
display will show the Bass level value for the source activated at that time (e.g. in FM mode the display will show the wording “FM Bass +2”). Use the buttons to scroll through the Menu functions. To change the setting of the selected function, use the The current status of the selected function appears on the display. The functions managed by the Audio Menu are: • BASS (Bass adjustment) • TREBLE (Treble adjustment) • BALANCE (right/left Balance adjustment) • FADER (front/rear Balance adjustment) function • LOUDNESS deactivation)
activation/
(Loudness
• EQUALIZER — if equipped (activation and selection
of factory equalization adjustments)
• USER EQUALIZER — if equipped (customized equal-
ization adjustment)
or
Tone Adjustment Proceed as follows: 1. Press AUDIO button. 2. Press the “Treble” in the AUDIO menu. 3. Press the the bass or treble adjustments. buttons briefly, the levels will By pressing the change progressively. By pressing them down longer, the levels will change quickly.
button or to increase/decrease
button to select “Bass” or
or
or
UNDERSTANDING YOUR INSTRUMENT PANEL 171
or
button to set “Balance” in the
Balance Adjustment Proceed as follows: 1. Press AUDIO button. 2. Press the AUDIO menu. 3. Press the left speakers or the the right speakers. buttons briefly, the levels will By pressing the change progressively. By pressing them down longer, the levels will change quickly. Select the value “0” to set the right and left audio outputs at the same level.
button to increase the sound from the button to increase the sound from
or
or
button to set “Fader” in the
172 UNDERSTANDING YOUR INSTRUMENT PANEL Fader Adjustment Proceed as follows: 1. Press AUDIO button. 2. Press the AUDIO menu. 3. Press the from the rear speakers or the sound coming from the front speakers. buttons briefly, the levels will By pressing the change progressively. By pressing them down longer, the levels will change quickly. Select the value “0” to set the right and left audio outputs at the same level.
button to increase the sound coming button to increase the
or
Loudness Function — If Equipped The Loudness function improves the volume of the sound while listening at low volumes, increasing the bass and treble. To activate/deactivate this function, select the “Loud- ness” setting in the AUDIO menu. The condition of the function (on or off) is shown on the display for a few seconds by the wording “Loudness On” or “Loudness Off”. Preset/User*/Classic/Rock/Jazz Functions — If Equipped The built-in equalizer can be activated/deactivated. When the equalizer function is off, the audio settings can only be changed by adjusting the “Bass” and “Treble” settings, whereas when the function is on, the acoustic curves can be adjusted. To deactivate the equalizer, select the “EQ Preset” function in the audio menu.
To activate the equalizer, use the AUDIO button or to select one of the adjustments: • “EQ User” (adjustment of 7 equalizer bands that can
be changed by the user)
• “Classic” (equalizer preset for optimal classic music
sound)
• “Rock” (equalizer preset for optimal rock and pop
music sound)
• “Jazz” (equalizer preset for optimal jazz music sound) When one of the equalizer adjustments is activated the wording “EQ” lights up. *User EQ Settings Function — If Equipped To set a personalized equalizer adjustment: 1. Press AUDIO button. 2. Use the
buttons to set EQ function.
or
UNDERSTANDING YOUR INSTRUMENT PANEL 173
or