- 2006 Toyota Camry Owners Manuals
- Toyota Camry Owners Manuals
- 1998 Toyota Camry Owners Manuals
- Toyota Camry Owners Manuals
- 2015 Toyota Camry Owners Manuals
- Toyota Camry Owners Manuals
- 2001 Toyota Camry Owners Manuals
- Toyota Camry Owners Manuals
- 2010 Toyota Camry Owners Manuals
- Toyota Camry Owners Manuals
- 2004 Toyota Camry Owners Manuals
- Toyota Camry Owners Manuals
- 2005 Toyota Camry Owners Manuals
- Toyota Camry Owners Manuals
- 1997 Toyota Camry Owners Manuals
- Toyota Camry Owners Manuals
- 2000 Toyota Camry Owners Manuals
- Toyota Camry Owners Manuals
- 2002 Toyota Camry Owners Manuals
- Toyota Camry Owners Manuals
- 2012 Toyota Camry Owners Manuals
- Toyota Camry Owners Manuals
- 1996 Toyota Camry Owners Manuals
- Toyota Camry Owners Manuals
- 2003 Toyota Camry Owners Manuals
- Toyota Camry Owners Manuals
- 2009 Toyota Camry Owners Manuals
- Toyota Camry Owners Manuals
- 2008 Toyota Camry Owners Manuals
- Toyota Camry Owners Manuals
- Download PDF Manual
-
“ST” will appear on the display. When the receiving signal gets weak, the channel separation will automatically be reduced for the lowest noise. If the signal becomes extremely weak, the radio will switch over to monaural reception. 4. Adjust the tone and sound balance. (See “(d) Adjusting the tone” and “(e) Ad- justing the sound balance”.) 5. To turn the radio off, push the “PWR VOL” knob.
(b) Selecting a station Tune in the desired station using one of the following methods. The frequency will appear on the display. Preset tuning: Use for tuning-in to a de- sired preset station. (See “(c) Presetting a station”.) Push the station selector button which has been preset to the desired station. The radio will tune in to the station and the button number will appear on the display. Seek tuning: Use for automatic station search and stop. Push the “TUNE (REW FF)” button on ei- ther side and hold it until a beep is heard. The radio will begin seeking up or down for a station of the nearest frequency and will stop on reception. Each time you push the button, stations will be sought out one af- ter another. Scan tuning: Use for station-to-station scanning. Scanning for all frequencies—Push the “SCAN” button and hold it until a beep is heard. With “SCAN” on the display, the ra- dio will automatically seek out a station of a higher frequency, hold it for 5 seconds and scan to the next. To continue listening to the broadcast of your choice, simply push the “SCAN” button once again.
If the radio scans over all frequencies without stop because the signals are too weak or just because you leave it going, the radio will begin scanning again with sensitivity boosted for searching out weak stations. Scanning for preset stations—Push the “SCAN” button within 2 seconds. With “SCAN” on the display, the radio will auto- matically seek out a preset station, hold it for 5 seconds and scan to the next. To continue listening to the station of your choice, simply push the “SCAN” button once again. Manual tuning Push the “TUNE (REW FF)” button on ei- ther side for less than 0.5 second. Each time you push the button, the radio will step up or down to another frequency where stations could exist. (c) Presetting a station 1. Tune in the desired station. (See “(b) Selecting a station”.) 2. Push one of the station selector but- tons and hold it until a beep is heard. This sets the station to the button and the but- ton number will appear on the display. Each button can store one AM station and one FM station. To change the preset sta- tion to a different one, follow the same pro- cedure.
84
The preset station will be cancelled when the power source is severed (battery dis- connected, burnt fuse, etc.). (d) Adjusting the tone To adjust a low-pitched tone, push the “BASS TREB” knob (if pushed in) and turn it. To adjust a high-pitched tone, push the “BASS TREB” knob (if pushed in), pull it fully out and turn it. (e) Adjusting the sound balance To balance the sound between the right and left speakers, pull out the “BAL” knob and turn it. To balance the sound between the front and rear speakers, turn the “FADE” knob. (f) Listening to the cassette tape 1. Put the cassette into the slot, with the tape side to the right and lightly push it in. The tape player will grab the cassette and slide it into place to play it. If the radio is on when inserting the cassette, the radio will automatically turn off. If the cassette is already in the slot, push the “TAPE” button. At this time, “PLAY” will appear on the dis- play.
The tape player can also be turned on by pushing the “PWR VOL” knob if the tape player was playing when the system was turned off by pushing the knob. 2. If using a tape recorded with Dolby(cid:1) NR*, push the button marked with the double-D symbol. The display will indi- cate that the Dolby noise reduction sys- tem is on. The Dolby NR mode reduces tape noise by about 10 dB. For best sound reproduc- tion, play your tapes with the Dolby(cid:1) NR* on or off according to the mode used for recording the tape. To play a tape recorded without Dolby(cid:1) NR*, push the button again to turn off the Dolby(cid:1) NR*. *: Dolby noise reduction manufactured under license from Dolby Lab- oratories Licensing Corporation. “DOLBY” and the double-D symbol
are trademarks of Dolby Laboratories Licensing Corporation.
3. Turn the “PWR VOL” knob to adjust the volume. 4. Select your program. (See “(g) Select- ing a program”.) 5. Adjust the tone and sound balance. (See “(d)” Adjusting the tone” and “(e) Ad- justing the sound balance”.)
6. To turn the player off, push the “PWR VOL” knob. 7. To eject the cassette, push the EJECT button. As this is done, the player will turn off. If the radio was on when the cassette tape was inserted, it will automatically turn on again. You can eject the cassette only once after the system is turned off. (g) Selecting a program 1. Push the “PROG” button to select a side to play. The tape operation indicator display shows you which side is being played. The player will automatically reverse di- rection at the end of the tape to play the other side. 2. Push the “REW FF (TUNE)” button on either side to fast forward or rewind the tape. At this time, “FF” or “REW” will ap- pear on the display. To stop the tape while it is fast forwarding, push “FF” or “TAPE”; to stop the tape while it is rewinding, push “REW” or “TAPE”. The tape will immedi- ately begin to play.
85
AM-FM radio with electronic tuner and cassette tape player (type B)
86
87
(a) Listening to the radio 1. Push the “AM(cid:2)FM” button to turn the radio on and select either an AM or FM broadcast. “AM” or “FM” will appear on the display. The radio can also be turned on by push- ing the “PWR VOL” knob if the radio was on when the system was turned off. 2. Turn the “PWR VOL” knob to adjust the volume. 3. Tune in the desired station. (See “(b) Selecting a station” and “(c) Presetting a station”.) The radio will change automatically to ste- reo reception when an FM stereo broad- cast is being received. At the same time, “ST” will appear on the display. When the receiving signal gets weak, the channel separation will automatically be reduced for the lowest noise. If the signal becomes extremely weak, the radio will switch over to monaural reception. 4. Adjust the tone and sound balance. (See “(d) Adjusting the tone” and “(e) Ad- justing the sound balance”.) 5. To turn the radio off, push the “PWR VOL” knob.
(b) Selecting a station Tune in the desired station using one of the following methods. The frequency will appear on the display. Preset tuning: Use for tuning-in to a de- sired preset station. (See “(c) Presetting a station”.) 1. Push the “AM(cid:2)FM” button repeatedly until the desired selection appears on the display. 2. Push the station selector button which has been preset to the desired station. The radio will tune in to the station and the button number will appear on the display. Seek tuning: Use for automatic station search and stop. Push the “TUNE (REW FF)” button on ei- ther side and hold it until a beep is heard. The radio will begin seeking up or down for a station of the nearest frequency and will stop on reception. Each time you push the button, stations will be sought out one af- ter another. Scan tuning: Use for station-to-station scanning.
Scanning for all frequencies—Push the “SCAN” button and hold it until a beep is heard. With “SCAN” on the display, the ra- dio will automatically seek out a station of a higher frequency, hold it for 5 seconds and scan to the next. To continue listening to the broadcast of your choice, simply push the “SCAN” button once again. If the radio scans over all frequencies without stop because the signals are too weak or just because you leave it going, the radio will begin scanning again with sensitivity boosted for searching out weak stations. Scanning for preset stations—Push the “SCAN” button within 2 seconds. With “SCAN” on the display, the radio will auto- matically seek out a preset station, hold it for 5 seconds and scan to the next. To continue listening to the station of your choice, simply push the “SCAN” button once again. Manual tuning Push the “TUNE (REW FF)” button on ei- ther side for less than 0.5 second. Each time you push the button, the radio will step up or down to another frequency where stations could exist.
88
(c) Presetting a station 1. Push the “AM(cid:2)FM” button repeatedly until the desired selection, “AM”, “FM1” or “FM2”, appears on the display. The radio has two FM selections, “FM1” and “FM2”. You can preset any desired six stations in each selection. When you pre- set an FM station, check which selection you have used. 2. Tune in the desired station. (See “(b) Selecting a station”.) 3. Push one of the station selector but- tons and hold it until a beep is heard. This sets the station to the button and the but- ton number will appear on the display. To change the preset station to a different one, follow the same procedure. The preset station will be cancelled when the power source is severed (battery dis- connected, burnt fuse, etc.). (d) Adjusting the tone To adjust the low-pitched tone, push the “BASS TREB” knob (if pushed in) and turn it. To adjust the high-pitched tone, push the “BASS TREB” knob (if pushed in), pull it fully out and turn it.
(e) Adjusting the sound balance To balance the sound between the right and left speakers, pull the “BAL” knob and turn it. To balance the sound between the front and rear speakers, turn the “FADE” knob. (f) Listening to the cassette tape 1. Put the cassette into the slot, with the tape side to the right and lightly push it in. The tape player will grab the cassette and slide it into place to play it. If the radio is on when inserting the cassette, it will auto- matically turn off. If the cassette is already in the slot, push the “TAPE” button. At this time, “PLAY” will appear on the dis- play. The tape player can also be turned on by pushing the “PWR VOL” knob if the tape player was playing when the system was turned off by pushing the knob. When a metal or chrome equivalent tape is inserted, the player will automatically adapt to it and “MTL” will appear on the display. 2. If using a tape recorded with Dolby(cid:1) NR*, push the button marked with the double-D symbol to select the Dolby B NR or Dolby C NR mode. The display will indicate which Dolby noise reduction sys- tem is operating.
The Dolby B NR mode reduces tape noise by about 10 dB. The Dolby C NR mode re- duces tape noise by another 10 dB, or about 20 dB total. For best sound repro- duction, select the same NR mode that was used to record the tape. To play a tape recorded without Dolby(cid:1) NR*, push the button until the Dolby NR indicator disappears. *: Dolby noise reduction manufactured under license from Dolby Lab- oratories Licensing Corporation. “DOLBY” and the double-D symbol
are trademarks of Dolby Laboratories Licensing Corporation.
3. Turn the “PWR VOL” knob to adjust the volume. 4. Select your program. (See “(g) Select- ing a program”.) 5. Adjust the tone and sound balance. (See “(d) Adjusting the tone” and “(e) Ad- justing the sound balance”.) 6. If desired, other functions may be used for your convenience. (See “(h) Other tape player functions”.) 7. To eject the cassette, push the EJECT button. As this is done, the player will turn off. If the radio was on when the cassette tape was inserted, it will automatically turn on again. 8. To turn the player off, push the “PWR VOL” knob.
89
The maximum number of settings is nine. The tenth push on the button will cancel the function and “APS” will disappear on the display. 3. Push the “REW FF (TUNE)” button on either side to get the tape going in the di- rection of the program. The player will au- tomatically stop at the beginning of the se- lected program and play it. If the number you set exceeds the number of the programs remaining on the side currently being played, the tape will fast forward to the beginning of the other side (when fast forwarding) or rewind to the be- ginning of that side (when rewinding). This function does not work properly un- less the blank portions on the tape have 3
seconds or more between one program and another. (h) Other tape player functions “RPT” button: Use for automatic repeat of the program currently being listened to.Push the “RPT” button while the program is being played. As this is done, “RPT” will appear on the display. When the program is finished, the tape will automatically be rewound to the beginning of the program and the program will be played again. To cancel it, push the button once again. This function does not work properly un- less the blank portions on the tape have 3
seconds or more between one program and another. “SKIP” button: Use for automatic skip- ping of blank portions between programs. Push the “SKIP” button. “SKIP” appears on the display. The player will automati- cally skip any blank portions of 15 sec- onds or more and play the next program, even if it is on the other side. To cancel it, push the button once again. “SCAN” button: Use for program-to- program scanning. Push the “SCAN” button. With “SCAN” on the display, each program will be played for 12 seconds and scan to the next. To continue listening to the program of your choice, simply push the “SCAN” button once again. The player will automatically reverse di- rections at the end of the tape and keep scanning.You can eject the cassette only once after the system is turned off. (g) Selecting a program 1. Push the “PROG” button to select a side to play. The tape operation indicator display shows you which side is being played. The player will automatically reverse di- rection at the end of the tape to play the other side. 2. Have a desired program played using either of the following methods. Manual program selection Push the “REW FF (TUNE)” button on ei- ther side to rewind or fast forward the tape. At this time, “REW” or “FF” will ap- pear on the display. To stop the tape while it is fast forwarding, push “FF” or “TAPE”; to stop the tape while it is rewinding, push “REW” or “TAPE”. The tape will immedi- ately begin to play. Automatic program selection: Use for quick access to a desired program. 1. Push the “APS” button. “APS” and pro- gram number “1” will appear on the dis- play. 2. Repeat the push until the number indi- cates how many programs ahead of/be- hind the one currently being played you wish to listen to (include the program you are currently listening to when counting back previous programs).
90
“R⋅M” button (radio monitor system): Use for automatic station reception. Push the “R(cid:2)M” button. “R(cid:2)M” appears on the display. In this mode, if you push the “REW FF (TUNE)” button on either side when listening to the tape, the system will change the radio mode and automatically receive the last station which was set. At the time, the received station condition appears on the display. The system will be cancelled out when the power source is severed (battery discon- nected, burnt fuse etc.)
(i) Anti-theft system To deter theft of your radio unit, the sys- tem is designed so that the radio unit be- comes inoperable if the unit is stolen from the vehicle. The system is not preset at factory. You must input a three-digit identification number decided by you.
NOTICE
If you pushed any wrong buttons on the anti-theft system, the following messages will appear on the display. (cid:3)“Err”—You have pushed wrong
buttons.
(cid:3)“1-9”—Indicates the number of er- rors you have made. You may make up to nine errors, but no more!
(cid:3)“HELP”—The number of errors you can make was exceeded. The audio system is completely inop- erable. Contact you Toyota dealer.
Setting the anti-theft system 1. Make sure the radio unit is turned off with the ignition switch in “ACC”. 2. While holding the “1” and “6” buttons in, push and hold the “PWR VOL” knob in until “SEC” appears on the display.
91
3. Press the “1” button while holding the right side of “TUNE” button in. “- - -” and the tape operation indicator will appear on the display.
4. Input your identification number by pressing the “1”, “2” and “3” buttons re- peatedly. Use the “1” button for the first digit, the “2” button for the second digit and the “3” button for the last digit. For ex- ample, if your number is 824, press the “1” button nine times, the “2” button three times and the “3” button five times. if the display returns to “- - -” while inputting, try again. We recommend that your identification number be associated with something easy to remember. In case you are unsure of the number, write it in a notebook you normally carry. Do not leave it behind in your vehicle.
5. With your identification number ap- pearing on the display, press the “SCAN” button and hold it in until “SEC” appears on the display. “SEC” will go off to indicate the system is set. If invalid buttons have been used, “Err” will appear on the display before “SEC” appears. Try again from the step 3. Once the system is set, the indicator light turns on and off with the ignition switch in “OFF” and “SEC” will appear each time the key is turned to the “ACC” position. To change the identification number for some reason, cancel the system (See “Cancelling the anti-theft system”) and set it again with a new number.
92
The system will be activated if the electri- cal power source is disconnected from the radio unit. When the system is activated, the audio system cannot be turned on even after the power supply resumes and “SEC” will appear on the display. If this happens, such as when the battery is dis- charged, see “If the anti-theft system is activated”.
Cancelling the anti-theft system 1. Follow the steps 1 to 4 described in “Setting the anti-theft system”. 2. With your identification number ap- pearing on the display, press the “SCAN” button and hold it in until “- - -” appears on the display. “- - -” will go off to indicate the system is cancelled. If invalid buttons have been used, “Err” will appear on the display and “SEC” appears. Try again from step 3 in “Setting the anti-theft sys- tem”.
The figure with “Err” indicates how many errors you have made. You may make up to nine errors, but no more!
NOTICE
A tenth error will activate the anti-theft system and “HELP” will appear on the display. The audio system will be completely inoperable. At this time, the indicator light also comes on. If this occurs, contact your Toyota dealer.
At the time of resale of your vehicle, can- cel the system for the new owner.
93
See “Cancelling the anti-theft system” for notes on the figure with “Err”.
If the anti-theft system is activated The audio system made inoperable by the activated anti-theft system will be oper- able if you give it the correct identification number. 1. Follow the steps 3 and 4 described in “Setting the anti-theft system”. 2. With your identification number ap- pearing on the display, press the “SCAN” button and hold it in until “SEC” appears on the display. “SEC” will go off to indicate that the system is reset and the audio sys- tem is operable. If invalid buttons have been used, “Err” will appear on the display before “SEC” appears. Try again from the beginning.
94
AM-FM radio with electronic tuner, cassette tape player and Compact Disc player
95
96
97
98
(a) Listening to the radio 1. Push the “AM(cid:2)FM” button to turn the radio on and select either an AM or FM broadcast. “AM” or “FM” will appear on the display. The radio can also be turned on by push- ing the “PWR VOL” knob if the radio was on when the system was turned off. 2. Turn the “PWR VOL” knob to adjust the volume. 3. Tune in the desired station. (See “(b) Selecting a station” and “(c) Presetting a station”.) The radio will change automatically to ste- reo reception when an FM stereo broad- cast is being received. At the same time, “ST” will appear on the display. When the receiving signal gets weak, the channel separation will automatically be reduced for the lowest noise. If the signal becomes extremely weak, the radio will switch over to monaural reception. 4. Adjust the tone and sound balance. (See “(d) Adjusting the tone” and “(e) Ad- justing the sound balance”.) 5. To turn the radio off, push the “PWR VOL” knob.
(b) Selecting a station Tune in the desired station using one of the following methods. The frequency will appear on the display. Preset tuning: Use for tuning-in to a de- sired preset station. (See “(c) Presetting a station”.) 1. Push the “AM(cid:2)FM” button repeatedly until the desired selection appears on the display. 2. Push the station selector button which has been preset to the desired station. The radio will tune in to the station and the button number will appear on the display. Seek tuning: Use for automatic station search and stop. Push the “TUNE” button on either side and hold it until a beep is heard. The radio will begin seeking up or down for a station of the nearest frequency and will stop on reception. Each time you push the button, stations will be sought out one after anoth- er. Scan tuning: Use for station-to-station scanning.
Scanning for all frequencies—Push the “SCAN” button and hold it until a beep is heard. With “SCAN” on the display, the ra- dio will automatically seek out a station of a higher frequency, hold it for 5 seconds and scan to the next. To continue listening to the broadcast of your choice, simply push the “SCAN” button once again. If the radio scans over all frequencies without stop because the signals are too weak or just because you leave it going, the radio will begin scanning again with sensitivity boosted for searching out weak stations. Scanning for preset stations—Push the “SCAN” button within 2 seconds. With “SCAN” on the display, the radio will auto- matically seek out a preset station, hold it for 5 seconds and scan to the next. To continue listening to the station of your choice, simply push the “SCAN” button once again. Manual tuning Push the “TUNE ” button on either side for less than 0.5 second. Each time you push the button, the radio will step up or down to another frequency where stations could exist. (c) Presetting a station 1. Push the “AM(cid:2)FM” button repeatedly until the desired selection, “AM”, “FM1” or “FM2”, appears on the display.
99
The radio has two FM selections, “FM1” and “FM2”. You can preset any desired six stations in each selection. When you pre- set an FM station, check which selection you have used. 2. Tune in the desired station. (See “(b) Selecting a station”.) 3. Push one of the station selector but- tons and hold it until a beep is heard. This sets the station to the button and the but- ton number will appear on the display. To change the preset station to a different one, follow the same procedure. The preset station will be cancelled when the power source is severed (battery dis- connected, burnt fuse, etc.). (d) Adjusting the tone Automatic tone adjustment Push the “EQ” button repeatedly until the desired frequency response pattern ap- pears on the display. This function auto- matically controls the tone in accordance with the selected pattern. To change the preset mode, adjust the manual tone control knobs as you like. (See the following “Manual tone adjust- ment”.)
To memorize the setting you have se- lected, push the “EQ” button for 2 sec- onds until a beep is heard. To cancel the memory, push the “EQ” button for 10 sec- onds until the second beep is heard. To cancel all the memory which you have set, push the “EQ” button for 20 seconds until the third beep is heard. Manual tone adjustment Before using the tone controls, push the “EQ” button repeatedly until your desired response pattern appears on the display. To adjust a low-pitched tone, push the “BASS” knob (if pushed in) and turn it. At the time, the “BASS” display will change. To adjust a middle-pitched tone, push the “MID BAL” knob (if pushed in) and turn it. At the time, the “MID” display will change. To adjust a high-pitched tone, push the “TREB FADE” knob (if pushed in) and turn it. At the time, the “TREB” display will change. (e) Adjusting the sound balance To balance the sound between the right and left speakers, push the “MID BAL” knob (if pushed in), pull it fully out and turn it. To balance the sound between the front and rear speakers, push the “TREB FADE” knob (if pushed in), pull it fully out and turn it.
(f) Listening to the cassette tape 1. Put the cassette into the slot, with the tape side to the right and lightly push it in. The tape player will grab the cassette and slide it into place to play it. If the radio or Compact Disc player is on when inserting the cassette, it will automatically turn off. If the cassette is already in the slot, push the “TAPE” button. At this time, “PLAY” will appear on the dis- play. The tape player can also be turned on by pushing the “PWR VOL” knob if the tape player was playing when the system was turned off by pushing the knob. When a metal or chrome equivalent tape is inserted, the player will automatically adapt to it and “MTL” will appear on the display. 2. If using a tape recorded with Dolby(cid:1) NR*, push the button by the double-D symbol to select the Dolby B NR or Dolby C NR mode. The display will indicate which Dolby noise reduction system is op- erating. The Dolby B NR mode reduces tape noise by about 10 dB. The Dolby C NR mode re- duces tape noise by another 10 dB, or about 20 dB total. For best sound repro- duction, select the same NR mode that was used to record the tape.
100
To play a tape recorded without Dolby NR*, push the button until the Dolby NR indicator disappears. *: Dolby noise reduction manufactured under license from Dolby Lab- oratories Licensing Corporation. “DOLBY” and the double-D symbol
are trademarks of Dolby Laboratories Licensing Corporation.
3. Turn the “PWR VOL” knob to adjust the volume. 4. Select your program. (See “(g) Select- ing a program”.) 5. Adjust the tone and sound balance. (See “(d) Adjusting the tone” and “(e) Ad- justing the sound balance”.) 6. If desired, other functions may be used for your convenience. (See “(h) Other tape player functions”.). 7. To eject the cassette, push the EJECT button. As this is done, the player will turn off. If the radio or Compact Disc player was on when the cassette tape was in- serted, it will automatically turn on again. 8. To turn the player off, push the “PWR VOL” knob. You can eject the cassette only once after the system is turned off.
(g) Selecting a program 1. Push the “PROG” button to select a side to play. The tape operation indicator display shows you which side is being played. The player will automatically reverse di- rections at the end of the tape to play the other side. 2. Have a desired program played using either of the following methods. Manual program selection Push the FAST FORWARD button to fast forward the tape. “FF” will appear on the display. Push the REWIND button to re- wind the tape. “REW” will appear on the display. To stop the tape while it is fast forwarding, push the FAST FORWARD or “TAPE” button; to stop the tape while it is rewind- ing, push the REWIND or “TAPE” button. The tape will immediately begin to play. Automatic program selection: Use for quick access to a desired program. 1. Push the TRACK UP/DOWN button on either side. “1.RR” or “1.FF” will appear on the display.
2. Repeat the push until the number indi- cates how many programs ahead of/be- hind the one currently being played you wish to listen to (include the program you are currently listening to when counting back previous programs). The maximum number of settings is nine. The tenth push on the button will cancel the function and the skip feature will dis- appear on the display. If number you set exceeds the number of the programs remaining on the side cur- rently being played, the tape will fast for- ward to the beginning of the other side (when fast forwarding) or rewind to the be- ginning of that side (when rewinding). This function does not work properly un- less the blank portions on the tape have 3
seconds or more between one program and another. (h) Other tape player functions “RPT” button: Use for automatic repeat of the program currently being listened to. Push the “RPT” button while the program is being played. As this is done, “RPT” will appear on the display. When the program is finished, the tape will automatically be rewound to the beginning of the program and the program will be played again. To cancel it, push the button once again.101
This function does not work properly un- less the blank portions on the tape have 3
seconds or more between one program and another. “SKIP” button: Use for automatic skip- ping of blank portions between programs. Push the “SKIP” button. “SKIP” appears on the display. The player will automati- cally skip any blank portions of 15 sec- onds or more and play the next program, even if it is on the other side. To cancel it, push the button once again. “SCAN” button: Use for program-to- program scanning. Push the “SCAN” button. With “SCAN” on the display, each program will be played for 12 seconds and scan to the next. To continue listening to the program of your choice, simply push the “SCAN” button once again. The player will automatically reverse di- rections at the end of the tape and keep scanning. “R⋅M” button (radio monitor system): Use for automatic station reception.Push the “R(cid:2)M” button. “R(cid:2)M” appears on the display. In this mode, if you push the REWIND or FAST FORWARD button when listening to the tape, the system will change the radio mode and automatically receive the last station which was set. At the time, the received station condition appears on the display. The system will be cancelled out when the power source is severed (battery discon- nected, burnt fuse etc.) (i) Listening to the Compact Disc This Compact Disc player does not need to use an adapter for 8 cm (3.2 in.) Discs. Do not use an adapter when listening to 8
cm (3.2 in.) Discs, which cause tracking errors or interfere with Disc ejection. 1. Put the Compact Disc into the slot, with the label side up and lightly push it in. The Disc player will grab the Disc and slide it into place to play it from the track 1 pro- gram. As this is done, the “DISC” light will come on. The track number will appear on the display. If the Compact Disc is already in the slot, push the “CD” button.The Compact Disc player can also be turned on by pushing the “PWR VOL” knob if the Compact Disc player was play- ing when the system was turned off by pushing the knob. If the radio or cassette tape player is on when playing the Disc, it will automatically turn off. If the Disc is inserted with the label side down, the Disc will automatically be ejected. 2. Turn the “PWR VOL” knob to adjust the volume. 3. Select your program. (See “(j) Select- ing a program”.) When the end of the Disc is reached, the player starts playing the track 1 program again. 4. Adjust the tone and sound balance. (See “(d) Adjusting the tone” and “(e) Ad- justing the sound balance”.) 5. Push the EJECT button to eject the Disc. As this is done, the Compact Disc player will turn off. If the radio or cassette tape player was on when the Disc was in- serted, it will automatically turn on again. 6. Push the “PWR VOL” knob to turn the Compact Disc player off.
102
You can eject the Disc only once after the system is turned off. When ejecting a 8 cm (3.2 in.) Disc, do not put a 12 cm (4.7 in.) Disc into the slot until the “DISC” light goes off. (j) Selecting a program Automatic program selection: Use for direct access to a desired program. Push the TRACK UP/DOWN button on ei- ther side and hold it until the desired pro- gram track number appears on the dis- play. As you release the button, the player will start playing the selected program from the beginning. Manual program selection: Push either of the FAST FORWARD or REVERSE buttons and hold it to fast for- ward or reverse the Disc. Releasing the button starts the play from that position. Scan program selection: Use for pro- gram-to-program scanning. Push the “SCAN” button. With “SCAN” on the display, each program will be played for 10 seconds from the beginning and scan to the next. To continue listening to the program of your choice, simply push the “SCAN” button once again.
(k) Other Compact Disc player func-
tions
“RPT” button: Use for automatic repeat of the program currently being listened to. Push the “RPT” button while the program is being played. As this is done, “RPT” will appear on the display. When the program is finished, the Disc will automatically re- turn to the beginning of the program and the program will be played again. To can- cel it, push the button once again. “RAND” button: Use for automatic ran- dom selection of Disc programs. If the “RAND” button is pushed while listening to Compact Disc, “RAND” will appear on the display and the player will endlessly repeat the programs selected at random. To continue listening to the program of your choice, simply push the “RAND” button once again.
(l) Anti-theft system To deter theft of your radio unit, the sys- tem is designed so that the radio unit be- comes inoperable if the unit is stolen from the vehicle. The system is not preset at factory. You must input a three-digit identification number decided by you.
NOTICE
If you pushed any wrong buttons on the anti-theft system, the following messages will appear on the display. (cid:3)“Err”—You have pushed wrong
buttons.
(cid:3)“1-9”—Indicates the number of errors you have made. You may make up to nine errors, but no more!
(cid:3)“HELP”—The number of errors you can make was exceeded. The audio system is completely inop- erable. Contact your Toyota dealer.
103
Setting the anti-theft system 1. Make sure the radio unit is turned off with the ignition switch in “ACC”. 2. While holding the 1 and 6 buttons in, push and hold the “PWR VOL” knob in un- til “SEC” appears on the display
3. Press the 1 button while holding the right side of “TUNE” button in. “- - -” will appear on the display.
4. Input your identification number by pressing the 1, 2 and 3 buttons repeated- ly. Use the 1 button for the first digit, the 2 button for the second digit and the 3 but- ton for the last digit. For example, if your number is 210, press the 1 button three times, the 2 button twice and the 3 button once. If the display returns to “- - -” while inputting, try again. We recommend that your identification number be associated with something easy to remember. In case you are unsure of the number, write it in a notebook you normally carry. Do not leave it behind in your vehicle.
104
5. With your identification number ap- pearing on the display, press the “SCAN” button and hold it in until “SEC” appears on the display. “SEC” will go off to indicate the system is set. If invalid buttons have been used, “Err” will appear on the display before “SEC” appears. Try again from the step 3. Once the system is set, the indicator light turns on and off with the ignition switch in “OFF” and “SEC” will appear each time the key is turned to the “ACC” position. To change the identification number for some reason, cancel the system (See “Cancelling the anti-theft system”) and set it again with a new number.
The system will be activated if the electri- cal power source is disconnected from the radio unit. When the system is activated, the audio system cannot be turned on even after the power supply resumes and “SEC” will appear on the display. If this happens, such as when the battery is dis- charged, see “If the anti-theft system is activated”.
Cancelling the anti-theft system 1. Follow the steps 1 to 4 described in “Setting the anti-theft system”. 2. With your identification number ap- pearing on the display, press the “SCAN” button and hold it in until “- - -” appears on the display. “- - -” will go off to indicate the system is cancelled. If invalid buttons have been used, “Err” will appear on the display and “SEC” appears. Try again from step 3 in “Setting the anti-theft sys- tem”.
105
See “Cancelling the anti-theft system” for notes on the figure with “Err”.
The figure with “Err” indicates how many errors you have made. You may make up to nine errors, but no more!
NOTICE
A tenth error will activate the anti-theft system and “HELP” will appear on the display. The audio system will be completely inoperable. At this time, the indicator light also comes on. If this occurs, contact your Toyota dealer.
At the time of resale of your vehicle, can- cel the system for the new owner.
If the anti-theft system is activated The audio system made inoperable by the activated anti-theft system will be oper- able if you give it the correct identification number. 1. Follow the steps 3 and 4 described in “Setting the anti-theft system”. 2. With your identification number ap- pearing on the display, press the “SCAN” button and hold it in until “SEC” appears on the display. “SEC” will go off to indicate that the system is reset and the audio sys- tem is operable. If invalid buttons have been used, “Err” will appear on the display before “SEC” appears. Try again from the beginning.
106
Air conditioning controls (type A)
107
108
(a) Controls and functions The temperature control knob is used to adjust the temperature of the delivered air. Turn the knob toward the HIGH position for higher temperature and toward the LOW position for lower temperature. The air intake control lever is used to se- lect intake air, either outside air or recircu- lated air. With the lever in the OUTSIDE AIR posi- tion, the system will take fresh outside air into the unit. For recirculated air, move the lever to the RECIRCULATED AIR posi- tion. The air flow control knob is used to select the air flow outlets air is delivered from. See “(f) Air flow selection” for detailed in- formation. The fan speed control knob is used to turn on and off the fan and select the fan speed. The higher the fan speed setting is, the more air is delivered. Turning the knob to the “OFF” position turns off the fan. The air conditioning on-off button is used to turn on and off the air conditioning. With the button pressed in, the air condi- tioning turns on. Pressing the button once again will turn the air conditioning off.
If the indicator light flashes, contact your Toyota dealer as soon as possible. There may be slippage of the drive belt or trouble in the compressor. If this happens, the air conditioning is automatically turned off to avoid damage to the drive belt. (b) Heating 1. Turn the temperature control knob anywhere except the LOW position. When dehumidified heating is desired, turn the knob between the HIGH and middle positions. If cooler air is desired at face level for bi- level operation, turn the knob around the middle. 2. Move the air intake control lever to the OUTSIDE AIR position. If quick circulation of heated air is desired, move the lever to the RECIRCULATED AIR position. For normal use, it is best to keep the lever in the OUTSIDE AIR position. Otherwise the windows will fog up more easily. 3. Turn the air flow control knob to the FLOOR position. If cooler air is desired at face level for bi- level operation, turn the knob to the BI- LEVEL position. If the windshield fogs up easily, turn the knob to the FLOOR/WINDSHIELD posi- tion.
For detailed information on air flow control including other settings, see “(f) Air flow selection”. 4. Turn the fan speed control knob any- where except the “OFF” position. 5. Leave the air conditioning on-off but- ton in the OFF position. If dehumidified heating is desired, press in the air conditioning on-off button. (c) Cooling 1. Turn the temperature control knob anywhere between the middle and LOW positions. If warmer air is desired at floor level for bi- level operation, turn the knob around the middle. 2. Move the air intake control lever to the OUTSIDE AIR position. If quick circulation of cooled air is desired, move the lever to the RECIRCULATED AIR position. For normal use, it is best to keep the lever in the OUTSIDE AIR position. 3. Turn the air flow control knob to the FACE position. If warmer air is desired at floor level for bi- level operation, turn the knob to the BI- LEVEL position.
109
For detailed information on air flow control including other settings, see “(f) Air flow selection”. 4. Turn the fan speed control knob any- where except the “OFF” position. 5. Press in the air conditioning on-off but- ton. (d) Ventilation 1. Turn the temperature control knob at the LOW position. 2. Move the air intake control lever to the OUTSIDE AIR position. 3. Turn the air flow control knob to the FACE position. For detailed information on air flow control including other settings, see “(f) Air flow selection”. 4. Turn the fan speed control knob any- where except the “OFF” position. 5. Leave the air conditioning on-off but- ton in the OFF position. (e) Windshield defogging and defrost-
ing
To remove interior fog on the windshield: 1. Turn the temperature control knob to any position. 2. Move the air intake control lever to the OUTSIDE AIR position.
3. Turn the air flow control knob to the WINDSHIELD position. For detailed information on air flow con- trol, see “(f) Air flow selection”. 4. Turn the fan speed control knob any- where except the “OFF” position. 5. Press in the air conditioning on-off but- ton. To remove frost or exterior fog on the windshield: 1. Turn the temperature control knob to the HIGH position. 2. Move the air intake control lever to the OUTSIDE AIR position. 3. Turn the air flow control knob to the WINDSHIELD position. For detailed information on air flow con- trol, see “(f) Air flow selection”. 4. Turn the fan speed control knob to the “HI” position. 5. Leave the air conditioning on-off but- ton in the OFF position. (f) Air flow selection FACE position—This position directs the air flow to face level.
BI-LEVEL position—This position directs the air flow to face level and the floor. Ex- cept in ventilation, the air to the floor is slightly warmer than that to face level. FLOOR position—This position directs air flow mostly to the floor. FLOOR/WINDSHIELD position — This position directs the air flow to the wind- shield as well as the floor. WINDSHIELD position—This position di- rects air flow mostly to the windshield and front side windows. Do not use the WINDSHIELD position during cooling operation in extremely hu- mid weather. The difference between the temperature of the outside air and that of the windshield could cause the outer sur- face of the windshield to fog up, blocking your vision. (g) Operating tips (cid:1) Be sure the air inlet grilles in front of the windshield are not blocked by leaves or other obstructions. If air flow control is not satisfactory, check the dashboard vents. (See “Side vents” or “Lower vent” after “Heater controls”.)
(cid:1)
110
(cid:1) To help cool down the interior after parking in the hot sun, drive for the first few minutes with the windows open. After the excess heat has blown away, close the windows.
(cid:1) When driving on dusty roads, close all windows. If dust thrown up by the ve- hicle is still drawn into the vehicle after closing the windows, it is recom- mended that the air intake control le- ver be set to the OUTSIDE AIR posi- tion and the fan speed control knob be turned anywhere except the “OFF” position. If following another vehicle on a dusty road, or driving in windy and dusty con- ditions, it is recommended that the air intake control lever be temporarily set to the RECIRCULATED AIR position, which will close off the outside pas- sage and prevent outside air and dust from entering the vehicle interior.
(cid:1)
111
Air conditioning controls (type B)
112
113
(a) Controls and functions The temperature control knob is used to adjust the temperature of the delivered air. Turn the knob toward the HIGH position for higher temperature and toward the LOW position for lower temperature. The air intake control button is used to se- lect intake air, either outside air or recircu- lated air. With the button in the OUTSIDE AIR mode, the system will take fresh outside air into the unit. For recirculated air, set the button to the RECIRCULATED AIR mode. Pressing the button once again will let the button out in the OUTSIDE AIR mode. The air flow control buttons are used to select the air flow outlets air is delivered from. See “(f) Air flow selection” for detailed in- formation. The fan speed control knob is used to turn on and off the fan and select the fan speed. The higher the fan speed setting is, the more air is delivered. Turning the knob to the “OFF” position turns off the fan. The air conditioning on-off button is used to turn on and off the air conditioning.
With the button pressed in, the air condi- tioning turns on. Pressing the button once again will turn the air conditioning off. If the indicator light flashes, contact your Toyota dealer as soon as possible. There may be slippage of the drive belt or trouble in the compressor. If this happens, the air conditioning is automatically turned off to avoid damage to the drive belt. (b) Heating 1. Turn the temperature control knob anywhere except the LOW position. When dehumidified heating is desired, turn the knob between the HIGH and middle positions. If cooler air is desired at face level for bi- level operation, place the knob around the middle. 2. If quick circulation of heated air is de- sired, set to the RECIRCULATED AIR mode of the air intake control button. For normal use, it is best to set to the OUTSIDE AIR mode. Otherwise the win- dows will fog up more easily. 3. Press in the FLOOR button of the air flow control buttons. If cooler air is desired at face level for bi- level operation, press in the BI-LEVEL button.
If the windshield fogs up easily, press in the FLOOR/WINDSHIELD button. For detailed information on air flow control including other settings, see “(f) Air flow selection”. 4. Turn the fan speed control knob any- where except the “OFF” position. 5. Leave the air conditioning on-off but- ton in the OFF position. If dehumidified heating is desired, press in the air conditioning on-off button. (c) Cooling 1. Turn the temperature control knob anywhere between the middle and LOW positions. If warmer air is desired at floor level for bi- level operation, turn the knob around the middle. 2. If quick circulation of cooled air is de- sired, set to the RECIRCULATED AIR mode of the air intake control button. For normal use, it is best to set to the OUTSIDE AIR mode. 3. Press in the FACE button of the air flow control buttons. If warmer air is desired at floor level for bi- level operation, press in the BI-LEVEL button.
114
For detailed information on air flow control including other settings, see “(f) Air flow selection”. 4. Press in any fan speed control button except the “OFF” button. 5. Press in the air conditioning on-off but- ton. (d) Ventilation 1. Turn the temperature control knob at the LOW position. 2. Set to the OUTSIDE AIR mode of the air intake control buttons. 3. Press in the FACE button of the air flow control buttons. For detailed information on air flow control including other settings, see “(f) Air flow selection”. 4. Turn the fan speed control knob any- where except the “OFF” position. 5. Leave the air conditioning on-off but- ton in the OFF position. (e) Windshield defogging and defrost-
ing
To remove interior fog on the windshield: 1. Turn the temperature control knob to any position. 2. Set to the OUTSIDE AIR mode of the air intake control buttons.
3. Press in the WINDSHIELD button of the air flow control buttons. For detailed information on air flow con- trol, see “(f) Air flow selection”. 4. Turn the fan speed control knob any- where except the “OFF” position. 5. Press in the air conditioning on-off but- ton. To remove frost or exterior fog on the windshield: 1. Turn the temperature control knob to the HIGH position. 2. Set to the OUTSIDE AIR mode of the air intake control buttons. 3. Press in the WINDSHIELD button of the air flow control buttons. For detailed information on air flow con- trol, see “(f) Air flow selection”. 4. Turn the fan speed control knob to the “HI” position. 5. Leave the air conditioning on-off but- ton in the OFF position. (f) Air flow selection FACE button—This button directs the air flow to face level. BI-LEVEL button—This button directs the air flow to face level and the floor. Ex- cept in ventilation, the air to the floor is slightly warmer than that to face level.
FLOOR button—This button directs air flow mostly to the floor. FLOOR/WINDSHIELD button—This but- ton directs air flow to the windshield as well as the floor. WINDSHIELD button—This button di- rects air flow mostly to the windshield and front side windows. Do not use the WINDSHIELD button dur- ing cooling operation in extremely humid weather. The difference between the tem- perature of the outside air and that of the windshield could cause the outer surface of the windshield to fog up, blocking your vision. (g) Operating tips (cid:1) Be sure the air inlet grilles in front of the windshield are not blocked by leaves or other obstructions. If air flow control is not satisfactory, check the dashboard vents. (See “Side vents” or “Lower vent” after “Heater controls”.)
(cid:1)
(cid:1) To help cool down the interior after parking in the hot sun, drive for the first few minutes with the windows open. After the excess heat has blown away, close the windows.
115
(cid:1) When driving on dusty roads, close all windows. If dust thrown up by the ve- hicle is still drawn into the vehicle after closing the windows, it is recom- mended that the air intake control but- ton be set to the OUTSIDE AIR mode and the fan speed control knob be turned anywhere except the “OFF” position. If following another vehicle on a dusty road, or driving in windy and dusty con- ditions, it is recommended that the air intake control button be temporarily set the RECIRCULATED AIR mode, which will close off the outside passage and prevent outside air and dust from entering the vehicle interior.
to
(cid:1)
116
Heater controls
117
118
(a) Controls and functions The temperature control knob is used to turn on and off the heater and adjust the temperature of the heated air. Turn the knob toward the FULL HEATING position for higher temperature. Turning the knob to the NO HEAT position turns off the heater. The air intake control lever is used to se- lect intake air, either outside air or recircu- lated air. With the lever in the OUTSIDE AIR posi- tion, the system will take fresh outside air into the unit. For recirculated air, move the lever to the RECIRCULATED AIR position. The air flow control knob is used to select the air flow outlets air is delivered from. See “(e) Air flow selection” for detailed in- formation. The fan speed control knob is used to turn on and off the fan and select the fan speed. The higher the fan speed setting is, the more air is delivered. Turning the knob to the “OFF” position turns off the fan.
(b) Heating 1. Turn the temperature control knob anywhere except the NO HEAT position. If cooler air is desired at face level for bi- level operation, turn the knob around the middle. 2. Move the air intake control lever to the OUTSIDE AIR position. If quick circulation of heated air is desired, move the lever to the RECIRCULATED AIR position. For normal use, it is best to keep the lever in the OUTSIDE AIR position. Otherwise the windows will fog up more easily. 3. Turn the air flow control knob to the FLOOR position. If cooler air is desired at face level for bi- level operation, turn the knob to the BI- LEVEL position. If the windshield fogs up easily, turn knob to the FLOOR/WINDSHIELD position. For detailed information on air flow control including other settings, see “(e) Air flow selection”. 4. Turn the fan speed control knob any- where except the “OFF” position.
(c) Ventilation 1. Turn the temperature control knob to the NO HEAT position. 2. Move the air intake control lever to the OUTSIDE AIR position. 3. Move the air flow control knob to the FACE position. For detailed information on air flow control including other settings, see “(e) Air flow selection”. 4. Turn the fan speed control knob any- where except the “OFF” position. (d) Windshield defogging and defrost-
ing
1. Turn the temperature control knob at the FULL HEATING position. 2. Move the air intake control lever to the OUTSIDE AIR position. 3. Turn the air flow control knob to the WINDSHIELD position. For detailed information on air flow con- trol, see “(e) Air flow selection”. 4. Turn the fan speed control knob to the “HI” position. (e) Air flow selection FACE position—This position directs the air flow to face level.
119
Side vents
(cid:1)
If following another vehicle on a dusty road, or driving in windy and dusty con- ditions, it is recommended that the air intake control lever be temporarily set to the RECIRCULATED AIR position, which will close off the outside pas- sage and prevent outside air and dust from entering the vehicle interior.
The side vents may be opened or closed as shown.
BI-LEVEL position—This position directs the air flow to face level and the floor. Ex- cept in ventilation, the air to the floor is slightly warmer than that to face level. FLOOR position—This position directs the air flow mostly to the floor. FLOOR/WINDSHIELD position — This position directs air flow to the wind- shield as well as the floor. WINDSHIELD position—This position di- rects air flow to the windshield and front side windows. (f) Operating tips (cid:1) Be sure the air inlet grilles in front of the windshield are not blocked by leaves or other obstructions. If air flow control is not satisfactory, check the dashboard vents. (See “Side vents” or “Lower vent”.)
(cid:1)
(cid:1) When driving on dusty roads, close all windows. If dust thrown up by the ve- hicle is still drawn into the vehicle after closing the windows, it is recom- mended that the air intake control le- ver be set to the OUTSIDE AIR posi- tion and the fan speed control knob anywhere except the “OFF” position.
120
Lower vent
The lower vent may be opened or closed as shown.
121
122
Part 1
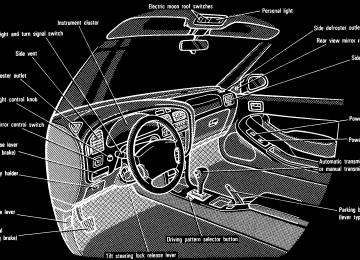
OPERATION OF INSTRUMENTS AND CONTROLS—Chapter 1-8
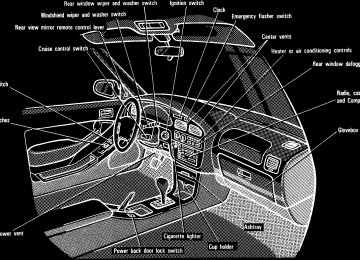
Other equipment(cid:1) Clock (cid:1) Cigarette lighter and ashtray (cid:1) Glovebox (cid:1) Miscellany holder (cid:1) Cup holder (cid:1) Luggage cover (cid:1) Parcel straps (cid:1) Floor mat
Clock
Cigarette lighter and ashtray
The digital clock indicates the time with the ignition key at the “ACC” or “ON” position. To reset the hour, de- press the “H” button. To reset the min- utes, depress the “M” button. To ad- just the time to a full hour, depress the “:00” button. For example, if the “:00” button is de- pressed when is between 1:01—1:29, the time will change to 1:00. If the time is between 1:30—1:59, the time will change to 2:00. When the instrument panel lights are turned on, the brightness of the time indi- cation will be reduced. Once the electrical power source has been disconnected from the clock, the time is automatically set to 1:00 (one o’clock).
time
the
To use the cigarette lighter, press it in. When it becomes heated, it automati- cally pops out ready for use. If the engine is not running, the key must be in the “ACC” position. Do not hold the cigarette lighter pressed in. When finished with your cigarette, thor- oughly extinguish it in the ashtray to pre- vent other cigarette butts from catching fire. After using the ashtray, push it back in completely. To remove the ashtray, press down on the lock spring plate and pull out. Use a Toyota genuine cigarette lighter or equivalent for replacement.
123
Glovebox
Miscellany holder
CAUTION
To reduce the chance of injury in case of an accident or sudden stop while driving, always push the ash- tray back in completely after using.
To open the glovebox door, pull the le- ver. To lock the glovebox door, insert the master key and turn it clockwise. With the instrument panel lights on, the glovebox light will come on when the door is open.
CAUTION
To reduce the chance of injury in case of an accident or a sudden stop, always keep the glovebox door closed while driving.
To open the holder, pull the lever as shown above.
CAUTION
To reduce the chance of injury in case of an accident or a sudden stop, always keep the miscellany holder closed while driving.
124
Cup holder
Luggage cover
To use the cup holder, pull it out com- pletely. The cup holder is designed for holding cups or drink-cans fit snugly in its holes.
CAUTION
(cid:1) Do not place anything else on the cup holder, as such items may be thrown about and possibly injure people in the vehicle during sud- den braking or an accident.
(cid:1) Keep the cup holder shut when not
in use.
USING THE LUGGAGE COVER To use the luggage cover, pull it out of the retractor and hook it to the an- chors. To remove the luggage cover, pull the lock release knobs and lift up the luggage cov- er.
Wagon with third seat— Make sure the shoulder belt passes through the hanger when using the lug- gage cover. This prevents the shoulder belt from being damaged.
CAUTION
Seat belt must be removed from the hanger when seat belt is in use.
125
HOLDING THE LUGGAGE COVER EDGE UPRIGHT When using the third seat, fold up the luggage cover edge so that it does not interfere with the passengers. 1. Unhook the strap from the anchor tab.
2. Fold the luggage cover edge. Then pass the strap through the eyelet and hook it onto the tab on the reverse side of the luggage cover. When using the luggage cover, hook the strap onto the anchor tab.
126
Parcel straps (wagon)
Floor mat
To secure your parcels, hook the par- cel straps to the catches and tighten the straps by pulling on the free end. See “Luggage stowage precautions” in Part 2 for precautions to observe in load- ing luggage.
Use a floor mat of the correct size. If the floor mat has a hole, then it is de- signed for use with a locking clip. Fix the floor mat and locking clip into the hole in the floor carpet.
127
CAUTION
Make sure the floor mat is properly placed on the floor carpet. If the floor mat slips and interferes with the movement of the pedals during driving, it may cause an accident.
128
Part 2
INFORMATION BEFORE DRIVING YOUR TOYOTA(cid:1) Break-in period (cid:1) Fuel (cid:1) Operation in foreign countries (cid:1) Three-way catalytic converters (cid:1) Engine exhaust cautions (cid:1) Facts about engine oil
consumption (cid:1) Brake system (cid:1) Brake pad wear limit indicators (cid:1) Luggage stowage precautions (cid:1) Your Toyota’s identification (cid:1) Theft prevention labels (cid:1) Types of tires
Break-in period Drive gently and avoid high speeds. Your vehicle does not need an elaborate break-in. But following a few simple tips for the first 1600 km (1000 miles) can add to the future economy and long life of your vehicle: (cid:1) Do not drive over 88 km/h (55 mph). (cid:1) Run the engine at moderate speed be-
tween 2000 and 4000 rpm.
(cid:1) Avoid full-throttle starts. (cid:1) Try to avoid hard stops during the first
300 km (200 miles).
(cid:1) Do not drive slowly with the manual
transmission in a high gear.
(cid:1) Do not drive for a long time at any
single speed, either fast or slow.
(cid:1) Do not tow a trailer during the first 800
km (500 miles).
Fuel FUEL TYPE Your new vehicle must use only un- leaded gasoline. To help prevent gas station mixups, your Toyota has a new smaller fuel tank open- ing. The special nozzle on pumps with un- leaded fuel will fit it, but the larger stan- dard nozzle on pumps with leaded gas will not.
NOTICE
Do not use leaded gasoline. Use of leaded gasoline will cause the three-way catalytic converter to lose its effectiveness and the emission control system to function improperly. Also, this can increase maintenance costs.
OCTANE NUMBER 5S-FE engine: Select Research Octane Number 91 (Octane Rating 87) or high- er. 1MZ-FE engine: Select Research Oc- tane Number 91 (Octane Rating 87) or higher. For improved vehicle perfor- mance, the use of premium unleaded gasoline with a Research Octane Num- ber of 96 (Octane Rating 91) or higher is recommended.
129
Operation in foreign countries If you plan to drive your Toyota in another country... First, comply with the vehicle registration laws. Second, confirm the availability of the correct fuel (unleaded and minimum oc- tane number).
Use of unleaded fuel with an octane num- ber or rating lower than stated above will cause persistent heavy knocking. If se- vere, this will lead to engine damage. If your engine knocks... If you detect heavy knocking even when using the recommended fuel, or if you hear steady knocking while holding a steady speed on level roads, consult your Toyota dealer. However, now and then, you may notice light knocking for a short time while accel- erating or driving up hills. This is no cause for concern. GASOLINES CONTAINING DETER- GENT ADDITIVES Toyota recommends use of gasolines that contain detergent additives to avoid build-up of engine deposits. For further details, ask your Toyota dealer or a local gasoline retailer. GASOLINES CONTAINING MTBE Gasolines that contain MTBE (Methyl Tertiary-Butyl Ether) are available in the market. If you use a gasoline mixed with MTBE, make certain that it does not contain more than 15% of MTBE.
130
If the use of gasolines containing MTBE causes poor driveability and/or poor fuel economy, you should discontinue the use of fuels containing MTBE. GASOLINES CONTAINING ALCOHOL If you use gasohol in your Toyota, be sure that it is unleaded, has an octane rating no lower than 87 and does not contain more than 10% ethanol. Gasohol is a mixture of gasoline and etha- nol. Toyota does not recommend the use of gasolines containing methanol. If you use gasoline containing methanol, use only gasoline meeting the requirements above and also containing less than 5% metha- nol with cosolvents and corrosion inhibi- tors for methanol.
NOTICE
(cid:2)Do not use gasohol other than stated above. It will cause fuel system damage or vehicle perfor- mance problems.
(cid:2)If driveability problems are en- countered (poor hot starting, va- porizing, engine knock, etc.), dis- continue the use.
(cid:2)Take care not to spill gasohol dur- ing refueling. Gasohol may cause paint damage.
FUEL TANK CAPACITY
70 L (18.5 gal., 15.4 Imp. gal.)
Three-way catalytic converters
The three-way catalytic converter is an emission control device installed in the exhaust system. The purpose is to reduce pollutants in the exhaust gas.
CAUTION
(cid:1) Keep people and combustible ma- terials away from the exhaust pipe while the engine is running. The exhaust gas is very hot.
(cid:1) Do not drive, idle or park your ve- hicle over anything that might burn easily such as grass, leaves, paper or rags.
NOTICE
A large amount of unburned gases flowing into the three-way catalytic converter may cause it to overheat and create a fire hazard. To prevent this and other damage, observe the following precautions: (cid:2)Use only unleaded gasoline. (cid:2)Do not drive with an extremely low fuel level; running out of fuel could cause the engine to misfire, creating an excessive load on the three-way catalytic converter.
(cid:2)Do not allow the engine to run at idle speed for more than 20 min- utes.
(cid:2)Avoid racing the engine. (cid:2)Do not push-start or pull-start
your vehicle.
(cid:2)Do not turn off the ignition while
the vehicle is moving.
(cid:2)Keep your engine in good run- ning order. Malfunctions in the engine electrical system, elec- tronic ignition system/distributor ignition system or fuel system could cause an extremely high three-way catalytic converter temperature.
(cid:2)If the engine becomes difficult to start or stalls frequently, take your vehicle in for a check-up as soon as possible. Remember, your Toyota dealer knows your vehicle and its three-way catalyt- ic converter system best.
(cid:2)To ensure that the three-way cat- alytic converter and the entire emission control system operate properly, your vehicle must re- ceive the periodic inspections re- quired by the Toyota Maintenance Schedule. For scheduled mainte- nance information, refer to the separate “Owner’s Manual Sup- plement/Maintenance Schedule”.
131
Engine exhaust cautions
CAUTION
(cid:1) Avoid inhaling the engine exhaust. It contains carbon monoxide, which is a colorless and odorless gas. It can cause unconscious- ness or even death.
(cid:1) Make sure the exhaust system has no holes or loose connections. The system should be checked from time to time. If you hit some- thing, or notice a change in the sound of the exhaust, have the system checked immediately.
(cid:1) Do not run the engine in a garage or enclosed area except for the time needed to drive the vehicle in or out. The exhaust gases cannot escape, making this a particularly dangerous situation.
(cid:1) Do not remain for a long time in a parked vehicle with the engine running. If it is unavoidable, how- ever, do so only in an unconfined area and adjust the heating or cooling system to force outside air into the vehicle.
132
(cid:1) Keep the trunk lid or back door closed while driving. An open or unsealed trunk lid or back door may cause exhaust gases to be drawn into the vehicle. If you must drive with the trunk lid or back door open to accommodate a large object, close the windows, open all the instrument panel vents and have the heating or cooling system deliver fresh air into the vehicle by turning the fan to high speed with the air intake control set at the OUTSIDE AIR position.
(cid:1) To allow proper operation of your vehicle’s ventilation system, keep the inlet grilles in front of the wind- shield clear of snow, leaves, or other obstructions.
(cid:1) If you smell exhaust fumes in the vehicle, drive with the windows open and the trunk lid or back door closed. Have the cause im- mediately located and corrected.
Facts about engine oil consumption FUNCTIONS OF ENGINE OIL Engine oil has the primary functions of lu- bricating and cooling the inside of the en- gine, and plays a major role in maintaining the engine in proper working order. ENGINE OIL CONSUMPTION It is normal that an engine should con- sume some engine oil during normal engine operation. The causes of oil consumption in a normal engine are as follows. (cid:1) Oil is used to lubricate pistons, piston rings and cylinders. A thin film of oil is left on the cylinder wall when a piston moves downwards in the cylinder. High negative pressure generated when the vehicle is decelerating sucks some of this oil into the combustion chamber. This oil as well as some part of the oil film left on the cylinder wall is burned by the high temperature com- bustion gases during the combustion process.
(cid:1) Oil is also used to lubricate the stems of the intake valves. Some of this oil is sucked into the combustion chamber together with the intake air and is burned along with the fuel. High tem- perature exhaust gases also burn the oil used to lubricate the exhaust valve stems.
IMPORTANCE OF ENGINE OIL LEVEL CHECK One of the most important points in proper vehicle maintenance is to keep the engine oil at the optimum level so that oil function will not be impaired. Therefore, it is essen- tial that the oil level be checked regularly. Toyota recommends that the oil level be checked every time you refuel the vehicle.
NOTICE
Failure to check the oil level regu- larly could lead to serious engine trouble due to insufficient oil.
For detailed information on oil level check, see “Checking the engine oil level” in Chapter 7-2.
The amount of engine oil consumed depends on the viscosity of the oil, the quality of the oil and the conditions the vehicle is driven under. More oil is consumed by high-speed driv- ing and frequent acceleration and decel- eration. A new engine consumes more oil, since its pistons, piston rings and cylinder walls have not become conditioned. When judging the amount of oil con- sumption, note that the oil may be- come diluted and make it difficult to judge the true level accurately. As an example, if a vehicle is used for re- peated short trips, and consumes a nor- mal amount of oil, the dipstick may not show any drop in the oil level at all, even after 1000 km (600 miles) or more. This is because the oil is gradually becoming di- luted with fuel or moisture, making it ap- pear that the oil level has not changed. The diluting ingredients evaporate out when the vehicle is then driven at high speeds, as on an expressway, making it appear that oil is excessively consumed after driving at high speeds.
Twin ground electrode spark plugs (1MZ-FE engine)
Your engine is fitted with twin ground elec- trode spark plugs.
NOTICE
Use only twin ground electrode spark plugs for your engine perfor- mance.
133
Brake system TANDEM MASTER CYLINDER BRAKE SYSTEM The tandem master cylinder brake sys- tem is a hydraulic system with two sepa- rate sub-systems. If either sub-system should fail, the other will still work. Howev- er, the pedal will be harder to press, and your stopping distance will be longer. Also, the brake system warning light may come on.
CAUTION
Do not drive your vehicle with only a single brake system. Have your brakes fixed immediately.
BRAKE BOOSTER The brake booster uses engine vacuum to power-assist the brakes. If the engine should quit while you are driving, you can bring the vehicle to a stop with normal pedal pressure. There is enough reserve vacuum for one or two stops—but no more!
CAUTION
(cid:1) Do not pump the brake pedal if the engine stalls. Each push on the pedal uses up your vacuum re- serve.
134
(cid:1) Even if the power assist is com- pletely lost, the brakes will still work. But you will have to push the pedal hard—much harder than normal. And your braking distance will be longer.
ANTI-LOCK BRAKE SYSTEM (with “ABS” warning light) The anti-lock brake system is designed to prevent lock-up of the wheels during sud- den braking or braking on slippery road surfaces. This assists the driver in con- trolling the vehicle under these circum- stances. The anti-lock brake system becomes op- erative after the vehicle has accelerated to a speed in excess of approximately 10
km/h (6 mph). It stops operating when the vehicle decelerates to a speed below approximately 5 km/h (3 mph). You may hear a sound in the engine compartment for a few seconds when the engine is started or just after the vehicle is started. This means that the anti-lock brake system is in the self check mode, and does not indicate a malfunction. When the anti-lock brake system function is in action, you may feel the brake pedal pulsating and hear a noise. In this situa- tion, to let the anti-lock brake system work for you, just hold the brake pedal down more firmly. Do not pump the brake.The brake pedal pulsation caused by the anti-lock brake system may indicate haz- ardous road surface conditions. Although the anti-lock brake system assists in pro- viding vehicle control, it is still important to drive with all due care, because the anti- lock brake system cannot overcome the laws of physics that act on your vehicle: (cid:1) Braking capability is dependent on tire
friction with the road surface.
(cid:1) Even though the anti-lock brake sys- tem is operating, a driver cannot main- tain full control on certain slippery road surfaces, when cornering at high speeds, or in violent maneuvers.
(cid:1) Avoid high speeds on wet roads. The anti-lock brake system cannot elimi- nate the risk of hydroplaning and loss of tire friction.
Always maintain a safe distance from the vehicle in front of you. Compared with ve- hicles not fitted with an anti-lock brake system, your vehicle may require a longer stopping distance in the following cases: (cid:1) Driving on rough, gravel or snow-cov-
ered roads.
(cid:1) Driving with tire chains installed. (cid:1) Driving on roads where the road sur- face is pitted or has other differences in surface height.
TYPE
Even if the anti-lock brake system should fail, the brake system will still operate con- ventionally. Have your vehicle checked by your Toyota dealer as soon as possible. DRUM-IN-DISC PARKING BRAKE SYSTEM (all 1MZ-FE engined vehicles, and some 5S-FE engined ve- hicles with anti-lock brake system) Your vehicle has a drum-in-disc type parking brake system. This type of brake system needs bedding-down of the brake shoes periodically or whenever the park- ing brake shoes and/or drums are re- placed. Have your Toyota dealer perform the bed- ding-down.
“ABS” warning light The light comes on when the ignition key is turned to the “ON” position. After about 3 seconds, the light will go off. If either of the following conditions occurs, this indicates a malfunction somewhere in the parts monitored by the warning light system. Contact your Toyota dealer as soon as possible to service the vehicle. (cid:1) The light does not come on as de-
scribed above, or remains on.
(cid:1) The light comes on while driving.
Brake pad wear limit indicators
The brake pad wear limit indicators on your disc brakes give a warning noise when the brake pads are worn to where replacement is required. If you hear a squealing or scraping noise while driving, have the brake pads checked and replaced by your Toyota dealer as soon as possible. Expensive ro- tor damage can result if the pads are not