- Download PDF Manual
-
to use the name displayed.
•
If the ZIP Code you want to enter is not displayed, touch Results Code from the list.
(Results) to open the search results list. Select the ZIP
Navigation
6 Enter the street name as follows. (1) (2) Use the keyboard to enter the start of the street name. • For the keyboard, see “Using the Keyboard” on Page 88.
(Street).
Touch
Street
(3)
Find the street name to enter as follows.
• The most likely street name is displayed in the entry field. Touch
to use the name displayed.
Navigation 117
7 Enter the house number as follows. (1) (House Number). (2)
Touch Enter the house number with the keyboard. (Enter the number(s), and then touch
House Number
.)
• For the keyboard, see “Using the Keyboard” on Page 88.
(3)
Done
(Done) to finish entering the address. (If the
Touch house number is not found, the center of the street is selected as the destination.)
Navigation
•
If the name you want is not automatically entered, enter a few more letters from the name until it is displayed in the list (touch Results results are automatically displayed). Select the street from the list.
(Results) to open the results list before the search
118 Navigation
8 The map is displayed in full-screen mode with the
9 After a summary of the route plan is displayed, the entire
Navigation
selected point at the center. If necessary, you can touch another point on the map to change the destination. The cursor (
(Next) to set the destination, or touch select another destination.
) is displayed at the new position. Touch
(Back) to
Next
Back
More
route is displayed on the map. The route is researched (More) to change the route automatically. Touch plan, or touch (Go!) to start navigation. (When the countdown is displayed in the “Go!” button, guidance begins automatically after 10 seconds even if you do not touch the button.)
Go!
Navigation 119
Navigation
■ Hints for quick address entry • When entering a city/town name or a street name:
- Only characters that can be displayed in the search results are shown on the
keyboard. Other characters are grayed out.
- While entering text, the most likely search result is always displayed in the
text entry field. If the search result is correct, touch
to select it.
- If you touch
Results
(Results) after entering two characters, items that
contain those two characters are displayed in the list.
• You can find intersections easily by using the following method.
- First, when searching for an uncommon road name, you only need to enter
the first few letters to acquire the name.
- When one street name is shorter than the other, the shorter one is searched
for first. This shortens the search time for the road with the longer name. • You can search by road category as well as road name. When the
same word is included in names such as the street, road, and main street, by entering the first character for the type of road, you can quickly bring up the search results. For example, if you are searching for “Pine Avenue” and you enter “Pi A”, roads such as “Pine Street” or “Pickwick Road” are not displayed.
• You can also search by using the ZIP Code. If the ZIP Code only
contains a few characters, you can search more quickly than when entering the city/town name.
Selecting the destination from your favorite spots (POI: Point Of Interest)
You can select your destination from the favorite spots that have already been saved in the software. You can use the same screen to find a spot using the following various methods. • Using the quick search function, you can quickly search for spots
around the name.
• Using the preset search function, you can search for the most
popular spots with a few quick touches.
• Search using spot categories. • Search using spot names. You can also search for special services from the “Where Am I?” screen.
120 Navigation
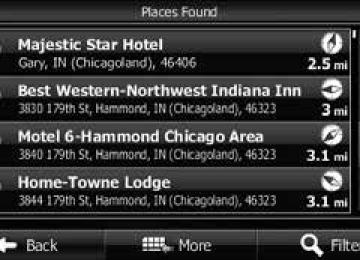
■ Performing a quick search for favorite spots Using the quick search function, you can quickly search for spots by name. You can use the following search items. • Around the recommended route (when a recommended route is
available)
• Around the current location (when no destination is set) 1 Follow the steps below to start a quick search.
3 Touch
Results
(Results) after entering the first few
characters to open a list of spot names that include the characters you entered.
Navigation
(Quick Place Search). (Only when
and then touch
•
•
If the Map screen is displayed, touch Quick Place Search registered to the Quick Menu.) If the Map screen is displayed, touch (Find), Quick Search Along Route
Find Places
Menu
(Menu),
Find
(Find Places), and then touch
(Quick Search Along Route).
2 Use the keyboard to enter the start of the spot name.
• For the keyboard, see “Using the Keyboard” on Page 88.
4 (Optional) You can display spots on the list in name
order, in order of the distance from the current position or previously confirmed position, or in order of necessary detour distance (during navigation). If you want to change the order in which entries are presented in the list, touch want. Also, you can display all of the spots on the list on the map.
(More) and select the style that you
More
Navigation 121
Navigation
5 Find the item you want on the list, and then touch that item. The map is displayed in full-screen mode with the selected point at the center. The name and address of the spot are displayed at the top of the screen.
6 (Optional) Touch Back
spot. Touch
to display details about the selected
(Back) to return to the map.
8 After a summary of the route plan is displayed, the entire
More
route is displayed on the map. The route is researched (More) to change the route automatically. Touch plan, or touch (Go!) to start navigation. (When the countdown is displayed in the “Go!” button, guidance begins automatically after 10 seconds even if you do not touch the button.)
Go!
7 If necessary, you can touch another point on the map to ) is displayed at
change the destination. The cursor ( the new position. Touch destination, or touch destination.
Next
Back
(Next) to set the
(Back) to select another
122 Navigation
■ Searching for favorite spots using a preset category By using the preset search function, you can quickly selected popular spots. 1 If the Map screen is displayed, touch
(Menu) to
Menu
return to the navigation menu. 2 On the navigation menu, touch 3 Touch 4 Display preset search categories as follows.
(Find Places).
Find Places
Find
(Find).
Gas Station Along Route
(Gas Station Around Route):
• Searches for gas stations along the route during route
navigation.
• Searches around the current position if navigation is not being
performed (if no destination is set).
• Searches the area around the last confirmed position if the
current position is unavailable (no GPS signal).
Navigation
Parking Around Here
(Parking Around Here):
• Searches for parking lots at the destination during route
navigation.
• Searches around the current position if navigation is not being
performed (if no destination is set).
• Searches the area around the last confirmed position if the
current position is unavailable (no GPS signal).
Restaurant Along Route
(Restaurant Along Route):
• Searches for restaurants along the route during route
navigation.
• Searches around the current position if navigation is not being
performed (if no destination is set).
• Searches the area around the last confirmed position if the
current position is unavailable (no GPS signal). Accommodation Around Here
(Accommodation Around Here ):
• Searches for accommodation at the destination during route
navigation.
• Searches around the current position if navigation is not being
performed (if no destination is set).
• Searches the area around the last confirmed position if the
current position is unavailable (no GPS signal).
Navigation 123
Navigation
5 Press the Favorites Quick Search button to display a basic
list of spots.
7 Find the item you want on the list, and then touch that item. The map is displayed in full-screen mode with the selected point at the center. The name and address of the spot are displayed at the top of the screen.
8 (Optional) Touch Back
spot. Touch
to display details about the selected
(Back) to return to the map.
9 If necessary, you can touch another point on the map to ) is displayed at
change the destination. The cursor ( the new position. Touch destination, or touch destination.
Next
Back
(Next) to set the
(Back) to select another
6 (Optional) You can display spots on the list in name
order, in order of the distance from the current position or previously confirmed position, or in order of necessary detour distance (during navigation). If you want to change the order in which entries are presented in the list, touch want. Also, you can display all of the spots on the list on the map.
(More) and select the style that you
More
124 Navigation
10 After a summary of the route plan is displayed, the entire
More
route is displayed on the map. The route is researched (More) to change the route automatically. Touch plan, or touch (Go!) to start navigation. (When the countdown is displayed in the “Go!” button, guidance begins automatically after 10 seconds even if you do not touch the button.)
Go!
Navigation
■ Searching for a favorite spot by category You can search for favorite spots by category or sub-category. 1 If the Map screen is displayed, touch
Menu
(Menu) to
return to the navigation menu. 2 On the navigation menu, touch 3 Touch 4 Touch 5 Select the spot area you want to search for as follows.
(Custom Search).
(Find Places).
Custom Search
Find Places
(Find).
Find
• Touch
Around Here
(Around Here) or
Around Last Known Position search around your current position, or the latest confirmed position.
(Around Last Known Position) to
• Touch • Touch
In a City Around Destination
(In a City) to search for city/town spots.
(Around Destination) to search for
spots at the destination during route navigation.
Navigation 125
6 By selecting a main category (such as accommodations),
List All Places
or by touching (List All Places), the entire list of spots around the position you selected or along the route is displayed.
7 By selecting a sub-category (such as hotels or motels)
from the main category, or by touching All Places), the entire list of spots around the position you selected or along the route is displayed.
List All Places
(List
Navigation
• Touch
Along Route
(Along Route) to search along the route being navigated, rather than around an optional point. This is useful when you want to search for a gas station or restaurant and so on along the route taking the smallest detour to get there.
•
(Optional) If you select city/town displayed by the search.
In a City
(In a City), you can select a
• See “Entering an address” on Page 106 for information about
how to select a "Country or State" or "City".
126 Navigation
8 Brand names of services may also be displayed
10 (Optional) You can display spots on the list in name
Navigation
depending on the sub-category of the selected spot. By selecting a brand name, or by touching (List All Places), the entire list of spots around the position you selected or along the route is displayed.
List All Places
9 The final search results are displayed as a list.
order, in order of the distance from the current position or previously confirmed position, or in order of necessary detour distance (during navigation). If you want to change the order in which entries are presented in the list, touch want. Also, you can display all of the spots on the list on the map.
(More) and select the style that you
More
11 Find the item you want on the list, and then touch that item. The map is displayed in full-screen mode with the selected point at the center. The name and address of the spot are displayed at the top of the screen.
Navigation 127
Navigation
12 (Optional) Touch Back
spot. Touch
to display details about the selected
(Back) to return to the map.
13 If necessary, you can touch another point on the map to ) is displayed at
change the destination. The cursor ( the new position. Touch destination, or touch destination.
Next
Back
(Next) to set the
(Back) to select another
14 After a summary of the route plan is displayed, the entire
More
route is displayed on the map. The route is researched (More) to change the route automatically. Touch plan, or touch (Go!) to start navigation. (When the countdown is displayed in the “Go!” button, guidance begins automatically after 10 seconds even if you do not touch the button.)
Go!
128 Navigation
■ Searching for a favorite spot by name You can search for a favorite spot by name. You can search the entire spot database or select a category/sub-category for another location or for the route being navigated. 1 If the Map screen is displayed, touch
(Menu) to
Menu
Navigation
• Touch
Along Route
(Along Route) to search along the route being navigated, rather than around an optional point. This is useful when you want to search for a gas station or restaurant and so on along the route taking the smallest detour to get there.
return to the navigation menu. 2 On the navigation menu, touch 3 Touch 4 Touch 5 Select the spot area you want to search for as follows.
(Custom Search).
(Find Places).
Custom Search
Find Places
(Find).
Find
• Touch
Around Here
(Around Here) or
Around Last Known Position search around your current position, or the latest confirmed position.
(Around Last Known Position) to
•
(Optional) If you select city/town displayed by the search.
In a City
(In a City), you can select a
• Touch • Touch
In a City Around Destination
(In a City) to search for city/town spots.
(Around Destination) to search for
spots at the destination during route navigation.
• See “Entering an address” on Page 106 for information about
how to select a "Country or State" or "City".
Navigation 129
Navigation
6 By selecting a main category (such as accommodations),
8 Touch
Find by Name
(Find by Name) to search a sub-
or by touching search all spots.
Find by Name
(Find by Name), you can
category of the selected spot.
7 By selecting a sub-category (such as hotels or motels)
Find by Name
from the main category, or by touching (Find by Name), you can search in the main category you selected.
9 Use the keyboard to enter the start of the spot name.
• For the keyboard, see “Using the Keyboard” on Page 88.
130 Navigation
12 (Optional) Touch Back
spot. Touch
to display details about the selected
(Back) to return to the map.
Navigation
13 If necessary, you can touch another point on the map to ) is displayed at
change the destination. The cursor ( the new position. Touch destination, or touch destination.
Next
Back
(Next) to set the
(Back) to select another
10 Touch
Results
(Results) after entering the first few
characters to open a list of spot names that include the characters you entered.
11 Find the item you want on the list, and then touch that item. The map is displayed in full-screen mode with the selected point at the center. The name and address of the spot are displayed at the top of the screen.
Navigation 131
Navigation
14 After a summary of the route plan is displayed, the entire
More
route is displayed on the map. The route is researched (More) to change the route automatically. Touch plan, or touch (Go!) to start navigation. (When the countdown is displayed in the “Go!” button, guidance begins automatically after 10 seconds even if you do not touch the button.)
Go!
■ Using “Where Am I?” to select the closest assistance
service
You can search for the closest assistance service by using the “Where Am I?” screen. 1 Touch
on the Map screen to open the Quick menu.
2 Touch
Where Am I?
(Where Am I?), and then touch
Help Nearby
(Help Nearby).
132 Navigation
3 The preset search categories are displayed. This button searches for everything around your current position (or the latest confirmed position if it is unavailable). •
(Car Repair Around Here)
(Health Around Here):
Car Repair Around Here Vehicle repairs / Road-side assistance services Health Around Here Hospitals / Emergency services Police Around Here Police stations Gas Station Around Here Gas stations
(Police Around Here):
•
•
•
(Gas Station Around Here):
4 Press any of the quick search buttons to display a basic
list for the service you selected.
Navigation
5 Find the item you want on the list, and then touch that item. The map is displayed in full-screen mode with the selected point at the center. The name and address of the spot are displayed at the top of the screen.
6 (Optional) Touch Back
spot. Touch
to display details about the selected
(Back) to return to the map.
7 If necessary, you can touch another point on the map to ) is displayed at
change the destination. The cursor ( the new position. Touch destination, or touch destination.
Next
Back
(Next) to set the
(Back) to select another
Navigation 133
Navigation
8 After a summary of the route plan is displayed, the entire
More
route is displayed on the map. The route is researched (More) to change the route automatically. Touch plan, or touch (Go!) to start navigation. (When the countdown is displayed in the “Go!” button, guidance begins automatically after 10 seconds even if you do not touch the button.)
Go!
Selecting a Map Position as the Destination
1 If the Map screen is displayed, touch
Menu
(Menu) to
return to the navigation menu. 2 On the navigation menu, touch 3 Touch 4 Search for the destination on the map as follows. Move
(Find on Map).
Find on Map
(Find).
Find
or enlarge/reduce the map as necessary.
5 Touch the position you want to select as the destination.
The cursor (
) is displayed.
6 Touch
Select destination.
(Select) to select the cursor as the
134 Navigation
7 After a summary of the route plan is displayed, the entire
More
route is displayed on the map. The route is researched (More) to change the route automatically. Touch plan, or touch (Go!) to start navigation. (When the countdown is displayed in the “Go!” button, guidance begins automatically after 10 seconds even if you do not touch the button.)
Go!
Navigation Selecting the Destination from the Destination List
You can set a position that has been saved in the destination list as the destination. See “Editing the Destination List (Route Editing)” on Page 147 for more details on registering a position to the destination list. 1 Display the destination list as follows.
and then touch (Favorites). (Only when registered to the Quick
•
•
If the Map screen is displayed, touch Favorites Menu.) If the Map screen is displayed, touch (Find) and then touch
Favorites 2 The destination list is displayed.
Menu (Favorites).
(Menu),
Find
Navigation 135
Navigation
3 Touch the position you want to select as the destination.
5 After a summary of the route plan is displayed, the entire
If necessary, you can scroll through the list, or touch Filter to search the list.
(Filter) and enter a few letters form the item name
4 The map is displayed in full-screen mode with the
selected point at the center. If necessary, you can touch another point on the map to change the destination. The cursor (
(Next) to set the destination, or touch select another destination.
) is displayed at the new position. Touch
(Back) to
Next
Back
More
route is displayed on the map. The route is researched (More) to change the route automatically. Touch plan, or touch (Go!) to start navigation. (When the countdown is displayed in the “Go!” button, guidance begins automatically after 10 seconds even if you do not touch the button.)
Go!
136 Navigation
Selecting a Frequently Used Destination (Smart History)
2 Touch
Find
(Find) on the navigation menu.
Navigation
Destinations that have been set previously are displayed in the History list. The two most recent destinations are displayed on the destination menu allowing you to select them easily. Smart History uses conditions such as the current time, date, and position, and displays a position in response to the user's navigation habits. The more you use the navigation system, the more accurate the anticipated destination becomes. 1 If the Map screen is displayed, touch
(Menu) to
Menu
return to the navigation menu.
3 Touch destination 4 The map is displayed in full-screen mode with the
in the History field.
or
selected point at the center. If necessary, you can touch another point on the map to change the destination. The cursor (
(Next) to set the destination, or touch select another destination.
) is displayed at the new position. Touch
(Back) to
Next
Back
Navigation 137
Navigation
5 After a summary of the route plan is displayed, the entire
More
route is displayed on the map. The route is researched (More) to change the route automatically. Touch plan, or touch (Go!) to start navigation. (When the countdown is displayed in the “Go!” button, guidance begins automatically after 10 seconds even if you do not touch the button.)
Go!
Selecting a Recent Destination from History
Destinations that have been set previously are displayed in the History list. 1 Use the History function as follows. If the Map screen is displayed, touch History If the Map screen is displayed, touch (Find) and then touch
(History). (Only when registered to the Quick Menu.)
and then touch
(History).
(Menu),
History
Menu
Find
•
•
2 A list of recently entered destinations is displayed. A
History search displays three destination on the top page based on previously entered routes (destinations with the highest likelihood of use). Other destinations are displayed based on the time they were entered in the past. If necessary, scroll through the list to display older entries and select the destination.
138 Navigation
3 Select a destination from the list. 4 The map is displayed in full-screen mode with the
selected point at the center. If necessary, you can touch another point on the map to change the destination. The cursor (
(Next) to set the destination, or touch select another destination.
) is displayed at the new position. Touch
(Back) to
Next
Back
5 After a summary of the route plan is displayed, the entire
Navigation
More
route is displayed on the map. The route is researched (More) to change the route automatically. Touch plan, or touch (Go!) to start navigation. (When the countdown is displayed in the “Go!” button, guidance begins automatically after 10 seconds even if you do not touch the button.)
Go!
Navigation 139
Navigation Creating a Route from the Destination List (Route Creator)
6 When the destination menu is displayed, select the
route's destination using the same method as described previously.
You can create a route for each destination in the saved routes menu. 1 If the Map screen is displayed, touch
(Menu) to
Menu
return to the navigation menu.
My Route
(My Route) on the navigation menu.
2 Touch 3 Touch 4 Only one row showing the route's start point (current position displayed) is displayed in the route point list.
(Create Route).
Create Route
5 Touch
to select a destination.
140 Navigation
7 After selecting a new destination, you are returned to the
list.
8 To add another destination, touch
at the point where you want to add a new route point to the list, and repeat the steps above.
Displaying the Entire Route on the Map You can easily display an overview of the entire route currently being navigated. Follow the steps below to use the initial settings screen. 1 Touch
(Menu) on the Map screen.
Menu
2 Touch
My Route
(My Route) on the navigation menu.
Navigation
3 Touch
Overview
(Overview). The entire route currently
being navigated is displayed on the map along with detailed information and buttons.
Navigation 141
Navigation
Confirming Route Settings and Calling Route Related Functions You can check a variety of route settings recommended by the software. 1 If the Map screen is displayed, touch
(Menu) to
Menu
return to the navigation menu.
My Route
2 Touch 3 The following information items are displayed.
(My Route) on the navigation menu.
• Destination Name/Address • Displays detailed information (unpaved roads, toll roads, and so
on) on the warning icons (depending on conditions) for the current route.
• Total time for route • Total distance for route • Estimated delay times calculated from traffic conditions on the
route
• Route planning method (“Priority to time” and so on)
142 Navigation
4 The following options are displayed on the screen (see
the next section for more detailed information). • Touch
(Edit Route) to add or delete a destination, or
Edit Route
change the order for the destinations. You can set the route departure point, excluding the current position. This is useful for creating a route in advance and saving it for later use.
• Touch
Overview
(Overview) to display the entire route on the
map. (See Page 141.)
• Touch
Avoidances
(Avoidances) to avoid a section of the
route. (See Page 143.) Cancel Route
• Touch
(Cancel Route) to delete the route
currently being navigated. (See Page 148.)
• Touch
More
(More) to display a list of various options such as selecting another route, changing the route settings, running a simulation of the route, saving the route being navigated, and reading a previously saved route.
• Touch
Back
(Back) to return to the navigation menu.
Setting the avoidance route
Navigation
The Avoidances feature allows you to remove any of the roads or special sections on the planned route. •
(Avoid Special Sections):
(Avoid Route Ahead):
Avoid Special Sections Avoid Special Sections allows you to remove any special road types (e.g. motorways or ferries) from your route. This feature is only available if there are special sections along the planned route. Avoid Route Ahead The Avoid Route Ahead option skips a predefined length of the planned route (500m, 1000m, etc.) right ahead of the current position. Avoid Specific Road Avoid Specific Road allows you to skip a specific road from your calculated route. Restore Original Route Touch "Restore Original Route" to delete the avoid route being navigated.
(Restore Original Route):
(Avoid Specific Road):
•
•
•
In each case, the result of the selected avoidance is shown on the map with an indication of additional or saved time and distance. The user can review and confirm the avoidance on this screen. Note that avoidances are not permanent: they are only applied for the active route.
Navigation 143
• Touch
New Route
(New Route) to create a new route at the
Waypoint
position you selected. Previous destinations and waypoints are deleted. • Touch
(Waypoint) to add the position you selected as a new waypoint for the current route. Other destinations for the route are already enabled. Note: Waypoints are set so that the optimum route is maintained between destinations. You can use the route editing function to set the position for waypoints on the route.
• Touch
Final Destination
(Final Destination) to add the destination
you selected as the final destination for the current route. Other destinations for the route are already enabled. Up to now, the position marked as the final destination becomes the final waypoint.
Navigation
Changing the Route When navigation has already begun, you can change the route being navigated by using one of the following methods. The methods are explained in the following section.
Selecting a new destination after the route has been set: new route, waypoint, and final destination
If a recommended route is already available, and a new destination has been selected using the method described in the previous section, the start new route, add a new waypoint (midway point), and add the destination you selected as the final destination buttons are displayed.
144 Navigation
Setting a New Starting Point for the Route
In standard navigation, all routes are created from the current position. You can turn off the GPS so that you can study a route that is not currently being driven, run a simulation, and check the time or distance for the route. This way, you can set a start point for the route without using the current GPS position. 1 If the Map screen is displayed, touch
(Menu) to
Menu
return to the navigation menu.
My Route
2 Touch 3 If a route is already available, touch
(My Route) on the navigation menu.
Edit Route
(Edit
Route). If a route has already started, touch (Create Route).
Create Route
4 The first row shows the start position (displays the
current position) for the route. When you touch warning message is displayed, select which operation to perform.
, if a
Navigation
Navigation 145
Navigation
7 The vehicle marker goes clear on the map, indicating
that there is no GPS reception. If a route is already being navigated, it is recalculated using the position selected at that time.
8 To return to standard navigation, touch
(Turn on GPS), and if a warning message is displayed, select which operation to perform.
Turn on GPS
5 When the destination menu is displayed, select the
route's start point by using the same method as selecting the destination.
6 Set the new start point, and then touch
Go!
(Go!).
146 Navigation
Editing the Destination List (Route Editing)
3 The following options are available.
Navigation
You can change the destination list and edit the route. You can add or delete destinations, change the start point, or change the order of the list. 1 Use the Route Editing function as follows.
(Edit Route) to start operation from Step 3. (Only
and then touch
•
If the Map screen is displayed, touch Edit Route when registered to the Quick Menu.) If the Map screen is displayed, touch touch 2 Touch
(Edit Route).
(My Route).
Edit Route
My Route
•
Menu
(Menu) and then
to add a new destination. to delete a destination. to change the start point of the route.
• Touch • Touch • Touch • Touch
More
(More) to change the display order of the list. You can also manually select the optimum route in the application.
Navigation 147
Navigation Pausing Route Navigation
Canceling Route Navigation
Perform one of the following procedures to cancel a route that is currently being navigated. •
If the Map screen is displayed, touch (Cancel Route). (If waypoints are set on the route, you Cancel Route need to touch Remove Next Waypoint until all waypoints have been deleted.) • On the Map screen is displayed, touch
(Remove Next Waypoint)
and then touch
My Route
(Menu),
Menu
(My Route), and then touch being navigated is deleted, including all waypoints.
Cancel Route
(Cancel Route). The route
You do not need to pause a route currently being navigated. When you start driving again, the software automatically restarts audio navigation from the current position.
148 Navigation
Changing the Method for Searching for a Route (Other Routes, etc.)
4 Touch
Route Alternatives
(Route Alternatives).
Navigation
Change the Route settings to perform a new search for the route being navigated using a different method. (See Page 169.) You can even search again by comparing different routes. Follow the steps below to use the initial settings screen. 1 If the Map screen is displayed, touch
(Menu) to
Menu
return to the navigation menu.
2 Touch 3 Touch
My Route
(My Route) on the navigation menu.
More
(More).
5 Using the current search method, three routes are
(More Results) to search using a different
displayed in order of recommendation. Touch More Results method. Also, if only a short distance is being navigated or only a few search candidates are found, each search method displays only one route.
Navigation 149
Changing the Road Categories used for the Route Search
You can use the following method to search the current route again using different road categories. This can also be changed in Settings. (See Page 169.) 1 Use the “Route Settings” function as follows.
(Route Settings). (Only when registered to the
and then touch
•
•
If the Map screen is displayed, touch Route Settings Quick Menu.) If the Map screen is displayed, touch (More), Settings (Route Settings).
Menu (Settings) and then touch
(Menu), More Route Settings
2 Touch one of the road categories displayed in the list to change the route. If necessary, scroll the list to view all road categories. The following items are available (the order differs depending on the type of vehicle selected).
Navigation
•
•
•
•
(Fast):
(Short):
Fast Searches all roads for the quickest route following the speed limits of the roads. Short Searches for the shortest distance in all possible routes. Green Searches for the route that conserves the most energy, taking into account the merits of “Fast” and “Short”. Easy Searches for a route that is easiest to drive, with few right and left turns. Using this option, the program allows you to avoid combinations of smaller roads and to take the expressway.
(Green):
(Easy):
6 Touch
Back
(Back) to return to the previous screen. The route is searched again using the selected method. The new recommended route is indicated by an orange line.
150 Navigation
•
•
•
•
•
•
•
(Vehicle):
(Navigation Mode):
(Route Planning Method):
Vehicle Sets various factors to take into account when performing a search, such as fuel consumption, vehicle model, fuel costs, and maximum speeds on normal roads and expressways. Navigation Mode You can change between On-road and Off-road. Set to On-road to perform normal navigation, or set to Off-road to navigate using the straightest possible route to the destination. Route Planning Method By changing the route search method, you can search for the optimum route for a variety of situations and types of vehicle. See the following items for more details. Highways Select whether or not to use the expressway when creating the route. Period Charge Select whether or not to use toll roads (Period Charge) when creating the route. Per-use Toll Select whether or not to use toll roads (Per-use Toll) when creating the route. (Ferries): Ferries Select whether or not to use ferries when creating the route.(However, ferries might not always be selected for the route.)However, information on temporary service ferries may not be displayed on the map. There may be a fee for using the ferry.
(Period Charge):
(Per-use Toll):
(Highways):
Navigation
•
•
•
(Carpool/HOV):
(Unpaved Roads):
Carpool/HOV Select whether or not to use Carpool/HOV lanes when creating the route. Unpaved Roads Select whether or not to use unpaved roads when creating the route. (Calculate Green Alternative): Calculate Green Alternative Select whether or not to consider energy efficiency when creating the route.
3 Touch
Back
(Back) to set the changes. The route is
searched again, and the new recommended route is indicated by an orange line.
Navigation 151
Navigation
Saving a Position to the Destination List The destination list is a list of frequently used destinations. You can add any destination to this list. See “Selecting the Destination from the Destination List” on Page 135 for more details on searching for a route using a destination from the destination list. 1 Select a destination. 2 When the map is displayed in full-screen mode with the
selected point at the center, touch
More
(More).
3 Touch
Add to Favorites
(Add to Favorites).
4 (Optional) You can use the keyboard to change the initial
display name in the destination list. Touch numbers or symbols. • For the keyboard, see “Using the Keyboard” on Page 88.
to enter
5 Touch
Done
(Done) to save the position as a new entry
on the destination list.
152 Navigation
Displaying a Simulation of the Route You can run a simulation of the route currently being navigated. Follow the steps below to use the initial settings screen. 1 If the Map screen is displayed, touch
(Menu) to
Menu
return to the navigation menu.
2 Touch 3 Touch
My Route
(My Route) on the navigation menu.
More
(More).
Navigation
4 Scroll down through the list, and then touch
(Simulate Navigation). The simulation Simulate Navigation begins from the start point and works through the entire route at the recommended speed.
5 (Optional) You can use the following buttons during the simulation (although the control buttons disappear after a few seconds, you can touch the map to show them again).
Navigation 153
Navigation
•
• • •
: Returns to the previous route event (the previous change in
the route)
: Pauses the simulation. : Goes to the next route event (the next change in the route) : Changes the speed of the simulation. You can select from speeds of x4, x8, or x16. Touch again to return to normal speed.
6 Touch
Back
(Back) to stop the simulation.
154 Navigation
Voice Control Navigation By using the voice control system (voice input microphone and button), you can set the destination by giving voice commands. This enables you to use functions that are usually inoperable while driving. 1 By using the voice recognition trigger or voice
recognition button you can use voice commands to operate the navigation. (See Page 292.)
Navigation
2 When using voice commands to operate the navigation,
a command list is displayed. 155
3 Voice a command after the “beep”. From then on, you can give voice commands that are displayed on the command list to set the destination in the same manner.
• Voice control navigation can be interrupted by touching the
microphone icon on the screen. When the icon is touched, the screen background color changes (green (cid:81) blue). To resume navigation voice control, touch the microphone icon again. The differences in background colors are explained below.
- Command standby screen (green):
This is the voice control command standby screen. When this screen is displayed, you can speak a command to perform navigation control. You can also perform control by directly touching the commands that are displayed on the screen.
Navigation 155
Navigation
- Manual mode screen (blue):
This screen appears when voice control is interrupted. You can perform control by directly touching the commands that are displayed on the screen.
- Talkback screen (yellow):
This screen appears while the talkback voice is being played when a command is recognized.
- Command recognition failed screen (red):
This screen appears when command recognition failed.
NOTE “Address” searching using voice commands is only available when the device is used within the USA and its language setting is set to English.
156 Navigation
Reference Data
The following pages explain the software's various features and menu screens.
Feature Smart Zoom
Smart zoom offers a large improvement over standard zoom functions. • While driving the route: When approaching an intersection, the screen is enlarged and the viewpoint raised so that you can easily see which way to drive at the next intersection. After navigating the intersection, the screen is reduced and the angle lowered to check the road in front.
• When driving without route navigation: The screen is enlarged as
you slow down and reduced as you speed up.
Switching between Day and Night Screens
For the Map screen and menu screen, the colors differ between day and night. • During daytime, the screen's colors are the same as those of a
printed map, and the menu is brighter.
• At night, the screen uses dark colors for large objects and reduces
the overall brightness of the screen.
The screen's color scheme differs between day and night. Using the current time and GPS position, you can also switch automatically between day and night screen settings just before sunrise (at dawn) and just after sunset (at dusk).
Navigation 157
Reference Data Route Search/Search Again
You can search for routes to suit your preferences. Route search methods: •
(Fast):
•
•
•
(Green):
Fast Searches all roads for the quickest route following the speed limits of the roads. Green Searches for the route that conserves the most energy, taking into account the merits of “Fast” and “Short”. Short Searches for the shortest distance in all possible routes. Easy Searches for a route that is easiest to drive, with few right and left turns. Using this option, the program allows you to avoid combinations of smaller roads and to take the expressway.
(Short):
(Easy):
(Ferries)
(Highways)
(Per-use Toll)
(Carpool/HOV)
(Period Charge)
(Unpaved Roads)
Highways Period Charge Per-use Toll Ferries Carpool/HOV Unpaved Roads Calculate Green Alternative
Search for a route by using or avoiding certain road categories: • • • • • • • The route may change drastically when real time traffic conditions are factored in. (See Page 159.) If you leave the route that was searched for based on your current position, and new information is received regarding traffic conditions for the recommended route, the software automatically searches for another route. See “Route Settings” on Page 169 for detailed information on Route settings.
(Calculate Green Alternative)
158 Navigation
Reference Data Online Road Information Saved in Route Search
This unit can provide you with even better routes, if real-time traffic information (TMC: Traffic Message Channel) is available. If public traffic data is broadcast at your location, this unit automatically takes into account the traffic data received. You do not need to set anything in the program. The decoded information will immediately be used in route planning. The moment unit receives traffic information that may affect your route, the program recalculates the route, and this unit will continue with a new route that is optimal based on the most up-to-date traffic conditions.
GPS Positioning Quality Indicator
The GPS reception quality icon at the top right of the menu screen indicates the current accuracy of positional information.
Icon
Explanation The software is not connected to the GPS receiver. Cannot perform GPS navigation. Products with a built-in GPS receiver are always connected. This icon is not normally displayed for those products. Although the software is connected to the GPS receiver, the signal is too weak to measure the GPS. Cannot perform GPS navigation. Only a few satellites are transmitting. Positional information is available, but altitude (elevation above sea level) cannot be calculated. GPS navigation is possible, but large positional errors may occur. Elevation above sea level is available, and measurements can be performed in 3D. GPS navigation is available.
Navigation 159
) is
When traffic information is being received, a special icon ( displayed on the map. When there is no traffic information available for the route, this icon indicates the status of the traffic information receiver, and when information is received, the type of upcoming traffic information is displayed. Road sections affected by traffic conditions are displayed in a different color on the map, and a small icon representing the type of traffic condition is displayed above the road.
Touch
to display the Traffic Summary screen.
Reference Data
Real-time traffic information (TMC) TMC (Traffic Message Channel) offers real-time traffic conditions. This can help you to avoid traffic jams that could not be anticipated due to road closures or accidents. TMC uses a dedicated FM Radio Data System (RDS) to broadcast real- time traffic and weather reports. The default settings use traffic information when searching for a route. The TMC receiver necessary to receive traffic condition reports is built-in to some products, but not for others. Contact your nearest SUBARU dealer. If traffic data normally broadcast in your region can be accessed, this received information is automatically taken into account. This does not need to be manually set. FM radio stations broadcasting TMC data are searched for automatically, and decoded information is immediately used to search for routes. If traffic information that might affect the current route is received, a warning is displayed indicating that the route will be searched for again, and navigation continues using a new, optimal route taking into account the latest traffic conditions. By delaying the timing before applying a route that has been searched again, the user can check the route and fine-tune the details creating the optimal search results. You can set this from Traffic settings. (See Page 168.)
160 Navigation
Event List
Touch been received.
(Event List) to check the traffic information that has
Reference Data
On this screen, you can select one entry from the list to view list of the traffic conditions for that section of the road.
Touch selected map position.
to open another screen displaying information on the
NOTE • This function is only available when TMC is installed in the product being
used.
• The TMC service is not available for all regions. There are also times when it
may not be available in your country or district. For more information on availability, contact your nearest SUBARU dealer.
On this screen, you can select one entry from the list to view full details of the traffic conditions for that section of the road.
Navigation 161
Reference Data
“More” Menu Various options are available from the “Others” menu. Touch More 1 If the Map screen is displayed, touch
(More) on the navigation menu.
(Menu) to
Menu
return to the navigation menu.
2 Touch
More
(More) on the navigation menu.
•
(Settings):
Settings Configures programs and changes operational patterns for the software. Performs functions such as fine tuning route search options, changing the Map screen design, turning warnings on or off, and launching the Setup Wizard.
162 Navigation
•
•
•
(Sunrise & Sunset):
Sunrise & Sunset You can check global sunrise and sunset times. Places a mark on the map to show the user's current position and route points. Touch the Details button to check accurate sunrise and sunset times for all points along the route (current position, all waypoints, final destination). (Trip Monitor): Trip Monitor Displays a list of all trip logs, whether they are saved by the user upon reaching the destination or whether they are saved automatically. By touching an item from the trip that is displayed, you can check trip data, speeds, and more detailed contents. When a path log has been saved, you can display it on the map in the color selected. You can use the path log for other purposes by exporting it as a GPX file. Help Displays a tutorial allowing for a quick grasp of the software's functions, and starts a demonstration showing a sample route simulation to check the navigation functions. The About section displays product information. Here you can view the software and database user license agreements, search for the contents license, and check the software ID. You can check statistical data for program use.
(Help):
Settings Menu Configures programs and changes operational patterns for the software. On the navigation menu, touch (More), and then touch
(Settings).
Settings
More
The Settings menu contains a variety of options. Touch scroll the list with your finger to view the entire list.
or
•
•
(Sound and Warnings):
Sound and Warnings Performs volume adjustment or changes the voice guidance language. Also enables various warnings and warning settings. (See Page 164.) Customize Quick Menu Allows you to set Quick menu items to suit your needs. Touch the button you want to change, and then select another function from the list. (See Page 166.)
(Customize Quick Menu):
Reference Data
•
•
•
•
•
•
•
(Traffic):
(Route Settings):
Traffic Sets On/Off of traffic information display and the method to use the received real-time traffic information on route search. (See Page 168.) Route Settings Sets the route search method. Select the type of vehicle you are using, the road category to use for the route search, and the route search method. (See Page 169.) (Map Settings): Map Settings Fine tunes the Map screen appearance. Performs adjustments for your selected map display, selects from a list of color designs used for daytime and nighttime, turns the path log on or off, and manages the spot display categories (allows you to select the type of spot displayed on the map). (See Page 170.) Visual Guidance Changes settings related to Map screen guidance. (See Page 172.) Units and Formats Sets display units and the date display. (See Page 173.) Trip Monitor Contains useful information on the user's distance moved in the trip logs and path logs. You can save trip logs automatically by turning this setting on, or save them manually when arriving at a destination. (See Page 173.) Start Configuration Wizard Changes basic software configurations set during the initial setup process. See step 3 in “Read First” on Page 83.
(Start Configuration Wizard):
(Units and Formats):
(Visual Guidance):
(Trip Monitor):
Navigation 163
•
•
•
•
(Verbosity Level):
(Voice Recognition):
Verbosity Level You can select the Verbosity Level from “Minimal”, “Compact”, or “Verbose”. Voice Recognition Touch this button to turn on or off talk back voice recognition results, or change the voice recognition method. (Alert Point Settings): Alert Point Settings Displays driver warning information on the map. Touch this button to turn these warnings on or off, and set how far from the danger the warning should be generated. You can make individual settings for each type of warning. Warning Sign Alerts Displays driver warning information on the map. Touch this button to turn these warnings on or off, and set how far from the danger the warning should be generated. You can make individual settings for each type of warning.
(Warning Sign Alerts):
Reference Data Sound and Warnings
Performs volume adjustment or changes the voice guidance language. Also enables various warnings and warning settings.
CAUTION
Be sure to set the volume of the audio at an appropriate level. Improper volume setting may result in hearing damage or a traffic accident.
•
•
•
(Volume):
(Voice Language):
Volume Touch this button to adjust various volumes in the application. The type and buttons for various different volumes is displayed on a new screen. See the following items for more details. Voice Language This button displays the current language for voice guidance. Touch this button to select a new language/narrator from the available languages and list of narrators. When you touch an item from the list, a sample of the audio is played back. Touch selecting a new voice language. TTS Pro Touch this button to select the frequency of voice information, as well as turning on or off various voice information such as information on traffic conditions.
(Back) after
(TTS Pro):
Back
164 Navigation
You can adjust the volume for the following voice categories. • Guidance:
Changes the volume for the guidance voice (when guiding using a narrator).
• Alert Beeps:
Changes the volume for audio warnings (the beep). Adjustment buttons for each audio classification: • Volume slider:
Adjusts the volume of the associated audio.
Reference Data
Navigation 165
Reference Data Customize Quick Menu
Allows you to set Quick menu items to suit your needs. (See Page 101.) Touch the button you want to change, and then select another function from the list.
Button
Quick Place Search Place Search)
(Quick
Favorites
(Favorites)
History
(History)
Explanation Touch this button to search around a point on the route, or your current position (when a route search has not been performed).
Primary Location Find / Find Places / Quick Search (See Page 120.)
Touch this button to select an item from the destination list.
Find / Favorite (See Page 135.)
Touch this button to select previously set destinations from the history list.
Find / History (See Page 137.)