- Download PDF Manual
-
(4)
(3)
(2)
Title information scroll buttons* Settings button Search button Shuffle Songs button AUDIO button File up/down and fast forward (fast reverse) buttons
It will be displayed if the length of the information is too long and it cannot be displayed.
(1) (2) (3) (4) (5) (6)
260 Audio and Visual
• iPhone, iPod, iPod classic, iPod nano, and iPod touch are trademarks of Apple
Inc., registered in the U.S. and other countries.
• To connect an iPod, first purchase a connection cord. • For details on the iPod functions, see the iPod's instruction manual. • For the iPod types (generations) supported by this unit, see “About the
Supported iPods” on Page 266.
• Some of the functions may not be available when vehicle is in motion.
■ Playing an iPod
CAUTION
Connect the connection cord correctly so that it does not interfere with the safe operation of the vehicle. 1 Connect an iPod that contains music files to the iPod
connector.
2 Press 3 Touch
iPod
• The playback starts.
How to Operate Portable Audio Devices
NOTE • When the ignition switch is in the “ACC” or “ON” position, the battery of the connected iPod is charged. However, it may take some time until the iPod is turned on, depending on the remaining power in the battery.
• Disconnect headphones and other accessories from the iPod before
connecting it to this unit. Failure to do so may make it impossible to operate the iPod from this unit.
• If the iPod's equalizer has been customized, the sound output may be
distorted when it is connected to the optional dedicated connection cable. • If this unit does not support the language used in the iPod, album names,
titles, and artist names are displayed as blank.
• iPod may not be recognized in ACC OFF/ON. In this case, remove the iPod and
reconnect it.
• When you connect your iPod, the music file starts playing from the previous position. Also, if you switch the power of the iPod off and on, the music file starts playing from the previous position. But if the unit cannot detect the file that was playing previously, it will start playing from the first file.
• If there are multiple music files stored on your iPod or iPhone, it may take
some time until the playback starts.
• If the iPod is set to Shuffle Songs and is connected to this unit,
is not
shown on the display.
Audio and Visual 261
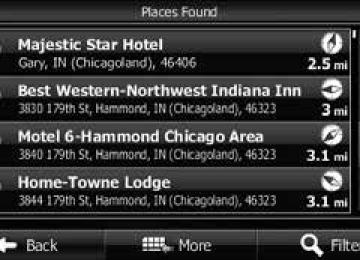
■ Finding a music file 1 Touch 2 Touch
Search
iPod
(Search).
3 To select a file or program to play, touch
Playlists
Artists
Albums Others
(Albums), (Others).
(Playlists), (Songs) or • The list screen for the selected mode appears. • Touch to return to the previous screen.
(Artists),
Songs
How to Operate Portable Audio Devices
■ Fast forwarding and fast reversing You can fast forward or fast reverse the currently playing file. 1 Touch
for 1 second or more.
or
•
Fast forward the file.
Fast reverse the file. Fast forward (or fast reverse) operates until you release your finger from the button.
■ Selecting a music file You can select the music file that you want to play. 1 Touch
or
•
Advance to the next file.
Return to the start of the currently playing file.
(Press twice or more): Return to the previous file. The selected music file starts to play.
262 Audio and Visual
How to Operate Portable Audio Devices
iPod
■ Repeating the same music file 1 Touch 2 Touch 3 Touch
(On) in Repeat.
(Settings).
Settings
On
• Repeat playback is set for the currently playing music file. • When you touch (On), repeat is continued until you (Off ) to cancel the repeat playback. cancel it. Touch
On Off
• When Repeat is canceled, repeat playback is performed for the
list that is playing back.
• Touch
to return to the previous screen.
4 Touch the list that you want to use.
• The list order depends on the selection mode, as shown below.
Playlists: Playlist screen (cid:74) Music file screen Albums: Album screen (cid:74) Music file screen Artists: Artist screen (cid:74) Album screen (cid:74) Music file screen Songs: Music file screen Others: Others screen (cid:74) Genre screen (cid:74) Artist screen (cid:74) Album screen (cid:74) Music file screen Others screen (cid:74) Program screen (cid:74) Episode screen Others screen (cid:74) Book screen Others screen (cid:74) Composer screen (cid:74) Album screen (cid:74) Music file screen
5 Touch the music file that you want to play.
• The selected music file starts to play. • Touch
or
on the scroll function to scroll the display
pages of the music file list.
• Touch
or
on the index function to display in the list
the names that start with the selected letter or number.
• Touch
to return to the previous screen.
NOTE When On is selected in Repeat, confirmation that the function is on.
is displayed in the top right of the screen as
Audio and Visual 263
Playing albums randomly You can play albums randomly. Note that the music files within the albums are played in order from the first. 1 Touch 2 Touch 3 Touch
(Album) in Shuffle.
(Settings).
Settings
Album
iPod
• When you touch
Album
(Album), random playback is
continued until you cancel it. Touch random playback.
Off
(Off) to cancel
• Touch
to return to the previous screen.
NOTE When the album random function is selected, the screen as confirmation that the function is on.
is displayed in the top right of
How to Operate Portable Audio Devices
■ Playing music files randomly
iPod
Playing files from the current list randomly 1 Touch 2 Touch 3 Touch
(Song) in Shuffle.
(Settings).
Settings
Song
• When you touch
Song
(Song), random playback is continued
until you cancel it. Touch playback.
Off
(Off ) to cancel random
• Touch
to return to the previous screen.
NOTE When the list random function is selected, the screen as confirmation that the function is on.
is displayed in the top right of
264 Audio and Visual
■ Playing the Shuffle Songs You can play all the music files randomly. 1 Touch 2 Touch
Shuffle Songs
iPod
(Shuffle Songs).
• When you touch
Shuffle Songs
(Shuffle Songs), random
playback is continued until you cancel it.
How to Operate Portable Audio Devices
iPod
■ Changing the audiobook playback speed 1 Touch 2 Touch 3 Touch
(Normal) or
(Settings).
Settings
Normal
Slow
(Slow), Audiobook Speed. •
(Slow):
(Normal):
Slow Slow down the reading speed of the audiobook. Normal Set the reading speed of the audiobook to normal. Fast Speed up the reading speed of the audiobook.
(Fast):
•
•
Fast
(Fast) in
NOTE When the all random function is selected, screen as confirmation that the function is on.
is displayed in the top right of the
• Touch
to return to the previous screen.
Audio and Visual 265
How to Operate Portable Audio Devices
■ Scrolling title information If the Album, Title or Artist information cannot be fully displayed because it is too long, you can scroll the display. 1 Touch
on the item that you want to scroll.
• The selected title information scrolls to the left. • Touch
to stop the scrolling and return to the start of the
title. If driving is detected while the display is being scrolled, the scrolling stops and returns to the start of the title.
•
• When the end of the title information is displayed, the scrolling
stops.
266 Audio and Visual
About the Supported iPods
This unit can be used with the following iPods.
Type iPod iPod nano
iPod classic
iPod touch
iPhone
Generation 5G 1G 2G 3G 4G 5G 1G 2G (120 GB) 2009 (160 GB) 1G 2G Late 2009 (8 GB/16 GB) Late 2009 (32 GB/64 GB) 3G 1G (iPhone) 2G (iPhone 3G) 3G (iPhone 3GS) iPhone 4
Firmware version or OS 1.3
1.3.1
1.1.3
1.1.3
1.0.4
1.0.2
1.1.2
2.0.1
2.0.4
iOS 3.1.3
iOS 4
iOS 4
iOS 4
iOS 3.1.3
iOS 4
iOS 4
iOS 4
iOS 4NOTE • Note that the warranty does not apply if an unsupported iPod is connected. • The video playback function is not supported.
Using Bluetooth Audio Before Using Bluetooth Audio
A Bluetooth-supporting portable audio player (“portable device” hereafter) can be used as a source for this unit by utilizing the Bluetooth wireless communication technology. To use a Bluetooth-supporting portable device with this unit, it is necessary to perform Bluetooth registration and connection settings. • The Bluetooth-supporting portable device connected to the unit must be a portable device which supports the relevant Bluetooth specifications. For the Bluetooth specifications supported by this unit, see “About the Compatible Bluetooth-Supporting Devices” on Page 279.
• Bluetooth is a short-range wireless technology for connecting cell
phones, computers and other such devices.
The Bluetooth® word mark and logos are registered trademarks owned by Bluetooth SIG, Inc. and any of such marks by FUJITSU TEN LIMITED is under license. Other trademarks and trade names are those of their respective owners.
How to Operate Portable Audio Devices
• For vehicles sold in the U.S.A.
FCC ID: BABFT0021A - This device complies with part 15 of the FCC Rules. Operation is subject to
the following two conditions: (1) This device may not cause harmful interference, and (2) this device must accept any interference received, including interference that may cause undesired operation. FCC WARNING Changes or modifications not expressly approved by the party responsible for compliance could void the user's authority to operate the equipment. CAUTION: Radio Frequency Radiation Exposure This equipment complies with FCC radiation exposure limits set forth for uncontrolled equipment and meets the FCC radio frequency (RF) Exposure Guidelines in Supplement C to OET65. This equipment has very low levels of RF energy that it deemed to comply without maximum permissive exposure evaluation (MPE). But it is desirable that it should be installed and operated with at least 20cm and more between the radiator and person's body (excluding extremities: hands, wrists, feet and ankles). Co-location: This transmitter must not be co-located or operated in conjunction with any other antenna or transmitter.
Audio and Visual 267
How to Operate Portable Audio Devices
• For vehicles sold in Canada
IC: 2024B-FT0021A - English:
Operation is subject to the following two conditions: (1) this device may not cause interference, and (2) this device must accept any interference, including interference that may cause undesired operation of the device.
- Français:
L'utilisation de ce dispositif est autorisée seulement aux deux conditions suivantes : (1) il ne doit pas produire de brouillage, et (2) l'utilisateur du dispositif doit être prêt à accepter tout brouillage radioélectrique reçu, même si ce brouillage est susceptible de compromettre le fonctionnement du dispositif. CAUTION: Radio Frequency Radiation Exposure This equipment complies with IC radiation exposure limits set forth for uncontrolled equipment and meets the RSS-102 of the IC radio frequency (RF) Exposure rules. This equipment has very low levels of RF energy that it deemed to comply without maximum permissive exposure evaluation (MPE). But it is desirable that it should be installed and operated with at least 20cm and more between the radiator and person's body (excluding extremities: hands, writsts, feet and ankles). - This Category II radiocommunication device complies with Industry Canada
Standard RSS-310. Ce dispositif de radiocommunication de catégorie II respecte la norme CNR- 310 d'Industrie Canada.
268 Audio and Visual
CAUTION
• The frequency band used by this unit is the same band that is used by industrial, scientific and medical devices such as microwave ovens, facility wireless stations used for identifying moving objects in factory production lines and other locations (wireless station that requires a license), special low output wireless stations (wireless station that does not require a license), and amateur radios (wireless station that requires a license). (The 3 types of wireless stations above are hereafter called “other wireless stations”.) Before operating this unit, make sure that no “other wireless stations” are operating nearby. If the unit causes harmful radio wave interference in “other wireless stations”, immediately change the location to stop the radio wave interference.
• The frequency band used by this unit is the 2.4 GHz band. • The FH-SS modulation scheme is used. • The estimated distance in which interference may occur is
less than 10 m.
• This unit uses the full band, making it possible to avoid the
band of devices that identify moving objects.
• This unit complies with the standards specified by the Radio
Act and Telecommunications Business Act in Japan. The stickers attached to the product certify this. Do not remove the stickers.
• Disassembling or modifying this unit is punishable by law.
NOTE • This unit can be used with Bluetooth-supporting portable devices. • For details of Bluetooth operations, see the portable device or cell phone
instruction manual.
• Factors in the surrounding environment may negatively affect the connection
status and prevent Bluetooth audio operations on the unit.
• BTA feature is subject to portable devices or cell phone compatibility.
■ Registering a portable device You can register portable devices on this unit. Up to 5 portable devices can be registered on the unit. The order of registration precedence is always 1 to 5. When a portable device is added or deleted, the order of precedence is updated.
WARNING
Do not register a portable device while driving. Be sure to park the vehicle in a safe location and apply the parking brake before registering a device. 1 Press 2 Touch Info
Info is not displayed, touch
If
•
3 Touch
Bluetooth
How to Operate Portable Audio Devices
4 Touch
Registered Devices
(Registreted Devices).
5 Touch
Add New
(Add New).
Audio and Visual 269
.
■ Deleting a portable device registration You can delete portable devices that are registered on the unit. 1 Press 2 Touch Info 3 Touch
Info is not displayed, touch
Bluetooth
If
•
4 Touch
Registered Devices
(Registreted Devices).
How to Operate Portable Audio Devices
6 Operate the portable device to enter the passcode
(passkey) of the unit. • The name of the unit is CAR MULTIMEDIA. • The initial setting for the passcode (passkey) is 0000. • Operate the portable device while the Registered Devices
screen is displayed.
7 When the registration is complete, “Connection
Completed” appears. • The portable device registration is complete. • After the registration completed message is displayed,
“Connection established successfully!” appears.
NOTE • If the registration fails, “Connection failed.” appears on the screen. If this
happens, perform the registration operation again.
• For details of operations on the portable device, see the portable device's
instruction manual.
270 Audio and Visual
5 Select the portable device that you want to delete.
How to Operate Portable Audio Devices
■ Connecting a portable device You can connect portable devices that are registered on the unit. • Make the preparations necessary for connecting to the unit, for
example by setting the portable device's Bluetooth standby to On. For details of operations on the portable device, see the portable device's instruction manual. 1 Press 2 Touch Info 3 Touch
Info is not displayed, touch
Bluetooth
If
•
6 Touch
Delete
(Delete).
•
“Are you sure you want to delete this device?” appears on the screen. Touch
(Yes) or
(No).
Yes
No
7 After touching “Yes”, when the deletion is complete,
“Completed” appears. • The portable device deletion is complete.
Audio and Visual 271
6 Touch
Connect
(Connect).
• The connection screen appears.
7 When the connection is complete, “Connection
Completed” appears. • The connection between the portable device and the unit is
complete.
NOTE • If the connection fails, “Connection failed.” appears on the screen. If this
happens, perform the connection operation again.
• Connection is not possible if no portable devices are registered. • On the Connect Portable Player screen, touch
Add New
(Add New) to
register a portable device.
How to Operate Portable Audio Devices
4 Touch
Connect Portable Player
(Connect Portable Player).
5 Select the portable device that you want to connect. • The Bluetooth mark is displayed for portable devices with an
active Bluetooth connection.
Bluetooth mark
272 Audio and Visual
.
■ Canceling a portable device connection 1 Press 2 Touch Info 3 Touch
Info is not displayed, touch
Bluetooth
If
•
4 Touch
Connect Portable Player
(Connect Portable Player).
5 Select the portable device with the connection that you
How to Operate Portable Audio Devices
want to cancel.
6 Touch
Disconnect
(Disconnect).
•
“Another device is already connected. Do you want to disconnect this device?” appears. Touch (Yes) or (No).
Yes
No
7 After touching “Yes”, when the cancelation is complete,
“Connection with the mobile telephone was disconnected.” appears. • The cancelation of the portable device connection is complete.
Audio and Visual 273
How to Operate Portable Audio Devices Using a Portable Device
(8)
(9)
(7)
(6)
(1)
(5)
(4)
(3)
(2)
Title information scroll buttons*1 *2
Settings button Tracks button*1
Search button*1
Album selection buttons*1
Track up/down and fast forward (fast reverse) buttons*1
AUDIO button Pause button Play button(1) (2) (3) (4) (5) (6) (7) (8) (9) *1 May not be displayed, and operations may not function depending on the
portable device type.
*2 It will be displayed if the length of the information is too long and it
cannot be displayed.
274 Audio and Visual
NOTE Some of the functions may not be available when vehicle is in motion.
■ Listening to a portable device 1 Press 2 Touch 3 Touch
• The playback starts on the connected portable device.
NOTE If the playback does not start when you touch button on the portable device.
on the unit, press the play
■ Pausing the playback 1 Touch
• To start the playback again, touch
■ Selecting a track 1 Touch
or
•
Advance to the next track.
(Once):
Return to the start of the currently playing track.
(Twice or more):
Return to the previous track.
How to Operate Portable Audio Devices
■ Selecting a music album 1 Touch
or
•
Advance to the next music album.
Return to the previous music album.
■ Fast forwarding and fast reversing 1 Touch
or
for 1 second or more.
•
Fast forward the track.
Fast reverse the track. Fast forward (or fast reverse) operates until you release your finger from the button.
Audio and Visual 275
How to Operate Portable Audio Devices
■ Finding a music album 1 Touch
(Search).
Search
■ Finding a music track 1 Touch
Tracks
(Tracks).
2 Touch the music album that you want to play.
2 Touch the music track that you want to play.
• The selected music album starts to play. • Touch
or
on the scroll function to scroll the display
• The selected music track starts to play. • Touch
or
on the scroll function to scroll the display
pages of the music track screen.
• Touch
to return to the previous screen.
pages of the music album screen.
• Touch
to return to the previous screen.
276 Audio and Visual
■ Scrolling title information If the Album, Title or Artist information cannot be fully displayed because it is too long, you can scroll the display. 1 Touch
on the item that you want to scroll.
• The selected title information scrolls to the left. • Touch
to stop the scrolling and return to the start of the
title. If driving is detected while the display is being scrolled, the scrolling stops and returns to the start of the title.
•
• When the end of the title information is displayed, the scrolling
stops.
How to Operate Portable Audio Devices
■ Various portable device settings
WARNING
Do not set a portable device while driving. Be sure to park the vehicle in a safe location and apply the parking brake before performing the settings. 1 Touch
(Settings).
Settings
Audio and Visual 277
How to Operate Portable Audio Devices
2 On the portable device Settings screen, you can perform the following settings by touching the setting buttons for each item. • Portable device settings screen
Item Repeat Random Bluetooth Auto Connect
Connection
Function Set repeat playback to on or off. Set random playback to on or off. Set the Bluetooth function to on or off. Set automatic connection between a portable device and the unit to on or off. Display the Connect Portable Player screen to register a portable device or perform the connection settings. (See Page 271.)
• Touch
to return to the previous screen.
278 Audio and Visual
Repeat setting Set the repeat function to on or off. 1 Touch
(On) or
Off
On
(Off).
NOTE When On is selected in Repeat, confirmation that the function is on.
is displayed in the top right of the screen as
Random setting Set the random function to on or off. 1 Touch
(On) or
Off
On
(Off).
NOTE When On is selected in Random, as confirmation that the function is on.
is displayed in the top right of the screen
On
(On) or
Bluetooth setting Set the Bluetooth function to on or off. 1 Touch Auto Connect setting Set automatic connection between a registered portable device and the unit. 1 Touch
(On) or
(Off).
(Off).
Off
Off
On
About the Compatible Bluetooth-Supporting Devices
The following Bluetooth-supporting portable audio devices can be used.
Specification
• Bluetooth Specification Ver. 1.1 or higher (Ver. 2.0 + EDR
or higher is recommended)
Profile
• A2DP (Advanced Audio Distribution Profile) Ver. 1.0 or
higher
• AVRCP (Audio/Video Remote Control Profile) Ver. 1.0 or
higher (Ver. 1.4 or higher is recommended)
NOTE The available functions may vary depending on the type of Bluetooth audio device.
How to Operate Portable Audio Devices
Audio and Visual 279
How to Operate Portable Audio Devices
Using AUX Using AUX
When you connect a device such as a commercially available portable audio device to the AUX (RCA) connector, you can use this unit to play music recorded on the portable audio device.
(1)
(1)
AUDIO button
NOTE • To connect a portable audio device, first purchase a connection cord. • Before using a portable audio device with this unit, be sure to read the
instruction manual of the portable audio device carefully to make sure that there will be no problems when using it with the unit.
280 Audio and Visual
■ Using AUX to listen to music
CAUTION
Connect the connection cord correctly so that it does not interfere with the safe operation of the vehicle. 1 Connect a commercially available portable audio device
and start playback.
2 Press 3 Touch
AUX
• The AUX screen appears, and the sound of the portable audio
device playback is output from the speakers.
NOTE For details of operations on the portable audio device, see the portable audio device's instruction manual.
Other Operations
Picture Function Operations Using the Picture Function
If you insert an SD memory card that contains image data, you can play a slide show of the images, or set an image as the Opening screen.
CAUTION
2 Display the picture operations screen.
SD Eject
(SD Eject) and remove the map SD card.
Before inserting an SD memory card that contains image data, touch Removing the card without first touching (SD Eject) may damage the data. No compensation will be given for any damaged data. (See Page 18.)
SD Eject
NOTE Some of the functions may not be available when vehicle is in motion.
■ Displaying the picture operations screen 1 Insert a different SD memory card that contains image
data. (See Page 16.)
282 Other
•
•
•
•
(Menu):
Menu You can display a picture list or set a slide show.
Display the previous image.
Display the next image.
(or
):
The slide show starts. Touch Start-up Screen Register the displayed image data as the “Customized” opening screen setting.
to stop the slide show.
(Start-up Screen):
•
Display the Audio/Multi screen. To display the picture operations screen again, touch
• Touch the screen to show only the image on the display. To display the picture operations screen again, touch the screen.
2 Display the image that you want to set and touch
Start-up Screen
(Start-up Screen).
Other Operations
3 “Are you sure to overwrite the start-up screen?” appears
on the screen. Touch • The picture is registered as the “Customized” opening screen
(Yes).
Yes
■ Replacing the Opening screen with your own image
setting.
data
You can register image data (1 picture only) imported from an SD memory card as the “Customized” opening screen setting. 1 Insert an SD memory card that contains the image data.
(See Page 16.)
Other 283
Other Operations
■ Selecting an image file from the picture list You can select the image file that you want to view from a folder. 1 On the picture operations screen, touch 2 Touch
(Search) in Picture.
Search
Menu
(Menu).
4 Touch the file that you want to view.
• The selected file is displayed. Touch the displayed image to
•
show it in a Picture screen display. If there are more pages, touch pages. • Touch
to return to the previous screen.
or
to scroll the
■ Slide show setting On the Slide Show Configuration screen, you can set a slide show. 1 On the picture operations screen, touch 2 Touch
(Configuration) in Slide Show.
Configuration
Menu
(Menu).
to scroll the
3 Touch the folder that you want to use. or
•
If there are more pages, touch pages. • Touch
to return to the previous screen.
284 Other
3 You can perform the following settings by touching the
setting buttons for each item.
About the Supported Image Data
Other Operations
Interval setting You can change the display interval of the slide show. 1 Touch
or
• 5 sec (cid:81) 10 sec (cid:81) 15 sec
Pattern setting You can change the pattern of the slide show. 1 Touch
or
• Standard (cid:81) Effect 1 (cid:81) Effect 2 (cid:81) Effect 3 (cid:81) Effect 4 (cid:81) Random
(cid:81) Standard (cid:81) ...
About the supported image file standards • Supported standards:
jpg (does not support jpg2000)
• Supported file names:
Supports single-byte characters (alphanumerics, symbols, kana) and double-byte characters (alphanumerics, symbols, Chinese characters, kana)
• Supported character code:
UNICODE
• Number of characters that can be displayed:
30 single-byte characters, 15 double-byte characters (+.jpg) * Only single-byte numbers, single-byte letters (upper case), “_”
(underscore), symbols, Chinese characters (not all Chinese characters can be displayed)
* Although more than 30 single-byte characters can be read, only 30
characters are displayed.
•
* The .jpg extension is not displayed. Image data size: 10 MB or less (per file)
• Number of images that can be imported from an SD memory card:
500
Other 285
Other Operations
Root directory ( )
Folder
Image (.jpg) file
1st level
2nd level
3nd level
NOTE • When the image size is larger than horizontal 400 × vertical 234 dots, the
original image is compressed to the standard size before display. The areas without an image are displayed as black bars.
• When the image size is smaller than horizontal 400 × vertical 234 dots, the image is displayed at the center of the display without changing the image size.
286 Other
About Steering Wheel Switches You can use these buttons to perform the main audio controls and other operations.
Compatibility with Steering Wheel Buttons
The table below shows the compatibility between the steering wheel buttons and this unit.
Operation Common operations
Button (+) (-)
Name Volume button When these buttons are pressed briefly, the volume
Function
changes by 1 step. When these buttons are pressed and held, the volume changes continuously.
(MODE)
Mode selection button
Voice recognition trigger
• When this switch is pressed while the power is off,
the power turns on.
• The mode changes in the following order.
FM (cid:74) SAT (cid:74) DISC* (CD, MP3/WMA) (cid:74) USB/iPod* (cid:74) BT-Audio* (cid:74) AUX* (cid:74) AM (cid:74) returns to FM.
• Ends voice recognition. • Starts voice recognition. • Skips guidance voice, talkback voice, or help voice. • Ends voice recognition.
Other Operations
Explanation of operation (+): Increases the volume (in BT-TEL mode, the ringtone volume, call volume and readout volume or in voice recognition mode, the guidance volume). (-): Decreases the volume (in BT-TEL mode, the ringtone volume, call volume and readout volume or in voice recognition mode, the guidance volume). When the power is on, the mode changes each time (MODE) is pressed. Cannot be operated while making a calling, receiving a call, or talking in BT-TEL mode. On the voice recognition mode, press and hold (MODE) to end voice recognition.
) briefly to start voice recognition. ) during guidance voice, talkback voice, or
Press ( Press ( help voice to skip the audio. Hold down ( the voice recognition screen. Press ( voice recognition screen.
) during voice recognition to close
) during voice recognition to close the
Other 287
Other Operations
Operation AM / FM (HD included) radio operations
Button
Name Channel selection buttons
Function • Selects in order the stations saved in the memory. • Selects automatically the channel closest to the
currently received frequency.
• Selects in order the stations in the station list.
(MODE)
SAT radio operations
Mode selection button Channel selection buttons
Mutes or cancels the mute.
• Selects in order the channels saved in the memory. • Selects automatically the channel closest to the
currently received frequency.
• Selects in order the channels in the station list.
(MODE)
CD player operations*1
Mode selection button Track selection buttons
Mutes or cancels the mute.
• Selects the next track, previous track, or start of the
current track.
• Fast forwarding or fast reversing
(MODE)
Mode selection button
Pauses or plays.
288 Other
) or (
) or (
) to start the automatic station
) briefly to select the stations in order.
Explanation of operation Press ( Press and hold ( selection operation. Keep pressing ( frequency quickly. The nearest broadcasting station from the frequency where the button was released can be received. Press and hold to mute or cancel the mute.
) to start SEEK to search a
) or (
) or (
) or (
) to start the automatic
) briefly to select the channels in order.
Press ( Press and hold ( channel selection operation. Keep pressing ( frequency quickly. The nearest broadcasting channel from the frequency where the button was released can be received. Press and hold to mute or cancel the mute.
) to start SEEK to search a
) or (
) briefly to select the next or previous
) to fast forward or fast reverse
) or (
Press ( track. Press and hold ( the track. Press and hold to pause or play.
) or (
Operation MP3/WMA player operations*1
Button
Name File selection buttons
Function • Selects the next file, previous file, or start of the
current file.
• Selects the next or previous folder.
USB operations*1
iPod and BT- Audio operations*1
(MODE)
(MODE)
(MODE)
AUX operations*1
(MODE)
Mode selection button File selection buttons
Mode selection button Track selection buttons
Mode selection button Mode selection button
Pauses or plays.
• Selects the next file, previous file, or start of the
current file.
• Selects the next or previous folder.
Pauses or plays.
• Selects the next track, previous track, or start of the
current track.
• Fast forwarding or fast reversing
Pauses or plays.
Other Operations
) briefly to select the next or previous
) to select the next or previous
) or (
Explanation of operation Press ( file. Press and hold ( folder. Press and hold to pause or play.
) or (
) or (
Press ( file. Press and hold ( folder. Press and hold to pause or play.
) or (
) or (
Press ( track. Press and hold ( the track. Press and hold to pause or play.
) or (
) briefly to select the next or previous
) to select the next or previous
) briefly to select the next or previous
) to fast forward or fast reverse
Mutes or cancels the mute.
Press and hold to mute or cancel the mute.
Other 289
Explanation of operation
Press Press and hold When in incoming call, press incoming call.
briefly to end a call or cancel a call.
to end the all call.
briefly to hold the
briefly to make or receive a call. When in a
Press different mode, changes to the telephone mode. On the incoming call on hold, press receive a call. Press and hold to mute or cancel the mute.
briefly to
Other Operations
Operation BT-TEL operations*1
Button
Name On Hook
Off Hook
Function • Ending a call. • Canceling a call. • Refuse the incoming call. • Holding the incoming call.*2
• Selects the telephone mode. • Making a call. • Receiving the incoming call. • Connecting the call on hold.
(MODE)
Mode selection button *1 Enabled only when operation is possible *2 The Holding function is only available on the operation on the cell phone side.
Mutes or cancels the mute.
290 Other
Other Operations
Under the following conditions, the voice recognition mode will be turned off: • Within 8 seconds after guidance, talkback or help voice finishes
playing, no voice is recognized. (When the screen is operated, counting of 8 seconds starts again after the screen is touched.)
• The button is pressed and held. • The Steering button or Hard button (excluding the Voice
Recognition button) is pressed.
• A call is received.
NOTE When voice recognition is started, the current audio output is muted or paused.
Voice Control System Operations About the Voice Control System
By using the voice control system (voice input microphone and button), you can perform navigation and audio operation by saying voice commands. This enables you to use functions that are usually inoperable while driving. The voice control system may not recognize the voice command if you do not say it correctly. Be aware of the following points that will assist correct recognition. • Speak after you hear the “beep”. If you speak before or at the same
time as the “beep”, your command will not be recognized.
• Speak in a loud and clear voice. • Some voices may be difficult to recognize. • Keep the windows closed as much as possible while speaking. Noise
such as wind or other external sounds may prevent correct recognition. Also, if the air conditioner fan is too loud, it may prevent correct recognition.
• The system does not support regional variations or alternative
phrases. Be sure to say the specified phrases.
Other 291
Other Operations Using the Voice Control System
When the voice control system is activated, you may speak the controls displayed on the screen, or you may touch the corresponding button.
NOTE For the following instructions found in this manual, we will use “000” as a placeholder for the command text available on your actual system. “000” is only for demonstration purposes.
1 Press
• The screen changes to the Main Menu. “Voice recognition on” mark
2 After the “Voice command please.” voice guidance, a
“beep” sounds.
3 Say the operation command.
• After you hear the “beep”, speak or operate the screen while a
“recognition mark (green-faced icon)” is displayed (within approx. 8 seconds). If you said the wrong command or the recognition result is incorrect, cancel the operation by saying “Cancel” after the talkback voice finishes playing.
•
Recognition result
•
•
“(cid:99)(cid:99)(cid:99)” or touch the button.
Operate by saying “(cid:99)(cid:99)(cid:99)”.
292 Other
• When the
button is pressed while guidance voice,
talkback voice or help voice is being played, you can skip the voice guidance.
• When you say “Help” while the Main Menu is displayed, a list of
the currently usable commands appears on the screen.
NOTE A caution display appears after pressing (Main Unit/Steering Wheel Switch) while a Bluetooth device, USB device or iPod is connected, and the stored data is being read. Be sure to start the operation after the caution display disappears.
Displaying the Command List
Other Operations
You can display a list of the usable commands on the screen. 1 Press
• The screen changes to the Main Menu, and after the “Voice
command please.” voice guidance, a “beep” sounds.
2 Say “Help”.
• The command list appears. •
If there are more pages, touch
or
to scroll the list.
Other 293
Other Operations
•
(Change):
(AV Operation):
Change Display the next page of the command list. AV Operation Display the command list for the current audio operation. (Only when an audio source is being used.) AV Source Display the audio source command list. Phone Display the handsfree operation command list. (Only during handsfree connection.) Navigation Display the navigation operation command list.
(Navigation):
(AV Source):
(Phone):
3 Check the command that you want to use in the
command list. • You can perform the operation by saying the displayed
command.
294 Other
Examples of Using the Voice Control System
This section describes examples of operating the voice control system. For the voice commands, see “Voice Command Lists” on Page 298. The notations used in the commands are as follows. • <(cid:99)(cid:99)(cid:99)>: Commands to be spoken • (cid:74) (cid:99)(cid:99)(cid:99): Names to be spoken
■ Changing the audio mode 1 Perform a voice input for the audio mode to which you
want to change. (USB in this example.) • Say “USB”. • The mode changes to USB.
■ Changing the radio frequency 1 Say “Seek up“.
• The current frequency switches to the next receivable
frequency.
• Saying “Seek down“ switches the current frequency to the
previous receivable frequency.
■ Changing the preset channel 1 Say “Preset 1”.
■ Changing the currently playing track number 1 Say “Track 1”.
• The current frequency switches to the frequency registered in
• The currently playing track number switches to track 1 .
Other Operations
the preset channel 1.
• Up to 6 preset channels can be changed.
■ Changing the frequency (AM radio frequency is used as an example of changing frequencies.) 1 Say “Frequency 522”.
• The current frequency switches to 522 kHz. • For the rules of frequencies, see “Radio Frequency Lists” on Page
316.
■ Changing the channel 1 Say “Channel 100”.
• The current channel switches to 100 ch. • For the rules of channels, see “XM Channel Lists” on Page 320.
■ Changing the currently playing track 1 Say “Track up”.
• The playback changes to the next track. • Say “Track down” to change the playback to the previous track
or start of the track.
■ Calling the list screen 1 Say “Show list”.
• The screen changes to the list screen.
■ Changing the currently playing folder 1 Say “Folder up”.
• The playback changes to the start of the next folder. • Say “Folder down” to change the playback to the start of the
previous folder.
Other 295
2 After the voice guidance, say “Call
”. •
•
If there are multiple candidates, follow the voice guidance and say a list number. If there are multiple telephone numbers, follow the voice guidance and say a location.
• Under the following conditions, some of registered names and
telephone numbers will be deleted from the multiple candidates.
- When multiple registered names of completely identical
characters are found, the first name to be found will be the candidate.
- When there are multiple identical locations registered in one
phone book, the first location to be found will be the candidate. 3 After notifying the name of the person you want to call by the voice guidance, if you hear the name of the right person spoken back to you, say “Yes”. • A call is made to the selected person's telephone number. •
If the name of the selected person is wrong, say “No”.
Other Operations
■ Specifying a folder (Switching USB folders) 1 Say “Folder”.
• After you hear “Folder” spoken back to you, the current mode
changes to the folder specification mode. (The screen also changes.)
2 After the voice guidance, say the name of the folder that
you want to play. • Starting from the first track of the specified folder, all tracks in
the folder will be switched from one to the next after your voice command.
* iPod mode allows you to specify the desired music track from
artist, genre or playlist.
* A maximum of 1000 music tracks can be specified (when
specifying from genre or playlist, a maximum of 100).
■ Making a call with the phone book 1 Say “Phone”.
• After you hear “Hands-Free” spoken back to you, the current
mode changes to the hands-free menu mode. (The screen also changes.)
296 Other
■ Using the speed dial to make a call 1 Say “Hands-Free”.
■ Using the Dial to make a call 1 Say “Hands-Free”.
• After you hear “Hands-Free” spoken back to you, the current
• After you hear “Hands-Free” spoken back to you, the current
mode changes to the hands-free menu mode. (The screen also changes.)
mode changes to the hands-free menu mode. (The screen also changes.)
2 Say “Speed Dial 1”.
2 Say “Dial”.
• The candidate registered in the Speed Dial 1 will be selected.
• After you hear “Dial” spoken back to you, the current mode
Other Operations
3 After notifying the number of the Speed Dial by the
voice guidance, if you hear the name of the right person spoken back to you, say “Yes”. • A call is made to the selected Speed Dial number. •
If the number of the selected Speed Dial is wrong, say “No”.
changes to the dial calling mode.
3 Say “123” (dial number).
• The dial calling mode allows you to say the desired dial number
with any number of digit at a time. 4 Notify “123” by voice command.
• When adding a dial number, speak the number you want to
add as in step 3. (Notify the added dial number by voice command.)
• When you dial the wrong number, speak “Delete” to delete the
digits of the number that you spoke last. (After the delete, notify all of the remaining dial number.)
5 Say “Call”.
• A call is made to the selected dial number.
Other 297
Voice command Radio
Phrase
Radio
Function
Sets to radio mode (Changes to the last mode used: FM, AM, or satellite radio.)
* Enabled only when operation is possible
■ Command for changing to the handsfree mode Enabled in all screens.
Voice command Phone
Phrase
Function
Handsfree, Phone
Sets to handsfree mode
■ Command for changing to the navigation mode Enabled in all screens.
Voice command Navigation
Phrase
Function
Navigation
Changes to the Navigation screen
Other Operations Voice Command Lists