- Download PDF Manual
-
stations is displayed.
2. Turn the multifunction knob to
choose the location for the station to be stored and press the multifunction knob.
To store stations using Autostore: 1. Select FM or AM and then select Autostore from the Tuner Menu.
2. The Autostore menu is displayed, and the automatic station storing is started.
3. The nine strongest stations in the
selected band are stored to the preset buttons.
Using the CD Player The CDC 40 is capable of playing CDs, MP3 CD-Rs, and mixed mode CD-Rs that have both audio and MP3 tracks on it. The CD changer holds a maximum of 6 CDs, and can play smaller 3 inch (8 cm) single CDs with an adapter ring.
Loading a CD To load CDs: 1. Press Z (Eject), the
CD-Changer menu displays.
2. Select an empty CD
compartment using the multifunction knob, Please insert CD now displays.
3. Insert a CD into the slot, Reading CD displays and a appears next to the selected position.
4. Repeat Step 2 to load
additional CDs.
(cid:129) (cid:129) (cid:129) (cid:129) Display Options The display can be changed depending on what type of CD is in the CD player. The display options are: (cid:129) Disabled ( o ): Track number,
CD number, album number and playing time for an audio CD.
(cid:129) Enabled ( a ): CD name, track name, artist name, and album name for an audio CD with CD text.
To change the display: 1. Select Extras from the CD Menu. 2. Enable or disable the Display
track box.
Playing a CD CDC: Press to play a CD that is already loaded into the CD player while the radio is playing. The CD Menu displays.
Selecting a Track Tracks can be selected using the four-way switch or the CD menu functions. Selecting a track using the four-way switch:
\ or ]: Press to go to the next or previous track within a CD. Selecting a track using the CD menu and the t or u function: 1. Turn the multifunction knob until
Track is highlighted.
2. Press the multifunction knob until
the desired track is displayed.
Selecting a track using the CD menu and the Track function: 1. Select Track from the CD menu. 2. Select the desired track from
the menu.
Infotainment
6-19
Searching Within a Track To search within a track using the four-way switch or the CD menu functions: To search using the four-way switch: 1. Press and hold \ or ]. 2. Release \ or ] when the desired point in the track is reached.
To search using the CD menu 1. Select r or [. 2. Select r or [ again when the
desired point in the track is reached.
6-20
Infotainment
Selecting CD CDs can be selected by: (cid:129) Pressing the appropriate station
preset button.
(cid:129) Pressing _ or ^ on the four-way
switch.
(cid:129) Using the CD menu function. To use the CD menu function: 1. Select CD from the CD menu. 2. Select the desired CD.
Random Mode There are two modes for random: (cid:129) Random play CD. (cid:129) Random magazine. Tracks on the current CD are played in random order for Random play CD: To use Random play CD: 1. Select Extras from the CD menu. 2. Select Random CD, and T
displays.
To turn off random: 1. Select Extras from the CD menu. 2. Select Normal, and T
disappears.
4 tracks per CD are played before changing to the next CD for Random magazine: To use random for all CDs: 1. Select Extras from the CD menu. 2. Select Random Magazine, and
U displays.
To turn off random: 1. Select Extras from the CD menu. 2. Select Normal, and U
disappears.
Repeat Track The Repeat function repeats the current track. The function can be enabled and disabled by using the four-way switch or the CD menu. To use repeat using the four-way switch: 1. Press and hold _ until S appears
on the display.
2. Press and hold ^ until S is no
longer on the display to turn off repeat track.
To use repeat using the CD menu: 1. Select Extras from the CD menu. 2. Select Repeat Track, S appears
on the display.
To turn off repeat using the CD menu: 1. Select Extras from the CD menu. 2. Select Normal, S disappears
from the display.
Scan CD The Scan CD function scans the first ten seconds of each track on the current CD. The function can be enabled and disabled by using the four-way switch or the CD menu. To use Scan CD using the four-way switch: 1. Press and hold _ until u appears on the display.
2. Press and hold ^ until u is no longer on the display to turn off repeat track.
To use Scan CD using the CD menu: 1. Select Extras from the CD menu. 2. Select Scan CD, u appears
on the display.
To turn off Scan CD using the CD menu: 1. Select Extras from the CD menu. 2. Select Scan CD, u disappears
from the display.
Ejecting a CD To eject a CD: 1. Press Z. 2. Select the desired CD to eject by
using the station preset buttons or the multifunction knob.
To eject all CDs: 1. Press and hold Z until Eject all
CDs displays.
2. Press the multifunction knob to confirm. The CDs are ejected.
Infotainment
6-21
Using an MP3 or Mixed Mode CD Supported File Structure The CDC 40 supports up to:
253 albums. 65,535 tracks.
(cid:129) Bit rates up to 256 kbps.
File Naming Files must be named .mp3 for the CD to work. ID3 tags are supported. The following information shows on the display when a CD MP3, or a mixed mode CD is playing. (cid:129) CD number (cid:129) Album name
Track title and artist
(cid:129) (cid:129) (cid:129) 6-22
Infotainment
Playing an MP3 or Mixed Mode CD CDC: Press to play an MP3 CD that is already loaded into the CD player while the radio is playing. The CD Menu displays.
Selecting a Track Tracks can be selected using the four-way switch or the CD menu functions. Selecting a track using the four-way switch:
\ or ]: Press to go to the next or previous track within an album. Selecting a track using the CD menu and the t or u function: 1. Turn the multifunction knob until
is highlighted.
2. Press the multifunction knob until
the desired track is displayed.
Selecting a track using the CD menu and the Track function: 1. Select Track from the CD menu. 2. Select the desired track from
the menu.
Searching Within a Track To search within a track using the four-way switch or the CD menu functions: To search using the four-way switch: 1. Press and hold \ or ]. 2. Release \ or ] when the desired point in the track is reached.
To search using the CD menu 1. Select r or [. 2. Select r or [ again when the
desired point in the track is reached.
Selecting an MP3 or Mixed Mode Album CDs can be selected by: (cid:129) Pressing the appropriate station
preset button.
(cid:129) Pressing _ or ^ on the four-way
switch.
(cid:129) Using the CD menu function. To use the CD menu function: 1. Select Album from the CD menu. 2. Select the desired Album.
Random Mode MP3 CDs and Mixed Mode CDs can be played in random order. There are two modes for random: (cid:129) Random play CD. (cid:129) Random magazine. To turn off random: 1. Select Extras from the CD menu. 2. Select Normal.
Tracks play in the following order for Random play CD: (cid:129) MP3 CD: If there are five or
fewer albums on an MP3
CD, four tracks per album are played in random order. If there are more than five albums on the MP3 CD, one track is played per album. Tracks from the selected album are played randomly.(cid:129) Mixed Mode CD: On a Mixed Mode CD, the tracks from the audio part are played first in random order. Then the tracks from the MP3 part are played as described above.
To use Random play CD: 1. Select Extras from the CD menu. 2. Select Random CD, T
displays.
Tracks play in the following order for Random magazine: (cid:129) MP3 CD: If there are five or
fewer albums on an MP3
CD, four tracks per album are played before changing to the next CD. If there are more than five albums, one track per album is played before changing to the next CD.(cid:129) Mixed Mode CD: On a Mixed Mode CD, the first of all four tracks from the audio part are played in random order and then the system changes to the next CD. The next time the system changes to the Mixed Mode CD, the tracks from the MP3 part are played as described above.
To use random for all CDs: 1. Select Extras from the CD menu. 2. Select Random Magazine,
U displays.
Infotainment
6-23
Care of CD’s and the CD Player Care of CDs Store CDs in their original cases or other protective cases and away from direct sunlight and dust. The CD player scans the bottom of the disc. If the bottom of a CD is damaged it may not play properly or at all. Do not touch the bottom of a CD while handling it. Pick up CDs by grasping the outer edges or the edge of the hole and the outer edge. If the surface of a CD is dirty, take a soft, lint free cloth or dampen a clean, soft cloth in a mild, neutral detergent solution mixed with water, and clean it. Make sure the wiping process starts from the center to the edge.
6-24
Infotainment
If a label is added to a
Care of the CD Player Do not add labels to a CD, it could get caught in the CD player. Use a marking pen to write on the top of the CD if a description is needed. Do not use CD lens cleaners, they could damage the CD player. Notice: CD, or more than one CD is inserted into the slot at a time, or an attempt is made to play scratched or damaged CDs, the CD player could be damaged. While using the CD player, use only CDs in good condition without any label, load one CD at a time, and keep the CD player and the loading slot free of foreign materials, liquids, and debris.
Theft-Deterrent Feature The audio system is equipped with an electronic safety system to prevent theft, and only works in the vehicle.
Audio Steering Wheel Controls
Some audio controls can be adjusted at the steering wheel. Several functions of the audio system can be operated with the audio remote control buttons and the rotary control located on both sides of the steering wheel.
Depending on the vehicle’s features, see the following audio controls:
Z (Rotary Control): Manually seek a station by turning to move the cursor either to the previous or next screen entry. Press to confirm the selection.
For the DIC (Driver Information Center), press the rotary control to call up the DIC menu. Press to reset the current value. Press and hold for two seconds to reset all of the values.
Y : Press to go to the next preset station if playing the radio.
Press to go to the beginning of a currently playing CD or to the next album on an MP3.
X : Press to toggle between the radio and CD or MP3 as an active source for playback.
^ / _: Press the arrows to go back or advance to the previous or next preset station if playing the radio. Press and hold to scroll through the preset stations.
Press to go back or advance one track at a time on a CD.
Press to quickly reverse or advance through the tracks within a CD.
3 (volume): Turn the rotary control to adjust the volume. Press and hold to adjust the volume continuously.
Radio Reception Frequency interference and static can occur during normal radio reception if items such as cell phone chargers, vehicle convenience accessories, and external electronic devices are plugged into the accessory power outlet. If there is interference or static, unplug the item from the accessory power outlet.
AM The range for most AM stations is greater than for FM, especially at night. The longer range can cause station frequencies to interfere with each other. For better radio reception, most AM radio stations boost the power levels during the day, and then reduce these levels during the night. Static can also occur when things like storms and power lines interfere with radio reception. When this happens, try reducing the treble on your radio.
Infotainment
6-25
FM Stereo FM stereo gives the best sound, but FM signals only reach about 10 to 40 miles (16 to 65 km). Tall buildings or hills can interfere with FM signals, causing the sound to fade in and out.
Fixed Mast Antenna The fixed mast antenna can withstand most car washes without being damaged, or it can be removed. If the mast should ever become slightly bent, straighten it out by hand. If the mast is badly bent, replace it. Check occasionally to make sure the mast is still tightened to the antenna base located on the roof of the vehicle.
6-26
Infotainment
✍ NOTES
Climate Controls
7-1
Climate Controls
Climate Controls Climate Control System ......7-1
Outlet Adjustment ...............7-4Climate Controls Climate Control System The heating, cooling, and ventilation for the vehicle can be controlled with this system.
Operation The air delivery mode or fan speed can be manually adjusted.
Air Delivery Mode Knob To change the current air delivery mode, use the left knob to select one of the following: ) (Bi-Level): This mode directs air to the instrument panel outlets and to the floor outlets. Cooler air is directed to the upper outlets and warmer air to the floor outlets.
7-2
Climate Controls
Y (Vent): This mode directs air to the instrument panel outlets.
X (Defog): This mode directs air to the windshield and front door windows. To reduce fogging, press # to turn on the air conditioner. The fan must also be on. W (Defog/Floor): This mode directs air to the windshield, front door windows, and floor outlets. To reduce fogging, press # to turn on the air conditioner. The fan must also be on. [ (Floor): This mode directs most of the air to the floor outlets.
Temperature Control Knob Turn the center knob clockwise or counterclockwise to increase or decrease the temperature inside the vehicle.
Fan Speed Control Knob Turn the right knob clockwise or counterclockwise to increase or decrease the fan speed. The speed settings can be adjusted between 1 (Low) and 4 (High). When the fan is off, the air conditioning compressor is also off. There will be some airflow from the outlets when driving, even with the fan in the off position. A (Fan): Select this position to turn the fan off.
Air Conditioning For vehicles with air conditioning. # (Air Conditioning): Press to turn the air conditioning system on or off. An indicator light inside the button comes on when the air conditioning is activated. The air conditioning can only be operated if the engine is on and the fan is running.
When the air conditioning is on the air is cooled and dehumidified. If cooling or dehumidification is not desired, turn off the air conditioning to save fuel. On hot days, open the windows briefly to let the hot inside air escape, then close them. This helps to reduce the time it takes for the vehicle to cool down.
For quicker cool down, do the following: 1. Press # to turn on the air
conditioning.
2. Select Y mode. 3. Set the temperature knob to the
coldest temperature.
4. Set the fan knob to 4. 5. Open all vents.
Recirculation ^ (Recirculation): Press to turn the recirculation mode on or off. An indicator light inside the button comes on when the recirculation mode is active. This mode recirculates air inside the passenger compartment and prevents outside air from entering the vehicle.
The quality of the passenger compartment air may decrease since the amount of outside air entering the vehicle is reduced.
When the recirculation mode is used without air conditioning, the air humidity increases, and the windows may fog. Avoid using the recirculation mode during high periods of humidity or cool outside temperatures since this may result in increased window fogging. If window fogging is experienced, select the defrost mode.
Rear Window Defogger The rear window defogger uses a warming grid to remove fog from the rear window. The rear window defogger will only work when the ignition is in ON/RUN.
Climate Controls
7-3
= (Rear Window Defogger): Press to turn the rear window defogger on or off. An indicator light inside the button will be lit when in use. If your vehicle has heated mirrors, they turn on when the rear window defogger button is pressed. Press the button again to turn them off. For more information, see Outside Power Mirror(s) on page 2-12. The rear window defogger will stay on for approximately 15 minutes after the button is pressed, unless the ignition is turned off. Notice: Do not use anything sharp on the inside of the rear window. If you do, you could cut or damage the warming grid, and the repairs would not be covered by the vehicle warranty. Do not attach a temporary vehicle license, tape, a decal or anything similar to the defogger grid.
7-4
Climate Controls
Outlet Adjustment Use the thumbwheel below the air outlets to change the direction of the air flow. Use the vertical thumbwheel next to the outlets to control the amount of air flow or to shut off the airflow completely. Keep all outlets open whenever possible for best system performance.
Operation Tips (cid:129) Clear away any ice, snow, or
leaves from the air inlets at the base of the windshield that can block the flow of air into the vehicle.
(cid:129) Use of non-GM approved hood deflectors can adversely affect the performance of the system.
(cid:129) Keep the path under all seats
clear of objects to help circulate the air inside the vehicle more effectively. If fogging reoccurs while in vent or bi-level modes with mild temperature throughout the vehicle, turn on the air conditioner to reduce windshield fogging.
(cid:129) Driving and Operating
Starting and Operating Your Vehicle New Vehicle Break-In .........8-2
Ignition Positions ................8-2
Retained Accessory Power (RAP) .....................8-3
Starting the Engine .............8-3
Engine Heater ....................8-4
Automatic Transmission Operation ..........................8-5
Manual Transmission Operation ..........................8-9
Parking Brake ...................8-10
Shifting Into Park ..............8-11
Shifting Out of Park ..........8-13
Parking the Vehicle ...........8-13Parking Over Things That Burn ........................8-13
Engine Exhaust .................8-14
Running the Vehicle While Parked ..................8-14Driving Your Vehicle Defensive Driving ..............8-16
Drunk Driving ....................8-16
Control of a Vehicle ..........8-17
Braking .............................8-17
Antilock Brake System (ABS) .................8-18
StabiliTrak® System ..........8-19
Steering ............................8-20
Off-Road Recovery ............8-22
Passing .............................8-23
Loss of Control .................8-23
Driving at Night .................8-24
Driving in Rain and on Wet Roads ......................8-25
Before Leaving on a Long Trip ........................8-26Driving and Operating
8-1
Highway Hypnosis .............8-26
Hill and Mountain Roads .............................8-26
Winter Driving ...................8-27
If Your Vehicle is Stuck in Sand, Mud, Ice, or Snow ..........................8-29
Rocking Your Vehicle to Get It Out .......................8-30
Loading the Vehicle ..........8-30
Fuel Fuel ..................................8-35
Gasoline Octane ...............8-35
Gasoline Specifications .....8-35
California Fuel ..................8-35
Additives ...........................8-36
Fuels in Foreign Countries ........................8-36
Filling the Tank .................8-37
Filling a Portable Fuel Container ........................8-388-2
Driving and Operating
Starting and Operating Your Vehicle New Vehicle Break-In Notice: Your vehicle does not need an elaborate break-in. But it will perform better in the long run if you follow these guidelines: (cid:129) Do not drive at any one
constant speed, fast or slow, for the first 500 miles (805 km). Do not make full-throttle starts. Avoid downshifting to brake or slow the vehicle. (cid:129) Avoid making hard stops for the first 200 miles (322 km) or so. During this time the new brake linings are not yet broken in. Hard stops with new linings can mean premature wear and earlier replacement. Follow this breaking-in guideline every time you get new brake linings.
Following break-in, engine speed and load can be gradually increased.
Ignition Positions
Use the key to turn the ignition switch to four different positions. Notice: Using a tool to force the key to turn in the ignition could cause damage to the switch or break the key. Use the correct key, make sure it is all the way in, and turn it only with your hand. If the key cannot be turned by hand, see your dealer/retailer.
To shift out of P (Park), the ignition must be in the ON/RUN position and the regular brake pedal must be applied. A (LOCK/OFF): This is the only position from which you can remove the key. This locks the steering wheel, ignition and automatic transmission.
On vehicles with an automatic transmission, the shift lever must be in P (Park) to turn the ignition switch to the LOCK/OFF position.
The ignition switch can bind in the LOCK/OFF position with your wheels turned off center. If this happens, move the steering wheel from right to left while turning the key to STEERING UNLOCK/IGNITION OFF. If this doesn’t work, then the vehicle needs service.
B (STEERING UNLOCKED/ IGNITION OFF): This position unlocks the steering wheel. C (ON/RUN): The ignition switch stays in this position when the engine is running. This position can be used to operate the electrical accessories, as well as to display some warning and indicator lights.
The battery could be drained if you leave the key in the ON/RUN position with the engine off. You may not be able to start the vehicle if the battery is allowed to drain for an extended period of time. D (START): This position starts the engine. When the engine starts, release the key. The ignition switch will return to ON/RUN for normal driving. A warning tone will sound when the driver door is opened and the key is in the ignition.
Retained Accessory Power (RAP) The power windows and mirrors may be used for up to five minutes after the key is turned to LOCK/OFF. The power windows and mirrors will not operate after any of the front doors are opened. The radio may be used for up to sixty minutes after the key is turned to LOCK/OFF.
Starting the Engine Automatic Transmission Move the shift lever to P (Park) or N (Neutral). The engine will not start in any other position. To restart when you are already moving, use N (Neutral) only. Notice: Do not try to shift to P (Park) if your vehicle is moving. If you do, you could damage the transmission. Shift to P (Park) only when your vehicle is stopped.
Driving and Operating
8-3
Manual Transmission The shift lever should be in Neutral and the parking brake engaged. Hold the clutch pedal to the floor and start the engine. The vehicle will not start if the clutch pedal is not all the way down.
Starting Procedure 1. With your foot off the accelerator
pedal, turn the ignition key to START. When the engine starts, let go of the key. The idle speed will go down as your engine gets warm. Do not race the engine immediately after starting it. Operate the engine and transmission gently to allow the oil to warm up and lubricate all moving parts.
8-4
Driving and Operating
Your vehicle has a Computer-Controlled Cranking System. This feature assists in starting the engine and protects components. If the ignition key is turned to the START position, and then released when the engine begins cranking, the engine will continue cranking for a few seconds or until the vehicle starts. If the engine does not start and the key is held in START for many seconds, cranking will be stopped after 15 seconds to prevent cranking motor damage. To prevent gear damage, this system also prevents cranking if the engine is already running. Engine cranking can be stopped by turning the ignition switch to STEERING UNLOCKED/ IGNITION OFF or LOCK/OFF.
Notice: Cranking the engine for long periods of time, by returning the key to the START position immediately after cranking has ended, can overheat and damage the cranking motor, and drain the
battery. Wait at least 15 seconds between each try, to let the cranking motor cool down. 2. If the engine does not start after 5-10 seconds, especially in very cold weather (below 0°F or −18°C), it could be flooded with too much gasoline. Try pushing the accelerator pedal all the way to the floor and holding it there as you hold the key in START for up to a maximum of 15 seconds. Wait at least 15 seconds between each try, to let the cranking motor cool down. When the engine starts, let go of the key and accelerator. If the vehicle starts briefly but then stops again, do the same thing. This clears the extra gasoline from the engine. Do not race the engine immediately after starting it. Operate the engine and transmission gently until the oil warms up and lubricates all moving parts.
Notice: The engine is designed to work with the electronics in the vehicle. If you add electrical parts or accessories, you could change the way the engine operates. Before adding electrical equipment, check with your dealer/retailer. If you do not, the engine might not perform properly. Any resulting damage would not be covered by the vehicle warranty.
Engine Heater The engine heater can provide easier starting and better fuel economy during engine warm-up in cold weather conditions at or below − 4°F (− 20°C). Vehicles with an engine heater should be plugged in at least four hours before starting.
To Use the Engine Heater 1. Turn off the engine.
{ CAUTION
Automatic Transmission Operation
Driving and Operating
8-5
Plugging the cord into an ungrounded outlet could cause an electrical shock. Also, the wrong kind of extension cord could overheat and cause a fire. You could be seriously injured. Plug the cord into a properly grounded three-prong 110-volt AC outlet. If the cord will not reach, use a heavy-duty three-prong extension cord rated for at least 15 amps.
4. Before starting the engine, be
sure to unplug both ends of the adapter and store the adapter to prevent damage.
The length of time the heater should remain plugged in depends on several factors. Ask a dealer/retailer in the area where you will be parking the vehicle for the best advice on this.
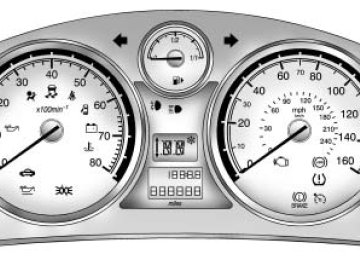
If your vehicle has an automatic transmission, the shift lever is located on the console between the seats. Your vehicle may also have an electronic shift position indicator that displays the position of the shift lever. This indicator is located above the trip odometer on the instrument panel cluster.
2. The engine heater connector is
located in the passenger side lower front grille. Open the cover and insert the 110-volt AC adapter delivered in the vehicles glove box.
3. Plug the other end of the adapter
into a grounded 110-volt AC outlet.
8-6
Driving and Operating
PARK (P): This position locks the front wheels. It is the best position to use when the engine is started because your vehicle cannot move easily.
{ CAUTION
It is dangerous to get out of your vehicle if the shift lever is not fully in PARK (P) with the parking brake firmly set. Your vehicle can roll. Do not leave your vehicle when the engine is running unless you have to. If you have left the engine running, the vehicle can move suddenly. You or others could be injured. To be sure your vehicle will not move, even when you are on fairly level ground, always set your parking brake and move the shift lever to PARK (P). See Shifting Into Park on page 8-11.
Make sure the shift lever is fully in PARK (P) before starting the engine. Your vehicle has an automatic transmission shift lock control system. The regular brakes must be applied before you can shift from PARK (P) when the ignition key is in ON/RUN. If you cannot shift out of PARK (P) while holding the brake pedal down, see Shifting Out of Park on page 8-13. REVERSE (R): Use this gear to back up. Notice: Shifting to R (Reverse) while the vehicle is moving forward could damage the transmission. The repairs would not be covered by the vehicle warranty. Shift to R (Reverse) only after the vehicle is stopped. To rock your vehicle back and forth to get out of snow, ice, or sand without damaging the transmission, see Rocking Your Vehicle to Get It Out on page 8-30.
NEUTRAL (N): In this position, the engine does not connect with the wheels. To restart while you are already moving, use NEUTRAL (N) only. Also, use NEUTRAL (N) when your vehicle is being towed.
{ CAUTION
Shifting into a drive gear while the engine is running at high speed is dangerous. Unless your foot is firmly on the brake pedal, the vehicle could move very rapidly. You could lose control and hit people or objects. Do not shift into a drive gear while the engine is running at high speed.
Driving and Operating
8-7
FIRST (1): This position gives you even more power but lower fuel economy than SECOND (2). Use it on very steep hills, or in deep snow or mud. If the shift lever is put in FIRST (1), the transmission does not shift into first gear until the vehicle is going slowly enough. Notice: Spinning the tires or holding the vehicle in one place on a hill using only the accelerator pedal may damage the transmission. The repair will not be covered by your warranty. If you are stuck, do not spin the tires. When stopping on a hill, use the brakes to hold the vehicle in place.
Notice: Shifting out of P (Park) or N (Neutral) with the engine running at high speed may damage the transmission. The repairs would not be covered by the vehicle warranty. Be sure the engine is not running at high speed when shifting the vehicle. DRIVE (D): This position is for normal driving. Notice: If your vehicle seems to start up rather slowly or not shift gears when you go faster, and you continue to drive your vehicle that way, you could damage the transmission. Have your vehicle serviced right away.
THIRD (3): This position is also used for normal driving, however, it offers more power and lower fuel economy than DRIVE (D). Here are some times you might choose THIRD (3) instead of DRIVE (D): (cid:129) When driving on hilly, winding
roads.
(cid:129) When going down a steep hill. SECOND (2): This position gives you more power but lower fuel economy. Use SECOND (2) on hills. It can help control the vehicles speed as you go down steep mountain roads, but then you would also want to use your brakes off and on. Notice: Driving in FIRST (1) for more than 25 miles (40 km) or at speeds over 55 mph (90 km/h) may damage the transmission. Also, shifting into FIRST (1) at speeds above 65 mph (105 km/h) can cause damage. Drive in THIRD (3) or DRIVE (D) instead of FIRST (1).
8-8
Driving and Operating
Winter Driving Mode This feature helps you accelerate in slippery driving conditions by using THIRD (3) gear when you begin to accelerate from a stopped position.
The Winter Driving Mode is turned off by one of the following: (cid:129) Pressing the winter driving mode
button again.
(cid:129) Manually shifting to SECOND (2)
or FIRST (1) gear. Turning off the ignition.
This light on the instrument panel cluster will come on when the winter driving mode is active. To protect the transmission, the winter program turns off automatically at high transmission oil temperatures.
The winter driving mode button is located on the center console. Press once to turn on the winter driving mode feature. The vehicle will be in THIRD (3) gear when the vehicle begins to move. Once the vehicle is moving, the vehicle will upshift normally.
Automatic Neutral Idle The Automatic Neutral Idle shift function automatically sets the transmission to NEUTRAL (N) to reduce fuel consumption when the vehicle is not moving. Automatic neutral is activated when ALL of the following occurs:
The selector lever is in DRIVE (D), THIRD (3), SECOND (2) or FIRST (1) gear. The foot brake is pressed. The vehicle is stopped. The accelerator pedal is not pressed. The transmission fluid temperature is greater than 0° C (32° F). The road is not steeper than 15°.
(cid:129) (cid:129) (cid:129) (cid:129) (cid:129) (cid:129) (cid:129) When you release the brake with the transmission in gear, you may feel the transmission shift from Neutral to Drive automatically. You may also feel the transmission shift from Drive to Neutral when the brake is applied. This is normal operation of the automatic transmission.
Downhill Grade Assist When traveling down steep grades your transmission may automatically downshift into a lower gear when the brake is applied. You may feel this downshift. This performance feature of your automatic transmission assists with engine braking to reduce wear on your brake system. This is normal operation of the automatic transmission.
Performance On Demand This feature allows the driver to automatically force a downshift, when traveling at speeds less than approximately 70 mph (112 km/h), by fully pressing the accelerator pedal.
Manual Transmission Operation Five-Speed
This is the shift pattern. Here is how to operate your manual transmission: FIRST (1): Press the clutch pedal and shift into FIRST (1). Then, slowly let up on the clutch pedal as you press the accelerator pedal.
You can shift into FIRST (1) when you are going less than 20 mph (32 km/h). If you have come to a complete stop and it is hard to shift into FIRST (1), put the shift lever in NEUTRAL (N) and let up on the clutch. Press the clutch pedal back down. Then shift into FIRST (1).
Driving and Operating
8-9
SECOND (2): Press the clutch pedal as you let up on the accelerator pedal and shift into SECOND (2). Then, slowly let up on the clutch pedal as you press the accelerator pedal. THIRD (3), FOURTH (4) and FIFTH (5): Shift into THIRD (3), FOURTH (4) and FIFTH (5), the same way you do for SECOND (2). Slowly let up on the clutch pedal as you press the accelerator pedal.
To stop, let up on the accelerator pedal and press the brake pedal. Just before the vehicle stops, press the clutch pedal and the brake pedal, and shift to NEUTRAL (N). NEUTRAL (N): Use this position when you start or idle your engine. REVERSE (R): With the vehicle stationary, wait three seconds after declutching and pull up on the button on the selector lever to engage reverse gear.
8-10
Driving and Operating
If reverse gear does not engage, set the selector lever in neutral, and release the clutch pedal. Press the clutch pedal again and repeat the gear selection.
Notice: Shifting to R (Reverse) while the vehicle is moving forward could damage the transmission. The repairs would
not be covered by the vehicle warranty. Shift to R (Reverse) only after the vehicle is stopped. Also, use REVERSE (R), along with the parking brake, to park your vehicle.
Shift Speeds
{ CAUTION
If you skip a gear when you downshift, you could lose control of your vehicle. You could injure yourself or others. Do not shift down more than one gear at a time when you downshift.
Parking Brake
The parking brake is located between the driver and passenger seats. To set the parking brake, hold the brake pedal down and pull up on the parking brake lever. To release the parking brake, hold the brake pedal down. Pull the parking brake lever up until you can press the release button. Hold the release button in as you move the brake lever all the way down.
A warning chime will sound and a brake warning light located on the instrument panel cluster will come on, if the parking brake is set, the ignition is on and the vehicle speed is greater than 5 mph (8 km/h). Notice: Driving with the parking brake on can overheat the brake system and cause premature wear or damage to brake system parts. Make sure that the parking brake is fully released and the brake warning light is off before driving.
Shifting Into Park { CAUTION
It can be dangerous to get out of your vehicle if the shift lever is not fully in PARK (P) with the parking brake firmly set. Your vehicle can roll. If you have left the engine running, the vehicle can move suddenly. You or others could be injured. To be sure your vehicle will not move, even when you are on fairly level ground, use the steps that follow.
Driving and Operating
8-11
1. Hold the brake pedal down with your right foot and set the parking brake. See Parking Brake on page 8-10 for more information.
2. Move the shift lever into
PARK (P) by holding in the button on the shift lever and pushing the shift lever all the way toward the front of the vehicle.
3. Turn the ignition key to
LOCK/OFF.
4. Remove the key and take it
with you. If you can leave your vehicle with the ignition key in your hand, your vehicle is in PARK (P).
8-12
Driving and Operating
Leaving Your Vehicle with the Engine Running
{ CAUTION
It can be dangerous to leave the vehicle with the engine running. The vehicle could move suddenly if the shift lever is not fully in P (Park) with the parking brake firmly set. And, if you leave the vehicle with the engine running, it could overheat and even catch fire. You or others could be injured. Do not leave the vehicle with the engine running.
If you have to leave your vehicle with the engine running, be sure your vehicle is in PARK (P) and your parking brake is firmly set before you leave it. After you have moved the shift lever into PARK (P), hold the regular brake pedal down. Then, see if you can move the shift lever away from PARK (P) without first pushing the button. If you can, it means that the shift lever was not fully locked in PARK (P).
Torque Lock If you are parking on a hill and you do not shift your transmission into PARK (P) properly, the weight of the vehicle may put too much force on the parking pawl in the transmission. You may find it difficult to pull the shift lever out of PARK (P).
This is called torque lock. To prevent torque lock, set the parking brake and then shift into PARK (P) properly before you leave the driver’s seat. To find out how, see Shifting Into Park on page 8-11. When you are ready to drive, move the shift lever out of PARK (P) before you release the parking brake. If torque lock does occur, you may need to have another vehicle push your vehicle a little uphill to take some of the pressure from the parking pawl in the transmission, so you can pull the shift lever out of PARK (P).
Shifting Out of Park This vehicle has an electronic shift lock release system. The shift lock release is designed to: (cid:129) Prevent ignition key removal
unless the shift lever is in PARK (P) with the shift lever button fully released.
(cid:129) Prevent movement of the shift lever out of PARK (P), unless the ignition is in the ON/RUN position and the regular brake pedal is applied.
The shift lock release is always functional except in the case of an uncharged or low voltage (less than 9 volt) battery. If your vehicle has an uncharged battery or a battery with low voltage, try charging or jump starting the battery. See Jump Starting on page 9-68 for more information.
Driving and Operating
8-13
To shift out of PARK (P) use the following sequence: 1. Apply the brake pedal. 2. Press the shift lever button. 3. Move the shift lever to the
desired position.
If you still are unable to shift out of PARK (P): 1. Fully release the shift lever
button.
2. While holding down the brake
pedal, press the shift lever button again.
3. Move the shift lever to the
desired position.
If you still cannot move the shift lever from PARK (P), consult your dealer/retailer or a professional towing service.
Parking the Vehicle Before you get out of your vehicle, move the shift lever into FIRST (1) or REVERSE (R) and firmly apply the parking brake. Once the shift lever has been placed into FIRST (1) or REVERSE (R) with the clutch pedal pressed in, you can turn the ignition off and release the clutch.
Parking Over Things That Burn
{ CAUTION
Things that can burn could touch hot exhaust parts under your vehicle and ignite. Do not park over papers, leaves, dry grass, or other things that can burn.
8-14
Driving and Operating
Engine Exhaust
{ CAUTION
Engine exhaust can kill. It contains the gas carbon monoxide (CO), which you cannot see or smell. It can cause unconsciousness and death. You might have exhaust coming in if: (cid:129) The exhaust system sounds
strange or different.
(cid:129) Your vehicle gets rusty
underneath.
(cid:129) Your vehicle was damaged in
a collision.
(Continued)
CAUTION (Continued)
(cid:129) Your vehicle was damaged
when driving over high points on the road or over road debris.
(cid:129) Repairs were not done
correctly.
(cid:129) Your vehicle or the exhaust system has been modified improperly.
If you ever suspect exhaust is coming into your vehicle: (cid:129) Drive it only with all the
windows down to blow out any CO.
(cid:129) Have your vehicle fixed
immediately.
Running the Vehicle While Parked It is better not to park with the engine running. But if you ever have to, here are some things to know.
{ CAUTION
Idling the engine with the climate control system off could allow dangerous exhaust into your vehicle. See the earlier caution under Engine Exhaust on page 8-14.
(Continued)
CAUTION (Continued)
{ CAUTION
Also, idling in a closed-in place can let deadly carbon monoxide (CO) into your vehicle even if the climate control fan is at the highest setting. One place this can happen is a garage. Exhaust — with CO — can come in easily. NEVER park in a garage with the engine running. Also see “If You Are Caught in a Blizzard” under Winter Driving on page 8-27.
It can be dangerous to get out of your vehicle if the shift lever is not fully in PARK (P) with the parking brake firmly set. Your vehicle can roll. Do not leave your vehicle when the engine is running unless you have to. If you have left the engine running, the vehicle can move suddenly. You or others could be injured. To be sure your
(Continued)
Driving and Operating
8-15
CAUTION (Continued)
vehicle will not move, even when you are on fairly level ground, always set the parking brake and move the shift lever to PARK (P).
Follow the proper steps to be sure your vehicle will not move. See Shifting Into Park on page 8-11.
8-16
Driving and Operating
Driving Your Vehicle Defensive Driving Defensive driving means “always expect the unexpected.” The first step in driving defensively is to wear your safety belt, see Safety Belts on page 1-8.
CAUTION (Continued)
Driver distraction can cause collisions resulting in injury or possible death. These simple defensive driving techniques could save your life.
{ CAUTION
Drunk Driving
Assume that other road users (pedestrians, bicyclists, and other drivers) are going to be careless and make mistakes. Anticipate what they might do and be ready. In addition: (cid:129) Allow enough following
distance between you and the driver in front of you.
(cid:129) Focus on the task of driving. (Continued)
{ CAUTION
Drinking and then driving is very dangerous. Your reflexes, perceptions, attentiveness, and judgment can be affected by even a small amount of alcohol. You can have a serious — or even fatal — collision if you drive after drinking. Do not drink and drive or ride with a driver who has been drinking. Ride home in a cab; or if you are with a group, designate a driver who will not drink.
Death and injury associated with drinking and driving is a global tragedy. Alcohol affects four things that anyone needs to drive a vehicle: judgment, muscular coordination, vision, and attentiveness. Police records show that almost 40 percent of all motor vehicle-related deaths involve alcohol. In most cases, these deaths are the result of someone who was drinking and driving. In recent years, more than 17,000 annual motor vehicle-related deaths have been associated with the use of alcohol, with about 250,000 people injured. For persons under 21, it is against the law in every U.S. state to drink alcohol. There are good medical, psychological, and developmental reasons for these laws. The obvious way to eliminate the leading highway safety problem is for people never to drink alcohol and then drive.
Driving and Operating
8-17
Medical research shows that alcohol in a person’s system can make crash injuries worse, especially injuries to the brain, spinal cord, or heart. This means that when anyone who has been drinking — driver or passenger — is in a crash, that person’s chance of being killed or permanently disabled is higher than if the person had not been drinking.
Control of a Vehicle The following three systems help to control your vehicle while driving — brakes, steering, and accelerator. At times, as when driving on snow or ice, it is easy to ask more of those control systems than the tires and road can provide. Meaning, you can lose control of your vehicle. Adding non-dealer/non-retailer accessories can affect your vehicle’s performance. See Accessories and Modifications on page 9-3.
Braking See Brake System Warning Light on page 4-17. Braking action involves perception time and reaction time. First, you have to decide to push on the brake pedal. That is perception time. Then you have to bring up your foot and do it. That is reaction time. Average reaction time is about three-fourths of a second. But that is only an average. It might be less with one driver and as long as two or three seconds or more with another. Age, physical condition, alertness, coordination, and eyesight all play a part. So do alcohol, drugs, and frustration. But even in three-fourths of a second, a vehicle moving at 60 mph (100 km/h) travels 66 feet (20 m). That could be a lot of distance in an emergency, so keeping enough space between your vehicle and others is important.
And, of course, actual stopping distances vary greatly with the surface of the road, whether it is pavement or gravel; the condition of the road, whether it is wet, dry, or icy; tire tread; the condition of the brakes; the weight of the vehicle; and the amount of brake force applied. Avoid needless heavy braking. Some people drive in spurts — heavy acceleration followed by heavy braking — rather than keeping pace with traffic. This is a mistake. The brakes might not have time to cool between hard stops. The brakes will wear out much faster if you do a lot of heavy braking. If you keep pace with the traffic and allow realistic following distances, you will eliminate a lot of unnecessary braking. That means better braking and longer brake life.
8-18
Driving and Operating
If your vehicle’s engine ever stops while you are driving, brake normally but do not pump the brakes. If you do, the pedal could get harder to push down. If the engine stops, you will still have some power brake assist. But you will use it when you brake. Once the power assist is used up, it can take longer to stop and the brake pedal will be harder to push. Adding non-dealer/non-retailer accessories can affect your vehicle’s performance. See Accessories and Modifications on page 9-3.
Antilock Brake System (ABS) Your vehicle has the Antilock Brake System (ABS), an advanced electronic braking system that will help prevent a braking skid. When you start the engine and begin to drive away, ABS will check itself. You might hear a momentary motor or clicking noise while this test is going on, and you might even notice that the brake pedal moves a little. This is normal.
If there is a problem with ABS, this warning light will stay on. See Antilock Brake System (ABS) Warning Light on page 4-18.
Let us say the road is wet and you are driving safely. Suddenly, an animal jumps out in front of you. You slam on the brakes and continue braking. Here is what happens with ABS: A computer senses that wheels are slowing down. If one of the wheels is about to stop rolling, the computer will separately work the brakes at each wheel. ABS can change the brake pressure faster than any driver could. The computer is programmed to make the most of available tire and road conditions. This can help you steer around the obstacle while braking hard. As you brake, the computer keeps receiving updates on wheel speed and controls braking pressure accordingly.
Driving and Operating
8-19
Remember: ABS does not change the time you need to get your foot up to the brake pedal or always decrease stopping distance. If you get too close to the vehicle in front of you, you will not have time to apply the brakes if that vehicle suddenly slows or stops. Always leave enough room up ahead to stop, even though you have ABS.
Using ABS Do not pump the brakes. Just hold the brake pedal down firmly and let antilock work for you. You might hear the antilock pump or motor operate, and feel the brake pedal pulsate, but this is normal.
Braking in Emergencies With ABS, you can steer and brake at the same time. In many emergencies, steering can help you more than even the very best braking.
StabiliTrak® System Your vehicle may have StabiliTrak which combines antilock brake, traction and stability control systems and helps the driver maintain directional control of the vehicle in most driving conditions. When you first start your vehicle and begin to drive away, the system performs several diagnostic checks to ensure there are no problems. You may hear or feel the system working. This is normal and does not mean there is a problem with your vehicle. The system should initialize before the vehicle reaches 20 mph (32 km/h). The system monitors vehicle movements, and helps the driver maintain control of the vehicle in most driving situations. When the vehicle’s stability is affected the engine output is reduced, and the brakes are applied to individual wheels.
When you turn the ignition on, this light on the instrument panel cluster will come on for a few seconds, then go out when the system is ready. You may also feel or hear the system working; this is normal. StabiliTrak is automatically enabled whenever you start your vehicle. To assist the driver with vehicle directional control, especially in slippery road conditions, you should always leave the system on. But, you can turn it off if you ever need to.
8-20
Driving and Operating
It is recommended to leave the system on for normal driving conditions, but it may be necessary to turn the system off if your vehicle is stuck in sand, mud, ice or snow, and you want to “rock” your vehicle to attempt to free it. It may also be necessary to turn off the system when driving in extreme off-road conditions where high wheel spin is required. See If Your Vehicle is Stuck in Sand, Mud, Ice, or Snow on page 8-29. StabiliTrak may also turn off automatically if it determines that a problem exists with the system. The light on the instrument panel cluster will be on solid to warn the driver that StabiliTrak is disabled and requires service. If the problem does not clear after restarting the vehicle, you should see your dealer/retailer for service.
Steering If the engine stalls while you are driving, the power steering assist system should continue to operate until you are able to stop the vehicle. If you lose power steering assist because the power steering system is not functioning, you can steer, but it will take more effort. If you turn the steering wheel in either direction several times until it stops, or hold the steering wheel in the stopped position for an extended amount of time, you may notice a reduced amount of power steering assist. The normal amount of power steering assist should return shortly after a few normal steering movements. The power steering system does not require regular maintenance. If you suspect steering system problems and/or the Service Vehicle Soon light comes on, contact your dealer/ retailer for service repairs.
The g switch is located on the instrument panel below the Driver Information Center (DIC). To turn off StabiliTrak, press and hold the g switch until the light in the switch illuminates. To turn StabiliTrak on again, press the g switch again or restart the vehicle. A light in the switch should come on briefly when the ignition key is turned to ON/RUN as a check to let you know that the light is working. Adding non-dealer/non-retailer accessories can affect your vehicle’s performance. See Accessories and Modifications on page 9-3 for more information.
Driving and Operating
8-21
If you need to reduce speed when approaching a curve, do it before you enter the curve, while the front wheels are straight ahead. Try to adjust the speed so you can drive through the curve. Maintain a reasonable, steady speed. Wait to accelerate until you are out of the curve, and then accelerate gently into the straightaway. Adding non-dealer/non-retailer accessories can affect your vehicle’s performance. See Accessories and Modifications on page 9-3.
Steering Tips It is important to take curves at a reasonable speed. A lot of the “driver lost control” accidents mentioned on the news happen on curves. Here is why: Experienced driver or beginner, each of us is subject to the same laws of physics when driving on curves. The traction of the tires against the road surface makes it possible for the vehicle to change its path when you turn the front wheels. If there is no traction, inertia will keep the vehicle going in the same direction. If you have ever tried to steer a vehicle on wet ice, you will understand this. Traction in a curve depends on the condition of the tires and the road surface, the angle at which the curve is banked, and your speed. While in a curve, speed is the one factor you can control.
Suppose you are steering through a sharp curve. Then you suddenly accelerate. Both control systems — steering and acceleration — have to do their work where the tires meet the road. Adding the sudden acceleration can demand too much of those places. You can lose control. See StabiliTrak® System on page 8-19. What should you do if this ever happens? Ease up on the brake or accelerator pedal, steer the vehicle the way you want it to go, and slow down. Speed limit signs near curves warn that you should adjust your speed. Of course, the posted speeds are based on good weather and road conditions. Under less favorable conditions you will want to go slower.
8-22
Driving and Operating
Steering in Emergencies There are times when steering can be more effective than braking. For example, you come over a hill and find a truck stopped in your lane, or a car suddenly pulls out from nowhere, or a child darts out from between parked cars and stops right in front of you. You can avoid these problems by braking — if you can stop in time. But sometimes you cannot; there is not room. That is the time for evasive action — steering around the problem. Your vehicle can perform very well in emergencies like these. First apply the brakes. See Braking on page 8-17. It is better to remove as much speed as you can from a possible collision. Then steer around the problem, to the left or right depending on the space available.
Off-Road Recovery Your vehicle’s right wheels can drop off the edge of a road onto the shoulder while driving.
An emergency like this requires close attention and a quick decision. If you are holding the steering wheel at the recommended 9 and 3 o’clock positions, you can turn it a full 180 degrees very quickly without removing either hand. But you have to act fast, steer quickly, and just as quickly straighten the wheel once you have avoided the object. The fact that such emergency situations are always possible is a good reason to practice defensive driving at all times and wear safety belts properly.
If the level of the shoulder is only slightly below the pavement, recovery should be fairly easy. Ease off the accelerator and then, if there is nothing in the way, steer so that your vehicle straddles the edge of the pavement.
Turn the steering wheel 3 to 5 inches (about one-eighth turn) until the right front tire contacts the pavement edge. Then turn the steering wheel to go straight down the roadway.
Passing Passing another vehicle on a two-lane road can be dangerous. To reduce the risk of danger while passing:
Look down the road, to the sides, and to crossroads for situations that might affect a successful pass. If in doubt, wait.
(cid:129) Watch for traffic signs, pavement
markings, and lines that could indicate a turn or an intersection. Never cross a solid or double-solid line on your side of the lane.
Driving and Operating
8-23
(cid:129) Do not get too close to the vehicle
you want to pass. Doing so can reduce your visibility.
(cid:129) Wait your turn to pass a slow
vehicle.
(cid:129) When you are being passed, ease
to the right.
Loss of Control Let us review what driving experts say about what happens when the three control systems — brakes, steering, and acceleration — do not have enough friction where the tires meet the road to do what the driver has asked. In any emergency, do not give up. Keep trying to steer and constantly seek an escape route or area of less danger.
Skidding In a skid, a driver can lose control of the vehicle. Defensive drivers avoid most skids by taking reasonable care suited to existing conditions, and by not overdriving those conditions. But skids are always possible. The three types of skids correspond to your vehicle’s three control systems. In the braking skid, the wheels are not rolling. In the steering or cornering skid, too much speed or steering in a curve causes tires to slip and lose cornering force. And in the acceleration skid, too much throttle causes the driving wheels to spin. A cornering skid is best handled by easing your foot off of the accelerator pedal.
(cid:129) 8-24
Driving and Operating
If your vehicle starts to slide, ease your foot off the accelerator pedal and quickly steer the way you want the vehicle to go. If you start steering quickly enough, your vehicle may straighten out. Always be ready for a second skid if it occurs. Of course, traction is reduced when water, snow, ice, gravel, or other material is on the road. For safety, you want to slow down and adjust your driving to these conditions. It is important to slow down on slippery surfaces because stopping distance is longer and vehicle control more limited. While driving on a surface with reduced traction, try your best to avoid sudden steering, acceleration, or braking, including reducing vehicle speed by shifting to a lower gear. Any sudden changes could cause the tires to slide. You might not realize the surface is
slippery until your vehicle is skidding. Learn to recognize warning clues — such as enough water, ice, or packed snow on the road to make a mirrored surface — and slow down when you have any doubt. Remember: Any Antilock Brake System (ABS) helps avoid only the braking skid.
Driving at Night Night driving is more dangerous than day driving because some drivers are likely to be impaired — by alcohol or drugs, with night vision problems, or by fatigue. Night driving tips include: (cid:129) Drive defensively. (cid:129) Do not drink and drive. (cid:129) Reduce headlamp glare by adjusting the inside rearview mirror.
(cid:129) Slow down and keep more space
between you and other vehicles because headlamps can only light up so much road ahead.
(cid:129) Watch for animals. (cid:129) When tired, pull off the road. (cid:129) Do not wear sunglasses. (cid:129) Avoid staring directly into approaching headlamps.
(cid:129) Keep the windshield and all glass
on your vehicle clean — inside and out.
(cid:129) Keep your eyes moving,
especially during turns or curves. No one can see as well at night as in the daytime. But, as we get older, these differences increase. A 50-year-old driver might need at least twice as much light to see the same thing at night as a 20-year-old.
Driving in Rain and on Wet Roads Rain and wet roads can reduce vehicle traction and affect your ability to stop and accelerate. Always drive slower in these types of driving conditions and avoid driving through large puddles and deep-standing or flowing water.
{ CAUTION
Wet brakes can cause crashes. They might not work as well in a quick stop and could cause pulling to one side. You could lose control of the vehicle. After driving through a large puddle of water or a car/vehicle wash, lightly apply the brake pedal until the brakes work normally.
(Continued)
CAUTION (Continued)
Flowing or rushing water creates strong forces. Driving through flowing water could