- 2000 Pontiac Grand PRIX Owners Manuals
- Pontiac Grand PRIX Owners Manuals
- 2004 Pontiac Grand PRIX Owners Manuals
- Pontiac Grand PRIX Owners Manuals
- 1999 Pontiac Grand PRIX Owners Manuals
- Pontiac Grand PRIX Owners Manuals
- 1995 Pontiac Grand PRIX Owners Manuals
- Pontiac Grand PRIX Owners Manuals
- 2003 Pontiac Grand PRIX Owners Manuals
- Pontiac Grand PRIX Owners Manuals
- 2002 Pontiac Grand PRIX Owners Manuals
- Pontiac Grand PRIX Owners Manuals
- 2008 Pontiac Grand PRIX Owners Manuals
- Pontiac Grand PRIX Owners Manuals
- 1998 Pontiac Grand PRIX Owners Manuals
- Pontiac Grand PRIX Owners Manuals
- 2007 Pontiac Grand PRIX Owners Manuals
- Pontiac Grand PRIX Owners Manuals
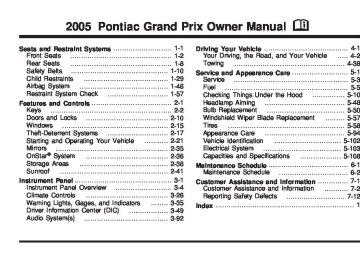
- 2005 Pontiac Grand PRIX Owners Manuals
- Pontiac Grand PRIX Owners Manuals
- 1997 Pontiac Grand PRIX Owners Manuals
- Pontiac Grand PRIX Owners Manuals
- 2001 Pontiac Grand PRIX Owners Manuals
- Pontiac Grand PRIX Owners Manuals
- 1993 Pontiac Grand PRIX Owners Manuals
- Pontiac Grand PRIX Owners Manuals
- 2006 Pontiac Grand PRIX Owners Manuals
- Pontiac Grand PRIX Owners Manuals
- 1996 Pontiac Grand PRIX Owners Manuals
- Pontiac Grand PRIX Owners Manuals
- Download PDF Manual
-
immediately when the ignition is turned off and the last door is closed.
If ON is selected, the interior lamps will stay on for about 25 seconds after the vehicle’s ignition is turned off and the last door is closed.
To program this mode, use the following procedure: 1. Press and release the set/reset button to scroll to
either OFF or ON.
2. Press the options button again to advance to the
next screen.
3-53
INTERIOR LIGHTS WHEN KEY REMOVED: This screen allows this feature to be turned OFF or ON. This feature enables the interior lamps in the vehicle to turn on for about 25 seconds after the key is removed from the ignition.
If OFF is selected, removing the key from the ignition will not cause the interior lamps to turn on.
If ON is selected, removing the key from the ignition will cause the interior lamps to be turned on for about 25 seconds.
To program this mode, use the following procedure: 1. Press and release the set/reset button to scroll to
either OFF or ON.
2. Press the options button again to advance to the
next screen.
AUTO DOOR LOCK: This screen allows this feature to be turned OFF or ON.
If OFF is selected, all automatic door locking is disabled. The doors will always need to be locked manually before driving, to increase occupant safety.
If ON is selected, the vehicle’s doors automatically lock when the doors are closed and the vehicle is shifted into DRIVE (D).
3-54
To program this mode, use the following procedure: 1. Press and release the set/reset button to scroll to
either OFF or ON.
2. Press the options button again to advance to the
next screen.
AUTO DOOR UNLOCK: This screen can be used if ON was selected for the AUTO DOOR LOCK feature. This screen allows this feature to be turned off, used for the driver’s door only, or for all the doors.
If OFF is selected, none of the doors will unlock when the vehicle’s transaxle is shifted into PARK (P).
If DRIVER is selected, only the driver’s door will unlock when the vehicle’s transaxle is shifted into PARK (P).
If ALL is selected, all the doors will unlock when the vehicle’s transaxle is shifted into PARK (P).
To program this mode, use the following procedure: 1. Press and release the set/reset button to scroll to
either OFF, DRIVER, or ALL.
2. Press the options button again to advance to the
next screen.
AUTO DOOR UNLOCK ON: If DRIVER or ALL was selected on the AUTO DOOR UNLOCK screen, this screen allows selection of when the vehicle’s doors will unlock. The choices are when the key is removed from the ignition or when the vehicle is shifted into PARK (P).
If KEY-OUT is selected, the auto door unlock will function when the key is taken out of the ignition.
If PARK is selected, the auto door unlock will function when the transaxle is shifted into PARK (P).
To program this mode, use the following procedure: 1. Press and release the set/reset button to scroll to
either KEY-OUT or PARK.
2. Press the options button again to advance to the
next screen.
DELAYED LOCKING: This screen allows this feature to be turned OFF or ON. The key must be out of the ignition for this feature to work.
If OFF is selected, there will be no delayed locking of the vehicle’s doors.
If ON is selected, the locking of the vehicle’s doors will be delayed by five seconds after a power door lock switch is pressed when a door is open, or the LOCK button on the remote keyless entry transmitter is pressed while a door is open.
To program this mode, use the following procedure: 1. Press and release the set/reset button to scroll to
either OFF or ON.
2. Press the options button again to advance to the
next screen.
REMOTE LOCKS FEEDBACK: This screen allows selection for this option to be turned OFF, or gives the choice of two methods of verification; LIGHTS or LIGHTS and HORN; that indicate the vehicle’s doors are locked when the LOCK button on the remote keyless entry transmitter is pressed.
If OFF is selected, this feature will not be programmed.
If LIGHTS is selected, the exterior lamps will flash when the LOCK button on the remote keyless entry transmitter is pressed.
If LIGHTS and HORN are selected, the exterior lamps will flash when the LOCK button on the remote keyless entry transmitter is pressed and the horn will sound when the LOCK button on the remote keyless entry transmitter is pressed again within five seconds of the previous command.
To program this mode, use the following procedure: 1. Press the set/reset button to scroll to OFF, LIGHTS,
or LIGHTS and HORN.
2. Press the options button again to advance to the
next screen.
If the vehicle does not have a content theft-deterrent system, the next screens with PROGRAMMING FINISHED and DISPLAY OFF will appear. If the vehicle does have a content theft-deterrent system, the next screen will appear.
3-55
THEFT DETERRENT: The vehicle may have a content theft-deterrent system. Once it is turned on, the system will activate if someone tries to enter the vehicle without using the remote keyless entry transmitter or the correct key. It will also activate when an incorrect key is used in the ignition. This screen allows this feature to be turned OFF or ON.
If OFF is selected, the theft-deterrent system will not function.
If ON is selected, the theft-deterrent system will be activated.
To program this mode, use the following procedure: 1. Press the set/reset button to scroll to OFF or ON. 2. Press the options button again to advance to
the next screen.
KEY CYLINDER DISARM: If the vehicle has a content theft-deterrent system, this screen allows this feature to be turned OFF or ON.
If OFF is selected, the content theft-deterrent system will not disarm when the vehicle is unlocked using the door lock, or when someone tampers with the door lock.
If ON is selected, the content theft-deterrent system will disarm when the vehicle is unlocked using the door key. This makes the vehicle more resistant to key lock tampering.
3-56
To program this mode, use the following procedure: 1. Press the set/reset button to scroll to OFF or ON. 2. Press the options button again to advance to
the next screen.
LOCK SWITCH ARM: If the vehicle has the content theft-deterrent system and ON was selected on the THEFT DETERRENT screen, this screen allows this feature to be turned OFF or ON. If ON is selected, the content theft-deterrent system starts the arming process when a door lock switch is pressed while a door is open.
If OFF is selected, the theft-deterrent system will not activate this feature.
If ON is selected, the content theft-deterrent system will arm when the doors are locked with the door lock switch. The key must be removed from the ignition when the doors are locked or the content theft-deterrent system will not arm.
To program this mode, use the following procedure: 1. Press the set/reset button to scroll to OFF or ON. 2. Press the options button again to advance to
the next screen.
REMOTE START: If your vehicle has the remote start feature, this screen allows this feature to be turned OFF or ON. The remote start feature allows you to start the engine from outside of the vehicle using your remote keyless entry transmitter. See “Remote Vehicle Start” under Remote Keyless Entry System Operation on page 2-5 for more information.
If OFF is selected, the remote start feature will be disabled.
If ON is selected, the remote start feature will be enabled.
To program this mode, use the following procedure: 1. Press the set/reset button to scroll to OFF or ON. 2. Press the options button again to advance to
the next screen.
PROGRAMMING FINISHED will appear on the next screen. This confirms that the personal options programming is complete. DISPLAY OFF will appear on the next screen. The screen will count down and then go blank. Press the options button to advance to a new screen.
DIC Controls and Displays (Uplevel DIC with Trip Computer) The Driver Information Center (DIC) control buttons and the message display screen are located above the radio. The DIC gives important safety and maintenance facts concerning the vehicle. The status of many of the vehicle’s systems along with driver personalization menus and warning messages about the vehicle’s systems may display on the DIC screen. The outside temperature automatically appears on the bottom right corner of the DIC display screen. If the outside temperature is below 38°F (3°C), the temperature reading will toggle between displaying the outside temperature and the word ICE for two minutes. If there is a problem with the system that controls the temperature display, the letters OC (Open Circuit) or SC (Short Circuit) will appear on the display. If this occurs, have the vehicle serviced by your GM dealer. The vehicle’s transaxle position and the direction the vehicle is traveling will also appear on the DIC screen.
3-57
The compass is self-calibrating, which eliminates the need to manually set the compass. However, under certain circumstances, such as during a long distance cross-country trip, it will be necessary to compensate for compass variance and reset the zone through the DIC. See “Setting the Compass” later in this section for more information.
The buttons on the DIC trip computer are gages, trip odometer, set/reset, options, and fuel. Gages 2 (Gages): Press this button to access the OIL LIFE REMAINING, TRANSMISSION FLUID TEMPERATURE, BATTERY, ENGINE HOURS, ENGINE BOOST, and MAXIMUM Gs modes.
3-58
OIL LIFE REMAINING: Press the gages button until OIL LIFE REMAINING is displayed. This screen indicates the percentage of oil life in the vehicle’s engine that has not degraded. See Engine Oil on page 5-14
for more information.After the oil has been changed in the vehicle, reset the ENGINE OIL MONITOR screen in the options menu. See “Engine Oil Monitor System” under “Options” later in this section.
Press the gages button again to advance to the next screen.
TRANSMISSION FLUID TEMP: This screen displays this message along with the temperature (F° or C°) of the transmission fluid.
Press the gages button again to advance to the next screen.
BATTERY: This screen displays the amount of volts the battery is generating.
Your vehicle’s charging system regulates voltage based on the state of the battery. The battery voltage may fluctuate when viewing this information on the DIC. This is normal.
Press the gages button again to advance to the next screen.
ENGINE HOURS: This screen shows the number of cumulative hours the engine has operated while the key was in the RUN position. This screen cannot be reset.
Press the gages button to scroll to the next screen.
ENGINE BOOST: If the vehicle has the supercharged engine, this screen will appear. It shows a graphic that indicates the amount of boost the engine is receiving.
Press the gages button again to scroll to the next screen.
MAXIMUM Gs: If you have the GXP option, this screen will appear. It shows acceleration, deceleration and lateral-acceleration information. This screen will only display when the vehicle is stopped. If you try to select this screen while the vehicle is moving, the message MAXIMUM Gs NOT WHILE MOVING will display.
Press the gages button again to scroll to the next screen.
Trip Odometer 3 (Trip Odometer): Press this button to access the Odometer, Trip Distances, AVERAGE SPEED, and TIME ELAPSED modes.
Odometer: When the trip odometer button is pressed, the first menu displayed on the DIC screen is the odometer reading, or cumulative mileage of the vehicle. The odometer cannot be reset.
Press the trip odometer button again to advance to the next menu.
Trip Distances: This menu shows the distances that the vehicle has driven between specific points. The trip odometer will record the number of miles up to 9,999.9 miles or 9 999.9 km travelled for up to two trips. When 9,999.9 miles or 9 999.9 km is reached for either trip, the odometer for that trip will go back to zero.
To reset the trip distances, use the following procedures: 1. Press the trip odometer button again to access TRIP A. Press the trip odometer button again to access TRIP B. To reset the trip odometer(s) back to zero miles or to zero kilometers, access the trip that needs to be reset and press the set/reset button.
2. Press the trip odometer button again to access the
odometer.
3-59
The trip odometer has a feature called the retro-active reset. This can be used to set the trip odometer to the number of miles (kilometers) driven since the ignition was last turned on. This can be used if the trip odometer is not reset at the beginning of the trip. To use the retro-active reset feature, press and hold the set/reset button for at least three seconds. The trip odometer will display the number of miles or kilometers driven since the ignition was last turned on and the vehicle was moving. Once the vehicle begins moving, the trip odometer will accumulate mileage. For example, if the vehicle was driven 5.0 miles (8.0 km) before it is started again, and then the retro-active reset feature is activated, the display will show 5.0 miles (8.0 km). As the vehicle begins moving, the display will then increase to 5.1 miles (8.2 km), 5.2 miles (8.4 km), etc. If the retro-active reset feature is activated after the vehicle is started, but before it begins moving, the display will show the number of miles or kilometers that were driven during the last ignition cycle.
Average Speed: The average speed is displayed in miles per hour (mph) or kilometers per hour (km/h). The average speed is calculated from the various vehicle speeds recorded since the last reset of this menu item. To reset the average speed, press the set/reset button. The display will return to zero. Press the trip odometer button again to advance to the next screen.
3-60
Time Elapsed: This screen can be used as a stopwatch. The display can show the hours, minutes and seconds. The elapsed time indicator will record up to 99 hours, 59 minutes and 59 seconds, then it will reset to zero and continue counting.
To set the time elapsed function, use the following procedures: 1. Press the set/reset button for less than two seconds
to start or stop the timer.
2. Press and hold the set/reset button for more than
two seconds to reset the timer back to zero.
Set/Reset r (Set/Reset): Press this button to set or reset a mode item when using the trip odometer or option buttons. Options 4 (Options): Press this button to access the Date, Language, Display Units, Daytime Display Enhancements, Engine Oil Monitor System, Tire Inflation Monitor System, Compass Calibration, and the Personal Programming modes.
Date: This menu sets the date.
The time is set through the radio. See Setting the Time on page 3-93 for more information.
To set the date, use the following procedure: 1. Press the options button until the date is displayed
on the DIC.
2. Press the set/reset button to access the RESET
YEAR screen. The second position in the year will be selected. Press and hold the set/reset button to scroll through the available digits. Release the button when the correct digit appears.
3. Press the options button to advance to the first
position in the year. Press and hold the set/reset button to scroll through the available digits. Release the button when the correct digit appears.
4. Press the options button to advance to the months
of the year.
5. Press the set/reset button to scroll through the months of the year, releasing the button when the correct month appears.
6. Press the options button to advance to the
days of the month.
7. Press the set/reset button to scroll through the days of the month, releasing the button when the correct day appears.
8. Press the options button again to advance to the
main date screen. The screen will now display the new date.
Language: This menu allows selection of the language in which the DIC messages will appear. The DIC can be programmed in one of three languages: English, French, or Spanish. The message on the HUD, if equipped, will also appear in the language selected.
To change the language, use the following procedure: 1. Press the options button to enter the language
screen.
2. Press the set/reset button to scroll through and set
the language choice.
3. Press the options button again to advance to the
next screen.
Display Units: This menu allows selection of measurements to be displayed in English or metric units. The messages on the HUD, if equipped, and the instrument panel cluster will also appear in the type of measurement selected.
To set the display units function, use the following procedure: 1. Press the set/reset button to select ENGLISH or
METRIC.
2. Press the options button to advance to the next
screen.
3-61
DAYTIME DISPLAY ENHANCEMENTS: This menu allows selection of the color of the display message. When ON is selected for the daytime enhancement, the messages will appear black on a red screen. This combination makes it easier to see the DIC messages during the daytime. When OFF is selected, or when the headlamps are on, the messages will appear red on a black background.
To set the daytime display enhancements function, use the following procedure: 1. Press the set/reset button to select OFF or ON. 2. Press the options button to advance to the
next screen.
ENGINE OIL MONITOR SYSTEM: This menu allows the engine oil monitor system to be reset. See Engine Oil Life System on page 5-18.
To reset the engine oil monitor system, use the following procedure: 1. Press the set/reset button after an oil change to
reset the engine oil monitor system. The confirmation, ENGINE OIL MONITOR SYSTEM HAS BEEN RESET, will appear on the screen and a chime will sound.
2. Press the options button again to advance to the
next screen.
3-62
Tire Inflation Monitor System: If the vehicle has ABS, this menu allows the tire inflation monitor system to be reset. See “Tire Inflation Monitor System” under Inflation - Tire Pressure on page 5-64 for more information.
To set or reset the tire inflation monitor system, use the following procedures: 1. Press the set/reset button to reset the tire inflation monitor system. TIRE INFLATION HAS BEEN SET will appear on the screen If the “Check Tire Pressure” message, indicating an irregularity in the pressure of one of the tires, had previously appeared on the DIC. If the “Check Tire Pressure” message did not appear, and the set/reset button is pressed, the system will reset, but no acknowledgement message will appear on the screen.
2. Press the options button again to advance to the
next screen. Select the set/reset button to return to the main (date) screen.
COMPASS CALIBRATION MODE: This menu allows you to adjust for compass variance.
Setting the Compass The compass is self-calibrating, which eliminates the need to manually set the compass. However, under certain circumstances, such as during a long distance cross-country trip, it will be necessary to compensate for compass variance and reset the zone through the DIC. Compass variance is the difference between the earth’s magnetic north and true geographic north. If not adjusted to account for compass variance, the compass in the vehicle could give false readings. In order to do this, the compass must be set or calibrated to the variance zone in which the vehicle is travelling. To adjust for compass variance, use the following procedure: 1. Find the vehicle’s current location and variance
zone number on the map.
2. Press the set/reset button to scroll through and
select the appropriate variance zone.
3. Press the options button to advance to the
calibration screen.
4. Drive the vehicle in a circle two times to activate
the compass.
The direction the vehicle is moving will be displayed in the bottom left corner of the screen, and will appear in the gages, fuel, trip, and some of the options modes. Press the options button again to advance to the next screen.
3-63
Personal Programming Mode Screens
PERSONAL PROGRAMMING MODE: This menu allows you to customize several features on your vehicle. These adjustments can only be made while the vehicle is in PARK (P). Press the set/reset button to display the first screen.
Press the options button to access these modes:
EXTERIOR LIGHTING DELAY: This screen allows this feature to be turned off, or allows the selection of the number of seconds the headlamps, sidelamps, taillamps, fog lamps, and back-up lamps are turned on after the key is removed from the ignition, or the vehicle is unlocked using the remote keyless entry transmitter.
If OFF is selected, the exterior lamps will not turn on.
If a time delay is chosen, the lamps will turn on for the selected time. The time delay will be cancelled and the exterior lamps will turn on automatically when the key is removed from the ignition, or the vehicle is unlocked using the remote keyless entry transmitter.
To program this mode, use the following procedure: 1. Press and release the set/reset button to scroll to
the selection you want to program. Choose from OFF, 15, 30, 60, or 90 seconds.
2. Press the options button again to advance to the
next screen.
3-64
INTERIOR LIGHTS WHEN DOOR CLOSED: This screen allows this feature to be turned OFF or ON.
If OFF is selected, the interior lamps will turn off immediately when the ignition is turned off and the last open door is closed.
If ON is selected, the interior lamps will stay on for about 25 seconds after the vehicle’s ignition is off and the last open door is closed.
To program this mode, use the following procedure: 1. Press and release the set/reset button to scroll to
either OFF or ON.
2. Press the options button again to advance to the
next screen.
INTERIOR LIGHTS WHEN KEY REMOVED: This screen allows this feature to be turned OFF or ON. This feature enables the interior lamps in the vehicle to turn on for about 25 seconds after the key is removed from the ignition.
If OFF is selected, removing the key from the ignition will not cause the interior lamps to turn on.
If ON is selected, removing the key from the ignition will cause the interior lamps to be turned on for about 25 seconds.
To program this mode, use the following procedure: 1. Press and release the set/reset button to scroll to
either OFF or ON.
2. Press the options button again to advance to the
next screen.
AUTO DOOR LOCK: This screen allows this feature to be turned OFF or ON.
If OFF is selected, all automatic door locking is disabled. The doors will always need to be locked manually before driving, to increase occupant safety.
If ON is selected, the vehicle’s doors automatically lock when the doors are closed and the vehicle is shifted into DRIVE (D).
To program this mode, use the following procedure: 1. Press and release the set/reset button to scroll to
either OFF or ON.
2. Press the options button again to advance to the
next screen.
AUTO DOOR UNLOCK: This screen can be used if ON was selected for the AUTO DOOR LOCK feature. This screen allows this feature to be turned off, used for the driver’s door only, or for all the doors.
If OFF is selected, none of the doors will unlock when the vehicle’s transaxle is shifted into PARK (P).
If DRIVER is selected, only the driver’s door will unlock when the vehicle’s transaxle is shifted into PARK (P).
If ALL is selected, all the doors will unlock when the vehicle’s transaxle is shifted into PARK (P).
To program this mode, use the following procedure: 1. Press and release the set/reset button to scroll to
either OFF, DRIVER, or ALL.
2. Press the options button again to advance to the
next screen.
AUTO DOOR UNLOCK ON: If DRIVER or ALL was selected on the AUTO DOOR UNLOCK screen, this screen allows selection of when the vehicle’s doors will unlock. The choices are when the key is removed from the ignition or when the vehicle is shifted into PARK (P).
If KEY-OUT is selected, the auto door unlock will function when the key is taken out of the ignition.
If PARK is selected, the auto door unlock will function when the transaxle is shifted into PARK (P).
To program this mode, use the following procedure: 1. Press and release the set/reset button to scroll to
either KEY-OUT or PARK.
2. Press the options button again to advance to the
next screen.
3-65
DELAYED LOCKING: This screen allows this feature to be turned OFF or ON. The key must be out of the ignition for this feature to work.
If OFF is selected, there will be no delayed locking of the vehicle’s doors.
If ON is selected, the locking of the vehicle’s doors will be delayed by five seconds after a power door lock switch is pressed while the door is open, or the LOCK button on the remote keyless entry transmitter is pressed while any door is open.
To program this mode, use the following procedure: 1. Press and release the set/reset button to scroll to
either OFF or ON.
2. Press the options button again to advance to the
next screen.
REMOTE LOCKS FEEDBACK: This screen allows this option to be turned OFF, or gives the choice of two methods of verification, LIGHTS or LIGHTS and HORN, that indicate the vehicle’s doors are locked when the LOCK button on the remote keyless entry transmitter is pressed.
If OFF is selected, this feature will not be programmed.
If LIGHTS is selected, the exterior lamps will flash when the LOCK button on the remote keyless entry transmitter is pressed.
3-66
If LIGHTS and HORN is selected, the exterior lamps will flash when the LOCK button on the remote keyless entry transmitter is pressed, and the horn will sound when the LOCK button on the remote keyless entry transmitter is pressed again within five seconds of the previous command.
To program this mode, use the following procedure: 1. Press the set/reset button to scroll to OFF, LIGHTS,
or LIGHTS and HORN.
2. Press the options button again to advance to the
next screen.
If the vehicle does not have a content theft-deterrent system, the next screens with PROGRAMMING FINISHED and DISPLAY OFF will appear. If the vehicle does have a content theft-deterrent system, the next screen will appear.
THEFT DETERRENT: The vehicle may have a content theft-deterrent system. Once it is turned on, the system will activate if someone tries to enter the vehicle without using the remote keyless entry transmitter or the correct key. It will also activate when an incorrect key is used in the ignition. This screen allows this feature to be turned OFF or ON.
If OFF is selected, the content theft-deterrent system will not function.
If ON is selected, the content theft-deterrent system will be activated. To program this mode, use the following procedure: 1. Press the set/reset button to scroll to OFF or ON. 2. Press the options button again to advance to
the next screen.
KEY CYLINDER DISARM: This screen allows this feature to be turned OFF or ON. This mode arms the vehicle’s ignition so that if a key other than the one that came with the vehicle is used to try to start it, the horn will sound. If OFF is selected, the content theft-deterrent system will not disarm when the vehicle is unlocked using the door lock, or if someone tampers with the door lock. If ON is selected, the content theft-deterrent system will disarm when the vehicle is unlocked using the door key. This makes the vehicle more resistant to key lock tampering. To program this mode, use the following procedure: 1. Press the set/reset button to scroll to OFF or ON. 2. Press the options button again to advance to
the next screen.
LOCK SWITCH ARM: If the vehicle has the content theft-deterrent system and ON was selected on the THEFT DETERRENT screen, this screen allows this feature to be turned OFF or ON.
If OFF is selected, the content theft-deterrent system will not activate this feature, which arms the system when the doors are locked with the door lock switch.
If ON is selected, the content theft-deterrent system will arm when the doors are locked with the door lock switch. The key must be removed from the ignition when the doors are locked or the content theft-deterrent system will not arm.
To program this mode, use the following procedure: 1. Press the set/reset button to scroll to OFF or ON. 2. Press the options button again to advance to
the next screen.
REMOTE START: If your vehicle has the remote start feature, this screen allows it to be turned OFF or ON. The remote start feature allows you to start the engine from outside of the vehicle using your remote keyless entry transmitter. See “Remote Vehicle Start” under Remote Keyless Entry System Operation on page 2-5 for more information.
If OFF is selected, the remote start feature will be disabled.
If ON is selected, the remote start feature will be enabled.
3-67
To program this mode, use the following procedure: 1. Press the set/reset button to scroll to OFF or ON. 2. Press the options button again to advance to
the next screen.
PROGRAMMING FINISHED will appear on the next screen. This confirms that the personal options programming is complete. DISPLAY OFF will appear on the next screen. This screen will count down and then go blank. Press the options button to advance to a new screen. Fuel . (Fuel): Press this button to access the Average Fuel Economy, Instantaneous Fuel Economy, and Fuel Range modes. AVG ECONOMY (Average Fuel Economy): This screen will display the approximate average miles per gallon (mpg) or liters per 100 kilometers (L/100 km). This number is calculated based on the number of mpg (L/100 km) recorded since the last time this menu item was reset. To reset the average fuel economy for the vehicle, follow this procedure: 1. Press the set/reset button to reset to zero. 2. Press the fuel button again to advance to the
next screen.
3-68
INST ECONOMY (Instantaneous Fuel Economy): This screen displays the current fuel economy at a particular moment and will change frequently as driving conditions change. Unlike average fuel economy, this screen cannot be reset.
Press the fuel button again to advance to the next screen.
RANGE: This screen displays the approximate number of remaining miles or kilometers the vehicle can be driven without refueling. This estimate is based on the average fuel economy for the amount of fuel remaining in the fuel tank and the current driving conditions. This estimate will change if driving conditions change. For example, if driving in traffic and making frequent stops, the display may read one number, but if the vehicle is driven on a freeway the number may change even though the same amount of fuel is in the fuel tank. This is because different driving conditions produce different fuel economies. Generally, freeway driving produces better fuel economy than city driving.
If the fuel tank contains less than 2 gallons (7.6 L), the LOW FUEL message will appear on the DIC screen. Fill the fuel tank as soon as possible to avoid running out of fuel. See “Low Fuel” under DIC Warnings and Messages on page 3-69.
DIC Warnings and Messages These messages will appear if there is a problem in one of the vehicle’s systems. They will override any other mode or screen the DIC may be in. Some messages can be cleared from the Driver Information Center (DIC) screen. In order to do this the message must be acknowledged. To acknowledge or clear the message from the screen, press the set/reset button on the DIC. See DIC Controls and Displays (Base Level DIC) on page 3-49 or DIC Controls and Displays (Uplevel DIC with Trip Computer) on page 3-57 for DIC button descriptions. Other warning messages are not allowed to be cleared until the problem indicated by the warning message is taken care of. When the problem indicated by the message is resolved, it can be acknowledged and the screen can be reset. Be sure to take any message that appears on the DIC screen seriously and remember that clearing the messages that are able to be acknowledged, will only make the message disappear, not the problem.
A/C OFF FOR ENGINE PROTECTION This warning message comes on when the engine coolant becomes hotter than the normal operating temperature. To avoid added strain on a hot engine, the air conditioning compressor is automatically turned off. When the coolant temperature returns to normal, the air conditioning compressor will turn back on. The vehicle can then continue to be driven. This message comes on while the ignition is in RUN. A chime will sound for two seconds when this message is displayed. Press the set/reset button to acknowledge this warning message and to clear it from the screen. This message will continue to display for three seconds if it has not been acknowledged when the engine is turned off. It will also re-display for three seconds if the message has been acknowledged, but the condition still exists when the engine is turned off. If the condition still exists, the message will re-appear when the engine is turned on.
3-69
BATTERY SAVER ACTIVE This message appears when the system detects that the battery voltage is dropping beyond a reasonable level. The battery saver system will start reducing certain features of the vehicle that you may not be able to notice. At the point that the features are disabled, this message is displayed. It means that the vehicle is trying to save the charge in the battery. Turn off all unnecessary accessories to allow the battery to recharge. The normal battery voltage range is 11.5 to 15.5 volts. If you have the uplevel DIC, you can monitor battery voltage on the DIC by pressing the gages button until you find BATTERY.
CHANGE OIL SOON
This symbol comes on with the CHANGE OIL SOON warning message.
AJAR
This symbol appears with the AJAR warning message.
This warning message comes on when a door, the trunk, or the hood of the vehicle is not properly closed. The graphic will highlight the hood or trunk if either one is not closed properly. The graphic will indicate a highlighted, open door to show which door or doors are not properly closed. This message will display while the ignition is in RUN. A chime will sound for two seconds when the ignition is shifted out of PARK (P). Press the set/reset button to acknowledge this message and to clear it from the screen. This message will continue to display for three seconds if it has not been acknowledged when the engine is turned off. It will also re-display for three seconds if the message has been acknowledged, but the condition still exists when the engine is turned off. If the condition still exists, the message will re-appear when the engine is turned on.
3-70
This warning message indicates that service is required for the vehicle. See your GM dealer. See Engine Oil on page 5-14 and Scheduled Maintenance on page 6-4
for more information. The CHANGE OIL SOON message is reset by acknowledging the message. The ENGINE OIL MONITOR SYSTEM screen under the options menu on the DIC must also be reset. See “Engine Oil Monitor System” in options under DIC Controls and Displays (Base Level DIC) on page 3-49 or DIC Controls and Displays (Uplevel DIC with Trip Computer) on page 3-57 for more information. This message will display while the ignition is in RUN. Press the set/reset button to acknowledge this message and to clear it from the screen. This message will continue to display for three seconds if it has not been acknowledged when the engine is turned off. It will also re-display for three seconds if the message has been acknowledged, but the condition still exists when the engine is turned off. If the condition still exists, the message will re-appear when the engine is turned on.CHARGING SYSTEM FAILURE
This symbol comes on with the CHARGING SYSTEM FAILURE warning message.
This warning message indicates that there is a problem with the generator and battery charging systems. Have the electrical system checked by your GM dealer as soon as possible. This message will display while the ignition is in RUN. A chime will sound for two seconds when this message is displayed. Press the set/reset button to acknowledge this message and to clear it from the screen. This message will continue to display if it has not been acknowledged when the engine is turned off. It will also re-display for three seconds if the message has been acknowledged, but the condition still exists when the engine is turned off. If the condition still exists, the message will re-appear when the engine is turned on.
3-71
CHECK GAS CAP This warning message comes on when the gas cap is not on, or is not fully tightened. Check the gas cap to ensure it is on and properly tightened. This message will display while the ignition is in RUN. A chime will sound for two seconds when this message is displayed and then the message continues to display. Press the set/reset button to acknowledge this message and to clear it from the screen. This message will continue to display for three seconds if it has not been acknowledged when the engine is turned off. It will also re-display for three seconds if the message has been acknowledged, but the condition still exists when the engine is turned off. If the condition still exists, the message will re-appear when the engine is turned on.
CHECK TIRE PRESSURE
This symbol comes on with the CHECK TIRE PRESSURE warning message.
If the vehicle has ABS brakes, this warning message will appear when the air pressure in one of the tires is too low or too high. Check the vehicle’s tire pressure as soon as possible, and fill or deflate the affected tire to the appropriate level. The correct tire inflation pressure should be set to those shown on the tire-loading information label on the vehicle. See Loading Your Vehicle on page 4-33 for more information. The CHECK TIRE PRESSURE screen is reset when it is acknowledged. However, the TIRE INFLATION MONITOR SYSTEM screen, located under the option menu in the DIC, must also be reset. See “Tire Inflation Monitor System” in the options section under DIC Controls and Displays (Base Level DIC) on page 3-49
or DIC Controls and Displays (Uplevel DIC with Trip Computer) on page 3-57 for more information.3-72
This message will display while the ignition is in RUN. A chime will sound for two seconds when this message is displayed. Press the set/reset button to acknowledge this message and to clear it from the screen. This message will continue to display for three seconds if it has not been acknowledged when the engine is turned off. It will also re-display for three seconds if the message has been acknowledged, but the condition still exists when the engine is turned off. If the condition still exists, the message will re-appear when the engine is turned on. CRUISE SET
This symbol comes on with the CRUISE SET message.
This message and symbol come on briefly whenever the cruise control is set. The cruise control light on the instrument panel cluster will also come on when cruise control is set. See Cruise Control Light on page 3-48. CRUISE SET will also appear briefly in the Head-Up Display (HUD), if equipped. This message will display when the ignition is in RUN. See Cruise Control on page 3-10 for more information. This message does not need to be acknowledged. CRUISE SYSTEM OFF If your vehicle has this message, it comes on briefly whenever the cruise control system is disabled. You will not be able to use the cruise control feature when this system is disabled. To use the cruise control feature, you must first enable the cruise control system. See Cruise Control on page 3-10 for more information. CRUISE SYSTEM ON If your vehicle has this message, it comes on briefly whenever the cruise control system is enabled. To use the cruise control feature, see Cruise Control on page 3-10.
3-73
DELAYED LOCKING This message comes on when the doors of the vehicle are closed and the delayed locking feature has been programmed through the DIC. See “Delayed Locking” in the options menu under DIC Controls and Displays (Base Level DIC) on page 3-49 or DIC Controls and Displays (Uplevel DIC with Trip Computer) on page 3-57 for more information. This message will appear when the ignition is in OFF. A chime will sound for two seconds when this message is displayed. This message cannot be acknowledged. HEADLAMPS SUGGESTED This message comes on when the amount of available light outside the vehicle is low and the exterior lamps control is off. This message informs the driver that it has become dark enough outside to require the headlamps and/or other exterior lamps to be turned on, even though the Daytime Running Lamps (DRL) are still illuminated.
This message will display while the ignition is in RUN. A chime will sound for two seconds when this message is displayed. Press the set/reset button to acknowledge this warning message and to clear it from the screen. This message will continue to display if it has not been acknowledged when the engine is turned off. It will also re-display for three seconds if the message has been acknowledged, but the condition still exists when the engine is turned off. If the condition still exists, the message will re-appear when the engine is turned on. HOT COOLANT Notice: appears on the DIC display, stop the vehicle as soon as possible. Do not increase the engine speed above normal idling speed. Severe engine damage can result from driving a vehicle with an overheated engine. See Engine Overheating on page 5-27 for more information.
If the HOT COOLANT warning message
3-74
This symbol comes on with the HOT COOLANT warning message.
This warning message will appear while the engine coolant temperature is too hot. The hot coolant temperature warning light will also appear on the instrument panel cluster. Also, the engine coolant temperature gage will read in the red or “hot” area. See Engine Coolant Temperature Warning Light on page 3-43 and Engine Coolant Temperature Gage on page 3-43 for more information. To avoid added strain, turn off the air conditioner if it is on. When the coolant temperature returns to normal, the air conditioner can be turned back on. This message will display only while the ignition is in RUN. A chime will sound continuously when this message is displayed. Press the set/reset button to acknowledge this message and to clear it from the screen.
This message will continue to display if it has not been acknowledged when the engine is turned off. It will also re-display for three seconds if the message has been acknowledged, but the condition still exists when the engine is turned off. If the condition still exists, the message will re-appear when the engine is turned on. HOT ENGINE OIL. REDUCE SPEED This warning message comes on when the vehicle’s engine oil is above the proper engine operating temperature. Reduce the speed of the vehicle. If the warning message continues to display, have the vehicle serviced by your GM dealer as soon as possible. A chime will sound continuously when this message is displayed. Press the set/reset button to acknowledge this warning message. This clears it from the screen. If the condition still exists, the message will re-appear when the engine is turned on.
3-75
HOT TRANS FLUID
This symbol comes on with the HOT TRANS FLUID warning message.
This warning message will appear when the transaxle fluid in the vehicle is too hot. Stop the vehicle and allow it to idle until it cools down. If the warning message continues to display, have the vehicle serviced by your GM dealer as soon as possible. If the vehicle has the Uplevel Trip Computer DIC, you can determine the actual temperature of the transaxle fluid using the vehicle’s gages button. See DIC Controls and Displays (Base Level DIC) on page 3-49 or DIC Controls and Displays (Uplevel DIC with Trip Computer) on page 3-57 for more information. This message will display while the ignition is in RUN. A chime will sound for two seconds when this message is displayed. Press the set/reset button to acknowledge this message and to clear it from the screen.
3-76
This message will continue to display if it has not been acknowledged when the engine is turned off. It will also re-display for three seconds if the message has been acknowledged, but the condition still exists when the engine is turned off. If the condition still exists, the message will re-appear when the engine is turned on. KEY FOB BATTERY LOW
This symbol comes on with the KEY FOB BATTERY LOW warning message.
This warning message will appear when the battery in the remote keyless entry transmitter needs to be replaced. See Remote Keyless Entry System Operation on page 2-5 for more information. This message will display while the ignition is in RUN. A chime will sound for two seconds when this message is displayed. Press the set/reset button to acknowledge this message and to clear it from the screen.
This message will continue to display if it has not been acknowledged when the engine is turned off. It will also re-display for three seconds if the message has been acknowledged, but the condition still exists when the engine is turned off. The message will re-appear when the engine is turned on and the condition still exists. KEY IN IGNITION This warning message comes on and a chime will sound continuously when the driver exits the vehicle while the key is in the ignition after the engine is turned off. This message cannot be acknowledged. This message will disappear and the chiming will stop when the key is removed from the ignition. LEFT FRONT TURN LAMP OUT This warning message comes on when the left front turn signal lamp needs to be replaced. See Taillamps, Turn Signal, and Stoplamps on page 5-54 for replacement procedures. This message will display while the ignition is in RUN. A chime will sound for two seconds when this message is displayed. Press the set/reset button to acknowledge this message and to clear it from the screen.
This message will continue to display if it has not been acknowledged when the engine is turned off. It will also re-display for three seconds if the message has been acknowledged, but the condition still exists when the engine is turned off. If the condition still exists, the message will re-appear when the engine is turned on. LEFT REAR TURN LAMP OUT This warning message comes on when the left rear turn signal lamp needs to be replaced. See Taillamps, Turn Signal, and Stoplamps on page 5-54 for replacement procedures. This message will display while the ignition is in RUN. A chime will sound for two seconds when this message is displayed. Press the set/reset button to acknowledge this message and to clear it from the screen. This message will continue to display if it has not been acknowledged when the engine is turned off. It will also re-display for three seconds if the message has been acknowledged, but the condition still exists when the engine is turned off. If the condition still exists, the message will re-appear when the engine is turned on.
3-77
LOW BRAKE FLUID
This symbol comes on with the LOW BRAKE FLUID warning message.
If the condition exists, the message will re-appear when the engine is turned on. LOW FUEL
This symbol comes on with the LOW FUEL warning message.
This warning message will appear when the brake fluid level is low. Fill the brake master cylinder to the proper level. See Engine Compartment Overview on page 5-12
for the location of the brake master cylinder reservoir. Also, see Brakes on page 5-40 for proper fluid level. The brake light will also appear on the instrument panel cluster when this message appears on the DIC. This message will display only while the ignition is in RUN. A chime will sound for two seconds while this message is displayed. Press the set/reset button to acknowledge this message and to clear it from the screen. This message will continue to display if it has not been acknowledged when the engine is turned off. It will also re-display for three seconds if the message has been acknowledged, but the condition still exists when the engine is turned off.3-78
This warning message will appear when the vehicle is low on fuel. Refill the fuel tank as soon as possible. This message will display while the ignition is in RUN. A chime will sound for two seconds when this message is displayed. Press the set/reset button to acknowledge this message and to clear it from the screen. This message will continue to display if it has not been acknowledged when the engine is turned off. It will also re-display for three seconds if the message has been acknowledged, but the condition still exists when the engine is turned off. If the condition still exists, the message will re-appear when the engine is turned on.
LOW OIL LEVEL
This symbol comes on with the LOW OIL LEVEL warning message.
This warning message appears when the vehicle’s engine oil is low. Fill the oil to the proper level as soon as possible. See Engine Compartment Overview on page 5-12 for engine oil fill location. Also, see Engine Oil on page 5-14 for information on the kind of oil to use and proper oil level. See Supercharger Oil on page 5-19
if the vehicle has a supercharged engine for information on the kind of oil to use and proper oil level. This message will display while the ignition is in RUN. A chime will sound for two seconds when this message is displayed. Press the set/reset button to acknowledge this message and to clear it from the screen. This message will continue to display if it has not been acknowledged when the engine is turned off. It will also re-display for three seconds if the message has been acknowledged, but the condition still exists when the engine is turned off.If the condition still exists, the message will re-appear when the engine is turned on. LOW OIL PRESSURE Notice: message appears on the DIC display, stop the vehicle immediately. Do not drive the vehicle until the cause of the low oil pressure is corrected. Severe engine damage can result from driving a vehicle with low oil pressure. See Engine Oil on page 5-14 for more information.
If the LOW OIL PRESSURE warning
This symbol comes on with the LOW OIL PRESSURE warning message.
This warning message will appear when the vehicle’s engine oil pressure is low. The low oil pressure warning light will also appear on the instrument panel.
3-79
Stop the vehicle immediately, as engine damage can result from driving a vehicle with low oil pressure. Have the vehicle serviced by your GM dealer as soon as possible when this warning message is displayed. This message will display only while the ignition is in RUN. A chime will sound continuously when this message is displayed. Press the set/reset button to acknowledge this message and to clear it from the screen. This message will continue to display if it has not been acknowledged when the engine is turned off. It will also re-display for three seconds if the message has been acknowledged, but the condition still exists when the engine is turned off. If the condition still exists, the message will re-appear when the engine is turned on.
3-80
LOW WASHER FLUID
This symbol comes on with the LOW WASHER FLUID warning message.
This warning message appears when the windshield washer fluid is low. Fill the windshield washer reservoir as soon as possible. See Engine Compartment Overview on page 5-12 for location of the windshield washer reservoir. Also, see Windshield Washer Fluid on page 5-39 for more information. This message will display only while the ignition is in RUN. A chime will sound for two seconds when this message is displayed. Press the set/reset button to acknowledge this message and to clear it from the screen. This message will continue to display if it has not been acknowledged when the engine is turned off. It will also re-display for three seconds if the message has been acknowledged, but the condition still exists when the engine is turned off. If the condition still exists, the message will re-appear when the engine is turned on.
PARKING BRAKE ON
This symbol comes on with the PARKING BRAKE ON warning message.
This warning message appears to alert the driver when the vehicle’s parking brake is on, the ignition is in RUN, and the vehicle speed is greater than 5 mph (8 km/h). See Parking Brake on page 2-30 for more information. The brake light will also appear on the instrument panel cluster when this message appears on the DIC. A chime will sound continuously while this message is displayed if driving above 5 mph (8 km/h). Press the set/reset button to acknowledge this message and to clear it from the screen.
This message will continue to display for three seconds if it has not been acknowledged when the engine is turned off. It will also re-display for three seconds if the message has been acknowledged, but the condition still exists when the engine is turned off. If the condition still exists, the message will re-appear when the engine is turned on. PARK LAMPS ON This warning message will come on to alert the driver when the parking lamps are on, the ignition is in OFF, and the key is removed. A chime will sound continuously while this message is displayed. This message cannot be acknowledged. READING LAMP ON This warning message will come on to alert the driver that the reading lamps are on and the ignition is in OFF. A chime will sound for two seconds while this message is displayed. This message cannot be acknowledged.
3-81
REDUCED ENGINE POWER
This symbol comes on with the REDUCED ENGINE POWER warning message.
This warning message appears when the vehicle’s engine power is reduced. This happens when driving conditions, such as climbing a steep hill, make the transaxle overwork in a gear that may cause damage to the vehicle’s engine or transaxle. Reduced engine power can affect the vehicle’s ability to accelerate. This message will display only when the ignition is in RUN. A chime will sound for two seconds while this message is displayed. Press the set/reset button to acknowledge this message and to clear it from the screen. This message will continue to display if it has not been acknowledged when the engine is turned off. It will also re-display for three seconds if the message has been acknowledged, but the condition still exists when the engine is turned off. If the condition still exists, the message will re-appear when the engine is turned on.
3-82
REMOTE START ACTIVE PRESS HAZARD SWITCH TO CANCEL This warning message will come on when a remote start is initiated. If you would like to cancel the remote start, turn on the hazard warning flashers. See Hazard Warning Flashers on page 3-5. REMOTE START DISABLED This warning message will come on if a remote start attempt is unsuccessful. This may be caused by any of the following conditions:
The remote start system is disabled through the DIC. The key is in the ignition. The hood or the doors are not closed. There is an emission control system malfunction. The engine coolant temperature is too high. The oil pressure is low.
See “REMOTE START” under DIC Controls and Displays (Base Level DIC) on page 3-49 or DIC Controls and Displays (Uplevel DIC with Trip Computer) on page 3-57 and “Remote Vehicle Start” under Remote Keyless Entry System Operation on page 2-5 for more information.
(cid:127) (cid:127) (cid:127) (cid:127) (cid:127) (cid:127) RIGHT FRONT TURN LAMP OUT This warning message will come on when the vehicle’s right front turn signal needs to be replaced. See Front Turn Signal, Parking and Fog Lamps on page 5-53
for bulb replacement procedures. This message will display only while the ignition is in RUN. A chime will sound for two seconds while this message is displayed. Press the set/reset button to acknowledge this message and to clear it from the screen. This message will continue to display if it has not been acknowledged when the engine is turned off. It will also re-display for three seconds if the message has been acknowledged, but the condition still exists when the engine is turned off. If the condition still exists, the message will re-appear when the engine is turned on.RIGHT REAR TURN LAMP OUT This warning message will come on when the vehicle’s right rear turn signal needs to be replaced. See Taillamps, Turn Signal, and Stoplamps on page 5-54 for bulb replacement procedures. This message will display only while the ignition is in RUN. A chime will sound for two seconds while this message is displayed. Press the set/reset button to acknowledge this message and to clear it from the screen. This message will continue to display if it has not been acknowledged when the engine is turned off. It will also re-display for three seconds if the message has been acknowledged, but the condition still exists when the engine is turned off. If the condition still exists, the message will re-appear when the engine is turned on.
3-83
SERVICE ABS SYSTEM
SERVICE BRAKE SYSTEM
This symbol comes on with the SERVICE ABS SYSTEM warning message.
This symbol comes on with the SERVICE BRAKE SYSTEM warning message.
If the vehicle has the Anti-Lock Brake System (ABS), this warning message will appear when the vehicle’s brakes are not functioning properly. Have the brake system serviced by your GM dealer as soon as possible. This message will display only while the ignition is in RUN. A chime will sound for two seconds while this message is displayed. Press the set/reset button to acknowledge this message and to clear it from the screen. This message will continue to display if it has not been acknowledged when the engine is turned off. It will also re-display for three seconds if the message has been acknowledged, but the condition still exists when the engine is turned off. If the condition still exists, the message will re-appear when the engine is turned on.
This warning message will appear when the vehicle’s brakes are not functioning properly. Have the brake system serviced by your GM dealer as soon as possible. This message will display only while the ignition is in RUN. A chime will sound for two seconds while this message is displayed. Press the set/reset button to acknowledge this message and to clear it from the screen. This message will continue to display if it has not been acknowledged when the engine is turned off. It will also re-display for three seconds if the message has been acknowledged, but the condition still exists when the engine is turned off. If the condition still exists, the message will re-appear when the engine is turned on.
3-84
SERVICE BRAKE APPLY SENSOR This message will come on when the brake apply sensor is not functioning properly. The vehicle still has brakes when this warning message displays, but you should have the vehicle serviced by your GM dealer as soon as possible. This message will display only while the ignition is in RUN. A chime will sound for two seconds while this message is displayed. Press the set/reset button to acknowledge this message and to clear it from the screen. This message will continue to display if it has not been acknowledged when the engine is turned off. It will also re-display for three seconds if the message has been acknowledged, but the condition still exists when the engine is turned off. If the condition still exists, the message will re-appear when the engine is turned on.
SERVICE PARK LAMPS This warning message will come on if one of the vehicle’s parking lamps needs to be replaced. See Front Turn Signal, Parking and Fog Lamps on page 5-53 for bulb replacement procedures. This message will display only while the ignition is in RUN. A chime will sound for two seconds while this message is displayed. Press the set/reset button to acknowledge this message and to clear it from the screen. This message will continue to display if it has not been acknowledged when the engine is turned off. It will also re-display for three seconds if the message has been acknowledged, but the condition still exists when the engine is turned off. If the condition still exists, the message will re-appear when the engine is turned on.
3-85
SERVICE STABILITY SYSTEM
This symbol comes on with the SERVICE STABILITY SYSTEM warning message.
If the vehicle has the StabiliTrak® Plus system, this warning message will appear when it is not functioning properly. A warning light will also appear on the instrument panel cluster. See Traction Control System (TCS) Warning Light on page 3-42 or Enhanced Traction System Warning Light on page 3-42. See StabiliTrak® Plus System on page 4-12 for more information. Have the StabiliTrak® Plus system serviced by your GM dealer as soon as possible. This message will display only while the ignition is in RUN. A chime will sound for two seconds while this message is displayed. Press the set/reset button to acknowledge this message and to clear it from the screen.
This message will continue to display if it has not been acknowledged when the engine is turned off. It will also re-display for three seconds if the message has been acknowledged, but the condition still exists when the engine is turned off. If the condition still exists, the message will re-appear when the engine is turned on. SERVICE THEFT SYSTEM This warning message comes on if there is a problem with the theft-deterrent system programmed in the key. A fault has been detected in the system which means that the system is disabled and it is not protecting the vehicle. The vehicle usually restarts; however, you may want to take the vehicle to your GM dealer before turning off the engine. See Keys on page 2-2 for information on the PASS-Key® III system. This message will display only while the ignition is in RUN. A chime will sound for two seconds while this message is displayed. Press the set/reset button to acknowledge this message and to clear it from the screen.
3-86
This message will continue to display if it has not been acknowledged when the engine is turned off. It will also re-display for three seconds if the message has been acknowledged, but the condition still exists when the engine is turned off. If the condition still exists, the message will re-appear when the engine is turned on. SERVICE TRACTION SYSTEM
This symbol will come on with the SERVICE TRACTION SYSTEM warning message.
See Traction Control System (TCS) on page 4-9 for more information. Have the traction control system serviced by your GM dealer as soon as possible. This message will display only while the ignition is in RUN. A chime will sound for two seconds while this message is displayed. Press the set/reset button to acknowledge this message and to clear it from the screen. This message will continue to display if it has not been acknowledged when the engine is turned off. It will also re-display for three seconds if the message has been acknowledged, but the condition still exists when the engine is turned off. If the condition still exists, the message will re-appear when the engine is turned on.
If the vehicle has the traction control system, this warning message appears when the system is not functioning properly. A warning light will also appear on the instrument panel cluster. See Traction Control System (TCS) Warning Light on page 3-42 or Enhanced Traction System Warning Light on page 3-42.
3-87
SERVICE VARIABLE EFFORT STEERING
This symbol comes on with the SERVICE VARIABLE EFFORT STEERING warning message.
SERVICE VEHICLE SOON
This symbol comes on with the SERVICE VEHICLE SOON warning message.
If the vehicle has the variable effort steering system, this warning message will display if this system is not functioning properly. See Steering on page 4-13 for more information. Have your system serviced by your GM dealer as soon as possible. This message will display only while the ignition is in RUN. A chime will sound for two seconds while this message is displayed. Press the set/reset button to acknowledge this message and to clear it from the screen. This message will continue to display if it has not been acknowledged when the engine is turned off. It will also re-display for three seconds if the message has been acknowledged, but the condition still exists when the engine is turned off. If the condition still exists, the message will re-appear when the engine is turned on.
3-88
This warning message displays when a non-emissions related malfunction occurs. Have the vehicle serviced by your GM dealer as soon as possible. This message will display only while the ignition is in RUN. A chime will sound for two seconds while this message is displayed. Press the set/reset button to acknowledge this message and to clear it from the screen. This message will continue to display if it has not been acknowledged when the engine is turned off. It will also re-display for three seconds if the message has been acknowledged, but the condition still exists when the engine is turned off. If the condition still exists, the message will re-appear when the engine is turned on.
STABILITY CONTROL ACTIVE
STABILITY CONTROL OFF
This symbol comes on with the STABILITY CONTROL ACTIVE warning message.
This symbol comes on with the STABILITY CONTROL OFF warning message.
If the vehicle has the StabiliTrak® Plus system, this warning message appears when the system is engaged and actively assisting the driver with directional control of the vehicle. Slippery road conditions may exist when this warning message is displayed, so driving should be adjusted accordingly. STABILITY CONTROL ACTIVE will also appear in the Head-Up Display (HUD), if equipped. This message will display only while the ignition is in RUN. This message stays on until road conditions change and StabiliTrak® Plus is not active. This message cannot be acknowledged and cleared from the screen.
If the vehicle has the StabiliTrak® Plus system, this warning message will appear when the system turns off. This message will display only while the ignition is in RUN. A chime will sound once and the message will stay on for three seconds and then disappear. A warning light indicating that this system is deactivated will also appear on the instrument panel cluster. See Traction Control System (TCS) Warning Light on page 3-42 or Enhanced Traction System Warning Light on page 3-42. When the StabiliTrak® Plus system is off, the system will not be engaged and will not actively assist the driver with directional control of the vehicle. See StabiliTrak® Plus System on page 4-12. Any of the following conditions may cause the StabiliTrak® Plus system to turn off:
The battery is low. There is a StabiliTrak® Plus system failure. See your GM dealer for service.
3-89
(cid:127) (cid:127) STARTING DISABLED DUE TO ELECTRONIC THROTTLE CONTROL This warning message comes on when there is a malfunction with the electronic throttle control which prevents the vehicle from starting. Have the vehicle serviced by your GM dealer. This message will only appear while the ignition is in RUN, and will not disappear until the problem is resolved. A chime will sound for two seconds. This message cannot be acknowledged. STARTING DISABLED DUE TO THEFT SYSTEM This warning message comes on when the system detects a malfunction in the content theft-deterrent system and prevents the vehicle from starting. This message will only appear while the ignition is in RUN, and will not disappear until the problem is resolved. A chime will sound for two seconds. This message cannot be acknowledged.
THEFT SYSTEM NOT PROGRAMMED This warning message comes on if the theft-deterrent system has not been programmed through the DIC. See “Personal Programming” under the options mode in DIC Controls and Displays (Base Level DIC) on page 3-49 or DIC Controls and Displays (Uplevel DIC with Trip Computer) on page 3-57 for information on how to set the theft-deterrent system. This message will display only while the ignition is in RUN. A chime will sound for two seconds while this message is displayed. Press the set/reset button to acknowledge this message and to clear it from the screen. This message will continue to display if it has not been acknowledged when the engine is turned off. It will also re-display for three seconds if the message has been acknowledged, but the condition still exists when the engine is turned off. If the condition still exists, the message will re-appear when the engine is turned on.
3-90
TRACTION CONTROL ACTIVE
TRACTION CONTROL OFF
This symbol comes on with the TRACTION CONTROL ACTIVE message.
This symbol comes on with the TRACTION CONTROL OFF message.
If the vehicle has the traction control system, this message will appear when the system is on. TRACTION CONTROL ACTIVE will also appear in the Head-Up Display (HUD), if equipped. This message only displays while the ignition is in RUN and will not disappear until driving conditions change and the traction control is no longer active. This message cannot be acknowledged or cleared from the screen.
If the vehicle has the traction control system, this message will appear when the traction control system turns off. TRACTION CONTROL OFF will also appear in the Head-Up Display (HUD), if equipped. This message will only display while the ignition is in RUN and will disappear after three seconds. A chime will sound once and the message will stay on for three seconds and then disappear. A warning light indicating that this system is deactivated will also appear on the instrument panel cluster. See Traction Control System (TCS) Warning Light on page 3-42 or Enhanced Traction System Warning Light on page 3-42.
3-91
Any of the following conditions may cause the traction control system to turn off:
The traction control system is turned off by pressing the TC (traction control) button located on the center console. See Traction Control System (TCS) on page 4-9 or Enhanced Traction System (ETS) on page 4-10 for more information. The battery is low. There is a traction control system failure. See your GM dealer for service. TURN SIGNAL ON This message will comes on if the vehicle is driven for more than 0.75 mile (1.21 km) with one of the turn signals on. It appears as a reminder to turn off the turn signal. This message only displays when the ignition is in RUN. A chime will sound for two seconds and the message will not disappear until the turn signal is manually turned off, or a turn is completed.
Audio System(s) Notice: Before adding any sound equipment to your vehicle, like a tape player, CB radio, mobile telephone, or two-way radio, make sure that it can be added by checking with your dealer. Also, check federal rules covering mobile radio and telephone units. If sound equipment can be added, it is very important to do it properly. Added sound equipment may interfere with the operation of your vehicle’s engine, radio, or other systems, and even damage them. Your vehicle’s systems may interfere with the operation of sound equipment that has been added improperly. Figure out which audio system is in your vehicle, find out what your audio system can do, and how to operate all of its controls. Your vehicle has a feature called Retained Accessory Power (RAP). With RAP, the audio system can be played even after the ignition is turned off. See Retained Accessory Power (RAP) on page 2-22 for more information.
3-92
(cid:127) (cid:127) (cid:127) Setting the Time The radio may have a button marked with an H or HR to represent hours and an M or MIN to represent minutes. Press and hold the hour button until the correct hour appears on the display. AM will appear for morning hours. Press and hold the minute button until the correct minute appears on the display. The time can be set with the ignition on or off. To synchronize the time with an FM station broadcasting Radio Data System (RDS) information, press and hold the hour and minute buttons at the same time until UPDATED appears on the display. If the time is not available from the station, NO UPDATE will appear on the display. RDS time is broadcast once a minute. After tuning to an RDS broadcast station, it may take a few minutes for the time to update.
Radio with CD (Base Level)
If your vehicle has the Monsoon audio system, included are eight speakers and an eight channel amplifier. MONSOON will appear on the display when the ignition or the radio is turned on. See your dealer for details. Radio Data System (RDS) The audio system has a Radio Data System (RDS). RDS features are available for use only on FM stations that broadcast RDS information.
3-93
With RDS, the radio can do the following: (cid:127) Seek to stations broadcasting the selected type of
programming
(cid:127) Receive announcements concerning local and
national emergencies
(cid:127) Display messages from radio stations (cid:127) Seek to stations with traffic announcements This system relies upon receiving specific information from these stations and will only work when the information is available. In rare cases, a radio station may broadcast incorrect information that will cause the radio features to work improperly. If this happens, contact the radio station. While the radio is tuned to an RDS station, the station name or call letters will appear on the display instead of the frequency. RDS stations may also provide the time of day, a program type (PTY) for current programming, and the name of the program being broadcast.
XM™ Satellite Radio Service XM™ is a satellite radio service that is based in the 48 contiguous United States. XM™ offers 100 coast to coast channels including music, news, sports, talk, and children’s programming. XM™ provides digital quality audio and text information that includes song title and artist name. A service fee is required in order to receive the XM™ service. For more information, contact XM™ at www.xmradio.com or call 1-800-852-XMXM (9696). Playing the Radio
PWR (Power): Push this knob to turn the system on and off.
VOL (Volume): Turn this knob to increase or to decrease the volume.
SCV (Speed-Compensated Volume): With SCV, the audio system adjusts automatically to make up for road and wind noise as you drive.
3-94
Set the volume at the desired level. Press this button to select MIN, MED, or MAX. Each higher setting will allow for more volume compensation at faster vehicle speeds. Then, as you drive, SCV automatically increases the volume, as necessary, to overcome noise at any speed. The volume level should always sound the same to you as you drive. To turn SCV off, press this button until OFF appears on the display.
RCL (Recall): Push this knob to switch the display between the radio station frequency and the time. When the ignition is off, push this knob to display the time.
For RDS, push the RCL knob to change what appears on the display while using RDS. The display options are station name, RDS station frequency, PTY, and the name of the program (if available).
For XM™ (if equipped), push the RCL knob while in XM™ mode to retrieve four different categories of information related to the current song or channel: Artist, Song Title, Category or PTY, Channel Number/Channel Name.
To change the default on the display, push the RCL knob until you see the display you want, then hold the knob until the display flashes. The selected display will now be the default.
Finding a Station
BAND: Press this button to switch between FM1, FM2, AM, or XM1 or XM2 (if equipped). The display will show the selection.
TUNE: Turn this knob to select radio stations. w SEEK x: Press the up or the down arrow to go to the next or to the previous station and stay there.
The radio will only seek stations with a strong signal that are in the selected band. w SCAN x: Press and hold either arrow for two seconds until SCAN appears on the display and you hear a beep. The radio will go to a station, play for a few seconds, then go on to the next station. Press either arrow again to stop scanning.
To scan preset stations, press and hold either SCAN arrow for more than four seconds until PSCAN and the preset number appear on the display and you hear a double beep. The radio will go to the first preset station stored on the pushbuttons, play for a few seconds, then go on to the next preset station. Press either SCAN arrow again to stop scanning presets.
The radio will only scan stations with a strong signal that are in the selected band.
3-95
Setting Preset Stations Up to 30 stations (six FM1, six FM2, and six AM, six XM1 and six XM2 (if equipped)), can be programmed on the six numbered pushbuttons, by performing the following steps: 1. Turn the radio on. 2. Press BAND to select FM1, FM2, AM, or XM1
or XM2.
3. Tune in the desired station. 4. Press EQ to select the equalization. 5. Press and hold one of the six numbered
pushbuttons until you hear a beep. Whenever that numbered pushbutton is pressed, the station that was set will return and the equalization that was selected will be stored for that pushbutton.
6. Repeat the steps for each pushbutton. Setting the Tone (Bass/Treble)
TONE: Press and release this button until BASS, MID, or TREB appears on the display. The SELECT LED indicator will light to show that the tone control can be adjusted. Turn the SELECT knob to increase or to decrease. If a station is weak or noisy, decrease the treble.
To return all of the tone controls to the middle position, press and hold the TONE button until FLAT appears on the display
EQ (Equalizer): Press this button to select customized equalization settings. Up to six customized equalization settings, can be programmed, by performing the following steps: 1. Turn the radio on. 2. Use the TONE button and the SELECT knob to
create the equalization.
3. Press and hold the EQ button for two seconds.
SELECT EQ # will appear on the display and the EQ symbol will flash.
4. Press EQ or turn the SELECT knob to select the
EQ number.
5. Press and hold the EQ button or push the SELECT
knob to store the equalization setting and the number. EQ SAVED will appear on the display and you will hear a beep.
6. Repeat the steps for the other EQ settings and
numbers.
EQ 5 has been programmed at the factory for use with talk radio, but it can be preset to a different tone.
3-96
Adjusting the Speakers (Balance/Fade)
BAL (Balance): To adjust the balance between the right and the left speakers, press and release this button until BAL appears on the display. The SELECT LED indicator will light to show that the speakers can be adjusted. Turn the SELECT knob to move the sound toward the right or the left speakers.
FADE: To adjust the fade between the front and the rear speakers, press and release this button until FADE appears on the display. The SELECT LED indicator will light to show that the speakers can be adjusted. Turn the SELECT knob to move the sound toward the front or the rear speakers.
Pressing and holding the BAL FADE button for two seconds will return all speaker settings to the middle position. Finding a Program Type (PTY) Station (RDS and XM™) To select and find a desired PTY perform the following: 1. Press the PROG TYPE button to activate program type select mode. PTY will appear on the display.
2. Turn the SELECT knob to select a PTY.
3. Once the desired PTY is displayed, press either SEEK arrow to select the PTY and take you to the PTY’s first station.
4. To go to another station within that PTY, and the PTY is displayed, press either SEEK arrow once. If the PTY is not displayed, press either SEEK arrow twice to display the PTY and then to go to another station.
5. Press PROG TYPE to exit program type
select mode. If PTY times out and is no longer on the display, go back to Step 1.
If both PTY and TRAF are on, the radio will search for stations with the selected PTY and traffic announcements.
SCAN: Scan the stations within a PTY by performing the following: 1. Press PROG TYPE to activate program type select
mode. PTY will appear on the display.
2. Turn the SELECT knob to select a PTY. 3. Once the desired PTY is displayed, press and hold
either SCAN arrow, and the radio will begin scanning the stations in the PTY.
4. Press either SCAN arrow to stop at a station.
3-97
If both PTY and TRAF are on, the radio will scan for stations with the selected PTY and traffic announcements.
BAND (Alternate Frequency): Alternate frequency allows the radio to switch to a stronger station with the same program type. To turn alternate frequency on, press and hold BAND for two seconds. AF ON will appear on the display. The radio may switch to stations with a stronger frequency.
To turn alternate frequency off, press and hold BAND again for two seconds. AF OFF will appear on the display. The radio will not switch to other stations.
This function does not apply for XM™ Satellite Radio Service. Setting Preset PTYs (RDS Only) These pushbuttons have factory PTY presets. Up to 12 PTYs (six FM1 and six FM2), can be programmed on the six numbered pushbuttons, by performing the following steps: 1. Press BAND to select FM1 or FM2. 2. Press PROG TYPE to activate program type select
mode. PTY will appear on the display.
3. Turn the SELECT knob to select a PTY.
3-98
4. Press and hold one of the six numbered
pushbuttons until you hear a beep. Whenever that numbered pushbutton is pressed, the PTY that was set will return, if program type select mode is activated.
5. Repeat the steps for each pushbutton. RDS Messages
ALERT!: Alert warns of local or national emergencies. When an alert announcement comes on the current radio station, ALERT! will appear on the display. You will hear the announcement, even if the volume is low or a CD is playing. If a CD is playing, play will stop during the announcement. Alert announcements cannot be turned off.
ALERT! will not be affected by tests of the emergency broadcast system. This feature is not supported by all RDS stations.
INFO (Information): If the current station has a message, INFO will appear on the display. Press this button to see the message. The message may display the artist, song title, call in phone numbers, etc.
If the entire message is not displayed, parts of the message will appear every three seconds. To scroll through the message, press and release the INFO button. A new group of words will appear on the display after every press of the button. Once the complete message has been displayed, INFO will disappear from the display until another new message is received. The last message can be displayed by pressing the INFO button. You can view the last message until a new message is received or a different station is tuned to.
TRAF (Traffic): If TRAF appears on the display, the tuned station broadcasts traffic announcements. To receive the traffic announcement from the tuned station, press this button. Brackets will be displayed around TRAF and when a traffic announcement comes on the tuned radio station you will hear it.
If the station does not broadcast traffic announcements, press the TRAF button and the radio will seek to a station that does. When a station that broadcasts traffic announcements is found, the radio will stop seeking and brackets will be displayed around TRAF. If no station is found that broadcasts traffic announcements, NO TRAFFIC will appear on the display.
If the brackets are on the display and TRAF is not, press the TRAF button to remove the brackets or use the TUNE knob or the SEEK arrows to go to a station that supports traffic announcements.
The radio will play the traffic announcement if the volume is low. The radio will interrupt the play of a CD if the last tuned station broadcasts traffic announcements and the brackets are displayed.
This function does not apply to XM™ Satellite Radio Service. Radio Messages
CALIBRATE: The audio system has been calibrated for your vehicle from the factory. If CALIBRATE appears on the display it means that the radio has not been configured properly for your vehicle and must be returned to the dealer for service.
LOCKED: This message is displayed when the THEFTLOCK® system has locked up. Take the vehicle to the dealer for service.
If any error occurs repeatedly or if an error cannot be corrected, contact your dealer.
3-99
XM™ Radio Messages
Condition
Action Required
Radio Display
Message
XL (Explicit Language Channels)
Updating
XL on the radio display, after the channel name, indicates content with explicit language. Updating encryption code
No Signal
Loss of signal
Loading XM
Acquiring channel audio (after 4 second delay)
CH Off Air
Channel not in service
CH Unavail
No Info
No Info
3-100
Channel no longer available
Artist Name/Feature not available Song/Program Title not available
These channels, or any others, can be blocked at a customer’s request, by calling 1-800-852-XMXM (9696).
The encryption code in the receiver is being updated, and no action is required. This process should take no longer than 30 seconds. The system is functioning correctly, but the vehicle is in a location that is blocking the XM signal. When you move into an open area, the signal should return. The audio system is acquiring and processing audio and text data. No action is needed. This message should disappear shortly. This channel is not currently in service. Tune to another channel. This previously assigned channel is no longer assigned. Tune to another station. If this station was one of the