- 2010 Mercedes-Benz R Class Owners Manuals
- Mercedes-Benz R Class Owners Manuals
- 2006 Mercedes-Benz R Class Owners Manuals
- Mercedes-Benz R Class Owners Manuals
- 2008 Mercedes-Benz R Class Owners Manuals
- Mercedes-Benz R Class Owners Manuals
- 2009 Mercedes-Benz R Class Owners Manuals
- Mercedes-Benz R Class Owners Manuals
- 2007 Mercedes-Benz R Class Owners Manuals
- Mercedes-Benz R Class Owners Manuals
- 2011 Mercedes-Benz R Class Owners Manuals
- Mercedes-Benz R Class Owners Manuals
- Download PDF Manual
-
앫 Release the lock button (컄 page 68) on the driver’s outside door handle to stop the closing procedure.
앫 Pull on the driver’s outside door handle
and hold firmly. The windows and the tilt/sliding sunroof* (or tilt/sliding pan- el*) will open for as long as the door handle is held but the door not opened.
Vehicles without tilt/sliding panel 왘 Aim transmitter eye of the SmartKey or
SmartKey with KEYLESS-GO* at the driver’s outside door handle (컄 page 251). The SmartKey or SmartKey with KEYLESS-GO* must be in close proxim- ity to the driver’s door handle.
왘 Press and hold button ‹ on the
Vehicles with tilt/sliding panel*
SmartKey or SmartKey with KEYLESS-GO* until the windows and the tilt/sliding sunroof* are completely closed.
왘 Release button ‹ on the SmartKey or SmartKey with KEYLESS-GO* to in- terrupt the closing procedure.
Vehicles with KEYLESS-GO*: 왘 Press and hold the lock button on an outside door handle (컄 page 68) until the windows and the tilt/sliding sun- roof* are completely closed.
왘 Release the lock button on the outside
door handle to interrupt the closing procedure.
If tilt/sliding panel is closed: 왘 Aim transmitter eye of the SmartKey or
SmartKey with KEYLESS-GO* at the driver’s outside door handle (컄 page 251). The SmartKey or SmartKey with KEYLESS-GO* must be in close proxim- ity to the driver’s door handle.
왘 Press and hold button ‹ on the
SmartKey or SmartKey with KEYLESS-GO* until the windows and the roller sunblinds are completely closed.
왘 Release button ‹ on the SmartKey or SmartKey with KEYLESS-GO* to in- terrupt the closing procedure.
컄컄
253
Controls in detail Power windows
컄컄
Vehicles with KEYLESS-GO*: 왘 Press and hold the lock button on an outside door handle (컄 page 68) until the windows and the roller sunblinds are completely closed.
왘 Release the lock button on the outside
door handle to interrupt the closing procedure.
If tilt/sliding panel is open: 왘 Aim transmitter eye of the SmartKey or
SmartKey with KEYLESS-GO* at the driver’s outside door handle (컄 page 251). The SmartKey or SmartKey with KEYLESS-GO* must be in close proxim- ity to the driver’s door handle.
Vehicles with KEYLESS-GO*: 왘 Press and hold the lock button on an outside door handle (컄 page 68) until the windows and the tilt/sliding panel* are completely closed.
왘 Release the lock button on the outside
door handle to interrupt the closing procedure.
왘 Press and hold button ‹ on the
왘 With the windows and the tilt/sliding
panel completely closed, press and hold the lock button on an outside door handle (컄 page 68) once more. The roller sunblinds close.
SmartKey or SmartKey with KEYLESS-GO* until the windows and the tilt/sliding panel* are completely closed.
왘 Release button ‹ on the SmartKey or SmartKey with KEYLESS-GO* to in- terrupt the closing procedure.
왘 With the windows and the tilt/sliding
panel completely closed, press and hold button ‹ on the SmartKey or SmartKey with KEYLESS-GO* once more. The roller sunblinds close.
254
왔 Power tilt/sliding sunroof* Opening and closing
The tilt/sliding sunroof is opened and closed electrically. The switch for the tilt/sliding sunroof is located on the over- head control panel.
Controls in detail Power tilt/sliding sunroof*
With the sunroof closed or tilted open, a screen can be slid into the roof opening to guard against sun rays. When sliding the sunroof open, the screen will also retract.
Sunroof switch 1 Push back to slide sunroof open 2 Push forward to slide sunroof closed 3 Push up to raise sunroof at rear 4 Pull down to lower sunroof at rear
255
Controls in detail Power tilt/sliding sunroof*
Warning!
When closing the tilt/sliding sunroof, make sure that there is no danger of anyone being harmed by the closing procedure.
If the tilt/sliding sunroof encounters an ob- struction that blocks its path in a circum- stance where you are closing the tilt/sliding sunroof by moving the tilt/sliding sunroof switch past the resistance point, or by pressing and holding button ‹ on the SmartKey, by pressing and holding the lock button (vehicles with KEYLESS-GO*) on the door handle, the automatic reversal function will not operate.
The opening/closing procedure of the tilt/sliding sunroof can be immediately halt- ed by releasing the switch or, if the switch was moved past the resistance point and re- leased, by moving the switch in any direc- tion.
256
The tilt/sliding sunroof is made out of glass. In the event of an accident, the glass may shatter. This may result in an opening in the roof.
In a vehicle rollover, occupants not wearing their seat belts or not wearing them properly may be thrown out of the opening. Such an opening also presents a potential for injury for occupants wearing their seat belts prop- erly as entire body parts or portions of them may protrude from the passenger compart- ment.
When leaving the vehicle, always remove the SmartKey or SmartKey with KEYLESS-GO* from the starter switch, take it with you, and lock your vehicle. Do not leave children un- attended in the vehicle, or with access to an unlocked vehicle. Unsupervised use of vehi- cle equipment can cause an accident and/or serious personal injury.
To avoid damaging the seals, do not transport any objects with sharp edges which can stick out of the tilt/sliding sunroof. Do not open the tilt/sliding sunroof if there is snow or ice on the roof, as this could result in malfunctions. The tilt/sliding sunroof can be opened or closed manually should an electrical malfunction occur (컄 page 462).
You can also open or close the tilt/slid- ing sunroof using the SmartKey or the KEYLESS-GO* function, see “Summer opening feature” (컄 page 251) and “Convenience closing feature” (컄 page 252).
i Depending on the current position, the tilt/sliding sunroofs may also open or close when the air recirculation button Ä on the control panel of the climate control (컄 page 218) or auto- matic climate control (컄 page 232) is pressed and held.
왘 Switch on the ignition (컄 page 38).
Opening and closing 왘 To open, close, raise, or lower the
tilt/sliding sunroof, move the sunroof switch to the resistance point in the required direction of arrows 1 to 4 (컄 page 255).
왘 Release the sunroof switch when the tilt/sliding sunroof has reached the de- sired position.
Fully opening (Express-open) and clos- ing (Express-close) 왘 To fully open or close the tilt/sliding sunroof, move the switch past the re- sistance point in the required direction 1 or 2 (컄 page 255) and release. The tilt/sliding sunroof opens or closes completely.
Stopping the power tilt/sliding sunroof during Express-open 왘 Move the sunroof switch in any direc-
tion. The movement of the tilt/sliding sun- roof stops.
If the movement of the tilt/sliding sun- roof is blocked during the closing pro- cedure, the tilt/sliding sunroof will stop and reopen slightly.
Controls in detail Power tilt/sliding sunroof*
Warning!
If the tilt/sliding sunroof encounters an ob- struction that blocks its path in a circum- stance where you are closing the tilt/sliding sunroof by moving the tilt/sliding sunroof switch past the resistance point, or by pressing and holding button ‹ on the SmartKey, by pressing and holding the lock button (vehicles with KEYLESS-GO*) on the door handle, the automatic reversal function will not operate.
The opening/closing procedure of the tilt/sliding sunroof can be immediately halt- ed by releasing the switch or, if the switch was moved past the resistance point and re- leased, by moving the switch in any direc- tion.
257
왘 Reinsert the fuse in the main box. 왘 Switch on the ignition (컄 page 38). 왘 Press and hold the sunroof switch in
the direction of arrow 3 (컄 page 255) until the tilt/sliding sunroof is fully raised at the rear.
왘 Hold the sunroof switch in the direction
of arrow 3 for approximately 1 second.
왘 Open the tilt/sliding sunroof using the
Express-open feature (컄 page 257). If the tilt/sliding sunroof opens com- pletely, it is synchronized.
If the tilt/sliding sunroof does not open completely: 왘 Repeat the above steps.
Controls in detail Power tilt/sliding sunroof*
Synchronizing
The tilt/sliding sunroof must be synchronized 앫 after the battery has been disconnected or discharged
앫 after the tilt/sliding sunroof has been
closed manually (컄 page 462)
앫 after a malfunction 앫 if the tilt/sliding sunroof does not open
smoothly
왘 Remove the fuse securing the
tilt/sliding sunroof from the fuse box (컄 page 503).
For information on which fuse box con- tains the fuse for the power tilt/sliding sunroof, see the fuse chart provided with the vehicle tool kit (컄 page 455).
258
왔 Panorama roof with power tilt/sliding panel* Roller sunblinds for the panorama roof with power tilt/sliding panel
Controls in detail Panorama roof with power tilt/sliding panel*
왘 Switch on the ignition (컄 page 38). 왘 To open or close the roller sunblinds, move the roof panel switch to the resis- tance point in the required direction of arrow 1 or 2. Release the roof panel switch when the roller sunblinds have reached the de- sired position.
Warning!
When closing the roller sunblinds, make sure that no one is in danger of being injured by the closing procedure. The closing of the roller sunblinds can be immediately halted by releasing the switch.
The tilt/sliding panel and the front and rear roller sunblinds are opened and closed electrically. The switch for the tilt/sliding panel and the roller sunblinds is located on the overhead control panel. The roller sunblinds only operate with the tilt/sliding panel closed. The front and rear roller sunblind cannot be operated individ- ually.
Roof panel switch 1 Open roller sunblinds 2 Close roller sunblinds
Fully opening the roller sunblinds (Ex- press-open) 왘 Move the roof panel switch past the re- sistance point in direction of arrow 1 and release. The roller sunblinds opens completely.
Stopping the roller sunblinds during Express-operation 왘 Move the roof panel switch in any
direction.
259
Controls in detail Panorama roof with power tilt/sliding panel*
Opening and closing the panorama roof with power tilt/sliding panel
The tilt/sliding panel is opened and closed electrically. The switch for the tilt/sliding panel is on the overhead control panel. The tilt/sliding panel only operates with the roller sunblinds opened.
Roof panel switch 1 Push back to slide roof panel open 2 Push forward to slide roof panel closed 3 Push up to raise roof panel 4 Pull down to lower roof panel
260
Warning!
When opening or closing the tilt/sliding pan- el, make sure that there is no danger of any- one being harmed by the opening or closing procedure.
The opening procedure of the tilt/sliding panel can be immediately halted by releas- ing the switch or, if the switch was moved past the resistance point and released, by moving the switch in any direction.
The closing procedure of the tilt/sliding panel can be immediately halted by releas- ing the switch.
The panorama roof with power tilt/sliding panel is made out of glass. In the event of an accident, the glass may shatter. This may re- sult in an opening in the roof.
Controls in detail Panorama roof with power tilt/sliding panel*
In a vehicle rollover, occupants not wearing their seat belts or not wearing them properly may be thrown out of the opening. Such an opening also presents a potential for injury for occupants wearing their seat belts prop- erly as entire body parts or portions of them may protrude from the passenger compart- ment.
When leaving the vehicle, always remove the SmartKey or the SmartKey with KEYLESS-GO* from the starter switch, take it with you, and lock the vehicle. Do not leave children unattended in the vehicle, or with access to an unlocked vehicle. Unsu- pervised use of vehicle equipment can cause an accident and/or serious personal injury.
To avoid damaging the seals, do not transport any objects with sharp edges which can stick out of the tilt/sliding panel. Do not open the tilt/sliding panel if there is snow or ice on the roof, as this could result in malfunctions.
You can also open or close the tilt/slid- ing panel using the SmartKey or the KEYLESS-GO* function, see “Summer opening feature” (컄 page 251) and “Convenience closing feature” (컄 page 252).
The tilt/sliding panel may also open when using the air recirculation button Ä on the control panel of the climate control (컄 page 218) or auto- matic climate control (컄 page 232).
왘 Switch on the ignition (컄 page 38).
Opening 왘 Pull and hold the roof panel switch to
resistance point in direction of arrow 1 (컄 page 260). Release the roof panel switch when the tilt/sliding panel has reached the de- sired position.
Closing 왘 Press and hold the roof panel switch in
direction of arrow 2 (컄 page 260). Release the roof panel switch when the tilt/sliding panel has reached the de- sired position.
261
Controls in detail Panorama roof with power tilt/sliding panel*
Raising You can raise the tilt/sliding panel at the rear for better ventilation of the vehicle in- terior. 왘 Press and hold the roof panel switch in
direction of arrow 3 (컄 page 260). Release the roof panel switch when the tilt/sliding panel has reached the de- sired position.
Lowering 왘 Pull and hold the roof panel switch in direction of arrow 4 (컄 page 260) un- til the tilt/sliding panel has lowered and closed completely.
Fully opening (Express-open) the pan- orama roof with tilt/sliding panel 왘 Pull the roof panel switch past the
resistance point in direction of arrow 1 (컄 page 260) and release. The tilt/sliding panel opens complete- ly.
Stopping the panorama roof with tilt/sliding panel during Express-open 왘 Move the roof panel switch in any di-
rection. The tilt/sliding panel will stop in its cur- rent position.
Synchronizing the panorama roof with power tilt/sliding panel
The tilt/sliding panel and its roller sun- blinds must be synchronized 앫 after the battery has been disconnected or discharged
앫 after a malfunction 앫 if the tilt/sliding panel does not open
smoothly
Do not attempt to open or close the tilt/sliding panel before the tilt/sliding panel is properly synchronized. The tilt/sliding panel could otherwise lock-up in the open position. If the tilt/sliding panel cannot be closed or synchronized, see an autho- rized Mercedes-Benz Light Truck Center or call Roadside Assistance (컄 page 315).
262
Controls in detail Panorama roof with power tilt/sliding panel*
왘 Switch off the ignition (컄 page 38) and remove the SmartKey from the starter switch.
Vehicles with KEYLESS-GO*: 왘 Switch off the ignition (컄 page 39). 왘 Open the driver’s door (this puts the starter switch in position 0, same as with the SmartKey removed from the starter switch). The driver’s door then can be closed again.
왘 Remove the fuse securing the
tilt/sliding panel from the fuse box (컄 page 504).
For information on which fuse box con- tains the fuse for the power tilt/sliding panel, see the fuse chart provided with the vehicle tool kit (컄 page 455).
왘 Reinsert the fuse in the fuse box. 왘 Switch on the ignition (컄 page 38). 왘 Push and hold the roof panel switch in direction of arrow 2 (컄 page 260) un- til the roller sunblinds are fully closed. 왘 Keep holding the roof panel switch in direction of arrow 2 (컄 page 260) for approximately 1 second.
왘 Pull and hold the roof panel switch in direction of arrow 1 (컄 page 260) un- til the roller sunblinds are fully opened. 왘 Keep holding the roof panel switch in direction of arrow 1 (컄 page 260) for approximately 1 second.
왘 Press and hold the roof panel switch in direction of arrow 3 (컄 page 260) un- til the tilt/sliding panel is fully raised at the rear.
왘 Push and hold the roof panel switch in direction of arrow 2 (컄 page 260) un- til the tilt/sliding panel is fully closed. 왘 Keep holding the roof panel switch in direction of arrow 2 (컄 page 260) for approximately 1 second.
왘 Open the tilt/sliding panel using the Express-open feature (컄 page 262). If the tilt/sliding panel opens com- pletely, the roof is synchronized.
If the tilt/sliding sunroof does not open completely: 왘 Repeat the above steps.
263
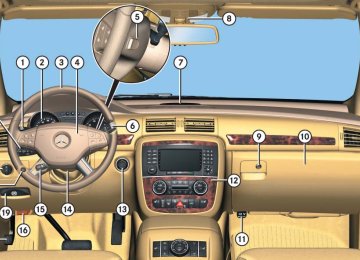
Controls in detail Driving systems
The driving systems of your vehicle are de- scribed on the following pages: 앫 Cruise control, with which the vehicle
can maintain a preset speed.
앫 Airmatic* adjusts the vehicle suspen- sion characteristics automatically and controls the vehicle level.
앫 Parktronic*, which serves as a parking
assistant.
For information on the BAS, ABS, EBP, 4-ETS and ESP® driving systems, see “Driv- ing safety systems” (컄 page 97).
Cruise control
The cruise control automatically maintains the speed you set for your vehicle. The use of cruise control is recommended for driving at a constant speed for extend- ed periods of time. You can set or resume cruise control at any speed above 20 mph (30 km/h). The cruise control function is operated by means of the cruise control lever. The cruise control lever is the uppermost lever on the left-hand side of the steering column (컄 page 22).
264
Warning!
The cruise control is a convenience system designed to assist the driver during vehicle operation. The driver is and must always remain responsible for the vehicle’s speed and for safe brake operation.
Only use the cruise control if the road, traffic and weather conditions make it advisable to travel at a steady speed. 앫 The use of cruise control can be danger- ous on winding roads or in heavy traffic because conditions do not allow safe driving at a steady speed.
앫 The use of cruise control can be danger- ous on slippery roads. Rapid changes in tire traction can result in wheel spin and loss of control.
앫 Deactivate the cruise control when driv-
ing in fog.
The “Resume” function should only be oper- ated if the driver is fully aware of the previ- ously set speed and wishes to resume this particular preset speed.
Warning!
The cruise control brakes automatically so that the set speed is not exceeded. The brake pedal is depressed automatically to do this.
Keep in mind that the cruise control is a con- venience system designed to assist the driv- er during vehicle operation. The driver is and must always remain responsible for the ve- hicle’s speed and for safe brake operation.
Keep driver’s foot area clear at all times, in- cluding the area under the brake pedal. Ob- jects stored in this area may impair pedal movement which could interfere with the braking ability of the cruise control system.
Do not place your foot under the brake pedal - your foot could become caught.
1 Setting current or higher speed Adjustment in 1 mph or 5 mph increments (Canada: 1 km/h or 10 km/h)
2 Setting current or lower speed Adjustment in 1 mph or 5 mph increments (Canada: 1 km/h or 10 km/h)
3 Canceling cruise control 4 Resuming to last set speed
Controls in detail Driving systems
Setting current speed 왘 Accelerate or decelerate to the desired
speed.
왘 Briefly lift 1 or depress 2 the cruise
control lever. The current speed is set.
왘 Remove your foot from the accelerator
pedal. The cruise control is activated.
The last set speed appears in the multi- function display for approximately 5 seconds.
On uphill grades, the cruise control may not be able to maintain the set speed. Once the grade eases, the set speed will be resumed. On downhill grades, the cruise control maintains the set speed with active braking action. In addition, on longer downhill grades the automatic trans- mission will automatically downshift.
265
Controls in detail Driving systems
Canceling cruise control There are several ways to cancel the cruise control: 왘 Step on the brake pedal.
The cruise control is canceled. The last speed set is stored for later use.
or 왘 Briefly push the cruise control lever in
direction of arrow 3 (컄 page 265). The cruise control is canceled. The last speed set is stored for later use.
The last stored speed is canceled when you turn off the engine.
266
Setting the automatic transmission to N while driving cancels the cruise control. However, the automatic trans- mission should not be set to N while driving except to coast when the vehi- cle is in danger of skidding (e.g. on icy roads).
Depressing the accelerator pedal does not deactivate the cruise control. After brief acceleration (e.g. for passing), the cruise control will resume the last speed set.
The cruise control switches off auto- matically when 앫 you step on the brake pedal 앫 you depress the parking brake
pedal
The cruise control also switches off au- tomatically when 앫 the vehicle speed is below 20 mph
(30 km/h)
앫 the ESP® is in operation or switched
off with the ESP® switch (컄 page 101)
앫 you set the automatic transmission
to N while driving
An acoustic warning sounds and the message Cruise control off appears in the multifunction display.
Controls in detail Driving systems
Setting a higher speed You can increase the speed in two stages.
Adjustment in 5 mph (Canada: 10 km/h) increments
Adjustment in 1 mph (Canada: 1 km/h) increments
Warning!
왘 Briefly lift the cruise control lever past
the resistance point in direction of arrow 1 (컄 page 265). The vehicle speed increases in incre- ments of 5 mph (Canada: 10 km/h).
The set value is increased in 1 mph (Canada: 1 km/h) increments each time you lift the cruise control lever to the resistance point.
왘 Lift the cruise control lever to the resis-
tance point in direction of arrow 1 (컄 page 265) and hold it up until the desired speed is reached.
왘 Release the cruise control lever.
The new speed is set.
You can increase the vehicle speed in 5 mph (Canada 10 km/h) increments. When using this feature, keep in mind that it may take a brief moment until the vehicle has reached the set speed.
Increase the vehicle speed to a value that the prevailing road conditions permit. Other- wise, sudden and unexpected acceleration of the vehicle could cause an accident and/or serious injury to you and others.
The set value is increased in 5 mph (Canada: 10 km/h) increments each time you lift the cruise control lever past the resistance point.
The new speed is set and the vehicle will accelerate. Keep in mind that it may take a brief moment until the vehi- cle has reached the set speed.
Setting a lower speed You can reduce the speed in two stages.
When you use the cruise control lever to decelerate, the brake system will au- tomatically brake the vehicle if the en- gine’s braking power does not brake the vehicle sufficiently.
267
왘 Briefly press the cruise control lever
down past the resistance point in direc- tion of arrow 2. The vehicle speed decreases in incre- ments of 5 mph (Canada: 10 km/h).
The new speed is set and the vehicle will decelerate. Keep in mind that it may take a brief moment until the vehi- cle has reached the set speed.
Controls in detail Driving systems
Adjustment in 1 mph (Canada: 1 km/h) increments
Adjustment in 5 mph (Canada: 10 km/h) increments
The set value is decreased in 1 mph (Canada: 1 km/h) increments each time you press the cruise control lever down to the resistance point.
왘 Press the cruise control lever down to
the resistance point in direction of arrow 2 (컄 page 265) and hold it down until the desired speed is reached.
왘 Release the cruise control lever.
The new speed is set.
Warning!
You can decrease the vehicle speed in 5 mph (Canada 10 km/h) increments. When using this feature, keep in mind that it may take a brief moment until the vehicle has reached the set speed.
Decelerate the vehicle speed to a value that the prevailing road conditions permit. Other- wise, sudden and unexpected deceleration of the vehicle could cause an accident and/or serious injury to you and others.
The set value is decreased in 5 mph (Canada: 10 km/h) increments each time you press the cruise control lever down past the resistance point.
268
Controls in detail Driving systems
Setting to last stored speed (“Resume” function)
Warning!
The speed stored in memory should only be set again if prevailing road conditions per- mit. Possible acceleration or deceleration differences arising from returning to the pre- set speed could cause an accident and/or serious injury to you and others.
AIRMATIC*
AIRMATIC lets you set a suspension tuning and automatically optimizes your vehicle’s damping behavior and regulates the vehicle level. The system consists of two components: 앫 Suspension tuning:
Adaptive Damping System (ADS)* (컄 page 269)
앫 Vehicle level control* (컄 page 270)
Adaptive Damping System (ADS)* The fine tuning of the damping is depen- dent on: 앫 road surface conditions 앫 your driving style 앫 your personal settings The ADS switch is located on the upper part of the center console.
왘 Briefly pull the cruise control lever in di-
rection of arrow 4 (컄 page 265). The cruise control resumes the last set speed.
왘 Remove your foot from the accelerator
pedal.
The last set speed appears in the multi- function display for approximately 5 seconds.
1 ADS switch 2 Indicator lamp for SPORT setting 3 Indicator lamp for COMF setting
269
Controls in detail Driving systems
The following settings are available: 앫 AUTO (for normal driving situations)
Indicator lamps 2 and 3 are off.
앫 SPORT (for sporty driving)
Indicator lamp 2 comes on.
앫 COMF (for comfort driving)
Indicator lamp 3 comes on. 왘 Start the engine (컄 page 53). 왘 Press ADS switch 1 repeatedly until
the desired suspension tuning is reached.
The setting is stored when you turn off the engine.
270
Vehicle level control* The vehicle level control automatically regulates the ride height to 앫 reduce fuel consumption 앫 improve driving safety
Changes to the vehicle level should be made while the vehicle is moving. The vehicle will then reach the set level as fast as possible.
The vehicle begins adjusting to the set vehicle level as soon as the doors or tail- gate are 앫 unlocked or 앫 opened or closed with the vehicle
unlocked
For major changes in vehicle level, the engine must be running.
Warning!
Make sure that no one is near the wheel housing or under the vehicle when you lower the vehicle while it is standing still. Limbs could become wedged into or under the vehicle.
For safety reasons, the vehicle can only be lowered with all doors and the tailgate closed. Lowering is interrupted if a door or the tailgate is opened and will continue after the door is closed again.
Warning!
Adapt your speed and driving to possible changed driving behavior of the vehicle after changing the vehicle level. The ESP® cannot prevent accidents, including those resulting from excessive speed. The ESP® cannot pre- vent the natural laws of physics from acting on the vehicle.
! Keep in mind that in rough or uneven roads, adjusting the vehicle to a lower level may cause the vehicle underbody to come in contact with the road and result in damage to the vehicle under- body. Always make sure the vehicle has sufficient ground clearance before adjusting it to a lower level.
Before jacking up the vehicle with equipment that lifts one or more of the wheels completely off the ground, remove the SmartKey from the starter switch.
Please also note the information in the section on towing (컄 page 499).
The activation threshold is defined by the set suspension tuning (컄 page 269).
The high-speed level is not available when towing a trailer.
Basic settings There are two setting from which to choose: 앫 Raised level, for driving on rough roads 앫 Highway level, for driving on paved
roads in fair or better condition
The third available level is the highspeed level that is set automatical- ly.
Controls in detail Driving systems
Compared to the highway level, the vehicle level changes by 앫 + 1.97 in (+ 50 mm) in raised level 앫 +/- 0 in (+ 0 mm) in highway level 앫 - 0.78 in (- 20 mm) in highspeed level The vehicle lowers to highspeed level auto- matically when 앫 the vehicles speed exceeds
70 mph (112 km/h)
앫 the vehicles speed is between
60 mph (96 km/h) and 70 mph (112 km/h) for longer than 20 seconds
Obey local speed limits. Use prudent driving speeds appropriate to prevail- ing conditions.
271
Controls in detail Driving systems
Raised level Only choose the raised level when the road conditions permit. Otherwise: 앫 Fuel consumption may increase. 앫 Handling characteristics of the vehicle
may be unfavorable.
You can select the raised level at vehi- cle speeds of up to 25 mph (40 km/h). At a higher vehicle speed, the message n Level selection not permitted appears in the multifunction display.
왘 Start the engine (컄 page 53).
272
The switch is located on the upper part of the center console.
When the raised level is reached, indicator lamp 2 comes on continuously and the following message appears in the multi- function display:
1 Vehicle level control switch 2 Indicator lamp If indicator lamp 2 is off: 왘 Press switch 1.
Indicator lamp 2 flashes. The vehicle adjusts to the raised level. The following message appears in the multifunction display while the level is being set:
The messages can be cleared by pressing button æ or ç on the multifunction steering wheel.
Highway level 왘 Close all doors and the tailgate. 왘 Start the engine (컄 page 53). The switch is located on the upper part of the center console.
1 Vehicle level control switch 2 Indicator lamp
Keep in mind that in rough or uneven roads, adjusting the vehicle to a lower level may cause the vehicle underbody to come in contact with the road and result in damage to the vehicle under- body. Always make sure the vehicle has sufficient ground clearance before adjusting it to a lower level.
If indicator lamp 2 is on: 왘 Press switch 1 (컄 page 272).
Indicator lamp 2 flashes. The vehicle adjusts to the highway level. The following message appears in the multifunction display while the level is being set:
Controls in detail Driving systems
When the highway level is reached, indica- tor lamp 2 goes out and the following message appears in the multifunction dis- play:
The messages can be cleared by pressing button æ or ç on the multifunction steering wheel.
The vehicle level is set to highway level automatically when the vehicle speed is exceeding 25 mph (40 km/h).
273
Controls in detail Driving systems
Parktronic* (Parking assist)
Warning!
Parktronic is a supplemental system. It is not intended to, nor does it replace, the need for extreme care. The responsibility during parking and other critical maneuvers always rests with the driver.
Special attention must be paid to objects with smooth surfaces or low silhouettes (e.g. trailer couplings, painted posts, or road curbs). Such objects may not be detected by the system and can damage the vehicle.
The operational function of the Parktronic system can be affected by dirty sensors, especially at times of snow and ice. See “Cleaning the Parktronic system sensors” (컄 page 399). Interference caused by other ultrasonic signals (e.g. working jackhammers, car wash, or the air brakes of trucks) can cause the system to send erratic indications, and should be taken into consideration.
274
Warning!
Make sure no persons or animals are in the area in which you are maneuvering. Other- wise you run the risk of causing injury.
The Parktronic system is an electronic aid designed to assist the driver during parking maneuvers. It visually and audibly indicates the relative distance between the vehicle and an obstacle. The Parktronic system is automatically activated when you switch on the ignition, release the parking brake, and set the automatic transmission to position D, R, or N. The Parktronic system deactivates at vehicle speeds exceeding approximately 11 mph (18 km/h). At lower vehicle speeds, the Parktronic system turns on again.
The Parktronic system also deactivates when you set the automatic transmission to position P or depress the parking brake pedal. The Parktronic system monitors the sur- roundings of your vehicle with six sensors in the front bumper and four sensors in the rear bumper.
1 Sensors in the front bumper
Range of the sensors To function properly, the sensors must be free of dirt, ice, snow and slush. Clean the sensors regularly, being careful not to scratch or damaging the sensors, see “Cleaning the Parktronic* system sensors” (컄 page 399).
Front sensors
Center Corners
approx. 40 in (100 cm) approx. 24 in (60 cm)
Rear sensors
Center Corners
approx. 48 in (120 cm) approx. 32 in (80 cm)
Controls in detail Driving systems
During parking maneuvers, pay special attention to objects located above or below the height of the sensors (e.g. planters or trailer hitches). The Parktronic system will not detect such objects at close range and dam- age to your vehicle or the object may result. Ultrasonic signals from outside sources (e.g. working jackhammers, car wash or the air brakes of trucks) may impair the operation of the Parktronic system.
275
Controls in detail Driving systems
Minimum distance
Center Corners
approx. 8 in (20 cm) approx. 6 in (15 cm)
If the system detects an obstacle in this range, all the distance warning segments illuminate and you hear a warning signal. If the obstacle is closer than the minimum distance, the actual distance may no longer be indicated by the system.
276
Warning indicators Visual signals indicate to the driver the rel- ative distance between the sensors and an obstacle. The warning indicator for the front area is located above the center air vents in the dashboard. The warning indi- cator for the rear area is located in the rear passenger compartment under the roof.
Each warning indicator is divided into five yellow and two red distance segments for either side of the vehicle. The Parktronic system is ready when the yellow readiness indicators 3 are illuminated. The current transmission position deter- mines which warning indicator will be activated.
Transmission position R or N
Warning indicator
Front area activated Front and rear area activated Neither activated
Front area warning indicator 1 Left side of the vehicle 2 Right side of the vehicle 3 Readiness indicators
As your vehicle approaches an object, one or more distance segments will illuminate, depending on the distance. When the seventh distance segment illuminates, you have reached the minimum distance. 앫 Front area: An intermittent acoustic
warning will sound as the first red distance segment illuminates and a constant acoustic warning lasting a maximum of 2 seconds will sound for the second red distance segment. The signal is canceled when the automatic transmission is set to position P or the parking brake is set.
앫 Rear area: An intermittent acoustic warning will sound as the first red distance segment illuminates and a constant acoustic warning lasting a maximum of 2 seconds will sound for the second red distance segment. The signal is canceled when the automatic transmission is set to position D, P, or the parking brake is set.
Switching the Parktronic system on/off You can switch off the Parktronic system manually. The Parktronic switch is located in the upper part of the center console.
1 Parktronic switch 2 Indicator lamp
Controls in detail Driving systems
Switching off the Parktronic system 왘 Press Parktronic switch 1. Indicator lamp 2 comes on.
Switching on the Parktronic system 왘 Press Parktronic switch 1 once more.
Indicator lamp 2 goes out.
The Parktronic system switches on automatically when you switch on the ignition (컄 page 38).
277
왘 Switch off the ignition (컄 page 38). 왘 Clean the Parktronic system sensors
(컄 page 399).
왘 Switch on the ignition (컄 page 38). or 왘 Check the Parktronic system operation at another location to rule out interfer- ence from outside radio or ultrasonic signals.
Controls in detail Driving systems
Parktronic system malfunction If only the red distance segments illumi- nate and an acoustic warning sounds, there is a malfunction in the Parktronic system. The Parktronic system will auto- matically switch off after 20 seconds and the indicator lamp in the Parktronic switch comes on. 왘 Have the Parktronic system checked by an authorized Mercedes-Benz Light Truck Center as soon as possible.
If only the red distance segments illumi- nate and no acoustic warning sounds, the Parktronic system sensors are dirty (e.g. slush, snow or ice) or there is an interfer- ence from other radio or ultrasonic signals (e.g. working jackhammers, car wash or the air brakes of trucks). The Parktronic system will automatically switch off after 20 seconds and the indicator lamp in the Parktronic switch comes on.
278
왔 Loading Roof rack*
Warning!
Only use the roof rack when the basic carri- er bars have been completely mounted. The left and right rails are only stabilized by means of the basic carriers being mounted.
Follow the manufacturer’s installation instructions. Otherwise, an improperly attached roof rack system or its load could become detached from the vehicle.
Do not exceed the maximum roof load of 220 lb (100 kg).
Take into consideration that when the roof rack is loaded, the handling characteristics are different from those when operating the vehicles without the roof rack loaded.
Use only those roof racks approved by Mercedes-Benz for your vehicle model. Follow manufacturer’s installation in- structions. The vehicle could otherwise be damaged. When loading the roof rack, make sure 앫 the tilt/sliding sunroof* (or
tilt/sliding panel*) can be com- pletely raised at the rear
앫 the tilt/sliding panel and the tail-
gate can be completely opened
Controls in detail Loading
1 Trim cover 왘 Flip roof trim covers 1 open. 왘 Attach the roof rack to the attachment
points under roof trim covers 1. Follow roof rack manufacturer’s instal- lation instructions.
For further information, inquire at your Mercedes-Benz Light Truck Center.
279
Controls in detail Loading
Loading instructions
Warning!
Always fasten items being carried as secure- ly as possible using cargo tie-down rings and fastening materials appropriate for the weight and size of the load.
In an accident, during hard braking or sud- den maneuvers, loose items will be thrown around inside the vehicle, and can cause in- jury to vehicle occupants unless the items are securely fastened in the vehicle.
To help avoid personal injury during a colli- sion or sudden maneuver, always use parti- tion net when transporting cargo.
Never drive vehicle with the tailgate open. Deadly carbon monoxide (CO) gases may enter vehicle interior resulting in uncon- sciousness and death.
280
The gross vehicle weight which is the weight of the vehicle including fuel, tools, spare wheel, installed accessories, pas- sengers, and luggage/cargo must never exceed the load limit and the Gross Vehicle Weight Rating (GVWR) for your vehicle as specified on the placard(s) located on the driver’s door B-pillar (컄 page 510). In addi- tion, the load must be distributed in such a way so that the weight on each axle never exceeds the Gross Axle Weight Rating (GAWR) for the front and rear axle. The GVWR and GAWR for your vehicle are indi- cated on the certification label which can be found on the driver’s door B-pillar (컄 page 510). For more information, see “Tire and Load- ing Information” (컄 page 357). The handling characteristics of a fully load- ed vehicle depend greatly on the load dis- tribution. It is therefore recommended to load the vehicle according to the illustra- tions shown, with the heaviest items being placed towards the front of the vehicle.
Please pay attention to and comply with the following instructions when loading the vehicle and transporting cargo: 앫 Always place items being carried
against front or rear seat backrests, and fasten them as securely as possi- ble.
앫 The heaviest portion of the cargo
should always be kept as low as possi- ble against front or rear seat backrests.
The cargo compartment is the pre- ferred place to carry objects. The expanded cargo compartment (컄 page 283) should only be used for items which do not fit in the cargo com- partment alone.
Cargo tie-down rings
Your vehicle is equipped with eight cargo tie-down rings. Carefully secure cargo by applying even load on all rings with rope of sufficient strength to hold down the cargo.
While the partition net* (컄 page 290) will help protect you from smaller ob- jects, it cannot prevent the movement of large, heavier objects into the pas- senger compartment in an accident. Such items must be properly secured using the cargo tie-down rings in the cargo compartment floor.
Controls in detail Loading
Cargo compartment Four cargo tie-down rings are located in the cargo compartment.
1 Cargo tie-down ring
281
Controls in detail Loading
Second seat-row Two cargo tie-down rings are located in the footwell behind the driver’s and passenger seat.
Third seat-row Two cargo tie-down rings are located in the footwell behind the second-row seats.
Hooks
Two hooks are located on the rear com- partment trim panels, one on each side.
1 Cargo tie-down ring
1 Cargo tie-down ring
1 Hook Use the hooks to secure light weight items only. The maximum permissible weight per hook is 9 lbs (4 kg).
282
Expanding cargo compartment
You can separately fold each seat of the rear passenger compartment to expand the cargo compartment.
Warning!
When expanding the cargo compartment, always fully fold the corresponding seats and always use the partition net (컄 page 290) when transporting cargo. Unless you are transporting cargo, the back- rests must remain properly locked in the up- right position.
In an accident, during hard braking or sud- den maneuvers, loose items will be thrown around inside the vehicle, and can cause injury to vehicle occupants unless the items are securely fastened in the vehicle.
Always use the cargo tie down rings (컄 page 281).
Controls in detail Loading
Warning!
Never drive vehicle with the tailgate open. Deadly carbon monoxide (CO) gases may enter vehicle interior resulting in uncon- sciousness and death.
Expanding cargo compartment in part
Folding third-row seats 왘 Push in the head restraints of the
third-row seats all the way (컄 page 139).
When the second-row seats are folded forward, the front seats may not be moved to the rearmost position. Other- wise you could damage the front and second-row seats.
1 Seat belt holder 2 Release handle 3 Seat backrest 왘 Remove cargo compartment cover blind* (컄 page 288), if so equipped. 왘 Place seat belt in seat belt holder 1.
컄컄
283
Controls in detail Loading
컄컄
왘 Pull release handle 2 on seat backrest
Expanding cargo compartment fully
Warning
Folded second-row seats are intended to serve as cargo compartment expansion in conjunction with folded third-row seats only. Do not fold the second-row seats and allow third-row seat occupants to use folded second-row seats as a footrest while driving. Third-row seat occupants must, like all vehi- cle occupants, keep both feet on the floor in front of their seat. Otherwise, occupants could slide under the seat belt in a collision. If occupants slide under it, the belt would apply force at the abdomen or neck. That could cause serious or even fatal injuries.
3 in direction of arrow. Seat backrest 3 is released.
왘 Move seat backrest 3 slightly for-
ward. Seat cushion 4 is released and folds forward automatically.
3 Seat backrest 4 Seat cushion 왘 Fold seat backrest 3 to a horizontal
position.
284
Do not fold the second-row seats and allow third-row seat occupants to use folded second-row seats as a table while driving. Objects placed on folded second-row seats may come loose during braking, vehicle ma- neuvers, or an accident and be thrown around in the vehicle interior. Objects thrown around in the vehicle interior may cause an accident and/or serious personal injury.
When folding the seats, it is important that you fold the second-row seats first, and then fold the third-row seats.
Controls in detail Loading
Folding second-row seats
When the second-row seats are folded forward, the front seats may not be moved to the rearmost position. Other- wise you could damage the front and second-row seats.
왘 Move the seat to be folded to its rear-
most position (컄 page 137).
왘 Remove the rear center console*, if so
equipped (컄 page 308).
The rear center console* can remain installed, if installed in the most for- ward position (컄 page 309). However, the cargo compartment floor will then not be an even plane.
왘 Remove the head restraint from the
second-row seat (컄 page 140).
왘 Place the head restraint on the seat
cushion. The guide bars must be facing forward.
왘 Push the head restraint against the
seat backrest in direction of the arrow.
1 Seat backrest 2 Seat cushion 3 Release lever
Make sure to remove the head restraint from the seat backrest and place it on the seat cushion as described before folding the seat. Otherwise, the seat or head restraint may be damaged.
컄컄
285
Controls in detail Loading
컄컄
왘 Pull release lever 3 past the resis-
tance point in direction of arrow as far as it will go. Seat backrest 1 is released.
왘 Fold seat backrest 1 forward until it fully rests on seat cushion 2 in a hori- zontal position.
왘 Push down on folded seat backrest 1
until it engages in position.
Folding third-row seats 왘 Push in the head restraints of the
third-row seats all the way (컄 page 139).
왘 Remove cargo compartment cover blind* (컄 page 288), if so equipped.
왘 Pull release handle 1 on seat backrest
2 in direction of arrow. Seat backrest 2 is released.
왘 Slowly move seat backrest 2 forward. Seat cushion 7 is released and folds forward automatically.
1 Seat belt holder 2 Release handle 3 Seat backrest 왘 Place seat belt in seat belt holder 1.
3 Seat backrest (third-row seat) 4 Recess (on second-row seat) 5 Guide pin 6 Seat backrest (second-row seat) 7 Seat cushion (third-row seat)
286
왘 Fold seat cushion 7 to a horizontal po-
sition. Guide pin 5 must engage in recess 4 of seat backrest 6.
The second-row seats must be in their rearmost position (컄 page 137).
왘 Fold seat backrest 3 to a horizontal
position.
Returning seats to their original position 왘 Carry out the steps described on (컄 page 283) to (컄 page 286) in reverse order.
왘 Make sure all seats are properly locked
in position.
Warning
Make sure all seats are properly locked in position before driving off. Do not drive with seats not properly locked.
Never ride in a moving vehicle with the seat not properly locked as this can be danger- ous. The seat could move forward and the seat backrest could fold. You could slide un- der the seat belt during braking, vehicle ma- neuvers, or in an accident. If you slide under it, the belt would apply force at the abdomen or neck. That could cause serious or even fa- tal injuries.
The seat backrest and seat belt provide the best restraint when the wearer is in a nearly upright position and the belt is properly po- sitioned on the body.
The second-row seats have red markings on the seat base that indicate when a second-row seat is not properly locked.
Controls in detail Loading
왘 When the red marking on a seat base is visible, push seat backrest back until the seat audibly engages. With the seat properly locked in posi- tion, you will not see the red marking on the seat base.
287
Controls in detail Loading
Cargo compartment cover blind*
The cargo compartment cover blind can be installed behind the third-row seats or the second-row seats.
With the cargo compartment cover blind installed, do not pile luggage high- er than the lower edges of the rear side windows.
The cargo compartment cover blind has two extensions which are connect- ed to the cargo compartment cover blind by cords. The cargo compartment cover blind must be extended for installation be- hind the second-row seats (컄 page 288).
288
Removing blind
Blind installed behind third-row seats 1 Handle 2 Mount
Rolling out blind 왘 Pull blind on handle 1 across the car-
go compartment.
왘 Guide blind into mounts 2 and re-
lease.
Rolling up blind 왘 Disengage blind and guide retraction
by its handle 1.
Blind installed behind second-row seats 1 Release button 2 Blind 왘 Roll the blind up. 왘 Push release button 1. 왘 Pull blind 2 to the left against the
spring pressure until the spring in the blind audibly engages.
왘 Remove the blind.
Installing blind 왘 For installation behind second-row seats, install the blind extensions (컄 page 289).
For installation behind third-row seats, the blind extensions must not be in- stalled. Otherwise, the blind could be damaged.
왘 Remove the covers from the mounts in
side rim.
왘 Place left side of blind 2 in left mount. 왘 Position right side of blind 2 over right
mount.
왘 Press release button 1 and guide
blind 2 into mount.
Controls in detail Loading
Extending blind
The cargo compartment cover blind has two extensions which are connect- ed to the cargo compartment cover blind by cords. The cargo compartment cover blind must be extended for installation be- hind the second-row seats.
왘 Position extension 2 over blind 1. Guide pins 4 must point directly at guidings 3.
왘 Turn extension 2 and blind 1 in op- posite directions as indicated by the ar- rows. Guide pins 4 must engage in guidings 3.
When not in use, you can attach the cover blind extensions to the cover blind.
1 Blind 2 Extension 3 Guidings 4 Guide pins
5 Extension guide rail 6 Mounting
컄컄
289
Controls in detail Loading
컄컄
왘 With the cargo compartment cover
Partition net*
installed behind third-row seats, insert extension guide rail 5 into mounting 6.
왘 Push extension into mounting 6 as far
as it will go.
Warning!
Make sure the partition net is properly en- gaged top and bottom position and the tight- ening belts are securely fastened.
Never use a damaged partition net.
To help avoid personal injury from smaller objects being thrown around in the occu- pant compartment during a collision or sud- den maneuver, always use partition net when transporting cargo.
The partition net cannot prevent the move- ment of large, heavier objects into the pas- senger compartment in an accident. Such items must be properly secured using the cargo tie-down rings in the cargo compart- ment floor (컄 page 281). Passenger use of seats behind installed par- tition net is restricted because of the foot- well being taken up by the net.
Use of the partition net is a particularly im- portant safety factor when the vehicle is loaded higher than the top of the seat backrests with smaller objects. The partition net can be installed in two lo- cations:
1 Holder in B-pillar 2 Holder in C-pillar 앫 With the cargo compartment expanded
in part (컄 page 283), use holders above C-pillars 2 and the cargo tie-down rings in the third-row footwell (컄 page 282).
290
앫 With the cargo compartment fully ex-
panded (컄 page 284), use holders above B-pillars 1 and the cargo tie-down rings in the second-row foot- well (컄 page 282).
왘 Open the zipper on the partition net
package.
왘 Roll out the partition net. 왘 Unfold the partition net.
The partition net bar must audibly en- gage.
Controls in detail Loading
Engaging partition net
Tightening partition net in second row
1 Holder 2 Mounting hook 왘 One after the other, engage mounting
hooks 2 in holder 1.
1 Tensioner 2 Hook 3 Tie-down ring 왘 Guide hook 2 towards tie-down
왘 Push mounting hooks 2 forward into
holder 1.
ring 3.
왘 Pull tensioner 1 down in direction of
arrow towards tie-down ring 3.
왘 Insert hook 2 in tie-down ring 3. 왘 Release tensioner 1.
291
Controls in detail Loading
Removing partition net 왘 Release tensioning of the strap by pull-
ing tensioner 1 down.
왘 Disengage hook 2 from tie-down
ring 3.
왘 Remove mounting hooks 2 from
holder 1, see “Engaging partition net” (컄 page 291).
왘 Roll up the partition net. 왘 Press the red button on the partition
net bar.
왘 Fold partition net bar. 왘 Roll up the partition net. 왘 Close zipper on partition net package.
292
Tightening partition net in third row
1 Hook 2 Tie-down ring 왘 Insert hook 1 in tie-down ring 2.
3 Partition net ring 4 Tensioner hook 5 Tensioner 왘 Pull tensioner 5 up in direction of ar-
row towards partition net ring 3.
왘 Insert tensioner hook 4 in partition
net ring 3 located at lower edge of the partition net.
왘 Release tensioner 1.
Removing partition net 왘 Release tensioning of the strap by pull-
ing tensioner 5 up.
왘 Disengage tensioner hook 4 from
partition net ring 3.
왘 Disengage hook 1 from tie-down
ring 2.
왘 Remove mounting hooks 2 from
holder 1, see “Engaging partition net” (컄 page 291).
왘 Roll up the partition net. 왘 Press the red button on the partition
net bar.
왘 Fold partition net bar. 왘 Roll up the partition net. 왘 Close zipper on partition net package.
Controls in detail Loading
293
Controls in detail Useful features
Storage compartments
Glove box/CD-changer*
Depending on vehicle equipment, a CD-changer* and an AUX-socket are located in the glove box.
Closing the glove box 왘 Push glove box lid up to close.
Releasing CD-changer*
Warning!
To help avoid personal injury during a colli- sion or sudden maneuver, exercise care when storing objects in the vehicle. Put lug- gage or cargo in the cargo compartment if possible. Do not pile luggage or cargo higher than the seat backs.
Always use partition net* when transporting cargo. Partition net* cannot secure hard or heavy objects.
Parcel nets cannot secure hard or heavy ob- jects.
Keep compartment lids closed. This will help to prevent stored objects from being thrown about and injuring vehicle occupants during 앫 braking 앫 vehicle maneuvers 앫 an accident
294
1 Glove box lid release 2 Glove box lid
Opening the glove box 왘 Pull lid release 1 in direction of arrow.
Glove box lid 2 opens downward.
1 Release button 2 CD-changer 3 AUX-socket 왘 Open the glove box. 왘 Press release button 1.
CD-changer 2 is released and swings down automatically.
For information on CD-changer operation, see separate Modular COMAND System operating instructions.
Closing CD-changer*
Locking and unlocking the glove box separately You can lock the glove box separately, e.g. when the vehicle is in the shop for service. 왘 Take the mechanical key out of the
SmartKey or SmartKey with KEYLESS-GO* (컄 page 459).
1 CD-changer 왘 Gently push CD-changer 1 up in direc-
tion of arrow until it engages.
For information on CD-changer operation, see separate Modular COMAND System operating instructions.
1 Unlocking glove box 2 Locking glove box
Controls in detail Useful features
왘 Insert mechanical key into glove box
lock.
왘 Turn mechanical key to position 2. 왘 Turn mechanical key to position 1 to
unlock the glove box.
The separate locking status of the glove box can be canceled by means of the mechanical key only.
295
Controls in detail Useful features
Storage compartment in front center console
1 Cover 2 Chrome label 왘 Tab lightly on chrome label 2 of
cover 1. Cover 1 swings open.
296
Additional storage compartment in front center console A storage compartment is located in front of the armrest in the front center console. The storage compartment also contains a power outlet (컄 page 306).
If your vehicle is equipped with a