- 2013 Mercedes-Benz C Class Owners Manuals
- Mercedes-Benz C Class Owners Manuals
- 2007 Mercedes-Benz C Class Owners Manuals
- Mercedes-Benz C Class Owners Manuals
- 2000 Mercedes-Benz C Class Owners Manuals
- Mercedes-Benz C Class Owners Manuals
- 1999 Mercedes-Benz C Class Owners Manuals
- Mercedes-Benz C Class Owners Manuals
- 2010 Mercedes-Benz C Class Owners Manuals
- Mercedes-Benz C Class Owners Manuals
- 2004 Mercedes-Benz C Class Owners Manuals
- Mercedes-Benz C Class Owners Manuals
- 2005 Mercedes-Benz C Class Owners Manuals
- Mercedes-Benz C Class Owners Manuals
- 2001 Mercedes-Benz C Class Owners Manuals
- Mercedes-Benz C Class Owners Manuals
- 2003 Mercedes-Benz C Class Owners Manuals
- Mercedes-Benz C Class Owners Manuals
- 2011 Mercedes-Benz C Class Owners Manuals
- Mercedes-Benz C Class Owners Manuals
- Download PDF Manual
-
CD mode
Safety precautions
i There are ten presets available. An existing entry is overwritten in the memory list when a new entry is given.
Calling up the ESN information menu 왘 Press INF soft key. 왘 Press ESN soft key.
The twelve-digit electronic serial number (ESN) of the SAT tuner* installed in your vehicle is displayed. 왘 Press RET soft key to exit the menu.
Warning!
The single CD player and the CD changer* are Class 1 laser products. There is a danger of invisible laser radiation if the housing is opened or damaged. Do not open the housing. The single CD player and the CD changer* do not contain any parts that can be serviced by the user. For safety reasons, have any service work which may be necessary performed only by qualified personnel.
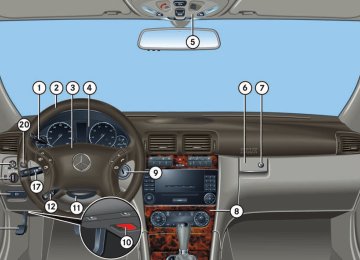
Controls in detail Audio system
Warning!
In order to avoid distraction which could lead to an accident, the driver should insert CDs with the vehicle at a standstill and operate the audio system only if permitted by road, weather and traffic conditions. Bear in mind that at a speed of just 30 mph (approximately 50 km/h), your car covers a distance of 44 feet (approximately 14 m) every second.
General notes The system may not be able to play audio CDs with copy protection. Playing copied CDs may cause malfunctions during playback.
! If you affix stickers to the CDs, they can be- come warped due to the heat that develops in the CD drive or CD changer*. In certain situations, the CDs can then no longer be ejected and cause damage to the drive. Such damage is not covered by the Mercedes-Benz Limited Warranty.
201
Controls in detail Audio system
! Your CD drive or CD changer* has been de- signed to play CDs which correspond to the EN 60908 standard. You can therefore only use CDs with a maximum thickness of 1.3 mm. If you insert thicker data carriers, e.g. ones that have data on both sides (one side with DVD data, the other side with audio data), they cannot be ejected and will damage the drive.
Do not use CDs with an 8 cm diameter, not even with a CD adapter. Attempting to play CDs with an 8 cm diameter or playing such CDs with an adapter may cause damage to the CD drive. Such damage is not covered by the Mercedes-Benz Limited Warranty. Should excessively high or low tempera- tures occur while in CD changer mode*, CD ERROR will appear in the display, and the CD will be muted until the temperature has reached an acceptable level for the system to continue operation. The single CD player play audio CDs, the CD changer* can play audio CDs as well as CDs with MP3 files.
Tips on handling CDs 앫 Handle CDs carefully to prevent
interference during playback.
앫 Avoid scratches, fingerprints and dust
on the CDs.
앫 Do not write on CDs or apply any labels
or other material to them.
앫 Clean CDs from time to time with a
commercially available cleaning cloth. Never wipe the CD in a circular motion; instead, wipe it in a straight line start- ing in the center and moving outward. Do not use solvents, anti-static sprays, etc. for cleaning.
앫 Replace the CD in its case after use. 앫 Protect CDs from heat and direct
sunlight.
MP3 notes The CD changer* can play audio CDs as well as CDs with MP3 files.
Information on MP3 data carriers
i CD media, CD burning software and CD writers are available in great variety. Due to this variety, it cannot be guaranteed that the CD changer will be able to play every user-written CD. The burning process can lead to data errors and aging of the medium may result in data loss. Therefore, the CD changer may be restricted in its ability to play MP3 data carriers; it may play them with reduced sound quality, or it may not be able to play them at all. Problems may be encountered during playback of user-written CDs with a storage capacity of more than 700 MB. These CDs do not meet valid standards as of this printing.
Compatible MP3 data carriers The CD changer can read the following data carriers in MP3 mode: 앫 CD-DA 앫 CD-R 앫 CD-RW
202
Compatible file systems and compres- sion methods Use Romeo or Joliet. Depending on file for- mat used, up to 128 characters are possi- ble. The following compression methods are compatible: 앫 MP3
앫 WMA 앫 WAVControls in detail Audio system
Information on copyright The music tracks that you create for use in MP3 mode or that you play in MP3 mode are subject to copyright laws under appli- cable international and national regula- tions. In many countries, the reproduction of copyrighted materials is not permitted, even if only for personal use, without the express prior consent of the copyright holder. Please check the current copyright laws for your country and comply with them. These restrictions do not apply, for exam- ple, to your own compositions and record- ings, or for recordings for which authorization has been obtained from the copyright holder.
Compatible bit and sampling rates Fixed and variable bit rates of up to 320 kBit/s are possible. The following table lists possible sampling rates:
MPEG1 Audio Layer3
MPEG2 Audio Layer3
MPEG2.5 Audio Layer3
WMA44.1 KHz, 48 KHz, 32 KHZ 22.5 KHz, 24 KHz, 16 KHz 11.025 KHz, 12 KHz, 8 KHz 32 KHz, 44.1 KHz, 48 KHz
i Only use MP3 tracks with a bit rate of 128 kBit/s or higher and with the specified sampling rates. The use of rates other than those specified may lead to noticeably inferior sound quality.
203
Controls in detail Audio system
MP3 playback You can play an MP3 CD on the CD changer* as you would any standard audio CD. All of the functions described for the CD changer also apply for the playback of MP3 CDs. Keep in mind that the single CD player in the audio system unit is not able to read MP3 CDs. The first 99 tracks on the CD, including tracks in subdirectories, are recognized and played. Any additional tracks will not be played.
i Due to the branched data structure, play- back of the first track may be delayed slightly.
Operating the single CD player in the audio system unit
Loading a CD The single CD player in the audio system unit has capacity for one CD. The CD slot for loading the drive is located underneath the soft keys.
i Keep in mind that the single CD player in the audio system unit is not able to play CDs with MP3 files. 왘 Make sure the system is switched on. 왘 Insert CD into CD slot. The label side of
the CD must face upwards. The system automatically pulls the CD into the CD slot. The audio CD begins to play.
! If a CD is already loaded, it must be ejected before inserting a new CD. Inserting a second CD in the slot with another CD still loaded will cause damage to the CD drive not covered by the Mercedes-Benz Limited Warranty.
i If a CD has been inserted incorrectly or can- not be read, WRONG CD ERROR will appear in the display.
Ejecting a CD 왘 Make sure the system is switched on. 왘 Press EJECT button.
The system ejects the CD. NO CD will appear in the display.
왘 Remove CD from slot.
i If you do not take the CD out of the CD slot within approx. 15 seconds, the system automat- ically pulls the CD back in and plays it. If a CD is pulled back in, press EJECT button for 5 seconds; the CD will then be ejected.
Operational readiness of CD changer* If a CD changer* has been installed in the vehicle, it can be operated from the front control panel of the audio system. A loaded magazine must be installed to play CDs. The CD changer* is located in the glove box.
Loading/unloading the CD magazine
i The CD changer* may not be able to play au- dio CDs with copy protection. 왘 Slide changer door to the right and
press g button.
왘 Magazine will be ejected.
204
Controls in detail Audio system
왘 Push magazine into CD changer* 2 in
direction of arrow and close sliding door.
After the last track on a CD has finished, the next CD is automatically played.
Playing CDs
Single CD player in the audio unit 왘 Press i button.
CD 0 will appear in the upper left-hand corner of the display.
The CD will resume playback at the point where it was switched off.
CD changer* 왘 Press Q button.
Playing tracks You have the following options: 앫 Audio system with CD changer*:
selecting CDs
앫 Direct track entry 앫 Track skip forward/reverse 앫 Fast forward/reverse 앫 Scan 앫 Random tracks 앫 Repeat track
1 CD 2 CD changer 3 CD tray 4 CD magazine 왘 Remove magazine 4 and pull
CD tray 3 fully out.
왘 Place CD 1 in recess of tray, label side
up.
왘 Push tray into magazine in direction of
arrow.
i CDs which have been inserted improperly or are unreadable will not be played.
CD and the selected magazine slot number appear in the upper left-hand corner of the display.
If you have not removed a CD since the last time the CD audio source was activated, the last CD listened to will begin to play at the point where it was switched off.
205
Controls in detail Audio system
Selecting CDs in the audio unit with CD changer*
Direct track entry
Skipping tracks forward/backward 앫 Skipping tracks forward
왘 Press S button briefly.
The next track will be played.
앫 Skipping tracks backward
왘 Press T button briefly.
You can make a direct selection from among the tracks on a CD. 왘 Press * button. 왘 Enter track number using buttons 1
to R. The number of the track being played appears next to TRACK in the display. You can only enter available track numbers.
If the track has been playing for more than 10 seconds, the unit skips back to the beginning of the track currently playing. If less than 10 seconds have been played, the unit skips back to the beginning of the previous track.
Pressing the T or S button repeatedly will result in multiple tracks being skipped.
왘 You can select from among the
inserted CDs with buttons R to 6. R = CD player in the audio unit 1 to 6 = CDs in the CD changer* The magazine slot number of the selected CD appears next to CD in the display, and the number of the currently played track appears next to TRACK.
i If there is no CD in the selected magazine slot, NO CD appears in the display with the cor- responding slot number.
206
Controls in detail Audio system
Random play The random function (RDM) plays the tracks of the current CD in random order.
Repeat The track being played is repeated until the repeat function is switched off.
i When you start the RDM function, the RPT function is automatically switched off. 앫 Switching on random 왘 Press RDM soft key.
RDM appears in the display. A randomly selected track is played.
앫 Switching off random
왘 Press RDM soft key again.
i When you start the RPT function, the RDM function is automatically switched off. 앫 Switching on repeat
왘 Press RPT soft key.
RPT appears in the display.
앫 Switching off repeat
왘 Press RPT soft key again.
Fast forward/reverse 앫 Fast forward
왘 Press and hold S button until desired point has been reached.
앫 Reverse
왘 Press and hold T button until desired point has been reached.
i The track number and the relative time of the track is shown in the display during the search.
Scan 앫 Starting scan
왘 Press SC soft key.
SC will appear in the display. Each track on the current CD will be played for approx. 8 seconds in as- cending order.
앫 Ending scan
왘 Press SC soft key or T or S.
207
Controls in detail Audio system
Pause function The CD changer mode is interrupted by an incoming call on the telephone* (컄 page 212). 앫 Switching on pause function
Track and time display
GSM network phones
Using your Mercedes-Benz specified mobile telephone*, a number of functions and operating steps can be performed and displayed in the audio system display. Further operating instructions not covered here can be found in the operating instruc- tions for the multifunction steering wheel and the cellular telephone*. If your audio system is set up for telephone operation, the t symbol will appear in the display. When you insert your Mercedes-Benz specified mobile telephone* into the telephone cradle, you will be prompted to enter your PIN for 30 seconds (컄 page 209). This display disappears when you press any button. When your mobile telephone is inserted into the telephone cradle, you will see the reception strength in the upper right-hand corner of the display.
왘 Press T soft key.
The number of the track being played and the elapsed playing time appear in the display.
왘 Press U button.
왘 Press T soft key again.
The CD changer mode is interrupted and PAUSE appears in the display.
The total number of tracks and the total playing time of the CD appear in the display.
앫 Switching off pause function
왘 Press T soft key.
왘 Press U button.
The CD changer mode is active again.
The standard CD playback menu appears in the display.
208
Switching on the telephone
PIN entry
Switching on the telephone 왘 Press h button.
If the telephone was previously switched off, PROCESSING appears in the display and you will then be prompted to enter your PIN.
Switching off the telephone 왘 Press h button for approx.
3 seconds. PROCESSING appears in the display until the telephone is off. Afterward, PHONE OFF appears in the display.
왘 Enter PIN number using buttons 1
to R.
왘 If necessary, correct number entered with the CLR soft key. Press soft key briefly to delete the last digit entered; press soft key and hold to delete the complete number.
왘 Press OK soft key after entering correct
PIN.
왘 READY or ROAMING will appear in the
display.
Controls in detail Audio system
i If the PIN is entered incorrectly three times, NEED PUK will appear in the display. Enter PUK via your telephone. Please refer to the separate telephone operating instructions for more information.
Adjusting the volume 왘 Turn rotary control of N button
during a telephone call. The volume will increase or decrease depending on the direction turned.
i The volume can be adjusted separately for telephone mode and audio mode.
Adjusting sound 왘 Adjust sound during a telephone call.
Sound adjustment (컄 page 191).
209
Controls in detail Audio system
Placing a call
Entering a telephone number and starting the dialing process
왘 Enter desired telephone number using
buttons 1 to R. The number can have up to 32 digits, but only twelve of these are visible in the display.
왘 If necessary, correct number entered with the CLR soft key. Press soft key briefly to delete the last digit entered; press soft key and hold to delete the complete number.
왘 After correct telephone number has
been entered, press s button.
210
i If the telephone number has been saved to- gether with a name in the telephone book, the name will appear in the display.
Phone book The numbers stored in the phone book of the telephone can be called up either by name or number. In addition, incoming calls are stored in the phone book.
i This is only possible, however, when the call information transmitted includes the number of the person calling. If the telephone number is not transmitted, NO NUMBER will be stored in the phone book. 앫 Searching and calling up telephone
book entries by name You can access your mobile telephone’s phone book using the audio system. You can access both the main entries and the sub-entries of your phone book.
왘 Press MEM soft key or press
button ‚ or ƒ.
왘 Press desired numerical key 2
to 9. The stored entries are selected according to the alphabetical order of the initial letters (e.g. for S -Smith, press button 7 four times).
or
왘 Press and hold button ‚
or ƒ. The system jumps from one initial letter to the next in ascending or descending order.
Controls in detail Audio system
왘 When you have selected a number,
왘 Press MEM soft key or press
press s button. The call will be made.
앫 Viewing the telephone number of a
telephone book entry 왘 Search for desired entry. 왘 Press NUM soft key.
The telephone number of the phone book entry appears in the display.
앫 Returning calls received
button ‚ or ƒ.
왘 Press RCV soft key (received calls). The number of received calls and then the call last received appear briefly in the display.
왘 Select desired telephone number
with button ‚ or ƒ. The letter R and the number of the memory position appear in the upper left-hand corner of the display. The numbers are stored in the order of the calls received.
왘 When you have selected a number,
press s button. The call will be made.
왘 Press and hold button ‚
or ƒ until desired initial letter has been reached.
or
왘 Press button ‚ or ƒ
repeatedly until desired entry has been reached. The stored entries are selected in alphabetical order with the sub-entries.
i Several sub-entries can be stored for each main entry (name). These entries are marked by a corresponding abbreviation that appears in the upper left-hand corner of the display. The following abbreviations for sub-entries are possi- ble: CEL = Mobile phone HOM = Home WOR = Work FAX = Fax PAG = Pager TEL = Main
211
Controls in detail Audio system
앫 Speed dial
If you have stored telephone numbers as speed dial numbers in your telephone, you can also enter these with buttons 1 to R on the radio head unit. 왘 Press desired button 1 to R
briefly.
왘 Press s button.
The call will be made.
앫 Turbo dial
If you have stored telephone numbers as turbo dial numbers in your telephone, you can also enter these with buttons 1 to R on the radio head unit. 왘 Press desired button 1 to R
until the call is made.
212
Redial If the number you have dialed is busy, you can again place calls to the last ten telephone numbers dialed using the redial function.
i If you have activated the automatic redial function on your telephone, the number of the person being called is automatically redialed af- ter a short waiting period if there is a busy signal. Refer to the separate operating instructions for the mobile telephone. 앫 Manual redial
왘 Press s button.
The telephone number last dialed will appear in the display.
왘 Select desired telephone number
with button ‚ or ƒ.
The letter L and the number of the memory position appears in the left-hand corner of the display. The numbers are stored in the order of the calls received.
왘 When you have selected a number,
press s button. The call will be made.
Accepting an incoming call If the telephone is active in the background (reception symbol is visible in the display), the audio source is muted when an incom- ing call is received. A ringing tone can be heard and the caller’s telephone number, or the name under which the telephone number has been saved in the phone book, appears in the display. If the caller’s number is not transmitted with the call, CALL will appear in the display. 왘 Press s button. The call is accepted.
Muting a call It is possible to mute a call; the caller is then no longer able to hear you. 앫 Mute on
왘 Press MUT soft key. 왘 MIC MUTE will appear in the display.
앫 Mute off
왘 Press MUT soft key again.
Talking with two callers at the same time If you wish to receive or place another call during an already active call, you can accept or place the second call and switch between the callers or combine them into one call. Note that the features described here are depending on availability from your mobile phone service provider. 앫 Placing/accepting a second call
Terminating a call 왘 Press t button.
The current call is terminated and the muted audio source becomes active again.
왘 Place new call by entering
telephone number manually.
왘 Press s button.
You are connected to the second caller; the first caller is kept on hold.
or
왘 Press s button to accept a
second call.
i You will be notified of the second call acous- tically, but you will not see this in the display.
Controls in detail Audio system
You are connected with the second caller; the first caller is kept on hold.
앫 Switching between calls
왘 Press 2 and s buttons.
This switches between the calls. The non-active call is kept on hold.
앫 Terminating a call
왘 Press t button.
The current call is terminated. You are again connected with the caller previously placed on hold.
앫 Combining two calls
왘 Press 3 and s buttons.
The calls are combined into one call.
앫 Terminating a combined call
왘 Press t button.
The connection to both callers is terminated.
213
Controls in detail Audio system
TDMA or CDMA network phones
Switching on the telephone
Switching on the telephone 왘 Press h button.
If you have programmed an unlock code for the telephone, you must now enter the code.
왘 Enter code using buttons 1
to R.
왘 If necessary, correct number entered with the CLR soft key. Press soft key briefly to delete the last digit entered; press soft key and hold to delete the complete number.
Using your Mercedes-Benz specified mobile telephone*, a number of functions and operating steps can be performed and displayed in the audio system display. Further operating instructions not covered here can be found in the operating instruc- tions for the multifunction steering wheel and the mobile telephone*. If your audio system is set up for telephone operation, the t symbol will appear in the display. When you insert your Mercedes-Benz specified mobile telephone* into the telephone cradle, you will be prompted to enter your PIN for 30 seconds (컄 page 209). This display disappears when you press any button. When your mobile telephone is inserted into the telephone cradle, you will see the reception strength in the upper right-hand corner of the display.
214
왘 Press OK soft key after entering correct
code. The telephone is unlocked. If you have entered an incorrect code, you must enter the correct code.
Switching off the telephone 왘 Press h button for approx.
3 seconds. PROCESSING appears in the display until the telephone is off. Afterward, PHONE OFF appears in the display.
Adjusting the volume 왘 Turn rotary control of N button
during a telephone call. The volume will increase or decrease depending on the direction turned.
i The volume can be adjusted separately for telephone mode and audio mode.
Adjusting sound 왘 Adjust sound during a telephone call.
Sound adjustment (컄 page 191).
Placing a call
Entering a telephone number and starting the dialing process
왘 Enter desired telephone number using
buttons 1 to R. The number can have up to 32 digits, but only twelve of these are visible in the display.
왘 If necessary, correct number entered with the CLR soft key. Press soft key briefly to delete the last digit entered; press soft key and hold to delete the complete number.
왘 After correct telephone number has
been entered, press s button.
i If the telephone number has been saved to- gether with a name in the phone book, the name will appear in the display.
Phone book The numbers stored in the phone book of the mobile telephone can be called up either by name or number. In addition, incoming calls are stored in the phone book.
i This is only possible, however, when the call information transmitted includes the number of the person calling. If the telephone number is not transmitted, NO NUMBER will be stored in the phone book. 앫 Searching and calling up phone book
or
entries by name
Controls in detail Audio system
You can access your mobile telephone’s phone book with the audio system. You can access both the main entries and the sub-entries of your phone book.
왘 Press MEM soft key or press
button ‚ or ƒ.
왘 Press desired numerical key 2
to 9. The stored entries are selected according to the alphabetical order of the initial letters (e.g. for S -Schneider, press button 7 four times).
컄컄
215
Controls in detail Audio system
컄컄
왘 Press and hold button ‚
or ƒ. The system jumps from one initial letter to the next in ascending or descending order.
왘 Press and hold button ‚
or ƒ until desired initial letter has been reached.
or
왘 Press button ‚ or ƒ
repeatedly until desired entry has been reached. The stored entries are selected in alphabetical order with the sub-entries.
216
i Several sub-entries can be stored for each main entry (name). These entries are marked by a corresponding abbreviation that appears in the upper left-hand corner of the display. The following abbreviations for sub-entries are possi- ble: CEL = Mobile phone HOM = Home WOR = Work FAX = Fax PAG = Pager TEL = Main
왘 When you have selected a number,
press s button. The call will be made.
앫 Viewing the telephone number of a
phone book entry 왘 Search for desired entry. 왘 Press NUM soft key.
The telephone number of the phone book entry appears in the display.
앫 Returning calls received
왘 Press MEM soft key or press
button ‚ or ƒ.
왘 Press RCV soft key (received calls). The number of received calls and then the call last received appear briefly in the display.
왘 Select desired telephone number
with button ‚ or ƒ. The letter R and the number of the memory position appear in the upper left-hand corner of the display. The numbers are stored in the order of the calls received.
왘 When you have selected a number,
press s button. The call will be made.
앫 Speed dial
If you have stored telephone numbers as speed dial numbers in your telephone, you can also enter these with buttons 1 to R on the radio unit. 왘 Press desired button 1 to R
briefly.
왘 Press s button.
The call will be made.
앫 Turbo dial
If you have stored telephone numbers as turbo dial numbers in your telephone, you can also enter these with buttons 1 to R on the radio unit. 왘 Press desired button 1 to R
until the call is made.
Redial If the number you have dialed is busy, you can again place calls to the last ten telephone numbers dialed using the redial function.
i If you have activated the automatic redial function on your mobile telephone, the number of the person being called is automatically redi- aled after a short waiting period if there is a busy signal. Refer to the separate operating instructions for the mobile telephone. 앫 Manual redial
왘 Press s button.
The telephone number last dialed will appear in the display.
Controls in detail Audio system
왘 Select desired telephone number
with button ‚ or ƒ. The letter L and the number of the memory position appears in the left-hand corner of the display. The numbers are stored in the order of the calls received.
왘 When you have selected a number,
press s button. The call will be made.
Accepting an incoming call If the telephone is active in the background (reception symbol is visible in the display), the audio source is muted when an incom- ing call is received. A ringing tone can be heard and the caller’s telephone number, or the name under which the telephone number has been saved in the telephone book, appears in the display. If the caller’s number is not relayed, CALL will appear in the display. 왘 Press s button. The call is accepted.
217
Controls in detail Audio system
Muting a call It is possible to mute a call; the caller is then no longer able to hear you. 앫 Mute on
왘 Press MUT soft key. 왘 MIC MUTE will appear in the display.
앫 Mute off
왘 Press MUT soft key again.
Terminating a call 왘 Press t button.
The current call is terminated and the muted audio source becomes active again.
218
Accepting a second incoming call If you receive another call during an already active call, you can accept the second call and switch between the two. 앫 Accepting a second call
왘 Place new call by entering
telephone number manually.
i You will be notified of the second call acous- tically, but you will not see this in the display.
You are connected to the second caller; the first caller is kept on hold.
앫 Switching between calls 왘 Press s button.
This switches between the calls. The non-active call is kept on hold.
앫 Terminating a call
왘 Press t button.
The current call is terminated. The connection to the caller previously kept on hold is also interrupted; however, reconnection is indicated by an acoustic signal.
Placing a second call If you wish to place another call during an already active call, you can place the second call and switch between the callers or combine them into one call. Note that this feature is dependent on availability from your mobile phone service provider. 앫 Placing a second call
왘 Place a new call by entering telephone number manually.
왘 Press s button.
You are connected to the second caller; the first caller is kept on hold.
앫 Terminating a call
왘 Press t button.
The current call is terminated. The connection to the caller previously kept on hold is also interrupted; however, reconnection is indicated by an acoustic signal.
앫 Combining two calls
왘 Press s button.
The calls are combined into one call.
앫 Terminating a combined call
왘 Press t button.
The connection to both callers is terminated.
Emergency calls “911”
The following describes how to dial a “911” emergency call using the audio system head unit when a Mercedes-Benz specified mobile phone* is inserted in the phone cradle*. Unless otherwise specified, the descriptions refer to the audio system head unit. Consult the separate telephone operating instructions that came with your mobile phone* for information on how to place a “911” emergency call on the mobile phone*.
Warning!
The “911” emergency call system is a public service. Using it without due cause is a crim- inal offense.
Controls in detail Audio system
The following conditions must be met for a “911” emergency call: 앫 Telephone must be switched on. 앫 The corresponding mobile communica-
tions network must be available.
i Emergency calls may not be possible with all telephone networks or if certain network servic- es and/or telephone functions are active. Check with your local service providers.
If you cannot make an emergency call, you will have to initiate rescue measures yourself.
GSM network phones
Placing a “911” emergency call using audio head unit with the phone locked 왘 Press h button to switch to
telephone operation. PIN? appears in the audio display.
왘 Enter 911 using the number keypad on
the audio head unit.
219
컄컄
Controls in detail Audio system
컄컄
왘 Press OK soft key or s button for
dialing to begin. DIALING appears in the audio display while the telephone establishes the connection.
왘 Wait until the emergency call center
answers, then describe the emergency.
Placing a “911” emergency call using audio head unit with the phone unlocked 왘 Press h button to switch to
telephone operation.
왘 Enter 911 using the number keypad on
the audio head unit.
왘 Press s button for dialing to begin. DIALING appears in the audio display while the telephone establishes the connection.
왘 Wait until the emergency call center
answers, then describe the emergency.
i If no SIM card is in the mobile phone, NO SERVICE appears in the audio display. In that case, you only can make an emergency call on the mobile phone itself, without the use of the head unit.
TDMA/CDMA network phones
Placing a “911” emergency call using audio head unit with the phone locked 왘 Press h button to switch to
telephone operation. CODE? appears in the audio display.
왘 Enter 911 using the number keypad on
the audio head unit.
왘 Press OK soft key or s button for
dialing to begin. DIALING appears in the audio display while the telephone establishes the connection.
왘 Wait until the emergency call center
answers, then describe the emergency.
220
Placing a “911” emergency call using audio head unit with the phone unlocked 왘 Press h button to switch to
telephone operation.
왘 Enter 911 using the number keypad on
the audio head unit.
왘 Press s button for dialing to begin.
DIALING appears in the audio display while the telephone establishes the connection.
왘 Wait until the emergency call center
answers, then describe the emergency.
왔 Power windows Opening and closing the windows
The side windows are opened and closed electrically. The switches for all the side windows are on the driver’s door. The switches for the respective windows are on the front passenger door and the rear doors.
1 Left front window 2 Right front window 3 Right rear window 4 Left rear window 5 Rear window override switch
(컄 page 80)
Warning!
When closing the power windows, make sure there is no danger of anyone being harmed by the closing procedure.
The closing of the door windows can be im- mediately halted by releasing the switch or, if switch was pulled past the resistance point and released, by either pressing or pulling the respective switch.
If the window encounters an obstruction that blocks its path in a circumstance where you pulled the switch past the resistance point and released it to close the window, the automatic reversal function will stop the window and open it slightly.
If the window encounters an obstruction that blocks its path in a circumstance where you are closing the window by pulling and holding the switch, by pressing and holding button ‹ on the SmartKey, or by press- ing and holding button , or e on the climate control panel, the automatic rever- sal function will not operate.
Controls in detail Power windows
When leaving the vehicle, always remove the SmartKey from the starter switch, take it with you, and lock the vehicle. Do not leave children unattended in the vehicle, or with access to an unlocked vehicle. A child’s unsupervised access to a vehicle could result in an accident and/or serious personal injury.
i You can also open or close the power win- dows using the SmartKey, see “Summer opening feature” (컄 page 223) and “Convenience clos- ing feature” (컄 page 223). Depending on current position, the windows may also open or close when the air recirculation button , in the control panel of the climate control (컄 page 165) or automatic climate control* (Canada only) (컄 page 175), or the charcoal filter button e in the control panel of the automatic climate control* (Canada only) (컄 page 183) is pressed and held. 왘 Switch on the ignition (컄 page 32).
221
Controls in detail Power windows
Opening the windows 왘 Press switch 1 to 4 to the resistance
point. The corresponding window will move downwards until you release the switch.
Fully opening the windows (Express-open) 왘 Press switch 1 to 4 past the
resistance point and release. The corresponding window opens completely.
Closing the windows 왘 Pull switch 1 to 4 to the resistance
point. The corresponding window will move upwards until you release the switch.
Warning!
If you pull and hold the switch up when closing the window, and upward movement of the window is blocked by some obstruc- tion including but not limited to arms, hands, fingers, etc., the automatic reversal will not operate.
Fully closing the windows (Express-close) 왘 Pull switch 1 to 4 past the resistance point and release. The corresponding window closes completely.
! If the upward movement of the window is blocked during the closing procedure, the win- dow will stop and open slightly. Remove the obstruction, pull the switch again past the resistance point and release. If the window still does not close when there is no obstruction, then pull and hold the switch again. The side window will then close without the obstruction sensor function.
Warning!
Driver’s door only: If within 5 seconds you again pull the switch past the resistance point and release, the automatic reversal will not function.
Stopping windows 왘 Press or pull respective switch again.
Synchronizing power windows
The power windows must be resynchronized each time 앫 after the battery has been
disconnected or discharged.
앫 if the power windows cannot be fully
opened (Express-open) or closed (Express-close).
왘 Switch on the ignition (컄 page 32).
222
왘 Pull the power window switches until
the side windows are closed. Hold the switches for approximately 1 second. The power windows are synchronized.
Summer opening feature
If the weather is warm, you can ventilate the vehicle before driving off by simulta- neously: 앫 opening the side windows 앫 opening the tilt/sliding sunroof*
Controls in detail Power windows
왘 Aim transmitter eye at the driver’s door handle. The SmartKey must be in close proximity to the door handle.
왘 Press and hold button Œ until the windows and the tilt/sliding sunroof* have reached the desired position.
왘 Release button Œ to interrupt pro-
cedure.
Convenience closing feature
Warning!
When closing the windows and the tilt/slid- ing sunroof*, make sure that there is no danger of anyone being harmed by the clos- ing procedure.
If potential danger exists, proceed as fol- lows:
앫 Release button ‹ to stop the closing
procedure. To open, press and hold button Œ. To continue the closing procedure after making sure that there is no danger of anyone being harmed by the closing procedure, press and hold button ‹.
왘 Aim transmitter eye at the driver’s door handle. The SmartKey must be in close proximity to the door handle.
왘 Press and hold button ‹ until the windows and the tilt/sliding sunroof* are completely closed.
왘 Release the ‹ button to stop
procedure.
Make sure all windows and the tilt/sliding sunroof* are properly closed before leav- ing the vehicle.
223
Controls in detail Power tilt/sliding sunroof*
Opening and closing the power tilt/sliding sunroof
The tilt/sliding sunroof can be opened and closed electrically. The switch for the tilt/sliding sunroof is on the overhead control panel.
With the sunroof closed or tilted open, a screen can be slid into the roof opening to guard against sun rays. When sliding the sunroof open, the screen will also retract.
Screen
Sunroof switch 1 Push up to raise sunroof at rear 2 Pull down to lower sunroof at rear 3 Push forward to slide sunroof closed 4 Push back to slide sunroof open
224
Warning!
When closing the tilt/sliding sunroof, make sure there is no danger of anyone being harmed by the closing procedure.
The opening/closing procedure of the tilt/sliding sunroof can be immediately halted by releasing the switch or, if the switch was moved past the resistance point and released, by moving the switch in any direction.
The tilt/sliding sunroof is made out of glass. In the event of an accident, the glass may shatter. This may result in an opening in the roof.
In a vehicle rollover, occupants not wearing their seat belts or not wearing them properly may be thrown out of the opening. Such an opening also presents a potential for injury for occupants wearing their seat belts properly as entire body parts or portions of them may protrude from the passenger compartment.
When leaving the vehicle, always remove the SmartKey from the starter switch, take it with you, and lock the vehicle. Do not leave children unattended in the vehicle, or with access to an unlocked vehicle. A child’s unsupervised access to a vehicle could result in an accident and/or serious personal injury.
! To avoid damaging the seals, do not trans- port any objects with sharp edges which can stick out of the tilt/sliding sunroof. Do not open the tilt/sliding sunroof if there is snow or ice on the roof, as this could result in malfunctions. The tilt/sliding sunroof can be opened or closed manually should an electrical malfunction occur (컄 page 364).
i When the tilt/sliding sunroof is open, reso- nance noises may result in addition to the usual wind noises. They are caused by minimal pres- sure changes in the passenger compartment. To reduce or eliminate these noises, change the po- sition of the tilt/sliding sunroof or open a side window slightly.
i You can also open or close the tilt/sliding sunroof using the SmartKey, see “Summer open- ing feature” (컄 page 223) and “Convenience closing feature” (컄 page 223). Depending on current position, the tilt/sliding sunroof may also open or close when the air re- circulation button , in the control panel of the climate control (컄 page 165) or automatic climate control* (Canada only) (컄 page 181), or the charcoal filter button e in the control panel of the automatic climate control* (Canada only) (컄 page 183) is pressed and held. 왘 Switch on the ignition (컄 page 32).
Controls in detail Power tilt/sliding sunroof*
Opening and closing the power tilt/sliding sunroof 왘 To open, close, raise, or lower the
tilt/sliding sunroof, move the sunroof switch to resistance point in the required direction of arrows 1 to 4. Release the sunroof switch when the tilt/sliding sunroof has reached the desired position.
Fully opening (Express-open) and closing (Express-close) the power tilt/sliding sunroof 왘 To open or close the tilt/sliding
sunroof, move the sunroof switch past the resistance point in the required direction of arrow 1 to 4 and release. The tilt/sliding sunroof opens or closes completely.
225
Controls in detail Power tilt/sliding sunroof*
Stopping the power tilt/sliding sunroof during Express-operation 왘 Move the sunroof switch in any
direction.
i If the movement of the tilt/sliding sunroof is blocked during the closing procedure, the tilt/sliding sunroof will stop and reopen slightly.
Synchronizing the power tilt/sliding sunroof
The tilt/sliding sunroof must be synchronized 앫 after the battery has been disconnected or discharged
앫 after the tilt/sliding sunroof has been
closed manually (컄 page 364)
앫 after a malfunction 앫 if the tilt/sliding sunroof does not open
smoothly
왘 Switch on the ignition (컄 page 32). 왘 Move and hold the sunroof switch in di- rection of arrow 1 (컄 page 224) until the tilt/sliding sunroof is fully raised at the rear. Hold the sunroof switch for approximately 1 second.
왘 Check the Express-open feature
(컄 page 225). If the tilt/sliding sunroof opens completely, the tilt/sliding sunroof is synchronized. Otherwise repeat the above steps.
226
왔 Driving systems The driving system of your vehicle is described on the following pages: 앫 Cruise control, with which the vehicle
can maintain a preset speed.
For information on the BAS, ABS and ESP®, see “Driving safety systems” (컄 page 82).
Cruise control
The cruise control automatically maintains the speed you set for your vehicle. The use of cruise control is recommended for driving at a constant speed for extend- ed periods of time. You can set or resume cruise control at any speed over 20 mph (30 km/h). The cruise control function is operated by means of the cruise control lever. The cruise control lever is the uppermost lever on the left-hand side of the steering column (컄 page 22).
Warning!
The cruise control is a convenience system designed to assist the driver during vehicle operation. The driver is and must always re- main responsible for the vehicle’s speed and for safe brake operation.
Only use cruise control if the road, traffic and weather conditions make it advisable to travel at a steady speed. 앫 The use of cruise control can be danger- ous on winding roads or in heavy traffic because conditions do not allow safe driving at a steady speed.
앫 The use of cruise control can be danger- ous on slippery roads. Rapid changes in tire traction can result in wheel spin and loss of control.
앫 Deactivate cruise control when driving
in fog.
The “Resume” function should only be oper- ated if the driver is fully aware of the previ- ously set speed and wishes to resume this particular preset speed.
Controls in detail Driving systems
1 Sets current or higher speed 2 Sets current or lower speed 3 Cancels cruise control 4 Resumes at last set speed
Setting current speed 왘 Accelerate or decelerate to the desired
speed.
왘 Briefly lift 1 or depress 2 the cruise
control lever. The current speed is set.
왘 Remove your foot from the accelerator
pedal. Cruise control is activated.
227
! Vehicles with automatic transmission*: Moving the gear selector lever to position N while driving also cancels cruise control. Howev- er, the gear selector lever should not be moved to position N while driving, except to coast when the vehicle is in danger of skidding (e.g. on icy roads).
i Vehicles with manual transmission: The set cruise controlled speed is switched off when de- clutching exceeds 4 seconds during shifting a new gear.
i The last stored speed is canceled when you turn off the engine.
Setting a higher speed 왘 Lift cruise control lever to position 1 and hold it up until the desired speed is reached.
왘 Release cruise control lever.
The new speed is set.
i Depressing the accelerator pedal does not deactivate cruise control. After brief accelera- tion (e.g. for passing), cruise control will resume the last speed set.
Controls in detail Driving systems
i On uphill or downhill grades, cruise control may not be able to maintain the set speed. Once the grade eases, the set speed will be resumed.
Canceling cruise control There are several ways to cancel cruise control: 왘 Step on the brake pedal.
Cruise control is canceled. The last speed set is stored for later use.
or 왘 Briefly push the cruise control lever to
position 3. Cruise control is canceled. The last speed set is stored for later use.
228
Setting a lower speed 왘 Depress cruise control lever to
position 2 and hold it down until the desired speed is reached.
왘 Release cruise control lever.
The new speed is set.
i Vehicles with automatic transmission*: When you use the cruise control lever to deceler- ate, the transmission will automatically down- shift if the engine’s braking power does not brake the vehicle sufficiently.
Controls in detail Driving systems
Fine adjustment in 1 mph (Canada: 1 km/h) increments
Setting to last stored speed “Resume” function)
Faster 왘 Briefly tip cruise control lever in
direction of arrow 1.
Slower 왘 Briefly tip cruise control lever in
direction of arrow 2.
Warning!
The speed stored in memory should only be set again if prevailing road conditions per- mit. Possible acceleration or deceleration differences arising from returning to preset speed could cause an accident and/or seri- ous injury to you and others.
왘 Briefly push cruise control lever to
position 4. The cruise control resumes the last set speed.
왘 Remove your foot from the accelerator
pedal.
229
Controls in detail Loading
Roof rack*
Warning!
Only use roof racks approved by Mercedes-Benz for your vehicle model to avoid damage to the vehicle.
Follow the manufacturer’s installation in- structions. Otherwise, an improperly at- tached roof rack system or its load could become detached from the vehicle.
Do not exceed the maximum roof load of 220 lbs (100 kg).
Take into consideration that when the roof rack is loaded, the handling characteristics are different from those when operating the vehicles without the roof rack loaded.
! Load the roof rack in such a way that the ve- hicle cannot be damaged while driving. Make sure 앫 you can fully raise the tilt/sliding sunroof*. 앫 you can fully open the trunk.
230
Ski sack* (Canada only)
왘 Mount the roof rack only between the
fastening points (see arrows).
왘 Secure the roof rack according to
manufacturer’s instructions for installation.
1 Handle 2 Cover 3 Armrest
Unfolding and loading 왘 Fold armrest 3 down (arrow).
! Do not sit on or lean your body weight against the armrest when it is folded down, as you could otherwise damage it. 왘 Pull handle 1 and swing cover 2
down.
4 Hook and loop fastener 왘 Unfasten hook and loop fastener 4. 왘 Pull ski sack into passenger compart-
5 Button 왘 Open trunk lid. 왘 Press button 5.
ment and unfold.
The flap opens downward.
Controls in detail Loading
왘 From trunk, slide skis into ski sack.
Warning!
The ski sack is designed for up to four pairs of skis. Do not load the ski sack with other objects.
Always fasten the ski sack securely. In an accident, an unfastened ski sack can cause injury to vehicle occupants.
컄컄
231
Unloading and folding 왘 Loosen the straps. 왘 Disconnect hook 7 from eye 8. 왘 Unload skis. 왘 Close flap in trunk. 왘 Fold and flatten ski sack lengthwise. 왘 Place folded ski sack inside recess of
backrest.
왘 Fasten hook and loop fastener. 왘 Close ski sack compartment cover.
Controls in detail Loading
컄컄
6 Strap 왘 Tighten strap 6 by pulling at the loose end (arrow) until the skis in the ski sack are tightly secured.
7 Hook 8 Eye 왘 Connect hook 7 to eye 8.
Tighten strap by pulling at the loose end (arrow).
232
Removing the ski sack You can remove the ski sack for cleaning or drying.
1 Button 2 Ski sack frame 3 Flap 왘 Open trunk lid. 왘 Press button 1.
The flap 3 opens downward.
왘 Press button 1 firmly until ski sack
frame 2 is released.
왘 Pull ski sack frame 2 with ski sack
out.
Controls in detail Loading
Warning!
Split rear bench seat*
Never drive vehicle with trunk open while the ski sack is removed. Deadly carbon monoxide (CO) gases may enter vehicle in- terior, resulting in unconsciousness and death.
i To prevent unauthorized persons from ac- cessing the trunk, always close the flap.
Installing the ski sack Install the ski sack in the reverse order. 왘 Push ski sack frame 2 with ski sack inward until the ski sack frame snaps into place.
왘 Close flap 3. 왘 Close trunk lid.
To expand the cargo area, you can fold down the left and right rear seat backrests. The two sections can be folded down separately.
Warning!
When expanding the luggage area, always fold the seat cushions fully forward.
Unless you are transporting cargo, the backrests must remain properly locked in the upright position.
In an accident, during hard braking or sudden maneuvers, loose items will be thrown around inside the vehicle, and cause injury to vehicle occupants unless the items are securely fastened in the vehicle.
Always use the cargo tie down rings* (컄 page 236).
233
Controls in detail Loading
Folding the backrest forward The release handle 1 is located in the trunk.
Returning the backrest to original position
왘 Pull release handle 1. 왘 Fully retract and fold rearward head
restraints (컄 page 103).
왘 Pull release handle 2. 왘 Fold seat cushion 3 forward. 왘 Fold backrest 4 forward.
! Always release the seat cushion and fold it forward before folding the seat backrests for- ward. Otherwise, the backrest covering may be damaged.
왘 Fold backrest 2 rearward until it
engages.
왘 Fold seat cushion 1 rearward until it
locks into position.
234
If the backrest is not locked into position, a red indicator 3 will be visible. 왘 Check for secure locking by pushing
and pulling on the backrest.
Controls in detail Loading
Warning!
Loading instructions
If a red indicator is visible with the backrest up, then the backrest is not properly locked into position.
Always lock backrest in its upright position when rear seat bench is occupied, cargo is being carried in the trunk, or the extended cargo compartment is not in use. Check for secure locking by pushing and pulling on the backrest.
In an accident, during hard braking or sud- den maneuvers, loose items will be thrown around inside the vehicle, and cause injury to vehicle occupants unless the items are securely fastened in the vehicle.
To help avoid personal injury during a collision or sudden maneuver, exercise care when transporting cargo.
i To prevent unauthorized persons from ac- cess to the trunk, always lock backrest in its up- right position.
The total load weight including vehicle occupants and luggage/cargo should not exceed the load limit indicated on the cor- responding placard located on the driver’s door B-pillar. The handling characteristics of a fully load- ed vehicle depend greatly on the load dis- tribution. It is therefore recommended to load the vehicle according to the illustra- tions shown, with the heaviest items being placed towards the front of the vehicle.
235
Controls in detail Loading
Always place items being carried against front or rear seat backrests, and fasten them as securely as possible. The heaviest portion of the cargo should al- ways be kept as low as possible since it in- fluences the handling characteristics of the vehicle.
To help avoid personal injury during a colli- sion or sudden maneuver, exercise care when transporting cargo.
Never drive vehicle with trunk open. Deadly carbon monoxide (CO) gases may enter ve- hicle interior resulting in unconsciousness and death.
Cargo tie-down rings*
The four cargo tie-down rings are located in the trunk.
i The trunk is the preferred place to carry ob- jects. The enlarged cargo area should only be used for items which do not fit in the trunk alone.
Cargo tie-down rings 왘 Carefully secure cargo by applying
even load on all rings with rope sufficient strength to hold down the cargo. Always follow loading instructions (컄 page 235).
Warning!
Always fasten items being carried as secure- ly as possible using cargo tie-down rings and fastening materials appropriate for the weight and size of the load.
In an accident, during hard braking or sud- den maneuvers, loose items will be thrown around inside the vehicle and can cause in- jury to vehicle occupants unless the items are securely fastened in the vehicle.
236
왔 Useful features Storage compartments
Glove box
Controls in detail Useful features
Warning!
Do not store any flammable substances in- side the vehicle or in the trunk. Otherwise the flammable substances could ignite and start a fire inside the vehicle.
To help avoid personal injury during a colli- sion or sudden maneuver, exercise care when storing objects in the vehicle. Put lug- gage or cargo in the trunk if possible. Do not pile luggage or cargo higher than the seat backs. Do not place anything on the shelf below the rear window.
Luggage nets cannot secure hard or heavy objects.
Keep compartment lids closed. This will help to prevent stored objects from being thrown about and injuring vehicle occupants during an accident.
1 Glove box lid release 2 Glove box lid
Opening glove box 왘 Pull glove box lid release 1.
The glove box lid 2 opens downward.
Closing glove box 왘 Push glove box lid 2 up to close.
i Audio system/COMAND* with CD chang- er*: The CD changer* is located in the glove box.
1 Unlocking 2 Locking
Locking glove box 왘 Insert mechanical key (컄 page 361) into the glove box lock and turn it to position 2.
Unlocking glove box 왘 Turn mechanical key in the glove box
lock to position 1.
237
Controls in detail Useful features
Storage compartment/telephone* tray under front center armrest A flat storage tray with a deeper storage compartment underneath is located below