- 2009 Jeep Grand Cherokee Owners Manuals
- Jeep Grand Cherokee Owners Manuals
- 2005 Jeep Grand Cherokee Owners Manuals
- Jeep Grand Cherokee Owners Manuals
- 2013 Jeep Grand Cherokee Owners Manuals
- Jeep Grand Cherokee Owners Manuals
- 2008 Jeep Grand Cherokee Owners Manuals
- Jeep Grand Cherokee Owners Manuals
- 2006 Jeep Grand Cherokee Owners Manuals
- Jeep Grand Cherokee Owners Manuals
- 2004 Jeep Grand Cherokee Owners Manuals
- Jeep Grand Cherokee Owners Manuals
- 2007 Jeep Grand Cherokee Owners Manuals
- Jeep Grand Cherokee Owners Manuals
- 2011 Jeep Grand Cherokee Owners Manuals
- Jeep Grand Cherokee Owners Manuals
- 2012 Jeep Grand Cherokee Owners Manuals
- Jeep Grand Cherokee Owners Manuals
- 2010 Jeep Grand Cherokee Owners Manuals
- Jeep Grand Cherokee Owners Manuals
- Download PDF Manual
-
Air Cleaner Block Heater . . . . . . . . . . . . . . . . . . . . . . . . . 253
Break-In Recommendations . . . . . . . . . . . . . . . . 68
Compartment . . . . . . . . . . . . . . . . . . . . . . . . . 345
Cooling . . . . . . . . . . . . . . . . . . . . . . . . . . . . . 364
Exhaust Gas Caution . . . . . . . . . . . . . . . . . . 69,305
Fails to Start . . . . . . . . . . . . . . . . . . . . . . . . . . 252
Flooded, Starting . . . . . . . . . . . . . . . . . . . . . . 252
Fuel Requirements . . . . . . . . . . . . . . . . . . 302,392
Jump Starting . . . . . . . . . . . . . . . . . . . . . . . . . 336
Oil . . . . . . . . . . . . . . . . . . . . . . . . . . . . . . 351,392
Oil Change Interval . . . . . . . . . . . . . . . . . . . . 351
. . . . . . . . . . . . . . . . . . . . . . . . . . 354
Oil Disposal Oil Filter . . . . . . . . . . . . . . . . . . . . . . . . . . . . 354
Oil Filter Disposal . . . . . . . . . . . . . . . . . . . . . . 354
Oil Selection . . . . . . . . . . . . . . . . . . . . . . . . . . 392
Overheating . . . . . . . . . . . . . . . . . . . . . . . . . . 329
Starting . . . . . . . . . . . . . . . . . . . . . . . . . . . . . 251Temperature Gauge . . . . . . . . . . . . . . . . . . . . . 184
Engine Oil Viscosity . . . . . . . . . . . . . . . . . . . . . . 353
. . . . . . . . . . . . . . . . . 353
Engine Oil Viscosity Chart Enhanced Accident Response Feature . . . . . . . . . . 55
Entry System, Illuminated . . . . . . . . . . . . . . . . . . 16
Event Data Recorder . . . . . . . . . . . . . . . . . . . . . . 56
Exhaust Gas Caution . . . . . . . . . . . . . . . . . . . 69,305
Exhaust System . . . . . . . . . . . . . . . . . . . . . . . . . 363
Exterior Finish Care . . . . . . . . . . . . . . . . . . . . . . 376Filters
Air Cleaner Engine Oil
. . . . . . . . . . . . . . . . . . . . . . . . . . 358
. . . . . . . . . . . . . . . . . . . . . . . . . . . 354
Finish Care . . . . . . . . . . . . . . . . . . . . . . . . . . . . 376
Flashers . . . . . . . . . . . . . . . . . . . . . . . . . . . . . . 328
Hazard Warning . . . . . . . . . . . . . . . . . . . . . . . 328
Turn Signal . . . . . . . . . . . . . . . . . . . . . 180,388,390
Flipper Glass, Liftgate . . . . . . . . . . . . . . . . . . . . . 26
Flooded Engine Starting . . . . . . . . . . . . . . . . . . . 252Fluid Capacities . . . . . . . . . . . . . . . . . . . . . . . . . 392
Fluid Leaks . . . . . . . . . . . . . . . . . . . . . . . . . . . . . 71
Fluid Level ChecksAutomatic Transmission . . . . . . . . . . . . . . . 371,372
Engine Oil . . . . . . . . . . . . . . . . . . . . . . . . . . . 351
Power Steering . . . . . . . . . . . . . . . . . . . . . . . . 360
Fluids, Lubricants and Genuine Parts . . . . . . . . . . 393
Fog Light Service . . . . . . . . . . . . . . . . . . . . . . . . 389
Fog Lights . . . . . . . . . . . . . . . . . . . . . . . 125,186,389
Folding Rear Seat . . . . . . . . . . . . . . . . . . . . . . . . 111
Four Wheel Drive . . . . . . . . . . . . . . . . . . . . . . . 262
Operation . . . . . . . . . . . . . . . . . . . . . . . . . . . 262
Systems . . . . . . . . . . . . . . . . . . . . . . . . . . . . . 262
Four Wheel Drive Operation . . . . . . . . . . . . . . . . 262
Four-Way Hazard Flasher . . . . . . . . . . . . . . . . . . 328
. . . . . . . . . . . . . . . . . . . 261
Freeing A Stuck Vehicle Front Axle (Differential) . . . . . . . . . . . . . . . . . . . 375
. . . . . . . . . . . . . . . . . . . . . . . . . . . . . . . . . 302
Fuel . . . . . . . . . . . . . . . . . . . . 306Filler Cap (Gas Cap)
INDEX 429
. . . . . . . . . . . . . . . . . . . 306
Filler Door (Gas Cap) Gasoline . . . . . . . . . . . . . . . . . . . . . . . . . . . . 302
Gauge . . . . . . . . . . . . . . . . . . . . . . . . . . . . . . 186
Materials Added . . . . . . . . . . . . . . . . . . . . . . . 304
Octane Rating . . . . . . . . . . . . . . . . . . . . . . . . 302
Requirements . . . . . . . . . . . . . . . . . . . . . . . . . 392
Tank Capacity . . . . . . . . . . . . . . . . . . . . . . . . 392
Fuel System Caution . . . . . . . . . . . . . . . . . . . 304,307
. . . . . . . . . . . . . . . . . . . . . . . . . . . . . . . . 380
FusesGarage Door Opener (HomeLink威) . . . . . . . . . . . 152
. . . . . . . . . . . . . . . 306,347
Gas Cap (Fuel Filler Cap) Gasoline (Fuel) . . . . . . . . . . . . . . . . . . . . . . . . . 302
Gasoline, Reformulated . . . . . . . . . . . . . . . . . . . 303
Gasoline/Oxygenate Blends . . . . . . . . . . . . . . . . 303
GaugesCoolant Temperature . . . . . . . . . . . . . . . . . . . . 184
Fuel . . . . . . . . . . . . . . . . . . . . . . . . . . . . . . . . 186
Speedometer . . . . . . . . . . . . . . . . . . . . . . . . . 18010
430 INDEX
. . . . . . . . . . . . . . . . . . . . . . . . . . 182
Tachometer Gear Ranges . . . . . . . . . . . . . . . . . . . . . . . . . . . 255
General Information . . . . . . . . . . . . . . . . . . . . 23,300
Glass Cleaning . . . . . . . . . . . . . . . . . . . . . . . . . . 379
Gross Axle Weight Rating . . . . . . . . . . . . . . . . . . 309
Gross Vehicle Weight Rating . . . . . . . . . . . . . . . . 309Hands-Free Phone (UConnect™) . . . . . . . . . . . . . . 83
Hazard Warning Flasher . . . . . . . . . . . . . . . . . . . 328
Head Restraints . . . . . . . . . . . . . . . . . . . . . . . . . 108
. . . . . . . . . . . . . . . . . . . . . . . . . . . . 108
Head Rests Headlights . . . . . . . . . . . . . . . . . . . . . . . . . . . . 122
Bulb Replacement . . . . . . . . . . . . . . . . . . . . . . 387
On With Wipers . . . . . . . . . . . . . . . . . . . . . . . 123
Replacing . . . . . . . . . . . . . . . . . . . . . . . . . . . . 387
Heated Mirrors . . . . . . . . . . . . . . . . . . . . . . . . . . 80
Heated Seats . . . . . . . . . . . . . . . . . . . . . . . . . . . 110
Heater, Engine Block . . . . . . . . . . . . . . . . . . . . . 253
High Beam Indicator . . . . . . . . . . . . . . . . . . . . . 180High Beam/Low Beam Select (Dimmer) Switch . . 126
HitchesTrailer Towing . . . . . . . . . . . . . . . . . . . . . . . . 311
Holder, Cup . . . . . . . . . . . . . . . . . . . . . . . . . . . 164
HomeLink威 (Garage Door Opener) Transmitter . . . 152
Hood Release . . . . . . . . . . . . . . . . . . . . . . . . . . 119
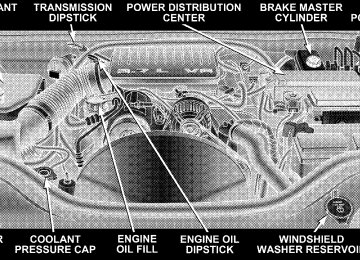
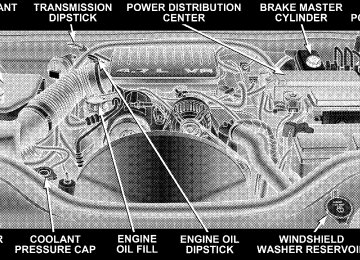
Hoses . . . . . . . . . . . . . . . . . . . . . . . . . . . . . . . . 369Identifying Your Engine . . . . . . . . . . . . . . . . . . . 345
IgnitionKey . . . . . . . . . . . . . . . . . . . . . . . . . . . . . . . . . 12
Illuminated Entry . . . . . . . . . . . . . . . . . . . . . . . . 16
Infant Restraint . . . . . . . . . . . . . . . . . . . . . . . . . . 58
Inflation Pressure Tires . . . . . . . . . . . . . . . . . . . . 288
Information Center, Vehicle . . . . . . . . . . . . . . . . . 187
Inside Rearview Mirror . . . . . . . . . . . . . . . . . . . . 78
Instrument Cluster . . . . . . . . . . . . . . . . . . . . 179,180
Instrument Panel and Controls . . . . . . . . . . . . . . 178
Instrument Panel Lens Cleaning . . . . . . . . . . . . . 379INDEX 431
Integrated Power Module . . . . . . . . . . . . . . . . . . 384
Interior Appearance Care . . . . . . . . . . . . . . . . . . 378
Interior Fuses . . . . . . . . . . . . . . . . . . . . . . . . . . 380
Interior Lighting . . . . . . . . . . . . . . . . . . . . . . . . 120
. . . . . . . . . . . . . . . . . . . . . . . 120,124
Interior Lights Intermittent Wipers (Delay Wipers) . . . . . . . . . . . 128
Introduction . . . . . . . . . . . . . . . . . . . . . . . . . . . . . 4Jack Location . . . . . . . . . . . . . . . . . . . . . . . . . . . 330
Jack Operation . . . . . . . . . . . . . . . . . . . . . . . 330,333
Jacking Instructions . . . . . . . . . . . . . . . . . . . . . . 333
Jump Starting . . . . . . . . . . . . . . . . . . . . . . . . . . 336Key, Programming . . . . . . . . . . . . . . . . . . . . . . . . 15
Key, Replacement . . . . . . . . . . . . . . . . . . . . . . . . 14
Key, Sentry (Immobilizer) . . . . . . . . . . . . . . . . . . . 13
Key-In Reminder . . . . . . . . . . . . . . . . . . . . . . . . . 13
Keyless Entry System . . . . . . . . . . . . . . . . . . . . . . 20
Keys . . . . . . . . . . . . . . . . . . . . . . . . . . . . . . . . . 12Lap/Shoulder Belts . . . . . . . . . . . . . . . . . . . . . . . 32
LATCH . . . . . 62,64
(Lower Anchors and Tether for CHildren) . . . . . . . . . . . . . . . . . . . . . . 302
Lead Free Gasoline Leaks, Fluid . . . . . . . . . . . . . . . . . . . . . . . . . . . . 71
Life of Tires . . . . . . . . . . . . . . . . . . . . . . . . . . . . 292
Liftgate . . . . . . . . . . . . . . . . . . . . . . . . . . . . . . . . 26
Liftgate Flipper Glass . . . . . . . . . . . . . . . . . . . . . . 26
Liftgate Window Wiper/Washer . . . . . . . . . . . . . 170
Lights . . . . . . . . . . . . . . . . . . . . . . . . . . . . . . 70,120
Airbag . . . . . . . . . . . . . . . . . . . . . . . . . . . . 56,181
Alarm . . . . . . . . . . . . . . . . . . . . . . . . . . . . . . . 70
Anti-Lock . . . . . . . . . . . . . . . . . . . . . . . . . . . 181
Automatic Headlights . . . . . . . . . . . . . . . . . . . 122
Back-Up . . . . . . . . . . . . . . . . . . . . . . . . . . . . . 390
Battery Saver . . . . . . . . . . . . . . . . . . . . . . . . . 122
Brake Assist Warning . . . . . . . . . . . . . . . . . 140,185
Brake Warning . . . . . . . . . . . . . . . . . . . . . . . . 180
Bulb Replacement . . . . . . . . . . . . . . . . . . . . . . 38710
432 INDEX
Cargo . . . . . . . . . . . . . . . . . . . . . . . . . . . . . . 165
Center Mounted Stop . . . . . . . . . . . . . . . . . . . 391
Cruise . . . . . . . . . . . . . . . . . . . . . . . . . . . . . . 185
Daytime Running . . . . . . . . . . . . . . . . . . . . . . 125
Dimmer Switch, Headlight . . . . . . . . . . . . . 121,126
Electronic Stability Program (ESP) Indicator . . . . . . . . . . . . . . . . . . . . . . . 140,182,185
Electronic Throttle Control Warning . . . . . . . . . 186
Fog . . . . . . . . . . . . . . . . . . . . . . . . . . 125,186,389
Four-Wheel Drive Indicator . . . . . . . . . . . . . . . 185
Fuses . . . . . . . . . . . . . . . . . . . . . . . . . . . . . . . 380
Hazard Warning Flasher . . . . . . . . . . . . . . . . . 328
Headlight Switch . . . . . . . . . . . . . . . . . . . . . . 122
Headlights . . . . . . . . . . . . . . . . . . . . . . . . . . . 387
Headlights On With Wipers . . . . . . . . . . . . . . . 123
High Beam Indicator . . . . . . . . . . . . . . . . . . . . 180
Illuminated Entry . . . . . . . . . . . . . . . . . . . . . . . 16
Instrument Cluster . . . . . . . . . . . . . . . . . . 122,124
. . . . . . . . . . . . . . . . . . . . . . . . . . 120,124
Interior. . . . . . . . . . . . . . . . . . . . 125
Lights On Reminder Low Fuel . . . . . . . . . . . . . . . . . . . . . . . . . . . . 187
Low Tire . . . . . . . . . . . . . . . . . . . . . . . . . . . . 183
Malfunction Indicator (Check Engine) . . . . . . . . 180
Map Reading . . . . . . . . . . . . . . . . . . . . . . . . . 120
Oil Pressure . . . . . . . . . . . . . . . . . . . . . . . . . . 182
Passing . . . . . . . . . . . . . . . . . . . . . . . . . . . . . 126
Reading . . . . . . . . . . . . . . . . . . . . . . . . . . 120,152
Rear Servicing . . . . . . . . . . . . . . . . . . . . . . . . 390
. . . . . . . . . . . . . . . . . . . . . . . . . . . . 390
Rear Tail Seat Belt Reminder . . . . . . . . . . . . . . . . . . . . . 185
Security Alarm (Theft Alarm) . . . . . . . . . . . . . . 182
Service . . . . . . . . . . . . . . . . . . . . . . . . . . . . . . 387
Service Engine Soon (Malfunction Indicator) . . . 180
Side Marker . . . . . . . . . . . . . . . . . . . . . . . . . . 390
SmartBeams . . . . . . . . . . . . . . . . . . . . . . . . . . 123
Tire Pressure Monitoring (TPMS) . . . . . . . . . . . 183
. . . . . . . . . . . . . . . . . . . . 184
Tow/Haul Indicator Traction Control . . . . . . . . . . . . . . . . . . . . 140,182Turn Signal . . . . . . . . . . . . . . . . . . 121,126,388,390
Vanity Mirror . . . . . . . . . . . . . . . . . . . . . . . . . . 82
Voltage . . . . . . . . . . . . . . . . . . . . . . . . . . . . . 187
Load Floor, Cargo . . . . . . . . . . . . . . . . . . . . . . . 169
Loading VehicleTires
. . . . . . . . . . . . . . . . . . . . . . . . . . . . . . . 283
Locks . . . . . . . . . . . . . . . . . . . . . . . . . . . . . . . . . 16
Automatic Door . . . . . . . . . . . . . . . . . . . . . . . . 19
Child Protection . . . . . . . . . . . . . . . . . . . . . . . . 17
Door . . . . . . . . . . . . . . . . . . . . . . . . . . . . . . . . 16
Liftgate, Tailgate . . . . . . . . . . . . . . . . . . . . . . . . 16
Power Door . . . . . . . . . . . . . . . . . . . . . . . . . . . 19Lower Anchors and Tether for CHildren (LATCH) . . . . . . . . . . . . . . . . . . . . . . . . . . . . 62,64
Lubrication, Body . . . . . . . . . . . . . . . . . . . . . . . 362
. . . . . . . . . . . . . . . . . 171
Luggage Rack (Roof Rack) Lumbar Support . . . . . . . . . . . . . . . . . . . . . . . . 108Maintenance Free Battery . . . . . . . . . . . . . . . . . . 358
INDEX 433
Maintenance Procedures . . . . . . . . . . . . . . . . . . . 350
Maintenance Schedule . . . . . . . . . . . . . . . . . . . . 396
Schedule “A” . . . . . . . . . . . . . . . . . . . . . . . . . 409
Schedule “B” . . . . . . . . . . . . . . . . . . . . . . . . . 399
Maintenance Schedules . . . . . . . . . . . . . . . . . . . . 396
Malfunction Indicator Light (Check Engine) . . 180,348
Manual, Service . . . . . . . . . . . . . . . . . . . . . . . . . 420
Master Cylinder (Brakes) . . . . . . . . . . . . . . . . . . 370
Memory Feature (Memory Seat) . . . . . . . . . . . . . 114
Memory Seat . . . . . . . . . . . . . . . . . . . . . . . . . . . 114
Memory Seats and Radio . . . . . . . . . . . . . . . . . . 114
Mini-Trip Computer . . . . . . . . . . . . . . . . . . . . . . 197
Mirrors . . . . . . . . . . . . . . . . . . . . . . . . . . . . . . . . 78
Automatic Dimming . . . . . . . . . . . . . . . . . . . . . 79
Electric Powered . . . . . . . . . . . . . . . . . . . . . . . 81
Electric Remote . . . . . . . . . . . . . . . . . . . . . . . . 81
Exterior Folding . . . . . . . . . . . . . . . . . . . . . . . . 80
Heated . . . . . . . . . . . . . . . . . . . . . . . . . . . . . . 80
Outside . . . . . . . . . . . . . . . . . . . . . . . . . . . . . . 8010
434 INDEX
Rearview . . . . . . . . . . . . . . . . . . . . . . . . . . . . . 78
Vanity . . . . . . . . . . . . . . . . . . . . . . . . . . . . . . . 82
Modifications/Alterations, Vehicle . . . . . . . . . . . . . 8
Monitor, Tire Pressure System . . . . . . . . . . . . . . . 294
Mopar Parts . . . . . . . . . . . . . . . . . . . . . . . . . 349,419
Multi-Displacement Engine System . . . . . . . . . . . 278
Multi-Function Control Lever . . . . . . . . . . . . . . . 121New Vehicle Break-In Period . . . . . . . . . . . . . . . . 68
Occupant Restraints . . . . . . . . . . . . . . . . . . . . . . . 31
Octane Rating, Gasoline (Fuel) . . . . . . . . . . . . . . 302
. . . . . . . . . . . . . . . . . . . . . . . . . . 184,185
Odometer Trip . . . . . . . . . . . . . . . . . . . . . . . . . . . . . . . . 184
Off-Pavement Driving (Off-Road) . . . . . . . . . . 274,375
Off-Road Driving (Off-Pavement) . . . . . . . . . . 274,375
Oil, Engine . . . . . . . . . . . . . . . . . . . . . . . . . . . . 351
Capacity . . . . . . . . . . . . . . . . . . . . . . . . . . . . 392
Change Interval . . . . . . . . . . . . . . . . . . . . . . . 351Dipstick . . . . . . . . . . . . . . . . . . . . . . . . . . . . . 351
Filter . . . . . . . . . . . . . . . . . . . . . . . . . . . . . . . 354
Identification Logo . . . . . . . . . . . . . . . . . . . . . 353
Materials Added to . . . . . . . . . . . . . . . . . . . . . 354
Pressure Warning Light . . . . . . . . . . . . . . . . . . 182
Recommendation . . . . . . . . . . . . . . . . . . . 352,392
Viscosity . . . . . . . . . . . . . . . . . . . . . . . . . . 353,392
Onboard Diagnostic System . . . . . . . . . . . . . . 347,348
Opener, Garage Door (HomeLink威) . . . . . . . . . . . 152
Outside Rearview Mirrors . . . . . . . . . . . . . . . . . . 80
Overdrive . . . . . . . . . . . . . . . . . . . . . . . . . . . . . 257
Overdrive OFF Switch . . . . . . . . . . . . . . . . . . . . 257
Overhead Console . . . . . . . . . . . . . . . . . . . . . . . 151
Overheating, Engine . . . . . . . . . . . . . . . . . . . 184,329
Owner’s Manual (Operator Manual) . . . . . . . . . . 420Paint Care . . . . . . . . . . . . . . . . . . . . . . . . . . . . . 376
Paint Damage . . . . . . . . . . . . . . . . . . . . . . . . . . 376
Panic Alarm . . . . . . . . . . . . . . . . . . . . . . . . . . . . 22Park Assist System, Rear . . . . . . . . . . . . . . . . . . 141
Parking Brake . . . . . . . . . . . . . . . . . . . . . . . . . . 267
Passing Light . . . . . . . . . . . . . . . . . . . . . . . . . . . 126
Pedals, Adjustable . . . . . . . . . . . . . . . . . . . . . . . 146
Pets . . . . . . . . . . . . . . . . . . . . . . . . . . . . . . . . . . 68
Pets, Transporting . . . . . . . . . . . . . . . . . . . . . . . . 68
. . . . . . . . . . . . . . . . . . . . . . . . . . 83
Phone, Cellular Phone, Hands-Free (UConnect™) . . . . . . . . . . . . . 83
Placard, Tire and Loading Information . . . . . . . . . 283
Polishing and Waxing . . . . . . . . . . . . . . . . . . . . . 377
PowerDistribution Center . . . . . . . . . . . . . . . . . . . . . 382
Door Locks . . . . . . . . . . . . . . . . . . . . . . . . . . . 19
Mirrors . . . . . . . . . . . . . . . . . . . . . . . . . . . . . . 81
Outlet (Auxiliary Electrical Outlet) . . . . . . . . . . 162
Seats . . . . . . . . . . . . . . . . . . . . . . . . . . . . 109,110
Steering . . . . . . . . . . . . . . . . . . . . . . . . . . 272,360
Sunroof . . . . . . . . . . . . . . . . . . . . . . . . . . . . . 159
Windows . . . . . . . . . . . . . . . . . . . . . . . . . . . . . 28INDEX 435
Pregnant Women and Seat Belts . . . . . . . . . . . . . . 40
Preparation for Jacking . . . . . . . . . . . . . . . . . . . . 332
PretensionersSeat Belts . . . . . . . . . . . . . . . . . . . . . . . . . . . . . 38
. . . . . . 154,158,190Programmable Electronic Features Programming Transmitters (Remote Keyless Entry) . . . . . . . . . . . . . . . . . 154,158
Quadra-Trac
. . . . . . . . . . . . . . . . . . . . . . . . . . . 262
Radial Ply Tires . . . . . . . . . . . . . . . . . . . . . . . . . 290
Radio Broadcast Signals . . . . . . . . . . . . . . . . . . . 201
Radio Operation . . . . . . . . . . . . . . . . . . . 202,216,232
Radio, Satellite . . . . . . . . . . . . . . . . . . . . . . . 224,226
Radio (Sound Systems) . . . . . . . . . . . . . . . . . 202,216
Rain Sensitive Wiper System . . . . . . . . . . . . . . . . 128
Rear Axle (Differential) . . . . . . . . . . . . . . . . . . . . 375
Rear Cup Holder . . . . . . . . . . . . . . . . . . . . . . . . 164
Rear Liftgate . . . . . . . . . . . . . . . . . . . . . . . . . . . . 1610
436 INDEX
Rear Park Assist System . . . . . . . . . . . . . . . . . . . 141
Rear Seat, Folding . . . . . . . . . . . . . . . . . . . . . . . 111
Rear Window Defroster . . . . . . . . . . . . . . . . . . . 234
Rear Window Features . . . . . . . . . . . . . . . . . . . . 170
Rear Wiper/Washer . . . . . . . . . . . . . . . . . . . . . . 170
. . . . . . . . . . . . . . . . . . . . . . . . 78
Rearview Mirrors Reclining Front Seats . . . . . . . . . . . . . . . . . . . . . 107
Recorder, Event Data . . . . . . . . . . . . . . . . . . . . . . 56
Recreational Towing . . . . . . . . . . . . . . . . . . . . . . 320
. . . . . . . 321
. . . . . 323
Reformulated Gasoline . . . . . . . . . . . . . . . . . . . . 303
Refrigerant . . . . . . . . . . . . . . . . . . . . . . . . . . . . 360
Reminder, Lights On . . . . . . . . . . . . . . . . . . . . . 125
Reminder, Seat Belt . . . . . . . . . . . . . . . . . . . . . . . 38
Remote Keyless Entry (RKE) . . . . . . . . . . . . . . . . . 20
Remote Sound System (Radio) Controls . . . . . . . . 230
Replacement Bulbs . . . . . . . . . . . . . . . . . . . . . . . 386
Replacement Tires . . . . . . . . . . . . . . . . . . . . . . . 292Shifting into Transfer Case Neutral (N) Shifting out of Transfer Case Neutral (N)
Reporting Safety Defects . . . . . . . . . . . . . . . . . . . 419
Restraints, Child . . . . . . . . . . . . . . . . . . . . . . . . . 58
Restraints, Occupant . . . . . . . . . . . . . . . . . . . . . . 31
Retractable Cargo Area Cover . . . . . . . . . . . . . . . 166
Rocking Vehicle When Stuck . . . . . . . . . . . . . . . . 261
Roof Type Carrier . . . . . . . . . . . . . . . . . . . . . . . 171
Rotation, Tires . . . . . . . . . . . . . . . . . . . . . . . . . . 301Safety Checks Inside Vehicle . . . . . . . . . . . . . . . . . 70
Safety Checks Outside Vehicle . . . . . . . . . . . . . . . 70
Safety Defects, Reporting . . . . . . . . . . . . . . . . . . 419
Safety Information, Tire . . . . . . . . . . . . . . . . . . . 279
Safety Tips . . . . . . . . . . . . . . . . . . . . . . . . . . . . . 69
Satellite Radio . . . . . . . . . . . . . . . . . . . . . . . 224,226
Satellite Radio Antenna . . . . . . . . . . . . . . . . . . . 230
Schedule, Maintenance . . . . . . . . . . . . . . . . . . . . 396
Seat Belt Maintenance . . . . . . . . . . . . . . . . . . . . . 70
Seat Belt Reminder . . . . . . . . . . . . . . . . . . . . . . . 38
. . . . . . . . . . . . . . . . . . . . . . . . . . . . . . 32
Seat BeltsINDEX 437
Adjustable Upper Shoulder Anchorage . . . . . . . . 36
And Pregnant Women . . . . . . . . . . . . . . . . . . . 40
Child Restraint . . . . . . . . . . . . . . . . . . . . . . . 58,66
Extender . . . . . . . . . . . . . . . . . . . . . . . . . . . . . 40
Front Seat . . . . . . . . . . . . . . . . . . . . . . . . . . . . 32
Inspection . . . . . . . . . . . . . . . . . . . . . . . . . . . . 70
Maintenance . . . . . . . . . . . . . . . . . . . . . . . . 70,380
Pretensioners . . . . . . . . . . . . . . . . . . . . . . . . . . 38
Reminder . . . . . . . . . . . . . . . . . . . . . . . . . . . . 185
Shoulder Belt Anchorage . . . . . . . . . . . . . . . . . . 36
Seats . . . . . . . . . . . . . . . . . . . . . . . . . . . . . . . . . 106
. . . . . . . . . . . . . . . . . . . . . . . . . . 106
Adjustment Cleaning . . . . . . . . . . . . . . . . . . . . . . . . . . . . 378
Easy Entry . . . . . . . . . . . . . . . . . . . . . . . . . . . 117
Head Restraints . . . . . . . . . . . . . . . . . . . . . . . 108
Heated . . . . . . . . . . . . . . . . . . . . . . . . . . . . . . 110
Lumbar Support . . . . . . . . . . . . . . . . . . . . . . . 108
Memory . . . . . . . . . . . . . . . . . . . . . . . . . . . . . 114
Power . . . . . . . . . . . . . . . . . . . . . . . . . . . 109,110Rear Folding . . . . . . . . . . . . . . . . . . . . . . . . . . 111
Reclining . . . . . . . . . . . . . . . . . . . . . . . . . . . . 107
. . . . . . . . . . . . . . . . . . . . . 16
Security Against Theft . . . . . . . . . . . . . 24,182
Security Alarm (Theft Alarm) . . . . . . . . . . . . . . . . . . . . . . . . . 352
Selection of Oil Sentry Key (Immobilizer) . . . . . . . . . . . . . . . . . . . 13
Sentry Key Programming . . . . . . . . . . . . . . . . . . . 15
Sentry Key Replacement . . . . . . . . . . . . . . . . . . . 14
Service Assistance . . . . . . . . . . . . . . . . . . . . . . . 416
Service Contract . . . . . . . . . . . . . . . . . . . . . . . . . 418
Service Engine Soon Light (Malfunction Indicator) . 180
Service Manuals . . . . . . . . . . . . . . . . . . . . . . . . 420
Setting the Clock . . . . . . . . . . . . . . . . . . 204,218,225
ShiftingAutomatic Transmission . . . . . . . . . . . . . . . . . 254
Shoulder Belts . . . . . . . . . . . . . . . . . . . . . . . . . . . 32
Signals, Turn . . . . . . . . . . . . . . . . . . . 126,180,388,390
. . . . . . . . . . . . . . . . . . . . . . . . . . . 123
SmartBeams Snow Chains (Tire Chains) . . . . . . . . . . . . . . . . . 30010
438 INDEX
Snow Plow . . . . . . . . . . . . . . . . . . . . . . . . . . . . 325
Spare Tire . . . . . . . . . . . . . . . . . . . . . . . . . . . . . 331
Spark Plugs . . . . . . . . . . . . . . . . . . . . . . . . . . . . 355
SpecificationsFuel (Gasoline) Oil
. . . . . . . . . . . . . . . . . . . . . . . . 302
. . . . . . . . . . . . . . . . . . . . . . . . . . . . . . . . 352
. . . . . . . . . . . . . . 148
Speed Control (Cruise Control) . . . . . . . . . . . . . . . . . . . . . . . . . . . 180
Speedometer Starting . . . . . . . . . . . . . . . . . . . . . . . . . . . . . . . 251
Automatic Transmission . . . . . . . . . . . . . . . . . 251
. . . . . . . . . . . . . . . . . . . . . . 252,253
Cold Weather Emergency (Jump Starting) . . . . . . . . . . . . . . . 336
. . . . . . . . . . . . . . . . . . . . 253
Engine Block Heater Engine Fails to Start . . . . . . . . . . . . . . . . . . . . 252Steering Power Wheel, Tilt
. . . . . . . . . . . . . . . . . . . . . . . . . . . 272,360
. . . . . . . . . . . . . . . . . . . . . . . . . . . 130Steering Wheel Mounted Sound System
Controls . . . . . . . . . . . . . . . . . . . . . . . . . . . . . 230
Storage . . . . . . . . . . . . . . . . . . . . . . . . . . . . . . . 385
Storage, Behind the Seat . . . . . . . . . . . . . . . . . . . 165
Storage Bin . . . . . . . . . . . . . . . . . . . . . . . . . . . . 165
Storage Compartment, Center Seat . . . . . . . . . . . . 113
Storage, Vehicle . . . . . . . . . . . . . . . . . . . . . . 245,385
Storing Your Vehicle . . . . . . . . . . . . . . . . . . . . . . 385
Sun Roof . . . . . . . . . . . . . . . . . . . . . . . . . . . . . . 159
Sun Visor Extension . . . . . . . . . . . . . . . . . . . . . . . 83
Sunglasses Storage . . . . . . . . . . . . . . . . . . . . . . . 152
Supplemental Restraint System - Airbag . . . . . . . . 41. . . . . . . . . . . . . . . . . . . . . . . . . . . . 182
Tachometer . . . . . . . . 238
Temperature Control, Automatic (ATC) . . . . . . . . . . 184
Temperature Gauge, Engine Coolant Tether Anchor, Child Restraint . . . . . . . . . . . . . . . 62
Tie Down Hooks, Cargo . . . . . . . . . . . . . . . . . . . 167
Tilt Steering Column . . . . . . . . . . . . . . . . . . . . . 130
Time Delay, Headlight . . . . . . . . . . . . . . . . . . . . 126
Tire and Loading Information Placard . . . . . . . . . 283INDEX 439
Tire Identification Number (TIN) . . . . . . . . . . . . . 282
Tire Markings . . . . . . . . . . . . . . . . . . . . . . . . . . 279
Tire Safety Information . . . . . . . . . . . . . . . . . . . . 279
Tires . . . . . . . . . . . . . . . . . . . . . . . . . . . . 70,287,421
Air Pressure . . . . . . . . . . . . . . . . . . . . . . . . . . 288
Alignment and Balance . . . . . . . . . . . . . . . . . . 293
Chains . . . . . . . . . . . . . . . . . . . . . . . . . . . . . . 300
Changing . . . . . . . . . . . . . . . . . . . . . . . . . . . . 330
General Information . . . . . . . . . . . . . . . . . . . . 287
High Speed . . . . . . . . . . . . . . . . . . . . . . . . . . 290
Inflation Pressures . . . . . . . . . . . . . . . . . . . . . 288
Jacking . . . . . . . . . . . . . . . . . . . . . . . . . . . . . 330
Life of Tires . . . . . . . . . . . . . . . . . . . . . . . . . . 292
Load Capacity . . . . . . . . . . . . . . . . . . . . . 283,284
Pressure Monitor System (TPMS) . . . . . . . . . . . 294
Pressure Warning Light . . . . . . . . . . . . . . . . . . 183
Quality Grading . . . . . . . . . . . . . . . . . . . . . . . 421
. . . . . . . . . . . . . . . . . . . . . . . . . . . . . . 290
Radial Replacement . . . . . . . . . . . . . . . . . . . . . . . . . 292Rotation . . . . . . . . . . . . . . . . . . . . . . . . . . . . . 301
Safety . . . . . . . . . . . . . . . . . . . . . . . . . . . . 70,279
Sizes . . . . . . . . . . . . . . . . . . . . . . . . . . . . . . . 280
Spare Tire . . . . . . . . . . . . . . . . . . . . . . . . . . . 331
Spinning . . . . . . . . . . . . . . . . . . . . . . . . . . . . 290
Tread Wear Indicators . . . . . . . . . . . . . . . . . . . 291
Wheel Mounting . . . . . . . . . . . . . . . . . . . . . . . 335
. . . . . . . . . . . . . . 313
Tongue Weight/Trailer Weight Torque Converter Clutch . . . . . . . . . . . . . . . . . . 260
Tow Hooks, Emergency . . . . . . . . . . . . . . . . . . . 338
Tow/Haul Indicator Light . . . . . . . . . . . . . . . . . 184
Towing . . . . . . . . . . . . . . . . . . . . . . . . . . . . 308,339
Disabled Vehicle . . . . . . . . . . . . . . . . . . . . . . . 339
Guide . . . . . . . . . . . . . . . . . . . . . . . . . . . . . . 312
Recreational . . . . . . . . . . . . . . . . . . . . . . . . . . 320
Weight . . . . . . . . . . . . . . . . . . . . . . . . . . . . . . 312
Traction Control . . . . . . . . . . . . . . . . . . . . . . . . . 132
Traction Control Light . . . . . . . . . . . . . . . . . . . . 182
Trailer Towing . . . . . . . . . . . . . . . . . . . . . . . . . . 30810
440 INDEX
Cooling System Tips . . . . . . . . . . . . . . . . . . . . 320
. . . . . . . . . . . . . . . . . . . . . . . . . . . . . 311
Hitches Minimum Requirements . . . . . . . . . . . . . . . . . 314
Trailer and Tongue Weight . . . . . . . . . . . . . . . . 313
Wiring . . . . . . . . . . . . . . . . . . . . . . . . . . . . . . 317
Trailer Towing Guide . . . . . . . . . . . . . . . . . . . . . 312
Trailer Weight . . . . . . . . . . . . . . . . . . . . . . . . . . 312
Transfer Case . . . . . . . . . . . . . . . . . . . . . . . . . . . 374
Maintenance . . . . . . . . . . . . . . . . . . . . . . . . . . 374Transmission Automatic . . . . . . . . . . . . . . . . . . . . . . . . 254,371
Maintenance . . . . . . . . . . . . . . . . . . . . . . . . . . 371
Range Indicator . . . . . . . . . . . . . . . . . . . . . . . 186
Shifting . . . . . . . . . . . . . . . . . . . . . . . . . . . . . 254
Transmitter Battery Service (Remote Keyless Entry) . 23
Transmitter, Garage Door Opener (HomeLink威) . . 152
Transmitter, Remote Keyless Entry (RKE) . . . . . . . . 20
Tread Wear Indicators . . . . . . . . . . . . . . . . . . . . 291
Turn Signals . . . . . . . . . . . . . . . . . . . 126,180,388,390Underhood Fuses . . . . . . . . . . . . . . . . . . . . . 382,384
Uniform Tire Quality Grades . . . . . . . . . . . . . . . . 421
Universal Transmitter . . . . . . . . . . . . . . . . . . . . . 152
Upholstery Care . . . . . . . . . . . . . . . . . . . . . . . . 378Vacuum/Vapor Harnesses . . . . . . . . . . . . . . . . . 369
Vanity Mirrors . . . . . . . . . . . . . . . . . . . . . . . . . . . 82
Variance, Compass . . . . . . . . . . . . . . . . . . . . . . . 200
Vehicle Identification Number (VIN) . . . . . . . . . . . . 7
Vehicle Loading . . . . . . . . . . . . . . . . . . . . . . . . . 284
Vehicle Modifications/Alterations . . . . . . . . . . . . . . 8
Vehicle Storage . . . . . . . . . . . . . . . . . . . . . . . 245,385
Video Entertainment System (Rear Seat Video System) . . . . . . . . . . . . . . . . . . 225
Viscosity, Engine Oil . . . . . . . . . . . . . . . . . . . . . . 353Warning Flasher, Hazard . . . . . . . . . . . . . . . . . . 328
Warnings and Cautions . . . . . . . . . . . . . . . . . . . . . 7
Warranty Information . . . . . . . . . . . . . . . . . . . . . 419Washer, Adding Fluid . . . . . . . . . . . . . . . . . . . . . 171
Washers, Windshield . . . . . . . . . . . . . . . . . . 126,362
Washing Vehicle . . . . . . . . . . . . . . . . . . . . . . . . . 376
Waxing and Polishing . . . . . . . . . . . . . . . . . . . . . 376
Wheel Alignment and Balance . . . . . . . . . . . . . . . 293
Wheel Mounting . . . . . . . . . . . . . . . . . . . . . . . . 335
Wind Buffeting . . . . . . . . . . . . . . . . . . . . . . . 30,161
Window Fogging . . . . . . . . . . . . . . . . . . . . . 236,245
WindowsPower . . . . . . . . . . . . . . . . . . . . . . . . . . . . . . . 28
Windshield Defroster . . . . . . . . . . . . . . . . 70,235,242
Windshield Washers . . . . . . . . . . . . . . . . . . . . . . 126
Fluid . . . . . . . . . . . . . . . . . . . . . . . . . . . . . . . 362
Windshield Wiper Blades . . . . . . . . . . . . . . . . . . 362
Windshield Wipers . . . . . . . . . . . . . . . . . . . . . . . 126
. . . . . . . . . . . . . . . . . . . . . . 128
Wipers, Intermittent Wipers, Rain Sensitive . . . . . . . . . . . . . . . . . . . . 128INDEX 441
10
442 INDEX
NOTES
NOTES
NOTES
NOTES
NOTES
NOTES
SECTION
TABLE OF CONTENTS
PAGE
INTRODUCTION . . . . . . . . . . . . . . . . . . . . . . . . . . . . . . . . . . . . . . . . . . . . . . . . . . . . . . . . . . . . . 3
THINGS TO KNOW BEFORE STARTING YOUR VEHICLE . . . . . . . . . . . . . . . . . . . . . . . . . . . . . . 9
UNDERSTANDING THE FEATURES OF YOUR VEHICLE . . . . . . . . . . . . . . . . . . . . . . . . . . . . . . 73
UNDERSTANDING YOUR INSTRUMENT PANEL . . . . . . . . . . . . . . . . . . . . . . . . . . . . . . . . . . . 175
STARTING AND OPERATING . . . . . . . . . . . . . . . . . . . . . . . . . . . . . . . . . . . . . . . . . . . . . . . . . 247
WHAT TO DO IN EMERGENCIES . . . . . . . . . . . . . . . . . . . . . . . . . . . . . . . . . . . . . . . . . . . . . . 327
MAINTAINING YOUR VEHICLE . . . . . . . . . . . . . . . . . . . . . . . . . . . . . . . . . . . . . . . . . . . . . . . 341
MAINTENANCE SCHEDULES . . . . . . . . . . . . . . . . . . . . . . . . . . . . . . . . . . . . . . . . . . . . . . . . . . 395
IF YOU NEED CONSUMER ASSISTANCE . . . . . . . . . . . . . . . . . . . . . . . . . . . . . . . . . . . . . . . . . 415
10
INDEX . . . . . . . . . . . . . . . . . . . . . . . . . . . . . . . . . . . . . . . . . . . . . . . . . . . . . . . . . . . . . . . . . . . . 423
10
INTRODUCTION
CONTENTS
䡵 Introduction . . . . . . . . . . . . . . . . . . . . . . . . . . . 4
▫ Roll Over Warning . . . . . . . . . . . . . . . . . . . . . 5
䡵 How To Use This Manual . . . . . . . . . . . . . . . . . . 7䡵 Warnings And Cautions . . . . . . . . . . . . . . . . . . . 7
䡵 Vehicle Identification Number . . . . . . . . . . . . . . . 7
䡵 Vehicle Modifications / Alterations . . . . . . . . . . . 84 INTRODUCTION
INTRODUCTION Thank you for selecting a Jeep威 Grand Cherokee and welcome to our worldwide family. This is a specialized utility vehicle designed for both on-road and off-road use. It can go places and perform tasks for which conventional two-wheel drive vehicles were not intended. However, on-road ride and handling will have a different feel from what drivers experience with other vehicles, so take time to become familiar with your vehicle. The two-wheel drive utility vehicle was designed for on-road use only. It is not intended for off-road driving or use in other severe conditions suited for a four-wheel drive vehicle.
Before you start to drive this vehicle, read this manual. Be sure you are familiar with all vehicle controls, particu- larly those used for braking, steering and transmission and transfer case shifting. Learn how your vehicle handles on different road surfaces. Your driving skills will improve with experience. When driving off-road or working the vehicle, don’t overload it or expect it to overcome the laws of nature. Always observe federal, state, provincial, and local laws wherever you drive. As with other vehicles of this type, failure to operate this vehicle correctly may result in loss of control or an accident. Be sure to read “On-Road/Off-Road Driving Tips” in Section 5 of this manual.
Roll Over Warning Utility vehicles have a significantly higher roll over rate than other types of vehicles. This vehicle has a higher ground clearance, higher center of gravity, and narrower track than many passenger cars. It is capable of perform- ing better in a wide variety of off-road applications. Driven in an unsafe manner, all vehicles can be caused to go out of control. Because of the higher center of gravity and the narrower track, if this vehicle is out of control it may roll over when some other vehicles may not. Do not attempt sharp turns or abrupt maneuvers or other unsafe driving actions that can cause loss of vehicle control. Failure to operate this vehicle safely may result in an accident, roll over of the vehicle, and severe or fatal injury. Drive carefully.
INTRODUCTION 5
Roll Over Warning Label
6 INTRODUCTION
Failure to use driver and passenger seat belts provided is a major cause of severe or fatal injury. In fact, the U.S. government notes that the universal use of existing seat belts could cut the highway death toll by 10,000 or more each year, and could reduce disabling injuries by 2
million annually. In a roll over crash an unbelted person is significantly more likely to die than a person wearing a seat belt. Always buckle up. This manual has been prepared with the assistance of service and engineering specialists to acquaint you with the operation and maintenance of your new vehicle. It is supplemented by a Warranty Information Booklet and various customer oriented documents. You are urged to read these publications carefully. Following the instruc- tions and recommendations in this manual will help assure safe and enjoyable operation of your vehicle.NOTE: After you read the manual, it should be stored in the vehicle for convenient reference and remain with the vehicle when sold so that the new owner will be aware of all safety warnings. When it comes to service, remember that your authorized dealer knows your vehicle best, has the factory-trained technicians and genuine Mopar威 parts, and is interested in your satisfaction.
WARNING!
Engine exhaust, some of its constituents, and certain vehicle components contain or emit chemicals known to the State of California to cause cancer and birth defects or other reproductive harm. In addition, certain fluids contained in vehicles and certain prod- ucts of component wear contain or emit chemicals known to the State of California to cause cancer and birth defects or other reproductive harm.
HOW TO USE THIS MANUAL Consult the table of contents to determine which section contains the information you desire. The detailed index, at the rear of the manual, contains a complete listing of all subjects.
INTRODUCTION 7
WARNINGS AND CAUTIONS This manual contains WARNINGS against operating procedures which could result in an accident or bodily injury. It also contains CAUTIONS against procedures which could result in damage to your vehicle. If you do not read this entire manual you may miss important information. Observe all Warnings and Cautions.
VEHICLE IDENTIFICATION NUMBER The vehicle identification number (VIN) is found on a label located on the left front corner of the instrument panel pad, visible from outside of the vehicle through the windshield. This number also appears on the Automobile Information Disclosure Label affixed to a window on your vehicle. Save this label for a convenient record of your vehicle identification number and optional equip- ment.
8 INTRODUCTION
Vehicle Identification Number
NOTE:
It is illegal to remove the VIN label.
VEHICLE MODIFICATIONS / ALTERATIONS
WARNING!
Any modifications or alterations to this vehicle could seriously affect its roadworthiness and safety and may lead to an accident resulting in serious injury or death.
THINGS TO KNOW BEFORE STARTING YOUR VEHICLE
CONTENTS
䡵 A Word About Your Keys . . . . . . . . . . . . . . . . . .12
▫ Ignition Key . . . . . . . . . . . . . . . . . . . . . . . . . .12
▫ Key-In-Ignition Reminder . . . . . . . . . . . . . . . .13
䡵 Sentry Key Immobilizer System . . . . . . . . . . . . . .13
▫ Important Note About Service . . . . . . . . . . . . .14
▫ Replacement Keys . . . . . . . . . . . . . . . . . . . . . .14
▫ Customer Key Programming . . . . . . . . . . . . . .15
▫ General Information . . . . . . . . . . . . . . . . . . . .16
䡵 Illuminated Entry . . . . . . . . . . . . . . . . . . . . . . . .16䡵 Doors And Door Locks . . . . . . . . . . . . . . . . . . . .16
▫ Manual Door Locks . . . . . . . . . . . . . . . . . . . . .16
▫ Power Door Locks . . . . . . . . . . . . . . . . . . . . .19
䡵 Remote Keyless Entry . . . . . . . . . . . . . . . . . . . . .20
▫ To Unlock The Doors . . . . . . . . . . . . . . . . . . .20
▫ To Lock The Doors . . . . . . . . . . . . . . . . . . . . .21
▫ To Release The Liftgate Flipper Glass . . . . . . . .21
▫ Using The Panic Alarm . . . . . . . . . . . . . . . . . .22
▫ General Information . . . . . . . . . . . . . . . . . . . .2310 THINGS TO KNOW BEFORE STARTING YOUR VEHICLE
▫ Transmitter Battery Service . . . . . . . . . . . . . . .23
䡵 Security Alarm System — If Equipped . . . . . . . . .24
▫ To Set The Alarm . . . . . . . . . . . . . . . . . . . . . .25
▫ To Disarm The System . . . . . . . . . . . . . . . . . . .25
䡵 Liftgate . . . . . . . . . . . . . . . . . . . . . . . . . . . . . . .26
. . . . . . . . . . . . . . . . . . .26
. . . . . . . . . . . . . . . . . . . . . . . .28
▫ Auto Down . . . . . . . . . . . . . . . . . . . . . . . . . .29
▫ Auto Up Feature With Anti-Pinch Protection▫ Liftgate Flipper Glass
䡵 Power Windows
(Driver’s And Front Passenger Door Only)
. . . .29
▫ Window Lockout Switch . . . . . . . . . . . . . . . . .30
▫ Wind Buffeting . . . . . . . . . . . . . . . . . . . . . . . .30
䡵 Occupant Restraints . . . . . . . . . . . . . . . . . . . . . .31▫ Lap/Shoulder Belts . . . . . . . . . . . . . . . . . . . . .32
▫ Lap/Shoulder Belt Operating Instructions . . . . .33
▫ Adjustable Upper Shoulder Belt Anchorage . . . .36
▫ Automatic Locking Mode — If Equipped . . . . .37
▫ Energy Management Feature . . . . . . . . . . . . . .37
▫ Seat Belt Pretensioners . . . . . . . . . . . . . . . . . . .38
▫ Enhanced Seat Belt Use Reminder System(BeltAlert)
. . . . . . . . . . . . . . . . . . . . . . . . . . .38
▫ Seat Belts And Pregnant Women . . . . . . . . . . . .40
▫ Seat Belt Extender . . . . . . . . . . . . . . . . . . . . . .40
▫ Driver And Front Passenger SupplementalRestraint Systems (SRS) . . . . . . . . . . . . . . . . . .41
▫ Child Restraint . . . . . . . . . . . . . . . . . . . . . . . .58
䡵 Engine Break-In Recommendations . . . . . . . . . . .68䡵 Safety Tips
. . . . . . . . . . . . . . . . . . . . . . . . . . . .69
▫ Exhaust Gas . . . . . . . . . . . . . . . . . . . . . . . . . .69
▫ Safety Checks You Should Make Inside TheVehicle . . . . . . . . . . . . . . . . . . . . . . . . . . . . . .70
THINGS TO KNOW BEFORE STARTING YOUR VEHICLE 11
▫ Safety Checks You Should Make Outside The
Vehicle . . . . . . . . . . . . . . . . . . . . . . . . . . . . . .70
12 THINGS TO KNOW BEFORE STARTING YOUR VEHICLE
A WORD ABOUT YOUR KEYS The keys for your new vehicle are enclosed in a plastic bag with the key code number on it. If you received your keys without the bag, ask your authorized dealer to give you the number. The key code can also be obtained by your authorized dealer from your vehicle invoice. Ignition Key Insert the key fully, then turn the switch to one of the four illustrated positions. The key can be inserted or with- drawn only in the OFF position. The gearshift lever must be in the P (Park) position.
Ignition Key Positions
To remove the ignition key, place the gearshift lever in P (Park), turn the ignition key to OFF and remove the key.
Key-In-Ignition Reminder If the driver’s door is opened when the key is in the ignition and not turned to the ON position, a chime will sound to remind you to remove the key.
CAUTION!
Always remove the key from the ignition, and lock all doors when leaving the vehicle unattended.
SENTRY KEY IMMOBILIZER SYSTEM The Sentry Key Immobilizer System (SKIM) prevents unauthorized operation of the vehicle by disabling the engine. The system will shut the engine down after 2
seconds of running if an invalid key is used to start the vehicle. This system utilizes ignition keys which have an electronic chip (transponder) embedded into them. OnlyTHINGS TO KNOW BEFORE STARTING YOUR VEHICLE 13
keys that have been programmed to the vehicle can be used to start and operate the vehicle for longer than the 2 second validation time period. The Sentry Key Immobilizer System does not need to be armed or activated. Operation of the system is automatic regardless of whether or not the vehicle is locked or unlocked. During normal operation, the SKIM indicator light will come on for 3 seconds immediately after the ignition switch is turned on for a bulb check. Afterwards, if the bulb remains on, this indicates a malfunction in the electronics. If the bulb begins to flash immediately after the ignition switch is turned on, this indicates that an invalid key is being used to start the vehicle. Both of these conditions will result in the engine being shut down after 2 seconds of running. Keep in mind that a key which has not been programmed is also considered an invalid key even if it is cut to fit the ignition for that vehicle.
14 THINGS TO KNOW BEFORE STARTING YOUR VEHICLE
If the SKIM indicator light comes on during normal vehicle operation (it has been running for longer than 10
seconds) a fault has been detected in the electronics and the vehicle should be serviced as soon as possible. NOTE: • The Sentry Key Immobilizer System is not compatible with remote starting systems. Use of these systems may result in vehicle starting problems and loss of security protection. • Mobil Speedpass™, additional Sentry Keys, or any other transponder equipped components on the same keychain will not cause a key-related (Transponder) fault unless the additional part is physically held against the ignition key being used when starting the vehicle. Also, cell phones, pagers, or other RF electron- ics will not cause interference with this system.All of the keys provided with your new vehicle have been programmed to the vehicle electronics. Important Note About Service A four digit PIN number is needed to service the Sentry Key Immobilizer System. This number can be obtained from your authorized dealer. However, this number can also be found on your customer invoice that you were given upon receipt of your vehicle. Replacement Keys
NOTE: Only keys that have been programmed to the vehicle electronics can be used to start the vehicle. Once a Sentry Key has been programmed to a vehicle, it cannot be programmed to any other vehicle.
At the time of purchase, the original owner is provided with a four digit PIN number. This number is required for dealer replacement of keys. Duplication of keys may be performed at an authorized dealer or by using the Customer Key Programming procedure. This procedure consists of programming a blank key to the vehicle electronics. A blank key is one which has never been programmed. NOTE: When having the Sentry Key System serviced, bring all vehicle keys to the dealer. Customer Key Programming
You can program new keys to the system if you have two valid keys by doing the following: 1. Cut the additional Sentry Key Transponder blank(s) to match the ignition switch lock cylinder key code.
THINGS TO KNOW BEFORE STARTING YOUR VEHICLE 15
2. Insert the first valid key into the ignition switch and turn the ignition switch ON for at least 3 seconds but no longer than 15 seconds. Turn the ignition switch OFF and remove the first key. 3. Insert the second valid key and turn the ignition switch ON within 15 seconds. After ten seconds, a chime will sound and the SKIM indicator light will begin to flash. Turn the ignition switch OFF and remove the second key. 4. Insert a blank Sentry Key into the ignition switch and turn the ignition switch ON within 60 seconds. After 10
seconds, a single chime will sound. The SKIM indicator light will stop flashing, turn on for 3 seconds; then turn off. The new Sentry Key has been programmed. Repeat this process to program up to a total of 8 keys.16 THINGS TO KNOW BEFORE STARTING YOUR VEHICLE
General Information The Sentry Key Immobilizer System complies with FCC rules part 15 and with RSS-210 of Industry Canada. Operation is subject to the following two conditions: 1. This device may not cause harmful interference. 2. This device must accept any interference that may be received, including interference that may cause undes- ired operation.
ILLUMINATED ENTRY The interior lights come on when you open any door. They will remain on for about 30 seconds after all doors are closed then fade to off. The lights also will fade to off if you turn on the ignition after you close all the doors.
DOORS AND DOOR LOCKS
Manual Door Locks Use the manual door lock plunger to lock the doors from inside the vehicle. If the plunger is down when the door is closed, the door will lock. Therefore, make sure the keys are not inside the vehicle before closing the door.
WARNING!
For personal security, and safety in the event of an accident, lock the vehicle doors as you drive as well as when you park and leave the vehicle.
THINGS TO KNOW BEFORE STARTING YOUR VEHICLE 17
Child Protection Locks The rear doors of your vehicle are equipped with child protection locks. If you push up on the lever on the open edge of the door it cannot be opened from the inside of the vehicle. Push the lever down to disengage the child protection locks.
WARNING!
When leaving the vehicle always remove the key from the ignition lock, and lock your vehicle. Do not leave children unattended in the vehicle, or with access to an unlocked vehicle. Unsupervised use of vehicle equipment may cause severe personal inju- ries and death.
CAUTION!
An unlocked vehicle is an invitation to thieves. Always remove the key from the ignition and lock all of the doors when leaving the vehicle unattended.
18 THINGS TO KNOW BEFORE STARTING YOUR VEHICLE
WARNING!
Avoid trapping anyone in the vehicle in a collision. Remember that the rear doors can only be opened from the outside when the child protection locks are engaged.
Child Lock Control
Power Door Locks A door lock switch is on each front door panel. Press this switch to lock or unlock the doors.
Power Door Lock Switch
If the plunger is down when the door is closed, the door will lock. Therefore, make sure the keys are not inside the vehicle before closing the door.
THINGS TO KNOW BEFORE STARTING YOUR VEHICLE 19
If you press the door lock switch while the keys are in the ignition switch, and the driver’s door is open, the doors will not lock. The rear doors cannot be opened from inside the vehicle until you pull up the lock plungers. Automatic Door Locks lock If this feature is selected your door locks will automatically if the vehicle speed is above 15 mph (24
km/h) and all doors are closed. It will reset whenever a door is opened. This feature is selectable and can be turned on or off. Refer to “Electronic Vehicle Information Center (EVIC) — Customer Programmable Features” in Section 4 of this manual or see your authorized dealer.20 THINGS TO KNOW BEFORE STARTING YOUR VEHICLE
Automatic Unlock on Exit Feature — Only Available if Auto Lock is Enabled This feature will unlock all the doors when the driver’s door is opened if the vehicle is stopped and in P (Park) or N (Neutral). Refer to “Electronic Vehicle Information Center (EVIC) — Customer Programmable Features” in Section 4 of this manual or see your authorized dealer.
REMOTE KEYLESS ENTRY This system allows you to lock or unlock the doors, liftgate, or activate the panic alarm from distances up to about 23 feet (7 meters) using a hand held radio trans- mitter. The transmitter need not be pointed at the vehicle to activate the system. If the key is in the ignition switch, then all NOTE: buttons on that transmitter will be disabled. The buttons on the remaining transmitters will work. If the vehicle is shifted out of P (Park), all the transmitter buttons are disabled for all keys.
Four Button Transmitter
To Unlock the Doors Press and release the “Unlock” button on the transmitter once to unlock the driver’s door, or twice to unlock all doors. The turn signal lights will flash twice to acknowl- edge the unlock signal. The illuminated entry system also turns on.
If desired, the system can be programmed to NOTE: unlock all doors on the first press of the “Unlock” button. Refer to “Remote Unlock Driver’s Door 1st” in the Personal Settings section of the “Electronic Vehicle Infor- mation Center (EVIC)”, or simply follow these steps: 1. Press and hold the “Lock” button for 4 to 10 seconds. 2. While the “Lock” button is pressed, (after 4 seconds) press the “Unlock” button. Release both buttons. The “Remote Unlock Driver’s Door 1st” feature can be reactivated by repeating this procedure. To Lock the Doors Press and release the “Lock” button on the transmitter to lock all doors. The turn signal lights will flash once to acknowledge the lock signal. The horn will chirp once to acknowledge the signal. If desired, the “Sound Horn On Lock” feature can be turned on and off by referring to the
THINGS TO KNOW BEFORE STARTING YOUR VEHICLE 21
Customer Programmable Features of the “Electronic Ve- hicle Information Center (EVIC)” section or by following these steps. 1. Press and hold the “Lock” button for 4 to 10 seconds. 2. While the “Lock” button is pressed (after 4 seconds), press the PANIC button. Release both buttons. The “Sound Horn On Lock” feature can be reactivated by repeating this procedure. To Release the Liftgate Flipper Glass Press the “Flipper Glass/Trunk Release” button on the transmitter two times to release the flipper glass.
22 THINGS TO KNOW BEFORE STARTING YOUR VEHICLE
WARNING!
Driving with the flipper glass open can allow poi- sonous exhaust gases into your vehicle. You and your passengers could be injured by these fumes. Keep the flipper glass closed when you are operating the vehicle.
Using The Panic Alarm To turn the panic alarm feature ON or OFF, press and hold the PANIC button on the transmitter for at least one second and release. When the panic alarm is on, the headlights and park lights will flash, the horn will pulse on and off and the interior lights will turn on. The panic alarm will stay on for 3 minutes unless you turn it off by pressing the PANIC button a second time or if the vehicle speed is 15 mph (24 km/h) or greater.
NOTE: The interior lights will turn off when the ignition is switched to the ACC or ON position after the panic alarm is activated. However, the exterior lights and horn will remain on. NOTE: When you turn off the panic alarm by pressing the PANIC button a second time, you may have to be closer to the vehicle due to the radio frequency noises of the system. To Turn Off “Flash Lights On Lock/Unlock”
If desired, the “Flash Lights On Lock/Unlock” NOTE: feature can be turned on and off by referring to the Customer Programmable Features of the “Electronic Ve- hicle Information Center (EVIC)” section or by following these steps. 1. Press and hold the “Unlock” button for 4 to 10
seconds.2. While the “Unlock” button is pressed, (after 4 seconds) press the “Lock” button. Release both buttons. The “Flash Lights On Lock/Unlock” feature can be reactivated by repeating this procedure. General Information This device complies with part 15 of the FCC rules and RSS 210 of Industry Canada. Operation is subject to the following conditions: • This device may not cause harmful interference. • This device must accept any interference received, including interference that may cause undesired op- eration.
THINGS TO KNOW BEFORE STARTING YOUR VEHICLE 23
If your Remote Keyless Entry transmitter fails to operate from a normal distance, check for these two conditions. 1. A weak battery in the transmitter. The expected life of the battery is a minimum of three years. 2. Closeness to a radio transmitter such as a radio station tower, airport transmitter, and some mobile or CB radios. Transmitter Battery Service The recommended replacement battery is one CR2032
battery. NOTE: Do not touch the battery terminals that are on the back housing or the printed circuit board.24 THINGS TO KNOW BEFORE STARTING YOUR VEHICLE
1. With the transmitter buttons facing down, remove the small screw, and separate the two halves of the transmit- ter. Make sure not to damage the rubber gasket during removal.
Separating Transmitter Halves
2. Remove and replace the battery. Avoid touching the new battery with your fingers. Skin oils may cause battery deterioration. If you touch a battery, clean it with rubbing alcohol. 3. To reassemble the transmitter case, join the two halves of the case together. Install and tighten the screw until snug. Make sure there is an even “gap” between the two halves. Test transmitter operation.
SECURITY ALARM SYSTEM — IF EQUIPPED This system monitors the vehicle doors, liftgate, liftgate flipper glass, and ignition for unauthorized operation. When the alarm is activated, the system provides both audible and visual signals. The horn will sound repeat- edly for three minutes and the headlights and taillights will flash for an additional 15 minutes.
To Set the Alarm The alarm will set when you use the remote keyless entry transmitter to lock the doors and liftgate or when you use the power door lock switch while the door is open. After all the doors are locked and closed, a red light (located in the instrument cluster) will flash rapidly for about 16
seconds to signal that the system is arming. During this 16 second pre-arm period, opening any door or the liftgate will cancel the arming. If the system successfully arms, the red light will flash at a slower rate to indicate the alarm is set. A manual lock of the doors, either with the door lock plunger located on the inside of the doors or with the driver’s door key lock cylinder, will not set the alarm.THINGS TO KNOW BEFORE STARTING YOUR VEHICLE 25
To Disarm the System To disarm the system, use the remote keyless entry transmitter. Also, using a valid sentry key and moving the ignition switch to the ON/START position will disarm the system. If something has triggered the system in your absence, the horn will sound three times when you unlock the doors. Check the vehicle for tampering. The Security Alarm System is designed to protect your vehicle; however, you can create conditions where the system will arm unexpectedly. If you remain in the vehicle and lock the doors with the transmitter, once the system is armed (after 16 seconds), when you pull the door handle to exit the alarm will sound. If this occurs, press the “Unlock” button on the remote keyless entry transmitter to disarm the system. The Security Alarm System will not disarm with a manual unlock, either through the lock plunger located on the inside of the door, or through a key in the driver’s door key cylinder.
26 THINGS TO KNOW BEFORE STARTING YOUR VEHICLE
LIFTGATE To open the liftgate, pull up (squeeze) on the handle and lift. Manually unlocking the vehicle doors with the plunger or a key in the lock cylinder will not unlock the liftgate.
WARNING!
Driving with the liftgate open can allow poisonous exhaust gases into your vehicle. You and your pas- sengers could be injured by these fumes. Keep the liftgate closed when you are operating the vehicle.
Liftgate Flipper Glass The liftgate flipper glass is also unlocked when the liftgate is unlocked. To open the flipper glass, push up on the window switch located on the liftgate.
Liftgate Release
THINGS TO KNOW BEFORE STARTING YOUR VEHICLE 27
Once the liftgate flipper glass has been opened, connec- tion to the rear window wiper is interrupted, preventing activation of the rear wiper blade while the flipper glass is open. If a power malfunction to the power liftgate NOTE: latch should occur, an emergency liftgate latch release can be used to open the liftgate. The emergency liftgate latch release can be accessed through a snap-in cover located on the liftgate trim panel.
WARNING!
Driving with the flipper glass open can allow poi- sonous exhaust gases into your vehicle. You and your passengers could be injured by these fumes. Keep the flipper glass closed when you are operating the vehicle.
Liftgate Glass Release
WARNING!
To avoid injury stand back when opening. Glass will automatically rise.
28 THINGS TO KNOW BEFORE STARTING YOUR VEHICLE
POWER WINDOWS The power window controls are located on the driver’s door trim panel. There is a single switch on the front passenger door/rear doors which operates the front passenger/rear passenger door windows. The window controls will operate only when the ignition switch is in the ON or ACCESSORY position.
Power Window Switches
The power window switches remain active for up to 10
minutes after the ignition switch has been turned off. Opening a vehicle front door will cancel this feature.Auto Down Both the driver and front passenger window switch has an “Auto Down” feature. Press the window switch past the first detent, release, and the window will go down automatically. To cancel the “Auto Down” movement, operate the switch in either the up or down direction and release the switch. To stop the window from going all the way down during the auto-down operation, pull up on the switch briefly. To open the window part way, press to the first detent and release it when you want the window to stop. The power window switches remain active for 10 min- utes after the ignition has been turned off. Opening either front door will cancel this feature.
THINGS TO KNOW BEFORE STARTING YOUR VEHICLE 29
Auto Up Feature with Anti-Pinch Protection (Driver’s and Front Passenger Door Only) Lift the window switch to the second detent, release, and the window will go up automatically. To stop the window from going all the way up during the auto-up operation, push down on the switch briefly. To close the window part way, lift the window switch to the first detent and release when you want the window to stop. If the window runs into any obstacle during the NOTE: auto-closure it will reverse direction and then stop. Remove the obstacle and use the window switch again to close the window. Any impact due to rough road condi- tions may trigger the auto reverse function unexpectedly during auto closure. If this happens pull the switch lightly to the first detent and hold to close the window manually.
30 THINGS TO KNOW BEFORE STARTING YOUR VEHICLE
WARNING!
There is no anti-pinch protection when the window is almost closed. Be sure to clear all objects from the window before closing.
Resetting the Auto-Up Feature Should the Auto-Up feature stop working the window probably needs to be reset. To reset Auto-Up: Pull the window switch up and close the window com- pletely, then pull and hold the switch for 1 second. Window Lockout Switch The window lockout switch on the driver’s door allows you to disable the window control on the other doors. To disable the window controls on the other doors, press the window lockout button. To enable the window controls, press the window lockout button again.
Wind Buffeting
Power Window Lock
Wind buffeting can be described as the perception of pressure on the ears or a helicopter type sound in the ears. Your vehicle may exhibit wind buffeting with the windows down, or the sunroof (if equipped) in certain
open or partially open positions. This is a normal occur- rence and can be minimized. If the buffeting occurs with the sunroof open, adjust the sunroof opening to minimize the buffeting.
Please pay close attention to the information in this section. It tells you how to use your restraint system properly to keep you and your passengers as safe as possible.
THINGS TO KNOW BEFORE STARTING YOUR VEHICLE 31
OCCUPANT RESTRAINTS Some of the most important safety features in your vehicle are the restraint systems. These include the front and rear seat belts for the driver and all passengers, front airbags for both the driver and right front passenger, and, if equipped, window bags for the driver and passengers seated next to a window. If you will be carrying children too small for adult-size belts, your seat belts also can be used to hold infant and child restraint systems. NOTE: The front airbags have a multi stage inflator design. This allows the airbag to have different rates of inflation that are based on collision severity.
WARNING!
In a collision, you and your passengers can suffer injuries, including fatalities, if you are not properly buckled up. You can strike the interior of your vehicle or other passengers, or you can be thrown out of the vehicle. Always be sure you and others in your vehicle are buckled up properly.
Buckle up even though you are an excellent driver, even on short trips. Someone on the road may be a poor driver and cause a collision which includes you. This can happen far away from home or on your own street.
32 THINGS TO KNOW BEFORE STARTING YOUR VEHICLE
Research has shown that seat belts save lives, and they can reduce the seriousness of injuries in a collision. Some of the worst injuries happen when people are thrown from the vehicle. Seat belts reduce the possibility of ejection and the risk of injury caused by striking the inside of the vehicle. Everyone in a motor vehicle should be belted at all times to reduce or prevent injuries. Lap/Shoulder Belts All seating positions in your vehicle have combination lap/shoulder belts. The belt webbing retractor is de- signed to lock during very sudden stops or collisions. This feature allows the shoulder part of the belt to move freely with you under normal conditions. But in a colli- sion, the belt will lock and reduce the risk of you striking the inside of the vehicle or being thrown out.
WARNING!
• Wearing a seat belt incorrectly is dangerous. Seat belts are designed to go around the large bones of your body. These are the strongest parts of your body and can take the forces of a collision the best. Wearing your belt in the wrong place could make your injuries in a collision much worse. You might suffer internal injuries, or you could even slide out of part of the belt. Follow these instruc- tions to wear your seat belt safely and to keep your passengers safe, too. • Two people should never be belted into a single seat belt. People belted together can crash into one another in an accident, hurting one another badly. Never use a lap/shoulder belt or a lap belt for more than one person, no matter what their size.
Lap/Shoulder Belt Operating Instructions
1. Enter the vehicle and close the door. Sit back and adjust the seat. 2. The seat belt latch plate is above the back of your seat. Grasp the latch plate and pull out the belt. Slide the latch plate up the webbing as far as necessary to make the belt go around your lap.
THINGS TO KNOW BEFORE STARTING YOUR VEHICLE 33
Latch Plate
34 THINGS TO KNOW BEFORE STARTING YOUR VEHICLE
3. When the belt is long enough to fit, insert the latch plate into the buckle until you hear a “click.”
Latch Plate To Buckle
WARNING!
A belt that is buckled into the wrong buckle will not protect you properly. The lap portion could ride too high on your body, possibly causing internal injuries. Always buckle your belt into the buckle nearest you. A belt that is too loose will not protect you as well. In a sudden stop you could move too far forward, increasing the possibility of injury. Wear your seat belt snugly. A belt that is worn under your arm is very dangerous. Your body could strike the inside surfaces of the vehicle in a collision, increasing head and neck injury. A belt worn under the arm can cause internal injuries. Ribs aren’t as strong as shoulder bones. Wear the belt over your shoulder so that your strongest bones will take the force in a collision. A shoulder belt placed behind will not protect you from injury during a collision. You are more likely to hit your head in a collision if you do not wear your shoulder belt. The lap and shoulder belt are meant to be used together.
4. Position the lap belt across your thighs, below your abdomen. To remove slack in the lap portion, pull up a bit on the shoulder belt. To loosen the lap belt if it is too tight, tilt the latch plate and pull on the lap belt. A snug belt reduces the risk of sliding under the belt in a collision.
WARNING!
A lap belt worn too high can increase the risk of injury in a collision. The belt forces won’t be at the strong hip and pelvic bones, but across your abdo- men. Always wear the lap part of your seat belt as low as possible and keep it snug. A twisted belt can’t do its job as well. In a collision it could even cut into you. Be sure the belt is straight. If you can’t straighten a belt in your vehicle, take it to your authorized dealer and have it fixed.
THINGS TO KNOW BEFORE STARTING YOUR VEHICLE 35
5. Position the shoulder belt on your chest so that it is comfortable and not resting on your neck. The retractor will withdraw any slack in the belt.
Removing Slack From Belt
Adjustable Upper Shoulder Belt Anchorage In the front seating positions, the shoulder belt can be adjusted upward or downward to position the belt away from your neck. Press the release button to release the anchorage, and then move it up or down to the position that serves you best.
36 THINGS TO KNOW BEFORE STARTING YOUR VEHICLE
6. To release the belt, push the red button marked PRESS on the buckle. The belt will automatically retract to its stowed position. If necessary, slide the latch plate down the webbing to allow it to retract fully.
WARNING!
A frayed or torn belt could rip apart in a collision and leave you with no protection. Inspect the belt system periodically, checking for cuts, frays, or loose parts. Damaged parts must be replaced immediately. Do not disassemble or modify the system. Seat belt assemblies must be replaced after an accident if they have been damaged (bent retractor, torn webbing, etc.).
Adjusting Upper Shoulder Belt
As a guide, if you are shorter than average, you will prefer a lower position, and if you are taller than average, you’ll prefer a higher position. When you release the anchorage, try to move it up or down to make sure that it is locked in position. Automatic Locking Mode — If Equipped In this mode, the shoulder belt is automatically pre- locked. The belt will still retract to remove any slack in the shoulder belt. When To Use The Automatic Locking Mode Anytime a child safety seat is installed in the rear center seating position. Children 12 years old and under should be properly restrained in the rear seat whenever possible. How To Use The Automatic Locking Mode 1. Buckle the combination lap and shoulder belt. 2. Grasp the shoulder portion and pull downward until the entire belt is extracted.
THINGS TO KNOW BEFORE STARTING YOUR VEHICLE 37
3. Allow the belt to retract. As the belt retracts, you will hear a clicking sound. This indicates the safety belt is now in the automatic locking mode. How to Disengage The Automatic Locking Mode Disconnect the combination lap/shoulder belt and allow it to retract completely to disengage the automatic lock- ing mode and activate the vehicle sensitive (emergency) locking mode. Energy Management Feature This vehicle has a safety belt system with an energy management feature in the front seating positions to help further reduce the risk of injury in the event of a head-on collision. This safety belt system has a retractor assembly that is designed to release webbing in a controlled manner. This feature is designed to help reduce the belt force acting on the occupant’s chest.
38 THINGS TO KNOW BEFORE STARTING YOUR VEHICLE
WARNING!
• The belt and retractor assembly must be replaced if the seat belt assembly “automatic locking re- tractor” feature or any other seat belt function is not working properly when checked according to the procedures in the Service Manual. • Failure to replace the belt and retractor assembly
could increase the risk of injury in collisions.
Seat Belt Pretensioners The driver and front passenger seat belts are equipped with a pretensioning device that is designed to remove any slack from the seat belt systems in the event of a collision. This device improves the performance of the seat belt by assuring that the belt is tight around the occupant early in a collision. Pretensioners work for all size occupants, including those in child restraints.
NOTE: These devices are not a substitute for proper seat belt placement by the occupant. The seat belt must still be worn snugly and positioned properly. The pretensioners are triggered by the Occupant Re- straint Control (ORC) Module. Like the front airbags, the pretensioners are a single use item. After a collision that is severe enough to deploy the airbags and pretensioners, they must be replaced. Enhanced Seat Belt Use Reminder System (BeltAlert) If the driver or front passenger seat belt has not been buckled within 60 seconds of starting the vehicle and if the vehicle speed is greater than 5 mph (8 km/h), the Enhanced Warning System (BeltAlert) will alert the driver or front passenger to buckle their seat belt. The driver should also instruct all other occupants to buckle their seat belts. Once the warning is triggered, the Enhanced Warning System (BeltAlert) will continue to
chime and flash the Seat Belt Warning Light for 96
seconds or until the driver or front passenger seat belt is buckled. The Enhanced Warning System (BeltAlert) will be reactivated if the driver or front passenger seat belt is unbuckled for more than 10 seconds and the vehicle speed is greater than 5 mph (8 km/h). The Enhanced Warning System (BeltAlert) can be en- abled or disabled by your authorized dealer or by following these steps: NOTE: The following steps must occur within the first 60 seconds of the ignition switch being turned to the ON or START position. The manufacturer does not recom- mend deactivating the Enhanced Warning System (BeltAlert). 1. Turn the ignition switch to the OFF position, and buckle the driver or front passenger seat belt.THINGS TO KNOW BEFORE STARTING YOUR VEHICLE 39
2. Turn the ignition key to the ACCESSORY/RUN posi- tion (engine does not need to be running), and wait for the Seat Belt Warning Light to turn off. 3. Within 60 seconds of starting the vehicle, unbuckle and then re-buckle the driver or front passenger seat belt at least three times with 10 seconds, ending with the seat belt buckled. 4. Turn the ignition key to the OFF position. A single chime will sound to signify that you have successfully completed the programming. The Enhanced Warning System (BeltAlert) can be reacti- vated by repeating this procedure. NOTE: Although the Enhanced Warning System (BeltAlert) has been deactivated, the Seat Belt Warning Light will continue to illuminate while the driver or front passenger seat belt remains unfastened.
WARNING!
Using a seat belt extender when not needed can increase the risk of injury in a collision. Only use when the lap belt is not long enough when it is worn low and snug, and in the recommended seating positions. Remove and store the extender when not needed.
40 THINGS TO KNOW BEFORE STARTING YOUR VEHICLE
Seat Belts and Pregnant Women We recommend that pregnant women use the seat belts throughout their pregnancy. Keeping the mother safe is the best way to keep the baby safe. Pregnant women should wear the lap part of the belt across the thighs and as snug across the hips as possible. Keep the belt low so that it does not come across the abdomen. That way the strong bones of the hips will take the force if there is a collision. Seat Belt Extender If a seat belt is too short, even when fully extended and when the adjustable upper shoulder belt anchorage (if equipped) is in its lowest position, your authorized dealer can provide you with a seat belt extender. This extender should be used only if the existing belt is not long enough. When it is not required, remove the ex- tender and store it.
Driver And Front Passenger Supplemental Restraint Systems (SRS)
Front Airbag Components
THINGS TO KNOW BEFORE STARTING YOUR VEHICLE 41
This vehicle has airbags for both the driver and right front passenger as a supplement to the seat belt restraint systems. The driver’s front airbag is mounted in the steering wheel. The passenger side airbag is mounted in the instrument panel, above the glove compartment. The words SRS/AIRBAG are embossed on the airbag covers. NOTE: The front airbags are certified to the Federal regulations that allow less forceful deployment. The front airbags have a multistage inflator design. This may allow the airbag to have different rates of inflation that are based on collision severity and occupant size. Also, the front passenger airbag is certified to the Federal regulations that define Occupant Classification (Refer to ⬙Occupant Classification System⬙ in this section).
42 THINGS TO KNOW BEFORE STARTING YOUR VEHICLE
This vehicle may also be equipped with window bags to protect the driver, front, and rear passengers sitting next to a window. If the vehicle is equipped with window bags, they are located above the side windows. Their covers are also labeled SRS/AIRBAG.
NOTE: Airbag covers may not be obvious in the interior trim; but they will open to allow airbag deployment.
Window Airbag Location
WARNING!
• Do not put anything on or around the front airbag covers or attempt to manually open them. You may damage the airbags and you could be injured because the airbags are no longer functional. These protective covers for the airbag cushions are designed to open only when the airbags are inflating. • If your vehicle is equipped with window bags, do not stack luggage or other cargo up high enough to block the location of the window bag. The area where the window bag is located should remain free from any obstructions. • If your vehicle is equipped with window bags, do not have any accessory items installed which will alter the roof, including adding a sunroof to your vehicle. Do not add roof racks that require permanent attachments (bolts or screws) for installation on the vehicle roof. Do not drill into the roof of the vehicle for any reason. • Do not cover or place items on the airbag covers. These
items may cause serious injury during inflation.
THINGS TO KNOW BEFORE STARTING YOUR VEHICLE 43
The front airbags have a multi stage inflator design. This allows the airbag to have different rates of inflation that are based on collision severity. Along with the seat belts, front airbags work with the instrument panel knee bol- sters to provide improved protection for the driver and front passenger. Window bags also work with seat belts to improve occupant protection. The seat belts are designed to protect you in many types of collisions. The front airbags deploy in moderate to severe frontal collisions. NOTE: The passenger front airbag may not deploy even when the driver front airbag has if the Occupant Classi- fication System (refer to ⬙Occupant Classification System⬙ in this section) has determined the passenger seat is empty or is occupied by someone that is classified in the ⬙small child⬙ category.
44 THINGS TO KNOW BEFORE STARTING YOUR VEHICLE
If your vehicle is so equipped, the window bag on the crash side of the vehicle is triggered in moderate to severe side collisions. In certain types of collisions, both the front and side airbags may be triggered. But even in collisions where the airbags work, you need the seat belts to keep you in the right position for the airbags to protect you properly. Here are some simple steps you can take to minimize the risk of harm from a deploying airbag. 1. Children 12 years and under should always ride buckled up in a rear seat. Infants in rear facing child restraints should NEVER ride in the front seat of a vehicle with a passenger airbag. An airbag deployment could cause severe injury or death to infants in that position. Children that are not big enough to properly wear the vehicle seat belt should be secured in the rear seat, in a
child restraint or belt-positioning booster seat. Older children who do not use child restraints or belt- positioning booster seats should ride properly buckled up in the rear seat. Never allow children to slide the shoulder belt behind them or under their arm. If a child from 1 to 12 years old must ride in the front passenger seat because the vehicle is crowded, move the seat as far back as possible, and use the proper child restraint. See “Child Restraint” in this section. You should read the instructions provided with your child restraint to make sure that you are using it properly. 2. All occupants should use their lap and shoulder belts properly. 3. The driver and front passenger seats should be moved back as far as practical to allow the front airbags room to inflate.
4. If your vehicle has window bags, do not lean against the door or window, airbags will inflate forcefully into the space between you and the door. 5. If the airbag system in this vehicle needs to be modified to accommodate a disabled person, contact the Customer Center. Phone numbers are provided under “If You Need Assistance” in Section 9 of this manual.
THINGS TO KNOW BEFORE STARTING YOUR VEHICLE 45
WARNING!
• Relying on the airbags alone could lead to more severe injuries in a collision. The airbags work with your seat belt to restrain you properly. In some collisions the airbags won’t deploy at all. Always wear your seat belts even though you have airbags. • Being too close to the steering wheel or instru- ment panel during airbag deployment could cause serious injury. Airbags need room to inflate. Sit back, comfortably extending your arms to reach the steering wheel or instrument panel. • If the vehicle has left and right side curtain airbags, they also need room to inflate. Do not lean against the door or window. Sit upright in the center of the seat.
46 THINGS TO KNOW BEFORE STARTING YOUR VEHICLE
Airbag System Components The airbag system consists of the following: • Occupant Restraint Control Module • Airbag Warning Light • Driver Airbag • Passenger Airbag • Side Curtain Airbags above Side Windows • Side Remote Acceleration Sensors (If Equipped) • Steering Wheel and Column • Instrument Panel • Interconnecting Wiring • Knee Impact Bolsters • Front Acceleration Sensors
Equipped)
(If
• Driver and Front Passenger Seat Belt Pretensioner • Occupant Classification System (OCS) — Front Pas-
senger Seat Only − Occupant Classification Module − Passenger Airbag Disable (PAD) Indicator Light − Weight Sensors
How The Airbag System Works • The Occupant Restraint Control (ORC) Module de- termines if a frontal, side, or rollover collision is severe enough to require the front and/or side airbags to inflate. The front airbag inflators are designed to provide different rates of airbag inflation from direc- tion provided by the ORC. The ORC may also modify the rate of inflation based on the occupant size pro- vided by the Occupant Classification Module. The ORC will detect roll overs, not rear impacts.
The ORC also monitors the readiness of the electronic parts of the system whenever the ignition switch is in the START or ON positions. These include all of the items listed above except the knee bolster, the instru- ment panel, and the steering wheel and column. If the key is in the LOCK position, in the ACC position, or not in the ignition, the airbags are not on and will not inflate.
Also, the ORC turns on the “Airbag Warning Light” and “PAD Indicator Light” for 6 to 8
seconds for a self-check when the ignition is first turned on. After the self-check, the “Airbag Warning Light” will turn off. The “PAD Indicator Light” will function normally (Refer to ⬙Pas- senger Airbag Disable (PAD) Indicator Light⬙ in this section). If the ORC detects a malfunction in any part of the system, it turns on the “Airbag Warning Light”THINGS TO KNOW BEFORE STARTING YOUR VEHICLE 47
either momentarily or continuously. A single chime will sound if the light comes on again after initial start up.
WARNING!
Ignoring the “Airbag Warning Light” in your instru- ment panel could mean you won’t have the airbags to protect you in a collision. If the light does not come on, stays on after you start the vehicle, or if it comes on as you drive, have the airbag system checked right away. • The Occupant Classification System (OCS) is part of a Federally regulated safety system required for this vehicle. It is designed to turn off the front passenger airbag in the unlikely event that a rear-facing infant seat is in the front passenger seat.
48 THINGS TO KNOW BEFORE STARTING YOUR VEHICLE
NOTE: Children 12 years and under should always ride buckled up in a rear seat in an appropriate child restraint. • The Passenger Airbag Disable (PAD) Indicator Light (an amber light located in the center of the instrument panel) tells the driver and front passenger when the front passenger airbag is turned off. The “PAD Indi- cator Light” illuminates the words ⬙PASS AIR BAG OFF⬙ to show that the passenger airbag will not inflate during a collision requiring airbags. When the right front passenger seat is empty or when very light objects are placed on the seat, the passenger airbag will not inflate even though the “PAD Indicator Light” is not illuminated.
Indicator Light Location
The “PAD Indicator Light” should not be illuminated when teenagers, most children in a forward-facing child restraint or booster seats, most children that can properly wear the vehicle’s seat belt, and when an adult passenger is properly seated in the front passen- ger seat. In this case, the airbag is ready to be inflated if a collision requiring an airbag occurs.
For almost all properly installed rear facing child re- straints, the “PAD Indicator Light” will be illuminated indicating that the front passenger airbag is turned off and will not inflate. If the “PAD Indicator Light” is not illuminated, DO NOT assume the airbag is turned off and move the child restraint to the rear seat. A deploying passenger airbag can cause death or serious injury to a child in a rear facing infant seat.
THINGS TO KNOW BEFORE STARTING YOUR VEHICLE 49
NOTE: Even though this vehicle is equipped with an Occupant Classification System, children 12 years and under should always ride buckled up in a rear seat in an appropriate child restraint.
Front Passenger Seat Occupant
Adult
Passenger Air- bag Disable
(PAD) Indicator
Light OFF
Grocery Bags,
Heavy Briefcases and Other Rela- tively Light Ob-
jects
ON
Airbag Status
ON
OFF
Empty or Very Small Objects * Since the system senses weight, some small objects
OFF*
OFF
will turn the PAD Indicator Light on.
50 THINGS TO KNOW BEFORE STARTING YOUR VEHICLE
The OCS classifies an occupant using weight sensors mounted in the base of the front passenger seat. Any weight on the seat will be sensed by the system. Objects hanging on the seat or other passengers pushing down on the seat will also be sensed. The weight of an adult will cause the system to turn the airbag on. In this case, the OCS has classified the occupant of the seat as an adult. An adult occupant needs to sit in a normal position (with their feet on or near the floor) in order to be properly classified. Reclining the seat back too far may change how an occupant is classified by the OCS. Drivers and adult passengers should verify that the “PAD Indicator Light” is not illuminated when an adult is riding in the front passenger seat. If an adult occu- pant’s weight is transferred to another part of the vehicle (like the door or instrument panel), the weight sensors in the seat may not properly classify the occupant. Objects lodged under the seat or between the seat and the center console can prevent the occupant’s weight from being
measured properly and may result in the occupant being improperly classified. Ensure that the front passenger seat back does not touch anything placed on the back seat because this can also affect occupant classification. Also, if you fold down the rear seat check to be sure it doesn’t touch the front passenger seat. If the front passenger seat is damaged in any way, it should only be serviced by an authorized dealer. If the seat is removed (or even if the seat attachment bolts are loosened or tightened in any way), take the vehicle to an authorized dealer. If there is a fault present in the OCS, the “Airbag Warning Light” (a red light located in the center of the instrument cluster directly in front of the driver) will be turned on. This indicates that you should take the vehicle to an authorized dealer. The “Airbag Warning Light” is turned on whenever there is fault that can affect the operation of the airbag system. If there is a fault present in the OCS,
both the “PAD Indicator Light” and the “Airbag Warning Light” are illuminated to show that the passenger airbag is turned off until the fault is cleared. If an object is lodged under the seat and interferes with operation of the weight sensors, a fault will occur which turns on both the “PAD Indicator Light” and the “Airbag Warning Light.” Once the lodged object is removed, the fault will be automatically cleared after a short period of time. • The Driver and Passenger Airbag/Inflator Units are located in the center of the steering wheel and the right side of the instrument panel. When the ORC detects a collision requiring the airbags, it signals the inflator units. A large quantity of nontoxic gas is generated to inflate the front airbags. Different airbag inflation rates are possible, based on collision severity and occupant size. The steering wheel hub trim cover and the upper right side of the instrument panel separate and fold out of the way as the bags inflate to their full size. The bags fully inflate in about 50–70 milliseconds. This is
THINGS TO KNOW BEFORE STARTING YOUR VEHICLE 51
about half of the time it takes to blink your eyes. The bags then quickly deflate while helping to restrain the driver and front passenger. The driver front airbag gas is vented through the vent holes in the sides of the airbag. The passenger front airbag gas is vented through the vent holes in the sides of the airbag. In this way, the airbags do not interfere with your control of the vehicle. • The Occupant Classification Module (OCM) is lo- cated beneath the front passenger seat. The OCM classifies the occupant into categories based on the measurements made by the seat weight sensors. The OCM communicates with the Occupant Restraint Con- trol (ORC) Module. The ORC uses the occupant cat- egory to determine whether the front passenger airbag should be turned off. It also determines the rate of airbag inflation during a collision.
52 THINGS TO KNOW BEFORE STARTING YOUR VEHICLE
• Your vehicle has four Weight Sensors located between the seat and the floor pan. The weight sensors measure applied weight and transfers that information to the OCM. • The Side Impact SRS Side Curtain Airbags are de- signed to activate only in certain side or rollover collisions. When the ORC (with side impact option) detects a collision requiring the side curtain airbag to inflate, it signals the inflators on the crash side of the vehicle. A quantity of nontoxic gas is generated to inflate the side curtain airbag. The inflating side cur- tain airbag pushes the outside edge of the headliner out of the way and covers the window. The airbag inflates in about 30 milliseconds (about one quarter of the time it takes to blink your eyes) with enough force to injure you if you are not belted and seated properly, or if items are positioned in the area where the side
curtain airbag inflates. This especially applies to chil- dren. The side curtain airbag is only about 31⁄2 inches (9 cm) thick when it is inflated. • The Knee Impact Bolsters help protect the knees of the driver and the front passenger, and position every- one for the best interaction with the front airbag.
The front passenger seat assembly contains critical com- ponents that affect the front passenger airbag deploy- ment. Correctly functioning front passenger seat compo- nents are critical for the Occupant Classification System (OCS) to properly classify the front passenger and calcu- late the proper airbag deployment. Do not make any modifications to the front passenger seat components, assembly, or to the seat cover. The following requirements must be strictly adhered to: • Do not modify the front passenger seat assembly or
components in any way.
position seat in any way.
• Do not modify the front seat center console or center • Do not use prior or future model year seat covers not designated for the specific model being repaired. Al- ways use the correct seat cover specified for the vehicle. • Do not replace the seat cover with an aftermarket seat • Do not add a secondary seat cover other than those • At no time should any supplemental restraint system (SRS) component or SRS related component or fas- tener be modified or replaced with any part except those which are approved by DaimlerChrysler/ Mopar.
approved by DaimlerChrysler/Mopar.
cover.
THINGS TO KNOW BEFORE STARTING YOUR VEHICLE 53
WARNING!
Unapproved modifications or service procedures to the front passenger seat assembly, its related compo- nents, or seat cover may inadvertently change the airbag deployment in case of a frontal crash. This could result in death or serious injury to the front seat passenger if the vehicle is involved in an acci- dent. A modified vehicle may not comply with required Federal Motor Vehicle Safety Standards (FMVSS).
If A Deployment Occurs The airbag system is designed to deploy when the Occupant Restraint Control (ORC) Module detects a moderate-to-severe frontal collision, to help restrain the driver and front passenger, and then to immediately deflate.
54 THINGS TO KNOW BEFORE STARTING YOUR VEHICLE
NOTE: A frontal collision that is not severe enough to need airbag protection will not activate the system. This does not mean something is wrong with the airbag system. If you do have a collision which deploys the airbags, any or all of the following may occur: • The nylon airbag material may sometimes cause abra- sions and/or skin reddening to the driver and front passenger as the airbags deploy and unfold. The abrasions are similar to friction rope burns or those you might get sliding along a carpet or gymnasium floor. They are not caused by contact with chemicals. They are not permanent and normally heal quickly. However, if you haven’t healed significantly within a few days, or if you have any blistering, see your doctor immediately.
• As the airbags deflate you may see some smoke-like particles. The particles are a normal by-product of the process that generates the nontoxic gas used for airbag inflation. These airborne particles may irritate the skin, eyes, nose, or throat. If you have skin or eye irritation, rinse the area with cool water. For nose or throat irritation, move to fresh air. If the irritation continues, see your doctor. If these particles settle on your clothing, follow the garment manufacturer’s instruc- tions for cleaning. • It is not advisable to drive your vehicle after the airbags have deployed. If you are involved in another collision, the airbags will not be in place to protect you.
WARNING!
Maintaining Your Airbag System
THINGS TO KNOW BEFORE STARTING YOUR VEHICLE 55
Deployed airbags and seat belt pretensioners cannot protect you in another collision. Have the airbags, seat belt pretensioner, and seat belt retractor assem- bly, replaced by an authorized dealer as soon as possible. Also, have the Occupant Classification System serviced as well.
Enhanced Accident Response Feature If the airbags deploy after an impact and the electrical system remains functional, vehicles equipped with power door locks will unlock automatically. In addition, approximately 5 seconds after the vehicle has stopped moving, the interior lights will illuminate to aid visibility. NOTE: The interior lights can only be deactivated if the key is removed from the ignition switch or the vehicle is driven.
WARNING!
• Modifications to any part of the airbag system could cause it to fail