- 2009 Hyundai Tucson Owners Manuals
- Hyundai Tucson Owners Manuals
- 2005 Hyundai Tucson Owners Manuals
- Hyundai Tucson Owners Manuals
- 2008 Hyundai Tucson Owners Manuals
- Hyundai Tucson Owners Manuals
- 2010 Hyundai Tucson Owners Manuals
- Hyundai Tucson Owners Manuals
- 2012 Hyundai Tucson Owners Manuals
- Hyundai Tucson Owners Manuals
- 2011 Hyundai Tucson Owners Manuals
- Hyundai Tucson Owners Manuals
- Download PDF Manual
-
Defrost-Level
Air is discharged through the windshield defroster nozzle, side defroster nozzle and side ventilator. If the "Defrost" mode is selected, the A/C will be turned turn on automatically and "Fresh" mode will be activated to improve windshield defrosting.
MAX A/C
MAX A/C-Level
Air is discharged through the face level vents. If the "MAX A/C" mode is selected, the A/C will turn on automatically and "Recircula- tion" mode will be activated.
1FEATURES OF YOUR HYUNDAI 98
B670E02A-AAT
Temperature Control
B690A01E-AAT
HEATING CONTROLS
B670C03JM
OFF Off-Level Air is discharged through the windshield defroster nozzle, side defroster nozzle and side ventilator.
NOTE: If the air flow control is off, the air intake control is set to the fresh mode auto- matically.
Cool
Warm
HJM2117
This control is used to adjust the degree of heating or cooling desired.
B690A01JM-A For normal heating operation, set the air ) position intake control to the fresh air ( and the air flow control to the floor ( position.
For faster heating, the air intake control should be set in the recirculate ( ) posi- tion.
If the windows fog up, set the air flow ) position. (The control to the defrost ( A/C will be on automatically and "Fresh" mode will be activated.)
For maximum heat, rotate the temperature control to "Warm".
BI-LEVEL HEATING
VENTILATION
B700A02E-AAT
B710A01S-AAT
B700A01JM-A
B710A01JM-A
Your Hyundai is equipped with bi-level heating controls. To use this feature:
To operate the ventilation system:
o Set the air intake control to the fresh air
).
o Set the air flow control at the bi-level
o Adjust the fan speed control to the de-
) position.
) position.
sired speed.
"Cool" and "Warm".
o Set the air intake control to "Fresh" mode
o To direct all intake air to the dashboard vents, set the airflow control to "Face"
o Adjust the fan speed control to the de-
).
sired speed.
"Cool" and "Warm".
o Set the temperature control between
o Set the temperature control between
FEATURES OF YOUR HYUNDAI
9999999999
B730A01L-AAT
).
Operation Tips o To keep dust or unpleasant fumes from entering the car through the ventilation system, temporarily set the air intake control to ( Be sure to return the control to ( when the irritation has passed to keep fresh air in the vehicle. This will help keep the driver alert and comfortable. o Air for the heating/cooling system is drawn in through the grilles just ahead of the windshield. Care should be taken that these are not blocked by leaves, snow, ice or other obstructions.
o To prevent interior fog on the wind- shield, set the air intake control to the ) position, fan speed to the fresh air ( desired position, turn on the air condi- tioning system, and adjust temperature control to desired temperature.
1FEATURES OF YOUR HYUNDAI 100
AIR CONDITIONING SYSTEM
B740A01S-AAT
Air Conditioning Switch (If installed)
B740B01S-AAT
Air Conditioning Operation for Cooling
o Set the temperature control to "Cool". ("Cool" provides maximum cooling. The temperature may be moderated by moving the control toward "Warm".)
o Adjust the fan control to the desired speed. For greater cooling, turn the fan control to one of the higher speeds or temporarily select the "Recirculation )" position on the air intake control.
HJM2119
The air conditioning is turned on or off by pushing the A/C button on the heating/air conditioning control panel.To use the air conditioning to cool the interior:
B740B01JM-A
o Set the side vent control to "OFF", to shut
off outside air entry.
o Turn on the fan control switch. o Turn on the air conditioning switch by pushing the switch. The air condition- ing indicator light should come on at the same time.
o Set the air intake control to "Fresh" mode
).
B720A01JM-AAT
DEFROSTING/DEFOGGING
A Type
B Type
A Type
B Type
FEATURES OF YOUR HYUNDAI
101101101101101
B720B01JM
B720B02JM
Use the heating/ventilation system to defrost or defog the windshield: To remove interior fog on the windshield: o Set the air flow control to the defrost ( ) position. (The A/C will be turned on automatically and "Fresh" mode will be activated.)
To remove frost or exterior fog on the windshield: o Set the air flow control to the defrost ( ) position. (The A/C will be turned on automatically and "Fresh" mode will be activated.)
o Set the temperature control to the desired position. o Set the fan speed control between "1" and "4" position.
o Set the temperature control to the warm. o Set the fan speed control to position "3" or "4". o Activate windshield wiper blade de-icer (If installed)
NOTE: When the A/C is operated continuously on the floor-defrost level ( ) or defrost level ( ), it may cause fog to form on the exterior windshield because of the temperature difference. At this time set the air flow control to the face level position ( ) and fan speed control to the low position.
1FEATURES OF YOUR HYUNDAI 102
B740C01S-AAT
Dehumidified Heating For dehumidified heating:
o Turn on the fan control switch. o Turn on the air conditioning switch. The air conditioning indicator light should come on at the same time.
o Set the air intake control to the "Fresh"
mode (
).
o Set the air flow control to the "Face" ( ). o Adjust the fan control to the desired
speed.
o For more rapid action, set the fan at one
of the higher speeds.
o Adjust the temperature control to pro-
vide the desired amount of warmth.
B740D01A-AAT
Operation Tips o If the interior of the car is hot when you first get in, open the windows for a few minutes to expel the hot air.
o When you are using the air conditioning system, keep all windows closed to keep hot air out.
o When moving slowly, as in heavy traffic, shift to a lower gear. This increases engine speed, which in turn increases the speed of the air conditioning com- pressor.
o On steep grades, turn the air condition- ing off to avoid the possibility of the engine over-heating.
o During winter months or in periods when the air conditioning is not used regu- larly, run the air conditioning once ev- ery month for a few minutes. This will help circulate the lubricants and keep your system in peak operating condi- tion.
AUTOMATIC HEATING AND COOLING CONTROL SYSTEM
B970A01Y-AAT
(If installed) Your Hyundai is equipped with an auto- matic heating and cooling control system controlled by simply setting the desired temperature.
B970B02JM-GAT
Heating and Cooling Controls
FEATURES OF YOUR HYUNDAI
103103103103103
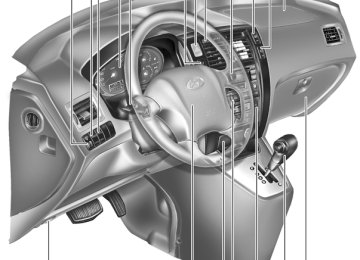
1. Temperature Control Switch 2. Air Flow Control Switch 3. Display Window 4. Defroster Switch 5. Blower Fan Control Switch
6. AUTO (Automatic Control)Switch 7. OFF Switch 8. Air Conditioning Switch 9. Air lntake Control Switch
B970B01JM
1FEATURES OF YOUR HYUNDAI 104
B970C01JM-AAT
Automatic Operation
HJM2124-1
The FATC (Full Automatic Temperature Control) system automatically controls heating and cooling by doing as follows:
1. Push the "AUTO" button. The indicator light will illuminate confirming that the Face, Floor and/or Bi-Level modes as well as the blower speed and air condi- tioner will be controlled automatically.
HJM2126-1
2. Push the "TEMP" button to set the de-
sired temperature. The temperature will increase to the maximum 90°F(32°C) by pushing the " button. Each push of the button will cause the temperature to increase by 1°F(0.5°C). The temperature will decrease to the minimum 62°F(17°C) by pushing the " " button. Each push of the button will cause the temperature to decrease by 1°F(0.5°C).
NOTE: o If the battery has been discharged or disconnected, the temperature mode will reset to Centigrade degrees. This is a normal condition and you can change the temperature mode from Centigrade to Farenheit as follows; Press the "TEMP" down button and "AUTO" button simultaneously for 3
secs. The display shows that the unit of temperature is adjusted to Centi- grade or Fahrenheit. (°C→→→→→°F or °F→→→→→°C)o Never place anything covering the sensor which is located on the instru- ment panel to ensure better control of the heating and cooling system.
Photo sensor
HJM2086
B980B01Y-AAT
Fan Speed Control Switch
B670C03Y-AAT
Air Intake Control Switch
FEATURES OF YOUR HYUNDAI
105105105105105
B980A01Y-AAT
MANUAL OPERATION The heating and cooling system can be controlled manually as well by pushing buttons other than the "AUTO" button. In this state, the system sequentially works according to the order of buttons selected. The function of the buttons which are not selected will be controlled automatically. Press the "AUTO" button in order to convert to automatic control of the system.
HJM2123-1
The fan speed can be set to the desired speed by pressing the appropriate fan speed control button. The higher the fan speed is, the more air is delivered. Press- ing the "OFF" button turns off the fan.B670C01JM
This is used to select fresh outside air or recirculation inside air. To change the air intake control mode, (Fresh mode, Recirculation mode) push the control button.
FRESH MODE ( ) : The indicator light on the button goes on when the air intake control is fresh mode.
RECIRCULATION MODE ( ) : The indicator light on the button is illuminated when the air intake control is recirculation mode.
1FEATURES OF YOUR HYUNDAI 106
With the "Fresh" mode selected, air enters the vehicle from the outside and is heated or cooled according to the function se- lected.
With the "Recirculation" mode selected, and air from within the passenger com- partment will be drawn through the heat- ing system and heated or cooled accord- ing to the function selected.
NOTE: It should be noted that prolonged opera- tion of the heating system in "recircula- tion" mode will give rise to fogging of the windshield and side windows and the air within the passenger compartment will become stale. In addition, prolonged use of the air conditioning with the "Recircu- lation" mode selected may result in the air within the passenger compartment becoming excessively dry.
B980D01Y-AAT
Heating and Cooling System Off Press the "OFF" button to stop the opera- tion of the heating and cooling system.
B980E01E-GAT
Air Flow Control
HJM2128-1
This is used to direct the flow of air. Air can be directed to the floor, dashboard outlets, or windshield. Four symbols are used to represent Face, Bi-Level, Floor and Floor- Defrost air position.HJM2111
Face-Level
When selecting the "Face" mode, the indi- cator light will come on, causing air to be discharged through the face level vents.
FEATURES OF YOUR HYUNDAI
107107107107107
HJM2114
HJM2113
HJM2112
Bi-Level
When selecting the "Bi-Level" mode, the indicator light will come on and the air will be discharged through the face vents and the floor vents.
Floor-Level
When selecting the "Floor-Level" mode, the indicator light will come on and the air will be discharged through the floor vents, windshield defroster nozzle, side defroster nozzle and side ventilator.
Floor-Defrost Level
When selecting the "Floor-Defrost" mode, the indicator light will come on and the air will be discharged through the windshield defrost vents, the floor vents and side de- froster nozzle and side ventilator .
1FEATURES OF YOUR HYUNDAI 108
B980F01JM-GAT
Defrost Switch
HJM2138-1
When the "Defrost" button is pressed, the ) mode will be automatically selected and the air will be discharged through the windshield defrost nozzle, side defroster nozzle and side ventilator. To assist in defrosting, the air conditioning will oper- ate if ambient temperature is higher than 2°C, and automatically turns off if the am- bient temperature drops below 2°C.CLIMATE CONTROL AIR FILTER (IN FRONT OF BLOWER UNIT)
B760A05E-AAT
(If installed)
Outside air
Inside air Filter
Inside air
Blower fan
Evaporator core
Heater core
B760A01E The climate control air filter is located in front of the blower unit behind the glove box. It operates to decrease the amount of pol- lutants entering the car. To replace the climate control air filter, refer to the page 6-17.
CAUTION:
o Replace the filter every 10,000 miles (15,000 km) or once a year. If the car is being driven in severe conditions such as dusty, rough roads, more frequent climate control air filter in- spections and changes are required. o When the air flow rate is suddenly decreased, the system should be checked by an authorized dealer.
STEREO SOUND SYSTEM
B750A02A-AAT
How Car Audio Works FM reception
Ionosphere
AM reception
Ionosphere
FM radio station
Mountains
FEATURES OF YOUR HYUNDAI
109109109109109
Unobstructed
area
Buildings
B750A02L AM broadcasts can be received at greater distances than FM broadcasts. This is because AM radio waves are transmitted at low frequencies. These long, low fre- quency radio waves can follow the curva- ture of the earth rather than travelling straight out into the atmosphere. In addi- tion, they curve around obstructions so that they can provide better signal cover- age.
B750A01L AM and FM radio signals are broadcast from transmitter towers located around your city. They are intercepted by the radio antenna on your car. This signal is then received by the radio and sent to your car speakers. When a strong radio signal has reached your vehicle, the precise engineering of your audio system ensures the best pos- sible quality reproduction. However, in some cases the signal coming to your vehicle may not be strong and clear. This can be due to factors such as the distance from the radio station, closeness of other strong radio stations or the presence of buildings, bridges or other large obstruc- tions in the area.
Iron bridges
Obstructed area
B750A03L FM broadcasts are transmitted at high fre- quencies and do not bend to follow the earth's surface. Because of this, FM broad- casts generally begin to fade at short dis- tances from the station. Also, FM signals are easily affected by buildings, moun- tains, or other obstructions. These can result in certain listening conditions which might lead you to believe a problem exists with your radio. The following conditions are normal and do not indicate radio trouble:
1FEATURES OF YOUR HYUNDAI 110
B750A04L o Fading - As your car moves away from the radio station, the signal will weaken and sound will begin to fade. When this occurs, we suggest that you select an- other stronger station.
o Flutter/Static - Weak FM signals or large obstructions between the transmitter and your radio can disturb the signal causing static or fluttering noises to occur. Reducing the treble level may lessen this effect until the disturbance clears.
B750A05L o Station Swapping - As an FM signal weakens, another more powerful sig- nal near the same frequency may begin to play. This is because your radio is designed to lock onto the clearest sig- nal. If this occurs, select another station with a stronger signal.
o Multi-Path Cancellation - Radio signals being received from several directions can cause distortion or fluttering. This can be caused by a direct and reflected signal from the same station, or by sig- nals from two stations with close fre- quencies. If this occurs, select another station until the condition has passed.
B750B05Y-AAT
Using a cellular phone or a two-way radio When a cellular phone is used inside the vehicle, noise may be produced from the audio equipment. This does not mean that something is wrong with the audio equip- ment. In such a case, use the cellular phone at a place as far as possible from the audio equipment.
WARNING:
Hyundai recommends that you never use a cell phone while driving. This could result in loss of control, and an accident that may cause death, serious injury, or property damage. You must stop at a safe place to use a cellular phone.
NOTE: Some states and cities have regulations prohibiting the use of cell phones while driving. You should be aware of the spe- cific requirements in your area.
CARE OF DISCS
B850A02F-AAT
Proper Handling
Storage When not in use, place your discs in their individual case and store them in a cool place away from the sun, heat, and dust. Do not grip or pull out the disc with your hand while the disc is being pulled into the unit by the self loading mechanism.
FEATURES OF YOUR HYUNDAI
111111111111111
ANTENNA
B870D02JM-AAT
Roof Antenna
Keep Your Discs Clean
Type A
Type B
B850A01L Handle your disc as shown. Do not drop the disc. Hold the disc so you will not leave fingerprints on the surface. If the surface is scratched, it may cause the pickup to skip signal tracks. Do not affix tape, paper, or gummed labels on the disc. Do not write on the disc.
Damaged Disc Do not attempt to play damaged, warped or cracked discs. These could severely damage the playback mechanism.
B850A02L
Fingerprints, dust, or soil on the surface of a disc could cause the pickup to skip signal tracks. Wipe the surface clean with a clean soft cloth. If the surface is heavily soiled, dampen a clean soft cloth in a solution of mild neutral detergent to wipe it clean. See drawing.
B870D02JM-U Your car uses a roof antenna to receive both AM and FM broadcast signals. This antenna is a removable type. To re- move the antenna, turn the antenna coun- terclockwise. To install the antenna, turn the antenna clockwise.
1FEATURES OF YOUR HYUNDAI 112
CAUTION:
o Be sure to remove the antenna before washing the car in an automatic car wash or it may be damaged.
o Before entering a place with a low height clearance, be sure to adjust the roof antenna low.
o In some vehicles, the antenna can be
folded into only front position.
o When reinstalling your antenna, it is important that it is fully tightened to ensure proper reception.
AUDIO SYSTEM
PA710E01JM-GAT
RADIO, SET UP, VOLUME CONTROL (PA 710S) (If installed)
FEATURES OF YOUR HYUNDAI
113113113113113
1. FM Selection Button 2. AM Selection Button 3. XM Selection Button 4. CD/AUX Selection Button 5. Automatic Channel Selection Button 6. Power ON/OFF 7. MUTE Button 8. SCAN Button 9. Information Display Button 10. SET UP Button 11. TUNE/ENTER Button 12. CAT(FLDR) Button 13. Preset Button
10
12
11
13
A-200JMU
1FEATURES OF YOUR HYUNDAI 114
1. FM Selection Button Turns to FM mode and toggles FM1 and FM2 when the button is pressed each time.
2. AM Selection Button Turns to AM mode, and toggles in the order of AM1➟AM2➟···➟AM1···when the button is pressed each time.
3. XM Selection Button Turns to XM mode, and toggles in the order of XM1➟XM2➟XM3➟···➟XM1··· when the button is pressed each time.
4. CD/AUX Selection Button If there is a cd in the CDP DECK it turns to CD mode, and if a device is connected to AUX then it toggles. CD➟AUX➟CD··· when the button is pressed each time.(It will not turn to AUX if the auxiliary device is not connected)
5. Automatic Channel Selection
Button
o When the [SEEK
]button is pressed, it reduces the band frequency by 200khz to automatically select channel. Stops at the previous frequency if no channel is found.
o When the [SEEK
]button is pressed, it increases the band frequency by 50khz to automatically select channel. Stops at the previous frequency if no channel is found.
6. Power ON/OFF & Volume Control
Button
Turns on/off the set when the IGNITION SWITCH is on ACC or ON. If the button is turned to the right, it increases the volume and left, decreases the volume.
7. MUTE Button Press to temporarily cut off the Sound.
8. SCAN Button If this button is pressed, the frequencies will become increased and receive the corresponding broadcasts. This function will play the frequencies for 5 seconds (XM MODE : 10 seconds) each and find other broadcasts as the frequency increases.
Press the button again when desiring to continue listening to the currently playing broadcast.
9. Information Display Button Information Display function operation (In- formation is displayed each time (the) Key is pressed) : Pressing the Category ➟Channel Name ➟Artist Name➟Song Title➟Category-KEY for 3 seconds will display the corresponding text then be- come restored. Text Scroll operation : After pressing (the) Key, if the text to be displayed is longer than the LCD text line, then rotating the Tune Knob will operate the Page up function displaying 8 charac- ters for 3 seconds each - displays the maximum lines of text supported by XM.
10. SET UP Button Press this button to turn to the XMoption, SCROLL and adjustment mode. If no action is taken for 5 seconds after pressing the button, it will return to the play mode.(After entering SET UP mode, move between items using the left, right and PUSH functions of the TUNE button.) The set up item changes from AUDIO ad- justment, TEXT SCROLL, XM setup.
11. TUNE/ENTER Button Turn this button clockwise by one notch to increase frequency by 0.05Mhz from cur- rent frequency. Turn this button counterclockwise by one notch to decrease frequency by 0.05Mhz from current frequency. Press this button while holding SET UP button to activate / inactivate the item to. Select SET UP item using left and right function of the Tune button.
Pressing the changes the BASS, MIDR- ANGE, TREBLE, FADER and BALANCE TUNE mode. The mode selected is shown on the dis- play. After selecting each mode, rotate the Audio control knob clockwise or counter- clockwise.
o BASS Control To increase the BASS, rotate the knob clockwise, while to decrease the BASS, rotate the knob counterclockwise.
o MID-RANGE Control To increase the MID-RANGE, rotate the knob clockwise, while to decrease the MID-RANGE, rotate the knob counterclock- wise.
o TREBLE Control To increase the TREBLE, rotate the knob clockwise, while to decrease the TREBLE, rotate the knob counterclockwise.
o FADER Control Turn the control knob clockwise to emph- asize rear speaker sound (front speaker sound will be attenuated). When the con- trol knob is turned counterclockwise, front speaker sound will be emphasized (rear speaker sound will be attenuated).
o BALANCE Control Rotate the knob clockwise to emphasize right speaker sound (left speaker sound will be attenuated). When the control knob is turned counter clockwise, left speaker sound will be emphasized (right speaker sound will be attenuated).
] Button when Category Up
12. CAT(FLDR) Button Moves [CAT search operation. o Category is moved Up from the cat- egory currently being received and Category Name becomes displayed. o If the Enter Key is not pressed within 5
seconds, then the previous mode will be restored.FEATURES OF YOUR HYUNDAI
115115115115115
o If the Key is pressed while in the last Category, then the first category will become displayed and operation will be repeated.
o Corresponding category can be se-
lected by pressing ENTER.
] Button when Category
Moves [CAT Down search operation. o Category is moved Down from the cat- egory currently being received and Category Name becomes displayed. o If the Enter Key is not pressed within 5
seconds, then the previous mode will be restored. o If the [CAT] Key is pressed while in the first Category, then the last category will become displayed and operation will be repeated.
o Corresponding category can be se-
lected by pressing ENTER.
13. Preset Button Push [1]~[6] buttons less than 0.8 seconds to play the channel saved in each button. Push pre-set button for 0.8 seconds or longer to save current channel to the re- spective button with a beep.
1FEATURES OF YOUR HYUNDAI 116
PA710F01JM-GAT
CD (PA 710S) (If installed)
10
11
1. CD Loading Slot 2. CD Indicator 3. CD Eject Button 4. CD/AUX Selection Button 5. Automatic Track Selection Button 6. INFO Button 7. TUNE/ENTER Button 8. RANDOM Play Button 9. REPEAT Button 10. SCAN Play Button 11. FOLDER Button
A-201JMU
1. CD Loading Slot Please face printed side upward and gen- tly push in. When the ignition switch is on ACC or ON and power is off, power is automatically turned on if the CD is loaded. This CDP supports both 8cm and 12 cm CDs. But if VCD, Data CD, MP3 CD are loaded, "Er-6" message will appear and CD will be ejected.
2. CD Indicator When car ignition switch is ACC or ON and if the CD is loaded, this indicator is lighted. If the CD is ejected the light is turned off.
3. CD Eject Button Push button to eject the CD during CD playback. This button is enabled when ignition switch is off.
4. CD/AUX Selection Button If there is a cd in the CDP DECK it turns to CD mode, and if a device is connected to AUX then it toggles. CD➟AUX➟CD··· when the button is pressed each time.(It will not turn to AUX if the auxiliary device is not connected)
5. Automatic Track Selection Button o Push [SEEK ] button for less than 0.8
seconds to play from the beginning of current song. o Push [SEEK] button for less than 0.8
seconds and press again within 1 sec- onds to play the previous song.o Push [SEEK
] button for 0.8 or longer to initiate reverse direction high speed sound search of current song.
o Push [SEEK
] button for less than 0.8
seconds to play the next song.
o Push [SEEK
] button for 0.8 or longer to initiate high speed sound search of current song.
6. INFO Button Displays the information of the current CD TRACK in the order of DISC TITLE ➟DISC ARTIST➟TRACK TITLE➟ TRACK ART- IST ➟TOTAL TRACK➟ Play Screen ➟DISC TITLE➟···.(not displayed if the information is not available on the DISC.)
7. TUNE/ENTER Button Turn this button clockwise to display songs after current song. Also, turn this button counterclockwise to display songs before current song. To listen to the displayed song, press the button to skip to the song and play.
FEATURES OF YOUR HYUNDAI
117117117117117
Pressing the changes the BASS, MIDR- ANGE, TREBLE, FADER and BALANCE TUNE mode. The mode selected is shown on the dis- play. After selecting each mode, rotate the Audio control knob clockwise or counter- clockwise.
o BASS Control To increase the BASS, rotate the knob clockwise, while to decrease the BASS, rotate the knob counterclockwise.
o MID-RANGE Control To increase the MID-RANGE, rotate the knob clockwise, while to decrease the MID-RANGE, rotate the knob counterclock- wise.
o TREBLE Control To increase the TREBLE, rotate the knob clockwise, while to decrease the TREBLE, rotate the knob counterclockwise.
o FADER Control Turn the control knob clockwise to emph- asize rear speaker sound (front speaker sound will be attenuated). When the con- trol knob is turned counterclockwise, front speaker sound will be emphasized (rear speaker sound will be attenuated).
11. FOLDER Button Folder up/down operation. o Folder is moved up or down from cur- rently playing and folder name becomes displayed.
o Press enter key to play the selected
folder.
o If the enter key is not pressed with in 5
seconds, then the previous folder name will be displayed again.1FEATURES OF YOUR HYUNDAI 118
o BALANCE Control Rotate the knob clockwise to emphasize right speaker sound (left speaker sound will be attenuated). When the control knob is turned counter clockwise, left speaker sound will be emphasized (right speaker sound will be attenuated).
8. RANDOM Play Button Turns on/off the randomization of the play list of files in the currently played DISC. To cancel the mode, press the key once again.
9. REPEAT Button Repeats current song when the button is pressed for less than 0.8 seconds. Repeats the entire DISC when the button is pressed for 0.8 seconds or longer.
10. SCAN Play Button Plays first 10 seconds of each song in the DISC. To cancel the mode, press the key once again.
PA760E01JM-GAT
RADIO, SET UP, VOLUME CONTROL (PA 760S) (If installed)
FEATURES OF YOUR HYUNDAI
119119119119119
1. FM Selection Button 2. AM Selection Button 3. XM Selection Button 4. CD/AUX Selection Button 5. Automatic Channel Selection Button 6. Power ON/OFF 7. MUTE Button 8. SCAN Button 9. Information Display Button 10. SET UP Button 11. TUNE/ENTER Button 12. CAT(FLDR) Button 13. Preset Button
10
12
11
13
A-300JMU
1FEATURES OF YOUR HYUNDAI 120
1. FM Selection Button Turns to FM mode and toggles FM1 and FM2 when the button is pressed each time.
2. AM Selection Button Turns to AM mode, and toggles in the order of AM1➟AM2➟···➟AM1···when the button is pressed each time.
3. XM Selection Button Turns to XM mode, and toggles in the order of XM1➟XM2➟XM3➟···➟XM1··· when the button is pressed each time.
4. CD/AUX Selection Button If there is a cd in the CDP DECK it turns to CD mode, and if a device is connected to AUX then it toggles. CD➟AUX➟CD··· when the button is pressed each time.(It will not turn to AUX if the auxiliary device is not connected)
5. Automatic Channel Selection
Button
o When the [SEEK
]button is pressed, it reduces the band frequency by 200khz to automatically select channel. Stops at the previous frequency if no channel is found.
o When the [SEEK
]button is pressed, it increases the band frequency by 50khz to automatically select channel. Stops at the previous frequency if no channel is found.
6. Power ON/OFF & Volume Control
Button
Turns on/off the set when the IGNITION SWITCH is on ACC or ON. If the button is turned to the right, it increases the volume and left, decreases the volume.
7. MUTE Button Press to temporarily cut off the Sound.
8. SCAN Button If this button is pressed, the frequencies will become increased and receive the corresponding broadcasts. This function will play the frequencies for 5 seconds (XM MODE : 10 seconds) each and find other broadcasts as the frequency increases.
Press the button again when desiring to continue listening to the currently playing broadcast.
9. Information Display Button Information Display function operation (In- formation is displayed each time (the) Key is pressed) : Pressing the Category ➟Channel Name ➟Artist Name➟Song Title➟Category-KEY for 3 seconds will display the corresponding text then be- come restored. Text Scroll operation : After pressing (the) Key, if the text to be displayed is longer than the LCD text line, then rotating the Tune Knob will operate the Page up function displaying 8 charac- ters for 3 seconds each - displays the maximum lines of text supported by XM.
10. SET UP Button Press this button to turn to the XMoption, SCROLL and adjustment mode. If no action is taken for 5 seconds after pressing the button, it will return to the play mode.(After entering SET UP mode, move between items using the left, right and PUSH functions of the TUNE button.) The set up item changes from AUDIO ad- justment, TEXT SCROLL, XM setup.
11. TUNE/ENTER Button Turn this button clockwise by one notch to increase frequency by 0.05Mhz from cur- rent frequency. Turn this button counterclockwise by one notch to decrease frequency by 0.05Mhz from current frequency. Press this button while holding SET UP button to activate / inactivate the item to. Select SET UP item using left and right function of the Tune button.
Pressing the changes the BASS, MIDR- ANGE, TREBLE, FADER and BALANCE TUNE mode. The mode selected is shown on the dis- play. After selecting each mode, rotate the Audio control knob clockwise or counter- clockwise.
o BASS Control To increase the BASS, rotate the knob clockwise, while to decrease the BASS, rotate the knob counterclockwise.
o MID-RANGE Control To increase the MID-RANGE, rotate the knob clockwise, while to decrease the MID-RANGE, rotate the knob counterclock- wise.
o TREBLE Control To increase the TREBLE, rotate the knob clockwise, while to decrease the TREBLE, rotate the knob counterclockwise.
o FADER Control Turn the control knob clockwise to emph- asize rear speaker sound (front speaker sound will be attenuated). When the con- trol knob is turned counterclockwise, front speaker sound will be emphasized (rear speaker sound will be attenuated).
o BALANCE Control Rotate the knob clockwise to emphasize right speaker sound (left speaker sound will be attenuated). When the control knob is turned counter clockwise, left speaker sound will be emphasized (right speaker sound will be attenuated).
] Button when Category Up
12. CAT(FLDR) Button Moves [CAT search operation. o Category is moved Up from the cat- egory currently being received and Category Name becomes displayed. o If the Enter Key is not pressed within 5
seconds, then the previous mode will be restored.FEATURES OF YOUR HYUNDAI
121121121121121
o If the Key is pressed while in the last Category, then the first category will become displayed and operation will be repeated.
o Corresponding category can be se-
lected by pressing ENTER.
] Button when Category
Moves [CAT Down search operation. o Category is moved Down from the cat- egory currently being received and Category Name becomes displayed. o If the Enter Key is not pressed within 5
seconds, then the previous mode will be restored. o If the [CAT] Key is pressed while in the first Category, then the last category will become displayed and operation will be repeated.
o Corresponding category can be se-
lected by pressing ENTER.
13. Preset Button Push [1]~[6] buttons less than 0.8 seconds to play the channel saved in each button. Push pre-set button for 0.8 seconds or longer to save current channel to the re- spective button with a beep.
1FEATURES OF YOUR HYUNDAI 122
PA760F01JM-GAT
CDC (PA 760S) (If installed)
11
1. CD Loading Slot 2. CD Eject Button 3. LOAD Button 4. CD/AUX Selection Button 5. Automatic Track Selection Button 6. INFO Button 7. TUNE/ENTER Button 8. RANDOM Play Button 9. REPEAT Button 10. DISC Selection Button 11. SCAN Play Button 12. FOLDER Button
12
10
A-301JMU
1. CD Loading Slot Please face printed side upward and gen- tly push in. When the ignition switch is on ACC or ON and power is off, power is automatically turned on if the CD is loaded. This CDP supports both 8cm and 12 cm CDs. But if VCD, Data CD, MP3 CD are loaded, "Er-6" message will appear and CD will be ejected.
2. CD Eject Button Push button to eject the CD during CD playback. This button is enabled when ignition switch is off.
3. CD LOAD Button Push [LOAD] button to load CDs to avail- able CDC deck (from 1~6). Push [LOAD] button for more than 2 seconds to load into all available decks. The last CD will play. 10 seconds idle status will disable loading process.
4. CD/AUX Selection Button If the auxiliary device is connected, it turns to AUX MODE to play the sound from the auxiliary player. If no auxiliary device is connected, it dis- plays ""NO MEDIA"" for 5 seconds and returns to the previous mode."
5. Automatic Track Selection Button o Push [SEEK ] button for less than 0.8
seconds to play from the beginning of current song. o Push [SEEK] button for less than 0.8
seconds and press again within 1 sec- onds to play the previous song.o Push [SEEK
] button for 0.8 or longer to initiate reverse direction high speed sound search of current song.
o Push [SEEK
] button for less than 0.8
seconds to play the next song.
o Push [SEEK
] button for 0.8 or longer to initiate high speed sound search of current song.
6. INFO Button Displays the information of the current CD TRACK in the order of DISC TITLE ➟DISC ARTIST➟TRACK TITLE➟ TRACK ARTIST➟TOTAL TRACK➟Play Screen ➟DISC TITLE➟···.(not displayed if the in- formation is not available on the DISC.)
7. TUNE/ENTER Button Turn this button clockwise to display songs after current song. Also, turn this button counterclockwise to display songs before current song. To listen to the displayed song, press the button to skip to the song and play.
FEATURES OF YOUR HYUNDAI
123123123123123
Pressing the changes the BASS, MIDR- ANGE, TREBLE, FADER and BALANCE TUNE mode. The mode selected is shown on the dis- play. After selecting each mode, rotate the Audio control knob clockwise or counter- clockwise.
o BASS Control To increase the BASS, rotate the knob clockwise, while to decrease the BASS, rotate the knob counterclockwise.
o MID-RANGE Control To increase the MID-RANGE, rotate the knob clockwise, while to decrease the MID-RANGE, rotate the knob counterclock- wise.
o TREBLE Control To increase the TREBLE, rotate the knob clockwise, while to decrease the TREBLE, rotate the knob counterclockwise.
o FADER Control Turn the control knob clockwise to emph- asize rear speaker sound (front speaker sound will be attenuated). When the con- trol knob is turned counterclockwise, front speaker sound will be emphasized (rear speaker sound will be attenuated).
1FEATURES OF YOUR HYUNDAI 124
o BALANCE Control Rotate the knob clockwise to emphasize right speaker sound (left speaker sound will be attenuated). When the control knob is turned counter clockwise, left speaker sound will be emphasized (right speaker sound will be attenuated).
8. RANDOM Play Button Turns on/off the randomization of the play list of files in the currently played DISC. To cancel the mode, press the key once again.
9. REPEAT Button Repeats current song when the button is pressed for less than 0.8 seconds. Repeats the entire DISC when the button is pressed for 0.8 seconds or longer.
10. DISC Selection Button o [DISC
] Change Button
Changes disc to the previous disc.
o [DISC
] Change Button
Changes disc to the next disc.
11. SCAN Play Button Plays first 10 seconds of each song in the DISC. To cancel the mode, press the key once again.
12. FOLDER Button Folder up/down operation. o Folder is moved up or down from cur- rently playing and folder name becomes displayed.
o Press enter key to play the selected
folder.
o If the enter key is not pressed with in 5
seconds, then the previous folder name will be displayed again.DRIVING YOUR HYUNDAI
Engine Exhaust Can Be Dangerous! ............................ 2-2
Before Starting the Engine ............................................ 2-4
Key Positions ................................................................ 2-5
Starting .......................................................................... 2-6
Manual Transaxle ......................................................... 2-7
Automatic Transaxle ..................................................... 2-9
Anti-Lock Brake System (ABS) .................................. 2-13
Traction Control System (TCS) .................................. 2-13
Electronic Stability Control (ESC) ............................... 2-15
Full-Time 4WD Operation ........................................... 2-16
4WD Lock System ...................................................... 2-19
Good Braking Practices .............................................. 2-21
Driving for Economy ................................................... 2-22
Winter Driving ............................................................. 2-23
Trailer or Vehicle Towing ............................................ 2-26
Vehicle Load Limit ....................................................... 2-292 DRIVING YOUR HYUNDAI
WARNING: ENGINE EXHAUST CAN BE DANGEROUS!
C010A02JM-AAT Engine exhaust fumes can be extremely dangerous. If, at any time, you smell exhaust fumes inside the vehicle, open the windows immediately. o Do not inhale exhaust fumes.
Exhaust fumes contain carbon monoxide, a colorless, odorless gas that can cause unconsciousness and death by asphyxiation.
o Be sure the exhaust system does not leak.
The exhaust system should be checked whenever the vehicle is raised to change the oil or for any other purpose. If you hear a change in the sound of the exhaust or if you drive over something that strikes the underneath side of the car, have the exhaust system checked as soon as possible by your Hyundai dealer.
o Do not run the engine in an enclosed area.
Letting the engine idle in your garage, even with the garage door open, is a hazardous practice. Never run the engine in your garage any longer than it takes to start the engine and back the car out.
o Avoid idling the engine for prolonged periods with people inside the car.
If it is necessary to idle the engine for a prolonged period with people inside the car, be sure to do so only in an open area with the air intake set at "Fresh" and fan operating at one of the higher speeds so fresh air is drawn into the interior.
If you must drive with the tail gate open because you are carrying objects that make this necessary: 1. Close all windows. 2. Open side vents. 3. Set the air intake control at "Fresh", the air flow control at "Floor" or "Face" and the fan at one of the higher speeds. To assure proper operation of the ventilation system, be sure the ventilation air intakes located just in front of the windshield are kept clear of snow, ice, leaves or other obstructions.
PROPOSITION 65 WARNING:
Engine exhaust and a wide variety of automobile components and parts, including components found in the interior furnishings in a vehicle, contain or emit chemicals known to the State of California to cause cancer and birth defects and reproductive harm. In addition, certain fluids contained in vehicles and certain products of component wear contain or emit chemicals known to the State of California to cause cancer and birth defects or other reproductive harm.
RISK OF ROLLOVER
! WARNING:
o The 2WD Tucson is not designed for off-road use. The 4WD Tucson is de- signed primarily for use on paved roads. However, occasional use in off-highway conditions such as es- tablished unpaved roads and non- challenging off-road trails is allowed. The 4WD Tucson is not designed for blazing new trails, challenging off-road conditions, or unpaved hill climbing. Exceeding the conditions that were intended for the vehicle's primary design may result in injury or death. o Utility vehicles have a significantly higher rollover rate than other types of vehicles.
DRIVING YOUR HYUNDAI
! WARNING:
Your vehicle is equipped with tires de- signed to provide for safe ride and han- dling capability. Do not use a size and type of tire and wheel that is different from the one that is originally installed on your vehicle. It can affect the safety and performance of your vehicle, which could lead to han- dling failure or rollover and serious in- jury. When replacing the tires, be sure to equip all four tires with the tire and wheel of the same size, type, tread, brand and load- carrying capacity. If you nevertheless decide to equip your vehicle with any tire/wheel combination not recom- mended by Hyundai for off-road driving, you should not use these tires for high- way driving.
WARNING:
o Utility vehicle have higher ground clearance and a narrower track to make them capable of performing in a wide variety of off-road applications. Specific design characteristics give them a higher center of gravitiy than ordinary cars. An advantage of the higher ground clearance is a better view of the road allowing you to antici- pate problem. They are not designed for cornering at the same speeds as conventional 2-wheel drive vehicles any more than low-slung sports cars are designed to perform satisfacto- rily under off-road conditions. If at all possible, avoid sharp turns or abrupt maneuvers. As with other vehicles of this type, failure to operate this ve- hicle correctly may result in loss of control or vehicle rollover.
o In a rollover crash, an unbelted per- son is significantly more likely to die than a person wearing a seat belt.
2 DRIVING YOUR HYUNDAI
BEFORE STARTING THE EN- GINE
C020A04A-AAT Before you start the engine, you should always:
1. Look around the vehicle to be sure there are no flat tires, puddles of oil, water or other indications of possible trouble.
2. After entering the car, check to be sure
the parking brake is engaged.
3. Check that all windows, and lights are
clean.
4. Check that the interior and exterior mir-
rors are clean and in position.
5. Check your seat, seatback and head- rest to be sure they are in their proper positions.
6. Lock all the doors. 7. Fasten your seat belt and be sure that all other occupants have fastened theirs. 8. Turn off all lights and accessories that
are not needed.
9. When you turn the ignition switch to "ON", check that all appropriate warn- ing lights are operating and that you have sufficient fuel.
10. Check the operation of warning lights and all bulbs when key is in the "ON" position.
! WARNING:
o All passengers must be properly belted whenever the vehicle is mov- ing. Refer to pages: 1-19 through 1- 25 for more information on their proper use.
o Always check the surrounding areas near your vehicle for people, espe- cially children, before putting a car into 'drive.'
! WARNING:
Always wear appropriate shoes when operating your vehicle. Unsuitable shoes (high heels, ski boots, etc.) may interfere with your ability to use the brake and accelerator pedal, and the clutch (if installed).
! WARNING:
When you intend to park or stop the vehicle with the engine on, be careful not to depress the accelerator pedal for a long period of time. It may overheat the engine or exhaust system and cause fire.
TO START THE ENGINE
C030A01E-AAT
COMBINATION IGNITION SWITCH o If your Hyundai is equipped with a manual transaxle, place the shift lever in neutral and depress the clutch pedal fully.
o If your Hyundai has an automatic transaxle, place the shift lever in "P" (park).
o To start the engine, insert the ignition key and turn it to the "START" position. Release it as soon as the engine starts. Do not hold the key in the "START" position for more that 15 seconds.
NOTE: o For safety, the engine will not start if the clutch pedal is not depressed fully (Manual Transaxle) or the shift lever is not in "P" or "N" Position (Auto- matic Transaxle).
o The ignition key cannot be turned from "ACC" position to "LOCK" position unless the shift lever is in the "P" (Park) position or the negative bat- tery terminal is disconnected from the battery. To remove the key, al- ways confirm that the shift lever is securely positioned in "P" (Park) (For Automatic Transaxle).
o For additional information about start-
ing, see page 2-6.
KEY POSITIONS
C040A02A-AAT
LOCK
ACC
ON
START
C040A01E-1
CAUTION:
The engine should not be turned off or the key removed from the ignition key cylin- der while the car is in motion. The steer- ing wheel is locked by removing the key.
o "START" The engine is started in this position. It will crank until you release the key.
NOTE: Do not hold the key in the "START" posi- tion for more than 15 seconds.
o "ON" When the key is in the "ON" position, the ignition is on and all accessories may be turned on. If the engine is not running, the key should not be left in the "ON" position. This will discharge the battery and may also damage the ignition system.
o "ACC" With the key in the "ACC" position, some electrical accessories (radio, etc.) may be operated.
o "LOCK" The key can be removed or inserted in this position. To protect against theft, the steering wheel locks by removing the key.
NOTE: If difficulty is experienced turning the ignition switch to the ACC position, turn the key while turning the steering wheel right and left to release the tension.
DRIVING YOUR HYUNDAI
C070C01A-AAT
To remove the ignition key
ACC
LOCK
ON
START
C070C01E-1
1. Turn the ignition key to the "ACC" posi-tion.
2. Simultaneously push and turn the igni- tion key counterclockwise from the "ACC" position to the "LOCK" position. 3. The key can be removed in the "LOCK"
position.
2 DRIVING YOUR HYUNDAI
STARTING
C050A01A-AAT
C050B02JM-AAT
Normal Conditions: The Starting Procedure:
1. Insert key, and fasten the seat belt. 2. Depress the clutch pedal fully and place the gearshift lever (manual transaxle) in neutral or the selector lever (auto- matic transaxle) in "P" (park) position. 3. After turning the ignition key to the "ON" position, make certain all warning lights and gauges are functioning properly before starting the engine.
C050A01E-1
WARNING:
Never run the engine in a closed or poorly ventilated area any longer than is needed to move your car in or out of the area. The carbon monoxide gas emitted is odor- less and can cause serious injury or death.
WARNING:
Be sure that the clutch is fully depressed when starting a manual transaxle ve- hicle. Your manual transaxle equipped vehicle will not start unless the clutch pedal is fully depressed.
4. Turn the ignition key to the "START" position and release it when the engine starts. After the engine has started, allow the engine to run for 10 to 20 seconds prior to placing the vehicle in gear. The starter should not be operated for more than 15 seconds at a time. Wait 15-30 seconds between starting at- tempts to protect the starter from over- heating.
WARNING:
Always fully depress the brake pedal before and while shifting out of the "P" Park position into another position to avoid inadvertent motion of the vehicle which could injure persons in or around the car.
DRIVING YOUR HYUNDAI
C070B02A-AAT
Using the Clutch The clutch should be pressed all the way to the floor before shifting, then released slowly. The clutch pedal should always be fully returned to the original position. Do not rest your foot on the clutch pedal while driving. This can cause unnecessary wear. Do not partially engage the clutch to hold the car on an incline. This causes unnec- essary wear. Use the foot brake or parking brake to hold the car on an incline. Do not operate the clutch pedal rapidly and re- peatedly.
OPERATING THE MANUAL TRANSAXLE
C070A02A-AAT
HJM3017
Your Hyundai's manual transaxle has a conventional shift pattern. This shift pat- tern is imprinted on the shift knob. The transaxle is fully synchronized in all for- ward gears so shifting to either a higher or a lower gear is easily accomplished.NOTE: o To shift into reverse, rest the lever in neutral for at least 3 seconds after your car is completely stopped. Then move the lever into the reverse posi- tion.
o During cold weather, shifting may be difficult until the transaxle lubricant has warmed up. This is normal and not harmful to the transaxle.
o If you've come to a complete stop and it's hard to shift into 1st or R(Reverse), put the shift lever in N(Neutral) posi- tion and release the clutch. Press the clutch pedal down, and then shift into 1st or R(Reverse) gear position.
o Do not use the shift lever as a handrest during driving, as this can result in premature wear of the transaxle shift forks.
CAUTION:
When downshifting from fifth gear to fourth gear, caution should be taken not to inadvertently press the gear lever sideways in such a manner that second gear is engaged. Such a drastic down- shift may cause the engine speed to increase to the point that the tachometer will enter the red-zone. Such over-rev- ving of the engine may cause engine damage.
2 DRIVING YOUR HYUNDAI
C070D02O-AAT
Recommended Shift Points
Shift from-to
Recommended
mph (km/h)
1-2
2-3
3-4
4-515 (20) 25 (40) 35 (55) 45 (75)
The shift points as shown on the chart are recommended for optimum fuel economy and performance.
C070D04O-AAT
Good Driving Practices o Never take the car out of gear and coast down a hill. This is extremely hazard- ous. Always leave the car in gear.
o Don't "ride" the brakes. This can cause them to overheat and malfunction. In- stead, when you are driving down a long hill, slow down and shift to a lower gear. When you do this, engine braking will help slow the car.
o Slow down before shifting to a lower gear. This will help avoid over-revving the engine, which can cause damage. o Slow down when you encounter cross winds. This gives you much better con- trol of your car.
o Be sure the car is completely stopped before you attempt to shift into reverse. The transaxle can be damaged if you do not. To shift into reverse, depress the clutch, move the shift lever to neutral, wait three seconds, then shift to the reverse position.
o Exercise extreme caution when driving on a slippery surface. Be especially careful when braking, accelerating or shifting gears. On a slippery surface, an abrupt change in vehicle speed can cause the drive wheels to lose traction and the vehicle to go out of control.
o Optimum vehicle performance and economy is obtained by smoothly de- pressing and releasing the accelerator pedal.
! WARNING:
o Always buckle-up! In a collision, an unbelted occupant is significantly more likely to be seriously injured or killed than a properly belted occu- pant.
o Avoid high speeds when cornering or
turning.
o Do not make quick steering wheel movements, such as sharp lane changes or fast, sharp turns.
o The risk of rollover is greatly in- creased if you lose control of your vehicle at highway speeds.
o Loss of control often occurs if two or more wheels drop off the roadway and the driver oversteers to reenter the roadway.
o In the event your vehicle leaves the roadway, do not steer sharply. In- stead, slow down before pulling back into the travel lanes.
o Never exceed posted speed limits.
NOTE:
Depress the brake pedal and push the button when shifting. Push the button when shifting. The selector lever can be shifted freely.
The first few shifts on a new vehicle, or if the battery has been disconnected, may be somewhat abrupt. This is a nor- mal condition, and the shifting sequence will adjust after shifts are cycled a few times by the T.C.M (Transaxle Control Module).
DRIVING YOUR HYUNDAI
C090A01JM
CAUTION:
Never shift into "R" or "P" position while the vehicle is moving.
The indicator lights in the instrument clus- ter indicate the selector lever position when the ignition is switched "ON". During "D" range operation, green lights indicate the gear currently in use.
OPERATING THE AUTOMATIC TRANSAXLE
C090A01O-GAT
HJM3018
The highly efficient Hyundai automatic transaxle has four forward speeds and one reverse speed. The individual speeds are selected automatically, depending on the position of the speed selector lever. The selector lever has 2 gates; the main gate and the manual gate.NOTE: For information on manual gate opera- tion, refer to "Sports Mode".
In the main gate, the selector lever has 4
positions, and is equipped with a button to avoid inadvertent selection.2 DRIVING YOUR HYUNDAI 10
C090B02A-AAT
The function of each position is as follows:
o P (Park): Use to hold the vehicle in place when parked or while starting the engine. When- ever parking the car, apply the parking brake and shift the selector lever to the "P" (Park) position.
CAUTION:
Never place the selector lever in the "P" (Park) position unless the vehicle is fully stopped. Failure to observe this caution will cause severe damage to the transaxle.
C090C01A-AAT
o R (Reverse): Use for backing up the vehicle. Bring the car to a complete stop before shifting the selector lever to "R" position.
C090F01JM-GAT
Sports Mode
C090D02O-AAT
o N (Neutral): In the "N" position, the transaxle is in neu- tral, which means that no gears are en- gaged. The engine can be started with the shift lever in "N" position, although this is not recommended except if the engine stalls while the car is moving.
C090E02O-AAT
o D (Drive): Use for normal driving. Bring the car to a complete stop before shifting the selector to "D" position. The transaxle will automati- cally shift through a four gear sequence.
HJM3020
Whether the vehicle is stationary or in motion, sports mode is selected by push- ing the selector lever from the "D" position into the manual gate. To return to "D" range operation, push the selector lever back into the main gate. In sports mode, moving the selector lever backwards and forwards can make gear- shifts simple. UP (+) : Push the lever forward once to shift up one gear. DOWN (-) : Pull the lever backwards once to shift down one gear. SKIP : By rapidly moving the selector for- wards or backwards twice, it is possible to skip one gear, i.e. 1st to 3rd or 3rd to 1st.!
CAUTION:
o In sports mode, The driver must ex- ecute shifts in accordance with pre- vailing road conditions, taking care to keep the engine speed below the red zone. For engine protection, upward shifts are made automatically when the engine rpm reaches the red zone. o By rapidly moving the selector lever backwards (-) twice, it is possible to skip one gear, i.e., 3rd to 1st, 4th to 2nd. Since sudden engine braking and/or rapid acceleration can cause a loss of traction, however, downshifts must be made carefully in accordance with the vehicle's speed.
NOTE: o In sports mode, only the four forward gears can be selected. To select re-