- 2009 Hyundai Santa FE Owners Manuals
- Hyundai Santa FE Owners Manuals
- 2005 Hyundai Santa FE Owners Manuals
- Hyundai Santa FE Owners Manuals
- 2004 Hyundai Santa FE Owners Manuals
- Hyundai Santa FE Owners Manuals
- 2010 Hyundai Santa FE Owners Manuals
- Hyundai Santa FE Owners Manuals
- 2006 Hyundai Santa FE Owners Manuals
- Hyundai Santa FE Owners Manuals
- 2003 Hyundai Santa FE Owners Manuals
- Hyundai Santa FE Owners Manuals
- 2007 Hyundai Santa FE Owners Manuals
- Hyundai Santa FE Owners Manuals
- 2008 Hyundai Santa FE Owners Manuals
- Hyundai Santa FE Owners Manuals
- 2012 Hyundai Santa FE Owners Manuals
- Hyundai Santa FE Owners Manuals
- Download PDF Manual
-
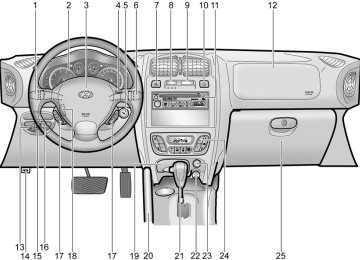
B500A01O o To open the glove box, pull on the glove box
release lever.
o The glove box door can be locked (and
unlocked) with the key.
WARNING:
Do not keep objects except spectacle in- side the spectacle case. Such objects can be thrown out in the event of a sudden stop or an accident, possibly injuring the pas- sengers in the vehicle.
WARNING:
To avoid the possibility of injury in case of an accident or a sudden stop, the glove box door should be kept closed when the car is in motion.
CENTER CONSOLE BOX
OUTSIDE REARVIEW MIRROR
FEATURES OF YOUR HYUNDAI
73
B500B01O-AAT Illuminated Glove Box
B505A01O-GAT
B510A01A-AAT Manual Type
Opening the glove box will automatically turn on the light when the multi-function switch is turned to the first/second position.
HSM2167
The center console box is used for storing cassette tape or small articles. To use the center console box, lift the cover (1) or open the cover with pressed the button (2).
WARNING:
To avoid the possibility of injury in case of an accident or a sudden stop, the center console box lid should be kept closed when the car is in motion.
B510A01O The outside rearview mirrors are equipped with a remote control for your convenience. It is operated by the control lever in the bottom front corner of the window. Before driving away, always check that your mirrors are positioned so you can see behind you, both to the left and right sides, as well as directly behind your vehicle. When using the mirror, always exercise caution when attempt- ing to judge the distance of vehicles behind or along side of you.
1FEATURES OF YOUR HYUNDAI 74
CAUTION:
If the mirror control is jammed with ice, do not attempt to break it free using the control handle or by manipulating the face of the mirror. Use an approved spray de-icer (not radiator antifreeze) to release the frozen mechanism or move the vehicle to a warm place and allow the ice to melt.
B510B01Y-AAT Electric Type (If installed)
To adjust the position of either mirror:
1. Move the selecting switch to the right or left to activate the adjustable mechanism for the corresponding door mirror.
2. Adjust the mirror angle by depressing the appropriate directional switch as illustrated.
B510B01O-A The outside rearview mirrors can be adjusted to your preferred rear vision, both directly be- hind the vehicle, and to the rear of the left and right sides. The remote control outside rearview mirror switch controls the adjustments for both right and left outside mirrors.
B510B02O
!
CAUTION:
o Do not operate the switch continuously
for an unnecessary length of time.
o Scraping ice from the mirror face could cause permanent damage. To remove any ice, use a sponge, soft cloth or approved de-icer.
WARNING:
Be careful when judging the size or dis- tance of any object seen in the passenger side rear view mirror. It is a convex mirror with a curved surface. Any objects seen in this mirror are closer than they appear.
FEATURES OF YOUR HYUNDAI
75
B510D01HP-AAT OUTSIDE REARVIEW MIRROR HEATER (If installed)
B510C02A-AAT FOLDING THE OUTSIDE REARVIEW MIRRORS
B380A01O-A The outside rearview mirror heater is actuated in connection with the rear window defroster. To heat the outside rearview mirror glass, push in the switch for the rear window defroster. The rearview mirror glass will be heated for defrost- ing or defogging and will give you improved rear vision in inclement weather conditions. Push the switch again to turn the heater off. The outside rearview mirror heater automatically turns itself off after 20 minutes.
B510C01O To fold the outside rearview mirrors, push them toward the rear. The outside rearview mirrors can be folded rearward for parking in narrow areas. To unfold the outside rear view mirrors, push them toward the fornt.
WARNING:
Do not adjust or fold the outside rearview mirrors while the vehicle is moving. This could result in loss of control, and an acci- dent which could cause serious injury or death.
1FEATURES OF YOUR HYUNDAI 76
DAY/NIGHT INSIDE REARVIEW MIRROR
HOMELINK MIRROR
B520A01A-AAT Manual Type
B520B02O-GAT Electric type (If installed)
B520C01L-GAT (If installed)
B520A01O Your Hyundai is equipped with a day/night inside rearview mirror. The "night" position is selected by flipping the tab at the bottom of the mirror toward you. In the "night" position, the glare of headlights of cars behind you is reduced.
HLZ2068-1
The electric type day/night inside rearview mir- ror automatically controls the glare of headlights of the car behind you.
1. Pressing the button turns the auto- dimming function OFF which is indicated by the green status indicator LED turning off. 2. Pressing the button again turns the auto- dimming function ON which is indicated by the green status indicator LED turning on.
NOTE: The mirror defaults to the "ON" position each time the vehicle is started.
Indicator Light
Glare Detection
Homelink buttons
B520C01L Your new vehicle may be equipped with an automatic night vision mirror. During nighttime driving, this feature will automatically detect and reduce dangerous rearview mirror glare.
Your new mirror also comes with an integrated HomeLink Universal Transceiver, which allows you to program up to 3 buttons on the mirror to activate your garage door(s), estate gate, home lighting, etc. The mirror actually learns the codes from your various existing transmitters.
Automatic-Dimming Function
HOMELINK PROGRAMMING
CAUTION:
o Make sure people and/or objects are out of the way of any garage doors or gates you may be operating during the pro- gramming procedures.
o Keep original transmitters for potential future programming needs, or in case you sell the vehicle.
o In the event you do sell your vehicle, it's recommended you erase your pro- grammed HomeLink mirror buttons.
Automatic-dimming mirror function buttons
B520C01L
To assist you during nighttime driving, your mirror will automatically dim upon detecting glare from the vehicles behind you.
Press the button to turn the automatic- dimming function off. The mirror indicator light will turn off.
Press the button to turn the automatic- dimming function on. The mirror indicator light will illuminate.
NOTE: The mirror defaults to the "on" position each time the vehicle is started.
WARNING:
Do not use HomeLink with any garage door opener that lacks the safety stop and re- verse feature as required by federal safety standards (includes garage doors manu- factured before April 1, 1982), as these doors can increase the risk of serious injury or death. Call 1-800-355-3515 or visit www.homelink.com for more information.
FEATURES OF YOUR HYUNDAI
77
NOTE: If programming a garage door opener or gate, it is advised to unplug the device during the "cycling" process to prevent possible motor burnout.
Programming
Ensure the ignition switch is turned to the "ACC" position to program and/or operate HomeLink system. It is also recommended that a new battery be placed in the handheld transmitter of the device being programmed to HomeLink for quicker programming and accurate transmis- sion of the radio-frequency. Follow these steps to program your HomeLink mirror:
Flashing
B520C02L
1FEATURES OF YOUR HYUNDAI 78
1. When programming the buttons for the first time, press and hold the two outside HomeLink buttons ( , ), releasing when the indicator light begins to flash (approxi- mately 20 seconds). This procedure erases the factory-set default codes. Do not per- form this step when programming additional transmitters.
Flashing
1 ~ 3 inches
Transmitter
B520C03L 2. Hold the transmitter of the device you want to program 1 to 3 inches away from the bottom of the mirror. Simultaneously press the handheld transmitter button and the HomeLink button you wish to program. The indicator light will flash slowly at first, then rapidly, indicating successful programming.
3.
If the garage door opener or other device you wish to program is rolling-code equipped, proceed to the "Rolling Code Programming" section.
4. Repeat step 2 to program the remaining
HomeLink buttons.
Additional Programming for Rolling Code Devices
For any rolling-code-equipped device; follow the steps additional below after completing the "Programming" section. A second person may make the following steps easier.
1. Locate the "learn" or "smart" button on the device's motor head unit. The exact location and color of the button varies by product brand, but is usually referenced in the device's owner's manual. Contact HomeLink at 1- 800-355-3515 or www.homelink.com for help.
2. Press and release the "learn" or "smart"
button on the device's motor head unit.
NOTE: You now have 30 seconds to initiate step 3.
3. Return to the vehicle and firmly press and release the programmed HomeLink button. Press and release the same HomeLink but- ton a second time to complete the program- ming process. (Some devices may require you to press and release a third time to complete the programming.)
4. Now HomeLink mirror and rolling-code- equipped device should be synchronized. The remaining HomeLink buttons may now be programmed if this has not been done previously.
Operating HomeLink
Simply press the appropriate HomeLink button to activate the trained product (garage door, security system, entry door lock, estate gate, lighting, etc.). The original handheld transmit- ters may also be used at any time.
Erasing Programmed Buttons
Reprogramming a Single HomeLink Button
Gate Operator Programming & Cana- dian Programming
FEATURES OF YOUR HYUNDAI
79
Flashing
To program a device to HomeLink using a HomeLink button previously trained, follow these steps:
1. Press and hold the desired HomeLink but- ton. Do not release until step 4 has been completed.
2. When the indicator light begins to flash slowly (after 20 seconds), hold the handheld trans- mitter 1 to 3 inches away from the bottom of the mirror.
3. Press and hold the transmitter button (or, if necessary, press and "cycle," as described in the '"Gate Operator & Canadian Program- ming" portion of this text).
4. The HomeLink indicator light will flash slowly at first, then rapidly, indicating successful programming. Release both buttons.
B520C02L
To erase the three HomeLink buttons, press and hold the two outside buttons until the indica- tor light begins to flash (after 20 seconds). Release both buttons.
Individual buttons cannot be erased, but can be reprogrammed.
During programming, your handheld transmit- ter may automatically stop transmitting. Continue to press and hold the HomeLink button while you press and repress ("cycle") your handheld transmitter every two seconds until the frequency signal has been learned. The indicator light will flash slowly at first and then rapidly upon successful programming.
Accessories
For more information on HomeLink and HomeLink-compatible products, or to purchase HomeLink accessories, call 1-800-355-3515
or visit www.homeink.com.1FEATURES OF YOUR HYUNDAI PARKING BRAKE 80
TAIL GATE
B530A01A-AAT
B540A01FC-AAT
WARNING:
The tail gate should always be kept com- pletely closed while the vehicle is in motion. If it is left open or ajar, poisonous exhaust gases may enter the car resulting in serious illness or death to the occupants. See addi- tional warnings concerning exhaust gases on page 2-2.
B530A01O Always engage the parking brake before leav- ing the vehicle. This also turns on the parking brake indicator light when the key is in the "ON" or "START" position. Before driving away, be sure that the parking brake is fully released and the indicator light is off.
o To engage the parking brake, pull the lever
up as far as possible.
o To release the parking brake, pull up and press the thumb button. Then, while holding the button in, lower the brake lever.
B540A01O
o The tail gate can be locked or unlocked with
a key.
o To open the tail gate, you need to unlock, press the lever of the outside handle, and then raise it.
o To close, lower the tail gate, then press down on it until it is closed. To be sure the tail gate is fully closed, try to pull it up again without using the outside handle.
LUGGAGE COMPARTMENT
FEATURES OF YOUR HYUNDAI
81
B540B02O-AAT Tail gate Window
B540C01HP-GAT LUGGAGE COMPARTMENT LIGHT
B640A01S-AAT CARGO SECURITY SCREEN (If installed)
HSM2113
Luggage compartment light has a 3-position switch. The three positions are:o In the "MIDDLE" position, the luggage com- partment light comes on when the tail gate is opened, then goes out when it is closed.
o In the "ON" position, the light stays on at all
o In the "OFF" position, the light stays off at all
times.
times.
B640A01O To use the security screen, pull it out of the retractor and hook it to the anchors as illus- trated.
HSM2012
o When you push the tail gate window release button to open the tail gate window, it will spring up slightly. Raise the tail gate window. The window will raise completly by itself after it has been raised halfway.o To close the tail gate window, lower the tail
gate window, and it will close by itself. To be sure the tail gate window is securely fastened, try to pull it up again.
NOTE: The tail gate window lock is operated is in connection with the tail gate lock. To open the tail gate window make sure the tail gate is unlocked with a key or the central door locking switch.
1FEATURES OF YOUR HYUNDAI 82
B650A01S-AAT Stowage Precautions
1. Do not place objects on the cargo security screen. Such objects may be thrown about inside the vehicle and possibly injure vehicle occupants during an accident or when brak- ing.
2. For better fuel economy, do not carry unnec-
essary weight.
3. Never allow anyone to ride in the luggage compartment. It is designed for luggage only.
4. Try to maintain the balance of the vehicle and locate the weight as far forward as possible.
B540D02O-AAT LUGGAGE NET (If installed)
CAUTION:
To prevent damage to the goods or the vehicle, care should be taken when carrying fragile or bulky objects in the luggage com- partment.
WARNING:
Avoid eye injury. DO NOT overstretch. The luggage net ALWAYS keep your face and body out of its recoil path. DO NOT use when the luggage net straps have visible signs of wear or damage.
HSM233
When loading the objects in the luggage com- partment, use the four rings located in the luggage compartment to attach the luggage net as shown illustration. This will help prevent the objects from sliding.ROOF RACK
B630A02O-AAT (If installed)
CAUTION:
o The following specifications are recom- mended when loading cargo or luggage.
ROOF RACK
75 lbs (34 kg) Evenly Distributed
HSM2173
If your Hyundai has a roof rack, you can load things on top of your vehicle. Crossrails and fixing components to adapt the roof rack on your vehicle may be obtained from an authorized Hyundai dealer.o Loading cargo or luggage above 75 lbs (34 kg) on the roof rack may damage your vehicle. When you carry large objects, never let them hang over the rear or the sides of your vehicle.
o To prevent damage or loss of cargo as you are driving, check frequently to make sure the luggage carrier and cargo are still securely fastened.
o Always drive your vehicle at a moderate
speed.
o To use the roof rails as a roof rack, you must fit the roof rails with two or more crossrails or equivalent before carrying cargo or luggage on the roof.
o Loading cargo or luggage exceeding the specification on the roof rack may re- duce the stability of your vehicle.
o In case a sunroof is installed, do not position roof rack loads that could inter- fere with opening of the sunroof.
FEATURES OF YOUR HYUNDAI
HIGH-MOUNTED REAR STOP LIGHT
83
B550A01A-AAT (If installed)
B550A01O In addition to the lower-mounted rear stoplights on either side of the car, the high mounted rear stoplight in the center of the rear window also lights when the brakes are applied.
1FEATURES OF YOUR HYUNDAI 84
AUTO FUEL CUT SWITCH
REMOTE FUEL-FILLER LID RELEASE
B560B01O-AAT
B560A02JM-AAT
B560A02O-1
B560B01O The auto fuel cut switch is located on the driver's side of the engine compartment. In the event of a collision or sudden impact, the auto fuel cut device cuts off the fuel supply. If this device is activated, it must be reset by pressing in on the top of the switch before the engine can be restarted.
WARNING:
Before resetting the auto fuel cut switch, the fuel line should be checked for fuel leaks.
B560A01O The fuel-filler lid may be opened from inside the vehicle by pulling up on the fuel-filler lid opener located on the front floor area on the left side of the vehicle.
NOTE: If the fuel-filler lid will not open because ice has formed around it, tap lightly or push on the lid to break the ice and release the lid. Do not pry on the lid. If necessary, spray around the lid with an approved de-icer fluid (do not use radiator anti-freeze) or move the vehicle to a warm place and allow the ice to melt.
WARNING:
o The fuel cap must be tightened until cap clicks, otherwise " " light will illuminate.
o Gasoline vapors are dangerous. Before refueling, always stop the engine and never allow sparks or open flames near the filler area. If you need to replace the filler cap, use a genuine Hyundai re- placement part.
!
WARNING:
o If you open the fuel filler cap during high ambient temperatures, a slight "pres- sure sound" may be heard. This is nor- mal and not a cause for concern. Whenever you open the fuel filler cap, turn it slowly.
o Make sure the fuel filler cap is replaced and securely seated after fueling. Failure to replace or fully seat the fuel filler cap will result in fuel vapors escaping into the atmosphere and the check engine " " indicator illuminating.
o Do not "TOP-OFF" after the first nozzle
shut off when refueling.
o Automotive fuels are flammable/explo- sive materials. When refueling, please note the following guidelines carefully. - Before touching the fuel nozzle or fuel filler cap, have one's hands in contact with metal parts away from the filler neck to discharge static elec- tricity.
- Do not get back in the vehicle while refueling. Do not operate anything that can produce static electricity. Static electricity discharge can ignite fuel vapors resulting in explosion.
WARNING:
- When using a portable fuel container be sure to place the container on the ground while refueling. Static elec- tricity discharge from the container can ignite fuel vapors causing a fire. While starting refueling contact should be maintained until the filling is complete.
- Do not use cellular phones around a gas station. The electric current or electronic interference from cellular phones can ignite fuel vapors caus- ing a fire.
- When refueling always shut the en- gine off. Sparks by electrical equip- ment of the engine can ignite fuel vapors causing a fire. After refueling, check to make sure the fuel filler cap is securely closed, and then start the engine.
- Do not smoke or try to light cigarettes around a gas station. Automotive fuels are flammable.
FEATURES OF YOUR HYUNDAI
HOOD RELEASE
B570A01L-GAT
85
B570A01O 1. Pull the release lever to unlatch the hood.
B570A02O
1FEATURES OF YOUR HYUNDAI 86
2. Push the secondary latch lever up and lift the
hood.
3. Raise the hood by hand.
FLOOR MAT ANCHOR
SUN VISOR
B571A03Y-AAT
B580A01O-AAT
Ticket holder
When closing the hood, slowly close the hood and make sure it locks into place.
B570A03O
B570A01JM-A
When using a floor mat on the front floor carpet, make sure it attaches to the floor mat anchor in your vehicle. This keeps the floor mat from sliding forward.
WARNING:
o Always double check to be sure that the hood is firmly latched before driving away. If it is not latched, the hood could open while the vehicle is being driven, causing a total loss of visibility, which might result in an accident.
o Do not move the vehicle with the hood in the raised position, as vision is ob- structed and the hood could fall or be damaged.
WARNING:
o Make sure the floor mat is properly placed on the floor carpet. If the floor mat slips and interferes with the movement of the pedals during driving, it may cause an accident.
o Don't put an additional floor mat on the top of the anchored floor mat, otherwise the additional mat may slide forward and interfere with the movement of the ped- als.
Vanity mirror
B580A01O Your Hyundai is equipped with sun visors to give the driver and front passenger either frontal or sideward shade. To reduce glare or to shut out direct rays of the sun, turn the sun visor down. A ticket holder is provided on the front of the sunvisor for the driver. Vanity mirrors are pro- vided on the back of the sun visor for the driver and front passenger.
NOTE: The Supplemental Restraint System (SRS) label containing useful information can be found in the front of each sun visor.
FEATURES OF YOUR HYUNDAI
STEERING WHEEL TILT LEVER
87
B580C01JM-AAT SUN VISOR EXTENDER
B600A02Y-AAT
WARNING:
Do not place the sun visor in such a manner that it obscures visibility of the roadway, traffic or other objects.
B580B01O-AAT Illuminated Vanity Mirror (If installed)
Opening the lid of the vanity mirror will automati- cally turn on the mirror light when the multi- function switch is turned to the first/second position.
B580C01O Your vehicle is equipped with sun visor extend- ers that may be used when the visor is in the side glass position.
To adjust the steering wheel:
B600A01O
1. Pull the lever upward and hold it to unlock. 2. Raise or lower the steering wheel to the
desired position.
3. After adjustment, release the lever.
WARNING:
Do not attempt to adjust the steering wheel while driving as this may result in loss of control of the vehicle and serious injury or death.
1FEATURES OF YOUR HYUNDAI 88
FRONT DOOR EDGE WARNING LIGHT B620A01S-AAT
HORN
B610A01L-GAT
REAR SEAT ARM REST
B611A01Y-AAT
B620A01O
A red light comes on when the front door is opened. The purpose of this light is to assist when you get in or out and also to warn passing vehicles.
B610A01O Press the pad on the steering wheel to sound the horn.
HSM2049
This arm rest is located in the center of the rear seat back.CRUISE CONTROL
B660A01S-AAT (If installed)
The cruise control system provides automatic speed control for your comfort when driving on freeways, toll roads, or other noncongested highways. This system is designed to function above approximately 25 mph (40 km/h).
B660B04O-AAT To Set the Cruise Speed
1. Push the cruise control ON/OFF switch. The "CRUISE" indicator light in the instru- ment cluster will illuminate. This turns the system on.
2. Accelerate to desired cruising speed above
25 mph (40 km/h).
FEATURES OF YOUR HYUNDAI
89
5. To momently increase speed, temporarily depress the accelerator pedal enough for the vehicle to exceed the preset speed. When you remove your foot from the accel- erator pedal, the vehicle will return to the speed you have set.
NOTE: If the vehicle speed decreases more than 12
mph (20 km/h) below the set speed or decreases below 25 mph (40 km/h), the cruise control system will automatically cancel the set speed.B660B01O 3. Push the "SET" (COAST) switch after you have set the vehicle speed at the desired speed. The "SET" indicator light in the instru- ment cluster will illuminate.
4. Remove your foot from the accelerator pedal and the desired speed will automatically be maintained.
B660A01O
1FEATURES OF YOUR HYUNDAI 90
B660C03O-AAT To cancel the cruise speed
B660D01O-AAT To Resume the Preset Speed
B660F04O-AAT To Reset at a Slower Speed
B660C01O To disengage the cruise control system, push the "CANCEL" switch. Additionally, the following actions will disengage the system:
B660D01O The vehicle will automatically resume the speed set prior to cancellation when you push the "RESUME (ACCEL)" switch, providing the ve- hicle speed is above 25 mph (40 km/h).
o Depress the brake pedal. o Shift the selector lever to "N" position. o Decrease the vehicle speed lower than the
memory speed by 12 mph (20 km/h).
o Decrease the vehicle speed to less than 25
mph (40 km/h).
o Release the cruise control ON/OFF switch.
B660E01Y-AAT To Reset at a Faster Speed
1. Push the "RESUME (ACCEL)" switch and
hold it.
2. Accelerate to desired speed and release the "RESUME (ACCEL)" switch. While the con- trol switch is held, the vehicle will gradually gain speed.
B660B01O
1. Push the "SET (COAST)" switch and hold it. While the control switch is pushed, the "SET" indicator light in the instrument cluster will illuminate and the vehicle speed will gradu- ally decrease.
2. When the desired speed is obtained, release
the control switch. The "SET" indicator light in the instrument cluster will go out.
FEATURES OF YOUR HYUNDAI
91
WARNING:
o Keep the cruise control ON/OFF switch off when not using the cruise control. o Use the cruise control system only when traveling on open highways in good weather.
o Do not use the cruise control when it may not be safe to keep the car at a constant speed, for instance, driving in heavy or varying traffic, or on slippery (rainy, icy or snow-covered) or winding roads or over 6% up-hill or down-hill roads.
o Pay particular attention to the driving conditions whenever using the cruise control system.
o During normal cruise control operation, when the "SET" switch is activated or reactivated after applying the brakes, the cruise control will energize after ap- proximately 3 seconds. This delay is normal.
1FEATURES OF YOUR HYUNDAI 92
HEATING AND COOLING CONTROL
B710A01O-GAT (If installed)
B710B02O-AAT Center Ventilator
The center ventilators are located in the middle of the instrument panel. To change the direction of the air flow, move the knob in the center of the vent up-and-down and side-to-side. The vents are opened when the vent knob is moved to " " position. The vents are closed when the vent knob is moved to " ". Keep these vents clear of any obstructions.
B710C02O-AAT Side Ventilator
The side ventilators are located on each side of the front door. To change the direction of the air flow, move the knob in the center of the vent up- and-down and side-to-side. The vents are opened when the vent knob is moved to " " position. The vents are closed when the vent knob is moved to " ". Keep these vents clear of any obstructions.
1. Side Ventilator 2. Side Defroster Nozzle 3. Windshield Defroster Nozzle 4. Center Ventilator
B710A01O-A
HEATING AND VENTILATION
FEATURES OF YOUR HYUNDAI
93
B670A03O-AAT (If installed)
B670B02O-AAT Fan Speed Control (Blower Control)
B670C02O-AAT Air Intake Control Switch
B690A01O-1
There are three controls and two switches for the heating and cooling system. They are:1. Air intake control switch 2. Air conditioning switch 3. Air flow control 4. Fan speed control 5. Temperature control
B670B01O-1
This is used to select the blower fan speed. The blower fan speed, and therefore the volume of air delivered from the system, may be con- trolled manually by setting the blower control between the "1" and "4" position. 1 being the lowest fan speed and 4 being the highest fan speed.B670C02O This is used to select fresh outside air or recirculate inside air. To change the air intake control mode, (Fresh mode, Recirculation mode) push the control button.
FRESH MODE ( ) : The indicator light on the button is illuminated when the air intake control is in fresh mode.
RECIRCULATION MODE ( ) : The indicator light on the button is illuminated when the air intake control is in recirculation mode.
1FEATURES OF YOUR HYUNDAI 94
With the " " mode selected, air enters the vehicle from outside and is heated or cooled according to the other functions selected. With the " " mode selected, air from within the passenger compartment is drawn through the heating system and heated or cooled ac- cording to the other functions selected.
NOTE: o It should be noted that prolonged opera- tion of the heating system in " " mode will give rise to fogging of the wind- shield and side windows and the air within the passenger compartment will become stale. In addition prolonged use of the air conditioning with the " " mode selected may result in the air within the passenger compartment becoming excessively dry.
o When the ignition switch is turned "ON" the air intake control switch will change to " " mode in floor, floor-defrost and defrost position. This is normal opera- tion. But, the air intake control switch will change to " " mode when the ignition switch is turned "ON" with the MAX A/C mode selected.
B670D04O-AAT Air Flow Control
HSM2122
Face-Level
Selecting the "Face" mode will cause air to be discharged through the face level vents.
B670D01O-1
This is used to turn the blower fan on/off and to direct the flow of air. Air can be directed to the floor, dashboard outlets, or windshield. Five symbols are used to represent Face, Bi-Level, Floor, Floor-Defrost and Defrost air position. The MAX A/C mode is used to cool the inside of the vehicle faster. The "OFF" mode is used to turn the blower fan off.FEATURES OF YOUR HYUNDAI
95
HSM2123
HSM2124
HSM2125
Bi-Level
Floor-Level
Floor-Defrost Level
Air is discharged through the face vents and the floor vents. This makes it possible to have cooler air from the dashboard vents and warmer air from the floor outlets at the same time.
Air is discharged through the floor vents, wind- shield defroster nozzle, side defroster nozzle and side ventilator. If the "Floor" mode is selected, the "Fresh" mode will be activated.
Air is discharged through the windshield de- froster nozzle, the floor vents, side defroster nozzle and side ventilator. If the "Floor-Defrost" mode is selected, the A/C will turn on automatically and "Fresh" mode will be activated.
1FEATURES OF YOUR HYUNDAI 96
HSM2126
Defrost-Level
Air is discharged through the windshield de- froster nozzle, side defroster nozzle and side ventilator. If the "Defrost" mode is selected, the A/C will turn on automatically and "Fresh" mode will be ac- tivated to improve windshield defrosting.
NOTE: If the "Floor-Defrost" or "Defrost" mode is selected, the air conditioning will not turn off by pushing the A/C button. If the air flow control is set to the floor- defrost or the defrost mode, the A/C will turn on automatically but the A/C indicator
light does not turn on. The A/C will not off until the air flow control is set to the another mode except the floor-defrost mode and the defrost mode.
NOTE: o The air intake control switch will change to " " mode when the ignition switch is turned "ON" with the MAX A/C mode selected.
o When you change to another mode from MAX A/C, the A/C and the air intake control switch are set to the following chart.
Air Intake
Control Switch
or *
A/C
ON
ON or OFF *
OFF
OFF
HSM428
ON or OFF *
MAX A/C-Level
Air is discharged through the face level vents. If the "MAX A/C" mode is selected, the A/C will turn on automatically and "Recirculation" mode will be activated.
ON
ON
* The A/C or the air intake control switch
returns to its former setting.
FEATURES OF YOUR HYUNDAI
HEATING CONTROLS
97
B670E02A-AAT Temperature Control
B690A01O-AAT
Cool
Warm
B670E01O This control is used to adjust the degree of heating or cooling desired.
B670D07O
OFF-Level
Air is discharged through the windshield de- froster nozzle, side defroster nozzle and side ventilator.
NOTE: If the air flow control is off, the air intake control is set to the fresh mode automati- cally.
B690A01O-1
For normal heating operation, set the air flow control to the floor ( ) position. (The "Fresh" mode will be activated.)For faster heating, the air intake control switch should be set in the recirculate ( ) position.
If the windows fog up, set the air flow control to the defrost ( ) position (The A/C will turn on automatically and "Fresh" mode will be acti- vated.)
For maximum heat, move the temperature con- trol to "Warm".
1FEATURES OF YOUR HYUNDAI BI-LEVEL HEATING 98
VENTILATION
AIR CONDITIONING SYSTEM
B700A02A-AAT
B710A01A-AAT
B740A01S-AAT (If installed) Air Conditioning Switch
B700A01O-1
Your Hyundai is equipped with bi-level heating controls. This makes it possible to have cooler air from the dashboard vents and warmer air from the floor outlets at the same time. To use this feature:o Set the air intake control switch to the fresh
air ( ) position.
o Set the air flow control at the bi-level ( )
speed.
o Adjust the fan speed control to the desired
and "Warm".
o Set the temperature control between "Cool"
position.
speed.
and "Warm".
To operate the ventilation system:
B710A01O-1
o Set the air intake control switch to the fresh
air ( ) position.
o To direct all intake air to the dashboard vents, set the airflow control to the face ( ) position.
o Adjust the fan speed control to the desired
o Set the temperature control between "Cool"
B740A01O The air conditioning is turned on or off by pushing the A/C button on the heating/air con- ditioning control panel.
B740B03O-AAT Air Conditioning Operation Cooling
o Set the temperature control to "Cool". ("Cool" provides maximum cooling. The tempera- ture may be moderated by moving the con- trol toward "Warm".)
o Adjust the fan control to the desired speed. For greater cooling, turn the fan control to one of the higher speeds or temporarily select the recirculate ( ) position on the air intake control switch.
B740B01O-1
To use the air conditioning to cool the interior:o Set the air flow control to the face ( ) position. o Turn on the air conditioning switch by push- ing in on the switch. The air conditioning indicator light should come on at the same time.
o Set the air intake control switch to the fresh
air ( ) position.
FEATURES OF YOUR HYUNDAI
99
B740C02O-AAT De-Humidified Heating
For dehumidified heating:
B740C01O-1
o Set the air flow control to the face ( ) position. o Turn on the air conditioning switch. The air conditioning indicator light should come on at the same time.
o Set the air intake control switch to the fresh
air ( ) position.
o Adjust the fan control to the desired speed. o For more rapid action, set the fan at one of
the higher speeds.
o Adjust the temperature control to provide the
desired amount of warmth.
1FEATURES OF YOUR HYUNDAI 100
B730A01L-AAT Operation Tips
o To keep dust or unpleasant fumes from entering the car through the ventilation sys- tem, temporarily set the air intake control switch to the position. Be sure to return the control switch to the position when the irritation has passed to keep fresh air in the vehicle. This will help keep the driver alert and comfort- able.
o Air for the heating/cooling system is drawn in through the grilles just ahead of the wind- shield. Care should be taken that these are not blocked by leaves, snow, ice or other obstructions.
o To prevent interior fog on the windshield, set the air intake control switch to the fresh air ( ) position, fan speed to the desired position, turn on the air conditioning system, and adjust temperature control to desired temperature.
B720A02E-AAT DEFROSTING/DEFOGGING Manual A/C
Full automatic A/C
Manual A/C
Full automatic A/C
FEATURES OF YOUR HYUNDAI
101
B720A02O-1
B720B02O-1
Use the heating/ventilation system to defrost or defog the windshield:
To remove interior fog on the windshield; o Set the air flow control to the defrost ( ) position. (The A/C will turn on automatically and the "Fresh" mode will be activated.)
o Set the temperature control to the desired position. o Set the fan speed control between "1" and "4" position.
To remove frost or exterior fog on the windshield; o Set the air flow control to the defrost ( ) position. (The A/C will turn on automatically and the "Fresh" mode will be activated.)
o Set the temperature control to warm. o Set the fan speed control to position "3" or "4".
NOTE: When the A/C is operated continuously on the floor-defrost level ( ) or defrost level ( ), it may cause fog to form on the exterior windshield. If this occurs, set the air flow control to the face level position ( ) and fan speed control to the low position.
1FEATURES OF YOUR HYUNDAI 102
AUTOMATIC HEATING AND COOLING CONTROL SYSTEM
B970A01Y-AAT (If installed)
B970B01O-AAT Heating and Cooling Controls
Your Hyundai is equipped with an automatic heating and cooling control system controlled by simply setting the desired temperature.
1. Temperature Control Button 2. AUTO (Automatic Control) Switch 3. Display Window 4. Air Flow Control Switch 5. Blower Fan Speed Control Switch
6. OFF Switch 7. Air Conditioning Switch 8. Air Intake Control Switch 9. Defroster Switch 10. Ambient Temperature Switch
B970B01O
B970C01O-AAT Automatic Operation
B970C01O The FATC (Full Automatic Temperature Con- trol) system automatically controls the heating and cooling by doing as follows:
1. Push the "AUTO" switch. The indicator light will come on confirming that the Face, Floor and/or Bi-Level modes as well as the blower speed and, the air conditioning will operate if ambient temperature is higher than 32°F (0°C) and automatically turns off if the ambi- ent temperature drops below 32°F(0°C).
B970C03O
2. Push the "TEMP" button to set the desired
temperature. The temperature will increase to the maxi- mum "HI" by pushing on the button. Each push of the button will cause the temperature to increase by 1°F(0.5°C). The temperature will decrease to the mini- mum "LO" by pushing on the button. Each push of the button will cause the temperature to decrease by 1°F(0.5°C).
FEATURES OF YOUR HYUNDAI
103
NOTE: o If the battery has been discharged or disconnected, the temperature mode will reset to Fahrenheit degree. This is a normal condition and you can adjust the temperature mode from Fahr- enheit to Centigrade as follows; Press the TEMP down ( ) button 3
seconds or more with the AMB button held down. The display shows that the unit of tem- perature is adjusted to Fahrenheit or Centigrade (°F →→→→→ °C or °C →→→→→ °F).Photo sensor
HSM502
o Never place things on the sensor which is located in the car on the instrument panel to ensure better control of the heating and cooling system.1FEATURES OF YOUR HYUNDAI 104
B995A01O-GAT AMBIENT TEMPERATURE SWITCH
B980B01Y-AAT Fan Speed Control
B670C02S-AAT Air Intake Control Switch
B995A01O Pressing the "AMB" button displays the ambient temperature on display window.
B980A01Y-AAT MANUAL OPERATION
The heating and cooling system can be con- trolled manually as well as by pushing buttons other than the "AUTO" button. At this state, the system sequentially works according to the order of buttons selected. The function of the buttons which are not se- lected will be controlled automatically. Press the "AUTO" button in order to convert to automatic control of the system.
B980B01O The fan speed can be set to the desired speed by pressing the appropriate fan speed control button. The higher the fan speed is, the more air is delivered. Pressing the "OFF" button turns off the fan.
B670C01O This is used to select fresh outside air or recirculation inside air. To change the air intake control mode, (Fresh mode, Recirculation mode) push the control button.
FRESH MODE ( ) : The indicator light on the button goes off when the air intake control is in fresh mode.
RECIRCULATION MODE ( ) : The indicator light on the button is illuminated when the air intake control is in recirculation mode.
B980D01Y-AAT Heating and Cooling System Off
B980E01O-AAT Air Flow Control
FEATURES OF YOUR HYUNDAI
105
B980D01O Press the "OFF" button to stop the operation of the heating and cooling system.
HSM218
This is used to direct the flow of air. Air can be directed to the floor, dashboard outlets, or windshield. Four symbols are used to represent Face, Bi-Level, Floor and Floor-Defrost posi- tion.
With the "Fresh" mode selected, air enters the vehicle from the outside and is heated or cooled according to the function selected.
With the "Recirculation" mode selected, air from within the passenger compartment will be drawn through the heating system and heated or cooled according to the function selected.
NOTE: o It should be noted that prolonged opera- tion of the heating system in "recircula- tion" mode will give rise to fogging of the windshield and side windows and the air within the passenger compartment will become stale. In addition, prolonged use of the air conditioning with the "Re- circulation" mode selected may result in the air within the passenger compart- ment becoming excessively dry.
o When the ignition switch is turned "ON" the air intake control will change to "FRESH" mode (regardless of the switch position). This is normal operation. The air intake control operates in "AUTO" mode when turning the ignition to the "ON" position if the "AUTO" mode was used before shutting off the engine.
1FEATURES OF YOUR HYUNDAI 106
HSM2122
HSM2123
HSM2124
Face-Level
Bi-Level
Floor-Level
When selecting the "Face-Level", the indicator light will come on, causing air to be discharged through the face level vents.
When selecting the "Bi-Level", the indicator light will come on and the air will be discharged through the face vents and the floor vents. This makes it possible to have cooler air from the dashboard vents and warmer air from the floor outlets at the same time.
When selecting the "Floor-Level", the indicator light will come on and the air will be discharged through the floor vents, windshield defroster nozzle, side defroster nozzle and side ventila- tor.
B980F02O-AAT Defrost Switch
B740D01Y-AAT Operation Tips
FEATURES OF YOUR HYUNDAI
107
o If the interior of the car is hot when you first get in, open the windows for a few minutes to expel the hot air.
o When you are using the air conditioning system, keep all windows closed to keep hot air out.
o When moving slowly, as in heavy traffic, shift to a lower gear. This increases engine speed, which in turn increases the speed of the air conditioning compressor.
o On steep grades, turn the air conditioning off to avoid the possibility of the engine over- heating.
o During winter months or in periods when the air conditioning is not used regularly, run the air conditioning once every month for a few minutes. This will help circulate the lubri- cants and keep your system in peak oper- ating condition.
HSM2125
Floor-Defrost Level
When selecting the "Floor-Defrost Level", the indicator light will come on and the air will be discharged through the windshield defroster nozzle, the floor vents, side defroster nozzle and side ventilator.
B980F01O When the "Defrost" button is pressed, the "Fresh" mode will be automatically selected and the air will be discharged through the windshield de- froster nozzle, side defroster nozzle and side ventilator. To assist in defrosting, the air conditioning will operate if ambient temperature is higher than 32°F(0°C) and automatically turns off if the ambient temperature drops below 32°F(0°C).
1FEATURES OF YOUR HYUNDAI 108
AIR CONDITIONER FILTER
B760A06A-GAT (FOR EVAPORATOR AND BLOWER UNIT) (If installed)
Blower
Outside air
Inside of a vehicle
Filter
Inside air
Evaporator core
B760A01Y
The air conditioner filter is located in front of the evaporator unit behind the glove box. It operates to decrease the amount of pollutants entering the car. To replace the air conditioner filter, refer to the page 6-17.
CAUTION:
o Replace the filter every 10,000 miles
(15,000 km) or once a year. If the car is being driven in severe condi- tions such as dusty, rough roads, more frequent air conditioner filter inspec- tions and changes are required.
o When the air flow rate is decreased, it must be checked at an authorized dealer.
STEREO SOUND SYSTEM
B750A02A-AAT How Car Audio Works FM reception
Ionosphere
AM reception
Ionosphere
FM radio station
Mountains
Buildings
B750A02L AM broadcasts can be received at greater distances than FM broadcasts. This is because AM radio waves are transmitted at low frequen- cies. These long, low frequency radio waves can follow the curvature of the earth rather than travelling straight out into the atmosphere. In addition, they curve around obstructions so that they can provide better signal coverage.
B750A01L AM and FM radio signals are broadcast from transmitter towers located around your city. They are intercepted by the radio antenna on your car. This signal is then received by the radio and sent to your car speakers. When a strong radio signal has reached your vehicle, the precise engineering of your audio system ensures the best possible quality repro- duction. However, in some cases the signal coming to your vehicle may not be strong and clear. This can be due to factors such as the distance from the radio station, closeness of other strong radio stations or the presence of buildings, bridges or other large obstructions in the area.
FEATURES OF YOUR HYUNDAI
109
Unobstructed area
Iron bridges
Obstructed area
B750A03L FM broadcasts are transmitted at high frequen- cies and do not bend to follow the earth's surface. Because of this, FM broadcasts gen- erally begin to fade at short distances from the station. Also, FM signals are easily affected by buildings, mountains, or other obstructions. These can result in certain listening conditions which might lead you to believe a problem exists with your radio. The following conditions are normal and do not indicate radio trouble:
1FEATURES OF YOUR HYUNDAI 110
B750B03Y-AAT Using a cellular phone or a two-way radio
When a cellular phone is used inside the vehicle, noise may be produced from the audio equip- ment. This does not mean that something is wrong with the audio equipment. In such a case, use the cellular phone at a place as far as possible from the audio equipment.
WARNING:
Don't use a cellular phone when you are driving. Stop at a safe place to use a cellular phone.
B750A04L o Fading - As your car moves away from the radio station, the signal will weaken and sound will begin to fade. When this occurs, we suggest that you select another stronger station.
o Flutter/Static - Weak FM signals or large obstructions between the transmitter and your radio can disturb the signal causing static or fluttering noises to occur. Reducing the treble level may lessen this effect until the disturbance clears.
B750A05L o Station Swapping - As an FM signal weak- ens, another more powerful signal near the same frequency may begin to play. This is because your radio is designed to lock onto the clearest signal. If this occurs, select another station with a stronger signal.
o Multi-Path Cancellation - Radio signals being received from several directions can cause distortion or fluttering. This can be caused by a direct and reflected signal from the same station, or by signals from two stations with close frequencies. If this occurs, select another station until the condition has passed.
AUDIO SYSTEM
H260A01O-AAT STEREO RADIO OPERATION (H260) (If installed)
3. BASS/TREBLE Control Knob
4. SCAN Button
6. BAND Selector
FEATURES OF YOUR HYUNDAI
111
7. PRESET Button
5. TUNE/SEEK Select Button
1. POWER ON-OFF/VOLUME/BALANCE Control Knob
2. FADER Control Knob
H260A01O
1FEATURES OF YOUR HYUNDAI 112
H260B04O-AAT 1. POWER ON-OFF Control Knob
The radio unit may be operated when the ignition key is in the "ACC" or "ON" position. Press the knob to switch the power on. The LCD shows the radio frequency in the radio mode or the CD track indicator in the CD mode. To switch the power off, press the knob again.
3. BASS Control Knob
Press to pop the knob out and turn to the left or right for the desired bass tone.
TREB (Treble Control) Knob
Pull the bass control knob further out. Turn to the left or right for the desired treble tone.
VOLUME Control
4. SCAN Button
When the scan button is pressed, the frequency will increase and the receivable stations will be tuned in one after another, receiving each sta- tion for 5 seconds. To stop scanning, press the scan button again.
5. TUNE (Manual) Select Button
Press the ( ) side or ( ) side to increase or to decrease the frequency. Press either button and hold down to continuously scroll. Release button once the desired station is reached.
Rotate the knob clockwise to increase the volume and turn the knob counterclockwise to reduce the volume.
BALANCE Control
Pull and turn the control knob clockwise to emphasize right speaker sound (left speaker sound will be attenuated). When the control knob is turned counterclockwise, left speaker sound will be emphasized (right speaker sound will be attenuated).
2. FAD (Fader Control) Knob
Turn the control knob counterclockwise to emphasize front speaker sound (rear speaker sound will be attenuated). When the control knob is turned clockwise, rear speaker sound will be emphasized (front speaker sound will be attenuated).
SEEK Operation (Automatic Channel Selection)
Press the TUNE select button for 0.5 sec or more. Releasing it will automatically tune to the next available station with a beep sound. When the ( ) side is pressed longer than 0.5
second, releasing will automatically tune to the next higher frequency and when the ( ) side is pressed longer than 0.5 second, releasing will automatically tune to the next lower frequency.6. BAND Selector
FM/AM
Pressing the button changes the AM, FM1
and FM2 bands. The mode selected is dis- played on LCD.7. PRESET STATION SELECT Button
Six (6) stations for AM, FM1 or FM2 respec- tively can be preset in the electronic memory circuit on this unit.
FEATURES OF YOUR HYUNDAI
113
CAUTION:
o Do not place beverages close to the audio system. The audio system mecha- nism may be damaged if you spill them. o Do not impact on the audio system, or the audio system mechanism could be damaged.
HOW TO PRESET STATIONS
Six AM and twelve FM stations may be pro- grammed into the memory of the radio. Then, by simply pressing the band select button and/or one of the six station select buttons, you may recall any of these stations instantly. To pro- gram the stations, follow these steps:
o Press band selector to set the band for AM,
FM1 or FM2.
o Select the desired station to be stored by
seek, scan or manual tuning.
o Determine the preset station select button
you wish to use to access that station.
o Press the station select button for more than two seconds. A select button indicator will show in the display indicating which select button you have depressed. The frequency display will flash after it has been stored into the memory. You should then release the button, and proceed to program the next desired station. A total of 18 stations can be programmed by selecting one AM and two FM stations per button.
o When completed, any preset station may be recalled by selecting AM, FM1 or FM2 band and the appropriate station button.
1FEATURES OF YOUR HYUNDAI 114
H260B01O-AAT COMPACT DISC PLAYER OPERATION (H260) (If installed)
4. SCAN Button
1. Playing CD
3. TRACK UP/DOWN
6. EJECT Button
2. FF/REW Button
5. REPEAT Button
H260A01O
4. SCAN Button
o Press the SCAN button to playback the first
10 seconds of each track.
o Press the SCAN button again within 10 sec. when you have reached the desired track.
5. REPEAT Button
o To repeat the track you are currently listen- ing to, press the RPT button. To cancel , press again.
o If you do not release RPT operation when the track ends, it will automatically be replayed. This process will be continued until you push the button again.
6. EJECT Button
When the EJECT button is pressed with a CD loaded, the CD will eject.
FEATURES OF YOUR HYUNDAI
115
NOTE: o If the CD does not operate properly or if the ER2 fault code is displayed, use one of two methods to reset the CD deck function. - Remove the audio fuse for 5 minutes.
Then, reinstall the audio fuse.
- Diconnect the negative terminal of the battery and wait 5 minutes. Then re- connect the negative battery terminal. o To assure proper operation of the unit, keep the vehicle interior temperature within a normal range by using the vehicle's air conditioning or heating system.
o When replacing the fuse, replace it with
a fuse having the correct capacity.
o The preset station frequencies are all erased when the car battery is discon- nected. Therefore, all data will have to be set again if this should occur.
o Do not add any oil to the rotating parts. Keep magnets, screwdrivers and other metallic objects away from the tape mechanism and head.
B260D04O-AAT 1. Playing CD
o Insert the CD with the label facing upward. o Insert the CD to start CD playback, during
radio operation.
o When a disc is in the CD deck, if you press the CD button, the CD player will begin playing even if the radio is being used.
o The CD player can be used when the ignition switch is in either the "ON" or "ACC" position.
2. FF/REW ( / )
If you want to fast forward or reverse through the compact disc track, push and hold the FF ( ) or REW ( ) button. When you release the button, the compact disc player will resume playing.
3. TRACK UP/DOWN
o The desired track on the disc currently being played can be selected using the track number.
o Press once to skip forward to the beg- inning of the next track. Press once to skip back to the beginning of the track.
1FEATURES OF YOUR HYUNDAI 116
o This equipment is designed to be used only in a 12 volt DC battery system with negative ground.
o This unit is made of precision parts. Do not attempt to disassemble or adjust any parts.
o When driving your vehicle, be sure to keep the volume of the unit set low enough to allow you to hear sounds coming from the outside.
o Do not expose this equipment (includ- ing the speakers) to water or excessive moisture.
CAUTION:
o Do not insert warped or poor quality discs into the CD player as damage to the unit may occur.
o Do not insert anything like coins into the player slot as damage to the unit may occur.
o Do not place beverages close to the audio system. The playback mechanism may be damaged if you spill them.
o Do not impact on the audio system, or the playback mechanism could be dam- aged.
o Driving off-road or other vibrations may
skip your compact disc. Do not use the audio system off-road as the discs could be scratched and dam- aged.
o Do not grip or pull out the disc with your hand while the disc is being pulled into the unit by the self loading mechanism. These can cause disc scratching to oc- cur or trouble in the compact disc player. o Avoid using CD-Recordable or CD- Rewritable to ensure proper operation. When using the compact disc player, genuine CDs are recommended.
FEATURES OF YOUR HYUNDAI
117
B890A02O-AAT AUDIO FAULT CODE
If you see any error indication in the display while using the system CD mode, find the cause in the chart below. If you cannot clear the error indication, take the car to your Hyundai dealer.
INDICATION
CAUSE
SOLUTION
Er2
Er3
Er6
CD DECK MECHANICAL ERROR (EJECT ERROR, LOADING ERROR)
After resetting the audio system, push the eject button. If disc is not ejected, consult your Hyundai dealer.
FOCUS ERROR DATA READ ERROR
Make sure the disc is not scratched or damaged. Press the eject button and pull out the disc. Then insert a normal CD disc.
DISC ERROR
Check if the disc is inserted correctly in the CD player. Make sure the disc is not scratched or damaged.
1FEATURES OF YOUR HYUNDAI 118
D285A01O-AAT STEREO RADIO OPERATION (D-285) (If installed)
1. POWER ON(cid:129)OFF,
VOLUME Control Knob
3. RADIO STATION