- Download PDF Manual
-
placed over the fuel fill inlet. Do not use: •
Fuels containing more than 85% ethanol or E-100 fuel. Fuel with methanol.
•
110
Transit (TTH) Canada/United States of America, enUSA, Edition date: 03/2014, Third Printing
E161513 Fuel and Refueling
3.7L Engine We recommend regular unleaded gasoline with a pump (R+M)/2 octane rating of 87. Some stations offer fuels posted as regular with an octane rating below 87, particularly in high altitude areas. We do not recommend fuels with an octane rating below 87. FUEL QUALITY - DIESEL Fuel Requirements - Choosing the Right Fuel: Vehicles Operated Where Ultra-Low Sulfur Diesel Fuel is Required (United States/Canada/Puerto Rico/U.S. Virgin Islands and Other Locales)
WARNINGS
Only use Ultra-Low Sulfur Diesel fuel (ULSD) containing a maximum of 15
ppm sulfur and up to 20% biodiesel (B20). These fuels should meet the diesel specifications defined by American Society for Testing and Materials (ASTM) D975 for diesel and by ASTM D7467 for B6-B20
blends, or an equivalent local market specification.Do not mix diesel with oil, kerosene, paraffin, gasoline or other liquids to diesel. This can cause damage to the
fuel system.
Do not use home heating oil, agricultural fuel, raw fats, oils, waste cooking greases, biodiesel fuels
greater than 20% or any diesel fuel not intended for highway use.
The vehicle warranty will not cover damage caused by using an improper type of fuel or fuel additive.
Note: Do not blend used engine oil with diesel fuel under any circumstances. Blending used oil with the fuel will significantly increase your vehicle’s exhaust emissions and reduce engine life due to increased internal wear. Fuel Requirements - Choosing The Right Fuel: Vehicles Operated Where Ultra-Low Sulfur Diesel Fuel Is Not Required Use only a diesel engine configured for use with high sulfur diesel fuel in markets with diesel fuel that has sulfur content greater than 15 ppm. Using low sulfur diesel fuel (16–500 ppm) or high sulfur diesel fuel (greater than 500 ppm) in a diesel engine designed to use only ultra-low sulfur diesel fuel may result in damage to engine emission control devices and the after-treatment system, potentially rendering your vehicle inoperable. For the engine to operate reliably on low sulfur or high sulfur diesel fuel, the engine must be a factory built high sulfur engine (available as a dealer order option for select markets) or an ultra-low sulfur diesel fuel configured engine that has been retrofitted for high sulfur diesel fuel using Ford Motor Company dealer service parts. Failure to use retrofit components other than those available through your authorized dealer will result in coolant system damage, engine overheating, selective catalyst reduction system or diesel particulate filter damage and possible base engine damage. Vehicles with engines configured for use with high sulfur diesel fuel are only available for sale in countries where ultra-low sulfur diesel fuel is generally not available or mandated by the government. Vehicles originally sold in a ultra-low sulfur diesel fuel market that are subsequently
111
Transit (TTH) Canada/United States of America, enUSA, Edition date: 03/2014, Third Printing
Fuel and Refueling
exported to non ultra-low sulfur diesel fuel markets will need to be retrofitted (at the customer’s expense using Ford authorized dealer service parts) in order to be reliably operated on non ultra-low sulfur diesel fuel. Biodiesel You may operate your vehicle on diesel fuels containing up to 20% biodiesel, also known as B20. Biodiesel fuel is a chemically converted product from renewable fuel sources, such as vegetable oils, animal fats and waste cooking greases.
To help achieve acceptable engine performance and durability when using biodiesel in your vehicle: • Confirm the biodiesel content of the
fuel to be B20 (20% biodiesel) or less by checking the label on the fuel pump. • Only use biodiesel fuel of good quality that complies with applicable industry standards ASTM D975 for diesel and ASTM D7467 for B6-B20 blends. Follow the recommended service maintenance intervals. See Normal Scheduled Maintenance (page 443). • Do not store biodiesel fuel in the fuel
•
tank for more than one month.
• Do not use raw oils, fats or waste
cooking greases.
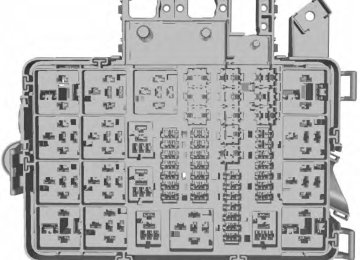
System Messages
Message
LOW FUEL PRESSURE
Action and Description
Consider changing brands or reducing biodiesel content if you have cold temperature fuel gelling issues or this message frequently appears.
Use of biodiesel in concentrations greater than 20% may cause damage to your vehicle, including engine and/or exhaust after-treatment hardware (exhaust catalyst and particulate filter) failures. When using biodiesel in concentrations greater than 20%, this can also cause fuel filter restrictions that may result in a lack of power or damage to fuel system components, including fuel pump and fuel injector failures. See Special Operating Conditions Scheduled Maintenance (page 445). . Look for a label on the fuel pump to confirm the amount of biodiesel contained in a diesel fuel. Biodiesel fuel blends with greater than 5% must be labeled.
Biodiesel content is often indicated with the letter B followed by the percent of biodiesel in the fuel. For example, B20
indicates a fuel containing 20% biodiesel. Ask the service station attendant to confirm the biodiesel content of a diesel fuel if you do not see a label on the fuel pump. Biodiesel fuels degrade more easily than diesel fuels not containing biodiesel and should not be stored in the fuel tank for more than one month. If you plan to park or store your vehicle for more than one month, then you should empty your vehicle fuel tank of biodiesel fuel. You should fill the tank with a pure petroleum-based diesel fuel and run your vehicle for a minimum of 30 minutes.112
Transit (TTH) Canada/United States of America, enUSA, Edition date: 03/2014, Third Printing
Fuel and Refueling
RUNNING OUT OF FUEL Running out of fuel can cause damage not covered by the vehicle Warranty. If your vehicle runs out of fuel: • Add a minimum of 1.3 gal (5 L) of fuel to restart the engine. If your vehicle is out of fuel and on a steep slope, more fuel may be required. You may need to switch the ignition from off to on several times after refueling to allow the fuel system to pump the fuel from the tank to the engine. When restarting, cranking time takes a few seconds longer than normal.
•
Filling a Portable Fuel Container Use the following guidelines to avoid electrostatic charge build-up when filling an ungrounded fuel container: • Only use an approved fuel container to transfer fuel to your vehicle. Place the container on the ground when filling it.
•
• Do not fill a fuel container when it is
inside your vehicle (including the cargo area). Keep the fuel pump nozzle in contact with the fuel container when filling it. • Do not use a device that holds the fuel
pump nozzle lever in the fill position. Adding Fuel From a Portable Fuel Container
WARNINGS
Do not insert the nozzle of a fuel container or an aftermarket funnel into the fuel system filler neck. This may damage the fuel system filler neck or its seal and cause fuel to run onto the ground.
If you intend to store your vehicle for more than two months, we recommend that you seek advice from an authorized dealer. Note: Degraded or oxidized biodiesel can damage fuel system seals and plastics and corrode steel parts. During cold weather, if you have problems operating on biodiesel, you may need to use a diesel fuel with lower biodiesel content, try another brand, or discontinue the use of biodiesel. Diesel Fuel Additives It should not be necessary to add any aftermarket additives to your fuel if you use a high quality diesel fuel that conforms to ASTM industry specifications. Aftermarket additives can damage the fuel injector system or engine. Use Motorcraft® cetane booster or an equivalent cetane booster additive if you suspect fuel has low cetane. Use Motorcraft® anti-gel & performance improver or an equivalent additive if there is fuel gelling during cold weather. Do not use alcohol-based additives to improve cetane quality, to prevent fuel gelling or any other use. The use of alcohol additives may result in damage to the fuel injectors and system. Your warranty may not cover repairs needed to correct the effects of using an aftermarket product that does not meet Ford specifications in your fuel. FUEL FILLER FUNNEL LOCATION The fuel filler funnel is located in the under seat storage compartment.
113
Transit (TTH) Canada/United States of America, enUSA, Edition date: 03/2014, Third Printing
Fuel and Refueling
3. Add fuel to your vehicle from the fuel
container.
4. Remove the plastic funnel from the
fuel tank filler pipe opening.
5. Replace the fuel tank filler cap and
close the fuel tank filler door.
6. Clean the plastic funnel and place it
back in your vehicle or properly dispose of it.
Note: Extra funnels can be purchased from an authorized dealer if you choose to dispose of the funnel. CATALYTIC CONVERTER
WARNING
Do not park or idle your vehicle over dry leaves, dry grass or other combustible materials. The exhaust will radiate a considerable amount of heat during use, and after you have switched the engine off. This is a potential fire hazard. Driving with a Catalytic Converter
WARNINGS
Avoid running out of fuel.
Do not crank the engine for long periods. Do not run the engine when a spark plug lead is disconnected. Do not push-start or tow-start your vehicle. Use booster cables. See Jump Starting the Vehicle (page
Do not switch the ignition off when driving.
177).
WARNINGS
Do not try to pry open or push open the capless fuel system with foreign objects. This could damage the fuel system and its seal and cause injury to you or others.
Do not dispose of fuel in the household refuse or the public sewage system. Use an authorized
waste disposal facility.
When refueling the vehicle fuel tank from a fuel container, use the plastic funnel included with your vehicle. See Fuel Filler Funnel Location (page ?). Note: Do not use aftermarket funnels as they will not work with the capless fuel system and can damage it. Note: Capless fuel systems do not have a fuel tank filler cap. 1. Fully open the fuel tank filler door until
it engages and remove the fuel tank filler cap.
2.
Insert the plastic funnel into the fuel tank filler pipe opening.
114
Transit (TTH) Canada/United States of America, enUSA, Edition date: 03/2014, Third Printing
E156223 Fuel and Refueling
•
Continued driving without refilling the fluid will result in: • Vehicle speed being limited. Prior to
this occurring a message will appear in the information display. Further vehicle operation without refilling the diesel exhaust fluid will cause the engine to run at idle speed. Note: You must add a minimum of 3.2 qt (3 L) for your vehicle to exit the run at idle speed mode. Filling the Diesel Exhaust Fluid Tank
WARNINGS
Do not allow diesel exhaust fluid to come into contact with eyes, skin or clothing. Should the fluid come into contact with eyes, flush them with plenty of water and contact a physician. Clean affected skin with soap and water. If swallowed, drink plenty of water and contact a physician immediately.
Refill the diesel exhaust fluid tank in a well-ventilated area. When removing the tank cap or a diesel exhaust fluid container cap, ammonia vapor may escape. Ammonia vapor is an irritant to the eyes, skin and mucous membranes. Inhaling ammonia vapor can cause burning to the eyes, throat and nose resulting in watering eyes or severe coughing.
Do not put diesel exhaust fluid in the fuel tank. This can cause engine damage not covered by the vehicle
warranty.
SELECTIVE CATALYTIC REDUCTION SYSTEM
WARNINGS
You must refill the diesel exhaust fluid tank when it is low. If it is not refilled, vehicle speed will be limited to 50 mph (80 km/h). Drive with caution and refill the fluid tank as soon as possible. If the diesel exhaust fluid becomes contaminated your vehicle will be limited to idle speed operation.
Replace the fluid immediately.
Tampering with or disabling the selective catalytic reduction system will result in severe vehicle
performance limitation. Vehicle speed will be limited to 6 mph (10 km/h).
Your vehicle has a selective catalytic reduction system to help reduce exhaust emission levels by injecting diesel exhaust fluid into the exhaust system. Diesel Exhaust Fluid Level For the system to operate correctly, you must maintain the diesel exhaust fluid level.
A warning lamp will illuminate when the diesel exhaust fluid level is low and needs to be
refilled. See Warning Lamps and Indicators (page 74). The warning lamp will illuminate approximately 500 mi (800 km) before the diesel exhaust fluid tank is empty. Refill the tank as soon as possible. Note: If the warning lamp illuminates when your vehicle is moving, and the diesel exhaust fluid is at a sufficient level, this indicates a system malfunction. Have your vehicle checked by an authorized dealer as soon as possible.
115
Transit (TTH) Canada/United States of America, enUSA, Edition date: 03/2014, Third Printing
E163176 Fuel and Refueling
Note: Immediately wash off any diesel exhaust fluid that has spilled on to a painted surface with soapy water. Filling the Diesel Exhaust Fluid Tank Using a Fuel Station Pump Filling the diesel exhaust fluid tank using a pump is similar to a refuelling your vehicle. The diesel exhaust fluid pump nozzle will shut off automatically when the tank is full. Note: Some filling stations utilize a magnetic mechanism in the pump nozzle that may prevent refilling the diesel exhaust fluid tank. To overcome this issue you will need to locate another filling station or use a refill container. Filling the Diesel Exhaust Fluid Tank Using a Container The following procedure applies to Motorcraft diesel exhaust fluid or similar fluid containers. Always follow the manufacturer's instructions. 1. Remove the diesel exhaust fluid
container cap. Place the spout on to the container and tighten it until you feel a strong resistance.
The diesel exhaust fluid tank filler neck is located below the fuel filler neck and has a blue cap. Fill the tank using a fluid pump at a diesel exhaust fluid filling station or a diesel exhaust fluid container. We recommend Motorcraft® diesel exhaust fluid, the containers are spill proof and stop the flow of fluid when the tank is full. The capacity of the diesel exhaust fluid tank is 21 liters.
3.
2. Remove the diesel exhaust fluid tank
filler cap. Insert the spout in to the filler neck until the seal on the spout seats on to the filler neck. Pour the fluid in to the tank. When the tank is full the fluid will stop flowing automatically.
You must only use diesel exhaust fluid that is certified by the American Petroleum Institute (API). Note: You must open the fuel filler door before you can open the diesel exhaust fluid filler door.
4. Return the container to the vertical
position slightly below the diesel exhaust fluid filler neck. Allow any fluid remaining in the spout to drain back in to the container.
5. Remove the spout from the diesel
exhaust fluid filler neck. Replace the diesel exhaust fluid tank cap.
116
Transit (TTH) Canada/United States of America, enUSA, Edition date: 03/2014, Third Printing
E172245E163354)E163354 Fuel and Refueling
6. Remove the spout from the diesel
exhaust fluid container and replace the cap.
Note: If there is diesel exhaust fluid left in the container retain it for later use. The spout is re-useable. Wash the spout with clean water prior to storage. Do not use the diesel exhaust fluid spout with any other fluid. Filling the Diesel Exhaust Fluid Tank in Cold Climates Diesel exhaust fluid may freeze if the ambient temperature is below 12°F (-11°C). Your vehicle has a preheating system which allows diesel exhaust fluid to operate below 12°F (-11°C). If you do not use your vehicle for an extended period when the ambient temperature is below 12°F (-11°C), the fluid in the tank may freeze. If the tank is overfilled and the fluid freezes it may damage the tank. This is not covered by the vehicle warranty. Contaminated Diesel Exhaust Fluid or Inoperative Selective Catalytic Reduction System
If the system becomes contaminated or inoperative, the diesel exhaust fluid warning
lamp will illuminate and a message will appear in the information display. Continued driving without replacing the fluid or not having the system repaired will result in: • Vehicle speed being limited. Prior to
this occurring a message will appear in the information display. Further vehicle operation without replacing contaminated diesel exhaust fluid will cause the engine to run at idle speed.
•
Note: If the vehicle speed becomes limited or the engine will only run at idle speed, normal vehicle operation will not resume until you have the system repaired. To service a contaminated or inoperative system, see an authorized dealer. Note: You must add a minimum of 3.2 qt (3 L) for your vehicle to exit the run at idle speed mode. Diesel Exhaust Fluid Guidelines • Do not put diesel exhaust fluid in the
vehicle fuel tank.
• Do not overfill the diesel exhaust fluid
tank.
• Do not dilute diesel exhaust fluid with
water or any other liquid.
• Do not re-use a diesel exhaust fluid
container.
• Do not store in direct sunlight. •
Store at temperatures between 23°F (-5°C) and 68°F (20°C).
• Do not store a diesel exhaust fluid
container in your vehicle.
• Diesel exhaust fluid is non-flammable, non-toxic, colorless and water-soluble. Approximate Diesel Exhaust Fluid Usage The chart below illustrates the approximate diesel exhaust fluid usage for the given distances traveled under various driving conditions. Usage may vary depending on: • Driving style. • • Vehicle load. •
Engine idling time.
Towing a trailer.
117
Transit (TTH) Canada/United States of America, enUSA, Edition date: 03/2014, Third Printing
E163176 Fuel and Refueling
Driving conditions
Approximate diesel exhaust fluid usage per
tank mi (km)
Primary trailer tow, aggressive driving City drive Steady highway drive
1100–4100 (1,770–6,600)
4100–6500 (6,600–10,460) 6500–10500 (10,460–16,900)
Do not attempt to start the engine if you have refueled the fuel tank with the incorrect fuel. This can cause damage not covered by the vehicle warranty. Have your vehicle checked by an authorized dealer immediately. If you use a high pressure spray to wash your vehicle, only spray the fuel tank filler door briefly from a distance not less than 8 in (200 mm).
Note: The front door must be open before you can open and close the fuel tank filler door. 1. Apply the parking brake and switch the
ignition off.
2. Fully open the fuel tank filler door until
it engages.
REFUELING
WARNINGS
When refueling always shut the engine off and never allow sparks or open flames near the filler neck. Never smoke or use a cell phone while refueling. Fuel vapor is extremely hazardous under certain conditions. Avoid inhaling excess fumes.
Do not attempt to refuel using a fuel pump nozzle that does not fit through both closing flaps of the
capless fuel filler neck.
Wait at least 10 seconds before removing the fuel pump nozzle to allow any residual fuel to drain into
the fuel tank.
Stop refueling after the fuel pump nozzle automatically shuts off for the second time. Failure to follow this
will fill the expansion space in the fuel tank and could lead to fuel overflowing.
Do not remove the fuel pump nozzle from its fully inserted position when refueling. Do not overfill the fuel tank. The pressure in an overfilled tank may cause leakage and lead to fuel spray
and fire.
118
Transit (TTH) Canada/United States of America, enUSA, Edition date: 03/2014, Third Printing
E162791 Fuel and Refueling
Note: When you insert the correct size fuel pump nozzle a spring loaded inhibitor will open. This helps to avoid refueling with the incorrect fuel. 3.
Insert the fuel pump nozzle up to the first notch on the nozzle A. Keep it resting on the cover of the fuel tank filler pipe opening.
5. Operate the fuel pump nozzle within
the area shown.
6. Slightly raise the fuel pump nozzle and
remove it slowly.
7. Close the fuel tank filler door.
4. Hold the fuel pump nozzle in position
B during refueling. Holding the fuel pump nozzle in position A may affect the flow of fuel and shut off the fuel pump nozzle before the fuel tank is full.
119
Transit (TTH) Canada/United States of America, enUSA, Edition date: 03/2014, Third Printing
E139202AE139203ABE162792E154765 Fuel and Refueling
4. After you are done pumping fuel, slowly
remove the fuel filler nozzle, allow about five to ten seconds after pumping fuel before removing the fuel filler nozzle. This allows residual fuel to drain back into the fuel tank and not spill onto the vehicle.
Note: A fuel spillage concern may occur if overfilling the fuel tank. Do not overfill the tank to the point that the fuel is able to bypass the fuel filler nozzle. The overfilled fuel may run down the drain located below and in front of the fuel filler door. If the fuel fill inlet was not properly closed, a service engine warning lamp may appear on the instrument cluster. At the next opportunity, do the following: 1. Safely pull off the road. 2. Put the vehicle in P (Park) and turn the
ignition off.
3. Open the fuel filler door and remove
any visible debris from the fuel fill opening. Insert either the fuel fill nozzle or the fuel fill funnel provided with the vehicle several times to allow the inlet to close properly. This will dislodge any debris preventing the inlet from sealing.
4.
If this action corrects the problem, the warning lamp may not reset immediately. It may take several driving cycles for the warning lamp to turn off. A driving cycle consists of an engine start-up (after four or more hours with the engine off) followed by city or highway driving. FUEL CONSUMPTION Empty reserve is the amount of fuel remaining in the tank after the fuel gauge indicates empty. The amount of usable fuel in the empty reserve varies and should not be relied upon to increase driving range.
Easy Fuel™ Capless Fuel System
WARNING
The fuel system may be under pressure. If you hear a hissing sound near the fuel filler door, do not refuel until the sound stops. Otherwise, fuel may spray out, which could cause serious personal injury.
When fueling your vehicle: 1. Apply the parking brake and switch the
ignition off.
2. Open the fuel filler door.
3. Slowly insert the fuel filler nozzle fully
into the fuel system, and leave the nozzle fully inserted to open both doors until you are done pumping. Hold handle higher during insertion for easier access.
120
Transit (TTH) Canada/United States of America, enUSA, Edition date: 03/2014, Third Printing
E156032E154765 Fuel and Refueling
3. After at least 3 to 5 tank fill ups, fill the
fuel tank and record the current odometer reading.
4. Subtract your initial odometer reading
from the current odometer reading. 5. Calculate fuel economy by dividing miles traveled by gallons used (For Metric: Multiply liters used by 100, then divide by kilometers traveled).
Keep a record for at least 1 month and record the type of driving (city or highway). This provides an accurate estimate of the vehicle’s fuel economy under current driving conditions. Additionally, keeping records during summer and winter show how temperature impacts fuel economy. In general, lower temperatures mean lower fuel economy. Conditions • Heavily loading a vehicle or towing a
trailer may reduce fuel economy at any speed.
• Carrying unnecessary weight may
reduce fuel economy (approximately 1 mpg [0.4 km/L] is lost for every 400
pounds [180 kilograms] of weight carried).• Adding certain accessories to your
vehicle (for example bug deflectors, rollbars/light bars, running boards, ski racks) may reduce fuel economy.
• Using fuel blended with alcohol may
lower fuel economy. Fuel economy may decrease with lower temperatures during the first 8–10
miles (12–16 kilometers) of driving.•
• Driving on flat terrain offers improved fuel economy as compared to driving on hilly terrain.
•
•
The usable capacity of the fuel tank is the amount of fuel that can be added into the tank after the gauge indicates empty The advertised capacity is the total fuel tank size. See Capacities and Specifications (page 265). It is the combined usable capacity plus the empty reserve.
• Due to the empty reserve, you may not be able to refuel the full amount of the advertised capacity of the fuel tank even when the fuel gauge reads empty.
Filling the Tank For consistent results when filling the fuel tank: •
Turn the ignition off before fueling; an inaccurate reading results if the engine is left running.
• Use the same fill rate
(low-medium-high) each time the tank is filled.
• Allow no more than two automatic
click-offs when filling.
Results are most accurate when the filling method is consistent. Calculating Fuel Economy Do not measure fuel economy during the first 1000 miles (1600 kilometers) of driving (this is your engine’s break-in period); a more accurate measurement is obtained after 2000 miles - 3000 miles (3200 kilometers - 4800 kilometers). Also, fuel expense, frequency of fill ups or fuel gauge readings are not accurate ways to measure fuel economy. 1. Fill the fuel tank completely and record
the initial odometer reading.
2. Each time you fill the tank, record the
amount of fuel added.
121
Transit (TTH) Canada/United States of America, enUSA, Edition date: 03/2014, Third Printing
Fuel and Refueling
Service engine soon indicator. Fluid leaks. Strange odors. Excessive exhaust smoke. Loss of engine power.
If you use parts other than Ford, Motorcraft or Ford-authorized parts for maintenance replacements, or for service of components affecting emission control, such non-Ford parts should be the equivalent to genuine Ford Motor Company parts in performance and durability. Illumination of any of the following warning lamps, indicators or vehicle symptoms could indicate that the emission control system is not working correctly. • Coolant temperature warning lamp. • Charging system warning lamp. • • • • • Do not make any unauthorized changes to your vehicle or engine. By law, vehicle owners and anyone who manufactures, repairs, services, sells, leases, trades vehicles, or supervises a fleet of vehicles are not permitted to intentionally remove an emission control device or prevent it from working. Information about your vehicle’s emission system is on the Vehicle Emission Control Information Decal located on or near the engine. This decal also lists engine displacement. Please see your warranty information for complete details. On-Board Diagnostics (OBD-II) Your vehicle has an on-board diagnostics system (OBD-II) that monitors the engine’s emission control system. This system protects the environment by making sure that your vehicle continues to meet government emission standards. The OBD-II system also assists an authorized dealer in correctly servicing your vehicle.
•
Transmissions give their best fuel economy when operated in the top cruise gear and with steady pressure on the gas pedal.
• Close windows for high speed driving. EMISSION CONTROL SYSTEM
WARNINGS
Do not park, idle, or drive your vehicle in dry grass or other dry ground cover. The emission system heats up the
engine compartment and exhaust system, which can start a fire.
An incorrectly operating or damaged exhaust system may result in entry of harmful and potentially lethal
fumes into the passenger compartment. If you smell exhaust fumes inside your vehicle, have an authorized dealer inspect your vehicle immediately. Do not drive if you smell exhaust fumes.
Your vehicle has various emission control components and a catalytic converter that will enable your vehicle to comply with applicable exhaust emission standards. To make sure that the catalytic converter and other emission control components continue to work correctly: • Use only the specified fuel listed. • Avoid running out of fuel. • Do not switch the ignition off when your
vehicle is moving, especially at high speeds.
• Have the items listed in scheduled
maintenance information carried out according to the specified schedule. The scheduled maintenance items listed in scheduled maintenance information are essential to the life and performance of your vehicle and to its emissions system.
122
Transit (TTH) Canada/United States of America, enUSA, Edition date: 03/2014, Third Printing
Fuel and Refueling
Readiness for Inspection/Maintenance (I/M) Testing Some state/provincial and local governments may have Inspection/Maintenance (I/M) programs to inspect the emission control equipment on your vehicle. Failure to pass this inspection could prevent you from getting a vehicle registration.
If the service engine soon indicator is on or the bulb does not work, you may need to have
your vehicle serviced. See On-Board Diagnostics (OBD-II). Your vehicle may not pass the I/M test if the service engine soon indicator is on or not working properly (bulb is burned out), or if the OBD-II system has determined that some of the emission control systems have not been properly checked. In this case, your vehicle is not ready for I/M testing. If the vehicle engine or transmission has just been serviced or the battery has recently run out of charge or been replaced, the OBD-II system may indicate that your vehicle is not ready for I/M testing. To determine if the vehicle is ready for I/M testing, switch the ignition on for 15
seconds without cranking the engine. If the service engine soon indicator flashes on and off eight times, it means that your vehicle is not ready for I/M testing; if the service engine soon indicator illuminates and remains on, it means that your vehicle is ready for I/M testing. The OBD-II system monitors the emission control system during normal driving. A complete check may take several days.When the service engine soon indicator illuminates, the OBD-II system has detected a
The vehicle has run out of fuel.
malfunction. Temporary malfunctions may cause the service engine soon indicator to illuminate. Examples of temporary malfunctions are: • • Poor fuel quality or water in the fuel. The engine may misfire or run rough. • The fuel filler door may not have been • closed correctly. See Refueling (page 118).
• Driving through deep water. The
electrical system may be wet. You can correct these temporary malfunctions by filling the fuel tank with good quality fuel, correctly closing the fuel filler door or letting the electrical system dry out. After three driving cycles without these or any other temporary malfunctions present, the service engine soon indicator should not illuminate. A driving cycle consists of a cold engine startup followed by mixed city or highway driving. No additional vehicle service is required. If the service engine soon indicator remains on, have your vehicle serviced at the first available opportunity. Although some malfunctions detected by the OBD-II may not have symptoms that are apparent, continued driving with the service engine soon indicator on can result in increased emissions, lower fuel economy, reduced engine and transmission smoothness, and lead to more costly repairs.
123
Transit (TTH) Canada/United States of America, enUSA, Edition date: 03/2014, Third Printing
Fuel and Refueling
Diesel Particulate Filter Maintenance Failure to carry out active or operator commanded regeneration when advised could result in a clogged diesel particulate filter. If the diesel particulate filter fills beyond the regeneration threshold, your vehicle will disable the ability for active and operator commanded regeneration. This could result in irreversible damage to the diesel particulate filter requiring replacement that the Ford Warranty may not cover. If your vehicle is not fitted with operator commanded regeneration, check with an authorized dealer for availability. Passive Regeneration During passive regeneration, the exhaust system temperature and constituents automatically clean the diesel particulate filter, or reduce the soot level, by oxidizing the soot. Cleaning occurs naturally during normal engine operating conditions, at varying levels depending on driving conditions. Active Regeneration Once the diesel particulate filter is full of exhaust particles, the engine control module will command the exhaust system to clean the diesel particulate filter through a process called active regeneration. Active regeneration requires the engine computer to raise the exhaust temperature to eliminate the particles. During cleaning, the particles convert to harmless gasses. Once cleaned the diesel particulate filter will then be ready to continue trapping exhaust particles. The regeneration process operates more efficiently when you drive your vehicle at a steady speed of 30 mph (48 km/h) or above for approximately 20 minutes to complete the process. The frequency and duration of regeneration will fluctuate by how you drive your vehicle, outside air temperature, and altitude. For most driving,
If your vehicle is not ready for I/M testing, you may need to: • Drive on an expressway or highway for
a steady 15 minutes, followed by 20
minutes of stop-and-go driving with at least four 30-second idle periods. • Allow your vehicle to sit for at leasteight hours without starting the engine. Then complete the above driving cycle.
The engine must warm up to its normal operating temperature. Do not switch the ignition off until the above driving cycle is complete. If your vehicle is still not ready for I/M testing, you will have to repeat the above driving cycle. Diesel Exhaust System: Oxidation Catalyst And Diesel Particulate Filter System Your vehicle is fitted with a diesel particulate filter. The diesel particulate filter is an inline filter in the exhaust system that reduces carbon emissions by trapping exhaust particles before they reach the tailpipe. The diesel particulate filter looks similar to a traditional exhaust catalyst, except it is larger, and is part of the exhaust system under the vehicle. The filter couples to a diesel oxidation catalyst that reduces the amount of harmful exhaust emitted from the tailpipe. As soot gathers in the system it begins to restrict the filter. The soot that gathers inside the filter is cleaned in two different ways, passive regeneration and active regeneration. Both methods occur automatically and require no actions from the driver. During either one of these regeneration methods, you may notice a change in exhaust tone. At certain times, the information display will display various messages related to the diesel particulate filter.
124
Transit (TTH) Canada/United States of America, enUSA, Edition date: 03/2014, Third Printing
Fuel and Refueling
regeneration frequency will vary from 100 mi (160 km) - 310 mi (500 km) between occurrences and each occurrence will last between 10 and 20 minutes. You can usually reduce the duration of regeneration if you maintain a constant speed above 30 mph (48 km/h).
When the engine control module detects that the diesel particulate filter is nearly full of particulates, and you are not driving your vehicle in a manner to allow effective automatic cleaning, the information display will show the following messages as a reminder for you to drive in a manner to clean the diesel particulate filter. If you drive your vehicle in a manner to allow effective automatic cleaning, the information display will show a cleaning exhaust filter message, which is the normal regeneration process.
System Messages
Message
Exhaust filter overloaded Drive to clean
Exhaust filter at limit Clean now
Action and Description
You must maintain the diesel particulate filter for it to continue to function correctly. Drive in a manner to clean the diesel particulate filter. Do not disregard a system mainten- ance message. The Ford Warranty may not cover damage caused to your vehicle as a result of disregarding these messages. You must maintain the diesel particulate filter for it to continue to function correctly. Drive in a manner to clean the diesel particulate filter. Do not disregard a system mainten- ance message. The Ford Warranty may not cover damage caused to your vehicle as a result of disregarding these messages.
You can also choose operator commanded regeneration to clean the exhaust system at this point. See the following Operator Commanded Regeneration. If you are not able to drive in a manner that allows effective automatic cleaning or you choose to carry out regeneration of the diesel particulate filter while the engine is idling, then operator commanded regeneration must be carried out.
Operator Commanded Regeneration (If Equipped) If your vehicle is operated with significant stationary operation, low speed drive cycles less than 25 mph (40 km/h), short drive cycles, drive time less than 15 minutes or the vehicle does not fully warm up, passive and active regeneration may not sufficiently clean the diesel particulate filter system. Operator commanded regeneration allows you to manually start diesel particulate filter cleaning while the engine is idling. If you are not sure whether your vehicle is fitted with this feature, contact an authorized dealer.
125
Transit (TTH) Canada/United States of America, enUSA, Edition date: 03/2014, Third Printing
Fuel and Refueling
When to Carry Out Operator Commanded Regeneration Use the operator commanded regeneration feature when the following message appears in the information display and:
•
•
You are not able to drive in a manner that allows effective automatic cleaning. You choose to manually start cleaning the diesel particulate filter while the engine is idling.
System Message Message
Exhaust filter overloaded Drive to clean
Action and Description
You must maintain the diesel particulate filter for it to continue to function correctly. Do not disregard a system maintenance message. The Ford Warranty may not cover damage caused to your vehicle as a result of disregarding this message.
• Make sure all fluids are at the correct
levels.
• Make sure that the louvers located at the tip of the exhaust are clear of any obstructions as they are used to introduce fresh air into the tailpipe to cool the exhaust gas as it leaves.
How to Start Operator Commanded Regeneration
WARNING
Stay clear of exhaust tip during regeneration. You or others can be burned.
Note: You cannot use the operator commanded regeneration until the diesel particulate filter load percentage has reached 100 percent. The diesel particulate filter load percentage will fluctuate up and down when driving your vehicle due to active and passive regenerations. Note: During the use of operator commanded regeneration, you may observe a light amount of white smoke. This is normal.
Operator Commanded Regeneration Precautions and Safe Exhaust Position
WARNING
Failure to comply with the following instructions for operator commanded regeneration may result
in fire, serious injury, death or property damage.
Before you start operator commanded regeneration, do the following: •
You must park your vehicle outside of any structure.
• Move the gearshift lever to park (P) with the parking brake set on stable, level ground. Your vehicle must be 9.8 ft (3 m) - 16.4 ft (5 m) away from any obstructions and must be away from materials that can easily combust or melt, for example, paper, leaves, petroleum products, fuels, plastics and other dry organic material.
•
• Make sure there is a minimum of 3.2 gal
(12 L) of fuel in the fuel tank.
126
Transit (TTH) Canada/United States of America, enUSA, Edition date: 03/2014, Third Printing
Fuel and Refueling
You cannot use the operator commanded regeneration if the service engine soon light is
illuminated.
Using the Information Display You can start operator commanded regeneration using the information display. See General Information (page 78).
To start operator commanded regeneration, run the engine at normal operating temperature and scroll to:
Message
Action and Description
Press the OK button. Press the OK button.
Settings Exhaust Filter Full OK = Cleaning Select one of the following: Exhaust Filter Full
Exhaust Filter Overloaded
Press the OK button and then follow the prompts regarding exhaust position as needed to initiate operator commanded regeneration. Be sure to understand each prompt. If you are not sure what is being asked by each prompt, contact an authorized dealer. The display will confirm the operation has started and when it has finished. Press the OK button and then follow the prompts regarding exhaust position as needed to initiate operator commanded regeneration. Be sure to understand each prompt. If you are not sure what is being asked by each prompt, contact an authorized dealer. The display will confirm the operation has started and when it has finished.
If the diesel particulate filter is near or at saturation, a message requesting permission to initiate filter cleaning will display.
Message
Exhaust Filter At Limit
Action and Description
Press the OK button and then follow the prompts regarding exhaust position as needed to initiate operator commanded regeneration. Be sure to understand each prompt. If you are not sure what is being asked by each prompt, contact an authorized dealer. The display will confirm the operation has started and when it has finished.
127
Transit (TTH) Canada/United States of America, enUSA, Edition date: 03/2014, Third Printing
Fuel and Refueling
Once operator commanded regeneration starts, engine rpm will rise to approximately 2,000 - 2,500 rpm and the cooling fan will increase speed; you will hear a change in audible sound due to the fan and engine speed increase. It is not necessary to open the hood on the engine compartment. Once operator commanded regeneration is complete, the engine rpm and fan will return to normal idling. The exhaust system will remain very hot for several minutes even after System Message Message
regeneration is complete. Do not reposition the vehicle over materials that could burn until the exhaust system has had sufficient time to cool. Depending on the amount of soot collected by the diesel particulate filter, ambient temperature, and altitude, operator commanded regeneration may last up to 30 minutes.
When the system is at the point of over saturation, the service engine soon light will illuminate
and the following message will appear.
Action and Description
Exhaust filter over limit Service now
You will not be able to allow cleaning. You must have your vehicle serviced by an authorized dealer.
sufficiently clean the diesel particulate filter system. You can switch off automatic regeneration until better driving conditions are available, for example steady high driving. You can then switch automatic regeneration back on to clean the diesel particulate filter.
Operator Commanded Regeneration with Automatic Regeneration Control (If Equipped) If your vehicle is operated with significant stationary operation, low speed drive cycles less than 25 mph (40 km/h), short drive cycles, drive time less than 15 minutes or the vehicle does not fully warm up, passive and active regeneration may not Switching the Automatic Regeneration Control On and Off To switch the automatic regeneration control on and off, scroll to:
Message
Information Driver Assist Auto Exh.Clean
Action and Description
Press the OK button. Press the OK button. Uncheck the box to switch automatic regeneration off. Check the box to switch automatic regeneration on.
When you switch automatic regeneration off, one of the following warning messages may be displayed.
128
Transit (TTH) Canada/United States of America, enUSA, Edition date: 03/2014, Third Printing
Fuel and Refueling
Message
Exhaust Filter Full Clean Soon Exhaust Filter Over- loaded Clean Now Exhaust filter at limit Clean now
Action and Description
The diesel particulate filter is full and you should switch the automatic regeneration control on as soon as possible. The diesel particulate filter is overloaded you must switch the automatic regeneration control on as soon as possible. You must clean the diesel particulate filter immediately. Failing to do so would cause the diesel particulate filter to become blocked.
In both cases, the engine control system will set a service light to inform you to have your vehicle checked by an authorized dealer. If there are any issues with the diesel particulate filter, the engine control system will turn on a service light to inform you to have your vehicle checked by an authorized dealer.
Powertrain fault indicator.
Service engine soon indicator.
Resonator and Tailpipe Assembly Maintenance
WARNINGS
Failure to maintain the functional holes, in the tailpipe section of the exhaust, clean and free of debris or
foreign material may result in the holes becoming blocked or plugged. Do not modify or remove the tail-pipe section. Blocked or plugged holes or removal/modification of the system could result in elevated exhaust gas temperatures which may result in vehicle/property damage or personal injury.
How to Interrupt or Cancel Operator Commanded Regeneration If you need to cancel the operator commanded regeneration, press the brake pedal or switch the ignition off to stop the procedure. Depending on the amount of time you allowed the operator commanded regeneration to operate, soot may not have had sufficient time to be eliminated, but the exhaust system and exhaust gas may still be hot. If you shut your vehicle off during operator commanded regeneration, you will notice turbo flutter. This is a normal consequence caused by shutting off a diesel engine during boosted operation and is considered normal. Filter Service and Maintenance Over time, a slight amount of ash will build up in the diesel particulate filter, which is not removed during the regeneration process. The filter may need to be removed for ash cleaning at approximately 119900 mi (193,000 km) or greater, actual mileage can vary greatly depending upon engine and vehicle operating conditions. The filter may need to be replaced at approximately 248500 mi (400,000 km) depending upon vehicle operating conditions.
129
Transit (TTH) Canada/United States of America, enUSA, Edition date: 03/2014, Third Printing
Fuel and Refueling
Emission Control System Laws
WARNING
Do not remove or alter the original equipment floor covering or insulation between it and the metal floor of the vehicle. The floor covering and insulation protect occupants of the vehicle from the engine and exhaust system heat and noise. On vehicles with no original equipment floor covering insulation, do not carry passengers in a manner that permits prolonged skin contact with the metal floor. Provide adequate insulation. Failure to follow these instructions may result in fire or personal injury.
In the U.S. federal law and certain state laws prohibit removing or rendering inoperative emission control system(s). Similar federal or provincial laws may apply in Canada. Ford recommends against any vehicle modification without determining applicable law.
Tampering with emissions control systems (including related sensors and the Diesel
Exhaust Fluid (DEF) injection system) can result in reduced engine power and the illumination of the service engine soon light.
WARNINGS
The normal operating temperature of the exhaust system is very high. Never work around or attempt to
repair any part of the exhaust system until it has cooled. Use special care when working around the diesel oxidation catalytic converter and/or the diesel particulate filter (DPF). The diesel oxidation catalytic converter and/or the DPF heats up to a high temperature after only a short period of engine operation and can stay hot even after the engine is turned off. Failure to follow these instructions may result in personal injury.
Note: Additions of aftermarket devices or modifications to the exhaust system can reduce the effectiveness of the exhaust system as well as cause damage to the exhaust system or engine. These actions may also affect your vehicle’s warranty. See the Warranty Guide for more information. The diesel resonator tail-pipe assembly is a uniquely functioning device that accompanies the diesel particulate filter assembly. The tail-pipe assembly serves multiple functions. First, it serves as an acoustic device to attenuate exhaust noise. Second, it provides an exit path for the exhaust from your vehicle. It also helps control the temperature of the exhaust during diesel particulate filter regeneration events. The visible holes in each leg of the twin tip and the holes under the shield just inboard of the right rear tire(s) are functional. You need to keep the holes clear of mud, debris or foreign material to maintain proper function of the exhaust system. Clean and remove debris or foreign material if present as needed. Spraying with a hose during regular washing of your vehicle should help keep holes clean and clear of debris or foreign material.
130
Transit (TTH) Canada/United States of America, enUSA, Edition date: 03/2014, Third Printing
Fuel and Refueling
• An open or pinched sensor hose. • • •
Incorrect engine oil level. Incorrect fuel for climatic conditions. Incorrect engine oil viscosity for climactic conditions.
Note: If these checks do not help you correct the concern, have your vehicle checked by an authorized dealer. Noise Emissions Warranty, Prohibited Tampering Acts and Maintenance On January 1, 1978, Federal regulation became effective governing the noise emission on trucks over 10,000 lbs. (4,536
kg) GVWR (Gross Vehicle Weight Rating). The preceding statements concerning prohibited tampering acts and maintenance, and the noise warranty found in the Warranty Guide, are applicable to complete chassis cabs over 10,000 lbs. (4,536 kg) GVWR.Tampering With a Noise Control System Federal law prohibits the following acts: The removal or rendering inoperative • by any person other than for purposes of maintenance, repair or replacement of any device or element of design incorporated into any new vehicle for the purpose of noise control prior to its sale or delivery to the ultimate purchaser or while it is in use The use of the vehicle after such device or element of design has been removed or rendered inoperative by any person. The U.S. Environmental Protection Agency may presume to constitute tampering as follows: • Removal of hood blanket, fender apron
•
absorbers, fender apron barriers, underbody noise shields or acoustically absorptive material. Tampering or rendering inoperative the engine speed governor, to allow engine speed to exceed manufacturer’s specifications.
•
The complexity of the diesel engine makes it so you are not encouraged to carry-out maintenance other than the services described in this Owner's Manual. If the engine does not start, runs rough, experiences a decrease in engine performance, experiences excess fuel consumption or produces excessive exhaust smoke, check for the following: • A plugged or disconnected air inlet
system hose.
• A plugged engine air filter element. • Water in the fuel filter and water
separator.
• A clogged fuel filter. • Contaminated fuel. • Air in the fuel system, due to loose
connections.
131
Transit (TTH) Canada/United States of America, enUSA, Edition date: 03/2014, Third Printing
Transmission
AUTOMATIC TRANSMISSION
WARNINGS
Always set the parking brake fully and make sure you shift the gearshift lever to park (P). Switch the ignition off and remove the key whenever you leave your vehicle.
Do not apply the brake pedal and accelerator pedal simultaneously. Applying both pedals simultaneously
for more than three seconds will limit engine rpm, which may result in difficulty maintaining speed in traffic and could lead to serious injury. Understanding the Gearshift Lever Positions of the Automatic Transmission
Manual upshift Manual downshift
Tow/Haul (T/H) (If Equipped) Tow/Haul delays transmission upshift to reduce the frequency of transmission shifting. The system provides engine braking in all forward gears when the gearshift lever is in drive (D). Engine braking helps you to slow and control your vehicle when descending a grade. Depending on trailer load and driving conditions, the transmission may downshift when descending a grade. Downshifting will depend on the amount of vehicle braking applied. Switching Tow/Haul On and Off
To activate tow/haul, press the button on the gearshift lever once. The TOW HAUL indicator
light will illuminate in the instrument cluster. To deactivate the tow haul feature and return to normal driving mode, press the button on the gearshift lever twice. The tow haul indicator lamp will deactivate. Tow haul will also deactivate when you power down your vehicle. Park (P)
WARNINGS
Do not shift the gearshift lever to park (P) when your vehicle is moving. This can cause damage to the
transmission not covered by the vehicle warranty, and can result in a crash or serious injury.
T/H
Tow/Haul button Park Reverse Neutral Drive Manual shifting
132
Transit (TTH) Canada/United States of America, enUSA, Edition date: 03/2014, Third Printing
E175317E161509 Transmission
The transmission shifts to the appropriate gear for optimum performance based on ambient temperature, road gradient, vehicle load and your input. Note: A shift will occur only when your vehicle speed and the engine speed are appropriate. Note: You can temporarily override the selected gear by pressing the + or - buttons on the side of the gearshift lever. Manual (M)
WARNING
Do not hold the + or - buttons permanently in.
Shift the gearshift lever to manual (M) to allow your vehicle to move forward and allow you to shift manually through the forward gears. Press the + or - buttons on the side of the gearshift lever to shift manually through the forward gears. The instrument cluster will display the selected gear, and a shift indicator arrow to assist optimum shifting. • Press the + button to upshift. • Press the - button to downshift. You can skip gears by pressing a button repeatedly at short intervals. Upshift at the recommended shift speeds according to the following chart:
Upshifts when accelerating (recom-
mended for best fuel economy)
Upshift from:
1 - 2
2 - 3
3 - 4Vehicle speed mph
( km/h): 15 (24) 25 (40) 40 (64)
WARNINGS
Apply the parking brake, shift the gearshift lever to park (P) and switch the ignition off before leaving your
vehicle. Make sure that the gearshift lever fully latches into position.
When the gearshift lever is in this position, it will lock the transmission. The engine does not transmit power to the driven wheels. You can start the engine with the gearshift lever in this position. Note: A warning tone will sound if you open the driver door and you have not shifted the gearshift lever to park (P). Reverse (R)
WARNINGS
Do not shift the gearshift lever to reverse (R) when your vehicle is moving. This can cause damage to the transmission not covered by the vehicle warranty, and can result in a crash or serious injury.
Always come to a complete stop before shifting the gearshift lever out of reverse (R).
Shift the gearshift lever to reverse (R) to allow your vehicle to move backward. Neutral (N) When the gearshift lever is in this position, the transmission does not lock. The engine does not transmit power to the driven wheels. You can start the engine with the gearshift lever in this position. Drive (D) Shift the gearshift lever to drive (D) to allow your vehicle to move forward and shift automatically through the forward gears.
133
Transit (TTH) Canada/United States of America, enUSA, Edition date: 03/2014, Third Printing
Transmission
If Your Vehicle Gets Stuck In Mud or Snow If your vehicle is stuck in mud or snow, shift between drive (D) and reverse (R) pressing lightly on the accelerator pedal in each gear. Stop between shifts in a steady pattern to rock your vehicle. Note: Do not rock your vehicle if the engine is not at normal operating temperature, damage to the transmission may occur. Note: Do not rock your vehicle for more than a minute, damage to the transmission or tires may occur and the engine may overheat. Brake-Shift Interlock WARNINGS
Do not drive your vehicle until you verify that the brake lamps are working. This procedure requires you to shift the gearshift lever out of park (P) causing your vehicle to roll. Make
sure you fully set the parking brake before attempting to shift the gearshift lever out of park (P).
If you release the parking brake and the brake warning lamp remains illuminated, the brakes may not be
working correctly. The system has detected a fault that requires service.
Your vehicle has a brake-shift interlock feature. This prevents you from shifting the gearshift lever from the park (P) position, unless the brake pedal is pressed. In the event of an electrical malfunction, or if the vehicle battery has run out of charge, use the following procedure to shift the gearshift lever from the park (P) position. 1. Apply the parking brake and switch the
ignition off.
Upshifts when accelerating (recom-
mended for best fuel economy)
Upshift from:
Vehicle speed mph
4 - 5
5 - 6( km/h): 45 (72) 50 (80)
Note: Engine damage may occur if you maintain an excessive engine speed without shifting. Hints on Driving with an Automatic Transmission
WARNING
Do not idle the engine for long periods in drive (D) with the brakes applied.
Putting Your Vehicle in Gear 1. Start the engine. 2. Press the brake pedal. 3. Shift the gearshift lever to drive (D),
reverse (R) or manual (M). 4. Release the parking brake. 5. Release the brake pedal and press the
accelerator pedal.
Stopping Your Vehicle 1. Release the accelerator pedal and
press the brake pedal.
2. Apply the parking brake. 3. Shift the gearshift lever to neutral (N)
or park (P).
4. Switch the ignition off.
134
Transit (TTH) Canada/United States of America, enUSA, Edition date: 03/2014, Third Printing
Transmission
2. Use a suitable tool, for example a
screwdriver, to carefully remove the housing cover.
4. Move the white lever toward the rear
of your vehicle.
5. Shift the gearshift lever out of park (P)
and into neutral (N).
6. Replace the gearshift lever housing cover, apply the brake pedal, switch the ignition on and release the parking brake.
Note: See an authorized dealer as soon as possible.
3. Locate the white lever, situated on the
left hand side of the gearshift lever.
135
Transit (TTH) Canada/United States of America, enUSA, Edition date: 03/2014, Third Printing
E182198E1821993E174827 Brakes
GENERAL INFORMATION Note: Occasional brake noise is normal. If a metal-to-metal, continuous grinding or continuous squeal sound is present, the brake linings may be worn-out. Have the system checked by an authorized dealer. If your vehicle has continuous vibration or shudder in the steering wheel while braking, have it checked by an authorized dealer. Note: Brake dust may accumulate on the wheels, even under normal driving conditions. Some dust is inevitable as the brakes wear and does not contribute to brake noise. See Cleaning the Alloy Wheels (page 230).
See Warning Lamps and Indicators (page 74).
Wet brakes result in reduced braking efficiency. Gently press the brake pedal a few times when driving from a car wash or standing water to dry the brakes. Brake Over Accelerator In the event the accelerator pedal becomes stuck or entrapped, apply steady and firm pressure to the brake pedal to slow the vehicle and reduce engine power. If you experience this condition, apply the brakes and bring your vehicle to a safe stop. Move the gearshift lever to park (P), switch the engine off and apply the parking brake. Inspect the accelerator pedal for any interference. If none are found and the condition persists, have your vehicle towed to the nearest authorized dealer. Brake Assist Brake assist detects when you brake rapidly by measuring the rate at which you press the brake pedal. It provides maximum braking efficiency as long as you press the pedal, and can reduce stopping distances in critical situations.
Anti-lock Brake System This system helps you maintain steering control during emergency stops by keeping the brakes from locking.
This lamp momentarily illuminates when you turn the ignition on. If the light does not illuminate during start up, remains on or flashes, the system may be disabled. Have the system checked by an authorized dealer.
If the system is disabled, normal braking is still effective. If the brake warning lamp illuminates when you release the parking brake, have the system checked by an authorized dealer.
HINTS ON DRIVING WITH ANTI-LOCK BRAKES Note: When the system is operating, the brake pedal will pulse and may travel further. Maintain pressure on the brake pedal. You may also hear a noise from the system. This is normal. The anti-lock braking system will not eliminate the risks when: •
You drive too closely to the vehicle in front of you. Your vehicle is hydroplaning. You take corners too fast. The road surface is poor.
• • •
136
Transit (TTH) Canada/United States of America, enUSA, Edition date: 03/2014, Third Printing
Brakes
PARKING BRAKE Center Parking Brake
Note: Do not press the release button while pulling the parking brake lever up.
To apply the parking brake: 1. Press the foot brake pedal firmly. 2. Pull the parking brake lever up to its
fullest extent.
To release the parking brake: 1. Press the foot brake pedal firmly. 2. Pull the parking brake lever up slightly. 3. Press the release button and push the
parking brake lever down.
Note: If you park your vehicle facing uphill turn the steering wheel away from the curb. Note: If you park your vehicle facing downhill turn the steering wheel toward the curb.
137
Transit (TTH) Canada/United States of America, enUSA, Edition date: 03/2014, Third Printing
E172225 Traction Control
PRINCIPLE OF OPERATION The traction control system helps avoid drive wheel spin and loss of traction. If your vehicle begins to slide, the system applies the brakes to individual wheels and, when needed, reduces engine power at the same time. If the wheels spin when accelerating on slippery or loose surfaces, the system reduces engine power in order to increase traction. USING TRACTION CONTROL In certain situations, for example stuck in snow or mud, it may be beneficial for you to switch the traction control system off. This allows the wheels to spin with full engine power.
Note: A MyKey can be set up to prevent the MyKey user from switching the traction control system off. See MyKey™ (page 46).
Press the traction control button located on the instrument panel. It illuminates when you switch the system off.
AdvanceTrac with RSC Features
Button func-
tions
Default at engine start-up
Electronic stability control off warning lamp Illuminated during bulb check Illuminated
Roll stability
control
Electronic stability control
Traction
control system
Enabled
Enabled
Enabled
Enabled
Button pressed momentarily Button pressed again after deactivation 1Engine traction control and two-wheel spin brake traction control functions are disabled. Single-wheel spin traction control is always enabled.
Not illuminated
Disabled1
Enabled
Enabled
Enabled
Enabled
138
Transit (TTH) Canada/United States of America, enUSA, Edition date: 03/2014, Third Printing
E179110 Traction Control
WARNING
If a malfunction occurs within the AdvanceTrac system, the traction control off lamp will illuminate. Make sure the traction control system was not manually switched off using the traction control button. If the traction control lamp stays on, have the system checked by an authorized dealer immediately. Operating your vehicle with traction control disabled could lead to an increased risk of loss of vehicle control, vehicle rollover, personal injury and death.
The traction control lamp temporarily illuminates on engine start-up and flashes
when a driving condition turns the traction control system on.
The traction control off lamp temporarily illuminates on engine start-up and stays on
when you switch the traction control system off, or if a malfunction occurs in the traction control system.
139
Transit (TTH) Canada/United States of America, enUSA, Edition date: 03/2014, Third Printing
E138639 Stability Control
The AdvanceTrac with Roll Stability Control system helps you keep control of your vehicle when on a slippery surface. The electronic stability control portion of the system helps avoid skids and lateral slides and roll stability control helps avoid a vehicle rollover. The traction control system helps avoid drive wheel spin and loss of traction. See Using Traction Control (page 138).
Vehicle without AdvanceTrac with RSC skidding off its intended route. Vehicle with AdvanceTrac with RSC maintaining control on a slippery surface.
PRINCIPLE OF OPERATION
WARNINGS
Vehicle modifications involving braking system, aftermarket roof racks, suspension, steering system, tire construction and wheel and tire size may change the handling characteristics of your vehicle and may adversely affect the performance of the AdvanceTrac system. In addition, installing any stereo loudspeakers may interfere with and adversely affect the AdvanceTrac system. Install any aftermarket stereo loudspeaker as far as possible from the front center console, the tunnel, and the front seats in order to minimize the risk of interfering with the AdvanceTrac sensors. Reducing the effectiveness of the AdvanceTrac system could lead to an increased risk of loss of vehicle control, vehicle rollover, personal injury and death.
Remember that even advanced