- Download PDF Manual
-
File:01prpip.ex Update:Wed Jun 19 14:48:25 1996
[PI00200(ALL)05/96]
thirty-two pica chart:0032381-C
File:01prpip.ex Update:Wed Jun 19 14:48:25 1996
*[PI00300(ALL)01/96]
thirty-six pica chart:
File:01prpip.ex Update:Wed Jun 19 14:48:25 1996
*[PI00425( ALL)05/95]
Table of Contents
Introduction .................................................... 1
Instrumentation .............................................. 7
Electronic Sound Systems ......................... 21
Controls and Features ................................ 47
Seating and Safety Restraints .................. 89
Starting ......................................................... 125
Driving ......................................................... 133
Roadside Emergencies .............................. 155
Maintenance and Care ............................. 183
Capacities and Specifications ................. 237
Reporting Safety Defects (U.S. Only) .................................................. 243
Customer Assistance ................................. 245
Accessories .................................................. 257
Quick Index ................................................ 265
Index ............................................................. 275
Service Station Information .................... 292File:02uninx.ex Update:Thu Feb 29 08:58:20 1996
*[IN00300(ALL)04/95] *[IN00400(ALL)04/95]
*[IN00500(ALL)04/95] *[IN00600(ALL)04/95] *[IN00700(ALL)04/95]
*[IN00750(ALL)04/95]
*[IN00800(ALL)04/95] *[IN00900(ALL)04/95]
*[IN01000(ALL)04/95]
Introductory Information
Ford’s Commitment to You At Ford Motor Company, excellence is the continuous commitment to achieve the best result possible. It is dedication to learning what you want, determination to develop the right concept, and execution of that concept with care, precision, and attention to detail. In short, excellence means being the standard by which others are judged. Our Guiding Principles n Quality comes first. For your satisfaction, the quality of our
products and services must be our number one priority.
n You are the focus of everything we do. Our work must be
done with you in mind, providing better products and services than our competition.
n Continuous improvement is essential to our success. We
must strive for excellence in everything we do: in our products — in their safety and value — and in our services, our human relations, our competitiveness, and our profitability.
n Employee involvement is our way of life. We are a team.
We must treat one another with trust and respect.
n Dealers and suppliers are our partners. We must maintain mutually beneficial relationships with dealers, suppliers, and our other business associates.
n Integrity is never compromised. Our conduct worldwide
must be pursued in a manner that is socially responsible and commands respect for its integrity and for its positive contributions to society.
File:02uninx.ex Update:Thu Feb 29 08:58:20 1996
*[IN01010(ALL)08/95] *[IN01020(ALL)08/95]
*[IN01030(ALL)08/95]
*[IN01040(ALL)07/95] *[IN01042(ALL)05/95] *[IN01044(ALL)05/95]
*[IN01046(ALL)05/95]
*[IN01050(ALL)08/95] *[IN01060(ALL)08/95]
*[IN01070(ALL)08/95]
Things to Know About Using This Guide Congratulations on the purchase of your new vehicle. This guide has information about the equipment and the options for your new vehicle. You may not have bought all of the options available to you. If you do not know which information applies to your vehicle, talk to your dealer. This guide describes equipment and gives specifications for equipment that was in effect when this guide was approved for printing. Ford may discontinue models or change specifications or design without any notice and without incurring obligation. NOTES and WARNINGS NOTES give you additional information about the subject matter you are referencing. WARNINGS remind you to be especially careful in those areas where carelessness can cause damage to your vehicle or personal injury to yourself, your passengers or other people. Please read all WARNINGS carefully.
RWARNING
Finding Information in This Guide After you have read this guide once, you will probably return to it when you have a specific question or need additional information. To help you find specific information quickly, you can use the Quick Index, Table of Contents, or the Index. The Quick Index at the end of the book provides a page number following each item which indicates where detailed information can be found.
File:02uninx.ex Update:Thu Feb 29 08:58:20 1996
*[IN01080(ALL)08/95]
%*[IN01090(ALL)08/95] *[IN01100(ALL)08/95]
%*[IN02400(ALL)04/95] *[IN02500(ALL)03/95]
%*[IN02600(ALL)01/95] *[IN02700(ALL)04/95]
%*[IN03100(ALL)03/95]
*[IN03250(ALL)03/95]
Introductory Information
To use the Index, turn to the back of the book and search in the alphabetical listing for the word that best describes the information you need. If the word you chose is not listed, think of other related words and look them up. We have designed the Index so that you can find information under a technical term. Canadian Owners — French Version French Owner Guides can be obtained from your dealer or by writing to Ford Motor Company of Canada, Limited, Service Publications, P.O. Box 1580, Station B, Mississauga, Ontario L4Y 4G3. Your Maintenance Schedule and Record Booklet The Maintenance Schedule and Record booklet lists the services that are most important for keeping your vehicle in good condition. A record log is also provided to help you keep track of all services performed. About the Warranties Your vehicle is covered by three types of warranties: Basic Vehicle Warranty, Extended Warranties on certain parts, and Emissions Warranties. Read your Warranty Information Booklet carefully to find out about your vehicle’s warranties and your basic rights and responsibilities. If you lose your Warranty Information Booklet, you can get a new one free of charge. Contact any Ford or Lincoln-Mercury dealer, or refer to the addresses and phone numbers on the first page of this owner guide.
File:02uninx.ex Update:Thu Feb 29 08:58:20 1996
%*[IN04000(ALL)01/95] *[IN04100(ALL)01/94]
*[IN04200(ALL)01/95]
*[IN04250(ALL)01/95]
%*[IN04650(ALL)06/92] %*[IN04700( X)11/89] %*[IN04810( X)11/89]
[IN04815( X)12/95]
Buying a Ford Extended Service Plan If you bought your vehicle in the U.S., you can buy a Ford Extended Service Plan for your vehicle. This optional contract provides service protection for a longer period of time than the basic warranty that comes with your vehicle. You do not have to buy this option when you buy your vehicle. However, your option to purchase the Ford Extended Service Plan runs out after 18 months or 18,000 miles. See your dealer for more details about the Ford Extended Service Plan. If you purchased a Canadian vehicle and did not take advantage of the Ford Extended Service Plan at the time of purchase, you may still be eligible. See your dealer for the details. Special Notice NOTICE TO OWNERS OF UTILITY-TYPE VEHICLES As with other vehicles of this type, failure to operate this vehicle correctly may result in loss of control or an accident. Be sure to read the Additional Special Driving Instructions for Utility Vehicles in this book and the special supplement included with four-wheel drive vehicles entitled 4-Wheeling with Ford. Although this special supplement is primarily directed to four-wheel drive vehicle operators, these principles of safe driving also apply to operators of the two-wheel drive Explorer. Even though you may not select a 4WD or AWD option for your Explorer, many of its operating characteristics are similar to those of a four-wheel drive vehicle. For this reason, Ford urges you to read and understand the contents of the 4-Wheeling with Ford supplement.
File:02uninx.ex Update:Thu Feb 29 08:58:20 1996
%*[IN04850( X)03/95] *[IN04875( X)03/95]
%*[IN06000(ALL)01/95] *[IN06100(ALL)03/95]
%*[IN06300(ALL)01/95] *[IN06400(ALL)01/95] *[IN06500(ALL)01/95] *[IN06600(ALL)01/95] *[IN06700(ALL)01/95]
*[IN06750(ALL)12/93]
%*[IN06800(ALL)01/95]
Introductory Information
AMBULANCE PACKAGES
Do not use this vehicle as an ambulance.
RWARNING
Breaking Your Vehicle In Your new vehicle goes through an adjustment or break-in period during the first 1,000 miles (1,600 km) that you drive it. During the break-in period, you need to pay careful attention to how you drive your vehicle. n Avoid sudden stops. Because your vehicle has new brake
linings, you should take these steps: — Watch traffic carefully so that you can anticipate when to
stop.
— Begin braking well in advance. — Apply the brakes gradually. The break-in period for new brake linings lasts for 100 miles (160 km) of city driving or 1,000 miles (1,600 km) of highway driving.
n Wheel lug nuts must be retightened to proper torque
specifications at 500 miles/800 km of new vehicle operation. Proper torque specifications are provided in this guide. Also retighten to proper torque specification at 500 miles/800 km after any wheel change or any other time the wheel lug nuts have been loosened.
n Use only the type of engine oil that Ford recommends. See
Engine oil recommendations in the Index. Do not use special “break-in” oils.
File:02uninx.ex Update:Thu Feb 29 08:58:20 1996
*[IN07000(ALL)03/95]
%*[IN07100(ALL)04/95] *[IN07110(ALL)07/95]
*[IN07120(ALL)07/95] *[IN07130(ALL)07/95]
%*[IN07200(ALL)04/95] *[IN07300(ALL)04/95] *[IN07400(ALL)06/95] *[IN07500(ALL)04/95] *[IN07600(ALL)04/95] *[IN07700(ALL)04/95] *[IN08100(ALL)04/95]
Some vehicles are equipped with a Powertrain Control Module that limits engine speeds with a cut-out mode to promote durability. Cleaning the Outside of Your Vehicle Pollen, bird droppings and tree sap can damage the paint, especially in hot weather. Wash your vehicle as often as necessary to keep it clean. Take similar precautions if your vehicle is exposed to chemical industrial fallout. Paint damage resulting from fallout is not related to a defect in paint materials or workmanship and therefore is not covered by warranty. Ford, however, believes that continual improvement in customer satisfaction is a high priority. For this reason, Ford has authorized its dealers to repair, at no charge to the owner, the surfaces of new vehicles damaged by environmental fallout within 12 months or 12,000 miles (20,000 km) of purchase, whichever comes first. Customers may be required to bring their vehicle in for inspection by a Ford representative. Washing and Polishing Your Vehicle Wash the outside of your vehicle, including the underside, with a mild detergent. DO NOT: n Wash your vehicle with hot water n Wash your vehicle while it sits in direct sunlight n Wash your vehicle while the body is hot Polish your vehicle to remove harmful deposits and protect the finish.
File:02uninx.ex Update:Thu Feb 29 08:58:20 1996
%*[IN08200(ALL)04/95] *[IN08300(ALL)04/95] %*[IN08400(ALL)04/95] *[IN08500(ALL)04/95]
*[IN08600(ALL)04/95] %*[IN08700(ALL)04/95]
*[IN08725(ALL)04/95]
Introductory Information
Cleaning Chrome and Aluminum Parts Wash chrome and aluminum parts with a mild detergent. Do not use steel wool, abrasive cleaners, fuel or strong detergents. Cleaning Plastic Parts Some of your vehicle’s exterior trim parts are plastic. Clean with a tar and road oil remover if necessary. Use a vinyl cleaner for routine cleaning. Do not clean plastic parts with thinners, solvents or petroleum-based cleaners. If you have your vehicle rustproofed, remove oversprayed rustproofing with a tar and road oil remover. If rustproofing is not removed from plastic and rubber parts, it can cause deterioration. Because your vehicle’s side mouldings are painted in lacquer, do not use thinners or solvents to clean them.
File:03prisp.ex Update:Thu May 16 09:43:45 1996
%*[IS00600(ALL)01/96]
*[IS00700(ALL)05/96]
Instrumentation
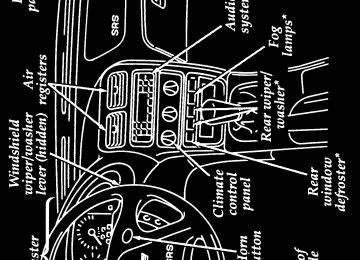
The instrument panel (dashboard) on your vehicle is divided into several different sections. The illustrations on the following pages show the major parts of the instrument panel that are described in this chapter. Some items shown may not be on all vehicles.
In your vehicle, the warning lights and gauges are grouped together on the instrument panel. We call this grouping an instrument cluster.
F
F
File:03prisp.ex Update:Thu May 16 09:43:45 1996
[IS01300(ALL)05/96]
[IS01400(ALL)01/96]
one third page art:0032087-B
[IS01500(ALL)01/96]
The instrument cluster on the Probe GT model is similar to the one shown. The two exceptions are: the speedometer on the GT model shows 140 mph (225 km/h) and it has a 7,000 rpm red-line tachometer.
GT model speedometer and tachometer The following warning lights and gauges are on the cluster. All of the warning lights and gauges alert you to possible problems with your vehicle. The following sections detail what each of these indicators means.
10
File:03prisp.ex Update:Thu May 16 09:43:45 1996
%*[IS01600(ALL)04/96] %*[IS01700(ALL)03/96] [IS01800(ALL)01/96]
[IS01900(ALL)01/96]
one inch art:0032097-A
%*[IS02000(ALL)05/96] *[IS02050(ALL)05/96]
[IS02100(ALL)01/96]
one inch art:0032051-A
Indicator Lights and Chimes Safety Belt Warning Light and Chime This warning light and chime remind you to fasten your safety belt. If you do not fasten your safety belt before the ignition is turned to ON, the chime will sound for 4 to 8 seconds and the warning light will illuminate for 1 to 2 minutes, or until the safety belt is fastened. If you fasten the safety belt before the ignition is turned to ON, neither the light nor chime will activate.
Safety belt light Air Bag Readiness Light This light illuminates for six seconds when the ignition is turned to the ON position. If the light fails to illuminate, continues to flash, remains on, or if a series of five beeps is heard, have the system serviced as soon as possible.
Air bag readiness light
11
File:03prisp.ex Update:Thu May 16 09:43:45 1996
*[IS02120(ALL)05/96]
%*[IS02200(ALL)01/96] [IS02300(ALL)03/96]
[IS02400(ALL)03/96]
[IS02500(ALL)01/96]
one inch art:0030319-E
[IS02600(ALL)03/96]
RWARNING
If any of these things happen, even intermittently, have the air bag system serviced at your Ford or Lincoln-Mercury dealer immediately.
Brake System Warning Light Your vehicle has a divided brake system. If one part isn’t working, the other part can still work and stop you. For good braking, though, you need both systems working well. If the warning light illuminates, there could be a problem. Have your brake system inspected right away. This light should illuminate as you start the vehicle. If it doesn’t illuminate then, have it fixed so it will be ready to warn you if there’s a problem.
Brake system and parking brake light This light illuminates briefly when you turn the ignition key to START. It normally goes off shortly after the engine starts and you release the parking brake, but it may stay on for up to 60 seconds. If the light stays on for longer than 60 seconds or comes on after you have fully released the parking brake, have the hydraulic brake system serviced.
12
File:03prisp.ex Update:Thu May 16 09:43:45 1996
*[IS02700(ALL)03/96]
*[IS02800(ALL)03/96]
%*[IS02900(ALL)03/96] [IS03000(ALL)03/96]
[IS03100(ALL)01/96]
one inch art:0032359-C
*[IS03200(ALL)03/96]
This light will also illuminate if the parking brake does not release fully. If it does stay on after the parking brake is fully released, it means there may be a brake problem. Pull off the road and stop carefully. You may notice that the pedal is harder to push, the pedal may go closer to the floor, or it may take longer to stop the vehicle. Try the brakes again after you have stopped.
RWARNING
The BRAKE light indicates that the brakes may not be working properly. Have the brakes checked immediately.
Anti-Lock Brake System Warning Light When the ignition switch is turned to the ON position, the anti-lock brake system warning light will illuminate. When the engine is started, the anti-lock brake system control unit will determine if all components of the system are operating correctly. The warning light could remain on for two to four seconds.
The anti-lock brake system warning light
RWARNING
If the anti-lock brake system warning light remains on or comes on while driving, have the braking system checked by a qualified service technician as soon as possible.
13
File:03prisp.ex Update:Thu May 16 09:43:45 1996
*[IS03300(ALL)03/96]
*[IS03400(ALL)01/96]
[IS03500(ALL)01/96]
[IS03600(ALL)03/96]
[IS03700(ALL)01/96]
one inch art:0032048-A
NOTE: If a fault occurs in the anti-lock
system, and the brake warning light is not lit, the anti-lock system is disabled but normal brake function remains operational.
NOTE: If your vehicle must be jump-started
because of a low battery, the Anti-Lock Brake System warning light could remain on. This is due to low battery voltage and does not indicate a malfunction in the system. Under these circumstances, you should drive your vehicle only after the battery has had time to charge and the light has gone out.
The Low Fuel Light This light illuminates when fuel level in your tank has reached approximately 2-3 gallons (7-10
liters).Low fuel light
14
File:03prisp.ex Update:Thu May 16 09:43:45 1996
%*[IS03800(ALL)05/96] *[IS03900(ALL)03/96]
*[IS04000(ALL)01/96]
one inch art:0030174-A
%*[IS04100(ALL)03/96] *[IS04200(ALL)03/96]
*[IS04300(ALL)01/96]
one inch art:0030175-B
[IS04400(ALL)03/96]
High Beam Light This light illuminates when the headlamps are turned to high beam or when you flash the lights.
High beam light Check Engine Warning Light This light illuminates when the electronic engine control system is not working properly. This is the computer that controls the operating conditions of the engine.
Check engine warning light This light illuminates briefly when you turn the ignition to the ON position, but should turn off when the engine starts. If the light does not come on when you turn the ignition to the ON position or if it comes on and stays on when you are driving, have your vehicle serviced as soon as possible. This indicates a possible problem with one of the engine’s emission control systems. You do not need to have your vehicle towed in.
15
File:03prisp.ex Update:Thu May 16 09:43:45 1996
*[IS04500(ALL)04/96]
[IS04600(ALL)01/96]
[IS04700(ALL)05/96]
[IS04800(ALL)03/96]
[IS04900(ALL)01/96]
one inch art:0032053-A
*[IS05000(ALL)04/96] %*[IS05100(ALL)05/96] *[IS05200(ALL)01/96] *[IS05300(ALL)01/96]
If the light flashes briefly while you are driving, it means that the condition is no longer present. O/D OFF Light (If equipped) This light tells you that the overdrive off (O/D OFF) button on the shift selector has been pushed. When the light is on, the transaxle will not shift into overdrive. Depressing the button on the shift selector again will return the vehicle to “overdrive on” mode. The transaxle will be in the “overdrive on” mode when the vehicle is started even if the O/D OFF mode was selected when the vehicle was last shut off. Refer to the Driving chapter for more information. If the light does not illuminate when the O/D OFF button is pressed, or if the light flashes when you are driving, have your vehicle serviced at the first opportunity. If this condition persists, damage could occur to the transaxle.
Overdrive OFF light Gauges Fuel Gauge The fuel gauge displays approximately how much fuel you have in the fuel tank. The ignition must be turned off while putting fuel in the tank in order to get a correct fuel gauge reading after the ignition is turned on.
16
File:03prisp.ex Update:Thu May 16 09:43:45 1996
*[IS05400(ALL)01/96]
[IS05500(ALL)01/96]
[IS05600(ALL)01/96]
[IS05700(ALL)01/96]
%*[IS05800(ALL)04/96] [IS05900(ALL)01/96]
[IS06000(ALL)01/96] *[IS06100(ALL)04/96] *[IS06200(ALL)04/96]
[IS06300(ALL)01/96]
[IS06400(ALL)01/96]
The fuel gauge indicator may vary slightly while the vehicle is in motion. This is the result of fuel movement within the tank. You can get a more accurate reading with the vehicle on smooth, level ground. Charging System Gauge This gauge tells you your battery’s voltage when you turn your ignition key to ON. When you start your engine, the pointer should move to the NORMAL range if you are not operating any electrical accessories. (If electrical accessories are operating and the engine is not running, the pointer may move into the red area). If the pointer moves into the red area when no electrical accessories are operating, have the vehicle’s electrical system checked. Engine Oil Pressure Gauge The gauge needle should stay in the NORMAL range (indicating normal engine oil pressure). If the needle drops below the NORMAL range into the low range, there is a loss of oil pressure. If this happens: 1. Pull off the road as soon as safely possible. 2. Shut off the engine immediately or severe
engine damage could result.
3. Check the oil level when the vehicle is on
level ground.
4. Add only as much oil as the engine needs before you drive the vehicle again. Do not overfill the oil reservoir. For more information, see Adding engine oil in the Index.
17
File:03prisp.ex Update:Thu May 16 09:43:45 1996
%*[IS06500(ALL)03/96] *[IS06600(ALL)02/96]
[IS06650(ALL)04/96]
*[IS06700(ALL)04/96]
*[IS06800(ALL)03/96] *[IS06900(ALL)03/96] *[IS07000(ALL)04/96] *[IS07100(ALL)01/96] *[IS07200(ALL)01/96]
*[IS07250(ALL)01/96]
Engine Coolant Temperature Gauge This gauge indicates the temperature of the engine coolant, not the coolant level. If the coolant is not at its proper level or mixture, the gauge indication will not be accurate. The pointer usually moves from C (cold) into the NORMAL band as your vehicle warms up. Under most driving conditions, the pointer should stay in the NORMAL band. If you are driving in heavy traffic or on an extended grade in hot weather, the pointer may reach to the top of the NORMAL band. If, under any circumstances, the pointer moves above the NORMAL band, the engine is overheating and continued operation may cause engine damage. If your engine overheats: 1. Pull off the road as soon as it is safely
possible.
2. Shut off the engine immediately or severe
engine damage could result.
3. Let the engine cool. 4. Check the coolant level following the
instructions on checking and adding coolant to your engine. (See Engine coolant in the Index.) If you do not follow these instructions, you or others could be injured. For instructions on checking and adding coolant to your engine, see Engine coolant in the Index. If you do not follow these instructions, you or others could be injured.
18
File:03prisp.ex Update:Thu May 16 09:43:45 1996
*[IS07300(ALL)04/96]
%*[IS07500(ALL)03/96] *[IS07600(ALL)03/96] %*[IS07700(ALL)03/96] *[IS07800(ALL)01/96] %*[IS08000(ALL)01/96] [IS08100(ALL)01/96]
%*[IS09000(ALL)03/96] [IS09100(ALL)01/96]
5. Refer to Adding Engine Coolant in the
Maintenance and Care chapter. Add as much coolant as your engine needs. If the engine continues to overheat, have the cooling system serviced.
Speedometer The speedometer tells you how many miles (kilometers) per hour your vehicle is moving. Odometer The odometer tells you the total number of miles (kilometers) your vehicle has been driven. Trip Odometer Use the trip odometer to track your mileage. Simply set the trip odometer to zero by pressing the reset button. Tachometer The tachometer indicates approximate engine revolutions per minute, and is located on the right-hand side of the instrument cluster. The tachometer pointer may move slightly when the key is placed in the ACC or ON position, with the engine off. This pointer movement is normal, and will not affect the accuracy of the tachometer once the engine is running.
19
f
File:04prasp.ex Update:Mon Jun 3 10:03:33 1996
%*[AS00975(ALL)10/95] *[AS01000(ALL)10/95] *[AS01300(ALL)08/95] *[AS01400(ALL)04/92]
*[AS01500(ALL)03/96] *[AS01600(ALL)10/95] *[AS01625(ALL)03/96] *[AS01650(ALL)03/96]
*[AS01675(ALL)02/96]
*[AS01700(ALL)03/96] *[AS01800(ALL)10/95]
Compact Disc Radio The Compact Disc Radio combines the Electronic Stereo Radio with the Ford Compact Disc Player. Using the Controls on Your New Radio/CD Player Most of the features of this unit work for both radio and CD operation, depending on which mode the unit is in. Also, some of the buttons control several different functions, so be sure to read all of the operating instructions carefully. How to turn the radio on and off Press the “POWER” button to turn the radio on. Press it again to turn it off. How to adjust the volume Press the (R/S) side of the “VOL” button to increase/decrease the volume. Bars illuminate in the display to show the relative volume level. NOTE: If the volume level is set above a
certain listening level when the ignition switch is turned off, when the ignition switch is turned back on, the volume will come back to a “nominal” listening level. However, if the radio power is turned off, the volume will remain in the position it was set at when radio power was switched off.
Selecting the AM or FM frequency band Push the “AM/FM” button to select the desired frequency band. When in the radio mode, pushing the button more than once will alternate between AM, FM1 and FM2. These functions are used with the station memory buttons described under How to tune radio stations.
22
File:04prasp.ex Update:Mon Jun 3 10:03:33 1996
%*[AS01900(ALL)03/96] *[AS02000(ALL)10/95]
*[AS02100(ALL)10/95]
[AS02200(ALL)04/95]
*[AS02300(ALL)03/96]
*[AS02400(ALL)04/96] *[AS02500(ALL)04/96]
How to tune radio stations There are four ways for you to tune in a particular station. You can manually locate the station using the “SCAN/TUNE” button, “SEEK” the station, “SCAN” to the station or select the station by using the memory buttons, which you can set to any desired frequency. These four methods are described below. q Using the “SCAN/TUNE” button to manually
tune You can change the frequency up or down one increment at a time (FM changes in increments of 200kHz; AM changes in increments of 10kHz) by first pressing the “SCAN/TUNE” button twice (display shows “TUNE”), then — within approximately five seconds —pressing and releasing either the top (b) or bottom (a) half of the “SEEK” button. To change frequencies quickly, press and hold down either the top or bottom half of the “SEEK” button. Manual tuning adjusts your radio to any allowable broadcast frequency, whether or not a station is present on that frequency. (See All About Radio Frequencies in this section.)
q Using the “SEEK” function
This feature on your radio allows you to automatically select listenable stations up or down the frequency band. Press the top (a) half of the “SEEK” button to select the next listenable station up the frequency band. Press the bottom (b) half of the button to select the next listenable station down the frequency band. By pressing and holding the button, listenable stations can be passed over to reach the desired station.
23
File:04prasp.ex Update:Mon Jun 3 10:03:33 1996
*[AS02600(ALL)02/96] *[AS02700(ALL)04/96]
*[AS02800(ALL)03/96]
*[AS03000(ALL)02/96] %*[AS03100(ALL)08/95]
*[AS03200(ALL)03/96] *[AS03400(ALL)10/95]
*[AS03500(ALL)10/95] *[AS03601(ALL)03/96]
q Using the “SCAN/TUNE” button to scan
radio stations Pressing the “SCAN/TUNE” button once enters the scan mode (display will indicate “SCN”). Pushing the top (a) half of the “SEEK” button will begin the scan mode up the frequency band, stopping on each listenable station for approximately five seconds. Pushing the bottom (b) half of the “SEEK” button will begin the scan mode down the frequency band, again stopping on each listenable station for approximately five seconds. To stop the scan mode on the presently sampled station, press the “SCAN/TUNE” button again. Setting the Station Memory Preset buttons Your radio is equipped with 5 station memory buttons. These buttons can be used to select up to 5 preset AM stations and 10
FM stations (5 in FM1 and 5 in FM2). Follow the easy steps below to set these buttons to the desired frequencies.1. Select a band, then select a frequency. 2. Press one of the memory preset buttons and hold the button until the sound returns. That station is now held in memory on that button.
3. Follow the two steps above for each station
memory preset button you want to set.
NOTE: If the vehicle’s battery is disconnected,
the clock and station memory preset buttons will need to be reset.
24
File:04prasp.ex Update:Mon Jun 3 10:03:33 1996
*[AS03701(ALL)10/95] *[AS03801(ALL)08/95]
*[AS03901(ALL)05/96]
*[AS04001(ALL)02/96]
*[AS04101(ALL)10/95]
*[AS04201(ALL)03/96]
q Using the Automatic Memory Load feature
You can activate the Auto Memory Load feature by pressing and holding the “AUTO PRESET” button for approximately three seconds. Auto Memory Load sets all memory buttons in AM, FM1 and FM2 sequentially by seeking out the first five strong stations for the respective band and storing them in memory buttons 1-5. (FM2 will store the second set of strong stations from the FM band.)
With Auto Memory Store, you can continually set strong stations into your memory buttons without losing your existing memory presets, which is especially helpful while traveling. Your radio will automatically set your memory buttons to the strong local stations so you don’t have to continually manually tune to existing stations. Activate Auto Memory Store by pushing the “AUTO PRESET” button once. Your radio will set the first five strong stations of the band you are in (AM, FM1 or FM2) into the memory buttons. The display will show “AUTO,” then run through the frequencies, stopping momentarily on the stations being set into the memory buttons. The radio is now in the “AUTO” mode and the display will show “AUTO” each time a preset is activated. NOTE: If there are fewer than five strong stations in the frequency band, the remaining unfilled buttons will store the last strong station detected on the band.
After all stations have been filled, the radio will begin playing the station stored on memory button 1.
25
File:04prasp.ex Update:Mon Jun 3 10:03:33 1996
*[AS04301(ALL)02/96]
*[AS04400(ALL)08/95] *[AS04500(ALL)02/96] *[AS04600(ALL)08/95]
*[AS04700(ALL)02/96] *[AS04800(ALL)08/95]
*[AS05100(ALL)02/96] *[AS05200(ALL)08/95]
To deactivate the Auto Memory Store mode and return to the manually-set memory button stations (or those stations set using Auto Memory Load), simply push the “AUTO PRESET” button. Display will show “AUTO” then “OFF.” The next time Auto Memory Store is activated on that band, the radio will store the next set of five strong stations. Using the “AUDIO” button to adjust the tone balance and speaker output
Increasing or decreasing bass response Push the “AUDIO” button repeatedly until the display reads “BASS.” Push the “+” side of the “VOL” button to increase bass (more “lows”), and push the “-” side to decrease bass (less “lows”). Increasing or decreasing treble response Push the “AUDIO” button repeatedly until the display reads “TREB.” Push the “+” side of the “VOL” button to increase treble (more “highs”), and push the “-” side to decrease treble (less “highs”).
q Adjusting speaker balance
Balance control allows you to adjust the sound distribution between the right and left speakers. Push the “AUDIO” button repeatedly until the display reads “BAL.” Push the “+” side of the “VOL” button to shift the sound to the right speakers, and push the “-” side to shift the sound to the left speakers.
26
File:04prasp.ex Update:Mon Jun 3 10:03:33 1996
*[AS05300(ALL)04/96] *[AS05400(ALL)08/95]
*[AS05500(ALL)09/95]
%*[AS05600(ALL)08/95] *[AS05700(ALL)08/95]
*[AS05800(ALL)08/95]
q Adjusting speaker fader
Fade control allows you to adjust the sound distribution between the front and rear speakers. Push the “AUDIO” button repeatedly until the display reads “FADE.” Push the “+” side of the “VOL” button to shift the sound to the front speakers, and push the “-” side to shift the sound to the rear speakers.
NOTE: Illuminated bars in the display show relative levels of bass and treble and positions of speaker balance and fader functions after adjustments are made, then revert to volume level set.
Clock operation When in the radio mode, push the “CLOCK” button to switch from radio frequency to clock. Only the clock numerals will be displayed in the clock mode — there is no A.M./P.M. indication. When in the clock mode, the time will be displayed until the button is pushed again. However, if you retune the radio while it is in the clock mode, the new radio frequency will be displayed for approximately ten seconds and then change back to clock. When in the CD mode, push the “CLOCK” button to change the display from elapsed time mode to track number mode to clock mode. If the CD track selection is changed when you are in the clock or elapsed time mode, the new track number will be displayed for approximately ten seconds and then revert back to the previous mode.
27
File:04prasp.ex Update:Mon Jun 3 10:03:33 1996
*[AS05900(ALL)08/95]
%*[AS07000(ALL)10/95] *[AS07100(ALL)03/96]
*[AS07200(ALL)09/95]
*[AS07300(ALL)08/95]
*[AS07400(ALL)10/95] *[AS07500(ALL)09/95]
To set the clock, simultaneously press the “CLOCK” button and either the bottom (b) half of the “SEEK” button to set hours, or the top (a) half of the “SEEK” button to set minutes. Using the Controls on Your New Compact Disc Player Your new Ford Compact Disc Player is capable of playing 12 cm or 8 cm discs, without an adapter. The player operates when the power is on and a disc is inserted (label side up). Handle the disc by its edge only. (Be sure to read and follow all of the care and cleaning instructions under How To Take Care of and Clean Your CD Player and Discs.) NOTE: If after you insert a disc, the disc is
ejected and “ERROR” begins scrolling in the display, remove the disc and reinsert it right side up (label side up).
The digital display on your CD player will either show the track (selection) number or the elapsed time. (The display mode can be selected by pressing the “CLOCK” button.) Indicators for play (a), stop (X) and compression on (“C”) are also in the display. (These features are described later.) Once a disc is inserted, operation of the CD player will override that of the radio. NOTE: The volume, bass, treble, balance and
fader controls on the radio are also used with the CD player. Refer to earlier operating instructions on these controls.
28
File:04prasp.ex Update:Mon Jun 3 10:03:33 1996
*[AS07600(ALL)04/96] *[AS07700(ALL)10/95]
*[AS07800(ALL)04/96]
[AS07900(ALL)04/96]
*[AS08000(ALL)10/95]
*[AS08100(ALL)10/95] *[AS08200(ALL)04/96]
*[AS08300(ALL)10/95]
How to insert a disc and begin play Insert one disc, label side up into the disc opening. When inserted, the disc automatically loads into the unit and play starts at the beginning of the first track (selection). When the disc reaches the end, the disc player automatically returns to the beginning of the disc and resumes playing. NOTE: Once a disc is inserted, the disc
opening is secured to prevent the accidental insertion of a second disc.
NOTE: The CD player has heat protection
circuitry to protect the laser diode. If the temperature of the player reaches 167˚F (75˚C), the heat detection circuit will shut off the player and “TOO HOT” will scroll in the display for approximately five seconds (radio will resume playing). When the temperature returns to normal operating range, the CD player will again be operational.
How to stop and restart the CD player When a disc is loaded, the unit automatically enters the play mode and the play indicator (a) illuminates. To stop temporarily, press the “PLAY/STOP” button or the “AM/FM” button. The stop indicator (X) in the display illuminates and operation returns to the radio mode. To resume CD play, press the “PLAY/STOP” button once again. NOTE: If the ignition key is turned OFF
during play and then is set to the ON or ACCESSORY position, the CD player will resume playing in the mode it was in when ignition was turned off.
29
File:04prasp.ex Update:Mon Jun 3 10:03:33 1996
*[AS08310(ALL)08/95] *[AS08320(ALL)08/95] *[AS08330(ALL)08/95]
*[AS08350(ALL)08/95]
*[AS08400(ALL)10/95] *[AS08500(ALL)10/95]
*[AS08600(ALL)10/95]
Using the “SEEK” feature The “SEEK” feature allows you to quickly find a particular selection on the disc. Press the bottom (b) half of the “SEEK” button once to repeat the current playing selection. Press the top (a) half of the “SEEK” button to advance to the next selection. Pressing and holding the bottom (b) or top (a) half of the “SEEK” button will scroll backward and forward respectively through the tracks. How to fast forward or reverse your CD player To quickly search for a particular point in a selection, press the “FF” button (to fast forward) or the “REV” button (to reverse). While either button is pressed, the disc goes forward or backward at two different speeds depending on how long the button is held down. (Pressing either button for more than three seconds will speed up the process.) Release the button at the desired point (found by watching the elapsed playing time in the display or by listening to the sound during fast forward or reverse). When you have reached the beginning of track 1, the CD player will begin playing. When you have reached the end of the disc by keeping the fast forward button pressed, the display will show “END” and the player will go into pause mode. Push the “PLAY/STOP” button to begin playing the first track of the disc, press the “REV” button to back up from the end of the disc, or use the “SEEK” function to locate a desired track.
30
File:04prasp.ex Update:Mon Jun 3 10:03:33 1996
*[AS08700(ALL)10/95] [AS08800(ALL)05/94]
*[AS09500(ALL)04/96] *[AS09600(ALL)10/95]
*[AS09700(ALL)10/95] %*[AS09710(ALL)08/95] *[AS09720(ALL)08/95]
*[AS09730(ALL)04/96] *[AS09740(ALL)08/95]
*[AS09750(ALL)04/96]
Using the “SCAN” function Press the “SCAN/TUNE” button to enter the scan mode. Once in the scan mode, press the top (b) or bottom (a) half of the “SEEK” button to scan forward or reverse, respectively. The CD player will begin scanning the disc, stopping on each listenable track for approximately an eight-second sampling. This continues until you press the “SCAN/TUNE” button a second time. How to eject the disc Push the “EJECT” button to stop play, eject the disc and resume radio operation of your audio system. NOTE: You can eject the disc while the radio
power and/or ignition is on or off.
How To Take Care of and Clean Your CD Player and Discs To ensure the continued performance of your Ford Compact Disc Player, carefully read the following precautions: q Always handle the disc by its edge. Never
touch the playing surface.
q Before playing, inspect the disc for any
contamination. If needed, clean the disc with an approved disc cleaner, such as the DiscwasherH Compact Disc Cleaner or the Allsop 3H Compact Disc Cleaner, by wiping from the center out to the edges. Do not use a circular motion to clean.
q Do not clean discs with solvents such as benzine, thinner, commercially available cleaners or antistatic spray intended for analog records.
31
File:04prasp.ex Update:Mon Jun 3 10:03:33 1996
*[AS09760(ALL)04/96]
*[AS09765(ALL)04/96] *[AS09770(ALL)04/96]
*[AS09780(ALL)04/96] *[AS09790(ALL)04/96]
*[AS09800(ALL)08/95] *[AS09810(ALL)04/96]
*[AS09820(ALL)04/96] *[AS09830(ALL)04/96] *[AS09840(ALL)04/96] *[AS09850(ALL)08/95]
q Do not expose the disc to direct sunlight or
heat sources such as defroster and floor heating ducts. Do not leave any discs in a parked car in direct sunlight where there may be a considerable rise in temperature or damage may result.
q After playing, store the disc in its case.
If a disc has already been inserted, do not try to insert another disc. Doing so may damage the disc player.
q Do not insert anything other than a disc into
the disc player.
NOTE: The use of optical instruments with
this product will increase eye hazard as the laser beam used in this compact disc player is harmful to the eyes. Do not attempt to disassemble the case. Refer servicing to qualified personnel only.
Common Operating Conditions of Your CD Player The following information is designed to help you recognize typical situations that could be mistakenly interpreted as mechanical malfunctions of the disc player. q A disc is already loaded. q The disc is inserted with the label surface
downward.
q The disc is dusty or defective. q The player’s internal temperature is above 140˚F (60˚C). Allow the player to cool off before operating.
32
File:04prasp.ex Update:Mon Jun 3 10:03:33 1996
*[AS09869(ALL)08/95]
*[AS09870(ALL)04/96] *[AS09880(ALL)04/96] *[AS09890(ALL)04/96] *[AS09900(ALL)04/96]
*[AS09910(ALL)04/96] *[AS09920(ALL)04/96]
q Different manufacturers of compact discs may
produce discs with different dimensions or tolerances, some of which may not be within industry standards or in accordance with the CD format. Because of this, a new disc that is free of dust and scratches could be defective and may not play on your Ford Compact Disc Player.
If play does not begin after the CD button is pushed: q The radio is not on. q The unit is in the stop mode. q Moisture may have condensed on the lenses
within the unit. If this occurs, remove the disc and wait approximately an hour until the moisture evaporates.
If the sound skips: q Badly scratched discs or extremely rough
roads will cause the sound to skip. Skipping will not damage the disc player or scratch the discs.
33
f
F
File:04prasp.ex Update:Mon Jun 3 10:03:33 1996
*[AS21400(ALL)03/96] *[AS21500(ALL)08/95] *[AS21701(ALL)10/95] *[AS21950(ALL)02/96]
*[AS21975(ALL)02/96]
*[AS22100(ALL)03/96] *[AS22225(ALL)02/96]
*[AS22300(ALL)02/96] *[AS22400(ALL)02/96]
Using the Controls on Your New Radio How to turn the radio on and adjust the volume Press the “POWER” button to turn the radio on. Press it again to turn it off. Press the right (+) side of the “VOLUME” button to increase the volume. Press the left (S) side of the button to decrease the volume. Illuminated bars in the display show the relative volume level. NOTE: If the volume level is set above a
certain listening level when the ignition switch is turned off, when the ignition switch is turned back on, the volume will come back to a “nominal” listening level. However, if the radio power is turned off, the volume will remain in the position it was set at when radio power was switched off.
Selecting the AM or FM frequency band Push the “AM/FM” button to select the desired frequency band. Pushing the button more than once will alternate between AM, FM1 and FM2. These functions are used with the station memory buttons described under How to tune radio stations. How to tune radio stations (Stereo Radio) There are three ways for you to tune in to a particular station. You can manually locate the station by using the “TUNE” button, “SEEK” the station or select the station by using the memory preset buttons, which you can set to any desired frequency.
36
File:04prasp.ex Update:Mon Jun 3 10:03:33 1996
%*[AS22410(ALL)02/96]
[AS22420(ALL)03/96]
*[AS22430(ALL)09/95] *[AS22440(ALL)08/95]
*[AS22450(ALL)03/96]
*[AS22730(ALL)02/96] *[AS22740(ALL)02/96]
How to tune radio stations (Stereo Cassette Radio) There are four ways for you to tune in to a particular station. You can manually locate the station by using Automatic Music Search “AMS”, “SEEK” the station, “SCAN” to the station or select the station by using the memory buttons, which you can set to any desired frequency. q Using the “TUNE” function (Stereo Radio) You can change the frequency up or down one increment at a time by pressing and releasing either the right (+) or left (S) side of the “TUNE” button. To change frequencies quickly, press and hold down either the right or left side of the “TUNE” button. Manual tuning adjusts your radio to any allowable broadcast frequency, whether or not a station is present on that frequency. (See All About Radio Frequencies in this section.)
q Using the “AMS” function to manually tune
your radio (Stereo Cassette Radio) You can change the frequency up or down one increment at a time by first pressing the “AMS” button (display shows “TUNE”) then within approximately five seconds pressing and releasing either the right a or left b side of the “SEEK” button. To change frequencies quickly, press and hold down either the right or left side of the “SEEK” button.
37
File:04prasp.ex Update:Mon Jun 3 10:03:33 1996
*[AS22800(ALL)04/96] *[AS22900(ALL)05/96]
*[AS23160(ALL)02/96] *[AS23170(ALL)02/96]
*[AS23200(ALL)02/96] *[AS23325(ALL)02/96]
*[AS23400(ALL)08/95] *[AS23500(ALL)03/96] *[AS23700(ALL)10/95]
*[AS23800(ALL)10/95]
q Using the “SEEK” function
This feature on your radio allows you to automatically select listenable stations up or down the frequency band. Press the right a side of the “SEEK” button to select the next listenable station up the frequency band. Press the left b side of the button to select the next listenable station down the frequency band. By holding the button down, listenable stations can be passed over to reach the desired station.
q Using the “SCAN” function (Stereo Cassette