- 2007 Ford Fusion Owners Manuals
- Ford Fusion Owners Manuals
- 2016 Ford Fusion Owners Manuals
- Ford Fusion Owners Manuals
- 2010 Ford Fusion Owners Manuals
- Ford Fusion Owners Manuals
- 2006 Ford Fusion Owners Manuals
- Ford Fusion Owners Manuals
- 2014 Ford Fusion Owners Manuals
- Ford Fusion Owners Manuals
- 2015 Ford Fusion Owners Manuals
- Ford Fusion Owners Manuals
- 2013 Ford Fusion Owners Manuals
- Ford Fusion Owners Manuals
- Download PDF Manual
-
Grade
Engine On due to Key not
Detected
Engine On due to Driver
Door Opened
Engine On due to Driver
Belt Unbuckled Engine On due to Heating /Cooling
Engine On due to Power
Outlet in Use
Engine On due to Vehicle
Charging
Deactivated by Driver
Engine may be on to support high demand for electrical
accessories, such as operating power windows, rear defroster,
or when using the power point.
Engine is on to support normal vehicle operation. Includes external vehicle conditions, such as altitude, traffic, low
ambient temperature. Also includes battery outside optimal operating conditions (state of charge and temperature), and
inadequate brake vacuum (can occur if the brake pedal is
depressed a number of times in succession).
Engine is on in order to increase the engine temperature to an
acceptable level.
Engine is on to support normal vehicle operation due to low
outside ambient temperature.
Engine is on in order to increase the engine temperature to an
acceptable level.
Engine is on due to a low gear selection by the transmission.
Engine is on due to a steep road grade.
Engine is on due to no key being detected by the vehicle.
Engine is on due to the driver door being opened.
Engine is on due to the driver seat belt being unbuckled.
Engine is on to achieve or maintain interior compartment at
an acceptable level.
Engine is on, which is required to support the use of the power
outlet (110V).
Engine is on due to the vehicle battery needing to be charged.
You have disabled the Start Stop feature.
108
Fusion/Mondeo (CC7) Canada/United States of America, enUSA, First Printing
Information Displays
Automatic Engine Shutdown
Message
Engine Shuts Off in XX
Seconds
Engine Shut Off for Fuel
Economy
Engine Shuts Off in XX Seconds Press Ok to
Override
All-Wheel Drive
Message
AWD Temporarily
Disabled AWD Off
AWD Restored
AWD Malfunction Service Required
Action
The engine is getting ready to shut off.
The engine has shut off to help increase fuel economy.
The engine is getting ready to shut off. You can press OK on the left steering wheel button to override the shut down.
Action
The all-wheel drive system temporarily turns off to protect
itself from overheating.
The all-wheel drive system temporarily turns off to protect itself from overheating or if you are using the temporary spare
tire.
The all-wheel drive system will resume normal function and clear this message after driving a short distance with the road
tire re-installed or after the system cools.
The all-wheel drive system is not operating properly. If the
warning stays on or continues to come on, contact an
authorized dealer as soon as possible.
109
Fusion/Mondeo (CC7) Canada/United States of America, enUSA, First Printing
Information Displays
Battery and Charging System
Message
Check Charging System
Low Battery Features Temporarily Turned Off
Turn Power Off to Save
Battery
Action
The charging system needs servicing. If the warning stays on or continues to come on, contact an authorized dealer as soon
as possible.
The battery management system detects an extended low- voltage condition. Your vehicle will disable various features to help preserve the battery. Turn off as many of the electrical loads as soon as possible to improve system voltage. If the system voltage has recovered, the disabled features will
operate again as normal.
The battery management system determines that the battery is at a low state of charge. Turn your ignition off as soon as possible to protect the battery. This message will clear once you restart your vehicle and the battery state of charge has recovered. Turning off unnecessary electrical loads will allow
faster battery state-of-charge recovery.
Blind Spot Information and Cross Traffic Alert System
Message
Blindspot System Fault
Blindspot Not Available
Sensor Blocked See
Manual
Action
A fault with the system has occurred. Contact an authorized
dealer as soon as possible.
The system sensors are blocked. See Blind Spot Informa-
tion System (page 201).
Cross Traffic Vehicle
Coming From X
Cross Traffic Not Avail- able Sensor Blocked See
Manual
Cross Traffic System
Fault
The system detects a vehicle. See Blind Spot Information
System (page 201).
The blind spot information system and cross traffic alert system sensors are blocked. See Blind Spot Information
System (page 201).
A fault with the system has occurred. Contact an authorized
dealer as soon as possible.
110
Fusion/Mondeo (CC7) Canada/United States of America, enUSA, First Printing
Information Displays
Action
The door(s) listed is not completely closed.
The luggage compartment is not completely closed.
The hood is not completely closed.
The system has disabled the door switches.
The factory keypad code displays in the information display
after system resets the keypad.
Action
Stop and rest as soon as it is safe to do so.
Take a rest break soon.
Action
An early reminder of a low fuel condition.
The fuel fill inlet may not be properly closed.
Action
Doors and Locks
Message X Door Ajar Trunk ajar Hood ajar
Switches Inhibited
Security Mode
Factory Keypad Code
XXXXX
Driver Alert
Message
Driver Alert Warning Rest
Now
Driver Alert Warning Rest
Suggested
Fuel
Message
Fuel Level Low
Check Fuel Fill Inlet
Hill Start Assist
Message
Hill Start Assist Not
Available
Hill start assist is not available. Contact an authorized dealer.
See Hill Start Assist (page 175).
111
Fusion/Mondeo (CC7) Canada/United States of America, enUSA, First Printing
Information Displays
Keys and Intelligent Access
Message
Action
Press Brake to START
A reminder to press the brake while starting your vehicle.
No Key Detected
The system does not detect a key in your vehicle. See Keyless
Starting (page 146).
Restart Now or Key is
Needed
Run Power Active
Starting System Fault
Key Program Successful
Key Program Failure
Max Number of Keys
Learned
Not Enough Keys
Learned
Key Battery Low Replace
Soon
Could Not Program
Integrated Key
Engine On
You pressed the start/stop button to switch off the engine and your vehicle does not detect your intelligent access key
inside your vehicle.
Your vehicle is in the run ignition state.
There is a problem with your vehicle’s starting system. Contact
an authorized dealer for service.
You have successfully programmed an intelligent access key
to the system.
You have failed to program an intelligent access key to the
system.
You have programmed the maximum number of keys to the
system.
You have not programmed enough keys to the system.
The key battery is low. Change the battery as soon as possible.
An attempt is made to program a spare key using two existing
keys.
A reminder that you are exiting your vehicle and the engine is
on.
112
Fusion/Mondeo (CC7) Canada/United States of America, enUSA, First Printing
Information Displays
Lane Keeping System
Message
Lane Keeping Sys. Malfunction Service
Required
Action
The system has malfunctioned. Contact your authorized
dealer as soon as possible.
Front Camera Tempor-
arily Not Available
The system has detected a condition that has caused the
system to be temporarily unavailable.
Front Camera Low Visib-
ility Clean Screen
The system has detected a condition that requires the wind-
shield to be cleaned to operate properly.
Front Camera Malfunc- tion Service Required Keep Hands on Steering
Wheel
Maintenance Message
LOW Engine Oil Pressure
Change Engine Oil Soon
Oil Change Required Brake Fluid Level LOW
Check Brake System
Engine Coolant Overtem-
perature
The system has malfunctioned. Contact your authorized
dealer as soon as possible.
The system requests you to keep your hands on the steering
wheel.
Action
Stop your vehicle as soon as safely possible and turn off the engine. Check the oil level. If the warning stays on or continues to come on with your engine running, contact an authorized
dealer as soon as possible.
The engine oil life remaining is 10% or less. See Engine Oil
Check (page 251).
The oil life left is at 0%. See Engine Oil Check (page 251). The brake fluid level is low, inspect the brake system immedi-
ately. See Brake Fluid Check (page 255).
The brake system needs servicing. Stop your vehicle in a safe
place. Contact an authorized dealer.
The engine coolant temperature is excessively high. Stop your vehicle in a safe place and allow the engine to cool. If the problem persists, contact an authorized dealer. See Engine
Coolant Check (page 252).
113
Fusion/Mondeo (CC7) Canada/United States of America, enUSA, First Printing
Information Displays
Message
Power Reduced to Lower Engine Temp Transport / Factory
Mode
Action
The engine has reduced power to help reduce high engine
temperature.
Your vehicle is still in Transport or Factory mode. This may not allow some features to operate properly. See an author-
ized dealer.
See Manual
The powertrain needs service due to a powertrain malfunction.
MyKey
Message
MyKey Not Created MyKey Active Drive
Safely
Speed Limited to XX
MPH/km/h
Near Vehicle Top Speed
Vehicle at Top Speed of
MyKey Setting
Check Speed Drive
Safely
Buckle Up to Unmute
Audio
AdvanceTrac On -
MyKey Setting
Traction Control On -
MyKey Setting
MyKey Park Aid Cannot
be Deactivated
Lane Keeping Alert On
MyKey Setting
Action
You cannot program a MyKey.
MyKey is active.
When switching on your vehicle and MyKey is in use, displays
that the MyKey speed limit is on.
MyKey is in use, the MyKey speed limit is on and your vehicle
speed is approaching 80 mph (130 km/h).
You have reached the speed limit set for your MyKey.
You have an active MyKey with a programmed set speed limit.
The belt-minder turns on with a MyKey in use.
With a MyKey in use, AdvanceTrac turns on.
With a MyKey in use, traction control turns on.
With a MyKey in use, park aid is always on.
With a MyKey in use, lane keeping alert turns on.
114
Fusion/Mondeo (CC7) Canada/United States of America, enUSA, First Printing
Information Displays
Park Aid
Message
Check Front Park Aid
Check Rear Park Aid
Front Park Aid On Off Rear Park Aid On Off
Park Brake
Message
Park Brake Engaged
Release Park Brake
Action
The system has detected a condition that requires service. Contact an authorized dealer. See Principle of Operation
(page 179).
The system has detected a condition that requires service. Contact an authorized dealer. See Principle of Operation
(page 179).
Front park aid status. Rear park aid status.
Action
You have set the parking brake and you have driven the vehicle more than 3 mph (5 km/h). If the warning stays on after you have released the parking brake, contact an authorized dealer. The electric parking brake is set and the vehicle is driven more than 3mph (5km/h). Release park brake before continued
driving.
Park Brake Malfunction
Service Now
The electric parking brake system has detected a condition
that requires service. Contact an authorized dealer.
Park Brake Not Applied Park Brake Not Released Park Brake Maintenance
Mode
Park Brake Use Switch
to Release
The electric parking brake is not fully applied. The electric parking brake is not fully released.
The electric parking brake system has been put into a special mode that is used to allow service of the rear brakes. Contact
an authorized dealer.
The electric parking brake is set and an automatic release is
attempted, but cannot be performed. Perform a manual
release.
To Release: Press Brake
and Switch
The electric parking brake is set and a manual release is
attempted without the brake pedal being pressed.
Park Brake Limited Function Service
Required
The electric park brake system has detected a condition that
requires service. Contact an authorized dealer.
115
Fusion/Mondeo (CC7) Canada/United States of America, enUSA, First Printing
Information Displays
Message
Park Brake System
Overheated
Park Brake Applied
Park Brake Released
Action
You have not released the electric parking brake causing it to
overheat.
The electric parking brake is set. Only displayed when a fault is present that is causing the brake system warning lamp to
be illuminated continuously.
The electric parking brake is released. Only displayed when a fault is present that is causing the brake system warning
lamp to be illuminated continuously.
Power Steering Message
Action
Steering Fault Service
Now
The power steering system detects a condition that requires
service. Contact an authorized dealer.
Steering Loss Stop
Safely
The power steering system is not working. Stop your vehicle
in a safe place. Contact an authorized dealer.
Steering Assist Fault
Service Required
The power steering system detects a condition that requires
service. Contact an authorized dealer.
Pre-Collision Assist
Message
Pre-Collision Assist
Malfunction
Action
There is a system malfunction with the pre-collision assist system. The system will be disabled. Contact an authorized
dealer as soon as possible.
Pre-Collision Assist Not
Available Sensor
Blocked See Manual
Pre-Collision Assist Not
Available
The pre-collision assist system radar is blocked because of poor radar visibility due to bad weather or ice, mud, water in
front of the radar. Driver can typically clean the sensor to resolve. Contact an authorized dealer as soon as possible. There is a system malfunction with the pre-collision assist system. The system will be disabled. Contact an authorized
dealer as soon as possible.
116
Fusion/Mondeo (CC7) Canada/United States of America, enUSA, First Printing
Information Displays
Remote Start Message
Action
To Drive: Turn Key to On
A reminder to turn the key on to drive your vehicle after a
remote start.
To Drive: Press Brake
and Start Button
A reminder to apply the brake and push the gearshift button
to drive your vehicle after a remote start.
Seats
Message
Memory Recall Not
Permitted While Driving
A reminder that memory seats are not available while driving.
Action
Memory X Saved
Shows where you have saved your memory setting.
Starting System
Message
Press Brake to Start Engine Start Pending
Please Wait
Pending Start Cancelled Cranking Time Exceeded
Action
A reminder to apply the brake when starting your vehicle.
The starter is attempting to start your vehicle.
The system has cancelled the pending start.
The starter has exceeded its cranking time in attempting to
start your vehicle.
117
Fusion/Mondeo (CC7) Canada/United States of America, enUSA, First Printing
Information Displays
Tire Pressure Monitoring System
Message
LOW Tire Pressure
Tire Pressure Monitor
Fault
Tire Pressure Sensor
Fault
Traction Control
Message
Traction Control Off / Traction Control On Spinout Detected Hazards Activated
Transmission Message
Transmission Malfunc-
tion Service Now Transmission Over- heating Stop Safely
Transmission Overtem- perature Stop Safely Transmission Service
Required
Transmission Too Hot
Press Brake
Action
One or more tires on your vehicle has low tire pressure. See
Tire Pressure Monitoring System (page 301).
The tire pressure monitoring system is malfunctioning. If the authorized dealer. See Tire Pressure Monitoring System
warning stays on or continues to come on, contact an
(page 301).
A tire pressure sensor is malfunctioning or your spare tire is in use. See Tire Pressure Monitoring System (page 301). If the warning stays on or continues to come on, contact an
authorized dealer as soon as possible.
Action
The status of the traction control system after you switched
it off or on. See Using Traction Control (page 177).
A spinout has occurred and the hazards are on.
Action
Contact an authorized dealer.
The transmission is overheating and needs to cool. Stop in a
safe place as soon as it is possible.
The transmission has overheated and needs to cool. Stop in
a safe place as soon as it is possible.
Contact an authorized dealer.
Transmission is getting hot. Stop to let it cool.
Transmission Limited Function See Manual
The transmission has overheated and has limited functionality.
See Automatic Transmission (page 163).
118
Fusion/Mondeo (CC7) Canada/United States of America, enUSA, First Printing
Information Displays
Message
Transmission Warming
Up Please Wait
Transmission Not in Park
Press Brake Pedal
Transmission Adjusted Transmission Adapt
Mode
Transmission Indicate
Mode Lockup On
Transmission Indicate
Mode Lockup Off
Action
Transmission is too cold. Wait for it to warm up before you
drive.
A reminder to shift into park.
You need to depress the brake pedal.
The transmission has adjusted the shift strategy. The transmission is adjusting the shift strategy.
The transmission is locked and unable to select gears.
The transmission is unlocked and free to select gears.
119
Fusion/Mondeo (CC7) Canada/United States of America, enUSA, First Printing
Climate Control
MANUAL CLIMATE CONTROL (If Equipped)
Fan speed control: Adjust the volume of air circulated in the vehicle. A/C: Press the button to switch the air conditioning on or off. Air conditioning cools your vehicle using outside air. To improve the time to reach a comfortable temperature in hot weather, drive with the windows open until you feel cold air through the air vents. Note: In certain conditions (for example, maximum defrost), the air conditioning compressor may continue to operate even though the air conditioning is switched off. Power: Press the button to switch the system on and off. When the system is off, it prevents outside air from entering the vehicle. Heated rear window: Press the button to switch the heated rear window on and off. See Heated Windows and Mirrors (page 128). Temperature control: Controls the temperature of the air circulated in your vehicle. MAX Defrost: Adjust the control to turn on defrost. Outside air flows through the windshield vents, air conditioning automatically turns on, and fan automatically adjusts to the highest speed. You can also use this setting to defrost and clear the windshield of a thin covering of ice. The heated rear window also automatically turns on when you select maximum defrost. Note: To prevent window fogging, you cannot select recirculated air when maximum defrost is on.
120
Fusion/Mondeo (CC7) Canada/United States of America, enUSA, First Printing
E144491 Climate Control
MAX A/C: Adjust the control for maximum cooling. Recirculated air flows through the instrument panel vents, air conditioning automatically turns on, and the fan automatically adjusts to the highest speed. Air distribution control: Adjust the control to turn airflow from the windshield, instrument panel, or footwell vents on or off. You can distribute air through any combination of these vents. Note: At least one of these buttons illuminates on when the system is on. Heated seats (if equipped): Press the button to switch the heated seats on and off. See Heated Seats (page 137). Recirculated air: Press the button to switch between outside air and recirculated air. The air currently in the passenger compartment recirculates. This can reduce the time needed to cool the interior and reduce unwanted odors from entering your vehicle. Note: Recirculated air may also turn on and off automatically in instrument panel or instrument panel and floor airflow modes during hot weather to improve cooling efficiency. Fan speed indicator: Illuminates to indicate fan speed.
121
Fusion/Mondeo (CC7) Canada/United States of America, enUSA, First Printing
Climate Control
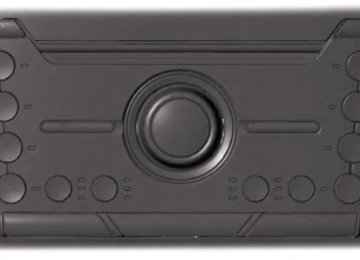
AUTOMATIC CLIMATE CONTROL - VEHICLES WITHOUT: SONY AUDIO SYSTEM
Heated seats (if equipped): Press the button to switch the heated seats on and off. See Heated Seats (page 137). Defrost: Select to distribute air through the windshield air vents. Air distribution to the instrument panel and footwell vents turns off. You can also use this setting to defrost and clear the windshield of a thin covering of ice. Fan speed control: Adjust the volume of air circulated in the vehicle. A/C: Press the button to switch the air conditioning on or off. Air conditioning cools your vehicle using outside air. To improve the time to reach a comfortable temperature in hot weather, drive with the windows open until you feel cold air through the air vents. Note: In certain conditions (for example, maximum defrost), the air conditioning compressor may continue to operate even though the air conditioning is switched off. Passenger temperature control: Adjust the temperature on the passenger side.
122
Fusion/Mondeo (CC7) Canada/United States of America, enUSA, First Printing
E198922 Climate Control
Climate controlled seats (if equipped): Press the button to switch the climate controlled seats on and off. See Climate Controlled Seats (page 137). MAX A/C: Press the button for maximum cooling. Recirculated air flows through the instrument panel vents, air conditioning automatically turns on and the fan automatically adjusts to the highest speed. Recirculated air: Press the button to switch between outside air and recirculated air. The air currently in the passenger compartment recirculates. This can reduce the time needed to cool the interior and reduce unwanted odors from entering your vehicle. Note: Recirculated air may also turn on and off automatically in instrument panel or instrument panel and floor airflow modes during hot weather to improve cooling efficiency. AUTO: Press the button to switch on automatic operation. Adjust to select the desired temperature. Fan speed, air distribution, air conditioning operation, and outside or recirculated air are automatically adjusted to heat or cool the vehicle to maintain the desired temperature. You can also switch off dual zone mode by pressing and holding the button for more than two seconds. Power: Press the button to switch the system on and off. When the system is off, it prevents outside air from entering the vehicle. Heated rear window: Press the button to switch the heated rear window on and off. See Heated Windows and Mirrors (page 128). MAX Defrost: Press the button to switch on defrost. Outside air flows through the windshield vents, air conditioning automatically turns on, and fan automatically adjusts to the highest speed. You can also use this setting to defrost and clear the windshield of a thin covering of ice. The heated rear window also automatically turns on when you select maximum defrost. Note: To prevent window fogging, you cannot select recirculated air when maximum defrost is on. Driver temperature control: Adjust the temperature setting using the control on the driver side.
AUTOMATIC CLIMATE CONTROL - VEHICLES WITH: SONY AUDIO SYSTEM/SONY AUDIO SYSTEM Note: You can switch temperature units between Fahrenheit and Celsius. See Settings (page 395).
123
Fusion/Mondeo (CC7) Canada/United States of America, enUSA, First Printing
Climate Control
A/C: Press the button to switch the air conditioning on or off. Air conditioning cools your vehicle using outside air. To improve the time to reach a comfortable temperature in hot weather, drive with the windows open until you feel cold air through the air vents. Note: In certain conditions (for example, maximum defrost), the air conditioning compressor may continue to operate even though the air conditioning is switched off. MAX A/C: Press the button for maximum cooling. Recirculated air flows through the instrument panel vents, air conditioning automatically turns on, and the fan automatically adjusts to the highest speed. Recirculated air: Press the button to switch between outside air and recirculated air. The air currently in the passenger compartment recirculates. This can reduce the time needed to cool the interior and reduce unwanted odors from entering your vehicle. Note: Recirculated air may also turn on and off automatically in instrument panel or instrument panel and floor airflow modes during hot weather to improve cooling efficiency. Power: Press the button to switch the system on and off. When the system is off, it prevents outside air from entering the vehicle.
124
Fusion/Mondeo (CC7) Canada/United States of America, enUSA, First Printing
E198026 Climate Control
Heated seats: Press the button to switch the heated seats on and off. See Heated Seats (page 137). Right-hand temperature control: Adjust the temperature on the right-hand side. Note: The maximum difference between left-hand and right-hand settings may be limited. Whenever you make an adjustment that would result in a larger difference, both settings will change together. Climate controlled seats: Press the button to switch the climate controlled seats on and off. See Climate Controlled Seats (page 137). Fan speed control: Adjust the volume of air circulated in the vehicle. Left-hand temperature control: Adjust the temperature setting using the control on the left-hand side. This control also adjusts the right-hand side temperature when you switch off dual zone mode. Heated rear window: Press the button to switch the heated rear window on and off. See Heated Windows and Mirrors (page 128). Defrost: Select to distribute air through the windshield air vents. Air distribution to the instrument panel and footwell vents turns off. You can also use this setting to defrost and clear the windshield of a thin covering of ice. MAX Defrost: Press the button to switch on defrost. Outside air flows through the windshield vents, air conditioning automatically turns on, and fan automatically adjusts to the highest speed. You can also use this setting to defrost and clear the windshield of a thin covering of ice. The heated rear window also automatically turns on when you select maximum defrost. Note: To prevent window fogging, you cannot select recirculated air when maximum defrost is on. AUTO: Press the button to switch on automatic operation. Adjust to select the desired temperature. Fan speed, air distribution, air conditioning operation, and outside or recirculated air are automatically adjusted to heat or cool the vehicle to maintain the desired temperature. You can also switch off dual zone mode by pressing and holding the button for more than two seconds.
HINTS ON CONTROLLING THE INTERIOR CLIMATE General Hints Note: Prolonged use of recirculated air may cause the windows to fog up. Note: You may feel a small amount of air from the footwell air vents regardless of the air distribution setting.
Note: To reduce humidity build-up inside your vehicle, do not drive with the system switched off or with recirculated air always switched on. Note: Do not place objects under the front seats as this may interfere with the airflow to the rear seats. Note: Remove any snow, ice or leaves from the air intake area at the base of the windshield.
125
Fusion/Mondeo (CC7) Canada/United States of America, enUSA, First Printing
Climate Control
Note: To improve the time to reach comfort in hot weather, drive with the windows fully open until you feel cold air through the air vents. Manual Climate Control Note: To reduce fogging of the windshield during humid weather, adjust the air distribution control to the windshield air vents position. Automatic Climate Control Note: Adjusting the settings when your vehicle interior is extremely hot or cold is not necessary. The system automatically adjusts to heat or cool the cabin to your selected temperature as quickly as possible. For the system to function efficiently, the instrument panel and side air vents should be fully open. Heating the Interior Quickly
Vehicle with manual climate control Adjust the fan speed to a high speed setting. Adjust the temperature control to the highest setting. Select the footwell air vents using the air distribution buttons.
Note: If you select AUTO during cold outside temperatures, the system directs airflow to the windshield and side window vents. In addition, the fan may run at a slower speed until the engine warms up. Note: If you select AUTO during hot outside temperatures, or when the inside of the vehicle is hot, the system automatically uses recirculated air to maximize interior cooling. When the interior reaches the selected temperature, the system automatically switches to using outside air.
Vehicle with automatic climate control Press the AUTO button.
Adjust the temperature control to the desired setting.
126
Fusion/Mondeo (CC7) Canada/United States of America, enUSA, First Printing
Climate Control
Recommended Settings for Heating Vehicle with manual climate control
Adjust the fan speed to the center setting. Adjust the temperature control to the midway point of the hot settings.
Select the footwell air vents using the air distribution buttons.
Cooling the Interior Quickly
Vehicle with manual climate control Adjust the temperature control to the MAX A/C position. Drive with the windows fully open until you feel cold air through the air vents.
Recommended Settings for Cooling Vehicle with manual climate control
Adjust the fan speed to the center setting. Adjust the temperature control to the midway point of the cold settings.
Select the instrument panel air vents using the air distribution buttons.
Vehicle with automatic climate control Press the AUTO button.
Adjust the temperature control to the desired setting. Use 72°F (22°C) as a starting point, then adjust the setting as necessary.
Vehicle with automatic climate control Press the MAX A/C button.
Vehicle with automatic climate control Press the AUTO button.
Adjust the temperature control to the desired setting. Use 72°F (22°C) as a starting point, then adjust the setting as necessary.
127
Fusion/Mondeo (CC7) Canada/United States of America, enUSA, First Printing
Climate Control
Side Window Defogging in Cold Weather
Vehicle with manual climate control
Select the windshield air vents using the air distribution buttons. Press the A/C button.
Vehicle with automatic climate control Press the defrost button.
Adjust the temperature control to the desired setting. Use 72°F (22°C) as a starting point, then adjust the setting as necessary.
Adjust the temperature control to the desired setting. Adjust the fan speed to the highest setting.
•
Note: Do not clean the mirror housing or glass with harsh abrasives, fuel or other petroleum-based cleaning products. CABIN AIR FILTER Your vehicle is equipped with a cabin air filter, which gives you and your passengers the following benefits: •
It improves your driving comfort by reducing particle concentration. It improves the interior compartment cleanliness. It protects the climate control components from particle deposits. You can locate the cabin air filter behind the glove box. Note: Make sure you have a cabin air filter installed at all times. This prevents foreign objects from entering the system. Running the system without a filter in place could result in degradation or damage to the system. Replace the filter at regular intervals. See Scheduled Maintenance (page 464).
•
HEATED WINDOWS AND MIRRORS Heated Rear Window Note: Make sure the engine is running before operating the heated windows. Press the button to clear the heated rear window of thin ice and fog. The heated rear window
will automatically turn off after a short period of time. Start the engine before you switch the heated rear window on. Note: Do not use razor blades or other sharp objects to clean or remove decals from the inside of the heated rear window. The vehicle warranty does not cover damage caused to the heated rear window grid lines. Heated Exterior Mirror When you switch the heated rear window on, the heated exterior mirrors will automatically turn on. Note: Do not remove ice from the mirrors with a scraper or adjust the mirror glass when it is frozen in place.
128
Fusion/Mondeo (CC7) Canada/United States of America, enUSA, First Printing
E184884 Climate Control
For additional cabin air filter information, or to replace the filter, see an authorized dealer. REMOTE START (If Equipped) The remote start feature allows you to pre-condition the interior of your vehicle. The climate control system works to achieve comfort according to your previous settings. Note: You cannot adjust the system during remote start operation. Turn the ignition on to return the system to its previous settings. You can now make adjustments normally, but you need to turn certain vehicle-dependent features back on, such as: • Heated seats. • Cooled seats. • Heated steering wheel. • Heated mirrors. • Heated rear window. You can adjust the default remote start settings using the information display controls. See Information Displays (page 96). Automatic Settings In hot weather, the system is set to 72°F (22°C). The cooled seats are set to high (if available, and selected to AUTO in the information display). In moderate weather, the system either heats or cools (based on previous settings). The rear defroster, heated mirrors and heated seats do not automatically turn on. In cold weather, the system is set to 72°F (22°C). The heated seats are set to high (if available, and selected to AUTO in the information display). The rear defroster and heated mirrors automatically turn on.
129
Fusion/Mondeo (CC7) Canada/United States of America, enUSA, First Printing
Seats
We recommend that you follow these guidelines: •
Sit in an upright position with the base of your spine as far back as possible.
• Do not recline the seatback more than
30 degrees.
• Adjust the head restraint so that the top of it is level with the top of your head and as far forward as possible. Make sure that you remain comfortable. Keep sufficient distance between yourself and the steering wheel. We recommend a minimum of 10 in (25 cm) between your breastbone and the airbag cover.
•
• Hold the steering wheel with your arms
slightly bent. Bend your legs slightly so that you can press the pedals fully.
•
• Position the shoulder strap of the safety belt over the center of your shoulder and position the lap strap tightly across your hips.
Make sure that your driving position is comfortable and that you can maintain full control of your vehicle. HEAD RESTRAINTS WARNINGS
Fully adjust the head restraint before you sit in or operate your vehicle. This will help minimize the risk of neck
injury in the event of a crash. Do not adjust the head restraint when your vehicle is moving.
The head restraint is a safety device. Whenever possible it should be installed and properly adjusted when
the seat is occupied.
SITTING IN THE CORRECT POSITION
WARNINGS
Sitting improperly, out of position or with the seatback reclined too far can take weight off the seat cushion and affect the decision of the passenger sensing system, resulting in serious injury or death in the event of a crash. Always sit upright against your seat back, with your feet on the floor.
Do not recline the seatback as this can cause the occupant to slide under the safety belt, resulting in
serious injury in the event of a crash.
Do not place objects higher than the seatback to reduce the risk of serious injury in the event of a crash or during
heavy braking.
When you use them properly, the seat, head restraint, safety belt and airbags will provide optimum protection in the event of a crash.
130
Fusion/Mondeo (CC7) Canada/United States of America, enUSA, First Printing
E68595 Seats
WARNINGS
Install the head restraint properly to help minimize the risk of neck injury in the event of a crash.
Note: Adjust the seatback to an upright driving position before adjusting the head restraint. Adjust the head restraint so that the top of it is level with the top of your head and as far forward as possible. Make sure that you remain comfortable. If you are extremely tall, adjust the head restraint to its highest position. Front seat and rear seat outboard head restraints
Rear center head restraint
The head restraints consist of:
An energy absorbing head restraint. Two steel stems. Guide sleeve adjust and unlock button. Guide sleeve unlock and remove button.
Adjusting the Head Restraint Raising the Head Restraint Pull the head restraint up. Lowering the Head Restraint 1. Press and hold button C. 2. Push the head restraint down. Removing the Head Restraint 1. Pull the head restraint up until it
reaches its highest position.
2. Press and hold buttons C and D. 3. Pull the head restraint up. Installing the Head Restraint Align the steel stems into the guide sleeves and push the head restraint down until it locks. Tilting Head Restraints The front head restraints tilt for extra comfort. To tilt the head restraint, do the following:
131
Fusion/Mondeo (CC7) Canada/United States of America, enUSA, First Printing
E138642E138645 Seats
The driver and passenger manual seats may consist of:
1. Adjust the seatback to an upright
driving or riding position.
2. Pivot the head restraint forward toward
your head to the desired position. After the head restraint reaches the forward-most tilt position, pivoting it forward again will then release it to the rearward, un-tilted position. MANUAL SEATS
WARNINGS
Do not adjust the driver seat or seatback when your vehicle is moving. Rock the seat backward and forward after releasing the lever to make sure that it is fully engaged. Reclining the seatback can cause an occupant to slide under the seat's safety belt, resulting in severe
personal injuries in the event of a crash.
A bar to move the seat backward and forward. A control to adjust the lumbar of the seatback (driver seat only). A lever to adjust the height of the seat (driver seat only). A lever to adjust the angle of the seatback.
POWER SEATS (If Equipped)
WARNINGS
Do not adjust the driver seat or seatback when your vehicle is moving. Do not place cargo or any objects behind the seatback before returning it to the original position.
Note: Driver seat shown, passenger seat similar.
132
Fusion/Mondeo (CC7) Canada/United States of America, enUSA, First Printing
E144727ABCDE144631 Seats
6-way power seat
133
Fusion/Mondeo (CC7) Canada/United States of America, enUSA, First Printing
E176793 Seats
10-way power seat
Power Lumbar (If Equipped)
MEMORY FUNCTION (If Equipped)
WARNINGS
Before activating the seat memory, make sure that the area immediately surrounding the seat is clear of
obstructions and that all occupants are clear of moving parts.
Do not use the memory function when your vehicle is moving.
This feature will automatically recall the position of the driver seat and power mirrors. The memory control is located on the driver door.
134
Fusion/Mondeo (CC7) Canada/United States of America, enUSA, First Printing
E144632E165608 Seats
Note: Using a linked key fob to recall your memory position when the ignition is off moves the seat to the Easy Entry position. Note: Pressing any active memory feature control - power seat, mirror (or any memory button) during a memory recall cancels the operation. Linking a PreSet Position to your Remote Control or Intelligent Access Key Fob Your vehicle can save the preset memory positions for up to three remote controls or intelligent access (IA) keys. 1. With the ignition on, move the memory
positions to the desired positions. 2. Press and hold the desired preset
button for about five seconds. A tone will sound after about two seconds. Continue holding until a second tone is heard.
3. Within three seconds, press the lock button on the remote control you are linking.
To unlink a remote control, follow the same procedure – except in step 3, press the unlock button on the remote control. Note: If more than one linked remote control or intelligent access key is in range, the memory function moves to the settings of the first key to initiate a memory recall. Easy Entry and Exit Feature If you enable the easy entry and exit feature, it automatically moves the driver seat position rearward up to two inches (five centimeters) when you switch the ignition off. The driver seat will return to the previous position when you switch the ignition on. You can enable or disable this feature in the information display. See Information Displays (page 96).
Saving a PreSet Position 1. Switch the ignition on. 2. Adjust the seat and exterior mirrors to
your desired position.
3. Press and hold the desired preset button until you hear a single tone.
You can save up to three preset memory positions. You can save a memory preset at any time. Recalling a PreSet Position Press and release the preset button associated with your desired driving position. The seat and mirrors will move to the position stored for that preset. Note: A preset memory position can only be recalled when the ignition is off, or when the transmission is in park (P) or neutral (N) if the ignition is on. You can also recall a preset memory position by: • Pressing the unlock button on your integrated keyhead transmitter or intelligent access key fob if it is linked to a preset position.
• Unlocking the intelligent driver door handle if a linked key fob is present. Entering a personal entry code on the Securicode keypad. See Locks (page 60).
•
135
Fusion/Mondeo (CC7) Canada/United States of America, enUSA, First Printing
E142554 Seats
REAR SEATS Note: Your vehicle may have split seatbacks that you must fold individually. Note: Make sure the center safety belt is unbuckled before folding the seatback. To lower the seat back(s) from inside the vehicle, do the following:
3. Stow the safety belt in the stowage clip. This will prevent the safety belt from getting caught in the seat latch. When raising the seat back(s), make sure you hear the seat latch into place.
1. Pull the handle to release the seatback. 2. Push the seatback forward.
136
Fusion/Mondeo (CC7) Canada/United States of America, enUSA, First Printing
E144634E164098 Seats
HEATED SEATS (If Equipped)
WARNING
People who are unable to feel pain to their skin because of advanced age, chronic illness, diabetes, spinal
cord injury, medication, alcohol use, exhaustion or other physical conditions, must exercise care when using the heated seat. The heated seat may cause burns even at low temperatures, especially if used for long periods of time. Do not place anything on the seat that insulates against heat, such as a blanket or cushion. This may cause the heated seat to overheat. Do not puncture the seat with pins, needles or other pointed objects. This may damage the heating element which may cause the heated seat to overheat. An overheated seat may cause serious personal injury.
Do not do the following: • Place heavy objects on the seat. • Operate the heated seat if water or any other liquid is spilled on the seat. Allow the seat to dry thoroughly.
• Operate the heated seats unless the engine is running. Doing so can cause the battery to lose charge.
CLIMATE CONTROLLED SEATS (If Equipped) Heated Seats
WARNING
Persons who are unable to feel pain to the skin because of advanced age, chronic illness, diabetes, spinal cord injury, medication, alcohol use, exhaustion, or other physical conditions, must exercise care when using the seat heater. The seat heater may cause burns even at low temperatures, especially if used for long periods of time. Do not place anything on the seat that insulates against heat, such as a blanket or cushion, because this may cause the seat heater to overheat. Do not puncture the seat with pins, needles, or other pointed objects because this may damage the heating element which may cause the seat heater to overheat. An overheated seat may cause serious personal injury.
Do not do the following: • Place heavy objects on the seat. • Operate the seat heater if water or any other liquid is spilled on the seat. Allow the seat to dry thoroughly.
• Operate the heated seats unless the engine is running. Doing so can cause the battery to lose charge.
Press the heated seat symbol to cycle through the various heat settings and off. Warmer settings are indicated by more indicator lights.
137
Fusion/Mondeo (CC7) Canada/United States of America, enUSA, First Printing
E146941E146322 Seats
REAR SEAT ARMREST
Press the heated seat symbol to cycle through the various heat settings and off. Warmer settings are indicated by more indicator lights. Cooled Seats (If Equipped) The cooled seats will only function when the engine is running.
Fold the armrest down to use the armrest and cupholder.
To operate the cooled seats: Press the cooled seat symbol to cycle through the various cooling settings and off. Cooler settings are indicated by more indicator lights. If the engine falls below 350 RPM while the cooled seats are on, the feature will turn itself off. You will need to reactivate it. Climate controlled seat air filter replacement (if equipped) Your vehicle is equipped with lifetime air filters that are integrated with the seats. Regular maintenance or replacement is not needed.
138
Fusion/Mondeo (CC7) Canada/United States of America, enUSA, First Printing
E146309E144635 Universal Garage Door Opener (If Equipped)
HomeLink Wireless Control System (If Equipped)
WARNING
Do not use the system with any garage door opener that does not have the safety stop and reverse
feature as required by U.S. Federal Safety Standards (this includes any garage door opener manufactured before April 1, 1982). A garage door opener which cannot detect an object, signaling the door to stop and reverse, does not meet current federal safety standards. Using a garage door opener without these features increases the risk of serious injury or death.
Note: Make sure that the garage door and security device are free from obstruction when you are programming. Do not program the system with the vehicle in the garage. Note: Make sure you keep the original remote control transmitter for use in other vehicles as well as for future system programming. Note: We recommend that upon the sale or lease termination of your vehicle, you erase the programmed function buttons for security reasons. See Erasing the function button codes later in this section. Note: You can program a maximum of three devices. To change or replace any of the three devices after it has been initially programmed, you must first erase the current settings. See Erasing the function button codes later in this section.
The universal garage door opener replaces the common hand-held garage door opener with a three-button transmitter that is integrated into the driver’s sun visor. The system includes two primary features, a garage door opener and a platform for remote activation of devices within the home. As well as being programmed for garage doors, the system transmitter can be programmed to operate entry gate operators, security systems, entry door locks and home or office lighting. Additional system information can be found online at www.homelink.com or by calling the toll-free help line on 1-800-355-3515. In-vehicle programming This process is to program your hand-held transmitter and your in-vehicle HomeLink button. Note: Put a new battery in the hand-held transmitter. This will ensure quicker training and accurate transmission of the radio-frequency signal.
1. With your vehicle parked outside of the
garage, turn your ignition to the on position, but do not start your vehicle.
2. Hold your hand-held garage door
transmitter 1–3 inches (2–8
centimeters) away from the HomeLink button you want to program.139
Fusion/Mondeo (CC7) Canada/United States of America, enUSA, First Printing
E142657E142658 Universal Garage Door Opener (If Equipped)
3. Using both hands, simultaneously,
press and hold the desired HomeLink button and the hand-held transmitter button. DO NOT release either one until the HomeLink indicator light flashes slowly and then rapidly. When the indicator light flashes rapidly, both buttons may be released. The rapid flashing indicates successful training. 4. Press and hold the HomeLink button you programmed for five seconds, then release. You may need to do this twice to activate the door. If your garage door does not operate, watch the HomeLink indicator light.
If the indicator light stays on, the programming is complete. See Programming your garage door motor later in this section. If the indicator light flashes rapidly for 2
seconds and then turns to a constant light, the HomeLink button is not programmed yet. Do the following: Press and hold the HomeLink button while you press and release the hand-held transmitter button every 2 seconds. The HomeLink indicator light will flash slowly and then rapidly once the HomeLink function button recognizes and accepts the hand-held transmitter’s radio frequency signal. After programming the HomeLink button, begin programming your garage door opener motor. Note: You may need a ladder to reach the unit and you may need to remove the cover or lamp lens on your garage door opener.140
Fusion/Mondeo (CC7) Canada/United States of America, enUSA, First Printing
To program additional buttons, repeat Steps 1 – 4. For questions or comments, please contact HomeLink at www.homelink.com or 1-800-355-3515. Programming your garage door opener motor 1. Press the learn button on the garage
door opener motor and then you have 30 seconds to complete the next two steps.
2. Return to your vehicle.
3. Press and hold the function button you
want to program for 2 seconds, then release. Repeat this step. Depending on your brand of garage door opener, you may need to repeat this sequence a third time.
Erasing the Function Button Codes Note: You cannot erase individual buttons.
E142659E142658 Universal Garage Door Opener (If Equipped)
A. B.
Red indicator light Green indicator light
1. Press and hold one of the buttons on
the hand-held transmitter for 10
seconds. The indicator light will change from green to red and green.2. Press the same button twice to confirm the change to programming mode. If done properly the indicator light will appear red.
3. Hold the transmitter within 1–3 inches (2–8 centimeters) of the button on the visor you want to program.
4. Press and hold both the programmed
Genie button on the hand-held transmitter and the button you want to program. The indicator light on the visor will flash rapidly when the programming is successful.
Note: The Genie transmitter will transmit for up to 30 seconds. If HomeLink does not program within 30 seconds the Genie transmitter will need to be pressed again. If the Genie transmitter indicator light displays green and red, release the button until the indicator light turns off before pressing the button again. Once HomeLink has been programmed successfully, the Genie transmitter must be changed out of program mode. To do this:
1. Press and hold the outer two function
buttons simultaneously for approximately 20 seconds until the indicator lights above the buttons flash rapidly.
2. When the indicator lights flash, release the buttons. The codes for all buttons are erased.
Reprogramming a Single Button To program a device to a previously trained button, follow these steps: 1. Press and hold the desired button. Do
NOT release the button.
2. The indicator light will begin to flash
after 20 seconds. Without releasing the button, follow Step 1 in the Programming section.
For questions or comments, contact HomeLink at www.homelink.com or 1-800-355-3515. Programming to a Genie Intellicode 2
Garage Door Opener Note: The Genie Intellicode 2 transmitter must already be programmed to operate with the garage door opener. Note: To program HomeLink to the transmitter you must first put the transmitter into programming mode.141
Fusion/Mondeo (CC7) Canada/United States of America, enUSA, First Printing
E142660BAE142661 Universal Garage Door Opener (If Equipped)
5. Press and hold the previously
programmed button on the visor for 2
seconds. Repeat this step up to 3 times until the garage door moves. Programming is now complete. Clearing a HomeLink Device To erase programming from the three HomeLink buttons press and hold the two outer HomeLink buttons until the indicator light begins to flash. The indicator light will begin flashing in 10 to 20 seconds, at which time both buttons should be released. Programming has now been erased, and the indicator light should blink slowly to indicate the device is in train mode when any of the three HomeLink buttons are pressed. FCC and RSS-210 Industry Canada Compliance This device complies with Part 15 of the FCC Rules and with RSS-210 of Industry Canada. Operation is subject to the following two conditions: (1) this device may not cause harmful interference, and (2) this device must accept any interference received, including interference that may cause undesired operation. Changes or modifications to your device not expressly approved by the party responsible for compliance can void the user’s authority to operate the equipment.1. Press and hold the previously
programmed Genie button on the hand-held transmitter for 10 seconds. The indicator light will change from red to red and green.
2. Press the same button twice to confirm
the change. If done correctly the indicator light will turn green.
Programming HomeLink to the Genie Intellicode Garage Door Opener Motor Note: You may need a ladder to access the garage door opener motor.
1. Press and hold the program button on
the garage door opener motor until both blue indicator lights turn on.
2. Release the program button. Only the smaller round indicator light should be on.
3. Press and release the program button.
The larger purple indicator light will flash.
Note: The next two steps must be completed in 30 seconds. 4. Press and release the Genie Intellicode
2 hand-held transmitter’s previously programmed button. Both indicator lights on the garage door opener motor unit should now flash purple.
142
Fusion/Mondeo (CC7) Canada/United States of America, enUSA, First Printing
E142662 Auxiliary Power Points
Locations Power points may be in the following locations: • On the front of the center console. • • On the rear of the center console. 110 Volt AC Power Point (If Equipped)
Inside the center console.
WARNING
Do not keep electrical devices plugged in the power point whenever the device is not in use. Do not use any extension cord with the 110 volt AC power point, since it will defeat the safety protection design. Doing so may cause the power point to overload due to powering multiple devices that can reach beyond the 150 watt load limit and could result in fire or serious injury.
Note: The power point will turn off when the ignition is switched off or the battery voltage drops below 11 volts. Use the power point for powering electric devices that require up to 150 watts. It is on the rear of the center console.
Note: Depending on your vehicle, the power point may open to the right or upward.
12 Volt DC Power Point WARNINGS
Do not plug optional electrical accessories into the cigar lighter socket. Incorrect use of the cigar
lighter can cause damage not covered by the vehicle warranty, and can result in fire or serious injury.
Do not use a power point for operating a cigar lighter. Incorrect use of the power points can cause
damage not covered by the vehicle warranty, and can result in fire or serious injury.
Note: When you switch the ignition on, you can use the socket to power 12 volt appliances with a maximum current rating of 15 amps. If the power supply does not work after you switch the ignition off, switch the ignition on. Note: Do not hang any accessory from the accessory plug. Note: Do not use the power point over the vehicle capacity of 12 volt DC 180 watts or a fuse may blow. Note: Always keep the power point caps closed when not in use. Do not insert objects other than an accessory plug into the power point. This will damage the power point and blow the fuse. Run the vehicle for full capacity use of the power point. To prevent the battery from running out of charge: • Do not use the power point longer than
necessary when the vehicle is not running.
• Do not leave devices plugged in
overnight or when you park your vehicle for extended periods.
143
Fusion/Mondeo (CC7) Canada/United States of America, enUSA, First Printing
E193395 Auxiliary Power Points
When the indicator light on the power point is: • On: The power point is working, the ignition is on and a device is plugged in.
• Off: The power point is off, the ignition
is off or no device is plugged in. Flashing: The power point is in fault mode.
•
The power outlet temporarily turns off power when in fault mode if the device exceeds the 150 watt limit. Unplug your device and switch the ignition off. Switch the ignition back on, but do not plug your device back in. Let the system cool off and switch the ignition off to reset the fault mode. Switch the ignition back on and make sure the indicator light remains on. Do not use the power point for certain electric devices, including: • Cathode-ray, tube-type televisions. • Motor loads, such as vacuum cleaners, electric saws and other electric power tools or compressor-driven refrigerators.
• Measuring devices, which process
precise data, such as medical equipment or measuring equipment.
• Other appliances requiring an
extremely stable power supply such as microcomputer-controlled electric blankets or touch-sensor lamps.
144
Fusion/Mondeo (CC7) Canada/United States of America, enUSA, First Printing
Storage Compartments
CENTER CONSOLE Stow items in the cupholder carefully as items may become loose during hard braking, acceleration or collisions, including