- 2008 Ford F 250 Owners Manuals
- Ford F 250 Owners Manuals
- 2012 Ford F 250 Owners Manuals
- Ford F 250 Owners Manuals
- 2000 Ford F 250 Owners Manuals
- Ford F 250 Owners Manuals
- 2001 Ford F 250 Owners Manuals
- Ford F 250 Owners Manuals
- 2006 Ford F 250 Owners Manuals
- Ford F 250 Owners Manuals
- 2015 Ford F 250 Owners Manuals
- Ford F 250 Owners Manuals
- 2010 Ford F 250 Owners Manuals
- Ford F 250 Owners Manuals
- 2004 Ford F 250 Owners Manuals
- Ford F 250 Owners Manuals
- 1999 Ford F 250 Owners Manuals
- Ford F 250 Owners Manuals
- 2007 Ford F 250 Owners Manuals
- Ford F 250 Owners Manuals
- 2009 Ford F 250 Owners Manuals
- Ford F 250 Owners Manuals
- 2013 Ford F 250 Owners Manuals
- Ford F 250 Owners Manuals
- 2016 Ford F 250 Owners Manuals
- Ford F 250 Owners Manuals
- 1998 Ford F 250 Owners Manuals
- Ford F 250 Owners Manuals
- 2005 Ford F 250 Owners Manuals
- Ford F 250 Owners Manuals
- 2011 Ford F 250 Owners Manuals
- Ford F 250 Owners Manuals
- 2014 Ford F 250 Owners Manuals
- Ford F 250 Owners Manuals
- 2002 Ford F 250 Owners Manuals
- Ford F 250 Owners Manuals
- 2003 Ford F 250 Owners Manuals
- Ford F 250 Owners Manuals
- 1996 Ford F 250 Owners Manuals
- Ford F 250 Owners Manuals
- Download PDF Manual
-
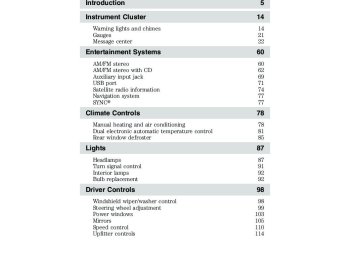
Table of Contents
14
14
21
22
6060
62
69
71
74
77
77
7878
81
85
8787
91
92
92
9898
99
103
105
110
114Introduction
Instrument Cluster
Warning lights and chimes Gauges Message center
Entertainment Systems
AM/FM stereo AM/FM stereo with CD Auxiliary input jack USB port Satellite radio information Navigation system SYNC威
Climate Controls
Manual heating and air conditioning Dual electronic automatic temperature control Rear window defroster
Lights
Headlamps Turn signal control Interior lamps Bulb replacement Driver Controls
Windshield wiper/washer control Steering wheel adjustment Power windows Mirrors Speed control Upfitter controls
2012 F-250/350/450/550 (f23) Owners Guide, 4th Printing USA (fus)
Table of Contents
Locks and Security
Keys Locks Anti-theft system
Seating and Safety Restraints
Seating Rear seats Safety restraints Airbags Child restraints
Tires, Wheels and Loading
Tire information Tire inflation Tire Pressure Monitoring System (TPMS) Vehicle loading Trailer towing Trailer brake controller-integrated Recreational towing
Driving
Starting Brakes Traction Control™ AdvanceTrac威 Hill descent control Transmission operation Reverse sensing system Rear-view camera system
129
129
137
149
153153
166
168
180
195
216219
221
237
244
252
256
263
265265
271
274
275
281
287
296
2982012 F-250/350/450/550 (f23) Owners Guide, 4th Printing USA (fus)
Table of Contents
Roadside Emergencies
Getting roadside assistance Hazard flasher control Fuel pump shut-off Fuses and relays Changing tires Wheel lug nut torque Jump starting Wrecker towing
Customer Assistance
Reporting safety defects (U.S. only) Reporting safety defects (Canada only)
Cleaning
Maintenance and Specifications
Engine compartment Engine oil Battery Engine coolant Engine coolant check Fuel information Air filter(s) Part numbers Maintenance product specifications and capacities Engine data Accessories
Ford Extended Service Plan
319
319
320
321
321
331
347
348
351
353359
360
361370
371
375
377
379
379
386
405
410
411
415
419421
2012 F-250/350/450/550 (f23) Owners Guide, 4th Printing USA (fus)
Table of Contents
Scheduled Maintenance
Normal scheduled maintenance and log
Index
424
428
442The information contained in this publication was correct at the time of going to print. In the interest of continuous development, we reserve the right to change specifications, design or equipment at any time without notice or obligation. No part of this publication may be reproduced, transmitted, stored in a retrieval system or translated into any language in any form by any means without our written permission. Errors and omissions excepted.
© Ford Motor Company 2012
2012 F-250/350/450/550 (f23) Owners Guide, 4th Printing USA (fus)
Introduction
CONGRATULATIONS Congratulations on acquiring your new Ford. Please take the time to get well acquainted with your vehicle by reading this handbook. The more you know and understand about your vehicle, the greater the safety and pleasure you will derive from driving it. For more information on Ford Motor Company and its products visit the following website: • In the United States: www.ford.com • In Canada: www.ford.ca • In Australia: www.ford.com.au • In Mexico: www.ford.com.mx Additional owner information is given in separate publications. This Owner’s Guide describes every option and model variant available and therefore some of the items covered may not apply to your particular vehicle. Furthermore, due to printing cycles it may describe options before they are generally available. Remember to pass on this Owner’s Guide when reselling the vehicle. It is an integral part of the vehicle.
WARNING: Fuel pump shut-off: In the event of an accident this feature will automatically cut off the fuel supply to the
engine. It can also be activated through sudden vibration (e.g. collision when parking). To restart your vehicle, refer to Fuel pump shut-off in the Roadside Emergencies chapter.
SAFETY AND ENVIRONMENT PROTECTION
Warning symbols in this guide
How can you reduce the risk of personal injury to yourself or others? In this guide, answers to such questions are contained in comments highlighted by the warning triangle symbol. These comments should be read and observed.
2012 F-250/350/450/550 (f23) Owners Guide, 4th Printing USA (fus)
Introduction
Warning symbols on your vehicle
When you see this symbol, it is imperative that you consult the relevant section of this guide before touching or attempting adjustment of any kind.
Protecting the environment We must all play our part in protecting the environment. Correct vehicle usage and the authorized disposal of waste, cleaning and lubrication materials are significant steps toward this aim. Information in this respect is highlighted in this guide with the tree symbol.
CALIFORNIA PROPOSITION 65 WARNING
WARNING: Engine exhaust, some of its constituents, and certain vehicle components contain or emit chemicals known to
the State of California to cause cancer and birth defects or other reproductive harm. In addition, certain fluids contained in vehicles and certain products of component wear contain or emit chemicals known to the State of California to cause cancer and birth defects or other reproductive harm.
PERCHLORATE MATERIAL Certain components of this vehicle such as airbag modules, safety belt pretensioners, and button cell batteries may contain Perchlorate Material – Special handling may apply for service or vehicle end of life disposal. See www.dtsc.ca.gov/hazardouswaste/perchlorate.
BREAKING-IN YOUR VEHICLE Your vehicle does not need an extensive break-in. Try not to drive continuously at the same speed for the first 1,000 miles (1,600 km) of new vehicle operation. Vary your speed frequently in order to give the moving parts a chance to break in. Drive your new vehicle at least 1,000 miles (1,600 km) before towing a trailer. For more detailed information about towing a trailer, refer to Trailer towing in the Tires, Wheels and Loading chapter.
2012 F-250/350/450/550 (f23) Owners Guide, 4th Printing USA (fus)
Introduction
Do not add friction modifier compounds or special break-in oils since these additives may prevent piston ring seating. See Engine oil in the Maintenance and Specifications chapter for more information on oil usage.
SPECIAL NOTICES
New Vehicle Limited Warranty For a detailed description of what is covered and what is not covered by your vehicle’s New Vehicle Limited Warranty, refer to the Warranty Guide that is provided to you along with your Owner’s Guide.
Special instructions For your added safety, your vehicle is fitted with sophisticated electronic controls.
WARNING: Please read the section Airbag Supplemental Restraint System (SRS) in the Seating and Safety Restraints chapter. Failure to follow the specific warnings and instructions could result in personal injury.
WARNING: Front seat mounted rear-facing child or infant seats should NEVER be placed in front of an active passenger airbag.
Notice to owners of diesel-powered vehicles Read the diesel supplement for information regarding correct operation and maintenance of your Diesel-powered light truck.
Notice to owners of pickup trucks and utility type vehicles
WARNING: Utility vehicles have a significantly higher rollover rate than other types of vehicles.
Before you drive your vehicle, please read this Owner’s Guide carefully. Your vehicle is not a passenger car. As with other vehicles of this type, failure to operate this vehicle correctly may result in loss of vehicle control, vehicle rollover, personal injury or death.
Using your vehicle with a snowplow For more information and guidelines for using your vehicle with a snowplow, refer to the Driving chapter.
2012 F-250/350/450/550 (f23) Owners Guide, 4th Printing USA (fus)
Introduction
Using your vehicle as an ambulance If your light truck is equipped with the Ford Ambulance Preparation Package, it may be utilized as an ambulance. Ford urges ambulance manufacturers to follow the recommendations of the Ford Incomplete Vehicle Manual, Ford Truck Body Builder’s Layout Book and the Qualified Vehicle Modifiers (QVM) Guidelines as well as pertinent supplements. For additional information, please contact the Truck Body Builders Advisory Service at http://www.fleet.ford.com/truckbbas/ and then by selecting “Contact Us” or by phone at 1–877–840–4338. Use of your Ford light truck as an ambulance, without the Ford Ambulance Preparation Package voids the Ford New Vehicle Limited Warranty and may void the Emissions Warranties. In addition, ambulance usage without the preparation package could cause high underbody temperatures, overpressurized fuel and a risk of spraying fuel which could lead to fires. If your vehicle is equipped with the Ford Ambulance Preparation Package, it will be indicated on the Safety Compliance Certification Label. The label is located on the driver’s side door pillar or on the rear edge of the driver’s door. You can determine whether the ambulance manufacturer followed Ford’s recommendations by directly contacting that manufacturer. Ford Ambulance Preparation Package is only available on certain Diesel engine equipped vehicles.
Using your vehicle as a stationary power source (PTO) Refer to the Driving chapter for more information and guidelines for operating a vehicle equipped with an aftermarket power take-off system.
DATA RECORDING
Service Data Recording Service data recorders in your vehicle are capable of collecting and storing diagnostic information about your vehicle. This potentially includes information about the performance or status of various systems and modules in the vehicle, such as engine, throttle, steering or brake systems. In order to properly diagnose and service your vehicle, Ford Motor Company, Ford of Canada, and service and repair facilities may access or share among them vehicle diagnostic information received through a direct connection to your vehicle when diagnosing or servicing your vehicle. For U.S. only (if equipped), if you choose to use the SYNC威 Vehicle Health Report, you consent that certain diagnostic information may also be accessed electronically by Ford Motor Company and Ford authorized service facilities, and that the diagnostic information may be used for any purpose. See your SYNC威 supplement for more information.
2012 F-250/350/450/550 (f23) Owners Guide, 4th Printing USA (fus)
Introduction
buckled/fastened;
and/or the brake pedal; and
Event Data Recording This vehicle is equipped with an event data recorder (EDR). The main purpose of an EDR is to record, in certain crash or near crash-like situations, such as an airbag deployment or hitting a road obstacle; this data will assist in understanding how a vehicle’s systems performed. The EDR is designed to record data related to vehicle dynamics and safety systems for a short period of time, typically 30 seconds or less. The EDR in this vehicle is designed to record such data as: • How various systems in your vehicle were operating; • Whether or not the driver and passenger safety belts were • How far (if at all) the driver was depressing the accelerator • How fast the vehicle was travelling; and • Where the driver was positioning the steering wheel. This data can help provide a better understanding of the circumstances in which crashes and injuries occur. Note: EDR data is recorded by your vehicle only if a non-trivial crash situation occurs; no data is recorded by the EDR under normal driving conditions and no personal data or information (e.g., name, gender, age, and crash location) is recorded (see limitations regarding 911 Assist and Traffic, directions and Information privacy below). However, parties, such as law enforcement, could combine the EDR data with the type of personally identifying data routinely acquired during a crash investigation. To read data recorded by an EDR, special equipment is required, and access to the vehicle or the EDR is needed. In addition to the vehicle manufacturer, other parties, such as law enforcement, that have such special equipment, can read the information if they have access to the vehicle or the EDR. Ford Motor Company and Ford of Canada do not access event data recorder information without obtaining consent, unless pursuant to court order or where required by law enforcement, other government authorities or other third parties acting with lawful authority. Other parties may seek to access the information independently of Ford Motor Company and Ford of Canada.
2012 F-250/350/450/550 (f23) Owners Guide, 4th Printing USA (fus)
Introduction
Note: Including to the extent that any law pertaining to Event Data Recorders applies to SYNC威 or its features, please note the following: Once 911 Assist (if equipped) is enabled (set ON), 911
Assist may, through any paired and connected cell phone, disclose to emergency services that the vehicle has been in a crash involving the deployment of an airbag or, in certain vehicles, the activation of the fuel pump shut-off. Certain versions or updates to 911 Assist may also be capable of being used to electronically or verbally provide to 911 operators the vehicle location (such as latitude and longitude), and/or other details about the vehicle or crash or personal information about the occupants to assist 911
operators to provide the most appropriate emergency services. If you do not want to disclose this information, do not activate the 911 Assist feature. See your SYNC威 supplement for more information. Additionally, when you connect to Traffic, Directions and Information (if equipped, U.S. only), the service uses GPS technology and advanced vehicle sensors to collect the vehicle’s current location, travel direction, and speed (“vehicle travel information”), only to help provide you with the directions, traffic reports, or business searches that you request. If you do not want Ford or its vendors to receive this information, do not activate the service. Ford Motor Company and the vendors it uses to provide you with this information do not store your vehicle travel information. For more information, see Traffic, Directions and Information, Terms and Conditions. See your SYNC威 supplement for more information.Vehicle Modification Data Recording Some aftermarket products may cause severe engine and/or transmission damage; refer to the What is not covered section in The new vehicle limited warranty for your vehicle chapter of your vehicle’s Warranty Guide for more information. Some vehicles are equipped with Powertrain Control Systems that can detect and store information about vehicle modifications that, for example, increase horsepower and torque output; this information cannot be erased and will stay in the system’s memory even if the modification is removed. When a dealer or repair facility works on your vehicle, it may be necessary for them to access the information in the Powertrain Control System. This information will likely identify if any unauthorized modifications have been made to the system, which may be used to determine if the warranty has been violated and if repairs will be covered by warranty. 10
2012 F-250/350/450/550 (f23) Owners Guide, 4th Printing USA (fus)
Introduction
CELL PHONE USE The use of mobile communications equipment has become increasingly important in the conduct of business and personal affairs. However, drivers must not compromise their own or others’ safety when using such equipment. Mobile communications can enhance personal safety and security when appropriately used, particularly in emergency situations. Safety must be paramount when using mobile communications equipment to avoid negating these benefits. Mobile communication equipment includes, but is not limited to, cellular phones, pagers, portable email devices, text messaging devices and portable two-way radios.
WARNING: Driving while distracted can result in loss of vehicle control, accident and injury. Ford strongly recommends that you
use extreme caution when using any device or feature that may take your focus off the road. Your primary responsibility is the safe operation of your vehicle. We recommend against the use of any handheld device while driving and that you comply with all applicable laws.
EXPORT UNIQUE (NON–UNITED STATES/CANADA) VEHICLE SPECIFIC INFORMATION For your particular global region, your vehicle may be equipped with features and options that are different from the features and options that are described in this Owner’s Guide. A market unique supplement may be supplied that complements this book. By referring to the market unique supplement, if provided, you can properly identify those features, recommendations and specifications that are unique to your vehicle. This Owner’s Guide is written primarily for the U.S. and Canadian Markets. Features or equipment listed as standard may be different on units built for Export. Refer to this Owner’s Guide for all other required information and warnings.
11
2012 F-250/350/450/550 (f23) Owners Guide, 4th Printing USA (fus)
Introduction
These are some of the symbols you may see on your vehicle.
Vehicle Symbol Glossary
Safety Alert
See Owner’s Guide
Fasten Safety Belt
Airbag - Front
Airbag - Side
Child Seat Tether Anchor
Child Seat Lower Anchor
Brake System
Anti-Lock Brake System
Parking Brake System
Brake Fluid - Non-Petroleum Based
Parking Aid System
Stability Control System
Speed Control
Master Lighting Switch
Hazard Warning Flasher
Fog Lamps-Front
Fuse Compartment
Fuel Pump Reset
Windshield Wash/Wipe
Windshield Defrost/Demist
Rear Window Defrost/Demist
12
2012 F-250/350/450/550 (f23) Owners Guide, 4th Printing USA (fus)
Introduction
Vehicle Symbol Glossary
Power Windows Front/Rear
Child Safety Door Lock/Unlock
Power Window Lockout
Interior Luggage Compartment Release
Panic Alarm
Engine Oil
Engine Coolant
Engine Coolant Temperature
Do Not Open When Hot
Battery
Avoid Smoking, Flames, or Sparks
Battery Acid
Explosive Gas
Fan Warning
Power Steering Fluid
Maintain Correct Fluid Level
MAX MIN
Service Engine Soon
Engine Air Filter
Passenger Compartment Air Filter
Jack
Check Fuel Cap
Low Tire Pressure Warning
13
2012 F-250/350/450/550 (f23) Owners Guide, 4th Printing USA (fus)
Instrument Cluster
WARNING LIGHTS AND CHIMES Base instrument cluster with standard measure shown; metric similar
3 4
P M x 100040 50 60
MPH km/h 0 80 10030
40
70
80
90
100
20
10Optional instrument cluster with standard measure shown; metric similar
3 4
P M x 100040 50 60
0 80 100MPH km/h
70
80
90
10030
40
20
10Warning lights and gauges can alert you to a vehicle condition that may become serious enough to cause expensive repairs. A warning light may illuminate when a problem exists with one of your vehicle’s functions. Many lights will illuminate when you start your vehicle to make sure the 14
2012 F-250/350/450/550 (f23) Owners Guide, 4th Printing USA (fus)
Instrument Cluster
bulb works. If any light remains on after starting the vehicle, refer to the respective system warning light for additional information. Standard message center Note: Some warning lights are reconfigurable telltale (RTT) indicator lights and will illuminate in the message center. These lights function the same as the other warning lights.
Optional message center Note: Some warning lights are reconfigurable telltale (RTT) indicator lights and will illuminate in the message center. These lights function the same as the other warning lights. The first three positions will only display one warning telltale at a time; the last three positions can cycle between different warning telltales.
Service engine soon: The service engine soon indicator illuminates when the ignition is first turned to the on position to check the bulb and to indicate whether the vehicle is ready for Inspection/Maintenance (I/M) testing. Normally, the service engine soon indicator will stay on until the engine is cranked, then turn itself off if no malfunctions are present. However, if after 15 seconds the service engine soon indicator blinks eight times, it means that the vehicle is not ready for I/M testing. See the Readiness for Inspection/Maintenance (I/M) testing in the Maintenance and Specifications chapter. Solid illumination after the engine is started indicates the on-board diagnostics system (OBD-II) has detected a malfunction. Refer to On-board diagnostics (OBD-II) in the Maintenance and Specifications chapter. If the light is blinking, engine misfire is occurring which could damage your catalytic converter. Drive in a moderate fashion (avoid heavy acceleration and deceleration) and have your vehicle serviced immediately by your authorized dealer.
15
2012 F-250/350/450/550 (f23) Owners Guide, 4th Printing USA (fus)
Instrument Cluster
WARNING: Under engine misfire conditions, excessive exhaust temperatures could damage the catalytic converter, the fuel
system, interior floor coverings or other vehicle components, possibly causing a fire.
Check fuel cap: Displays when the fuel cap may not be properly installed. Continued driving with this light on may cause the Service engine soon warning indicator to come on. Refer to Fuel filler cap in the Maintenance and Specifications chapter. Low fuel (RTT): Displays when the fuel level in the fuel tank is at or near empty (refer to Fuel gauge in this chapter).
Powertrain malfunction/Reduced power/Electronic throttle control (RTT): Displays when the engine has defaulted to a “limp-home” operation or when a transmission problem has been detected and shifting may be restricted. If the light remains on, have the system serviced immediately by your authorized dealer. Brake system warning light: To confirm the brake system warning light is functional, it will momentarily illuminate when the ignition is turned to the on position when the engine is not running, or in a position between on and start, or by applying the parking brake when the ignition is turned to the on position. If the brake system warning light does not illuminate at this time, seek service immediately from your authorized dealer. Illumination after releasing the parking brake indicates low brake fluid level or a brake system malfunction. The brake system should be inspected immediately by your authorized dealer.
BRAKE
16
2012 F-250/350/450/550 (f23) Owners Guide, 4th Printing USA (fus)
Instrument Cluster
WARNING: Driving a vehicle with the brake system warning light on is dangerous. A significant decrease in braking
performance may occur. It will take you longer to stop the vehicle. Have the vehicle checked by your authorized dealer. Driving extended distances with the parking brake engaged can cause brake failure and the risk of personal injury.
ABS
Anti-lock brake system: If the ABS light stays illuminated or continues to flash, a malfunction has been detected, have the system serviced immediately by your authorized dealer. Normal braking is still functional unless the brake warning light also is illuminated. Airbag readiness: If this light fails to illuminate when the ignition is turned to on, continues to flash or remains on, have the system serviced immediately by your authorized dealer. A chime will sound if there is a malfunction in the indicator light. Safety belt: Reminds you to fasten your safety belt. A Belt-Minder威 chime will also sound to remind you to fasten your safety belt. Refer to the Seating and Safety Restraints chapter to activate/deactivate the Belt-Minder威 chime feature. Charging system: Illuminates when the battery is not charging properly. If it stays on while the engine is running, there may be a malfunction with the charging system. Contact your authorized dealer as soon as possible. This indicates a problem with the electrical system or a related component. Engine oil pressure (RTT and static warning light): Displays when the oil pressure falls below the normal range. Refer to Engine oil in the Maintenance and Specifications chapter.
17
2012 F-250/350/450/550 (f23) Owners Guide, 4th Printing USA (fus)
Instrument Cluster
Door ajar (RTT): Displays when the ignition is in the on position and any door is not completely closed.
Engine coolant temperature (RTT): Illuminates when the engine coolant temperature is high. Stop the vehicle as soon as possible, switch off the engine and let cool. Refer to Engine coolant in the Maintenance and Specifications chapter.
WARNING: Never remove the coolant reservoir cap while the engine is running or hot.
Low tire pressure warning (if equipped): Illuminates when your tire pressure is low. If the light remains on at start up or while driving, the tire pressure should be checked. Refer to Inflating your tires in the Tires, Wheels and Loading chapter. When the ignition is first turned to on, the light will illuminate for three seconds to ensure the bulb is working. If the light does not turn on, have the system inspected by your authorized dealer. For more information on this system, refer to Tire pressure monitoring system (TPMS) in the Tires, Wheels and Loading chapter. Hill descent (if equipped): Displays when using the hill descent mode. Refer to the Driving chapter for transmission function and operation.
Transmission Tow/Haul Feature (if equipped): Displays when the Tow/Haul feature has been activated. Refer to the Driving chapter for transmission function and operation. If the light flashes steadily, have the system serviced immediately, damage to the transmission could occur.
18
2012 F-250/350/450/550 (f23) Owners Guide, 4th Printing USA (fus)
Instrument Cluster
OFF
AdvanceTrac威/Traction control (if equipped): Displays when the AdvanceTrac威/Traction control is active. If the light remains on, have the system serviced immediately, refer to the Driving chapter for more information. AdvanceTrac威/Traction control off light (if equipped): Illuminates when AdvanceTrac威/Traction control has been disabled by the driver. Refer to the Driving chapter for more information. 4X2 (RTT) (if equipped): Displays momentarily when two-wheel drive high is selected. If the light fails to display when the ignition is turned on, or remains on, have the system serviced immediately by your authorized dealer. Four wheel drive low (RTT and static) (if equipped): Displays when four-wheel drive low is engaged. If the light fails to display when the ignition is turned on, or remains on, have the system serviced immediately by your authorized dealer. Four wheel drive high (RTT and static) (if equipped): Displays when four-wheel drive high is engaged. If the light fails to display when the ignition is turned on, or remains on, have the system serviced immediately by your authorized dealer. Electronic locking differential (RTT and static) (if equipped): Displays when using the electronic locking differential.
4x4
HIGH4x4
LOW4x2
19
2012 F-250/350/450/550 (f23) Owners Guide, 4th Printing USA (fus)
Instrument Cluster
Speed control (if equipped): The speed control system indicator light changes color to indicate what mode the system is in: • On (amber light): Illuminates
when the speed control system is turned on. Turns off when the speed control system is engaged or turned off. • Engaged (green light): Illuminates when the speed control system is
engaged. Turns off when the speed control system is disengaged.
Turn signal: Illuminates when the left or right turn signal or the hazard lights are turned on. If the indicators stay on or flash faster, check for a burned out bulb. High beams: Illuminates when the high-beam headlamps are turned on.
Diesel warning lights: If your vehicle is equipped with a diesel engine, it has some unique warning lights; refer to Instrument Cluster in your diesel supplement for detailed information on their function. • Glow plug pre-heat
• Water in fuel
• Diesel exhaust fluid
Key-in-ignition warning chime: Sounds when the key is left in the ignition in the off or accessory position and the driver’s door is opened. Headlamps on warning chime: Sounds when the headlamps or parking lamps are on, the ignition is off (the key is not in the ignition) and the driver’s door is opened.
20
2012 F-250/350/450/550 (f23) Owners Guide, 4th Printing USA (fus)
GAUGES Base cluster with automatic transmission shown. Metric similar.
Instrument Cluster
1. Engine oil pressure gauge: Indicates engine oil pressure. The needle should stay in the normal operating range (between L and H). If the needle falls below the normal range, stop the vehicle, turn off the engine and check the engine oil level. Add oil if needed. If the oil level is correct, have your vehicle checked at your authorized dealer. 2. Engine coolant temperature gauge: Indicates engine coolant temperature. At normal operating temperature, the needle will be in the normal range (between H and C). If it enters the red section, the engine is overheating. Stop the vehicle as soon as safely possible, switch off the engine and let the engine cool.
WARNING: Never remove the coolant reservoir cap while the engine is running or hot.
3. Transmission fluid temperature gauge: If the gauge is in the: Normal area The transmission fluid is within the normal operating temperature (between H and C).
21
2012 F-250/350/450/550 (f23) Owners Guide, 4th Printing USA (fus)
Instrument Cluster
Yellow area The transmission fluid is higher than normal operating temperature. This can be caused by special operation conditions (i.e. snowplowing, towing or off road use). Refer to Special operating conditions in the scheduled maintenance information for instructions. Operating the transmission for extended periods of time with the gauge in the yellow area may cause internal transmission damage. Altering the severity of the driving conditions is recommended to lower the transmission temperature into the normal range. Red area The transmission fluid is overheating. Stop the vehicle to allow the temperature to return to normal range. If the gauge is operating in the yellow or red area, stop the vehicle and verify the airflow is not restricted such as snow or debris blocking airflow through the grill. If the gauge continues to show high temperatures, see your authorized dealer. 4. Fuel gauge: Indicates approximately how much fuel is left in the fuel tank (when the ignition is in the on position). The fuel gauge may vary slightly when the vehicle is in motion or on a grade. The fuel icon and arrow indicates which side of the vehicle the fuel filler door is located. Refer to Filling the tank in the Maintenance and Specifications chapter for more information. 5. Speedometer: Indicates the current vehicle speed. 6. Tachometer: Indicates the engine speed in revolutions per minute. Driving with your tachometer pointer continuously at the top of the scale may damage the engine. Odometer and trip odometer: The odometer is displayed on the lower line in the message center and registers the total accumulated distance the vehicle has traveled. For trip odometer, refer to Standard message center or Optional message center in this chapter.
STANDARD MESSAGE CENTER Your vehicle’s message center is capable of monitoring many vehicle systems and will alert you to potential vehicle problems and various conditions with an informational message followed by a long indicator chime. The message center display is located in the instrument cluster and the controls are located on the steering wheel. 22
2012 F-250/350/450/550 (f23) Owners Guide, 4th Printing USA (fus)
Instrument Cluster
Selectable features Info (information menu) Press the INFO button repeatedly to cycle through the following features:
TRIP A/B Registers the distance of individual journeys. Press and release the INFO button until the TRIP A/B appear in the display (this represents the trip mode). Press and hold the RESET button for two seconds to reset. Refer to UNITS later in this section to switch the display from metric to English. XXX° (outside air temperature) (if equipped) This displays the outside temperature. Refer to UNITS later in this section to switch the display from Metric to English. MYKEY MILES (km) (if programmed) For more information, refer to MyKey威 in the Locks and Security chapter. XXX MILES (km) TO E This displays an estimate of approximately how far you can drive with the fuel remaining in your tank under normal driving conditions. Remember to turn the ignition off when refueling to allow this feature to correctly detect the added fuel. The low fuel indicator will illuminate when the fuel level is at approximately 1/16 of the tank. DTE is calculated using a running average fuel economy, which is based on your recent driving history of 500 miles (800 km). This value is not the same as the average fuel economy display. The running average fuel economy is re-initialized to a factory default value if the battery is disconnected. XX.X AVG MPG (L/100km) Average fuel economy displays your average fuel economy in miles/gallon or liters/100 km.
23
2012 F-250/350/450/550 (f23) Owners Guide, 4th Printing USA (fus)
Instrument Cluster
service stations
If you calculate your average fuel economy by dividing distance traveled by gallons of fuel used (liters of fuel used by 100 kilometers traveled), your figure may be different than displayed for the following reasons: • Your vehicle was not perfectly level during fill-up • Differences in the automatic shut-off points on the fuel pumps at • Variations in top-off procedure from one fill-up to another • Rounding of the displayed values to the nearest 0.1 gallon (liter) 1. Drive the vehicle at least 5 miles (8 km) with the speed control system engaged to display a stabilized average. 2. Record the highway fuel economy for future reference. It is important to press the RESET button (press and hold RESET for two seconds in order to reset the function) after setting the speed control to get accurate highway fuel economy readings.
MPG (L/km) This displays instantaneous fuel economy as a bar graph ranging from ↓ poor economy to ↑ excellent economy. Your vehicle must be moving to calculate instantaneous fuel economy. When your vehicle is not moving, this function shows ↓, one or no bars illuminated. Instantaneous fuel economy cannot be reset. TIMER Timer displays the trip elapsed drive time. To operate, do the following: 1. Press and release RESET in order to start the timer. 2. Press and release RESET to pause the timer. 3. Press and hold RESET until the timer resets. TBC GAIN (if equipped) Displays the level of trailer brake gain or if the trailer is not connected. EXHAUST FILTER (diesel only) Refer to Diesel exhaust system: oxidation catalyst/diesel particulate filter system in your diesel supplement for more information. 24
2012 F-250/350/450/550 (f23) Owners Guide, 4th Printing USA (fus)
Instrument Cluster
System check and vehicle feature customization Press the SETUP button repeatedly to cycle the message center through the following features: Note: Some items are optional and will not appear. Note: When returning to the SETUP menu and a non-English language has been selected, HOLD RESET FOR ENGLISH will be displayed to change back to English. Press and hold the RESET button to change back to English. RESET FOR SYSTEM CHECK When this message appears, press the RESET button and the message center will begin to cycle through the following systems and provide a status of the item if needed. 1. OIL LIFE 2. EXHAUST FLUID LEVEL (Diesel only) 3. ENGINE HOURS 4. ENGINE IDLE HOURS 5. CHARGING SYSTEM 6. DOOR 7. BRAKE SYSTEM 8. TBC GAIN = XX.X (if equipped) 9. FUEL LEVEL 10. MYKEY DISTANCE (if MyKey威 is programmed) 11. MYKEY(S) PROGRAMMED 12. ADMIN KEYS PROGRAMMED Note: Some systems show a message only if a condition is present. OIL LIFE This displays the remaining oil life. An oil change is required whenever indicated by the message center and according to the recommended maintenance schedule. To reset the oil monitoring system to 100% after each oil change, perform the following: 1. Press and release the SETUP button to display “OIL LIFE XXX% HOLD RESET = NEW”.
25
2012 F-250/350/450/550 (f23) Owners Guide, 4th Printing USA (fus)
Instrument Cluster
2. Press and hold the RESET button for two seconds and release to reset the oil life to 100%. Note: To change oil life 100% value (if equipped with this feature) to another value, proceed to Step 3. 3. Once “OIL LIFE SET TO XXX%” is displayed, release and press the RESET button to change the oil life start value. Each release and press will reduce the value by 10%. UNITS Displays the current units English or Metric. Press the RESET button to change from English to Metric. AUTOLAMP (SEC) This feature keeps your headlights on for up to three minutes after the ignition is switched off. Press the RESET control to select the new autolamp delay values of 0, 10, 20, 30, 60, 90, 120 or 180 seconds. AUTOLOCK This feature automatically locks all vehicle doors when the vehicle is shifted into any gear, putting the vehicle in motion. Press the RESET control to turn autolock on or off. AUTOUNLOCK This feature automatically unlocks all vehicle doors when the driver’s door is opened within 10 minutes of the ignition being turned off. Press RESET to turn it off or on. COURTESY WIPE One extra wipe will occur a few seconds after washing the front window to clear any excess washer fluid remaining on the windshield. Press RESET to turn this feature on or off. CREATE MYKEY / MYKEY SETUP/ CLEAR MYKEY For more information refer to MyKey威 in the Locks and Security chapter. RESET FOR ZONE SETTING This feature changes the compass zone setting. Most geographic areas (zones) have a magnetic north compass point that varies slightly from the northerly direction on maps. This variation is four degrees between adjacent zones and will become noticeable as the vehicle crosses multiple zones. A correct zone setting will eliminate this error. 26
2012 F-250/350/450/550 (f23) Owners Guide, 4th Printing USA (fus)
Instrument Cluster
Refer to Compass zone/calibration adjustment. ZONE
RESET = CHANGE The compass heading is displayed as one of N, NE, E, SE, S, SW, W and NW in the message center display. Refer to Compass zone/calibration adjustment. RESET FOR CALIBRATION This feature calibrates the compass. The compass reading may be affected when you drive near large buildings, bridges, power lines and powerful broadcast antenna. Magnetic or metallic objects placed in, on or near the vehicle may also affect compass accuracy. Usually, when something affects the compass readings, the compass will correct itself after a few days of operating your vehicle in normal conditions. If the compass still appears to be inaccurate, a manual calibration may be necessary. Refer to Compass zone/calibration adjustment. Compass zone/calibration adjustment 1. Determine your magnetic zone by referring to the zone map. 2. Turn ignition to the on position. 3. Start the engine. 23
15
14
13
127 8 9 1011
4. From the SETUP menu, press and release the RESET button until the message center display changes to show the current zone setting ZONE
RESET = CHANGE. 5. Press and release the RESET button repeatedly until the correct zone setting for your geographic location is displayed on the message center. The range of zone values are from 1 to 15 and “wraps” back to 1. 6. To exit the zone setting mode, and to “lock in” your change: • press and release the SETUP button or, • press INFO button to exit or, • wait four seconds and the zone will be “locked in”. 27
2012 F-250/350/450/550 (f23) Owners Guide, 4th Printing USA (fus)
Instrument Cluster
Perform compass calibration in an open area free from steel structures and high voltage lines. For optimum calibration, turn off all electrical accessories (heater/air conditioning, wipers, etc.) and make sure all vehicle doors are shut. 7. Press the RESET button until the display reads RESET FOR CALIBRATION to start the compass calibration function. 8. Slowly drive the vehicle in a circle (less than 3 mph [5 km/h]) until the CIRCLE SLOWLY TO CALIBRATE display changes to CALIBRATION COMPLETED. It will take up to five circles to complete calibration. 9. The compass is now calibrated. Note: If the RESET button is pressed or three minutes has expired, the display will go back to the INFO menu and will show CAL instead of the compass heading until the compass is calibrated. RESET FOR REMOTE START (if equipped) Press RESET to enable remote start on or off and choose the remote start duration time (5, 10, 15 minutes) and other options. REAR PARK AID (if equipped) This feature sounds a warning tone to warn the driver of obstacles near the rear bumper, and functions only when R (Reverse) gear is selected. Press RESET to turn this feature on or off. You can also choose to turn this feature on/off when the vehicle is placed in reverse. TBC MODE (if equipped) Allows you to choose the trailer brake mode. Press RESET to choose: • ELECTRIC • EOH (electric over hydraulic) TRAILER SWAY (if equipped) This feature uses the electronic stability control to mitigate trailer sway, Press RESET to turn it off or on. LANGUAGE = ENGLISH / SPANISH / FRENCH Allows you to choose which language the message center will display in. Selectable languages are English, Spanish, or French. Waiting four seconds or pressing the RESET button cycles the message center through each of the language choices. Press and hold the RESET button for two seconds to set the language choice. 28
2012 F-250/350/450/550 (f23) Owners Guide, 4th Printing USA (fus)
Instrument Cluster
System warnings System warnings alert you to possible problems or malfunctions in your vehicle’s operating systems. In the event of a multiple warning situation, the message center will cycle the display to show all warnings by displaying each one for four seconds. The message center will display the last selected feature if there are no more warning messages. Types of messages and warnings: • Some messages will appear briefly to inform you of something you • Some messages will appear once and then again when the vehicle is • Some messages will reappear after clearing or being reset if a problem • Some messages can be acknowledged and reset by pressing RESET.
or condition is still present and needs your attention.
may need to take action on or be informed of.
restarted.
This allows you to use the full message center functionality by clearing the message.
PARK BRAKE ENGAGED — Displayed when the parking brake is applied (or not fully released). CHECK BRAKE SYSTEM — Displayed when a fault has been detected by the ABS module. CHECK CHARGING SYSTEM— Displayed when the electrical system is not maintaining proper voltage. If you are operating electrical accessories when the engine is idling at a low speed, turn off as many of the electrical loads as soon as possible. If the warning stays on or comes on when the engine is operating at normal speeds, contact your authorized dealer as soon as possible. DRIVER DOOR AJAR — Displayed when the driver’s door is not completely closed. PASSENGER DOOR AJAR — Displayed when the passenger’s door is not completely closed. REAR LEFT DOOR AJAR — Displayed when the rear left door is not completely closed. REAR RIGHT DOOR AJAR — Displayed when the rear right door is not completely closed. CHECK FUEL CAP — Displayed when the fuel cap may not be properly closed. Refer to What you should know about automotive fuels in the Maintenance and Specifications chapter.
29
2012 F-250/350/450/550 (f23) Owners Guide, 4th Printing USA (fus)
Instrument Cluster
PARK BRAKE ENGAGED — Displayed when the parking brake is set, the engine is running and the vehicle is driven more than 3 mph (5 km/h). If the warning stays on after the parking brake is released, contact your authorized dealer as soon as possible. CHECK BRAKE SYSTEM — Displayed when a fault has been detected by the ABS module. BRAKE FLUID LEVEL LOW — Indicates the brake fluid level is low and the brake system should be inspected immediately. Refer to Brake fluid in the Maintenance and Specifications chapter. FUEL LEVEL LOW — Displayed as a reminder of a low fuel condition. CHECK PARK AID (if equipped) — Displayed when the transmission is in R (Reverse) and the reverse sensing system (park aid) is disabled. Refer to Rear park aid in this section to enable. TIRE PRESSURE SENSOR FAULT (if equipped) — Displayed when a tire pressure sensor is malfunctioning, or your spare tire is in use. For more information on how the system operates under these conditions, refer to Understanding Your Tire Pressure Monitoring System (TPMS) in the Tires, Wheels and Loading chapter. If the warning stays on or continues to come on, contact your authorized dealer as soon as possible. LOW TIRE PRESSURE (if equipped) — Displayed when one or more tires on your vehicle have low tire pressure. Refer to Inflating your tires in the Tires, Wheels and Loading chapter. TIRE PRESSURE MONITOR FAULT (if equipped) — Displayed when the tire pressure monitoring system (TPMS) is functioning. If the warning stays on or continues to come on, contact your authorized dealer as soon as possible. TRAIN LEFT FRONT TIRE (if equipped) — Displayed when training the TPMS. Refer to TPMS reset procedure in the Tires, Wheels and Loading chapter for more information. TRAIN RIGHT FRONT TIRE (if equipped) — Displayed when training the TPMS. Refer to TPMS reset procedure in the Tires, Wheels and Loading chapter for more information. TRAIN RIGHT REAR TIRE (if equipped) — Displayed when training the TPMS. Refer to TPMS reset procedure in the Tires, Wheels and Loading chapter for more information. TRAIN LEFT REAR TIRE (if equipped) — Displayed when training the TPMS. Refer to TPMS reset procedure in the Tires, Wheels and Loading chapter for more information. 30
2012 F-250/350/450/550 (f23) Owners Guide, 4th Printing USA (fus)
Instrument Cluster
TIRES NOT TRAINED – REPEAT (if equipped) — Displayed when an error occurs while training the TPMS. Refer to TPMS reset procedure in the Tires, Wheels and Loading chapter for more information. TRAINING COMPLETE (if equipped) — Displayed when training of the TPMS is complete. Refer to TPMS reset procedure in the Tires, Wheels and Loading chapter for more information. TRACTION CONTROL OFF (if equipped) — Displayed when the traction control has been disabled by the driver. Refer to the Driving chapter for more information. INTKEY COULD NOT PROGRAM — Displayed when an attempt is made to program a fifth integrated key to the remote keyless entry system. For more information on integrated key, refer to the Locks and Security chapter. KEY COULD NOT PROGRAM — Displayed when an attempt is made to program a spare key using two existing MyKeys. Refer to MyKey威 in the Locks and Security chapter for more information. VEHICLE SPEED 80 MPH MAX — Displayed when a MyKey威 is in use and the Admin has enabled the MyKey speed limit and the vehicle speed is 80 mph (130 km/h). Refer to MyKey威 in the Locks and Security chapter for more information. SPEED LIMITED TO 80 MPH — Displayed when starting the vehicle and MyKey威 is in use and the MyKey speed limit is on. Refer to MyKey威 in the Locks and Security chapter for more information. CHECK SPEED DRIVE SAFELY — Displayed when a MyKey威 is in use and the optional setting is on and the vehicle exceeds a preselected speed. Refer to MyKey威 in the Locks and Security chapter for more information. VEHICLE NEAR TOP SPEED — Displayed when a MyKey威 is in use and the MyKey speed limit is on and the vehicle speed is approaching 80 mph (130 km/h). Refer to MyKey威 in the Locks and Security chapter for more information. TOP SPEED MYKEY SETTING — Displayed when a MyKey威 is in use and the MyKey speed limit is on and the vehicle speed is 80 mph (130 km/h). Refer to MyKey威 in the Locks and Security chapter for more information. BUCKLE UP TO UNMUTE AUDIO — Displayed when a MyKey威 is in use and Belt-Minder威 is activated. Refer to MyKey威 in the Locks and Security chapter for more information.
31
2012 F-250/350/450/550 (f23) Owners Guide, 4th Printing USA (fus)
Instrument Cluster
ADVTRAC ON MYKEY SETTING (if equipped) — Displayed when a MyKey威 is in use when trying to disable the ESC system and the optional setting is on. Refer to MyKey威 in the Locks and Security chapter for more information. SERVICE ADVANCETRAC (if equipped) — Displayed when the AdvanceTrac威 system has detected a condition that requires service. Contact your authorized dealer as soon as possible. TO STOP ALARM START VEHICLE (if equipped) — Displayed when the perimeter alarm system is armed and the vehicle is entered using the key on the driver’s side door. In order to prevent the perimeter alarm system from triggering, the ignition must be turned to start or on before the 12 second chime expires. See Perimeter alarm system in the Locks and Security chapter. SECURITY SYSTEM FAULT — Displayed when the security system has detected a fault. See your authorized dealer for service. WIRING FAULT ON TRAILER (if equipped) — Displayed and accompanied by a single chime if there are certain faults in the vehicle wiring and trailer wiring/brake system. Refer to Trailer towing in the Tires, Wheels and Loading chapter for more information. TRAILER BRAKE MODULE FAULT (if equipped) — Displayed and accompanied by a single chime in response to faults sensed by the TBC. Refer to Trailer towing in the Tires, Wheels and Loading chapter for more information. TRAILER CONNECTED (if equipped) — Displayed when a correct trailer connection (a trailer with electric trailer brakes) is sensed during a given ignition cycle. Refer to Trailer towing in the Tires, Wheels and Loading chapter for more information. TRAILER BRAKE GAIN = XX.X (if equipped) — Displays the current gain setting for the trailer brake. Refer to Trailer towing in the Tires, Wheels and Loading chapter for more information. TBC GAIN = XX.X NO TRAILER (if equipped) — Displays the current gain setting for the trailer brake when a trailer is not connected. Refer to Trailer towing in the Tires, Wheels and Loading chapter for more information. TRAILER DISCONNECTED (if equipped) — Displayed and accompanied by a single chime when a trailer connection becomes disconnected, either intentionally or unintentionally, and has been sensed during a given ignition cycle. Refer to Trailer towing in the Tires, Wheels and Loading chapter for more information. 32
2012 F-250/350/450/550 (f23) Owners Guide, 4th Printing USA (fus)
Instrument Cluster
TRAILER SWAY REDUCE SPEED (if equipped) — Displayed when the trailer sway control has detected trailer sway. For more information, refer to the Driving chapter for more information. CHECK PARK AID (if equipped) — Displayed when the transmission is in R (Reverse) and the reverse sensing system (park aid) is disabled. TRANSPORT MODE CONTACT DEALER (if equipped) — Displayed when the vehicle is set to transport mode. The transport mode is used to disable certain vehicle functions to prevent battery discharge when the vehicle is in the transport/inventory phase and is not driven long enough to maintain the battery’s charge. This mode can be disabled by doing the following: Turn the ignition on, without starting the engine. Press and release the brake pedal fully five times and press the hazard button four times (on, off, on, off) within 10 seconds. CHECK LOCKING DIFFERENTIAL (if equipped) — Displayed when an electronic locking differential (ELD) system fault is present. For more information, refer to Electronic locking differential (ELD) in the Driving chapter. ELD ENGAGED/DISENGAGED (if equipped) — Displayed when the electronic locking differential is engaged. See Electronic locking differential in the Driving chapter for more information. ELD DISENGAGED (if equipped) — Displayed when the electronic locking differential is disengaged. See Electronic locking differential in the Driving chapter for more information. TO ENGAGE ELD RELEASE PEDAL (if equipped) — Displayed when the electronic locking differential requests this condition be met in order to engage. See Electronic locking differential in the Driving chapter for more information. TO ENGAGE ELD SLOW TO XX MPH/KM/H (if equipped) — Displayed when the electronic locking differential requests that a certain speed be met in order to engage. See Electronic locking differential in the Driving chapter for more information. CHECK 4X4 (if equipped) — Displayed when a 4X4 system fault is present. For more information, refer to Four-wheel drive (4WD) operation in the Driving chapter. 4X4 SHIFT IN PROGRESS — Displayed when the 4X4 system is making a shift. For further information, refer to Four-wheel drive (4WD) operation in the Driving chapter. FOR 4X4 LOW SLOW TO 3 MPH (if equipped) — Displayed when 4X4 LOW is selected while the vehicle is moving. For more information, refer to Four-wheel drive (4WD) operation in the Driving chapter.
33
2012 F-250/350/450/550 (f23) Owners Guide, 4th Printing USA (fus)
Instrument Cluster
FOR 4X4 LOW APPLY BRAKE (if equipped) — Displayed when trying to select 4X4 LOW. For more information, refer to Four-wheel drive (4WD) operation in the Driving chapter. FOR 4X4 LOW SHIFT TO N (if equipped) — Displayed when 4X4
LOW is selected and the vehicle is stopped. For more information, refer to Four-wheel drive (4WD) operation in the Driving chapter. TO EXIT 4X4 LOW SLOW TO 3 MPH (if equipped) — Displayed when 2WD is selected while the vehicle is operating in 4X4 LOW. For more information, refer to Four-wheel drive (4WD) operation in the Driving chapter. TO EXIT 4X4 LOW SHIFT TO N (if equipped) — Displayed when 2WD is selected while the vehicle has been stopped in 4X4 LOW. For more information, refer to Four-wheel drive (4WD) operation in the Driving chapter. TO EXIT 4X4 LOW APPLY BRAKE (if equipped) — Displayed when 2WD is selected from 4X4 LOW mode. For more information, refer to Four-wheel drive (4WD) operation in the Driving chapter. SHIFT DELAYED PULL FORWARD (if equipped) — May display when shifting to or from 4X4 LOW. For more information, refer to Four-wheel drive (4WD) operation in the Driving chapter. HILL DESCENT CONTROL READY (if equipped) — Displayed when the hill descent control switch is turned on. HILL DESCENT CONTROL FAULT (if equipped) — Displayed when a hill descent system fault is present. HILL CNTRL OFF SYSTEM COOLING (if equipped) — Displayed when the hill descent system is cooling due to overuse. HILL DESCENT CONTROL OFF (if equipped) — Displayed when the hill descent system is deactivated. FOR HILL CNTRL 20 MPH OR LESS (if equipped) — Displayed when the vehicle speed requirement for hill control mode entry has not been met. DRIVER RESUME CONTROL (if equipped) — Displayed when the hill control and off-road mode require the driver to resume control. FOR HILL CNTRL SELECT GEAR (if equipped) — Displayed when the driver is requested to select a transmission gear to enable operation of the hill mode and off-road mode.34
2012 F-250/350/450/550 (f23) Owners Guide, 4th Printing USA (fus)
Instrument Cluster
ENGINE WARMING PLEASE WAIT XX (diesel engine only) — Displayed in extremely cold weather, typically below –15°F (–26°C), if the engine block heater is not utilized. The engine will not respond to accelerator pedal movement for 30 seconds; this is done so the engine oil can be properly circulated to avoid engine damage from lack of lubrication. A timer will begin a countdown from 30 seconds. Once the counter has reached 0 seconds, OK TO DRIVE will be displayed and the engine will respond to accelerator pedal movement. Refer to your diesel supplement for more information. OK TO DRIVE (diesel engine only) — Displayed when the time counter has reached 0 (zero) and the engine is sufficiently warm enough to drive in extremely cold weather (refer to the engine warming please wait message description mentioned previously). Refer to your diesel supplement for more information. WATER IN FUEL DRAIN FILTER (diesel engine only) — Displayed when the water separator has reached a predetermined capacity and needs to be drained. Refer to your diesel supplement for more information. ENGINE TURNS OFF IN XX (diesel engine only) — Displayed when the vehicle is in the final 30 seconds of a countdown to where the engine will intentionally be turned off by the PCM. The diesel engine shutdown for extended idling is an optional feature. Refer to your diesel supplement for more information. ENGINE TURNED OFF (diesel engine only) — Displayed after the 30 second countdown. Refer to your diesel supplement for more information. DRIVE TO CLEAN EXHAUST FILTER (diesel engine only) — Displayed when the Diesel Particulate Filter (DPF) is full of particles (exhaust soot) and the vehicle is not being operated in a manner to allow normal cleaning. This message will stay on until the exhaust filter cleaning has begun, at which time the CLEANING EXHAUST FILTER message will be displayed. It is recommended the vehicle operator drive the vehicle above 30 mph (48 km/h) until the CLEANING EXHAUST FILTER message turns off. This message is NORMAL. Refer to your diesel supplement for more information. Note: If this message is ignored, your vehicle will continue to fill the Diesel Particulate Filter (DPF) with particles (exhaust soot). If cleaning light will illuminate and engine power may be is not permitted, the limited. If the vehicle is still not operated in a manner to allow cleaning, will illuminate and engine power will the service engine soon light be further limited. Dealer service will then be required to restore your vehicle to full-power operation.
35
2012 F-250/350/450/550 (f23) Owners Guide, 4th Printing USA (fus)
Instrument Cluster
Note: Diesel Particulate Filter (DPF) regeneration will not initiate at idle or in Power Take Off (PTO) mode. When DRIVE TO CLEAN EXHAUST FILTER is displayed in the message center, PTO and/or Stationary Elevated Idle Control (SEIC) must be disengaged/inactive in order to properly clean the DPF. The vehicle must be driven until the CLEANING EXHAUST FILTER message turns off. CLEANING EXHAUST FILTER (diesel engine only) — Displayed when the vehicle has entered the cleaning mode. Various engine actions will raise the exhaust temperature in the Diesel Particulate Filter (DPF) system to burn off the particles (exhaust soot). After the particles are burned off, the exhaust temperature will fall back to normal levels. This message is NORMAL. Refer to your diesel supplement for more information.
WARNING: When the CLEANING EXHAUST FILTER message appears in the message center, do not park near flammable
materials, vapors or structures until filter cleaning is complete.
EXHAUST FILTER DRIVE COMPLETE (diesel engine only) — Displayed when the Diesel Particulate Filter (DPF) has been adequately cleaned after the DRIVE TO CLEAN EXHAUST FILTER followed by CLEANING EXHAUST FILTER messages have been displayed. This message is NORMAL. Refer to your diesel supplement for more information. EXHAUST FILTER CLEANED (diesel engine only) — Displayed when the Diesel Particulate Filter (DPF) has been adequately cleaned by the manual regeneration process (OCR). Refer to your diesel supplement for more information. EXHAUST CLEAN STOPPED (diesel engine only) — Displayed when the Diesel Particulate Filter (DPF) manual regeneration process (OCR) has been stopped. Refer to your diesel supplement for more information. STOP SAFELY NOW (diesel engine only) — Displayed and a chime sounds when the vehicle exhaust system temperature exceeds intended operating range. If this warning occurs, engine power is reduced and the engine will shut down when the vehicle speed is below 3 mph (5 km/h). Stop the vehicle as soon as safely possible and contact your authorized dealer. Depending on the severity of the over-temperature condition, the vehicle may not restart after cycling the ignition off. If the vehicle restarts, there may be limited power. If the exhaust over-temperature condition reoccurs, the message center will display STOP SAFELY NOW, the chime will sound, and engine power will be reduced again and shut down below 3 mph (5 km/h). Refer to your diesel supplement for more information. 36
2012 F-250/350/450/550 (f23) Owners Guide, 4th Printing USA (fus)
Instrument Cluster
REDUCED ENGINE POWER (diesel engine only) — Displayed approximately two hours after the DRIVE TO CLEAN EXHAUST SYSTEM message has displayed and the vehicle operator has not driven the vehicle above 30 mph (48 km/h) for at least 20 minutes to clean the DPF. At this point the vehicle must be serviced by an authorized dealer. This message is normal. Refer to your diesel supplement for more information. EXHAUST FLUID RANGE XXX MI (diesel engine only) — Displays the distance you can travel before depleting the remaining diesel exhaust fluid. Refer to your diesel supplement for more information. SPEED LIMITED XXMPH IN XX MI EXHAUST FLUID EMPTY (diesel engine only) — Displayed when the diesel exhaust fluid is nearing empty. The vehicle’s top speed will become limited in the displayed distance. The diesel exhaust fluid must be replenished to resume normal operation of the vehicle. Refer to your diesel supplement for more information. XX MPH MAX UPON RESTART EXHAUST FLUID EMPTY (diesel engine only) — Displayed when the remaining diesel exhaust fluid level is depleted. Speed will be limited upon restart. The diesel exhaust fluid must be replenished to resume normal operation of the vehicle. Refer to your diesel supplement for more information. SPEED LIMITED TO XX MPH EXHAUST FLUID EMPTY (diesel engine only) — Displayed when the diesel exhaust fluid is empty. The diesel exhaust fluid must be replenished to resume normal operation of the vehicle. Refer to your diesel supplement for more information. ENGINE IDLED SOON EXHAUST FLUID EMPTY (diesel engine only) — Displayed when the SCR system detects low exhaust fluid. The engine will eventually enter into an idle only mode. The diesel exhaust fluid must be replenished to resume normal operation of the vehicle. Refer to your diesel supplement for more information. ENGINE IDLED SEE MANUAL (diesel engine only) — Displayed when a problem exists with the SCR system. The vehicle will enter into an idle-only mode. If the exhaust fluid is empty, it must be replenished to resume normal operation of the vehicle. Refer to your diesel supplement for more information. SPEED LIMITED XXMPH IN XXXMI EXHAUST FLUID SYSTEM FAULT (diesel engine only) — Displayed when the SCR system detects a fault. The vehicle’s top speed will become limited in the displayed distance and count down from this point. Refer to your diesel supplement for more information. Contact your authorized dealer as soon as possible.
37
2012 F-250/350/450/550 (f23) Owners Guide, 4th Printing USA (fus)
Instrument Cluster
XX MPH MAX UPON RESTART EXHAUST FLUID SYSTEM FAULT (diesel engine only) — Displayed when the SCR system detects a fault. The vehicle’s top speed will become limited upon restarting. Refer to your diesel supplement for more information. Contact your authorized dealer as soon as possible. SPEED LIMITED TO XX MPH EXHAUST FLUID SYSTEM FAULT (diesel engine only) — Displayed when the SCR system detects a fault. The vehicle’s top speed is limited. Refer to your diesel supplement for more information. Contact your authorized dealer as soon as possible. ENGINE IDLED SOON EXHAUST FAULT SEE MANUAL (diesel engine only) — Displayed when the SCR system detects a fault. The engine will eventually enter into an idle-only mode. Refer to your diesel supplement for more information. Contact your authorized dealer as soon as possible. ENGINE IDLED SEE MANUAL EXHAUST FLUID SYSTEM FAULT (diesel engine only) — Displayed when the SCR system detects a fault. The engine will enter into an idle only mode. Refer to your diesel supplement for more information. Contact your authorized dealer as soon as possible. ENGINE OIL DILUTED (diesel engine only) — Displays once the engine oil has become diluted and needs to be changed. Refer to your diesel supplement for more information. ENGINE OIL CHANGE SOON — Displayed when the engine oil life remaining is 5% to 1%. Refer to the scheduled maintenance information for more information. OIL CHANGE REQUIRED — Displayed when the oil life left reaches 0%. Refer to the scheduled maintenance information for more information. LOW FUEL PRESSURE SEE MANUAL (diesel engine only) — If this message appears during a cold start or during cold operation 32°F (0°C) up to 10 minutes after the initial cold start; monitor the message center and if it disappears and does not re-appear after the engine has fully warmed up, the low fuel pressure message is most likely caused by waxed or gelled fuel. To prevent this, use an anti-gel additive. Refer to your diesel supplement for more information. The customer warranty may be void from using additives that do not meet or exceed Ford specifications. If the low fuel pressure message persistently appears after re-fueling during the cold start and cold operation conditions defined previously and then disappear when the engine has fully warmed up, consider different fuel sources. 38
2012 F-250/350/450/550 (f23) Owners Guide, 4th Printing USA (fus)
Instrument Cluster • Low Fuel Operation: If the message appears when the vehicle is warm
and during low fuel tank level operation, i.e. the tank level is at or very near empty, refuel the vehicle and operate the vehicle. If the message reappears after fueling, see below. If the message does not come back, the low fuel pressure condition was due to low fuel levels in the fuel tank.
• Normal Operation: If the message appears during normal operation when the vehicle / engine is fully warm, and fuel level is not low, the fuel filters must be changed regardless of the maintenance schedule interval. If replacement of the fuel filter does not remedy the low fuel pressure message during normal operation as defined above, please take the vehicle to your authorized dealer.
OPTIONAL MESSAGE CENTER (IF EQUIPPED) Your vehicle’s message center is capable of monitoring many vehicle systems and will alert you to potential vehicle problems and various conditions with a informational messages and/or warnings. The message center is also used to program/configure the different features of your vehicle. The message center display is located in the instrument cluster. Use the steering wheel mounted buttons to navigate through the message center. Press the up/down buttons to move up/down through the message center choices.
OK
OK
39
Press the left/right buttons to move left/right through the message center choices.
2012 F-250/350/450/550 (f23) Owners Guide, 4th Printing USA (fus)
Instrument Cluster
Press the OK button to select highlighted options and confirm choices/messages.
OK
Main menu From the main menu screen you can choose the following: • Gauge Mode • Trip A/B • Fuel Economy • Truck Apps (if equipped) • Settings • Information
Scroll up/down to highlight one of the options, then press the right arrow key or OK to enter into that menu option. Gauge Mode In this mode, the following options are available in different graphical formats: • Engine Oil Temperature (diesel only) • Transmission Temperature • Compass (see Compass following for compass options) • Exhaust Filter (diesel only). Refer to Diesel exhaust system:
oxidation catalyst/diesel particulate filter system in your diesel supplement for more information.
• Blank Compass: The compass orientation can be changed between fixed north or rotating north. To change the modes, press OK when the compass display is shown. Use the right arrow to choose the mode. Press and hold OK to set the mode.
40
2012 F-250/350/450/550 (f23) Owners Guide, 4th Printing USA (fus)
Instrument Cluster
Trip A/B In this mode, Trip A or B registers the following: • Trip Time — shows the elapsed trip time. This timer will stop when the vehicle is turned off and will restart when the vehicle is restarted. • Trip Distance — shows the accumulated trip distance. • Fuel Used — shows the amount of fuel used for a given trip. • Average MPG (L/100km) — shows the average distance traveled per • Odometer — shows the vehicle’s total accumulated distance. This
unit of fuel used for a given trip.
value cannot be reset.
Press the right arrow key to reach Trip B. Press the left arrow to go back to Trip A. Press OK to pause the Trip A or B screen/press again to un-pause. Press and hold OK to reset the currently displayed trip information. Fuel Economy In this mode, fuel economy information is displayed as follows: • Instant MPG (L/100km) — shows instantaneous fuel usage. • Miles (kilometers) to empty — shows the approximate distance the • Average MPG (L/100km) — shows the average fuel usage based on time. See Fuel Hist. following to change the time interval. Press and hold OK to reset this value.
vehicle can travel before running out of fuel.
service stations.
If you calculate your average fuel economy by dividing miles traveled by gallons of fuel used (liters of fuel used by 100 kilometers traveled), your figure may be different than displayed for the following reasons: • Your vehicle was not perfectly level during fill-up. • Differences in the automatic shut-off points on the fuel pumps at • Variations in top-off procedure from one fill-up to another. • Rounding of the displayed values to the nearest 0.1 gallon (liter). To determine your average highway fuel economy, do the following: 1. Drive the vehicle at least 5 miles (8 km) with the speed control system engaged to display a stabilized average. 2. Record the highway fuel economy for future reference.
41
2012 F-250/350/450/550 (f23) Owners Guide, 4th Printing USA (fus)
Instrument Cluster
It is important to press RESET in order to reset the function after setting the speed control to get accurate highway fuel economy readings. For more information refer to Essentials of good fuel economy in the Maintenance and Specifications chapter. Fuel Hist.: Press the right arrow key (when in the Fuel Econ. menu) to reach Fuel Hist. Fuel history shows fuel usage (AVG MPG or L/100km) as a bar graph based on time. The duration time can be changed as follows: Duration– Press the right arrow key (when in the Fuel Hist. menu) to reach the following duration choices. • 5 Minutes • 10 Minutes • 30 Minutes • Last 5 Resets Use the up/down arrows keys to highlight one of the choices; press and hold OK to set your choice. The graph is updated each minute with the fuel economy that was achieved during the prior 5, 10, 30 minutes or last 5 resets of driving. Truck Apps (if equipped) In this mode, off-road and trailer towing application options are available.
Off Road*
Pitch and bank angle (in degrees). Displays the pitch angle (front to rear) and bank angle (side to side) of the road surface. Steering angle (in degrees). Displays the steering angle of the front wheels after the vehicle has been driven for a period of time. Differential lock/unlock. Displays the state (locked or unlocked) of the electronic locking differential. Energy flow. Displays the operating mode of the transfer case: 4X2, 4X4 Low or 4X4 High. * If equipped—your vehicle may be equipped with some or all of these options. When “Press OK for info” is displayed, pressing OK will give you information on the following options if equipped (Note: Information is only available when traveling less than 3 mph [5 km/h]): • ELD (electronic locking differential) • Hill Descent Control 42
2012 F-250/350/450/550 (f23) Owners Guide, 4th Printing USA (fus)
Instrument Cluster
• 4X4 System • Traction Control • Advancetrac + RSC Trailer: Press the right arrow key (when in the Off Road menu) to reach the Trailer menu (vehicle must be equipped with factory installed trailer brake controller). The following information is displayed: • Active trailer name or default trailer. • Accumulated trailer distance. • Trailer gain and output. • Trailer disconnected When “Press OK for options” is displayed, pressing OK will open the trailer options menus:
Change Active Trailer
Connection Checklist (if equipped)
Trailer*
When this is highlighted, press the right arrow key to change the currently selected trailer. Use the up and down arrows to select a trailer and press the OK button to choose the highlighted trailer. Adding a new trailer– Use the up/down arrows to highlight “New Trailer” from the Change Active Trailer menu and press the right arrow key to enter the New Trailer input screen. Use the up/down arrow keys to choose alpha, numeric and symbol characters and then press the right arrow to move the character space over. Continue adding characters as needed. Press the left arrow to go back and change a previously selected character. When finished with the new trailer name, press OK to accept the new trailer name. Press the right arrow button when this is highlighted to show the trailer connection types: Conventional, Fifth Wheel and Gooseneck. Use the up/down arrows to highlight one of these choices and press OK to display the connection checklist. Follow the on-screen instructions to go through the connections list.
43
2012 F-250/350/450/550 (f23) Owners Guide, 4th Printing USA (fus)
Instrument Cluster
Delete Trailer
Information Screen
Rename Trailer
Reset Trailer Mileage / Kilometers (if equipped)
Trailer*
Press the right arrow button when this is highlighted to show currently stored trailers. Use the up/down arrows to highlight the trailer you want to delete and press OK to delete. Follow the on-screen prompts to exit or confirm delete. Press the right arrow button when this is highlighted to display information on the following vehicle features: Tow Haul mode, Trailer Brake Controller. Press the right arrow button when this is highlighted to display saved or default trailers. Use the up/down buttons to highlight a trailer and press OK to select it. Use the up/down arrow buttons to change the characters as needed. When done, press OK to accept the change. Press the right arrow button when this is highlighted to display accumulated distance on a given trailer within the list of trailer(s). Use the up/down buttons to select a trailer, then press and hold OK to reset the trailer mileage (kilometers).
* If equipped—your vehicle may be equipped with some or all of these options. Settings In this mode, you can configure different driver setting choices. Press the right arrow key (when in the Settings menu) to reach the Driver Assist menu:
Driver Assist*
On/Off Camera Delay
Electric or Elect. Over Hydraulic
On/Off
Rear Park Aid Rear View Camera Trailer Brake Mode Trailer Sway Control
44
2012 F-250/350/450/550 (f23) Owners Guide, 4th Printing USA (fus)
Instrument Cluster
* If equipped—your vehicle may be equipped with some or all of these options.
Vehicle*
Autolamp Delay Off or XXX seconds Compass
Zone Setting (1–15) See the diagram below to determine your magnetic zone.
Determine which magnetic zone you are in for your geographic location by referring to the zone map.
23
15
14
13
127 8 9 1011
Vehicle* (cont’d)
Calibration (When choosing Calibration, follow the on-screen directions to calibrate the compass)
Compass (cont’d) Easy Entry/Exit On/Off DTE Calculation (distance to empty) Locks
Normal History Used Towing History Used
Maintenance
Autolock, Autounlock Unlocking Coolant (if equipped) Fuel Filter (diesel only)
On/Off On/Off One Stage or Two Stage Hold OK if coolant maintenance performed Hold OK if Fuel Filter Changed
45
2012 F-250/350/450/550 (f23) Owners Guide, 4th Printing USA (fus)
Instrument Cluster
Vehicle* (cont’d)
Standard: with standard set, pressing the up/down arrows from a lower level menu will escape to the main menu. Memory On: with memory on set, pressing the up/down arrows will navigate to the previous lower level menu.
Set to XXX% (Press and hold OK to set).
Menu Control
Oil Life Reset (if equipped)
Remote Start
Duration System On/Off
5, 10 or 15 minutes Enable/Disable
Wiper Control * If equipped—your vehicle may be equipped with some or all of these options.
MyKey
Hold OK to create MyKey Always on or Selectable 80 MPH (120 km/h) or Off 45, 55 or 65 MPH (75, 90 or 105 km/h), Off
Create MyKey *AdvanceTrac *MAX Speed *Speed Warning *Volume Limiter On/Off *Clear MyKeys *Only displays if MyKey is programmed.
Hold OK to Clear MyKeys
Language
English, Español, Français
Units
English or Metric
Units
System Reset
Hold OK to Reset System to Factory Default
46
2012 F-250/350/450/550 (f23) Owners Guide, 4th Printing USA (fus)
Instrument Cluster
Information In this mode, you can view different vehicle system information and perform a system check. When “Press OK for info” is displayed, pressing OK will give you information on the currently selected/displayed options. Information is only available when traveling less than 3 mph (5 km/h).
MyKey
Admin Keys (Number of admin keys) MyKeys (Number of MyKeys programmed) MyKey Miles (km) (Distance traveled using a programmed MyKey)
System Check*
Gain and Output (when trailer is connected) No trailer (when no trailer is connected)
Oil Life Engine Hours Engine Idle Hours Doors Exhaust Fluid Level (diesel only) Brakes Trailer Brake Ctrl. Trailer Sway Park Aid Fuel Level (distance to empty) * If equipped—your vehicle may be equipped with some or all of these options.