- 2010 Ford Expedition Owners Manuals
- Ford Expedition Owners Manuals
- 2000 Ford Expedition Owners Manuals
- Ford Expedition Owners Manuals
- 2005 Ford Expedition Owners Manuals
- Ford Expedition Owners Manuals
- 2006 Ford Expedition Owners Manuals
- Ford Expedition Owners Manuals
- 2007 Ford Expedition Owners Manuals
- Ford Expedition Owners Manuals
- 2012 Ford Expedition Owners Manuals
- Ford Expedition Owners Manuals
- 1997 Ford Expedition Owners Manuals
- Ford Expedition Owners Manuals
- 2009 Ford Expedition Owners Manuals
- Ford Expedition Owners Manuals
- 2002 Ford Expedition Owners Manuals
- Ford Expedition Owners Manuals
- 2011 Ford Expedition Owners Manuals
- Ford Expedition Owners Manuals
- Download PDF Manual
-
98
2007 Expedition (exd) Owners Guide (post-2002-fmt) USA (fus)
Driver Controls
AUXILIARY POWER POINT (12VDC) Power outlets are designed for accessory plugs only. Do not insert any other object in the power outlet as this will damage the outlet and blow the fuse. Do not hang any type of accessory or accessory bracket from the plug. Improper use of the power outlet can cause damage not covered by your warranty. The auxiliary power point is located on the instrument panel. Do not use the power point for operating the cigarette lighter element (if equipped). To prevent the fuse from being blown, do not use the power point(s) over the vehicle capacity of 12 VDC/180W. If the power point or cigar lighter socket is not working, a fuse may have blown. Refer to Fuses and Relays in the Roadside Emergencies chapter for information on checking and replacing fuses. To prevent the battery from being discharged, do not use the power point longer than necessary when the engine is not running. Always keep the power point caps closed when not being used. A second auxiliary power point is located on the rear side of the center console. The power point is accessible from the rear seats.
99
2007 Expedition (exd) Owners Guide (post-2002-fmt) USA (fus)
Driver Controls
The rear auxiliary power point is located on the right rear quarter panel. The power point is accessible from the liftgate or the third row seat. Equipped with rear climate control
Not equipped with rear climate control
Cigar/Cigarette lighter (if equipped) Do not plug optional electrical accessories into the cigarette lighter socket. Do not hold the lighter in with your hand while it is heating, this will damage the lighter element and socket. The lighter will be released from its heating position when it is ready to be used. Improper use of the lighter can cause damage not covered by your warranty.
100
2007 Expedition (exd) Owners Guide (post-2002-fmt) USA (fus)
Driver Controls
Cupholder/Ashtray (if equipped) The cupholder/ashtray is located on the instrument panel. To open cupholder/ashtray, push in on the door and release. The door will spring out 1/4+ inches. Then pull cupholder/ashtray assembly out the remaining distance to utilize. To close, push assembly in completely and release.
POWER WINDOWS
Do not leave children unattended in the vehicle and do not let children play with the power windows. They may seriously injure
themselves.
When closing the power windows, you should verify they are free of obstructions and ensure that children and/or pets are not in
the proximity of the window openings.
Press and pull the window switches to open and close windows. • Push down (to the first detent) • Pull up (to the first detent) and
and hold the switch to open.
hold the switch to close.
Rear Window Buffeting: When one or both of the rear windows are open, the vehicle may demonstrate a wind throb or buffeting noise; this noise can be alleviated by: • Lowering a front window approximately two to three inches or • Open 3rd Row Power Quarter Glass, for vehicles equipped with this
option
101
2007 Expedition (exd) Owners Guide (post-2002-fmt) USA (fus)
Driver Controls
One touch down Allows the driver’s window to open fully without holding the control down. Push the switch completely down to the second detent and release quickly. The window will open fully. Momentarily press the switch to any position to stop the window operation.
Window lock The window lock feature allows only the driver to operate the power windows. To lock out all the window controls (except for the driver’s) press the right side of the control. Press the left side to restore the window controls.
Accessory delay With accessory delay, the audio system, power windows and moon roof (if equipped) operate for up to ten minutes after the ignition switch is turned from the ON to the OFF position or until either front door is opened.
AUTOMATIC DIMMING INTERIOR REAR VIEW MIRROR (IF EQUIPPED) Your vehicle may be equipped with an interior rear view mirror which has an auto-dimming function. The electronic day/night mirror will change from the normal (high reflective) state to the non-glare (darkened) state when bright lights (glare) reach the mirror. When the mirror detects bright light from behind the vehicle, it will automatically adjust (darken) to minimize glare. The mirror will automatically return to the normal state whenever the vehicle is placed in R (Reverse) to ensure a bright clear view when backing up.
102
2007 Expedition (exd) Owners Guide (post-2002-fmt) USA (fus)
Driver Controls
Do not block the sensors on the front and back of the interior rear view mirror since this may impair proper mirror performance. Do not clean the housing or glass of any mirror with harsh abrasives, fuel or other petroleum-based cleaning products.
EXTERIOR MIRRORS
Power side view mirrors The ignition can be in any position to adjust the power side view mirrors. To adjust your mirrors: 1. Rotate the control clockwise to adjust the right mirror and rotate the control counterclockwise to adjust the left mirror. 2. Move the control in the direction you wish to tilt the mirror. 3. Return to the center position to lock mirrors in place.
POWER FOLD
Powerfold mirrors (if equipped) Rotate the 4–way adjustment switch to the center position. Press the switch down to auto fold in and down again to auto fold back to design position. Powerfold the side mirrors in carefully when driving through a narrow space, like an automatic car wash. The mirrors may be moved inward/outward manually, however, if a mirror is moved manually, it will need to be reset. To reset: with the switch in the center position, press the switch down to fold the mirrors in and wait a short period (8 seconds). An audible ⬙click⬙ will be heard indicating re-synchronization. If the click is not heard, use the switch to fold the mirrors out, then in, until the click is heard. After that, the mirrors will operate to their normal positions until they are again moved manually.
103
2007 Expedition (exd) Owners Guide (post-2002-fmt) USA (fus)
Driver Controls
Heated outside mirrors Both mirrors are heated automatically to remove ice, mist and fog when the rear window defrost is activated. Type A
(if equipped)
Type B
POWER FOLD
Do not remove ice from the mirrors with a scraper or attempt to readjust the mirror glass if it is frozen in place. These actions could cause damage to the glass and mirrors.
Signal indicator mirrors (if equipped) When the turn signal is activated, the lower portion of the mirror housing will blink.
104
2007 Expedition (exd) Owners Guide (post-2002-fmt) USA (fus)
Driver Controls
POWER ADJUSTABLE FOOT PEDALS (IF EQUIPPED) The accelerator and brake pedal should only be adjusted when the vehicle is stopped and the gearshift lever is in the P (Park) position. Press and hold the rocker control to adjust accelerator and brake pedal. • Press the top of the control to adjust the pedals toward you. • Press the bottom of the control to adjust the pedals away from you. The adjustment allows for approximately 3 inches (76 mm) of maximum travel.
Never adjust the accelerator and brake pedal with feet on the pedals while the vehicle is moving.
SPEED CONTROL With speed control set, you can maintain a set speed without keeping your foot on the accelerator pedal.
Do not use the speed control in heavy traffic or on roads that are winding, slippery or unpaved.
Setting speed control The controls for using your speed control are located on the steering wheel for your convenience. 1. Press the ON control and release it. 2. Accelerate to the desired speed.
105
2007 Expedition (exd) Owners Guide (post-2002-fmt) USA (fus)
Driver Controls
3. Press the SET + control and release it. 4. Take your foot off the accelerator pedal. 5. The indicator light instrument cluster will turn on.
on the
steep hill.
Note: • Vehicle speed may vary momentarily when driving up and down a • If the vehicle speed increases above the set speed on a downhill, you • If the vehicle speed decreases more than 10 mph (16 km/h) below
may want to apply the brakes to reduce the speed.
your set speed on an uphill, your speed control will disengage.
Resuming a set speed Press the RES (resume) control and release it. This will automatically return the vehicle to the previously set speed.
106
2007 Expedition (exd) Owners Guide (post-2002-fmt) USA (fus)
Driver Controls
Increasing speed while using speed control There are two ways to set a higher speed: • Press and hold the SET + control until you get to the desired speed, then release the control. You can also use the SET + control to operate the Tap-Up function. Press and release this control to increase the vehicle set speed in small amounts by 1 mph (1.6 km/h).
• Use the accelerator pedal to get to the desired speed. When the vehicle reaches that speed press and release the SET + control.
Reducing speed while using speed control There are two ways to reduce a set speed: • Press and hold the SET - control until you get to the desired speed, then release the control. You can also use the SET - control to operate the Tap-Down function. Press and release this control to decrease the vehicle set speed in small amounts by 1 mph (1.6 km/h).
• Depress the brake pedal until the desired vehicle speed is reached,
press the SET + control.
Turning off speed control There are two ways to turn off the speed control: • Depress the brake pedal. This will not erase your vehicle’s previously
set speed.
107
2007 Expedition (exd) Owners Guide (post-2002-fmt) USA (fus)
Driver Controls • Press the speed control OFF
control.
Note: When you turn off the speed control or the ignition, your speed control set speed memory is erased.
STEERING WHEEL CONTROLS (IF EQUIPPED) These controls allow you to operate some radio and climate control features. Audio control features Press MEDIA to select: • AM, FM1, FM2
• CD (if equipped) • DVD/FES (if equipped) • SAT1, SAT2 or SAT3 (Satellite • LINE IN (Auxiliary input jack)Radio mode if equipped).
In AM, FM1, or FM2 mode: • Press to
SEEK
select preset stations within the selected radio band or press and hold to select the next/previous radio frequency.
In Satellite radio mode (if equipped): • Press
SEEK
to
advance through preset channels or subscribed channels.
In CD mode: • Press
SEEK
to select the next selection on the CD or
press and hold to forward or reverse the CD.
108
2007 Expedition (exd) Owners Guide (post-2002-fmt) USA (fus)
Driver Controls
In any mode: • Press VOL + or − to adjust
volume.
Climate control features (if equipped) Press TEMP + or - to adjust temperature.
Press FAN + or - to adjust fan speed.
109
2007 Expedition (exd) Owners Guide (post-2002-fmt) USA (fus)
Driver Controls
Navigation control features (if equipped) Press and hold VOICE briefly until icon appears on the the voice Navigation display to use the Navigation voice command. Press the control again to hear previous command repeated from the navigation system.
MOON ROOF (IF EQUIPPED) The moon roof control is located on the overhead console.
Do not let children play with the moon roof or leave children unattended in the vehicle. They may seriously hurt themselves.
When closing the moon roof, you should verify that it is free of obstructions and ensure that children and/or pets are not in the
proximity of the moon roof opening.
Note: The moon roof will open to the “comfort” position first before opening all the way. The “comfort” position helps to alleviate rumbling wind noise which may happen in the vehicle with the roof fully opened. To open the moon roof: The moon roof is equipped with a one-touch open feature. Firmly press and release the rear control. The moon roof will open to the “comfort” position. Firmly press and release the control again to fully open. To stop the one-touch open feature press any control again. To close the moon roof: Press and hold the front control until the glass stops moving. When fully closed, the rear portion of the glass panel will appear higher than the front portion. To vent the moon roof: Press and hold the TILT control. The moon roof must be in the closed position in order to move it into the vent position. To close, press and hold the rear or front control until the glass panel stops moving.
110
2007 Expedition (exd) Owners Guide (post-2002-fmt) USA (fus)
Driver Controls
The moon roof has a built-in sliding shade that can be manually opened or closed when the glass panel is shut. To close the shade, pull it toward the front of the vehicle.
HOMELINK姞 WIRELESS CONTROL SYSTEM (IF EQUIPPED) The HomeLink威 Wireless Control System, located on the driver’s visor, provides a convenient way to replace up to three hand-held transmitters with a single built-in device. This feature will learn the radio frequency codes of most transmitters to operate garage doors, entry gate operators, security systems, entry door locks, and home or office lighting.
When programming your HomeLink威 Wireless Control System to a garage door or gate, be sure that people and objects are out of
the way to prevent potential harm or damage.
Do not use the HomeLink威 Wireless Control System with any garage door opener that lacks safety stop and reverse features as required by U.S. federal safety standards (this includes any garage door opener model manufactured before April 1, 1982). A garage door which cannot detect an object, signaling the door to stop and reverse, does not meet current U.S. federal safety standards. For more information, contact HomeLink威 at: www.homelink.com or 1–800–355–3515. Retain the original transmitter for use in other vehicles as well as for future programming procedures (i.e. new HomeLink威 equipped vehicle purchase). It is also suggested that upon the sale of the vehicle, the programmed Homelink威 buttons be erased for security purposes, refer to Programming in this section.
Programming Do not program HomeLink威 with the vehicle parked in the garage. Note: Your vehicle may require the ignition switch to be turned to the ACC position for programming and/or operation of the HomeLink威. It is also recommended that a new battery be placed in the hand-held transmitter of the device being programmed to HomeLink威 for quicker training and accurate transmission of the radio-frequency signal.
111
2007 Expedition (exd) Owners Guide (post-2002-fmt) USA (fus)
Driver Controls
1. Press and hold the two outside buttons releasing only when the indicator light begins to flash after 20 seconds. Do not repeat Step 1
to program additional hand-held transmitters to the remaining two HomeLink威 buttons. This will erase previously programmed hand-held transmitter signals into HomeLink威. 2. Position the end of your hand-held transmitter 1–3 inches (2–8 cm) away from the HomeLink威 button you wish to program (located on your visor) while keeping the indicator light in view. 3. Simultaneously press and hold both the chosen HomeLink威 and hand-held transmitter buttons until the HomeLink威 indicator light changes from a slow to a rapidly blinking light. Now you may release both the HomeLink威 and hand-held transmitter buttons. Note: Some entry gates and garage door openers may require you to replace Step 3 with procedures noted in the “Gate Operator and Canadian Programming” in this section for Canadian residents. 4. Firmly press, hold for five seconds and release the programmed HomeLink威 button up to two separate times to activate the door. If the door does not activate, press and hold the just-trained HomeLink威 button and observe the indicator light. • If the indicator light stays on constantly, programming is complete and your device should activate when the HomeLink威 button is pressed and released. • If the indicator light blinks rapidly for two seconds and then turns to a constant light continue with “Programming” Steps 5 through 7 to complete programming of a rolling code equipped device (most commonly a garage door opener). 5. At the garage door opener receiver (motor-head unit) in the garage, locate the “learn” or “smart” button (usually near where the hanging antenna wire is attached to the unit). 6. Firmly press and release the “learn” or “smart” button. (The name and color of the button may vary by manufacturer.)112
2007 Expedition (exd) Owners Guide (post-2002-fmt) USA (fus)
Driver Controls
Note: There are 30 seconds in which to initiate Step 7. 7. Return to the vehicle and firmly press, hold for two seconds and release the programmed HomeLink威 button. Repeat the press/hold/release sequence again and, depending on the brand of the garage door opener (or other rolling code equipped device), repeat this sequence a third time to complete the programming. HomeLink威 should now activate your rolling code equipped device. To program additional HomeLink威 buttons begin with Step 2 in the “Programming” section. For questions or comments, please contact HomeLink威 at www.homelink.com or 1–800–355–3515.
Gate Operator & Canadian Programming During programming, your hand-held transmitter may automatically stop transmitting — not allowing enough time for HomeLink威 to accept the signal from the hand-held transmitter. After completing Steps 1 and 2
outlined in the “Programming” section, replace Step 3 with the following: Note: If programming a garage door opener or gate operator, it is advised to unplug the device during the “cycling” process to prevent overheating. • Continue to press and hold the HomeLink威 button (note Step 3 in the“Programming” section) while you press and release — every two seconds (“cycle”) your hand-held transmitter until the frequency signal has been accepted by the HomeLink威. The indicator light will flash slowly and then rapidly after HomeLink威 accepts the radio frequency signal.
• Proceed with Step 4 in the “Programming” section.
113
2007 Expedition (exd) Owners Guide (post-2002-fmt) USA (fus)
Driver Controls
Operating the HomeLink姞 Wireless Control System To operate, simply press and release the appropriate HomeLink威 button. Activation will now occur for the trained product (garage door, gate operator, security system, entry door lock, or home or office lighting etc.). For convenience, the hand-held transmitter of the device may also be used at any time. In the event that there are still programming difficulties, contact HomeLink威 at www.homelink.com or 1–800–355–3515.
Erasing HomeLink姞 buttons To erase the three programmed buttons (individual buttons cannot be erased): • Press and hold the two outer HomeLink威 buttons until the indicator light begins to flash-after 20 seconds. Release both buttons. Do not hold for longer that 30 seconds.
HomeLink威 is now in the train (or learning) mode and can be programmed at any time beginning with Step 2 in the “Programming” section. Reprogramming a single HomeLink姞 button To program a device to HomeLink威 using a HomeLink威 button previously trained, follow these steps: 1. Press and hold the desired HomeLink威 button. Do NOT release the button. 2. The indicator light will begin to flash after 20 seconds. Without releasing the HomeLink威 button, follow Step 2 in the “Programming” section. For questions or comments, contact HomeLink威 at www.homelink.com or 1–800–355–3515.
114
2007 Expedition (exd) Owners Guide (post-2002-fmt) USA (fus)
Driver Controls
STANDARD MESSAGE CENTER (IF EQUIPPED) With the ignition in the ON position, the message center, located on your instrument cluster, displays important vehicle information through a constant monitor of vehicle systems. You may select display features on the message center for a display of status preceded by a brief indicator chime. The system will also notify you of potential vehicle problems with a display of system warnings followed by a long indicator chime. Note: If the vehicle’s ignition key is turned OFF then back ON, the message center display will return to the displayed message prior to key OFF.
Selectable features Press and release the RESET stem to scroll and reset the following functions. Reset the function by a single press of the RESET stem for more than 2 seconds.
Info menu This menu displays the following control displays: • Odometer/Trip Odometer (Trip A and Trip B) • Distance to Empty • Average Fuel Economy (AFE) • Outside Air Temperature (OAT) • Compass • Setup Menu • Blank Display Odometer/Trip odometer Refer to Gauges in the Instrument Cluster chapter.
115
2007 Expedition (exd) Owners Guide (post-2002-fmt) USA (fus)
Driver Controls
Distance to empty (DTE) Selecting this function from the INFO MENU estimates approximately how far you can drive with the fuel remaining in your tank under normal driving conditions. Remember to turn the ignition OFF when refueling to allow this feature to correctly detect the added fuel. The DTE function will display LOW FUEL LEVEL and sound a tone for one second when you have approximately 50 miles (80 km) to empty. If you RESET this warning message, this display and tone will return within 10 minutes. DTE is calculated using a running average fuel economy, which is based on your recent driving history of 500 miles (800 km). This value is not the same as the average fuel economy display. The running average fuel economy is reinitialized to a factory default value if the battery is disconnected. Average fuel economy (AFE) Select this function to display your average fuel economy in miles/gallon or liters/km. If you calculate your average fuel economy by dividing miles traveled by gallons of fuel used (liters of fuel used by 100 kilometers traveled), your figure may be different than displayed for the following reasons: • Your vehicle was not perfectly level during fill-up • Differences in the automatic shut-off points on the fuel pumps at • Variations in top-off procedure from one fill-up to another • Rounding of the displayed values to the nearest 0.1 gallon (liter) 1. Drive the vehicle at least 5 miles (8 km) with the speed control system engaged to display a stabilized average. 2. Record the highway fuel economy for future reference. It is important to press the RESET stem (press and hold for 2 seconds in order to reset the function) after setting the speed control to get accurate highway fuel economy readings.
service stations
116
2007 Expedition (exd) Owners Guide (post-2002-fmt) USA (fus)
Driver Controls
Outside air temperature (OAT) The outside air temperature is shown together with the compass heading in the bottom row of the message center display.
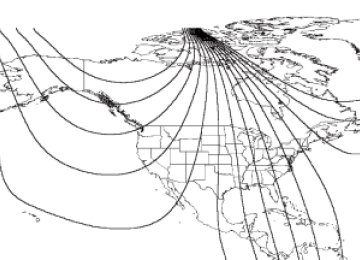
Compass display (if equipped) The compass heading is displayed as one of N, NE, E, SE, S, SW, W and NW in the message center display. The compass reading may be affected when you drive near large buildings, bridges, power lines and powerful broadcast antenna. Magnetic or metallic objects placed in, on or near the vehicle may also affect compass accuracy. Usually, when something affects the compass readings, the compass will correct itself after a few days of operating your vehicle in normal conditions. If the compass still appears to be inaccurate, a manual calibration may be necessary. Refer to Compass zone adjustment. Most geographic areas (zones) have a magnetic north compass point that varies slightly from the northerly direction on maps. This variation is up to four degrees between adjacent zones and will become noticeable as the vehicle crosses multiple zones. A correct zone setting will eliminate this error. Refer to Compass calibration adjustment. Compass zone adjustment (if equipped) 1. Determine which magnetic zone you are in for your geographic location by referring to the zone map. 2. Turn ignition to the ON position.
23
15
14
13
127 8 9 1011
117
2007 Expedition (exd) Owners Guide (post-2002-fmt) USA (fus)
Driver Controls
3. Locate the reset button on top of the compass sensor mounted behind the mirror.
4. Press and hold the reset button on the compass module for approximately 4 seconds until the message center displays a selection to change the current zone setting: ZONE
RESET = CHANGE 5. Press and release the RESET stem to scroll through until the correct zone appears in the message center display. 6. The display will return to normal operation after 4 seconds. The zone is now updated. Compass calibration adjustment Perform compass calibration in an open area free from steel structures and high voltage lines. For optimum calibration, turn off all electrical accessories (heater/air conditioning, wipers, etc.) and make sure all vehicle doors are shut. 1. Start the vehicle. 2. Locate the reset button on the compass sensor mounted on the base of mirror. 3. To calibrate, press and hold the reset button on the compass module for approximately eight seconds and release. 4. Slowly drive the vehicle in a circle (less than 5 km/h [3 mph]) until the CIRCLE SLOWLY TO CALIBRATE display changes to CALIBRATION COMPLETED. It will take up to five circles to complete calibration. 118
2007 Expedition (exd) Owners Guide (post-2002-fmt) USA (fus)
5. The compass is now calibrated.
Driver Controls
Setup menu This menu allows the user, via the RESET stem located in the instrument cluster, to interface and control the information displayed in the message center for following selectable features: • System Check • Oil life • Units (English/Metric) • Autolamp • Autolock • Language (English/French/Spanish) Press and release the RESET stem to scroll through the INFO MENU until following message “HOLD RESET FOR SETUP MENU” appears in the display. A brief press of the RESET stem causes the display to turn OFF. Press and release the RESET stem to exit the ⬙blank⬙ display mode. To access the SETUP MENU, press and hold the RESET stem until the following message “HOLD RESET FOR SYSTEM CHECK” appears in the display. Note: The first selection in the SETUP MENU is System Check. To get into System Check, press and hold the RESET stem for 2 seconds. To skip the System Check entry, briefly press the RESET stem to scroll through the remaining SETUP MENU display sequence. If the RESET stem is not pressed within 4 seconds, the message center display returns to the SETUP MENU entry message “HOLD RESET FOR SETUP MENU”.
119
2007 Expedition (exd) Owners Guide (post-2002-fmt) USA (fus)
Driver Controls
System check Selecting this function from the SETUP MENU causes the message center to cycle through each of the systems being monitored. For each of the monitored systems, the message center will indicate either an OK message or a warning message for 2 seconds. Pressing the RESET stem cycles the message center through each of the systems being monitored. If the RESET stem is not pressed, the display will automatically scroll through each of the systems being monitored: 1. OIL LIFE 2. CHARGING SYSTEM 3. WASHER FLUID LEVEL 4. DOOR/LIFTGATE/GLASS AJAR 5. BRAKE SYSTEM 6. FUEL LEVEL (will only display if 50 miles or less to empty) Oil life An oil change is required whenever indicated by the message center and according to the recommended maintenance schedule. USE ONLY RECOMMENDED ENGINE OILS. To reset the oil monitoring system to 100% after each oil change [approximately 5,000 miles (8,000 km) or 180 days] perform the following: 1. Press and release the RESET stem to display “OIL LIFE = XXX% HOLD RESET = NEW”.
2. Press and hold the RESET stem for 2 seconds and release. Oil life is set to XX% and “OIL LIFE SET TO XX%” is displayed.
Note: Oil Life Start Value of 100% equals 5,000 miles (8,000 km) or 180 days. For example, setting Oil Life Start Value to 60% sets the Oil Life Start Value to 3,000 miles (4,828 km) and 120 days.
120
2007 Expedition (exd) Owners Guide (post-2002-fmt) USA (fus)
Driver Controls
Units (English/Metric) 1. Select this function from the SETUP MENU for the current units to be displayed. 2. Press and hold the RESET stem for 2 seconds to change from English to Metric. 3. Press the RESET stem for the next SETUP MENU item or wait for more than 4 seconds to return to the INFO MENU (“HOLD RESET FOR SETUP MENU” will appear). Autolamp This feature keeps your headlights on for up to three minutes after the ignition is switched off. 1. To change the time delay of the autolamp feature, select this function from the SETUP MENU. 2. Press and hold the RESET stem for 2 seconds to select the new Autolamp delay time (in seconds) values of 0, 10, 20, 30, 60, 90, 120 or 180 and wraps back to 0. Selecting 0 will result in no delay feature. 3. Press the RESET stem for the next SETUP MENU item or wait for more than 4 seconds to return to the INFO MENU (“HOLD RESET FOR SETUP MENU” will appear). Autolock This feature automatically locks all vehicle doors when the vehicle is shifted into any gear and when the vehicle is in motion over 13 mph (20 km/h) or higher. 1. To disable/enable the autolock feature, select this function from the SETUP MENU. 2. Press and hold the RESET stem for 2 seconds to turn the autolock feature ON or OFF. 3. Press the RESET stem for the next SETUP MENU item or wait for more than 4 seconds to return to the INFO MENU (“HOLD RESET FOR SETUP MENU” will appear).
121
2007 Expedition (exd) Owners Guide (post-2002-fmt) USA (fus)
Driver Controls
Language Note: When entering the SETUP MENU and a non-English language has been selected, “HOLD RESET FOR ENGLISH” will be displayed to change back to English. 1. Select this function from the SETUP MENU for the current language to be displayed. 2. Press and hold the RESET stem for 2 seconds to select a new language. Selectable languages are English, Spanish, French. 3. Press the RESET stem for the next SETUP MENU item or wait for more than 4 seconds to return to the INFO MENU (“HOLD RESET FOR SETUP MENU” will appear). Blank display Press the RESET stem once to turn the message center display OFF. System warnings System warnings alert you to possible problems or malfunctions in your vehicle’s operating systems. In the event of a multiple warning situation, the message center will cycle the display to show all warnings by displaying each one for 4 seconds. The message center will display the last selected feature if there are no more warning messages. This allows you to use the full functionality of the message center after you acknowledge the warning by pressing the RESET stem and clearing the warning message. Warning messages are divided into four categories: • They cannot be cleared until the condition is corrected. • They will reappear on the display ten minutes from the reset if the • They will not reappear until an ignition OFF-ON cycle has been • They reappear if the condition clears then reoccurs within the same
condition has not been corrected.
completed.
ignition ON-OFF cycle.
This acts as a reminder that these warning conditions still exist within the vehicle.
122
2007 Expedition (exd) Owners Guide (post-2002-fmt) USA (fus)
Warning display Driver door ajar Passenger door ajar Rear left door ajar Rear right door ajar Door ajar Liftgate/glass ajar Check charging system Tire pressure sensor fault (if equipped) Low tire pressure (if equipped) Tire pressure monitor fault (if equipped) 4x4 shift in progress (if equipped) Brake fluid level low Check park brake Washer fluid level low XXX% Oil life change soon Oil change required Check brake system
XXX miles (km) to empty fuel level low
Park brake engaged
Driver Controls
Status Warning can be reset. Will return if reset and warning is cleared and set again within the same ignition cycle. Will return on ignition cycle.
Warning can be reset. Will NOT return if reset and warning is cleared and set again within the same ignition cycle. Will return on ignition cycle.
Warning can be reset. Will return after 10 minutes. If within the 10 minutes, the condition is cleared and set again, it will not return until the initial 10 minutes is up. Will return on ignition cycle. Warning can be reset. Will return after 10 minutes. If within the 10 minutes, the condition is cleared and set again, it will return immediately. Will return on ignition cycle.
DOOR AJAR. Displayed when a door is not completely closed. CHECK CHARGING SYSTEM. Displayed when the electrical system is not maintaining proper voltage when the engine is running. If you are operating electrical accessories when the engine is idling at a low speed,
123
2007 Expedition (exd) Owners Guide (post-2002-fmt) USA (fus)
Driver Controls
turn off as many of the electrical loads as soon as possible. If the warning stays on or comes on when the engine is operating at normal speeds, have the electrical system checked as soon as possible. PARK BRAKE ENGAGED. Displayed when the manual park brake is set, the engine is running and the vehicle is driven more than 3 mph (5 km/h). If the warning stays on after the park brake is released, contact your authorized dealer as soon as possible. CHECK BRAKE SYSTEM. Displayed when the braking system is not operating properly. If the warning stays on or continues to come on, contact your authorized dealer as soon as possible. LOW TIRE PRESSURE (if equipped). Displayed when one or more tires on your vehicle have low tire pressure. Refer to Inflating your tires in the Tires, Wheels and Loading chapter. TIRE MONITOR FAULT (if equipped). Displayed when the Tire Pressure Monitoring System is malfunctioning. If the warning stays on or continues to come on, have the system inspected by your authorized dealer. TIRE SENSOR FAULT (if equipped). Displayed when a tire pressure sensor is malfunctioning, or your spare tire is in use. For more information on how the system operates under these conditions, refer to Understanding your Tire Pressure Monitoring System in the Tires, Wheels and Loading chapter. If the warning stays on or continues to come on, have the system inspected by your authorized dealer. BRAKE FLUID LEVEL LOW. Indicates the brake fluid level is low and the brake system should be inspected immediately. Refer to Brake fluid reservoir in the Maintenance and Specifications chapter. WASHER FLUID LEVEL LOW. Indicates the washer fluid reservoir is less than one quarter full. Check the washer fluid level. Refer to Windshield washer fluid in the Maintenance and Specifications chapter. XXX% OIL LIFE CHANGE SOON/OIL CHANGE REQUIRED. Displayed when the engine oil life remaining is 5 percent or less. When oil life left is between 5% and 0%, the XXX% OIL LIFE CHANGE SOON message will be displayed. When oil life left reaches 0%, the OIL CHANGE REQUIRED message will be displayed. LIFTGATE/GLASS AJAR. Displayed when the liftgate or the liftgate glass is not completely closed.
124
2007 Expedition (exd) Owners Guide (post-2002-fmt) USA (fus)
Driver Controls
OPTIONAL MESSAGE CENTER (IF EQUIPPED) With the ignition in the ON position, the message center, located on your instrument cluster, displays important vehicle information through a constant monitor of vehicle systems. You may select display features on the message center for a display of status preceded by a brief indicator chime. The system will also notify you of potential vehicle problems with a display of system warnings followed by a long indicator chime.
Selectable features
Reset Press this control to select and reset functions shown in the INFO menu and SETUP menu.
Info menu This control displays the following control displays: • Odometer/Compass • Outside air temperature (if equipped) • Trip odometer • Distance to Empty • Average Fuel Economy • Instantaneous Fuel Economy • Trip Elapsed Drive Time • Blank Screen Odometer/Trip odometer Refer to Gauges in the Instrument Cluster chapter.
2007 Expedition (exd) Owners Guide (post-2002-fmt) USA (fus)
125
Driver Controls
Outside air temperature (if equipped) Press and hold the INFO button for 2 seconds to display the outside temperature. To switch from a blank display to the temperature display, hold the INFO button for 2 seconds until the temperature is seen in the display. To switch the temperature display to compass display, hold the INFO button again for 2 seconds until the compass heading is seen in the display Compass display (if equipped) The compass reading may be affected when you drive near large buildings, bridges, power lines and powerful broadcast antenna. Magnetic or metallic objects placed in, on or near the vehicle may also affect compass accuracy. Usually, when something affects the compass readings, the compass will correct itself after a few days of operating your vehicle in normal conditions. If the compass still appears to be inaccurate, a manual calibration may be necessary. Refer to Compass zone/calibration adjustment. Most geographic areas (zones) have a magnetic north compass point that varies slightly from the northerly direction on maps. This variation is four degrees between adjacent zones and will become noticeable as the vehicle crosses multiple zones. A correct zone setting will eliminate this error. Refer to Compass zone/calibration adjustment. Compass zone/calibration adjustment 1. Determine your magnetic zone by referring to the zone map. 2. Turn ignition to the ON position. 3. Start the engine. 4. From Setup menu, select the Update Zone function.
23
15
14
13
127 8 9 1011
126
2007 Expedition (exd) Owners Guide (post-2002-fmt) USA (fus)
Driver Controls
5. Press and release the RESET until the message center displays a selection to change the current zone setting.
6. Press and release the RESET control until the message center display changes to show the current zone setting (XX). 7. Press and release the RESET control repeatedly until the correct zone setting for your geographic location is displayed on the message center. The range of zone values are from 1 to 15 and “wraps” back to 1. 8. To exit the zone setting mode, and to “lock in” your change: • press and release the SETUP control or, • press INFO control to exit or, • wait 4 seconds and the zone will be “locked in”. Perform compass calibration in an open area free from steel structures and high voltage lines. For optimum calibration, turn off all electrical accessories (heater/air conditioning, wipers, etc.) and make sure all vehicle doors are shut. 9. Press the RESET control to start the compass calibration function. 10. Slowly drive the vehicle in a circle (less than 3 mph [5 km/h]) until the CIRCLE SLOWLY TO CALIBRATE display changes to CALIBRATION COMPLETED. It will take up to five circles to complete calibration. 11. The compass is now calibrated. Note: If the RESET control is pressed or 3 minutes has expired, the display will go back to the INFO menu and will show CAL instead of the compass heading until the compass is calibrated.
127
2007 Expedition (exd) Owners Guide (post-2002-fmt) USA (fus)
Driver Controls
and sound a tone for one second when you have
Distance to empty (DTE) Selecting this function from the INFO menu estimates approximately how far you can drive with the fuel remaining in your tank under normal driving conditions. Remember to turn the ignition OFF when refueling to allow this feature to correctly detect the added fuel. The DTE function will display XXX MILES TO E FUEL LEVEL LOW approximately 50 miles (80 km) to empty. If you RESET this warning message, this display and tone will return after 10 minutes. DTE is calculated using a running average fuel economy, which is based on your recent driving history of 500 miles (800 km). This value is not the same as the average fuel economy display. The running average fuel economy is reinitialized to a factory default value if the battery is disconnected. Average fuel economy (AFE) Select this function from the INFO menu to display your average fuel economy in miles/gallon or liters/ 100 km. If you calculate your average fuel economy by dividing 100 miles traveled by gallons of fuel used (kilometers traveled by liters used), your figure may be different than displayed for the following reasons: • Your vehicle was not perfectly level during fill-up • Differences in the automatic shut-off points on the fuel pumps at • Variations in top-off procedure from one fill-up to another • Rounding of the displayed values to the nearest 0.1 gallon (liter) 1. Drive the vehicle at least 5 miles (8 km) with the speed control system engaged to display a stabilized average. 2. Record the highway fuel economy for future reference. It is important to press the RESET control (press and hold RESET for 2 seconds in order to reset the function) after setting the speed control to get accurate highway fuel economy readings.
service stations
128
2007 Expedition (exd) Owners Guide (post-2002-fmt) USA (fus)
Driver Controls
Instantaneous fuel economy Press INFO until the menu displays “MPG”. This will display your fuel economy as a Bar Graph ranging from poor economy to excellent economy. Your vehicle must be moving to calculate instantaneous fuel economy. When your vehicle is not moving, this function shows one or no bars illuminated. Instantaneous fuel economy cannot be reset. Trip elapsed drive time Select this function from the INFO menu to display a timer. To operate the Trip Elapsed Drive Time perform the following: 1. Press and release RESET in order to start the timer. 2. Press and release RESET to pause the timer. 3. Press and hold RESET for 2 seconds in order to reset the timer. Setup menu Press this control for the following displays: • Reset to English (if in another • System Check • Oil Life • Units (English/Metric) • Autolamp Delay (if equipped) • Air Suspension (if equipped) • Autolock (if equipped) • Power Liftgate (if equipped) • Easy Entry/Exit (if equipped) • Compass Zone (if equipped) • Compass Calibration (if equipped) • Language
language)
129
2007 Expedition (exd) Owners Guide (post-2002-fmt) USA (fus)
Driver Controls
Reset to English (if in another language) When entering the SETUP MENU and a non-English language has been selected, “HOLD RESET FOR ENGLISH” will be displayed to change back to English. Press and hold the RESET control to set the language choice. Easy entry/exit (if equipped) This feature automatically moves the drivers seat backwards for easy exit from the vehicle. 1. To disable/enable the easy entry/exit seat feature, select this function from the SETUP control for the current display mode. 2. Press the RESET control to turn the easy entry/exit ON or OFF. Autolamp delay This feature keeps your headlights on for up to three minutes after the ignition is switched off. 1. To disable/enable the autolamp delay feature, select this function from the SETUP control for the current display mode. 2. Press the RESET control to select the new Autolamp delay values of 0, 10, 20, 30, 60, 90, 120 or 180
seconds. Air Suspension Before disabling the air suspension, make sure the liftgate and liftgate glass are in the closed position. 1. To disable/enable the air suspension feature with the vehicle in P (Park), select this function from the SETUP control for the current display mode. 2. Press the RESET control to turn the air suspension OFF or ON.130
2007 Expedition (exd) Owners Guide (post-2002-fmt) USA (fus)
Driver Controls
Autolock This feature automatically locks all vehicle doors when the vehicle is shifted into any gear, putting the vehicle in motion. 1. To disable/enable the autolock feature, select this function from the SETUP control for the current display mode. 2. Press the RESET control to turn the autolock ON or OFF. Power Liftgate (if equipped) This feature allows users to open/close the rear liftgate at the touch of a button. 1. To disable/enable the power liftgate feature, select this function from the SETUP control for the current display mode. 2. Press the RESET control to turn the power liftgate ON or OFF. If disabled, the outside release handle and the rear cargo area control button are off. The instrument panel button will continue to function the liftgate in power mode. Language 1. Select this function from the SETUP menu for the current language to be displayed.
2. Waiting 4 seconds or pressing the RESET control cycles the message center through each of the language choices.
Selectable languages are English, Spanish, or French.
131
2007 Expedition (exd) Owners Guide (post-2002-fmt) USA (fus)
Driver Controls
3. Press and hold the RESET control for 2 seconds to set the language choice.
Units (English/Metric) 1. Select this function from the SETUP menu for the current units to be displayed. 2. Press the RESET control to change from English to Metric. System check Selecting this function from the SETUP menu causes the message center to cycle through each of the systems being monitored. For each of the monitored systems, the message center will indicate either an OK message or a warning message for two seconds. Pressing the RESET control cycles the message center through each of the systems being monitored. The sequence of the system check report and how it appears in the message center is as follows: 1. OIL LIFE 2. CHARGING SYSTEM 3. WASHER FLUID LEVEL 4. DOOR STATUS 5. LIFTGATE/GLASS 6. BRAKE FLUID LEVEL 7. TIRE PRESSURE SYSTEM (if equipped) 8. AIR SUSPENSION SYSTEM (if equipped) 9. FUEL LEVEL
132
2007 Expedition (exd) Owners Guide (post-2002-fmt) USA (fus)
Driver Controls
System warnings System warnings alert you to possible problems or malfunctions in your vehicle’s operating systems. In the event of a multiple warning situation, the message center will cycle the display to show all warnings by displaying each one for 4 seconds. The message center will display the last selected feature if there are no more warning messages. This allows you to use the full functionality of the message center after you acknowledge the warning by pressing the RESET control and clearing the warning message. Warning messages that have been reset are divided into three categories: • They cannot be cleared until the condition is corrected. • They will reappear on the display ten minutes from the reset. • They will not reappear until an ignition OFF-ON cycle has been
completed.
Status Warning can be reset. Will return if reset and warning is cleared and set again within the same ignition cycle. Will return on ignition cycle.
This acts as a reminder that these warning conditions still exist within the vehicle. Warning display Driver door ajar Passenger door ajar Rear left door ajar Rear right door ajar Door ajar Liftgate/glass ajar Check charging system Tire pressure sensor fault (if equipped) Low tire pressure (if equipped) Tire pressure monitor fault (if equipped) 4x4 shift in progress (if equipped) Air suspension OFF (if equipped)
133
2007 Expedition (exd) Owners Guide (post-2002-fmt) USA (fus)
Driver Controls
Warning display Brake fluid level low Check park brake Washer fluid level low Oil change required XXX% Oil life change soon Check air suspension (if equipped) Check brake system
XXX miles (km) to empty fuel level low
Park brake engaged
Press reset to clear
Park aid
OFF (if equipped) Status Warning can be reset. Will NOT return if reset and warning is cleared and set again within the same ignition cycle. Will return on ignition cycle.
Warning can be reset. Will return after 10 minutes. If within the 10 minutes, the condition is cleared and set again, it will not return until the initial 10 minutes is up. Will return on ignition cycle. Warning can be reset. Will return after 10 minutes. If within the 10 minutes, the condition is cleared and set again, it will return immediately. Will return on ignition cycle. This can be reset, it will remain on the display for 4 seconds. This cannot be reset. Pressing reset will change the option from ON to OFF. It appears on the display when the vehicle is in reverse and will not go away until the vehicle is no longer in reverse.
134
2007 Expedition (exd) Owners Guide (post-2002-fmt) USA (fus)
Driver Controls
Status Temporary alert
Warning display For 4x4 low stop vehicle (if equipped) For 4x4 apply brake (if equipped) For 4x4 shift to N (if equipped) To exit 4x4 low stop vehicle (if equipped) To exit 4x4 apply brake (if equipped) To exit 4x4 shift to N (if equipped) DRIVER DOOR AJAR. Displayed when the driver door is not completely closed. PASSENGER DOOR AJAR. Displayed when the passenger door is not completely closed. REAR LEFT DOOR AJAR. Displayed when the rear left door is not completely closed. REAR RIGHT DOOR AJAR. Displayed when the rear right door is not completely closed. DOOR AJAR. Displayed when there is an error with the door ajar system. LIFTGATE/GLASS AJAR. Displayed when the liftgate or liftgate glass is not completely closed. LOW TIRE PRESSURE.Displayed when one or more tires on your vehicle have low tire pressure. Refer to Inflating Your Tires in the Tires, Wheels and Loading chapter. TIRE PRESSURE MONITOR FAULT. Displayed when the Tire Pressure Monitoring System is malfunctioning. If the warning stays on or continues to come on, have the system inspected by your authorized dealer. TIRE PRESSURE SENSOR FAULT. Displayed when a tire pressure sensor is malfunctioning, or your spare tire is in use. For more information on how the system operates under these conditions, refer to Understanding Your Tire Pressure Monitoring System in the Tires,
135
2007 Expedition (exd) Owners Guide (post-2002-fmt) USA (fus)
Driver Controls
Wheels and Loading chapter. If the warning stays on or continues to come on, have the system inspected by your authorized dealer. 4X4 SHIFT IN PROGRESS. Displayed on 4x4 vehicles only when 4x4
Low, 4x4 High or 4x4 Auto Range is selected. For further information, refer to AdvanceTrac威 with RSC stability enhancement system in the Driving chapter. XXX MILES TO EMPTY FUEL LEVEL LOW. Displayed as an early reminder of a low fuel condition. AIR SUSPENSION OFF (if equipped). Displayed when the air suspension is off. For more information, refer to Air suspension in the Driving chapter. BRAKE FLUID LEVEL LOW. Indicates the brake fluid level is low and the brake system should be inspected immediately. Refer to Brake fluid reservoir in the Maintenance and Specifications chapter. CHECK PARK BRAKE. Displayed when the park brake is engaged. If the warning stays on after the park brake is off, contact your authorized dealer as soon as possible. WASHER FLUID LEVEL LOW. Indicates the washer fluid reservoir is less than one quarter full. Check the washer fluid level. Refer to Windshield washer fluid in the Maintenance and Specifications chapter. CHECK AIR SUSPENSION (if equipped). Displayed when the air suspension system is not operating properly. If this message is displayed while driving, pull off the road as soon as safely possible. For more information, refer to Air suspension in the Driving chapter. CHECK BRAKE SYSTEM. Displayed when the braking system is not operating properly. If the warning stays on or continues to come on, contact your authorized dealer as soon as possible. PARK BRAKE ENGAGED. Displayed when the manual park brake is set, the engine is running and the vehicle is driven more than 3 mph (5 km). If the warning stays on after the park brake is released, contact your authorized dealer as soon as possible. PARK AIDOFF (if equipped). Displayed when the transmission is in R (Reverse). Refer to Reverse Sensing System in this section to enable. OIL CHANGE REQUIRED/CHANGE OIL SOON. Displayed when the engine oil life remaining is 5 percent or less. When oil life left is between 5% and 0%, the CHANGE OIL SOON message will be displayed. When oil life left reaches 0%, the OIL CHANGE REQUIRED message will be displayed. 136
2007 Expedition (exd) Owners Guide (post-2002-fmt) USA (fus)
Driver Controls
An oil change is required whenever indicated by the message center and according to the recommended maintenance schedule. USE ONLY RECOMMENDED ENGINE OILS. To reset the oil monitoring system to 100% after each oil change [approximately 5,000 miles (8,000 km) or 180 days] perform the following: 1. Press and release the SETUP control to display “OIL LIFE = XXX% HOLD RESET = NEW”.
2. Press and hold the RESET control for 2 seconds and release. Oil life is set to 100% and “OIL LIFE SET TO 100%” is displayed.
FOR 4X4 LOW STOP VEHICLE (if equipped). Displayed when 4X4
LOW is selected while the vehicle is moving. For more information, refer to Control trac four-wheel drive (4x4) operation in the Driving chapter. FOR 4X4 APPLY BRAKE (if equipped). Displayed when 4X4 LOW is selected while the vehicle is moving. For more information, refer to Control trac four-wheel drive (4x4) operation in the Driving chapter. FOR 4X4 SHIFT TO N (if equipped). Displayed when 4X4 LOW is selected and the vehicle is stopped. For more information, refer to Control trac four-wheel drive (4x4) operation in the Driving chapter. TO EXIT 4X4 LOW STOP VEHICLE (if equipped). Displayed when 2WD is selected while the vehicle is operating in 4X4 LOW. For more information, refer to Control trac four-wheel drive (4x4) operation in the Driving chapter. TO EXIT 4X4 LOW APPLY BRAKE (if equipped). Displayed when 2WD is selected while the vehicle is operating in 4X4 LOW. For more information, refer to Control trac four-wheel drive (4x4) operation in the Driving chapter. TO EXIT 4X4 SHIFT TO N (if equipped). Displayed when 2WD is selected while the vehicle has been stopped in 4X4 LOW. For more information, refer to Control trac four-wheel drive (4x4) operation in the Driving chapter.137
2007 Expedition (exd) Owners Guide (post-2002-fmt) USA (fus)
Driver Controls
POSITIVE RETENTION FLOOR MAT (IF EQUIPPED)
Do not install additional floor mats on top of the factory installed floor mats as they may interfere with the accelerator or the
brake pedals.
Position the floor mat so that the eyelet is over the pointed end of the retention post and rotate forward to lock in. Make sure that the mat does not interfere with the operation of the accelerator or the brake pedal. To remove the floor mat, reverse the installation procedure.
POWER LIFTGATE (IF EQUIPPED) The liftgate can be operated by the following: • instrument panel control button • key fob button • outside release handle • control button in the rear cargo area Note: The liftgate can be reversed with a second press on a control button or key fob and can be manually closed at any time. The liftgate will only operate with the vehicle in P (Park). The chime will beep once if conditions are not correct to start an operation. These conditions include: • the vehicle speed is at or above 3 mph (5 kph) • or the ignition is in Run and the transmission is not in Park • or the Battery Voltage is below the minimum operating voltage
WARNING: Make sure all persons are clear of the power liftgate area before using the power liftgate control.
138
2007 Expedition (exd) Owners Guide (post-2002-fmt) USA (fus)
Driver Controls
Keep keys out of reach of children. Do not allow children to play near an open or moving power liftgate.
Do not open the liftgate in a garage or other enclosed area with a low ceiling. If the liftgate is raised the liftgate could be damaged against a low ceiling. To open the liftgate from the Instrument panel: Press the button once to open the liftgate, press it again to close.
To open the liftgate with the Key fob: Refer to Remote Entry System in the Locks and security chapter. To open the liftgate with outside release handle (manual actuation): 1. To open, unlock the liftgate with the key fob or power door unlock control. 2. Pull and release the liftgate handle to open the liftgate. Note: For the best performance allow the power system to open the liftgate after releasing the handle. Continued upward force after unlatching may activate the obstacle detection feature and stop the power system. Note: If weight is added to the gate (bike rack, snow, etc.) the gate may automatically start a power close event immediately after a power open. In this mode a unique continuous chime will sound.
139
2007 Expedition (exd) Owners Guide (post-2002-fmt) USA (fus)
Driver Controls
To close the liftgate with the rear cargo area control button: Press and release the control on the left rear quarter panel to close the liftgate. The chime will beep once if conditions are not correct to start an operation (i.e., the vehicle is out of park). In a normal close, the chime will begin just before the gate starts to move and continue for total of three seconds. Press and release the control to open or reverse the liftgate. Rear cargo area control button will not open the liftgate when the liftgate is latched.
Warning, keep clear of the liftgate when activating the rear switch.
To manually operate the liftgate: 1. Disable the liftgate power function, refer to the Message Center in this chapter. 2. Open and close the liftgate as you would a standard liftgate. Note: In case of operation in extreme cold -40° F (-40° C), or on extreme inclines, manual operation of the liftgate is suggested. Obstacle detection The power liftgate system is equipped with an obstacle detection feature. If the power liftgate is closing, the system is designed to reverse to full open when it encounters a solid obstacle. A three second chime is also sounded when an obstacle is detected. Once the obstacle is removed, the liftgate can be closed under power. If the power liftgate is opening, the system is designed to stop when it encounters a solid obstacle. A chime will continuously sound while the obstacle is present. Resetting the power liftgate: The power liftgate may not operate under these conditions. If any of these conditions occur, the power liftgate must be reset. • a low voltage or dead battery
140
2007 Expedition (exd) Owners Guide (post-2002-fmt) USA (fus)
Driver Controls
• disconnected battery • the liftgate is manually closed and left ajar (unlatched) To reset the power liftgate: 1. Manually close and fully latch the liftgate. 2. Power open the liftgate by using the keyfob or instrument panel button. Note: If the power liftgate system is turned
in the message center, the system cannot be activated with the outside release handle or rear cargo area control button. The system will need to be turned to resume operation with the outside release handle or rear cargo area control button. The Power Liftgate is still operational through the use of the Key Fob and IP button when the Power Liftgate is turned off in the Message center. Liftgate ajar signal If the liftgate or liftgate glass are not fully latched, you will receive a “LIFTGATE or LIFTGLASS AJAR” message on the instrument panel. If you see this message, check both the liftgate glass and liftgate door to insure they are fully latched. Make sure the liftgate is closed to prevent exhaust fumes from being drawn into the vehicle. If you must drive with the liftgate
open, keep the vents open so outside air comes into the vehicle.
Liftgate window To open the liftgate window, push the button on the left side of the liftgate handle above the license plate.
141
2007 Expedition (exd) Owners Guide (post-2002-fmt) USA (fus)
Driver Controls
MANUAL LIFTGATE (IF EQUIPPED) • To open the liftgate, position your hand on top of the liftgate handle and pull to open the liftgate. • Do not open the liftgate or
liftgate glass in a garage or other enclosed area with a low ceiling. If the liftgate glass is raised and the liftgate is also opened, both liftgate and glass could be damaged against a low ceiling.
• Do not leave the liftgate or liftgate glass open while driving. Doing so could cause serious damage to the liftgate and its components as well as allowing carbon monoxide to enter the vehicle.
Do not grab or pull the liftgate handle from the bottom. Doing so may cause wrist or arm injury.
Make sure the liftgate is closed to prevent exhaust fumes from being drawn into the vehicle. If you must drive with the liftgate
open, keep the vents open so outside air comes into the vehicle.
CARGO MANAGEMENT SYSTEM (IF EQUIPPED) The cargo management system consists of a storage compartment located in the floor of the rear cargo area. 1. To open, lift up on the handle and cover. 2. To close, lower the cover and press down on the handle until the latch clicks.
142
2007 Expedition (exd) Owners Guide (post-2002-fmt) USA (fus)
Driver Controls
Cargo shelf/divider (if equipped) The cargo shelf/divider is located behind the rear seat of your vehicle. The shelf has two positions: Flat shelf which pivots up and snaps into place OR a divider which pivots up and snaps vertically into place. Do not put more than 30 lbs. (14 kg) on the shelf. To move the shelf to the shelf position, pull up and pivot the shelf over the channels on the side trim panels and snap the shelf ends in the channels.
To move the shelf to the divider position, pull up and pivot the shelf over the channels on the side trim panels and snap vertically in place.
Do not load any objects on the shelf that may obstruct your vision or strike occupants of the vehicle in the case of a sudden
stop or collision.
Do not place people or pets on or under the parcel shelf.
143
2007 Expedition (exd) Owners Guide (post-2002-fmt) USA (fus)
Driver Controls
LUGGAGE RACK Your vehicle is equipped with a roof rack for transporting items on the exterior of the vehicle. The maximum recommended load to be carried on the roof rack is 200 lbs (90 kg), evenly distributed. The cross-bars can be adjusted by using the thumbwheels at each end. Use the tie-down loops on the thumbwheels to secure load.
To adjust the position of the cross-bar (if equipped): 1. Loosen the thumbwheel at both ends of the cross-bar (both cross-bars are adjustable). 2. Slide the cross-bar to the desired location. 3. Firmly retighten the thumbwheels at each end of the cross-bar.
Be sure to check that the thumbwheels are tight each time load is added or removed from the roof rack, and periodically while traveling. Always ensure that the load is secure before traveling. Ford Motor Company recommends loading the roof rack only when equipped with (optional) crossbars, to avoid unintended damage to the roof panel.
144
2007 Expedition (exd) Owners Guide (post-2002-fmt) USA (fus)
Locks and Security
KEYS One key operates all the locks and starts the vehicle. Always carry a spare key with you in case of an emergency. Your keys are programmed to your vehicle; using a non-programmed key will not permit your vehicle to start. If you lose your authorized dealer supplied keys, replacement keys are available through your authorized dealer. Refer to the SecuriLock娂 passive anti-theft system section later in this chapter for more information.
POWER DOOR LOCKS If the door does not unlock when the control is pressed, refer to the Power door lock disable feature section in this chapter. Press control to unlock all doors.
Press control to lock all doors.
Smart unlocking feature The smart unlocking feature helps prevent you from locking yourself out of the vehicle. With the key in any ignition position, the driver’s door will automatically unlock if it is locked using the power lock control on the driver’s door panel while the driver’s door is open.
Autolock The autolock feature will lock all the doors, liftgate and liftgate window when: • all doors are closed, • the ignition is in the 3 (ON) position, • you shift into any gear putting the vehicle in motion, and • the vehicle attains a speed greater than 12 mph (20 km/h).
145
2007 Expedition (exd) Owners Guide (post-2002-fmt) USA (fus)
Locks and Security
The autolock feature repeats when: • any door is opened then closed while the ignition is in the 3 (ON) position and the vehicle speed is 9 mph (15 km/h) or lower, and • the vehicle attains a speed greater than 12 mph (20 km/h). Deactivating/activating autolock Your vehicle comes with the autolock feature enabled. There are four methods to enable/disable this feature: • Through your authorized dealer, or • Performing the power door lock control procedure, or • Performing the keyless entry key pad (if equipped) procedure, or • Performing the message center (if equipped) procedure. Before following the activation or deactivation procedures, make sure that the anti-theft system is not armed, ignition is in the 1 (OFF/LOCK) position, and all vehicle doors, liftgate and liftgate window are closed. Power door unlock/lock procedure You must complete Steps 1-5 within 30 seconds or the procedure will have to be repeated. If the procedure needs to be repeated, you must wait 30 seconds. Note: All doors must be closed and remain closed throughout the configuration process. 1. Turn the ignition to the 3 (ON) position. 2. Press the power door unlock control three times. 3. Turn the ignition from the 3 (ON) to the 1 (OFF/LOCK) position. 4. Press the power door unlock control three times. 5. Turn the ignition back to the 3 (ON) position. The horn will chirp. 6. Press the unlock control, then press the lock control. The horn will chirp once if autolock was deactivated or twice (one short and one long chirp) if autolock was activated. 7. Turn the ignition to the 1 (OFF/LOCK) position. The horn will chirp once to confirm the procedure is complete. Keyless entry key pad procedure 1. Turn the ignition to the 1 (OFF/LOCK) position. 2. Close all doors, the liftgate and liftgate window.
146
2007 Expedition (exd) Owners Guide (post-2002-fmt) USA (fus)
Locks and Security
3. Enter 5–digit entry code 4. Press and hold the 3 • 4. While holding the 3 • 4 press the 7 • 8. 5. Release the 7 • 8. 6. Release the 3 • 4. The user should receive a horn chirp to indicate the system has been disabled or a chirp followed by a honk to indicate the system has been enabled. Message center procedure For information on activating/deactivating the autolock feature using the vehicle’s message center (if equipped), refer to Message center information in the Driver Controls chapter.
CHILDPROOF DOOR LOCKS When these locks are set, the rear doors cannot be opened from the inside. The rear doors can be opened from the outside when the doors are unlocked. The childproof locks are located on rear edge of each rear door and must be set separately for each door. Setting the lock for one door will not automatically set the lock for both doors. Move lock control up to engage the childproof lock. Move control down to disengage childproof locks.
REMOTE ENTRY SYSTEM This device complies with part 15 of the FCC rules and with RSS-210 of Industry Canada. Operation is subject to the following two conditions: (1) This device may not cause harmful interference, and (2) This device must accept any interference received, including interference that may cause undesired operation. Changes or modifications not expressly approved by the party responsible for compliance could void the user’s authority to operate the equipment. The remote entry system allows you to lock or unlock all vehicle doors and liftgate and open the liftgate window without a key.
147
2007 Expedition (exd) Owners Guide (post-2002-fmt) USA (fus)
Locks and Security
The remote entry lock/unlock feature operates in any ignition position. The liftgate glass features operate as long as vehicle speed is less than 5 mph (8 km/h). The panic feature operates with the key in the 1 (OFF/LOCK) position. If there is any potential remote keyless entry problem with your vehicle, ensure ALL remote entry transmitters are brought to the authorized dealer to aid in troubleshooting.
Unlocking the doors/liftgate Press this control to unlock the driver’s door. The interior lamps will illuminate when the ignition is in the 1 (OFF/LOCK) position. • 4–button remote
• 5–button remote
Press the control a second time within three seconds to unlock all doors and liftgate.
Locking the doors/liftgate Press this control to lock all doors and liftgate. The park/turn signal lamps will flash once. To confirm all doors are closed and locked, press the control a second time within three seconds; the park/turn signal lamps will flash once and the horn will chirp.
148
2007 Expedition (exd) Owners Guide (post-2002-fmt) USA (fus)
• 4–button remote
Locks and Security
• 5–button remote
If any of the doors or liftgate are ajar, the horn will make two quick chirps, reminding you to properly close all doors.
Opening the liftgate window Press the control to unlatch the liftgate window. • 4–button remote
149
2007 Expedition (exd) Owners Guide (post-2002-fmt) USA (fus)
Locks and Security • 5–button remote
Opening the power liftgate (if equipped) Press the control twice to fully unlatch and open the liftgate.
Make sure all persons are clear of the liftgate area before using power liftgate control.
In order to fully lower and latch the liftgate, press the control twice. If the liftgate stops mid travel, it may have detected an obstacle, Check to ensure the liftgate swing zone is free from obstruction and reset the power assist by manually closing the liftgate. Normal operation can then be resumed.
Make sure the liftgate is closed to prevent exhaust fumes from being drawn into the vehicle. This will also prevent passengers
and cargo from falling out. If you must drive with the liftgate open, keep the vents open so outside air comes into the vehicle.
Sounding a panic alarm Press this control to activate the alarm. The personal panic alarm will cycle the horn and parking lamps on/off.
150
2007 Expedition (exd) Owners Guide (post-2002-fmt) USA (fus)
• 4–button remote
Locks and Security
• 5–button remote
To deactivate the alarm, press the control again or turn the ignition to the 2 (ACCESSORY) or 3 (ON) position.
Memory feature The remote entry system can also control the memory feature. Press the control once to unlock the driver’s door. Pressing the control will automatically move the seat, rearview mirrors, and adjustable pedals to the desired memory position (the memory position corresponds to the transmitter being used). • 4–button remote
151
2007 Expedition (exd) Owners Guide (post-2002-fmt) USA (fus)
Locks and Security • 5–button remote
Activating the memory feature To activate this feature: 1. Position the seat, rearview mirror, and adjustable pedals to the positions you desire. 2. Press the SET control on the driver’s seat. 3. Within 5 five seconds, press one control on the remote transmitter and then press the 1 or 2 memory seat control to which you would like to associate with Driver 1 or Driver 2 positions. 4. Repeat this procedure for another remote transmitter if desired. Deactivating the memory seat feature To deactivate this feature: 1. Press the SET control on the driver’s seat. 2. Within 5 five seconds, press any control on the remote transmitter which you would like to deactivate and then press the SET control on the memory seat control.
3. Repeat this procedure for another remote transmitter if desired.
Replacing the battery The remote entry transmitter uses one coin type three-volt lithium battery CR2032 or equivalent.
152
2007 Expedition (exd) Owners Guide (post-2002-fmt) USA (fus)
Locks and Security
To replace the battery: 1. Twist a thin coin between the two halves of the remote entry transmitter near the key ring. DO NOT TAKE THE RUBBER COVER AND CIRCUIT BOARD OFF THE FRONT HOUSING OF THE REMOTE ENTRY TRANSMITTER.
2. Do not wipe off any grease on the battery terminals on the back surface of the circuit board.
3. Remove the old battery. Note: Please refer to local regulations when disposing of transmitter batteries. 4. Insert the new battery. Refer to the diagram inside the remote entry transmitter for the correct orientation of the battery. Press the battery down to ensure that the battery is fully seated in the battery housing cavity. 5. Snap the two halves back together. Note: Replacement of the battery will not cause the remote transmitter to become deprogrammed from your vehicle. The remote transmitter should operate normally after battery replacement.
Replacing lost transmitters If a remote transmitter has been lost and you would like to remove it from the vehicle’s memory, or you would like to purchase additional remote transmitters and have them programmed to your vehicle: • Take all your vehicle’s transmitters to your dealer for programming, or • Perform the programming procedure yourself.
153
2007 Expedition (exd) Owners Guide (post-2002-fmt) USA (fus)
Locks and Security
Programming remote transmitters It is necessary to have all (maximum of six — original and/or new) of your remote transmitters available prior to beginning this procedure. If all remote entry transmitters are not present during the programming procedure, the transmitters that are not present during programming will no longer operate the vehicle. Note: Do not press the brake pedal anytime during this sequencing, as doing so will invalidate the procedure. To program the transmitters yourself: • Unlock all doors using the power door lock/unlock control. Insert a key in the ignition and turn from the 1 (OFF/LOCK) to the 3 (ON) position and cycle between 1 (OFF/LOCK) and 3 (ON) eight times in rapid succession (within 10 seconds) with the eighth turn ending in the 3 (ON) position. The locks will cycle between unlocked and locked to confirm that the programming mode has been entered.
• Within 20 seconds, program a remote transmitter by pressing any button on a transmitter. The locks will cycle once to confirm that the remote transmitter has been programmed. If more than 20 seconds pass before pressing a remote transmitter button, the programming mode will exit and the procedure will have to be repeated. • Repeat the previous step to program additional remote transmitters. The locks will cycle once to confirm that each remote transmitter has been programmed. • When you have completed programming the remote transmitters, turn
the ignition to the 1 (OFF/LOCK) position or wait 20 seconds. The doors will again lock/unlock to confirm programming has been completed.
Illuminated entry The lamps illuminate when the remote entry system is used to unlock the door(s). The system automatically turns off after 25 seconds or when the ignition is turned to the 2 (ACCESSORY) or 3 (ON) position. The dome lamp control must not be set to the off position for the illuminated entry system to operate.
154
2007 Expedition (exd) Owners Guide (post-2002-fmt) USA (fus)
Locks and Security
(unlock) control on the
(lock) control is pressed, or
Perimeter lamps illuminated entry The following items will illuminate when the remote entry transmitter is pressed: • Head lamps • Park lamps • Tail lamps The lamps will automatically turn off: • if the ignition switch is turned to the 3 (RUN) position, or • the • after 25 seconds of illumination. Note: On some vehicles, the perimeter lamps illuminated entry feature will not activate in daylight conditions. Deactivating/activating perimeter lamps illuminated entry You may enable/disable this feature by having your vehicle serviced by your authorized dealer. You may also perform the following power door lock sequence to enable/disable the perimeter lamps feature. Note: Before starting, ensure the ignition is in the 1 (LOCK) position and all vehicle doors are closed. You must complete Steps 1–5 within 30 seconds or the procedure will have to be repeated. If the procedure needs to be repeated, wait a minimum of 30 seconds before beginning again. 1. The ignition must be OFF to begin the sequence. 2. Place the key in the ignition and turn the ignition to the 3 (RUN) position. 3. Press the power door unlock control on the door panel three times. 4. Turn the ignition from the 3 (RUN) position to the 1 (LOCK) position. 5. Press the power door unlock control on the door panel three times. 6. Turn the ignition back to the 3 (RUN) position. The horn will chirp one time to confirm programming mode has been entered and is active. 7. Press the power door unlock control twice within 5 seconds. Note: The horn will chirp once to indicate the perimeter lighting feature has
155
2007 Expedition (exd) Owners Guide (post-2002-fmt) USA (fus)
Locks and Security
been deactivated. The horn will chirp once and honk once (one short and one long) to indicate the perimeter lighting feature has been activated. 8. Turn the ignition to the 1 (LOCK) position to exit the procedure. Note: The horn will chirp once to confirm the procedure is complete. KEYLESS ENTRY SYSTEM (IF EQUIPPED) You can use the keyless entry keypad to: • lock or unlock the doors without using a key, • activate or deactivate the Autolock feature if equipped • release the liftgate glass, The keypad can be operated with the factory set 5–digit entry code; this code is located on the owner’s wallet card in the glove box and is available from your authorized dealer. You can also create your own 5–digit personal entry code. When pressing the controls on the keyless entry keypad, press the middle of the controls to ensure a good activation. Programming your own personal entry code To create your own personal entry code: 1. Enter the factory set code. 2. Within five seconds press the 1 • 2 on the keypad. 3. Enter your personal 5–digit code. Each number must be entered within five seconds of each other. 4. Three unique personal entry codes can be stored: • Pressing 1 • 2 assigns driver 1 settings. • Pressing 3 • 4 assigns driver 2 settings. • Pressing 5 • 6, 7 • 8, or 9 • 0 assigns Driver 3 settings. 5. The doors will again lock then unlock to confirm that your personal keycode has been programmed to the module. • Do not use five numbers in sequential order. • The factory set code will work even if you have set your own personal
code.
Erasing personal code 1. Enter the factory set 5–digit code. 2. Within five seconds, press the 1 • 2 on the keypad and release.
156
2007 Expedition (exd) Owners Guide (post-2002-fmt) USA (fus)
Locks and Security 3. Press and hold the 1 • 2 for two seconds. This must be done within