- 1997 Ford Escort Owners Manuals
- Ford Escort Owners Manuals
- 2000 Ford Escort Owners Manuals
- Ford Escort Owners Manuals
- 1996 Ford Escort Owners Manuals
- Ford Escort Owners Manuals
- 2002 Ford Escort Owners Manuals
- Ford Escort Owners Manuals
- 1999 Ford Escort Owners Manuals
- Ford Escort Owners Manuals
- 1998 Ford Escort Owners Manuals
- Ford Escort Owners Manuals
- 2001 Ford Escort Owners Manuals
- Ford Escort Owners Manuals
- 2003 Ford Escort Owners Manuals
- Ford Escort Owners Manuals
- Download PDF Manual
-
avoid wearing loose clothing or jewelry that could get caught in moving parts. Take appropriate precautions with long hair.
q Do not work on a vehicle in an enclosed
space with the engine running, unless you are sure you have enough ventilation.
q Never get under a vehicle while it is
supported only by a jack. If you must work under a vehicle, use safety stands.
q Keep all lit cigarettes and other smoking materials away from the battery and all fuel-related parts.
If you disconnect the battery, the engine must “relearn” its idle conditions before your vehicle will drive properly. To find out how the engine does this, see Starting your vehicle’s fuel-injected engine in the Index.
Working with the engine off:
1. Set the parking brake fully and make sure
that the gearshift is securely latched in Park (automatic transaxle) or First (manual transaxle).
2. Remove the key from the ignition after you
turn the engine off.
3. Block the wheels. This will prevent your
vehicle from moving unexpectedly.
281
File:15ctsve.ex Update:Tue Sep 19 14:37:50 1995
*[SV02700(ALL)03/95] *[SV02825(ALL)04/95]
*[SV02850(ALL)03/95]
*[SV03000(ALL)02/95]
%*[SV03100(ALL)03/95] %*[SV03200(ALL)01/95]
%*[SV03300(ALL)02/95]
[SV03350(ALL)09/89]
*[SV04100(ALL)11/90]
Working with the engine on:
1. Set the parking brake fully and make sure the gearshift is securely latched in P (Park) (automatic transaxle) or Neutral (manual transaxle).
2. Block the wheels. This will prevent your
vehicle from moving unexpectedly.
RWARNING
Do not start your engine with the air cleaner removed and do not remove it while the engine is running.
Opening the Hood
1.
Inside the vehicle, pull the hood release handle located under the bottom left corner of the instrument panel.
2. Go to the front of the vehicle and release the auxiliary latch that is located under the hood at the center of the vehicle.
3. Lift the hood and secure it in the open
position with the prop rod.
When you close the hood, make sure the prop rod is in its retainer and that the hood latches securely.
282
F
File:15ctsve.ex Update:Tue Sep 19 14:37:50 1995
[SV04175(ALL)08/95]
%*[SV04500(ALL)04/95] *[SV04600(ALL)09/93] [SV05710(ALL)07/93]
[SV05725(ALL)07/93]
[SV05800(ALL)09/89]
RWARNING
Read and understand Precautions When Servicing Your Vehicle at the beginning of this chapter before opening the hood.
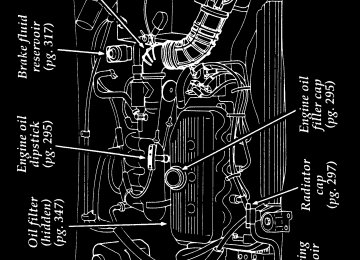
Engine Compartment Your vehicle has one of these types of engines:
a 1.9L SFI engine a 1.8L DOHC MFI engine
The following pages show diagrams of each engine type and where to find items that you should regularly service. The items most frequently checked or serviced by the owner will be highlighted in yellow.
284
F
F
File:15ctsve.ex Update:Tue Sep 19 14:37:50 1995
%*[SV05840(ALL)04/95] *[SV05850(ALL)04/95]
*[SV05860(ALL)07/95]
*[SV05870(ALL)08/95]
*[SV05880(ALL)07/95]
*[SV05890(ALL)04/95]
%*[SV06100(ALL)03/95] [SV06110(ALL)01/92]
[SV06235(ALL)07/93]
[SV06275(ALL)08/95]
[SV06300(ALL)03/95]
Cleaning the Engine
A clean engine is more efficient because a buildup of grease and dirt acts as an insulator, keeping the engine warmer than normal. q Extreme care must be used if a power washer is used to clean the engine. The high pressure fluid could penetrate sealed parts and assemblies causing damage or malfunctions.
In order to avoid possible cracking of the engine block or fuel injection pump, do not spray a hot engine or injection pump with cold water.
q The alternator, distributor and air intake must
be covered. Covering these components will help prevent water damage.
q Never wash or rinse the engine while it is running. Water getting into the engine may cause internal damage.
Filling the Fuel Tank The fuel filler door can be opened by pulling on the finger hold located on the rear edge of the fuel filler door.
For your convenience, a fuel filler door location indicator is included in your instrument cluster. It indicates which side of your vehicle contains the fuel filler door.
The fuel filler door is outside the vehicle on the driver side near the back.
1. Turn the ignition switch to the OFF position and remove the key. To remove the fuel cap, turn it counterclockwise.
287
File:15ctsve.ex Update:Tue Sep 19 14:37:50 1995
*[SV06325(ALL)05/95]
*[SV06350(ALL)05/95]
*[SV06375(ALL)05/95]
*[SV06400(ALL)06/95]
*[SV06425(ALL)05/95] *[SV06440(ALL)07/95]
%*[SV06450(ALL)05/95]
[SV06475(ALL)03/95]
RWARNING
If the fuel cap is venting vapor or if you hear a hissing sound, wait until it stops before completely removing the cap.
2. Make sure that you pump unleaded fuel and
put the nozzle all the way inside the fuel filler pipe.
3.
If you spill any fuel on the body of your vehicle, clean it off immediately. The fuel may dull or soften the paint if you do not wash it off.
4. Replace the fuel cap tightly when you are
finished. Turn it clockwise until you hear at least three clicks. The ratcheting mechanism allows the fuel cap to be sealed without overtightening.
5. Push the fuel door closed.
If you lose the fuel cap, replace it with an authorized Motorcraft or equivalent part.
RWARNING
If you do not use the proper fuel cap, the pressure in the fuel tank can damage the fuel system or cause it to work improperly in a collision.
NOTE: If you replace your fuel cap with an
aftermarket fuel filler cap, the customer warranty may be void for any damage to the tank and/or fuel system.
288
File:15ctsve.ex Update:Tue Sep 19 14:37:50 1995
[SV07670(ALL)06/95] *[SV07680(ALL)06/95]
*[SV07700(ALL)08/95]
%*[SV08750(ALL)05/95] *[SV08800(ALL)06/95]
[SV08900(ALL)06/95]
one inch art:0060001-C
*[SV08975(ALL)07/95]
[SV08985(ALL)06/95]
Choosing the Right Fuel Use only UNLEADED FUEL in your vehicle. Using leaded fuel is prohibited by federal law. Your warranty may not apply if your vehicle is damaged because you used the wrong fuel. Vehicle inspection programs may detect misfueling. Under these circumstances, you may be required by law to make costly repairs at your own expense. Octane Recommendations Your vehicle is designed to use regular fuel with an octane rating of 87. In most cases it is not necessary to use a fuel with an octane rating higher than 87. At service stations, the octane rating is displayed in a label on the pumps.
In some parts of the country, “regular” grade fuels are sold with octane ratings of 86 or even less, especially in high altitude areas. We recommend that you do not use these fuels. Always use a fuel with an octane rating of 87, even if it is sold as a “midgrade” or “premium.” Do not be concerned if your vehicle sometimes knocks lightly when you drive up a hill or when you accelerate. However, if a fuel with the recommended rating knocks heavily under all driving conditions or knocks lightly driving at cruising speed on level roads, see your dealer or a qualified service technician. Persistent, heavy knocking can damage the engine.
289
File:15ctsve.ex Update:Tue Sep 19 14:37:50 1995
*[SV09300(ALL)02/95] *[SV09475(ALL)06/95]
*[SV09477(ALL)08/95]
*[SV09479(ALL)08/95] [SV09481(ALL)06/95] *[SV09483(ALL)06/95] *[SV09486(ALL)08/95]
*[SV09487(ALL)04/95]
*[SV09489(ALL)06/95]
*[SV09510(ALL)06/95]
[SV09520(ALL)06/95] %*[SV09530(ALL)04/95]
Fuel Quality
If you are experiencing starting, rough idle or hesitation problems when the engine is cold, it may be caused by fuel with low volatility. Try a different brand of fuel. If the condition persists, see your dealer or a qualified service technician.
Using a high-quality fuel makes your vehicle more responsive and maintains its good fuel economy and emissions by: q protecting your fuel system from rusting. q protecting your fuel lines from freezing. improving vehicle starting and warm-up.
q protecting the fuel system from vapor lock in very hot weather, which causes the engine to hesitate or stall and makes restarts difficult.
q minimizing deposits in fuel injectors,
combustion chambers and on intake valves. q preventing the fuel system from “gumming up” when your vehicle is not used for long periods of time.
It should not be necessary to add any aftermarket products to your fuel tank if you continue to use a high-quality fuel. Gasolines for Clean Air Fuels in certain areas of the country are required to contain oxygenates to improve air quality. Common oxygenates are ethanol or grain alcohol (blended at no more than 10%), methanol or wood alcohol (blended at no more than 5% with cosolvents and additives) and MTBE or methyl tertiary butyl ether (blended at no more than 15%).
290
File:15ctsve.ex Update:Tue Sep 19 14:37:50 1995
*[SV09540(ALL)06/95]
*[SV09550(ALL)04/95]
%*[SV10185(ALL)06/95] *[SV10195(ALL)05/95]
[SV10200(ALL)08/95]
[SV10205(ALL)08/95]
[SV10210(ALL)08/95]
[SV10215(ALL)08/95]
[SV10220(ALL)08/95]
[SV10225(ALL)08/95]
[SV10230(ALL)08/95]
*[SV10235(ALL)08/95]
Reformulated fuel is also required in certain areas of the U.S. These fuels are designed to further reduce emissions from your vehicle. Generally, you should not experience difficulties operating your vehicle on reformulated gasoline or on fuels containing oxygenates. We encourage you to use these fuels. Safety Information Relating to Automotive Fuels
RWARNING
Automotive fuels can cause serious injury or death if misused or mishandled.
q Turn vehicle off when refueling q Do not smoke when refueling. Fuels are
extremely flammable.
q Do not siphon any fuel by mouth.
RWARNING
Gasoline or gasoline blended with methanol can cause blindness and possible death when swallowed. If any fuel is swallowed, call a physician or poison control center immediately.
q Avoid breathing vapors while refueling. If fuel is splashed on the skin, wash with soap and water. If fuel is splashed in the eyes, remove contact lenses (if worn), flush with water for 15
minutes, and seek medical attention.Gasoline and gasoline blends may contain small amounts of carcinogens, such as benzene. Long-term exposure to unleaded gasoline vapors has caused cancer in laboratory animals.
291
File:15ctsve.ex Update:Tue Sep 19 14:37:50 1995
*[SV10237(ALL)08/95]
%*[SV11300(ALL)05/95] [SV11325(ALL)08/95]
[SV11350(ALL)08/95]
*[SV11550(ALL)07/95]
*[SV11580(ALL)01/95]
%*[SV11600(ALL)05/95] *[SV11700(ALL)07/95]
If you are taking the medication “Antabuse” or other forms of disulfiram for the treatment of alcoholism, vapor or skin contact with a gasoline-methanol blend may cause the same kind of adverse reaction as drinking an alcoholic beverage. In sensitive individuals, serious personal injury or sickness could result. Consult a physician promptly if you experience an adverse reaction. Running Out of Fuel NOTE: Avoid running out of fuel because this situation may have an adverse effect on modern powertrain components.
If your vehicle runs out of fuel, try to stop on level ground away from traffic. The engine may be restarted by adding at least one (1) gallon (four liters) of fuel to the fuel tank. If the vehicle is not level, up to three (3) gallons (12 liters) of fuel may be required to start the engine. You may need to crank the engine several times before the fuel system starts to pump fuel from the tank to the engine.
RWARNING
Never pour fuel in the throttle body or attempt to start the engine with the air cleaner removed. Doing so could result in fire and personal injury.
Fuel Economy Fuel economy is an estimate of the efficiency of your vehicle and can be calculated as Miles Per Gallon (MPG) or Liters Per 100 Kilometers (L/100K). Do not calculate the fuel economy during your vehicle’s break-in period. This would not be an accurate estimate of how much fuel your vehicle will normally use.
292
File:15ctsve.ex Update:Tue Sep 19 14:37:50 1995
*[SV11800(ALL)05/95] *[SV11900(ALL)06/95]
*[SV12000(ALL)06/95]
[SV12150(ALL)08/95]
*[SV12200(ALL)08/95]
%*[SV12300(ALL)08/95]
*[SV12400(ALL)05/95]
%*[SV12500(ALL)08/95] *[SV12510(ALL)05/95]
*[SV12520(ALL)05/95] *[SV12530(ALL)05/95] *[SV12540(ALL)05/95] *[SV12550(ALL)03/95]
To calculate fuel economy: 1. Fill the tank completely and record the
initial odometer reading.
2. Every time you buy fuel record the
amount (in gallons or liters) purchased.
3. After at least three to five tankfuls, fill the
fuel tank and record the final odometer reading.
4. Divide the total number of miles that you have driven by the total number of gallons that your vehicle has used. In metric, multiply the number of liters used by 100
and divide the answer by the number of kilometers traveled. This will give you the number of liters used per 100 km. Comparisons With Environmental Protection Agency (EPA) and Transport Canada (TC) Fuel Economy Estimates EPA fuel economy figures are obtained from laboratory tests under simulated road conditions and may not reflect the actual conditions you experience or your style of driving. The EPA fuel economy estimate is not a guarantee that you will achieve the fuel economy shown. Improving Fuel Economy Fuel economy is affected by a number of variables which can reduce efficiency. You can improve fuel economy by understanding these variables and minimizing their effect. The following decrease fuel economy: q Lack of regular, scheduled maintenance q Excessive speed q Rapid acceleration293
File:15ctsve.ex Update:Tue Sep 19 14:37:50 1995
*[SV12560(ALL)05/95] *[SV12570(ALL)05/95] *[SV12580(ALL)05/95] *[SV12590(ALL)05/95] *[SV12610(ALL)05/95] *[SV12620(ALL)05/95] *[SV12630(ALL)05/95] *[SV12640(ALL)05/95]
%*[SV13600(ALL)02/95] *[SV13610(ALL)03/95]
*[SV13650(ALL)03/95]
one third page art:0060021-E
*[SV13670(ALL)01/95] *[SV13680(ALL)01/95] *[SV13690(ALL)04/95] %*[SV13700(ALL)01/95]
q Driving with your foot on the brake
Sudden stops
q Extended engine idling q Using speed control in hilly terrain q Extended use of the A/C, defroster, rear window defroster and other accessories
q Underinflated tires q Heavy loads q Aftermarket add-ons such as bike, ski or
luggage racks, bug deflectors, etc.
Engine Oil Recommendations We recommend using Motorcraft oil or an equivalent oil meeting Ford Specification ESE-M2C153-E and displaying the American Petroleum Institute CERTIFICATION MARK on the front of the container.
The API Certification Mark Never use:
“Non-Detergent” oils
q Oils labeled API SA, SB, SC, SD, SE, SF or SG q Additional engine oil additives, oil treatments
or engine treatments
294
File:15ctsve.ex Update:Tue Sep 19 14:37:50 1995
%*[SV13710(ALL)03/95]
%*[SV13750(ALL)03/95]
%*[SV13775(ALL)01/95] *[SV13800(ALL)03/95]
%*[SV13900(ALL)04/95] *[SV14000(ALL)02/95]
*[SV14050(ALL)05/94]
*[SV14100(ALL)02/95]
*[SV14200(ALL)03/95]
*[SV14300(ALL)01/95]
Engine oils with an SAE 5W-30 viscosity are PREFERRED for your vehicle. They provide the best engine performance, fuel economy and engine protection for all climates down to -15˚F (-25˚C).
Synthetic engine oils which are CERTIFIED and of the preferred viscosity may be used in your engine. The engine oil and oil filter must still be changed according to the maintenance schedule. Checking and Adding Engine Oil
Since the proper amount of engine oil is important for safe engine operation, check the oil using the dipstick each time you put fuel in your vehicle. Remember the engine must be off, the oil must be warm and the vehicle must be parked on level ground.
Checking the engine oil level:
1. Turn the engine off after it has warmed up and allow a few minutes for the engine oil to drain back into the oil pan.
2. Set the parking brake fully and make sure
that the gearshift is securely latched in P (Park) (automatic transaxle) or 1 (First) (manual transaxle).
3. Open the hood. Protect yourself from engine
heat.
4. Locate the engine oil dipstick (highlighted in
yellow) and carefully pull it out of the engine.
5. Wipe the dipstick clean and put it back into
position, making sure it is fully seated.
295
File:15ctsve.ex Update:Tue Sep 19 14:37:50 1995
[SV14400(ALL)06/93]
one inch art:0000970-A
[SV14450(ALL)06/94]
one inch art:0070030-B
[SV14500(ALL)07/93]
*[SV14600(ALL)01/95]
%*[SV14700(ALL)03/95] *[SV14800(ALL)01/95]
*[SV15000(ALL)03/95]
Engine oil dipstick (1.9L engine)
Engine oil dipstick (1.8L engine)
6. Carefully pull the dipstick out again. If the
oil level is below the “Add 1 qt.” or “L” line, add engine oil as necessary. If the engine oil is beyond the letter “F” or the “FULL” line, engine damage or high oil consumption may occur and some oil must be removed from the engine.
7. Put the dipstick back in and make sure it is
fully seated.
Adding engine oil
It may be necessary to add some oil between oil changes. Make sure you use a CERTIFIED engine oil of the preferred viscosity. Your vehicle’s warranty coverage may not apply if engine damage is caused by the use of improper engine oil.
Add engine oil through the oil filler cap highlighted in yellow. To add oil, remove the filler cap and use a funnel to pour oil into the opening. Be careful not to overfill the engine. Recheck the oil level after you finish adding oil.
296
File:15ctsve.ex Update:Tue Sep 19 14:37:50 1995
[SV17200(ALL)06/95]
10-1/2 pica art:0060618-C
*[SV17275(ALL)07/95]
*[SV17280(ALL)07/95]
%*[SV17300(ALL)03/95] %*[SV17350(ALL)09/95] *[SV17360(ALL)01/95]
*[SV17400(ALL)05/95]
[SV17450(ALL)09/95]
RWARNING
Continuous contact with USED motor oil has caused cancer in laboratory mice.
Protect your skin by washing with soap and water. Engine Coolant Checking the Engine Coolant NOTE: Be sure to read and understand Precautions When Servicing Your Vehicle at the beginning of this chapter.
RWARNING
The cooling fan is automatic and may come on at any time. Always disconnect the negative terminal of the battery before working near the fan.
Check the engine coolant level in the engine coolant recovery reservoir at least once a month. The coolant should be between the Full Hot and Full Cold marks on the reservoir. To locate the reservoir, see the diagram of your vehicle’s engine under Engine compartment in this chapter.
297
File:15ctsve.ex Update:Tue Sep 19 14:37:50 1995
*[SV17455(ALL)09/95]
*[SV17460(ALL)09/95]
[SV17475(ALL)05/94]
[SV17500(ALL)06/94]
one third page art:0070033-D
[SV17560(ALL)08/95]
*[SV17565(ALL)09/95]
RWARNING
Do not put engine coolant in the container for the windshield washer fluid.
If sprayed to clean the glass, engine coolant or antifreeze could make it difficult to see through the windshield. NOTE: Additional illumination may be needed
to see the coolant reservoir markings clearly.
The engine coolant reservoir If the engine coolant has not been checked for a long period of time the engine coolant reservoir may eventually empty. If the engine coolant reservoir empties, check the engine coolant level in the radiator. Read the following instructions before removing the radiator cap. If it is necessary to fill the radiator, refer to the Refill Capacities chart later in this chapter.
RWARNING
Failure to follow these instructions could result in serious personal injury from hot engine coolant or steam blowout and/or damage to the engine cooling system or engine.
298
File:15ctsve.ex Update:Tue Sep 19 14:37:50 1995
*[SV17570(ALL)09/95]
*[SV17580(ALL)09/95]
*[SV17590(ALL)09/95] *[SV17600(ALL)09/95]
*[SV17610(ALL)09/95]
*[SV18100(ALL)08/95] *[SV18300(ALL)09/95]
*[SV18950(ALL)08/95]
*[SV19350(ALL)02/95]
1. Before you remove the radiator cap, turn the
engine off and let it cool. Even when the engine is cool, be careful when you remove the radiator cap.
2. When the engine is cool, wrap a thick cloth
around the cap and turn it slowly counterclockwise to the first stop.
3. Step back while the pressure releases.
4. When you are sure that all the pressure has
been released, use the cloth to press, turn, and remove cap.
5. Stand away from the radiator opening. Hot steam may blow out or hot engine coolant may even splash out.
Adding Engine Coolant
RWARNING
Never remove the coolant recovery cap while the engine is running or hot.
To find out how much engine coolant mixture your vehicle’s coolant system can hold, see Refill capacities for fluids in the Index.
Ford Premium Cooling System Fluid is an optimized formula that will protect all metals and rubber elastomers used in Ford engines for four years or 50,000 miles (80,000 km). It is not necessary and not recommended to use supplemental coolant additives in your gasoline powered vehicle. These additives may harm your engine cooling system. Follow the recommended service interval for changing your engine coolant.
299
File:15ctsve.ex Update:Tue Sep 19 14:37:50 1995
*[SV19450(ALL)04/94]
*[SV19452(ALL)03/95]
*[SV19455(ALL)02/94]
%*[SV19456(ALL)04/95]
*[SV19460(ALL)03/95]
NOTE: When you change or add engine
coolant, it is important to maintain your engine coolant concentration between 40% (-11˚F [-24˚C]) and 60% (-62˚F [-52˚C]), depending on your local climate conditions. Below 40% you will lose freeze protection and above 60% your engine may overheat on a warm day.
NOTE: The use of an improper coolant may
void your warranty for the engine cooling system. Use only a premium, nationally recognized brand name engine coolant. Do not use alcohol, methanol antifreeze or engine coolant mixed with alcohol or methanol antifreeze. If you do not use the proper coolant, the aluminum engine on your vehicle will corrode.
Ford Motor Company expressly authorizes the Ford Rotunda engine coolant recycling process and chemicals. Use only Ford Rotunda recycled engine coolant or an equivalent non-Ford Rotunda recycled engine coolant that is certified by the supplier to meet Ford specification ESE-M97B44-A.
NOTE: Always dispose of used automotive
fluids in a responsible manner. Follow your community’s standards for disposing of these types of fluids. Call your local recycling center to find out about recycling automotive fluids.
Use Ford Premium Cooling System Fluid E2FZ-19549-AA (in Canada, Motorcraft CXC-8-B) or an equivalent engine coolant that meets Ford Specification ESE-M97B44-A.
300
File:15ctsve.ex Update:Tue Sep 19 14:37:50 1995
*[SV19480(ALL)04/93]
*[SV19900(ALL)02/95]
*[SV20000(ALL)01/95]
%*[SV20210(ALL)08/95] *[SV20220(ALL)01/93]
%*[SV21700(ALL)03/95]
%*[SV21800(ALL)03/95] [SV22100(ALL)01/95]
*[SV22350(ALL)05/95]
%*[SV22500(ALL)01/95]
Leave the engine coolant in all year. Make sure that the coolant will not freeze at the temperature level in which you drive during winter months. Keep an engine coolant in your engine that has a protection rating of at least -20˚F (-29˚C), or whatever protection rating is appropriate for the climate in which you live. You may add water by itself only in an emergency, but you should replace it with a 50/50 mixture as soon as possible. Have your dealer check the engine cooling system for leaks if you have to add a quart (liter) of engine coolant more than once a month. Checking Hoses Inspect all engine and heater system hoses for deterioration, leaks and loose clamps before adding or replacing engine coolant. Make whatever repairs or replacements are necessary using Motorcraft parts or their equivalents. Windshield Washer Fluid and Wipers Washer Fluid The windshield washer reservoir is located in the engine compartment.
RWARNING
Do not put windshield washer fluid in the container for the engine coolant.
Use specially formulated windshield washer fluid rather than plain water, because specially formulated washer fluids contain additives that dissolve road grime. For safety reasons, washer fluids containing an appropriate antifreeze such as methanol should be used in freezing weather
301
File:15ctsve.ex Update:Tue Sep 19 14:37:50 1995
[SV22600(ALL)03/95]
[SV22625(ALL)10/89]
one third page art:0000876-A
[SV22650(ALL)09/95]
%*[SV23200(ALL)03/95] *[SV23300(ALL)03/95]
(temperatures below 32˚F [0˚C]). State or local regulations on Volatile Organic Compounds (VOC’s) may restrict use of the most common antifreeze, methanol. Washer fluids containing non-methanol antifreeze agents should be used only if they provide cold weather protection without damaging the vehicle’s paint finish, wiper blades, and windshield washer system. Washer Fluid for the Liftgate (Wagon only — if equipped)
Location of the rear windshield washer reservoir
The wagon’s rear reservoir is located on the passenger side of the storage compartment. You must remove the access cover to find the washer reservoir cap. The reservoir must be filled slowly to allow air trapped in the reservoir to escape. Wiper Blades
Check the windshield wiper blades at least twice a year. Also check them whenever they seem less effective than usual. Substances such as tree sap and some hot wax treatments used by commercial car washes reduce the effectiveness of wiper blades.
302
File:15ctsve.ex Update:Tue Sep 19 14:37:50 1995
*[SV23400(ALL)09/95]
[SV23450(ALL)07/93]
[SV23475(ALL)08/93]
half page art:0070198-A
[SV23500(ALL)03/95]
If the blades do not wipe properly, clean both the windshield and the wiper blades. Use undiluted windshield washer solution or a mild detergent. Rinse thoroughly with clear water. Do not use fuel, kerosene, paint thinner, or other solvents to clean your wiper blades. These will damage your blades.
Inspect the wiper arm pivots on a regular basis to ensure that the wiper arms move freely. Lubricate the pivot points if necessary.
Wiper arm pivot points
To make reaching the wiper blades easy, simply turn the ignition switch to the ON position and turn the wipers on. Wait for them to reach a vertical position and turn the ignition to OFF. Do not move the wipers manually. Manually moving the wipers across the windshield may damage them.
303
File:15ctsve.ex Update:Tue Sep 19 14:37:50 1995
*[SV23600(ALL)03/01] *[SV23700(ALL)09/95]
[SV23750(ALL)08/93]
[SV23755(ALL)08/95]
[SV23760(ALL)08/95]
[SV23765(ALL)08/95]
[SV23770(ALL)08/95]
Wiper blade replacement
If the wiper blades still do not work properly after you clean them, you may need to replace the wiper blade assembly or the blade element. When replacing the wiper blade assembly, blade refill, or wiper arm always use a Motorcraft part or equivalent.
NOTE: There are two different length wiper
blades on your vehicle. The driver-side wiper blade is 20 inches (50 cm) long, and the passenger-side wiper blade is 17 inches (45 cm) long. Ensure that you install the correct size wiper blade in the correct location.
To replace the wiper blades:
1. Pull the wiper arm away from the
windshield and lock into the service position.
2. Turn the blade at an angle from the wiper
arm. Push the lock pin with a screwdriver to relase the blade and pull the wiper blade down toward the windshield to remove it from the arm.
3. Attach a new wiper blade to the wiper arm
and press it into place until you hear it click.
304
File:15ctsve.ex Update:Tue Sep 19 14:37:50 1995
[SV23775(ALL)08/95]
two third page art:0032367-A
Replacing the wiper blades
305
File:15ctsve.ex Update:Tue Sep 19 14:37:50 1995
%*[SV23800(ALL)03/95] *[SV23900(ALL)03/95]
*[SV24200(ALL)03/95]
*[SV24300(ALL)02/95]
*[SV24500(ALL)02/95]
*[SV24550(ALL)10/89] *[SV24700(ALL)01/95]
*[SV24800(ALL)05/95]
%*[SV24925(ALL)05/95]
Tires Look at your tires each time you fill your fuel tank. If one tire looks lower than the others, check the pressure in all of them. Always follow these precautions: q Keep your tires inflated to the recommended
pressures.
Stay within the recommended load limits (see Load limits in the Index).
q Make sure the weight of your load is evenly
distributed.
q Drive at safe speeds. If you do not take these precautions, your tires may fail or go flat.
RWARNING
Driving too fast for conditions creates the possibility of loss of vehicle control. Driving at very high speeds for extended periods of time may result in damage to vehicle components.
At least once a month, check the pressure in all your vehicle’s tires, including the spare. Use an accurate tire pressure gauge. Check the tire pressure when tires are cold, after the vehicle has been parked for at least one hour or has been driven less than 3 miles (5 km). You can find proper cold pressure and load limits of recommended size tires on the Safety Compliance Certification Label.
306
File:15ctsve.ex Update:Tue Sep 19 14:37:50 1995
*[SV24975(ALL)05/95]
%*[SV25100(ALL)02/95] *[SV25200(ALL)04/95]
*[SV25300(ALL)04/95]
*[SV25350(ALL)03/95]
[SV25410(E )08/92]
one third page art:0070010-B
RWARNING
Improperly inflated tires can affect vehicle handling and can fail suddenly, possibly resulting in loss of vehicle control.
Tire Rotation
Because your vehicle’s front and rear tires perform different jobs, they often wear differently. To make sure your tires wear evenly and last longer, rotate them as indicated in the following diagram.
Do not include the spare tire as part of your rotation.
For tire rotation intervals, see the Maintenance Schedule and Record booklet. If you notice the tires wearing unevenly, have them checked.
Rotating the tires
307
File:15ctsve.ex Update:Tue Sep 19 14:37:50 1995
%*[SV25700(ALL)04/95] *[SV25900(ALL)05/95]
*[SV26150(ALL)09/89]
quarter page art:0060006-A
*[SV26175(ALL)01/95]
*[SV26200(ALL)01/95]
[SV26250(E )02/94]
Replacing the Tires
Replace any tires that show wear bands. When your tire shows a wear band, it has only 1/16
inch (2 mm) of tread left.A worn-out tire
Because your vehicle’s tires may wear unevenly, you may need to replace them before a wear band appears across the entire tread. Some spots wear more heavily than others.
RWARNING
When replacing full size tires, never mix radial, bias-belted, or bias-type tires. Use only the tire sizes that are listed on the tire pressure decal. Make sure that all tires are the same size, speed rating, and load-carrying capacity. Use only the tire combinations recommended on the decal. If you do not follow these precautions, your vehicle may not drive properly and safely.
If you have the standard Escort 2-door hatchback, the correct tire size for your vehicle is P175/70R13. If you have the Escort GT, the correct tire size for your vehicle is P185/60R15.
308
File:15ctsve.ex Update:Tue Sep 19 14:37:50 1995
[SV26280(E )08/93]
*[SV26400(ALL)01/95]
%*[SV26500(ALL)04/95] *[SV26550(ALL)03/95]
%*[SV27400(ALL)02/95] *[SV27500(ALL)01/95]
*[SV27550(ALL)01/95]
*[SV27600(ALL)01/95]
If you have an Escort LX 2-door hatchback, an Escort 4-door hatchback, an Escort wagon, or an Escort sedan, the correct tire size for your vehicle is P175/65R14.
Tires that are larger or smaller than your vehicle’s original tires may also affect the accuracy of your speedometer. Wheel and Tire Matching
See an authorized tire dealer for proper servicing procedures. Wheels and tires must be properly removed, matched and remounted to maintain the best possible ride. Information About Tire Quality Grades
New vehicles are fitted with tires that have their Tire Quality Grade (described below) molded into the tire’s sidewall. These Tire Quality Grades are determined by standards that the United States Department of Transportation has set.
Tire Quality Grades apply to new pneumatic tires for use on passenger cars. They do not apply to deep tread, winter-type snow tires, space-saver or temporary use spare tires, tires with nominal rim diameters of 10 to 12 inches or limited production tires as defined in Title 49
Code of Federal Regulations Part 575.104(c)(2).U.S. Department of Transportation — Tire quality grades: The U.S. Department of Transportation requires Ford to give you the following information about tire grades exactly as the government has written it.
309
File:15ctsve.ex Update:Tue Sep 19 14:37:50 1995
%*[SV27799(ALL)01/95] *[SV27800(ALL)01/95]
*[SV27999(ALL)01/95] *[SV28000(ALL)01/95]
*[SV28299(ALL)01/95] *[SV28300(ALL)01/95]
Treadwear
The treadwear grade is a comparative rating based on the wear rate of the tire when tested under controlled conditions on a specified government test course. For example, a tire graded 150 would wear one and one-half (1 1/2) times as well on the government course as a tire graded 100. The relative performance of tires depends upon the actual conditions of their use, however, and may depart significantly from the norm due to variations in driving habits, service practices and differences in road characteristics and climate. Traction A B C
The traction grades, from highest to lowest, are A, B, and C, and they represent the tire’s ability to stop on wet pavement as measured under controlled conditions on specified government test surfaces of asphalt and concrete. A tire marked C may have poor traction performance. Warning: The traction grade assigned to this tire is based on braking (straightahead) traction tests and does not include cornering (turning) traction. Temperature A B C
The temperature grades are A (the highest), B, and C, representing the tire’s resistance to the generation of heat and its ability to dissipate heat when tested under controlled conditions on a specified indoor laboratory test wheel. Sustained high temperature can cause the material of the tire to degenerate and reduce tire life, and excessive temperature can lead to sudden tire failure. The grade C corresponds to a level of performance which all passenger car tires must meet under the Federal Motor Vehicle Safety Standard No. 109. Grades B and A
310
File:15ctsve.ex Update:Tue Sep 19 14:37:50 1995
%*[SV28500(ALL)04/95] *[SV28600(ALL)01/95]
*[SV28700(ALL)05/95]
*[SV28810(ALL)02/95]
*[SV28820(ALL)11/94]
*[SV28830(ALL)08/93]
*[SV28850(E )06/93]
represent higher levels of performance on the laboratory test wheel than the minimum required by law. Warning: The temperature grade for this tire is established for a tire that is properly inflated and not overloaded. Excessive speed, underinflation, or excessive loading, either separately or in combination, can cause heat buildup and possible tire failure. Snow Tires and Chains The tires on your vehicle have all-weather treads that provide traction in rain or snow. However, during the winter months in some climates, you may need to use snow tires and occasionally chains for your tires.
RWARNING
Snow tires must be the same size and grade as the tires you currently have on your vehicle.
Use chains on the tires only in an emergency or if the law requires them where you live. If you choose to use chains on your vehicle’s tires, be aware of the following: q Local regulations may prohibit or restrict the
use of tire chains. Investigate the laws and regulations in your area before installing chains.
q Tire chains may scratch or chip aluminum
wheels. IT IS RECOMMENDED THAT TIRE CHAINS ARE INSTALLED ON STEEL WHEELS ONLY. Be sure to remove wheel covers (if equipped) from steel rims before using tire chains to avoid scratches or damage.
q Do not use tire chains if you have the GT
model.
311
File:15ctsve.ex Update:Tue Sep 19 14:37:50 1995
*[SV28900(ALL)01/95]
[SV29010(ALL)06/93]
*[SV29020(ALL)05/95]
*[SV29030(ALL)11/94]
*[SV29040(ALL)11/94]
%*[SV29100(ALL)04/95] *[SV29120(ALL)05/95]
*[SV29140(ALL)04/95]
q Make sure the chains are the right size for your tires. Use only SAE Class “S” chains. Other types may damage your vehicle.
q Put the chains on the front tires tightly with the ends held down securely. Retighten the chains after driving 1/2 mile (0.8 km). Follow the chain manufacturer’s instructions.
q Do not drive faster than 30 mph (50 km/h)
or the chain manufacturer’s recommended speed limit, whichever is lower. Avoid bumps, holes and sharp turns. If you can hear the chains rub or bang against your vehicle, remove the chains to prevent damage to your vehicle.
q Tire chains may affect vehicle handling. Drive
carefully and avoid hard braking.
q Do not use chains on temporary spare tires. They may damage the vehicle and the tire.
Cleaning the Wheels
Wash the wheels with the same detergent you use to wash your vehicle’s body. Do not use acid-based wheel cleaners, steel wool, abrasives, fuel, or strong detergents. These substances will damage protective coatings. Use tar and road oil remover to remove grease and tar.
NOTE: Before going to a car wash, find out if
the brushes are abrasive.
312
File:15ctsve.ex Update:Tue Sep 19 14:37:50 1995
%*[SV29210(ALL)03/95] [SV29220(ALL)03/95]
*[SV29230(ALL)03/95]
*[SV29240(ALL)03/95]
[SV29245(ALL)03/95]
[SV29250(ALL)02/94]
Battery If the original equipment maintenance-free battery is replaced, it may be replaced by a low-maintenance battery. See Motorcraft Parts at the end of this chapter for the proper replacement battery.
The low-maintenance battery has removable vent caps for checking the electrolyte level and adding water. The electrolyte level should be checked at least every 24 months or 24,000 miles (40,000 km) in temperatures up to 90˚F (32˚C) and more often in temperatures above 90˚F (32˚C). Keep the electrolyte level in each cell up to the level indicator. Do not overfill.
If the level gets low, refill the battery with distilled water. If necessary, you can add tap water to the battery, provided the water is not hard or does not have a high mineral or alkali content. If the battery needs water quite often, have the charging system checked for a possible malfunction.
If you disconnect the battery, the engine must “relearn” its idle conditions before your vehicle will drive properly. To find out how the engine does this, see Starting your vehicle’s fuel-injected engine in the Index.
If the battery has been disconnected, you will have to reset the clock and the preset stations on your radio once the battery is reconnected.
313
File:15ctsve.ex Update:Tue Sep 19 14:37:50 1995
%*[SV29255(ALL)03/95] *[SV29260(ALL)04/95]
*[SV29265(ALL)03/95]
one inch art:0000983-A
[SV29280(ALL)03/95]
*[SV29285(ALL)03/95]
Help Us Protect Our Environment
Ford Motor Company strongly recommends that used lead-acid batteries be returned to an authorized recycling facility for disposal.
Battery recycling symbol
Because your vehicle’s engine is electronically controlled by a computer, some control conditions are maintained by power from the battery. If you ever disconnect the battery or install a new battery, you must allow the computer to relearn its idle conditions before your vehicle will drive properly. To begin this process put the gearshift in P (Park) (automatic transaxle) or Neutral (manual transaxle), turn off all the accessories, and start the vehicle. Let the engine idle for at least one minute. The relearning process will complete automatically as you drive the vehicle.
If you do not let the engine relearn its idle, the idle quality of your vehicle may be adversely affected until the idle is relearned. Your vehicle will eventually relearn its idle while you drive it, but it takes much longer than if you use the previous procedure.
314
File:15ctsve.ex Update:Tue Sep 19 14:37:50 1995
%*[SV29300(ALL)05/95] *[SV29310(ALL)03/95]
*[SV29335(ALL)01/95]
%*[SV29340(ALL)02/93] [SV29345(ALL)03/95]
*[SV29350(ALL)02/95]
*[SV29370(ALL)01/95]
[SV29392(ALL)12/89]
Automatic Transaxle Fluid Under normal circumstances, you do not need to check the fluid level of the transaxle, since your vehicle does not use up transaxle fluid. Refer to the Maintenance Schedule and Record booklet for replacement intervals. However, if the transaxle is not working properly — for instance, the transaxle may slip or shift slowly, or you may notice some sign of fluid leakage — the fluid level should be checked. NOTE: If the vehicle has been operated for an extended period at high speeds, driven in city traffic during hot weather, or has been pulling a trailer, the vehicle should be turned off for about 30
minutes to allow the fluid to cool before checking.Checking the Automatic Transaxle Fluid It is preferable to check the transaxle fluid level at normal operating temperature after approximately 20 miles (32 km) of driving. With the vehicle on a level surface and the brake pedal fully applied, start the engine and move the gearshift selector through all of the gears. Allow sufficient time for each position to engage. Securely latch the gearshift selector in the P (Park) position. Fully set the parking brake and leave the engine running. Wipe off the dipstick cap and pull the dipstick out. Wipe the indicator end clean. Put the dipstick back into the filler tube and make sure it is fully seated. Pull the dipstick out and read the fluid level. When checking fluid at the normal operating temperature, the fluid level should be within the normal operating temperature marks on the
315
File:15ctsve.ex Update:Tue Sep 19 14:37:50 1995
[SV29394(ALL)08/93]
one third page art:0070122-B
[SV29396(ALL)12/89]
%*[SV29400(ALL)01/95] [SV29410(ALL)12/89]
[SV29420(ALL)01/95]
[SV29422(ALL)06/93]
dipstick. When the vehicle has not been driven, and outside temperatures are above 68˚F (20˚C), the fluid levels should be between the room temperature marks on the dipstick.
Automatic transaxle fluid dipstick
NOTE: Your vehicle should not be driven if the outside temperature is above 68˚F (20˚C) and the fluid level is below the Low mark on the room temperature scale.
Adding Automatic Transaxle Fluid
Before adding any fluid, be sure that the correct type will be used.
Add fluid in 1/2 pint (.25 L) increments through the filler tube to bring the level to the correct area on the dipstick. If an overfill occurs, excess fluid should be removed by a qualified technician.
When you are finished adding fluid, be sure to put the dipstick back and ensure that it fits snugly.
316
File:15ctsve.ex Update:Tue Sep 19 14:37:50 1995
%*[SV29425(ALL)04/95]
*[SV29800(ALL)01/89] [SV29900(ALL)01/92]
%*[SV30200(ALL)02/95] [SV30250(ALL)02/94]
*[SV30300(ALL)03/95]
%*[SV30400(ALL)06/93]
[SV30425(ALL)03/95]
*[SV30450(ALL)05/95]
NOTE: Always dispose of used automotive
fluids in a responsible manner. Follow your community’s standards for disposing of these types of fluids. Call your local recycling center to find out about recycling automotive fluids.
Manual Transaxle Fluid
The lubricant level and quality should not deteriorate under normal driving conditions. However, you should have the fluid level checked occasionally. If lubricant is required, see Lubricant specifications in the Index. Brake Fluid
If you have a manual transaxle, the brake fluid reservoir in your vehicle includes the clutch fluid reservoir.
Under normal circumstances, your vehicle should not use up brake fluid rapidly. However, expect the level of the brake fluid to slowly fall as you put more mileage on your vehicle and the brake pads wear.
You should check the brake fluid at every scheduled engine oil change, but be sure to check it at least once a year. You can do this by looking at the fluid level in the plastic reservoir on the master cylinder. (See The Engine Types in this chapter to locate the master cylinder.) The fluid level should be at or near the MAX mark.
If the brake fluid level is low, the brake warning light in the instrument cluster will illuminate.
RWARNING
Brake fluid is toxic.
317
File:15ctsve.ex Update:Tue Sep 19 14:37:50 1995
*[SV30460(ALL)07/95]
[SV30475(ALL)07/93]
one third page art:0070173-A
%*[SV30500(ALL)02/95]
*[SV30800(ALL)01/95]
*[SV30900(ALL)01/95] [SV30950(ALL)06/93]
*[SV31000(ALL)01/95]
If brake fluid contacts eyes, flush eyes with running water for 15 minutes. Get medical attention if irritation persists. If taken internally, drink water and induce vomiting. Get medical attention immediately.
Brake fluid master cylinder reservoir
If the fluid is low, carefully clean and remove the filler cap from the reservoir. Fill the reservoir to the MAX line with Ford High Performance DOT 3 Brake Fluid C6AZ-19542-AA or DOT 3 equivalent fluid meeting Ford specification ESA-M6C25-A.
RWARNING
If you use a brake fluid that is not DOT 3, you will cause permanent damage to your brakes.
Do not fill the reservoir above the MAX line.
NOTE: Avoid spilling brake fluid on painted
surfaces.
If you find that the fluid level is excessively low — below the seam or ridge on the outside of the plastic reservoir — have the brake system inspected.
318
File:15ctsve.ex Update:Tue Sep 19 14:37:50 1995
*[SV31100(ALL)01/95]
%*[SV31200(ALL)02/95] *[SV31300(ALL)01/95]
%*[SV31400(ALL)03/95]
*[SV31500(ALL)02/95]
*[SV31600(ALL)01/95]
*[SV31700(ALL)05/95] [SV31850(ALL)02/94]
[SV32100(ALL)02/94]
[SV32150(ALL)03/95]
RWARNING
Do not let the reservoir for the master cylinder run dry. This may cause the brakes to fail.
Power Steering Fluid
Check the level of the power steering fluid at least twice a year (i.e., every Spring and Fall). Checking and Adding Power Steering Fluid
1. Start the engine and let it run until the
power steering fluid reaches normal operating temperature. The power steering fluid will be at the right temperature when the engine coolant temperature gauge in the instrument cluster is near the center of the NORMAL operating temperature range.
2. While the engine idles, turn the steering
wheel back and forth several times. Make sure that the cap assembly is installed at this time.
3. Turn the engine off.
4. Check the fluid level in the reservoir. The
fluid level should be in between the F (Full) and L (Low) markings on the reservoir.
5.
If the power steering fluid is low, add fluid in small amounts, continuously checking the level until you reach the F (Full) range. Do not overfill. To find out how much fluid your vehicle’s reservoir for the power steering fluid will hold, see Refill capacities in the Index.
6. When you are finished, put the reservoir cap
back on and make sure that it fits snugly.
319
File:15ctsve.ex Update:Tue Sep 19 14:37:50 1995
[SV32200(ALL)03/95]
*[SV32700(ALL)01/95]
%*[SV33000(ALL)04/95]
[SV33025(ALL)07/93]
[SV33050(ALL)07/93]
[SV33100(ALL)06/93]
Use only power steering fluid that meets Ford Specification ESW-M2C33-F, such as Motorcraft Type “F” Automatic Transmission and Power Steering Fluid.
If the power steering fluid is low, do not drive your vehicle for a long period of time before adding fluid. This can damage the power steering pump. Fuses, Fuse Links and Circuit Breakers Fuses, fuse links and circuit breakers protect your vehicle electrical system from overloading. If electrical parts in your vehicle are not working, the system may have been overloaded and blown a fuse, fuse link or tripped a circuit breaker. Before you replace or repair any electrical parts, check the appropriate circuit protector.
The following charts tell you which circuit protector protects each electrical part of your vehicle. If a fuse or fuse link blows, or a circuit breaker opens a circuit, none of the parts of your vehicle that use the circuit will work. For example, if the RADIO fuse is blown, the radio and remote control mirrors will not work. If the radio works, but the electric mirrors don’t work, something is wrong with the mirrors.
NOTE: Fuse links should only be repaired by
your dealer.
320
File:15ctsve.ex Update:Tue Sep 19 14:37:50 1995
*[SV33500(ALL)07/95] [SV33550(ALL)08/95]
[SV33555(ALL)08/95]
[SV33569(ALL)06/93]
[SV33570(ALL)08/95]
half page art:0000830-A
Fuses
If electrical parts in your vehicle are not working, the system may have been overloaded and blown a fuse. If a fuse blows, all the parts of your vehicle that use the fuse will not work.
Your vehicle has two fuse panels. The interior fuse panel is below the instrument panel in front of the driver’s door. The main panel is under the hood behind the battery.
The instrument panel fuse panel
Fuse panel under instrument panel
321
File:15ctsve.ex Update:Tue Sep 19 14:37:50 1995
[SV33575(ALL)08/95]
half page art:0070083-C
Inside of the instrument fuse panel cover
322
t