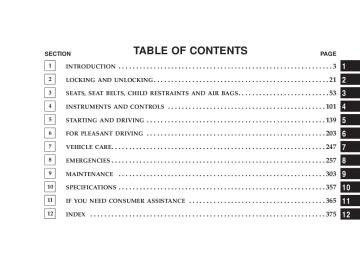
- Download PDF Manual
-
N10M0380
NOTE: Wrap a cloth around the tip of the screwdriver to avoid scratching the light assembly.
300 EMERGENCIES
2. Remove the light bulb from the light holder.
Reading lights
N10M0410
N11I0040
Insert a straight blade screwdriver into the notch of the light assembly and pry gently to remove the lens. Remove the light bulb from the light holder. NOTE: Wrap a cloth around the tip of the straight blade screwdriver in order to avoid scratching the lens.
Rear personal light
EMERGENCIES 301
N10Q0090
Insert the tip of a flat blade screwdriver at the edge of the lens, pry gently to remove the lens, and then remove the bulb from the light holder. NOTE: Wrap a cloth around the tip of the screwdriver in order to avoid scratching the lens.
MAINTENANCE
CONTENTS m View of engine compartment . . . . . . . . . . . . . . 305
m Service precautions . . . . . . . . . . . . . . . . . . . . . 306
m Emission-control system maintenance . . . . . . . 307
m Emissions Testing . . . . . . . . . . . . . . . . . . . . . . 308
m Onboard Diagnostic System (OBD II) . . . . . . . . 308
m Replacement Parts . . . . . . . . . . . . . . . . . . . . . . 309N Fuel system (tank, filler tube, connections,
and fuel tank filler cap) . . . . . . . . . . . . . . . . . 309
N Fuel hoses . . . . . . . . . . . . . . . . . . . . . . . . . . . 309
N Air cleaner filter . . . . . . . . . . . . . . . . . . . . . . 310
N Evaporative emission control system(except evaporative emission canister) . . . . . . . 310
N Spark plugs. . . . . . . . . . . . . . . . . . . . . . . . . . 311
N Ignition cables . . . . . . . . . . . . . . . . . . . . . . . . 311N Distributor cap and rotor . . . . . . . . . . . . . . . . 311
m General maintenance . . . . . . . . . . . . . . . . . . . . 312
N Engine oil and oil filter. . . . . . . . . . . . . . . . . . 312
m Engine coolant. . . . . . . . . . . . . . . . . . . . . . . . . 316
N To check the coolant level . . . . . . . . . . . . . . . . 316
N To add coolant. . . . . . . . . . . . . . . . . . . . . . . . 316
m Brake fluid . . . . . . . . . . . . . . . . . . . . . . . . . . . 317
m Clutch fluid (manual transaxle) . . . . . . . . . . . . 318
N To check the clutch fluid. . . . . . . . . . . . . . . . . 318
N To replace the fluid . . . . . . . . . . . . . . . . . . . . 318
m Battery . . . . . . . . . . . . . . . . . . . . . . . . . . . . . . 319
N During cold weather . . . . . . . . . . . . . . . . . . . 319304 MAINTENANCE
N Disconnection and connection . . . . . . . . . . . . . 319
m Automatic transaxle. . . . . . . . . . . . . . . . . . . . . 321
N To check the fluid level. . . . . . . . . . . . . . . . . . 322
N Procedure for checking the fluid level . . . . . . . 322
m Manual transaxle. . . . . . . . . . . . . . . . . . . . . . . 323
m Disc brake pads, rear drum brake liningsand rear wheel cylinders . . . . . . . . . . . . . . . . . 323
m Brake hoses . . . . . . . . . . . . . . . . . . . . . . . . . . . 323
m Ball joint, steering linkage seal and driveshaft boots . . . . . . . . . . . . . . . . . . . . . . . . . . . 323
m Supplemental Restraint System (SRS) . . . . . . . . 323
m Door hinges, rear hatch hinges, hood lockrelease mechanism and safety catch . . . . . . . . . 324
m Exhaust system . . . . . . . . . . . . . . . . . . . . . . . . 324
m Windshield wiper blades . . . . . . . . . . . . . . . . . 325
N Windshield washers . . . . . . . . . . . . . . . . . . . . 325
m Parking brake . . . . . . . . . . . . . . . . . . . . . . . . . 326m Drive belt (for generator, water pump, power
steering pump) . . . . . . . . . . . . . . . . . . . . . . . . 327
m Timing belt . . . . . . . . . . . . . . . . . . . . . . . . . . . 328
m Tires . . . . . . . . . . . . . . . . . . . . . . . . . . . . . . . . 328
N Tire inflation pressures . . . . . . . . . . . . . . . . . . 328
N Radial ply tires . . . . . . . . . . . . . . . . . . . . . . . 330
N Tire pressure for sustained high-speed driving . . . 330
N Oversize tires . . . . . . . . . . . . . . . . . . . . . . . . 330
N Tire maintenance . . . . . . . . . . . . . . . . . . . . . . 331
N Cargo loads. . . . . . . . . . . . . . . . . . . . . . . . . . 331
N Tread wear indicators . . . . . . . . . . . . . . . . . . . 331
N Tire rotation . . . . . . . . . . . . . . . . . . . . . . . . . 332
N Tire chains. . . . . . . . . . . . . . . . . . . . . . . . . . . 333
N Snow tires . . . . . . . . . . . . . . . . . . . . . . . . . . . 333
m Regular Maintenance Schedule. . . . . . . . . . . . . 334
m Severe Maintenance Schedule. . . . . . . . . . . . . . 343VIEW OF ENGINE COMPARTMENT 2.4 liter engine
MAINTENANCE 305
7. Brake fluid reservoir 8. Windshield washer reservoir 9. Drive belt 10. Radiator cap 11. Automatic transaxle fluid level dipstick 12. Air cleaner filter
3.0 liter engine
Q02A2510
1. Power steering fluid reservoir 2. Engine coolant reservoir 3. Engine oil filler cap 4. Engine oil level dipstick 5. Battery 6. Clutch fluid reservoir (manual transaxle only)
Q02A2520
306 MAINTENANCE
NOTE: The Scheduled Maintenance Charts are located in the rear of this maintenance section. Always refer to the schedules for proper service intervals.
SERVICE PRECAUTIONS Adequate care of your vehicle at regular intervals serves to preserve the value and appearance as long as possible. Some maintenance items can be performed by the owner, while others should be done only by an authorized dealer. This section describes only those items which can be performed by the owner. In the event a malfunction or other problem is discovered, have it corrected by an authorized dealer. This section contains information on inspection mainte- nance procedures that you can do yourself, if you so desire. Follow the instructions and precautions for each of the various procedures.
WARNING!
† When checking or servicing the inside of the engine compartment, be sure the engine is stopped and has had a chance to cool down. † If it is necessary to do work in the engine com- partment with the engine running, be especially careful that your clothing, hair, etc. does not become caught by the fan, drive belts, or other moving parts.
WARNING!
† The fan may turn on automatically even if the engine is not running; turn the ignition key to the “LOCK” position and remove the key to ensure safety while you work in the engine compartment. † Do not smoke, or allow open flames around fuel † Be extremely cautious when working around the battery. It contains poisonous and corrosive sulfu- ric acid. † Do not get under your vehicle with just the car’s
or the battery. The fumes are flammable.
jack supporting it. Always use properly rated automotive jack stands. † Improper handling of components and materials used in the vehicle can endanger your personal safety. Consult an authorized dealer if you have questions.
MAINTENANCE 307
EMISSION-CONTROL SYSTEM MAINTENANCE Your vehicle is equipped with an emission-control sys- tem which satisfies all requirements of the U.S. Environ- mental Protection Agency. The emission-control system consists of: (1) a positive crankcase ventilation system (2) an evaporative emission-control system (3) an exhaust emission- control system. The 9Scheduled9 maintenance services listed must be performed at the times or mileages specified to assure the continued proper functioning of the emission-control system. These, and all other “General” maintenance services included in this manual, should be performed to provide the best vehicle performance and reliability. More frequent maintenance may be needed for vehicles driven under severe operating conditions such as dusty areas and frequent start and stop driving. In order to assure the proper function of the emission- control system, it is recommended that you have your vehicle inspected and maintained by an authorized dealer in accordance with the schedule in this manual. Inspection and service should also be performed any time a malfunction is suspected.
308 MAINTENANCE
EMISSIONS TESTING In some localities, it may be or will become a legal requirement to ensure that all emissions components and systems are functioning properly as a part of the test procedure. The test center accomplishes this by checking the On Board Diagnostic System system (OBD) with an electronic scan tool. If your vehicle has recently been serviced, the OBD system may have been reset to a 9not ready9 condition because the OBD system has not had sufficient time since the servicing to reconfirm that emissions components are operating properly. In most cases, a reasonable mix and amount of normal city and highway driving and at least one overnight-off period will be required to prepare your vehicle for this check; however your DaimlerChrysler Motors Corporation dealer has the equipment and procedures required to make certain that the OBD system of your vehicle is ready for the required testing.
ONBOARD DIAGNOSTIC SYSTEM (OBD II) To meet new government regulations and promote cleaner air, your vehicle is equipped with a sophisticated onboard diagnostic system called OBD II. This system
monitors the performance of the emissions, engine, and automatic transaxle control systems. When these systems are operating properly, your vehicle will provide excel- lent performance and fuel economy, as well as engine emissions well within current government regulations. If any of these systems require service, the OBD II system will turn on the Malfunction Indicator Light. It will also store diagnostic codes and other information to assist your service technician in making repairs. Al- though your vehicle will usually be driveable and not need towing, see your dealer for service as soon as possible.
CAUTION!
Prolonged driving with the light on could cause further damage to the emission control system. It could also affect fuel economy and driveability. The vehicle must be serviced before any state emissions tests can be performed.
If the light is flashing, severe catalytic converter damage and power loss will soon occur. Immediate service is required. If the gas cap is not tightened properly, the light may come on. Be sure the gas cap is tightened every time you add fuel. Tighten the cap until you hear it “click.”
REPLACEMENT PARTS Use of genuine Mopar parts for normal/scheduled main- tenance and repairs is highly recommended to insure the designed performance. Damage or failures caused by the use of non-Mopar parts for maintenance and repairs will not be covered by the DaimlerChrysler Motors Corpora- tion warranty. Fuel system (tank, filler tube, connections, and fuel tank filler cap) Check periodically for damage or leakage in the fuel lines and connections, and check for damage and looseness of the fuel tank filler tube cap. Particular attention should be paid to examining those fuel lines nearest to high heat sources such as the exhaust manifold.
MAINTENANCE 309
WARNING!
If you see a fuel leak or if you smell fuel, do not operate the vehicle. Any spark (including from the ignition ), flame or smoking material could cause an explosion or fire. Call an authorized dealer for assistance.
Fuel hoses Inspect the surfaces of hoses for evidence of heat and mechanical damage, hard and brittle rubber, cracking, tears, cuts and abrasions. Particular attention should be paid to examining those hose surfaces nearest to high heat sources such as the exhaust manifold. Inspect all hose connections, such as clamps and couplings, to make sure they are secure and that no leaks exist. If there is any evidence of deterioration or damage, hoses should be replaced immediately.
310 MAINTENANCE
Air cleaner filter
M23A0130
The air cleaner filter will become dirty and loaded with dust during use, and the filtering effect will be substan- tially reduced. Replace it with a new filter in accordance with the schedule in this manual. 1. Unclamp the air cleaner cover. 2. Take out the air cleaner filter.
After replacing the air cleaner filter, reinstall the cover in its original position.
CAUTION!
Take care not to damage the engine air flow sensor when removing the air cleaner cover.
Evaporative emission control system (except evaporative emission canister) If the fuel-vapor vent line is clogged or damaged, the fuel-vapor mixture will escape, polluting the atmosphere. Have the system checked at an authorized dealer at the mileage specified on the scheduled maintenance chart.
Spark plugs
Iridium tipped type
P15A0340
Spark plugs must fire properly to assure proper engine performance and emission-control. Do not reuse spark plugs by cleaning or regapping. Spark plugs should be replaced at the mileage specified on the scheduled maintenance chart. Your vehicle may be equipped with standard type spark plugs or iridium tipped ones. Iridium tipped spark plugs are identified by blue marks on the ceramic. They do not
MAINTENANCE 311
require replacement as frequently as the conventional type spark plug and are designed to last much longer. NOTE: Use the recommended or equivalent spark plugs listed under “Engine specifications” on page 361. Use of non-recommended plugs will cause engine dam- age, loss of performance or radio noise. Ignition cables The ignition cables should be kept clean, properly con- nected, and fully seated. Terminals should be fully seated and should not be removed from the distributor or coil towers unless they are damaged or cable testing indicates high resistance or broken insulation. Cracked, damaged, or faulty cables must be replaced. Distributor cap and rotor Check the distributor cap and rotor to maintain proper function and good emission control.
Engine oil and oil filter 2.4 liter engine
Good
312 MAINTENANCE
GENERAL MAINTENANCE The following pages contain the maintenance service recommended by DaimlerChrysler. In addition to the general maintenance items for which fixed maintenance intervals have been specified, there are other items which are expected to operate satisfactorily without periodic maintenance. However, if a malfunction of these items does occur, it could adversely affect the engine or vehicle performance. These items should be inspected if a malfunction is observed or suspected. See your authorized dealer for assistance, if you have any questions.
M03A0700
3.0 liter engine Good
M03A0710
To check and refill engine oil It is normal for an engine to consume some oil. You may find it necessary to add oil between the recommended oil change intervals. Before starting the engine, check the engine oil level. Replenish if necessary. To check the oil level, remove the dipstick, wipe it off, and gently insert it fully into the crankcase. Slowly remove it again. The oil level must not exceed the range of “Good” on the dipstick.
MAINTENANCE 313
NOTE: The engine must be “OFF” when performing oil level checks. If the level does not reach the range of “Good”, which indicates minimum necessary quantity of oil, remove the oil filler cap on the engine valve cover, and refill to within the “Good” range.
CAUTION!
Overfilling the crankcase will cause oil aeration and loss of oil pressure, which could damage the engine.
WARNING!
† Used engine oil is contaminated, and can cause skin problems: Avoid contact with the skin and wash thoroughly after working with used oil.
† Keep used oil out of reach of children.
314 MAINTENANCE
To replace the oil filter The oil filter should be replaced at the time or mileage specified on the scheduled maintenance chart. You should be sure that any replacement filter used on this vehicle is a high quality filter. The manufacturer’s specifications for Genuine DaimlerChrysler oil filters require that the filter be capable of withstanding a pressure of 256 psi (1.8MPa). A Genuine DaimlerChrysler oil filter is recommended as a replacement filter. Follow the installation instructions printed on the filter.
Engine oil identification mark ILSAC certification mark (“Starburst” symbol)
Use only engine oils displaying the ILSAC certification symbol on the front of the container.
M03A0150
API service symbol
Recommended engine oil viscosity
MAINTENANCE 315
M03A1320
If you are unable to find oils with the ILSAC certification mark (“Starburst” symbol), an API classification SL, SL/CF oil with above label may be used. This mark appears on the top of the oil containers and has three distinct areas for identifying various aspects of the oil. 1. The top portion will indicate the quality of the oil. 2. The center portion will show the SAE grade of the oil viscosity.
M03B0010
Use engine oil with proper thickness for the outdoor temperature where you will be driving. SAE 5W-30 engine oil is best for the outdoor temperature range shown in the above chart. You are strongly encouraged to use SAE 5W-30 engine oils to aid in low temperature starting and for improved fuel economy.
316 MAINTENANCE
ENGINE COOLANT
To check the coolant level The coolant reserve system provides a quick visual method for determining the coolant level. When the engine is cold, the level of the coolant in the reserve tank should be between the FULL and LOW marks. The radiator normally remains completely full so there is no need to remove the radiator cap except for checking the coolant freeze point or replacing the antifreeze coolant. To add coolant Use DaimlerChrysler Genuine Coolant or an equivalent. Genuine Coolant provides excellent protection against corrosion and rust formation of all metals, including aluminum, and prevents clogs in the radiator, heater, cylinder head, engine block, etc. If frequent coolant additions are required, or if the level in the reserve tank does not drop when the engine cools, the system should be pressure-tested for leaks. Take your vehicle to an authorized dealer for inspection of the cooling system.
CAUTION!
† Do not use alcohol or methanol anti-freeze or any engine coolants mixed with alcohol or methanol anti-freeze. The use of an improper anti-freeze can cause corrosion of aluminum components. † When additional coolant is needed to maintain the proper level, a minimum of 50% concentration of ethylene-glycol antifreeze in water should be added to the reserve tank. Do not overfill. A higher concentration (not to exceed 60%) should be used if a lower freezing point is required. The concentration level can be checked using instru- ments available at automotive supply stores, or can be done by your authorized dealer or service station. Use only high quality ethylene-glycol antifreeze coolant formulated to prevent corrosion of all cooling system metals. † Do not top off with water only. Water by itself reduces the rust-protective and anti-freeze quali- ties of the coolant and has a lower boiling point. It can also cause damage to the cooling system if it should freeze. Do not use tap water, as it may cause corrosion and rust formation.
Radiator cap The radiator cap must be fully tightened to prevent loss of coolant and engine damage.
WARNING!
Make sure that the engine is thoroughly cooled down before removing the radiator cap, otherwise hot steam or boiling coolant may gush from the filler port and scald you.
Points to remember 1. Do not overfill the reserve tank. 2. A special radiator cap is used to ensure sealing and to allow the coolant to return from the reserve tank to the radiator when the engine cools. If cap replacement is necessary, use the proper cap. 3. Check the coolant freeze point in the radiator using proper instruments, when it is safe to do so. If antifreeze is added, the contents of the reserve tank must be protected against freezing. 4. Keep the front of the radiator clean. If your vehicle is equipped with air conditioning, keep the front of the condenser clean.
MAINTENANCE 317
If the temperature of the engine coolant does not rise 5. normally after engine warm-up, take the vehicle to an authorized dealer to have the thermostat checked, and replaced if necessary.
BRAKE FLUID Recommended brake fluid conforming to DOT 3 or DOT 4
should be used. The reservoir cap must be fully tightened to avoid contamination from foreign matter or moisture.CAUTION!
damage to painted surfaces.
† Do not allow petroleum-based fluid to contact, mix with, or otherwise contaminate the brake fluid. Seal damage will result. † Take care in handling brake fluid as it may cause † Use only the specified brake fluid. Also, the additives in different brands may result in a chemical reaction when mixed together, so avoid mixing different brands if possible. † Keep the reservoir tank cap closed to prevent the brake fluid from evaporating or absorbing moisture.
318 MAINTENANCE
CLUTCH FLUID (MANUAL TRANSAXLE)
Good
M10A0040
To check the clutch fluid The clutch fluid in the clutch master cylinder should be checked when performing other underhood services. In addition, the system should be checked for leakage at the same time. Check to make certain that the clutch fluid level is always between the MAX and MIN level mark- ings on the fluid reservoir and refill the fluid, if necessary. A rapid fluid loss indicates a leak in the clutch system which should be inspected by an authorized dealer and repaired immediately.
To replace the fluid Recommended brake fluid conforming to DOT 3 or DOT 4
should be used. The reservoir cap must be fully tightened to avoid contami- nation from foreign matter or moisture.CAUTION!
† Do not allow petroleum-based fluid to contact, mix with, or otherwise contaminate the clutch fluid. Seal damage will result. † Take care in handling clutch fluid as it may cause † Use only the specified clutch fluid.
damage to painted surfaces.
Also, the additives in different brands may result in a chemical reaction when mixed together, so avoid mixing different brands if possible. † Keep the reservoir tank cap closed to prevent the clutch fluid from deteriorating due to moisture or air exposure.
BATTERY
Test indicator
M07B0080
The condition of the battery is very important for quick starting and proper functioning of the vehicle’s electrical system. Check the battery at regular intervals. To determine the battery charge, check the battery test indicator on top of the battery. If the test indicator is a blue/green color when viewed from above, the battery is OK. A black colored indicator
MAINTENANCE 319
means the battery is low on charge and may require charging. Have it checked at an authorized dealer. During cold weather The capacity of the battery is reduced at low tempera- tures. This is the result of its chemical and physical properties and this is why a very cold battery, particu- larly one that is not fully charged, will only deliver a fraction of the starter current that is normally available. It is recommended that you have the battery checked by an authorized dealer before the start of cold weather and, if necessary, have it charged or replaced. This not only ensures reliable starting, but prolongs battery life. Disconnection and connection To disconnect the battery cable, stop the engine, discon- nect the negative terminal first, then the positive termi- nal. To reconnect the battery, first connect the positive terminal and then the negative terminal, before starting the vehicle.
320 MAINTENANCE
WARNING!
cause it to overheat and be damaged.
† Never disconnect the battery while the engine is running; doing so could damage the vehicle’s electrical components. † Never short-circuit the battery; doing so could † Keep sparks, cigarettes and flames away from the battery because the battery may produce an explo- sion. † Electrolyte (battery acid) is corrosive diluted sul- furic acid. If electrolyte comes in contact with, your hands, eyes, clothes, or the coated surface of your vehicle, thoroughly flush the area with wa- ter. If electrolyte gets in your eyes, flush them with water immediately and get prompt medical attention.
WARNING!
battery in an enclosed space.
nect the battery cables from the vehicle.
† Ventilate the area when charging or using the † Always wear protective clothing and goggles when working with the battery, or have a skilled technician do it. † If the battery is to be quick-charged, first discon- † In order to prevent a short circuit, be sure to disconnect the negative(-) terminal first, and re- connect it last. † If the electrolyte level is very low, have the battery † Battery posts, terminals and related accessories contain lead and lead compounds. Wash hands after handling.
checked at an authorized dealer.
NOTE 1. Check each battery terminal for corrosion. If necessary, neutralize corrosion by washing with a solution of bak- ing soda and water. Apply grease to posts and clamps after cleaning or tightening. 2. Before cleaning the battery, tighten all filler port caps to prevent foreign matter from entering the battery. 3. Check to see if the battery is securely installed and cannot be moved. Also check each terminal for tightness. 4. When the vehicle is to be left unused for a long period of time, remove the battery and store it in a place where the battery fluid will not freeze. The battery should be stored only in a fully charged condition.
MAINTENANCE 321
AUTOMATIC TRANSAXLE
Good
M05A0530
The automatic transaxle should be maintained and ser- viced by an authorized dealer to obtain the best perfor- mance and maximize life. It is important that the trans- axle fluid be maintained at the level prescribed.
322 MAINTENANCE
To check the fluid level The fluid level should be checked when the engine temperature gauge indicates a normal warmed up con- dition and the fluid in the transaxle is heated to its normal operating temperature. Operation with an im- proper fluid level will greatly reduce the life of the transaxle and the fluid. Procedure for checking the fluid level 1. With the parking brake engaged and the engine idling, select each gear momentarily, ending with the selector lever in the “N” (NEUTRAL) position. 2. The fluid level should be at the HOT mark, but never above the HOT mark when the engine is at its normal warmed up condition. Add or drain as necessary to bring the fluid to this prescribed level. 3. Make certain that the dipstick cap is reseated properly to prevent dirt and water from entering the transaxle.
WARNING!
Transaxle fluid is extremely flammable and poison- ous. Do not spill fluid when adding or draining.
To add or change the fluid
Drain plug
Use only recommended Mopar ATF+4 automatic trans- mission fluid to ensure optimum transaxle performance.
M05A0460
Special additives DaimlerChrysler does not recommend the addition of any fluid additives to the transaxle.
MANUAL TRANSAXLE Add oil to maintain the proper level. Refill or change oil according to the scheduled maintenance table.
Lubricant Viscosity range
Gear Oil Classification GL-4
SAE75W-90 or 75W-85WDISC BRAKE PADS, REAR DRUM BRAKE LININGS AND REAR WHEEL CYLINDERS Proper brakes are essential to safe operation of your vehicle. Check brake pads and rear brake linings for wear, and check rear wheel cylinders for leakage. For proper braking performance, replace brake pads with original equipment type pads.
BRAKE HOSES Brake hoses and tubing should be checked for: 1. Severe surface cracking, scuffing or worn spots. If the casing of the hose is exposed by cracks or abrasions in the
MAINTENANCE 323
rubber hose cover, the hose should be replaced. Deterio- ration of the hose could cause brake failure. 2. Faulty installation may cause twisting, or wheel, tire or chassis interference.
BALL JOINT, STEERING LINKAGE SEAL AND DRIVE SHAFT BOOTS Check the following parts for damage and grease leak- age: 1. Ball joint boots of the front suspension and steering linkage 2. Bellows on both ends of the drive shaft
SUPPLEMENTAL RESTRAINT SYSTEM (SRS) The entire SRS system must be inspected by an autho- rized dealer 10 years after the vehicle manufacture date shown on the certification label. [See “SRS servicing” on page 98.]
324 MAINTENANCE
DOOR HINGES, REAR HATCH HINGES, HOOD LOCK RELEASE MECHANISM AND SAFETY CATCH The door hinges, trunk hinges, hood lock release mecha- nism and hood safety catch should be inspected, cleaned, and lubricated as required to maintain ease of operation and to provide protection against rust and wear. Apply engine oil to door hinges, hood hinges, and trunk hinges. Apply Multipurpose Grease NLGI Grade 2 sparingly to all sliding contact areas of the hood latch and release lever. Work lubricant into the hood lock mechanism until all frictional surfaces are covered. Also, apply a film of the same lubricant to the pivot contact areas of the safety catch.
EXHAUST SYSTEM
WARNING!
Carbon monoxide gas found in the vehicle’s exhaust is poisonous. Inhalation of exhaust fumes can cause unconsciousness or death.
The best protection against carbon monoxide entry into the vehicle interior is a properly maintained engine exhaust system. Whenever a change is noticed in the sound of the exhaust system; when exhaust fumes can be detected inside the vehicle; or when the underside or rear of the vehicle is damaged, have a competent technician inspect the com- plete exhaust system and adjacent body areas for broken, damaged, deteriorated, or mispositioned parts. In addition inspect the exhaust system each time the vehicle is raised for lubrication or oil change. Replace as required. Open seams or loose connections could permit danger- ous exhaust fumes to seep into the trunk and passenger compartments. Do this service when performing underbody service. Check for any of the following conditions: 1. Check for holes or exhaust gas leakage caused by corrosion or damage. 2. Check the joints and connections for looseness or exhaust gas leakage. 3. Check the rubber hangers and brackets for damage.
Windshield washers
MAINTENANCE 325
WINDSHIELD WIPER BLADES Check the wiper blades occasionally. Periodic cleaning of the wiper blades is suggested to remove the accumula- tion of salt and road film. The wiper blade arms and glass areas should be cleaned with a sponge or cloth and a mild detergent or non-abrasive cleaner. If the blades continue to streak or smear, they should be replaced. NOTE: Do not operate wipers for long periods on dry glass; this accelerates deterioration of the rubber and could scratch the glass.
M31A0730
The windshield washer reservoir is in the engine com- partment. Check the fluid level at regular intervals and replenish the fluid if necessary. NOTE: When freezing weather is anticipated flush out the water in the reservoir by operating the pump. Fill the reservoir with windshield antifreeze (not radiator anti- freeze) and operate the system for a few seconds to flush out any residual water.
326 MAINTENANCE
PARKING BRAKE
For vehicles with rear disc brakes: You should feel the parking brake take hold between 3 to 5 clicks. Also check to see if the lever is properly engaged with the ratchet, when pulled.
I27A0100
Check the parking brake lever travel occasionally. To check, pull the lever slowly and count the number of clicks of the ratchet. For vehicles with rear drum brakes: You should feel the parking brake take hold between 5 to 7 clicks.
DRIVE BELT (FOR GENERATOR, WATER PUMP, POWER STEERING PUMP) 2.4 liter engine
Power steering pump pulley
Water pump pulley
Inspect the drive belt for evidence of cuts and cracks, and replace it if damaged. When replacing the belt with a new belt, make sure that there is no interference between the belt and other engine components. Then, check the tension of the belt at the designated point. The deflection must be within specification.
MAINTENANCE 327
Crank shaft pulley
A/C pulley
M50A0620
Check the tension of the drive belt. The deflection must be within specifications, when depressed at a point midway between the pulleys as shown in the illustrations with a force of about 100 N (22 lb.).
M50A0820
328 MAINTENANCE
Amount of belt deflection
TIRES
in (mm)
Standard value
.26 to .35
(6.7 to 9.0) .46 to .60(11.7 to 15.3)
.43 to .56
(11.0 to 14.3)
.33 to .43
(8.5 to 10.9)Used belt .28 to .33
(7.2 to 8.4) .49 to .56(12.5 to 14.3)
.46 to .52
(11.7 to 13.3)
.35 to .40
(9.0 to 10.1)New belt .17 to .21
(4.4 to 5.3) .34 to .43
(8.8 to 11.0) .33 to .41
(8.4 to 10.4) .24 to .30
(6.2 to 7.6)WARNING!
Do not check or touch the drive belt with the engine running, or serious injury may result.
TIMING BELT The timing belt should be replaced with a new one at the mileage specified on the scheduled maintenance chart.
WARNING!
Driving with tires that are worn or improperly inflated can result in a collision, and serious or fatal injury.
Tire inflation pressures Proper tire inflation pressure is essential to the safe and satisfactory operation of your vehicle. Three primary areas are affected by improper tire pressure: 1. Safety Under-inflation increases tire flexing and can result in tire failure. Over-inflation results in a tire losing its ability to cushion shock. Objects on the road and potholes could cause tire damage that may result in tire failure. 2. Economy Improper inflation pressures can cause uneven wear patterns to develop across the tire tread. These abnormal wear patterns will reduce tread life, resulting in a need for earlier tire replacement. Under-inflation also increases tire rolling resistance and results in higher fuel consumption.
3. Ride comfort and vehicle stability Proper tire inflation pressures contribute to the excellent ride quality built into your vehicle. Over-inflation pro- duces an uncomfortable and jarring ride. Under-inflation can produce a feeling of sluggish re- sponse. Unequal unpredictable vehicle response to steering maneuvers. The proper tire pressure for your vehicle is listed on a placard attached near the door sill striker on the driver’s door. The recommended inflation pressures should be followed when the specified tires are installed.
inflation pressures can produce erratic and
Item Normal tire
Front
Tire size Rear P205/60R16 91H 32 psi (220 kpa) P215/50R17 90H 32 psi (220 kpa) 60 psi (420 kpa)
Compact spare tire T125/70D16
The pressures should be checked and adjusted, if neces- sary, at least once a month. Tire pressures should be checked more often when weather temperatures vary widely, because tire pressures vary withMAINTENANCE 329
outdoor temperatures. Inflation pressures specified on the placard are always “cold inflation pressure”. Cold inflation pressure can be measured after the vehicle has been stationary for at least three hours or driven less than one mile (1.6 km) after being stationary for three hours. Cold inflation pressure must not exceed the maximum values molded into the tire sidewall. After driving sev- eral miles, tire inflation pressure may increase 2 to 6 psi (14 to 41 kPa) over the cold inflation pressure; do NOT let air out of the tires to match the specified cold pressure, or your tires will be underinflated. Check your tires each time you refuel. If one tire looks lower than the others, check the tire inflation pressure for all of them. The following precautions also should be observed: 1. Keep your tires inflated to the pressures that are recommended. (See the tire and loading information placard attached on the latch on the driver’s door.) 2. Stay within the load limits that are recommended.
330 MAINTENANCE
3. Make sure that the weight of your vehicle load is evenly distributed. 4. Drive at safe speeds. 5. After the tire inflation pressure has been adjusted, check the tires for damage and air leaks. Be sure to replace the rubber caps on the valve stems. Radial ply tires Radial ply tires provide improved tread life, road hazard resistance and smoother high speed ride. The radial ply factory-installed tires on this vehicle are of belted con- struction and are selected to complement the ride and handling characteristics of your vehicle. Radial ply tires have the same load carrying capacity as bias or bias-belted tires of the same letter size, and use the same recommended inflation pressures. Mixing of radial ply tires with bias or bias-belted tires is not recommended. Combining radial ply and bias or bias-belted tires on one vehicle will negatively affect vehicle handling. It is recommended that radial ply tires should always be used as a set of four.
As longer wearing tires can be more susceptible to irregular tread wear, it is very important to follow the tire rotation interval shown in the section “Tire rotation” to achieve full tread life potential in these tires. Cuts and punctures in radial ply tires are repairable only in the tread area, because of sidewall flexing. Consult your tire dealer for radial ply tire repairs. Tire pressure for sustained high-speed driving For sustained high-speed driving, increase inflation pres- sure 4 psi (28 kPa) above the recommended pressure but do not exceed the maximum cold inflation pressure molded into the tire sidewall. Oversize tires The use of tire sizes other than those listed may cause interference with vehicle components under extremes of suspension and steering travel, and may result in tire and vehicle damage.
Tire maintenance The following maintenance steps are recommended: 1. Check pressure regularly. 2. Maintain wheel balance and front suspension align- ment. 3. Rotate tires regularly in accordance with the recom- mendation in the section “Tire rotation” on page 330. Cargo loads The load-carrying capacity of your vehicle is shown on the tire and loading information placard. DO NOT USE the weight rating data provided on the safety certification label for determining vehicle passen- ger and/or cargo load capacity. For determining the combined weight of occupants and cargo, use the specifications provided on the tire and loading information placard.
MAINTENANCE 331
Tread wear indicators
Location of tread wear indicator
Tread wear indicator
M32A0010
Tread wear indicators are built into the original equip- ment tires on your vehicle to assist you in determining when your tires have been worn to the point of needing replacement. Many states have laws making tire replace- ment mandatory at this point. These indicators are molded into the bottom of the tread grooves and will appear as 1/2 in (13 mm) wide bands when tire tread depth becomes 1/16 in (1.6 mm).
332 MAINTENANCE
When the indicators appear in two or more adjacent grooves, tire replacement is recommended. NOTE: The mark and the location of the tire wear indicator are different depending on tire manufacturers. Tire rotation
Type 2
Type 1
M40A0490
However, the timing for tire rotation may vary according to your vehicle condition, road surface conditions and each individual driver’s driving habits. Any time you notice unusual wear, rotate your tires as soon as possible. When rotating tires, check for uneven wear, damage and wheel alignment. Abnormal wear is usually caused by incor- rect tire pressure, improper wheel alignment, out-of-balance wheel or severe braking. Consult an authorized dealer to determine the cause of irregular tread wear.
M40A0270
To equalize wear and help extend tire life, DaimlerChrysler recommends that you rotate your tires approximately every 7, 500 miles (12, 000 km) under normal driving conditions and every 6,000 miles (9,600km) in severe driving conditions.
The first rotation is the most important to achieve more uniform wear for all tires on the vehicle.
CAUTION!
Do not use the compact spare tire for tire rotation.
Tire chains
CAUTION!
Tire chains are not recommended for your vehicle. The clearance between the chains and the body is small, and the body might be damaged.
Snow tires Some areas of the country require the use of snow tires during winter. Standard tires are of the all season type and satisfy this requirement as indicated by the M+S designation on the tire side wall. If you need snow tires, select tires equivalent in size and type to the original equipment tires. Failure to do so may adversely affect the safety and handling of your vehicle.
MAINTENANCE 333
Snow tires should be inflated 4 psi (28 kPa) higher than the inflation pressure shown on the vehicle’s tire placard. Never inflate over the maximum pressure shown on the tire sidewall. Snow tires should not be operated at sustained speeds over 75 mph (120 km/h). NOTE: As flange nuts are used on your vehicle, change to tapered nuts when snow tires (steel wheels) are used.
334 MAINTENANCE
REGULAR MAINTENANCE SCHEDULE The content and mileage interval can vary depending on model. ! 6,000 Miles (10 000 km) or at 6 months N Change engine oil and engine oil filter. N Rotate tires.
MILEAGE/ MONTHS
DEALERSHIP NAME/CODE
DATE
REPAIR ORDER #
! 12,000 Miles (19 000 km) or at 12 months N Check automatic transaxle fluid level. N Inspect disc brake pads, rotors and calipers for
wear and leaks.
N Check brake hoses for deterioration or leaks. N Inspect drive shaft boots for grease leaks and
damage.
N Change engine oil and engine oil filter. N Rotate tires.
MILEAGE/ MONTHS
DEALERSHIP NAME/CODE
DATE
REPAIR ORDER #
! 18,000 Miles (29 000 km) or at 18 months N Change engine oil and engine oil filter. N Rotate tires.
MILEAGE/ MONTHS
DEALERSHIP NAME/CODE
DATE
REPAIR ORDER #
MAINTENANCE 335
! 24,000 Miles (38 000 km) or at 24 months N Check automatic transaxle fluid level. N Inspect disc brake pads, rotors and calipers for
wear and leaks.
N Check brake hoses for deterioration or leaks. N Inspect drive shaft boots for grease leaks and
damage.
N Change engine oil and engine oil filter. N Rotate tires.
MILEAGE/ MONTHS
DEALERSHIP NAME/CODE
DATE
REPAIR ORDER #
336 MAINTENANCE
! 30,000 Miles (48 000 km) or at 30 months N Replace air cleaner filter. N Replace spark plugs, standard type. N Check drive belts condition (for the generator,
water pump, power steering pump).
N Check manual transaxle oil level. N Check coolant hoses (radiator hose, heater hose). N Check fuel hoses condition. N Inspect rear drum brake linings and rear wheel cylinders (except vehicles with disc brakes) for wear and leaks of all wheels.
N Inspect ball joint and steering linkage seals for
grease leaks and damage.
N Inspect suspension system for looseness and dam-
age.
N Check and service exhaust system as required (connection portion of muffler, muffler pipes and converter heat shields).
MILEAGE/ MONTHS
DEALERSHIP NAME/CODE
DATE
REPAIR ORDER #
! 30,000 Miles (48 000 km) or at 30 months N Change engine oil and engine oil filter. N Rotate tires.
MILEAGE/ MONTHS
DEALERSHIP NAME/CODE
DATE
REPAIR ORDER #
! 36,000 Miles (58 000 km) or at 36 months N Check automatic transaxle fluid level. N Inspect disc brake pads, rotors and calipers for
wear and leaks.
N Check brake hoses for deterioration or leaks. N Inspect drive shaft boots for grease leaks and damage. N Change engine oil and engine oil filter. N Rotate tires.
MILEAGE/ MONTHS
DEALERSHIP NAME/CODE
DATE
REPAIR ORDER #
! 42,000 Miles (67 000 km) or at 42 months N Change engine oil and engine oil filter. N Rotate tires.
! 54,000 Miles (86 000 km) or at 54 months N Change engine oil and engine oil filter. N Rotate tires.
MILEAGE/ MONTHS
DEALERSHIP NAME/CODE
DATE
REPAIR ORDER #
MILEAGE/ MONTHS
DEALERSHIP NAME/CODE
DATE
REPAIR ORDER #
MAINTENANCE 337
! 48,000 Miles (77 000 km) or at 48 months N Check automatic transaxle fluid level. N Inspect disc brake pads, rotors and calipers for
N Check brake hoses for deterioration or leaks. N Inspect drive shaft boots for grease leaks and
wear.
damage.
N Change engine oil and engine oil filter. N Rotate tires.
MILEAGE/ MONTHS
DEALERSHIP NAME/CODE
DATE
REPAIR ORDER #
338 MAINTENANCE
! 60,000 Miles (96 000 km) or at 60 months N Replace air cleaner filter. N Replace spark plugs, standard type. N Replace timing belt.*1
*1: For California, Massachusetts and Vermont this maintenance is recommended but not re- quired.
N Change automatic transaxle fluid. N Check drive belts condition (for the generator,
water pump, power steering pump).
N Check manual transaxle oil level. N Check fuel hoses condition. N Flush and replace engine coolant. N Inspect rear drum brake linings and rear wheel cylinders (except vehicles with disc brakes) for wear and leaks of all wheels.
N Inspect disc brake pads, rotors and calipers for
wear and leaks.
! 60,000 Miles (96 000 km) or at 60 months N Inspect suspension system for looseness and dam-
age.
N Inspect ball joint and steering linkage seals for
grease leaks and damage.
N Check and service exhaust system as required (connection portion of muffler, muffler pipes and converter heat shields).
N Check fuel system for leak
(tank, pipe line and connection, and fuel tank filler tube cap).
N Check evaporative emission control system for leaks and clogging (except evaporative emission canister).
N Replace ignition cables. N Check distributor cap and rotor. N Change engine oil and engine oil filter. N Rotate tires.
MILEAGE/ MONTHS
DEALERSHIP NAME/CODE
DATE
REPAIR ORDER #
MILEAGE/ MONTHS
DEALERSHIP NAME/CODE
DATE
REPAIR ORDER #
! 66,000 Miles (106 000 km) or at 66 months N Change engine oil and engine oil filter. N Rotate tires.
! 78,000 Miles (125 000 km) or at 78 months N Change engine oil and engine oil filter. N Rotate tires.
MILEAGE/ MONTHS
DEALERSHIP NAME/CODE
DATE
REPAIR ORDER #
MILEAGE/ MONTHS
DEALERSHIP NAME/CODE
DATE
REPAIR ORDER #
MAINTENANCE 339
! 72,000 Miles (115 000 km) or at 72 months N Check automatic transaxle fluid level. N Inspect disc brake pads, rotors and calipers for
! 84,000 Miles (134 000 km) or at 84 months N Check automatic transaxle fluid level. N Inspect disc brake pads, rotors and calipers for
N Check brake hoses for deterioration or leaks. N Inspect drive shaft boots for grease leaks and
N Check brake hoses for deterioration or leaks. N Inspect drive shaft boots for grease leaks and
wear.
damage.
wear.
damage.
N Change engine oil and engine oil filter. N Rotate tires.
N Change engine oil and engine oil filter. N Rotate tires.
MILEAGE/ MONTHS
DEALERSHIP NAME/CODE
DATE
REPAIR ORDER #
MILEAGE/ MONTHS
DEALERSHIP NAME/CODE
DATE
REPAIR ORDER #
340 MAINTENANCE
! 90,000 Miles (144 000 km) or at 90 months N Replace air cleaner filter. N Replace spark plugs, standard type. N Check drive belts condition (for the generator,
water pump, power steering pump).
N Check manual transaxle oil level. N Check fuel hoses condition. N Check automatic transaxle fluid level. N Flush and replace engine coolant. N Inspect rear drum brake linings and rear wheel cylinders (except vehicles with disc brakes) for wear and leaks of all wheels.
N Inspect ball joint and steering linkage seals for
grease leaks and damage.
N Inspect suspension system for looseness and damage. N Check and service exhaust system as required (connection portion of muffler, muffler pipes and converter heat shields).
MILEAGE/ MONTHS
DEALERSHIP NAME/CODE
DATE
REPAIR ORDER #
! 90,000 Miles (144 000 km) or at 90 months N Change engine oil and engine oil filter. N Rotate tires.
MILEAGE/ MONTHS
DEALERSHIP NAME/CODE
DATE
REPAIR ORDER #
! 96,000 Miles (154 000 km) or at 96 months N Check automatic transaxle fluid level. N Inspect disc brake pads, rotors and calipers for
wear and leaks.
N Check brake hoses for deterioration or leaks. N Inspect drive shaft boots for grease leaks and
damage.
N Change engine oil and engine oil filter. N Rotate tires.
MILEAGE/ MONTHS
DEALERSHIP NAME/CODE
DATE
REPAIR ORDER #
! 102,000 Miles (163 000 km) or at 102 months N Replace spark plugs, platinum-tipped type. N Replace timing belt.*2
*2: Not required if belt was previously changed.
N Change engine oil and engine oil filter. N Rotate tires.
MILEAGE/ MONTHS
DEALERSHIP NAME/CODE
DATE
REPAIR ORDER #
! 108,000 Miles (173 000 km) or at 108 months N Check automatic transaxle fluid level. N Inspect disc brake pads, rotors and calipers for
wear and leaks.
N Check brake hoses for deterioration or leaks. N Inspect drive shaft boots for grease leaks and damage. N Change engine oil and engine oil filter. N Rotate tires.
MAINTENANCE 341
! 114,000 Miles (183 000 km) or at 114 months N Change engine oil and engine oil filter. N Rotate tires.
MILEAGE/ MONTHS
DEALERSHIP NAME/CODE
DATE
REPAIR ORDER #
! 120,000 Miles (192 000 km) or at 120 months N Replace air cleaner filter. N Replace spark plugs, standard type. N Replace timing belt.*1
*1: For California, Massachusetts and Vermont this maintenance is recommended but not required.
N Change automatic transaxle fluid. N Check drive belts condition (for the generator,
water pump, power steering pump).
N Check manual transaxle oil level. N Check fuel hoses condition.
MILEAGE/ MONTHS
DEALERSHIP NAME/CODE
DATE
REPAIR ORDER #
MILEAGE/ MONTHS
DEALERSHIP NAME/CODE
DATE
REPAIR ORDER #
342 MAINTENANCE
! 120,000 Miles (192 000 km) or at 120 months N Flush and replace engine coolant. N Inspect rear drum brake linings and rear wheel cylinders (except vehicles with disc brakes) for wear and leaks of all wheels.
N Inspect disc brake pads, rotors and calipers for
wear and leaks.
age.
N Inspect suspension system for looseness and dam-
N Inspect ball joint and steering linkage seals for
grease leaks and damage.
N Check and service exhaust system as required (connection portion of muffler, muffler pipes and converter heat shields).
MILEAGE/ MONTHS
DEALERSHIP NAME/CODE
DATE
REPAIR ORDER #
! 120,000 Miles (192 000 km) or at 120 months N Check fuel system for leak
(tank, pipe line and connection, and fuel tank filler tube cap).
N Check evaporative emission control system for leaks and clogging (except evaporative emission canister).
N Replace ignition cables. N Check distributor cap and rotor. N Change engine oil and engine oil filter. N Rotate tires. N Inspect SRS*2 airbag system.
*2: Supplemental Restraint System
MILEAGE/ MONTHS
DEALERSHIP NAME/CODE
DATE
REPAIR ORDER #
SEVERE MAINTENANCE SCHEDULE The content and mileage interval can vary depending on model. ! 3,000 Miles (5 000 km) or at 3 months N Change engine oil and engine oil filter. N Rotate tires.
MILEAGE/ MONTHS
DEALERSHIP NAME/CODE
DATE
REPAIR ORDER #
! 6,000 Miles (10 000 km) or at 6 months N Change engine oil and engine oil filter. N Inspect disc brake pads, rotors and calipers for
wear and leaks.
N Rotate tires. N Inspect suspension system for looseness and dam-
age.
age.
MILEAGE/ MONTHS
DEALERSHIP NAME/CODE
DATE
REPAIR ORDER #
MAINTENANCE 343
! 9,000 Miles (14 000 km) or at 9 months N Change engine oil and engine oil filter. N Rotate tires.
MILEAGE/ MONTHS
DEALERSHIP NAME/CODE
DATE
REPAIR ORDER #
! 12,000 Miles (19 000 km) or at 12 months N Check automatic transaxle fluid level. N Check brake hoses for deterioration or leaks. N Inspect drive shaft boots for grease leaks and
damage.
N Change engine oil and engine oil filter. N Rotate tires. N Inspect suspension system for looseness and dam-
MILEAGE/ MONTHS
DEALERSHIP NAME/CODE
DATE
REPAIR ORDER #
344 MAINTENANCE
! 15,000 Miles (24 000 km) or at 15 months N Replace air cleaner filter. N Replace spark plugs, standard type. N Inspect rear drum brake linings and rear wheel cylinders (except vehicles with disc brakes) for wear and leaks of all wheels.
N Change engine oil and engine oil filter. N Rotate tires.
MILEAGE/ MONTHS
DEALERSHIP NAME/CODE
DATE
REPAIR ORDER #
! 18,000 Miles (29 000 km) or at 18 months N Change engine oil and engine oil filter. N Inspect disc brake pads, rotors and calipers for
wear and leaks.
N Rotate tires. N Inspect suspension system for looseness and dam-
age.
MILEAGE/ MONTHS
DEALERSHIP NAME/CODE
DATE
REPAIR ORDER #
! 21,000 Miles (34 000 km) or at 21 months N Change engine oil and engine oil filter. N Rotate tires.
MILEAGE/ MONTHS
DEALERSHIP NAME/CODE
DATE
REPAIR ORDER #
! 24,000 Miles (38 000 km) or at 24 months N Change engine oil and engine oil filter. N Check automatic transaxle fluid level. N Check brake hoses for deterioration or leaks. N Inspect suspension system for looseness or dam-
age.
damage.
N Inspect drive shaft boots for grease leaks and
N Inspect disc brake pads, rotors and calipers for
wear and leaks.
N Rotate tires.
MILEAGE/ MONTHS
DEALERSHIP NAME/CODE
DATE
REPAIR ORDER #
! 27,000 Miles (43 000 km) or at 27 months N Change engine oil and engine oil filter. N Rotate tires.
MILEAGE/ MONTHS
DEALERSHIP NAME/CODE
DATE
REPAIR ORDER #
MAINTENANCE 345
! 30,000 Miles (48 000 km) or at 30 months N Replace air cleaner filter. N Replace spark plugs, standard type. N Check drive belts condition (for the generator,
water pump, power steering pump).
N Change manual transaxle oil. N Change automatic transaxle fluid. N Check fuel hoses condition. N Inspect rear drum brake linings and rear wheel cylinders (except vehicles with disc brakes) for wear and leaks of all wheels.
N Inspect ball joint and steering linkage seals for
grease leaks and damage.
N Check and service exhaust system as required (connection portion of muffler, muffler pipes and converter heat shields).
N Check coolant hoses (radiator hose, heater hose). N Inspect suspension system for looseness and damage.
MILEAGE/ MONTHS
DEALERSHIP NAME/CODE
DATE
REPAIR ORDER #
346 MAINTENANCE
! 30,000 Miles (48 000 km) or at 30 months N Change engine oil and engine oil filter. N Inspect disc brake pads, rotors and calipers for
wear and leaks.
N Rotate tires.
MILEAGE/ MONTHS
DEALERSHIP NAME/CODE
DATE
REPAIR ORDER #
! 33,000 Miles (52 800 km) or at 33 months N Change engine oil and engine oil filter. N Rotate tires.
MILEAGE/ MONTHS
DEALERSHIP NAME/CODE
DATE
REPAIR ORDER #
! 36,000 Miles (58 000 km) or at 36 months N Check automatic transaxle fluid level. N Check brake hoses for deterioration or leaks. N Inspect drive shaft boots for grease leaks and
damage.
age.
N Inspect suspension system for looseness and dam-
N Change engine oil and engine oil filter. N Inspect disc brake pads, rotors and calipers for
wear and leaks.
N Rotate tires.
MILEAGE/ MONTHS
DEALERSHIP NAME/CODE
DATE
REPAIR ORDER #
! 39,000 Miles (62 000 km) or at 39 months N Change engine oil and engine oil filter. N Rotate tires.
MILEAGE/ MONTHS
DEALERSHIP NAME/CODE
DATE
REPAIR ORDER #
MAINTENANCE 347
! 42,000 Miles (67 000 km) or at 42 months N Change engine oil and engine oil filter. N Inspect disc brake pads, rotors and calipers for
! 48,000 Miles (77 000 km) or at 48 months N Change engine oil and engine oil filter. N Inspect disc brake pads, rotors and calipers for
wear and leaks.
N Rotate tires. N Inspect suspension system for looseness and damage.
MILEAGE/ MONTHS
DEALERSHIP NAME/CODE
DATE
REPAIR ORDER #
! 45,000 Miles (72 000 km) or at 45 months N Replace air cleaner filter. N Replace spark plugs, standard type. N Inspect rear drum brake linings and rear wheel cylinders (except vehicles with disc brakes) for wear and leaks of all wheels.
N Change engine oil and engine oil filter. N Rotate tires.
wear and leaks.
N Rotate tires. N Check automatic transaxle fluid level. N Check brake hoses for deterioration or leaks. N Inspect drive shaft boots for grease leaks and
N Inspect suspension system for looseness and dam-
damage.
age.
MILEAGE/ MONTHS
DEALERSHIP NAME/CODE
DATE
REPAIR ORDER #
! 51,000 Miles (82 000 km) or at 51 months N Change engine oil and engine oil filter. N Rotate tires.
MILEAGE/ MONTHS
DEALERSHIP NAME/CODE
DATE
REPAIR ORDER #
MILEAGE/ MONTHS
DEALERSHIP NAME/CODE
DATE
REPAIR ORDER #
348 MAINTENANCE
! 54,000 Miles (86 000 km) or at 54 months N Change engine oil and engine oil filter. N Inspect disc brake pads, rotors and calipers for
wear and leaks.
! 60,000 Miles (96 000 km) N Replace air cleaner filter. N Replace spark plugs, standard type. N Check drive belts condition (for the generator,
N Rotate tires. N Inspect suspension system for looseness and dam-
water pump, power steering pump).
N Replace timing belt.*1
age.
MILEAGE/ MONTHS
DEALERSHIP NAME/CODE
DATE
REPAIR ORDER #
! 57,000 Miles (91 000 km) or at 57 months N Change engine oil and engine oil filter. N Rotate tires.
MILEAGE/ MONTHS
DEALERSHIP NAME/CODE
DATE
REPAIR ORDER #
*1: For California, Massachusetts and Vermont this maintenance is recommended but not re- quired.
N Change manual transaxle fluid. N Change automatic transaxle fluid. N Check fuel hoses condition. N Flush and replace engine coolant. N Check coolant hoses (radiator hose, heater hose). N Inspect rear drum brake linings and rear wheel cylinders (except vehicles with disc brakes) for wear and leaks of all wheels.
N Check brake hoses for deterioration or leaks.
MILEAGE/ MONTHS
DEALERSHIP NAME/CODE
DATE
REPAIR ORDER #
! 60,000 Miles (96 000 km) or at 48 months N Inspect ball joint and steering linkage seals for
grease leaks and damage.
N Inspect drive shaft boots for grease leaks and damage. N Check and service exhaust system as required (connection portion of muffler, muffler pipes and converter heat shields).
N Check fuel system for leaks
(tank, pipe line and connection, and fuel tank filler tube cap).
N Check evaporative emission control system (ex-
cept evaporative emission canister).
N Replace ignition cables. N Check distributor cap and rotor. N Change engine oil and engine oil filter. N Inspect disc brake pads, rotors and calipers for
wear and leaks.
N Rotate tires.
MILEAGE/ MONTHS
DEALERSHIP NAME/CODE
DATE
REPAIR ORDER #
MAINTENANCE 349
! 63,000 Miles (100 000 km) or at 63 months N Change engine oil and engine oil filter. N Rotate tires.
MILEAGE/ MONTHS
DEALERSHIP NAME/CODE
DATE
REPAIR ORDER #
! 66,000 Miles (106 000 km) or at 66 months N Change engine oil and engine oil filter. N Inspect disc brake pads, rotors and calipers for
wear and leaks.
N Rotate tires. N Inspect suspension system for looseness and dam-
age.
MILEAGE/ MONTHS
DEALERSHIP NAME/CODE
DATE
REPAIR ORDER #
! 75,000 Miles (120 000 km) or at 75 months N Replace air cleaner filter. N Replace spark plugs, standard type. N Inspect rear drum brake linings and rear wheel cylinders (except vehicles with disc brakes) for wear and leaks of all wheels.
N Check brake hoses for deterioration or leaks. N Change engine oil and engine oil filter. N Rotate tires.
MILEAGE/ MONTHS
DEALERSHIP NAME/CODE
DATE
REPAIR ORDER #
350 MAINTENANCE
! 69,000 Miles (110 000 km) or at 69 months N Change engine oil and engine oil filter. N Rotate tires.
MILEAGE/ MONTHS
DEALERSHIP NAME/CODE
DATE
REPAIR ORDER #
! 72,000 Miles (115 000 km) or at 72 months N Change engine oil and engine oil filter. N Inspect disc brake pads, rotors and calipers for
wear and leaks.
N Rotate tires. N Check automatic transaxle fluid level. N Inspect drive shaft boots for grease leaks and
N Check brake hoses for deterioration or leaks. N Inspect suspension system for looseness and dam-
damage.
age.
MILEAGE/ MONTHS
DEALERSHIP NAME/CODE
DATE
REPAIR ORDER #
! 78,000 Miles (125 000 km) or at 78 months N Change engine oil and engine oil filter. N Inspect disc brake pads, rotors and calipers for
! 84,000 Miles (134 000 km) or at 84 months N Change engine oil and engine oil filter. N Inspect disc brake pads, rotors and calipers for
MAINTENANCE 351
wear and leaks.
N Rotate tires. N Inspect suspension system for looseness and dam-
age.
MILEAGE/