- 2013 Volvo S60 Owners Manuals
- Volvo S60 Owners Manuals
- 2004 Volvo S60 Owners Manuals
- Volvo S60 Owners Manuals
- 2012 Volvo S60 Owners Manuals
- Volvo S60 Owners Manuals
- 2006 Volvo S60 Owners Manuals
- Volvo S60 Owners Manuals
- 2003 Volvo S60 Owners Manuals
- Volvo S60 Owners Manuals
- 2007 Volvo S60 Owners Manuals
- Volvo S60 Owners Manuals
- 2001 Volvo S60 Owners Manuals
- Volvo S60 Owners Manuals
- 2005 Volvo S60 Owners Manuals
- Volvo S60 Owners Manuals
- 2008 Volvo S60 Owners Manuals
- Volvo S60 Owners Manuals
- 2011 Volvo S60 Owners Manuals
- Volvo S60 Owners Manuals
- 2002 Volvo S60 Owners Manuals
- Volvo S60 Owners Manuals
- 2009 Volvo S60 Owners Manuals
- Volvo S60 Owners Manuals
- Download PDF Manual
-
Grocery bag holder Handling Hazard warning flashers Head restraint - center, rear Headlight washer Headlight wiper blades Headlights Heated front seats High beam "flash" High beam bulb High beam indicator High/ low beams - replacing Hoisting the car HomeLink® Universal Transceiver Hood Hood - opening IC Immobilizer (start inhibitor) Indicator and warning symbols Inflatable Curtain Instrument lighting Instrument panel Integrated booster cushion Interior Interior lighting Intermittent wiping Introduction Isofix fasteners (child seats) Jack Jump starting Keylock Keys Kickdown
136
199
33
108
119
112131
42
112
41
175
39
42 , 56 , 59
40
181
30
179
168
82
170
17020
116
30 , 31
20
39
30
25
99
104
41
25113 , 157
1432 , 128
116
134LED illumination Lighting panel Load carriers Locking Locking steering wheel Locks Long distance trips Long loads - carrying Low beam bulb Lubricants Maintenance Schedule Maintenance services Malfunction indicator light Manual climate control with air conditioning Manual transmission Messages in the display Multifilter with air quality sensor Normal turns (direction indicators) Occupant safety Octane rating Odometer Oil pressure Oil quality Oil viscosity Opening/ locking the trunk P Park Paint Paint - color code Paintwork damage Parking brake Parking lights Pen holder Polishing Power seat Power steering fluid Power sun roof Prem- Air Programme type PT PROPOSITION 65 WARNING
40
39
148
119
129
115
150
112
180
195165
164
33
58
132
35
5740
28
126
30
33
171
171
120133, 135
162
162
162
33 , 45
39
108
161
102
174
49
70
143Radiator Radio Rain sensor Reading lamps Rear fog lights Rear seat Rear suspension Rear window defroster Rearview mirror/ door mirrors Recirculation REDUCE SPEED Refrigerant (A/ C system) Refueling Remote control - central locking system Replacing the battery Reporting safety defects Reverse gear inhibitor Roadholding Roof racks (load carriers) Safety Safety defects - reporting Seat belt Seat belt maintenance Seat belt reminder Seat belts (keeping child seats in place) SEE MANUAL Service Service reminder SERVICE REQUIRED SERVICE URGENT Shiftlock Side airbags Side marker lamp SIPS airbags Ski hatch Snow chains Snow tires Spare tires Spare wheel Spark plugs Specifications Speedometer Spoiler lamps
170
65
41
104
39
111
197
42 , 59
48
56 , 60
35
52
126 , 127
117
177
28
132
131
14828
10
28
48
27
35
164
33
35
35
2 , 128
18
183
18
112
153
153
154
113
199
191
30
3912
SRS 139
Stability system 116
Start inhibitor (immobilizer) 129
Starter switch and steering wheel lock 128
Starting the car 34, 37, 139
STC (Stability Traction Control) 36
Steering wheel adjustment 129
Steering wheel lock 162
Stone chips 35
STOP ENGINE 35
STOP SAFELY ASAP Storage compartments 107
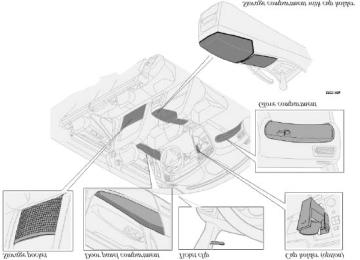
Storage compartments in the passenger compartment 106
153
Studded tires 49
Sun roof (electrically operated) Sun visor 50
Supplemental Restraint System (SRS) 12
Supplemental Restraint System (SRS) - warning light 33
Suspension 197
Switches in the center console 37
Tachometer Temperature (climate control) Temperature gauge Temporary spare tire Text window - messages Tire economy - improving Tires Tires - tread wear indicators Tools Towing Towing a trailer Trailer indicator lamp Trailer towing Trip computer Trip odometer Trunk - unlocking Type designations Uniform Tire Quality Grading Unlocking Unlocking the trunk Vanity mirror30
55
30
154
35
152
152
155
113
141
144
33
144
43
30
120
192157 , 158
119
120105
Vehicle Identification Number (VIN) Vehicle loading VIN (Vehicle Identification Number) Volvo and the environment Volvo On Call W - Winter Warning symbol in center of dashboard Warranties Washer fluid reservoir Washing the car Waste bin Waxing Weight distribution Weights Wheels WHIPS Windshield washer Windshield washer fluid reservoir Windshield wipers Winter tires Winter/ Wet driving mode Wiper blades
WARNING!
192
154
192
202134 , 136
31
164
170 , 173
160
110
161
130
193
152
22
41
173
41
152
149
175Detergents and solvents Do not use gasoline containing lead or benzene as a detergent or solvent Both lead and benzene are toxic and may be hazardous to your health
Installation of optional equipment/ use of mobile telephones Incorrectly installed optional equipment, alarm systems or the use of mobile telephones which are not connected to a suitable antenna can cause faults in the car's electronic control systems Your car is equipped with a sophisticated electronics system Any repairs, maintenance or fault tracing on this system should be done by an authorized Volvo retailer only Please consult your Volvo retailer if you have any questions before connecting accessory or optional equipment to the vehicle's electrical system
Carbon monoxide Carbon monoxide is a poisonous, colorless and odorless gas which is present in all exhaust gases If you ever smell exhaust fumes inside the vehicle, make sure the passenger compartment is venti- lated and immediately return the vehicle to your retailer for correction
The following should be checked regularly:* 1. Washer fluid reservoir should be filled with water and solvent (wintertime: windshield washer anti- freeze). See page 149. 2. Power steering - When cold, the level must not be above the COLD mark and when hot it must not be above the HOT mark. Top up if the level drops to the ADD mark with ATF fluid. See page 174. 3. Coolant level should be between the expansion tank marks. Mixture: 50% anti-freeze and 50% water. See page 169. 4. Engine oil level should be between the dipstick marks. The distance between the marks represents approx. 1.6 US qt. (1.5 liter). See page 172. 5. Brake fluid - check, without removing the cap, that the level is above the MIN mark. Use brake fluid DOT 4+. See page 174.
Fuel octane rating, see page 126.
Tire pressure, see label located on the inside of the fuel tank cover.
*Engine oil should be checked each time the car is refueled.
See pages 179 - 183 for more information on replacing bulbs.
Contents | Top of Page
2 0 0 1 VOLVO
S60
Introduction
Welcome to the world-wide family of Volvo owners. We trust that you will enjoy many years of safe driving in your Volvo, an automobile designed with your safety and comfort in mind. To help ensure your satisfaction with this vehicle, we encourage you to familiarize yourself with the equipment descriptions, operating instructions and maintenance require- ments/ recommendations in this manual. We also urge you and your passengers to wear seat belts at all times in this (or any other) automobile. And, of course, please do not operate a vehicle if you may be affected by alcohol, medication or any impairment that could hinder your ability to drive.
Your Volvo is designed to meet all applicable safety and emission standards, as evidenced by the certification labels attached to the driver's door opening and on the left wheel housing in the engine compartment.
For further information please contact your retailer, or:
In the USA: Volvo Cars of North America Customer Relations P.O. Box 914 Rockleigh, New Jersey 07647-0914 800-458-1552
In Canada: Volvo Canada Ltd. 175 Gordon Baker Road Willowdale, Ontario M2H 2N7 800-663-8255
General Information
Shiftlock (automatic transmission) When your car is parked, the gear selector is locked in the (P) ark position. To release the selector from this position, turn the ignition key to position II (or start the engine), depress the brake pedal, press the button on the front side of the gear selector and move the selector from (P) ark.
Keylock (automatic transmission) When you switch off the ignition, the gear selector must be in the (P) ark position before the key can be removed from the ignition switch. Anti-lock Brake System (ABS) The ABS system in your car performs a self- diagnostic test when the vehicle first reaches the speed of approximately 12 mph (20 km/h). The brake pedal will pulsate several times and a sound may be audible from the ABS control module. This is normal. Fuel filler door The fuel filler door, located on the right rear fender, is connected to your car's central locking system. The driver's door must be unlocked before the fuel filler door can be opened. When you lock your car using the central locking button on the driver's door or remote control, the fuel filler door also locks after a 10-minute delay. If you lock your car with the fuel filler door open, you will need to unlock the car to allow the fuel filler door to be closed again. Fuel filler cap After refueling, close the fuel filler cap by turning it clockwise until it clicks into place. If this cap is not closed tightly or if the engine is running when the car is refueled, the Malfunction Indicator Lamp (" Check Engine" light) will illuminate. Important information Before you operate your car for the first time, please familiarize yourself with the new- engine oil consumption information on page 126. You should also be familiar with the information in chapters one, two and four of this manual. Information contained in the balance of the manual is extremely useful and should be read after operating the vehicle for the first time. The manual is structured so that it can be used for reference. For this reason, it should be kept in the car for ready access. Do not export your Volvo to another country before investigating that country's applicable safety and exhaust emission requirements. In some cases it may be difficult or impossible to comply with these requirements. Modifications to the emission control system( s) may render your Volvo not certifiable for legal operation in the U. S., Canada and other countries. All information, illustrations and specifications contained in this manual are based on the latest product information available at the time of publication. Please note that some vehicles may be equipped differently, depending on special legal requirements. Optional equipment described in this manual may not be available in all markets. Volvo reserves the right to make model changes at any time, or to change specifications or design without notice and without incurring obligation. Volvo and the environment
Volvo is committed to the well being of its customers. As a natural part of this commitment, we care about the environment in which we all live. Caring for the environment means an everyday involvement in reducing our environmental impact. Volvo's environmental activities are based on a holistic view, which means we consider the overall environmental impact of a product throughout its complete life cycle. In this context, design, production, product use, and recycling are all important considerations. In production, Volvo has partly or completely phased out several chemicals including freons, lead chromates, naphtanates, asbestos, mercury and cadmium; and reduced the amount of chemicals used in our plants 50% since 1991. Volvo was the first in the world to introduce into production a three- way catalytic converter with a Lambda sond, now called oxygen sensor, in 1976. The current version of this highly efficient system reduces emissions of harmful substances (CO, HC, NOx) from the exhaust pipe by approximately 95% and the search to eliminate the remaining emissions continues. Volvo is the only automobile manufacturer to offer CFC- free retrofit kits for the air conditioning system of all models as far back as the 1975 model 240. Advanced electronic engine controls, refined purification systems and cleaner fuels are bringing us closer to our goal. After Volvo cars and parts have fulfilled their use, recycling is the next critical step in completing the life cycle. The metal content is about 75% of the total weight of a car, which makes the car among the most recycled industrial products. In order to have efficient and well controlled recycling, many Volvo variants have printed dismantling manuals, indicating the weight and material of individual components.
For Volvo, all homogeneous plastic parts weighing more than 1.7 oz. (50 grams) are marked with international symbols that indicate how the component is to be sorted for recycling. In addition to continuous environmental refinement of conventional gasoline- powered internal combustion engines, Volvo is actively looking at advanced technology alternative- fuel vehicles. When you drive a Volvo, you become our partner in the work to lessen the car's impact on the environment. To reduce your vehicle's environmental impact, you can:
Maintain proper air pressure in your tires. Tests have shown decreased fuel economy with improperly inflated tires. Follow the recommended maintenance schedule. Drive at a constant speed. See an authorized Volvo retailer as soon as possible for inspection if the check engine (malfunction indicator) lamp
illuminates, or stays on after the vehicle has started.
Properly dispose of any vehicle- related waste such as used motor oil, used batteries, brake pads, etc. When cleaning your car, use Volvo's own car care products, all of which have systematically been adapted to the
environment. For additional information regarding the environmental activities in which Volvo Cars of North America, Inc. and Volvo Car Corporation are involved, visit our Internet Home Page at: http://www.volvocars.com Prem-Air On the surface of the radiator in the engine compartment, there is a special coating called Prem- Air. Prem- Air works as a catalytic converter, converting most of the ground level ozone passing through the radiator into oxygen, thereby reducing harmful ground-level ozone.
Instruments, switches and controls
1. Front fog lights 2. Headlights/ Parking lights 3. Rear fog light 4. Turn signals/ High/ low beams 5. Cruise control
Page 39
39
39
40
444
6. Horn 30
7. Instrument panel 67
8. Audio controls 41
9. Windshield wipers 45
10. Parking brake (hand brake) 37, 38
11. Center console switches 51
12. Climate control 61
13. Audio system 45
14. 12 V socket 42
15. Hazard warning flashers 108
16. Glove compartment 53
17. Panel vents 30
18. Text window 30
19. Temperature gauge 30/ 44
20. Odometer/ Trip odometer/Cruise control indicator 30
21. Speedometer 30
22. Turn signal indicators 23. Tachometer 30
24. Ambient temperature/ Clock/Selected gear indicator 30
30
25. Fuel gauge 31
26. Indicator and warning symbols 27. Cup holder (option) 108
53
28. Panel vents 39
29. Instrument lighting 30. Lighting panel 39
104
31. Reading lights 104
32. Interior lighting 33. Sun roof control 49
4, 10
34. Seat belt reminder 48
35. Rearview mirror 36. Lock button, for all doors 119
46
37. Blocking rear seat power windows 46
38. Controls, power windows 39. Controls, sideview mirrors 48Contents
Contents Safety Instruments and controls Climate control Audiio Interior Locks and alarm Starting and driving Wheels and tires Car care Maintenance and service Specifications Index
Contents | Top of Page
2 0 0 1 VOLVO
S60
Instruments and controls pg. 29 Instruments and controls 30
Instrument panel 31
Indicator and warning symbols 36
Steering wheel adjustment 37
Switches in the center console 39
Lighting panel 40
Turn signals Windshield wipers/ washer 41
Hazard warning flashers, rear window/ sideview mirror defroster, heated front seats 42
Trip computer (option) 43
44
Cruise control 45
Parking brake, electric socket/ cigarette lighter Electrically operated windows 46
48
Rearview mirror/ sideview mirrors Electrically operated sun roof 49
pg. 30 Instrument panel1. Turn signal indicators - right - left
2. Text window The text window displays information and warning messages.
3. Temperature gauge The pointer should be approximately midway on the gauge when driving. Do not drive the car if the warning light is on. The text window will provide you with additional information. If the engine temperature remains high, check coolant level - see page 169.
4. Trip odometer The trip odometers are used for measuring shorter distances. The right- hand digit gives tenth of a mile/ kilometer. Press the button for more than 2 seconds to reset. Change between trip odometers 1 and 2 using one short press on the button.
5. Odometer
6. Speedometer
7. Warning symbol
8. High beam indicator
9. Tachometer Indicates engine speed in thousands of revolutions per minute (rpm). Do not drive for long with the needle in the red section. The engine has an built-in function preventing excessively high engine speeds. When this function operates, you may discern some pulsation, which in that case is quite normal.
10. Gear and driving mode indicator The currently selected driving mode is displayed here. If you use the optional Geartronic function on the automatic trans- mission, the currently selected gear will be displayed.
11. Ambient temperature gauge This display indicates the air temperature outside your car. A "snowflake" symbol in the text window is displayed when the temperature is in the range of 23 - 36° F (- 5 - +2° C). Please note that this symbol does not indicate a fault with your car.
At low speeds or when the car is not moving, the temperature readings may be slightly higher than the actual ambient temperature.
12. Clock/ set button Turn the button to set the clock.
13. Fuel gauge The fuel tank holds approximately 18.5 US gals (70 liters) or 21.1 US gals (80 liters) on turbo models.
When a warning light in the gauge comes on, there are approximately 1.8 US gal. (8 liters) of fuel remaining in the tank.
14. Indicator and warning symbols pg. 31 Indicator and warning symbols The indicator and warning symbols light up when you turn the ignition key to the driving position (position II) before starting. This shows that the symbols are functioning. When the engine starts, all symbols go out. If the engine is not started within 5 seconds, all symbols except CHECK ENGINE and go out. Certain symbols may not have their functions illustrated, depending on the car's equipment. The symbol for the parking brake goes out when the parking brake is released.
Warning symbol This symbol shines as a red or orange light depending on the severity of the discovered fault.
in center of dashboard
Red symbol - Stop the car as soon as possible in a suitable location and read the message shown in the text window.
Orange symbol - Follow the instructions shown in the text window.
Anti-lock brake system ABS If the warning light comes on, there is a malfunction of the ABS system (the
standard braking system will still function). The vehicle should be driven to a Volvo retailer for inspection. See page 138 for additional information. pg. 32 Indicator and warning symbols BRAKE Brake failure warning light If the light comes on while driving or braking, stop immediately, open the hood and check the brake fluid level in the reservoir. See page 170 for reservoir position and page 174 for instructions.
Canadian models are equipped with this warning light:
If the BRAKE and ABS warning lights come on at the same time, this could indicate a fault in the brake system.
Stop the car in a suitable place and switch off the engine. Restart the engine. If both warning lights go off, no further action is required. If both lights are still on after the engine has been restarted, switch off the engine again and check the brake fluid
level (see page 170 for the location of the brake fluid reservoir).
WARNING!
If the fluid level is below the MIN mark in the reservoir or if a "Brake failure - Service urgent" message is displayed in the text window: DO NOT DRIVE. Have the car towed to an authorized Volvo retailer and have the brake system inspected.
If the brake fluid level is above the MIN mark, drive carefully to an authorized Volvo retailer and have the brake
system inspected. pg. 33 Indicator and warning symbols
Supplemental Restraint System SRS
If the light comes on (or stays on after the vehicle has started), the SRS diagnostic system has detected a fault. Drive to an authorized Volvo retailer for an inspection of the system. See the SRS section for more information.
Generator warning light
If the light comes on while the engine is running, have the charging system checked.
Service reminder indicator
This light will come on at 7,500 mile (12,000 km) intervals, after 750 hours of driving or after 12 months, whichever occurs first, to remind the driver that the service interval has been exceeded. The light will stay on for 2 minutes after start until reset by the servicing retailer.
PARK BRAKE Parking brake applied This light will be on when the parking brake (hand brake) is applied. The parking brake lever is situated between the front seats.
Canadian models are equipped with this symbol.
Rear fog light
This light indicates that the fog light is on.
Turn signal indicator - trailer (certain models)
If you are towing a trailer, this light will flash simultaneously with the turn signals on the trailer. If the light does not flash when signaling, neither the trailer's turn signals nor the car's turn signals are functioning.
Oil pressure warning light
If the light comes on while driving, stop the car and then stop the engine immediately and check the engine oil level. See page 172. If the light stays on after restart, have the car towed to the nearest authorized Volvo retailer. After hard driving, the light may come on occasionally when the engine is idling. This is normal, provided it goes off when the engine speed is increased.
CHECK ENGINE Malfunction indicator light If the light comes on (or stays on after the vehicle has started), the engine diagnostic system has detected a possible fault in the emission control system. Although driveability may not be affected, see an authorized Volvo retailer as soon as possible for inspection.
Canadian models are equipped with this warning light:
NOTE: If the fuel filler cap is not closed tightly or if the engine is running when the car is refueled, the Malfunction Indicator Lamp may indicate a fault. However, your vehicle's performance will not be affected. Use only Volvo original or approved fuel filler caps. pg. 34 Indicator and warning symbols
Cars equipped with STC or DSTC (option) Cars equipped with STC or DSTC have a switch in the center console marked STC or DSTC. See pages 37, 38.
If the indicator light flashes, it indicates that the STC or DSTC system is working.
The indicator light stays on when the STC or DSTC system has been switched off with the appropriate button in the center console.
Fault in the STC or DSTC system If the indicator light remains on, there is a fault in one of the systems.
Stop the car in a safe place and switch off the engine. Restart the engine. If the indicator light goes off, no further action is necessary.
If the indicator light remains on, drive to an authorized Volvo retailer to have the system inspected. pg. 35 Indicator and warning symbols Messages in the text window When a warning light in the instrument panel comes on, a message is also displayed in the text window. After you have read the message, you can erase it by pressing button A (see illus- tration).
NOTE: Certain messages cannot be erased until the condition has been corrected. If a warning message is displayed when e. g. you are using the trip computer or would like to use the telephone, this message must be erased before you can access the function of your choice. Press button A to erase the warning message.
You can scroll through the stored messages by pressing button A (see illustration). The text window can be cleared (the message will be returned to memory) by pressing button A again.
Meaning: This message may be displayed when STC or DSTC are not switched on.
Message REDUCE SPEED STOP SAFELY ASAP Stop and switch off the engine. Serious risk of damage. STOP ENGINE Stop and switch off the engine. Serious risk of damage. Take your car in for service immediately. SERVICE URGENT SEE MANUAL Consult your owner's manual. SERVICE REQUIRED Take your car in for service as soon as possible. FIX NEXT SERVICE Have your car checked at the next service interval.
pg. 36 Steering wheel adjustment
Both the height and the reach of the steering wheel can be adjusted to a comfortable position for the driver. Pull down the lever on the left of the steering column. Adjust the steering wheel to a suitable position and press the lever back into place to lock the steering wheel in the new position. Check that the steering wheel is locked in the new position.
WARNING!
Never adjust the steering wheel while driving.
pg. 37 Switches in the center console
1. Folding head restraints (option) This button is used to fold down the outboard rear head restraints. The ignition key must be in position I or II or the engine must be running.
NOTE: If the head restraints have been folded down, they must be returned to their original position manually. The head restraints should be in the upright position before the rear seat backrests are folded down.
WARNING!
For safety reasons, no one should be allowed to sit in the outboard rear seat positions if the head restraints are folded down. If these positions are occupied, the head restraints should be in the upright (fixed) position.
2. Not in use.
3. Not in use
4. Stability Traction Control system (option)
NOTE: Press this switch for at least half a second to turn the STC system on or off. An LED in the switch will light up to indicate that the system is on. See page 139 for more information on STC. This system should be switched off if you, for any reason, temporarily have to drive with tires of different dimensions (e. g., spare tire).
NOTE: To help reduce the risk that this system is turned off inadvertently, the switch must be held in for at least half a second to turn STC off. The warning symbol in the instrument panel will light up to indicate that STC is OFF. pg. 38 Switches in the center console
5. Dynamic Stability Traction Control system (option) This button is used to switch DSTC off. When the LED in the button is ON, this indicates that the system is ON (the light will also come on if a fault has been detected in the system).
NOTE: To avoid inadvertently switching the system off, the button must be pressed for at least half a second before DSTC is deactivated. The text "DSTC off" will be displayed briefly in the text window. The warning symbol will come on to indicate that DSTC has been switched off. The system is automatically switched on when the engine is started. DSTC should be switched off if the steering wheel position or the front wheels are not properly aligned. See page 140 for more information on
WARNING!
Please be aware that the car's handling characteristics may be affected if Dynamic Stability Traction Control (DSTC) is switched off.
6. Temporarily disconnecting the alarm sensors (option) See page 123 for more details.
7. Not in use
8. 12 volt socket This 12 volt socket can be used to plug in certain accessories such as cellular telephones, etc. The ignition key must be in position 1 (or higher) for the auxiliary socket to function.
NOTE: The auxiliary sockets can also be used for cigarette lighters, which are available at your Volvo retailer. pg. 39 Lighting panel
A - Headlights and parking lights
All lighting off.
Models with daytime running lights: Low beam headlights will automatically come on if the ignition key is in position II. Front and rear parking lights and license plate lights will also be on. Volvo recommends the use of daytime running lights. If, however, you would prefer to have these lights turned off (USA only), please consult your Volvo retailer. Please note that the use of daytime running lights is mandatory in Canada.
Parking lights on. The parking lights should be switched off when you leave the car to help avoid battery
drain.
Headlights, parking lights, license plate lights and instrument panel illumination are on if the ignition key is in
position II.
If the headlight switch is in this position, all lights will go out when the ignition is switched off.
The headlight switch must be in this position before the high beams will function.
Switch from high to low beams and vice versa by pulling the turn signal switch lever on the left side of steering column toward you.
B - Instrument lighting Move the thumb wheel up to increase brightness or down to decrease brightness. There is also an instrument panel illumination sensor (see illustration on page 54) which automatically adjusts the level of illumination.
The symbols have maximum illumination in daylight (only the background lighting can be adjusted). At night, both the symbol light and background lighting can be adjusted.
C - Front fog lights (option)* The front fog lights will function only in combination with the low beam headlights.
An LED in the switch indicates when the front fog lights are on.
D - Rear fog light* The rear fog light is considerably brighter than the normal tail lights and should be used only when conditions such as fog, rain, snow, smoke or dust reduce visibility for other vehicles to less than 500 ft (150 meters).
An LED in the switch indicates when the rear fog light is on.
The rear fog light will only function in combination with the high/ low beam headlights. By design, there is one rear fog light only, located in the driver's side tail light cluster.
* These lights will be automatically switched off the next time the car is started.
Contents | Top of Page
2 0 0 1 VOLVO
S60
pg. 40 Turn Signals
1. Lane change position In maneuvers such as lane changing, the driver can flash the turn signals by moving the turn signal lever to the first stop and holding it there. The lever will return to the neutral position when released.
2. Signal lever engaged for normal turns
3. High/ low beam switch (headlights on). Move the lever towards the steering wheel and release it.
Headlight flasher (headlights off). Move the lever towards the steering wheel. The headlight high beam will be on until the lever is released.
NOTE: If the turn signal indicator flashes faster than normal, check for a burned- out turn signal bulb.
3. Exterior courtesy lights Home Safe System When you leave your car at night, you can make use of the courtesy lighting function:
Remove the key from the ignition switch. Pull the direction indicator lever towards the steering wheel (as when using the headlight flasher function). Exit the car and lock the doors. The headlights, parking lights, license plate lights and the lights in the sideview mirrors will now come on and remain on for 30, 60 or 90 seconds (the time interval is at your discretion and can be changed by an authorized Volvo retailer).
Approach lighting When approaching the car at night, press the yellow button in the central locking remote control (see illustration on page 117). This lights up the interior courtesy lights, parking lights, license plate lights and the lights in the sideview mirrors.
pg. 41 Windshield wipers/ washer
Windshield wipers
Windshield wipers off
If the lever is in the 0 position and you move it upwards, the wipers will sweep one stroke at a time for as long as you hold the lever up.
Intermittent wiper function With the lever in this position, you can set the wiper interval by twisting the
control ring (A) upward to increase wiper speed or downward to decrease the speed.
Rain sensor (option) The rain sensor replaces the intermittent wiper function. The windshield wiper speed increases or decreases according to the amount of rain. The sensitivity of the sensor can be adjusted by twisting control A upward or downward.
Wipers operate at "normal" speed
Wipers operate at "high" speed
3 - Windshield washer/ headlight washer (certain models) The wipers will make 2- 3 sweeps across the windshield and headlights (certain models) after the lever is released.
pg. 42 Hazard warning flashers, rear window/ sideview mirror defroster, heated front seats
Hazard warning flashers The four- way flasher should be used to indicate that the vehicle has become a traffic hazard. To activate the flashers, press the triangular button in the center dash. Press the button again to turn off the flashers.
NOTE: Regulations regarding the use of the hazard warning flasher may vary, depending on where you live.
Sideview mirror and rear window defroster Press the switch to start heating the rear window and sideview mirrors
to remove ice or condensation. An LED in the switch will light up.
A timer automatically switches off the heating to the sideview mirrors after approximately 6 minutes and to the rear window after approxi- mately 12 minutes. The LED will go out correspondingly.
Heated front seats (option)
The front seat heating can be switched on and off as required. Press the switch once for maximum seat heating. Both LEDs in the switch will be lit. Press the switch a second time for comfort heating. One LED in the switch will be lit. Press the switch a third time to turn the heating off completely. The seat heating for the passenger seat should be
switched off when the seat is not occupied.
pg. 43 Trip computer (option)
The trip computer stores information gathered from several systems in your car and has four menus that can be displayed in the text window.
Driving distance on current fuel reserve Average fuel consumption Current fuel consumption Average speed
NOTE: Warning messages from the car's monitoring systems will override the trip computer function. If a warning message is displayed in the text window while you are using the trip computer, you must acknowledge the message by pressing button A. Press button A again to return to the trip computer function.
Trip computer controls The four trip computer functions can be accessed by twisting control B one step at a time in either direction. Twisting a fifth time returns you to the original function.
The trip computer can be reset (current data will be erased from system memory) by pressing RESET (button C).
Trip computer functions Driving distance on current fuel reserve This function shows the approximate distance that can be driven on the fuel remaining in the tank. This calculation is based on average fuel consumption during the last 12 miles (20 km) of driving and the amount of fuel remaining in the tank when the reading was taken.
When the driving distance on current fuel reserve is less than 12 miles (20 km), "----" will be displayed in the text window.
Average fuel consumption
This value indicates fuel consumption since the last time the trip computer was reset (by pressing RESET, button C). When the engine is switched off, information on fuel consumption is stored and remains in system memory until the RESET (button C) is pressed again.
Current fuel consumption This value indicates the current fuel consumption, based on readings taken once per second. When the car is not moving, "----" will be displayed.
Average speed This value indicates average speed since the last time the trip computer was reset (by pressing RESET, button C). When the engine is switched off, information on average speed is stored and remains in system memory until the RESET (button C) is pressed again.
pg. 44 Cruise control
Cruise control The cruise control panel is located on the left side of the steering wheel hub.
Engaging cruise control/ setting speed
Press the CRUISE button Press + or - to set the current speed Increase or decrease speed as desired
NOTE: Cruise control will not function at speeds below 22 mph (35 km/ h).
Braking Cruise control is automatically disengaged when the brake pedal is depressed. The currently set speed is stored in memory. Quickly pressing resume
will return the car to the previously set speed.
Acceleration
Momentary acceleration, such as when passing another car, does not affect cruise control operation. The car will
automati- cally return to the previously set speed when you release the accelerator pedal.
When the cruise control is already engaged, the car's speed can be increased or decreased by holding down + or -
until the car reaches the desired speed. One short press on either symbol corresponds to a speed change of approximately 1 mph (1.6 km/ h).
Disengaging cruise control Cruise control can also be disengaged by:
Pressing the CRUISE button. Putting the gear selector in (N) eutral.
NOTE: Cruise control is automatically disen- gaged if the engine is switched off, if the gear selector is placed in (N) eutral, if the car's speed drops to under 70% of the currently set speed or if the wheels start to spin.
Temporarily disengaging cruise control
Press 0 to temporarily disengage cruise control. Press "resume" Press the brake pedal. Press "resume"
to return to the previously set speed..
to return to the previously set speed.
WARNING!
Cruise control should not be used in heavy traffic or when driving on wet or slippery roads. Cruise control may not maintain set speed on steep downgrades.
pg. 45 Parking brake, electric socket/ cigarette lighter
Parking brake (hand brake) The lever is situated between the front seats. The brake is applied to the rear wheels. The indicator light in the instrument panel will light up to indicate when the parking brake is applied. Apply the parking brake by pulling up firmly on the lever. Release the parking brake by depressing the button at the end of the lever and lowering the lever completely.
WARNING!
Always use the parking brake (hand brake) when parking. On hills, also turn the front wheels toward the curb. The indicator light in the instrument panel will light up even if the parking brake is applied only slightly. Be sure to pull the lever up sufficiently
Auxiliary sockets These 12 volt sockets can be used to plug in certain accessories such as cellular telephones, etc. The key must be in position I (or higher) for the auxiliary socket to function.
The auxiliary sockets can also be used for cigarette lighters, which are available at your Volvo retailer.
NOTE: The cover should be kept on when the auxiliary socket is not in use.
Ashtrays Volvo cars in North America do not have an ashtray in the front seat as standard equipment. If you want to have an ashtray in the front seat, please contact your Volvo retailer.
pg. 46 Electrically operated windows Electrically operated windows The electrically operated windows are controlled by buttons in the arm rests. The ignition switch must be ON * (ignition key in position I, II or the engine running) for the electrically operated windows to function.
To lower: Press down the front edge of the button to the first detent (" stop").
To raise: Lightly pull up the front edge of the button to the first detent (" stop").
* The electrically operated windows will also function after the ignition has been switched off as long as neither of the front doors has been opened.
Auto up/ down function (front doors only): Either front door window can be opened or closed automatically.
Auto down: Press the front part of the button as far down as possible and release it immediately. To stop the window at any time, pull the button up.
Auto up: Pull the front part of the button up as far as possible and release it immediately. To stop the window at any time, press the button down.
NOTE: The electrically operated windows in the front seat have an overload protecting circuit breaker which reverses movement of the electrically operated windows to their starting points if they are obstructed in any way. There- after the windows will operate normally again.
WARNING!
Always remove the ignition key when the vehicle is unattended.
Make sure that childrens' hands are clear before raising the windows.
Never leave children unattended in the car.
Cutout switch for rear windows The electrically operated rear door windows can be disabled by a switch located on the driver's door (see illustration).
If the LED in the switch is OFF: The rear door windows can be raised or lowered with the buttons on the rear door armrests or with the buttons on the driver's door armrest.
If the LED in the switch is ON: The rear door windows can only be raised or lowered with the buttons on the driver's door armrest.
pg. 47 Electrically operated windows
Electrically operated window in the front passenger's seat The control for the electrically operated window in the front passenger's seat operates that window only.
Electrically operated windows in the rear doors. The rear door windows can be operated with the control on each door and the switch on the driver's door. If the LED in the switch for blocking electrically operated windows in the rear doors (located in the driver's door control panel) is on, the rear door windows can only be operated from the driver's door.
pg. 48 Rearview mirror/ sideview mirrors
Rearview mirror
A Normal position
B Night position, reduces glare from following headlights
Autodim function (option) The autodim function reacts to headlights from following traffic and automatically reduces glare.
NOTE: This function is automatically switched off when the gear selector is placed in the Reverse position.
Electrically operated sideview mirrors The mirror control switches are located on the driver's door armrest.
Driver's side: Press the L switch (an LED in the switch will light up) to activate the adjustment control and then use this control to adjust the driver's door mirror.
Passenger's door: Press the R switch (an LED in the switch will light up) and then use the adjustment control to adjust the passenger's door mirror.
After you have adjusted the mirror( s), press the L or R switch again (the LED will go out) to deactivate the adjustment control.
WARNING!
The mirrors should always be adjusted prior to driving. Objects seen in the passenger's side wide- angle sideview mirror are closer than they appear to be.
Remote control (central locking system) - option If you lock the car and later unlock it with the same remote control and open the driver's door, the sideview mirrors (and the driver's seat) will automatically move to the position they were in when you left the car.
pg. 49 Electrically operated sun roof
Electrically operated sun roof To operate the sun roof, the ignition key must first be turned to the intermediate or drive position (position I, II or the engine running).
To slide open the sun roof: Pull the switch back to the first detent (" stop") and hold it until the sun roof has
opened to the position you prefer. The sun roof will initially open to the "comfort" 1 position. Pull and hold the switch again to open the sun roof completely.
1. A position where the sun roof is not quite fully open which helps alleviate "rumbling" wind noise.
AUTO open: Pull the switch as far back as possible and release it to automatically slide open the sun roof to the
"comfort" position. Pull the switch again to open the sun roof completely.
To close the sun roof: Push the switch forward to the first detent (" stop") and hold it until the sun roof has closed
completely.
AUTO close: Push the switch forward as far as possible and release it to automati- cally close the sun roof.
NOTE: If the sun roof is impeded during AUTO close, it will reverse direction, reopen and stop.
Ventilation position (opening the rear edge of the sun roof): With the sun roof closed, push up the rear section of
the switch. To close, pull the front section of the switch straight down until the sun roof has closed completely.
pg. 50 Electrically operated sun roof
Sun visor: The sun roof also features a sliding sun visor. The visor slides open automatically when the sun roof is opened. The visor must be closed manually.
CAUTION:
Do not attempt to fully close the sun visor when the sun roof is in the ventilation position as this could damage the mechanism.
WARNING!
The sun roof must never be obstructed in any way when in operation.
Contents | Top of Page
2 0 0 1 VOLVO
S60
Introduction
Welcome to the world-wide family of Volvo owners. We trust that you will enjoy many years of safe driving in your Volvo, an automobile designed with your safety and comfort in mind. To help ensure your satisfaction with this vehicle, we encourage you to familiarize yourself with the equipment descriptions, operating instructions and maintenance require- ments/ recommendations in this manual. We also urge you and your passengers to wear seat belts at all times in this (or any other) automobile. And, of course, please do not operate a vehicle if you may be affected by alcohol, medication or any impairment that could hinder your ability to drive.
Your Volvo is designed to meet all applicable safety and emission standards, as evidenced by the certification labels attached to the driver's door opening and on the left wheel housing in the engine compartment.
For further information please contact your retailer, or:
In the USA: Volvo Cars of North America Customer Relations P.O. Box 914 Rockleigh, New Jersey 07647-0914 800-458-1552
In Canada: Volvo Canada Ltd. 175 Gordon Baker Road Willowdale, Ontario M2H 2N7 800-663-8255
General Information
Shiftlock (automatic transmission) When your car is parked, the gear selector is locked in the (P) ark position. To release the selector from this position, turn the ignition key to position II (or start the engine), depress the brake pedal, press the button on the front side of the gear selector and move the selector from (P) ark.
Keylock (automatic transmission) When you switch off the ignition, the gear selector must be in the (P) ark position before the key can be removed from the ignition switch. Anti-lock Brake System (ABS) The ABS system in your car performs a self- diagnostic test when the vehicle first reaches the speed of approximately 12 mph (20 km/h). The brake pedal will pulsate several times and a sound may be audible from the ABS control module. This is normal. Fuel filler door The fuel filler door, located on the right rear fender, is connected to your car's central locking system. The driver's door must be unlocked before the fuel filler door can be opened. When you lock your car using the central locking button on the driver's door or remote control, the fuel filler door also locks after a 10-minute delay. If you lock your car with the fuel filler door open, you will need to unlock the car to allow the fuel filler door to be closed again. Fuel filler cap After refueling, close the fuel filler cap by turning it clockwise until it clicks into place. If this cap is not closed tightly or if the engine is running when the car is refueled, the Malfunction Indicator Lamp (" Check Engine" light) will illuminate. Important information Before you operate your car for the first time, please familiarize yourself with the new- engine oil consumption information on page 126. You should also be familiar with the information in chapters one, two and four of this manual. Information contained in the balance of the manual is extremely useful and should be read after operating the vehicle for the first time. The manual is structured so that it can be used for reference. For this reason, it should be kept in the car for ready access. Do not export your Volvo to another country before investigating that country's applicable safety and exhaust emission requirements. In some cases it may be difficult or impossible to comply with these requirements. Modifications to the emission control system( s) may render your Volvo not certifiable for legal operation in the U. S., Canada and other countries. All information, illustrations and specifications contained in this manual are based on the latest product information available at the time of publication. Please note that some vehicles may be equipped differently, depending on special legal requirements. Optional equipment described in this manual may not be available in all markets. Volvo reserves the right to make model changes at any time, or to change specifications or design without notice and without incurring obligation. Volvo and the environment
Volvo is committed to the well being of its customers. As a natural part of this commitment, we care about the environment in which we all live. Caring for the environment means an everyday involvement in reducing our environmental impact. Volvo's environmental activities are based on a holistic view, which means we consider the overall environmental impact of a product throughout its complete life cycle. In this context, design, production, product use, and recycling are all important considerations. In production, Volvo has partly or completely phased out several chemicals including freons, lead chromates, naphtanates, asbestos, mercury and cadmium; and reduced the amount of chemicals used in our plants 50% since 1991. Volvo was the first in the world to introduce into production a three- way catalytic converter with a Lambda sond, now called oxygen sensor, in 1976. The current version of this highly efficient system reduces emissions of harmful substances (CO, HC, NOx) from the exhaust pipe by approximately 95% and the search to eliminate the remaining emissions continues. Volvo is the only automobile manufacturer to offer CFC- free retrofit kits for the air conditioning system of all models as far back as the 1975 model 240. Advanced electronic engine controls, refined purification systems and cleaner fuels are bringing us closer to our goal. After Volvo cars and parts have fulfilled their use, recycling is the next critical step in completing the life cycle. The metal content is about 75% of the total weight of a car, which makes the car among the most recycled industrial products. In order to have efficient and well controlled recycling, many Volvo variants have printed dismantling manuals, indicating the weight and material of individual components.
For Volvo, all homogeneous plastic parts weighing more than 1.7 oz. (50 grams) are marked with international symbols that indicate how the component is to be sorted for recycling. In addition to continuous environmental refinement of conventional gasoline- powered internal combustion engines, Volvo is actively looking at advanced technology alternative- fuel vehicles. When you drive a Volvo, you become our partner in the work to lessen the car's impact on the environment. To reduce your vehicle's environmental impact, you can:
Maintain proper air pressure in your tires. Tests have shown decreased fuel economy with improperly inflated tires. Follow the recommended maintenance schedule. Drive at a constant speed. See an authorized Volvo retailer as soon as possible for inspection if the check engine (malfunction indicator) lamp
illuminates, or stays on after the vehicle has started.
Properly dispose of any vehicle- related waste such as used motor oil, used batteries, brake pads, etc. When cleaning your car, use Volvo's own car care products, all of which have systematically been adapted to the
environment. For additional information regarding the environmental activities in which Volvo Cars of North America, Inc. and Volvo Car Corporation are involved, visit our Internet Home Page at: http://www.volvocars.com Prem-Air On the surface of the radiator in the engine compartment, there is a special coating called Prem- Air. Prem- Air works as a catalytic converter, converting most of the ground level ozone passing through the radiator into oxygen, thereby reducing harmful ground-level ozone.
Instruments, switches and controls
1. Front fog lights 2. Headlights/ Parking lights 3. Rear fog light 4. Turn signals/ High/ low beams 5. Cruise control
Page 39
39
39
40
444
6. Horn 30
7. Instrument panel 67
8. Audio controls 41
9. Windshield wipers 45
10. Parking brake (hand brake) 37, 38
11. Center console switches 51
12. Climate control 61
13. Audio system 45
14. 12 V socket 42
15. Hazard warning flashers 108
16. Glove compartment 53
17. Panel vents 30
18. Text window 30
19. Temperature gauge 30/ 44
20. Odometer/ Trip odometer/Cruise control indicator 30
21. Speedometer 30
22. Turn signal indicators 23. Tachometer 30
24. Ambient temperature/ Clock/Selected gear indicator 30
30
25. Fuel gauge 31
26. Indicator and warning symbols 27. Cup holder (option) 108
53
28. Panel vents 39
29. Instrument lighting 30. Lighting panel 39
104
31. Reading lights 104
32. Interior lighting 33. Sun roof control 49
4, 10
34. Seat belt reminder 48
35. Rearview mirror 36. Lock button, for all doors 119
46
37. Blocking rear seat power windows 46
38. Controls, power windows 39. Controls, sideview mirrors 48Contents
Contents Safety Instruments and controls Climate control Audiio Interior Locks and alarm Starting and driving Wheels and tires Car care Maintenance and service Specifications Index
Contents | Top of Page
2 0 0 1 VOLVO
S60
Audio pg. 61 Audio 62
Audio system HU- 413 - overview 63
Audio system HU- 613 - overview 64
Audio system HU- 803 - overview 65
Audio systems HU- 413/ HU- 613/ HU- 803
69
Audio systems HU- 803 - radio 71
Program types (HU- 803 only) 72
AUM (Advanced User Mode) 73
Audio system HU- 413/ HU- 613 - cassette deck 75
Audio system HU- 613/ HU- 803 - CD player Audio system HU- 413/ HU- 613/ HU- 803 - CD changer (option) 77
78
Dolby Surround Pro Logic HU- 803 (option) Audio systems - specifications 80
81
Audio systems - general information HomeLink¨ Universal Transceiver (option) 82pg. 62 Audio system HU- 413 - overview
1. Display 2. Radio - Manual station selection Cassette - Fast winding forward/ backward CD - Fast forward/ backward. 3. Radio - Station seek up/ down Cassette - selecting next/ previous track CD - Selecting next/ previous track 4. Fader - press and turn Balance - press, pull and turn 5. Selector knob:
Radio Cassette CD changer 6. Cassette eject 7. Selector knob for: Stored radio frequencies CD changer (option) - selecting disc 8. Cassette opening 9. Tape direction selector CD random play 10. On/ off - press Volume - turn 11. Bass - press and turn Treble - press, pull and turn 12. Automatic presetting of radio stations 13. Dolby B Noise Reduction 14. Active Sound Control (ON or OFF) 15. Scan function
pg. 63 Audio system HU- 613 - overview
1. .On/ off - press Volume - turn 2. Selector knob for: Stored radio frequencies CD changer - selecting disc 3. Selector knob: Radio Cassette CD CD changer (option) 4. Fader - press and turn Balance - press, pull and turn 5. Radio - Station seek up/ down Cassette - selecting next/ previous track CD - Selecting next/ previous track 6. Radio - Manual station selection Cassette - Fast winding forward/ backward CD - Fast forwards/ backward 7. CD eject 8. CD slot 9. CD random play
10. Active Sound Control (ON or OFF) 11. Scan function 12. Dolby B Noise Reduction 13. Automatic presetting of radio stations 14. Bass - press and turn Treble - press, pull and turn 15. Tape direction selector 16. Cassette opening 17. Cassette eject 18. Display
pg. 64 Audio system HU- 803 - overview
1. On/ off - press Volume - turn 2. Bass - press and turn Treble - press, pull and turn 3. Fader - press and turn Balance - press, pull and turn 4. Center volume - press and turn Effect channel volume - press, pull and turn 5. Selector knob for: Stored radio frequencies CD - selecting disc 6. Selector knob: Radio Internal CD changer Station scan - press External CD changer (option) 7. 7 Radio - Station seek up/ down CD - Selecting next/ previous track 8. Radio - Manual station selection CD - Fast forward/ backward 9. CD eject 10. Dolby Pro Logic - switching on 11. 2 channel stereo 12. 3 channel stereo 13. CD slot 14. CD random play 15. Program type 16. News 17. Traffic information
18. Automatic presetting of radio stations 19. Display
pg. 65 Audio systems HU- 413/ HU- 613/ HU- 803
Switch on/off Press the knob to switch on or turn off the radio.
Volume control Turn the knob clockwise to increase volume. Volume control is electronic and does not have an end stop. If you have a key pad in the steering wheel, increase or decrease the volume with the + or - buttons.
Band selector Turn "SOURCE" knob to select FM or AM. The station and band are displayed. You can also select cassette deck, CD, or the optional CD changer if connected, with this knob. Active sound control (ASC) The ASC (Active Sound Control) automatically adapts volume to vehicle speed.
Press the ASC button (HU- 613) for several seconds to switch this function ON or OFF. This function is included in the Advanced User Mode on the HU- 803 equipped with this feature.
"ASC ON" or "ASC OFF" will be shown in the display for several seconds.
Bass Adjust the bass by pressing the button to extend the control and turning it to the left (less bass) or to the right (more bass). A "detent" indicates "equalized" bass. Press the button back in when you have made the adjustment.
Treble Adjust the treble by pressing the button to extend the control, pulling it out as far as possible, and then turning it to the left (less treble) or to the right (more treble). A "detent" indicates "equalized" treble. Press the button back in when you have made the adjustment.
pg. 66 Audio systems HU- 413/ HU- 613/ HU- 803
Fader - Balance front/rear Adjust front/ rear speaker balance by pressing the button to extend the control and turning it to the left (more sound from the rear speakers) or to the right (more sound from the front speakers). A "detent" indicates "equalized" balance. Press the button back in when you have made the adjustment.
Balance right/left Adjust left/ right speaker balance by pressing the button to extend the control, pulling it out as far as possible and then turning it to the left (more sound from the left speakers) or to the right (more sound from the right speakers). A "detent" indicates "equalized" balance. Press the button back in when you have made the adjustment.
A - Setting station Press the left side of the button to select lower frequencies and the right side for higher frequencies. Set frequencies are displayed.
B - Station seek up/ down Press the left side (lower frequency) or right side (higher frequency) of the button to start the seek function. The radio seeks the next audible station and tunes it in. Repeat the procedure to continue the seek function.
pg. 67 Audio systems HU- 413/ HU- 613/ HU- 803
Station setting Press the left button is shown in the display.
to select a lower frequency and the right button
for a higher frequency. The set frequency
Station seek up/down Press the left audible station and sets it. Press the button again to continue seek.
or right-hand
side of the button to seek lower or higher frequencies. The radio seeks the next
Steering wheel keypad If you have a keypad in the steering wheel, press the right or left arrow to select preset stations.
Scan function Press the SCAN button (HU- 613) or the SOURCE knob (HU- 803) to start the station scan function. When a station is found, scanning stops for several seconds, after which scanning will continue.
Press the SCAN button or SOURCE knob when a station has been found if you would like to listen to that station and to discontinue the scan function.
pg. 68 Audio systems HU- 413/ HU- 613/ HU- 803
Automatic station preset This function seeks and stores up to 10 strong AM or FM stations in a separate memory. This function is especially useful in areas where you are not familiar with the radio stations.
1. Press in the "AUTO" button. A number of strong signal stations (max. 10) from the currently selected waveband are now stored automatically in the memory. An "A" and "AUTO" is displayed. If there is no station with sufficient signal strength "NO STATION" is displayed.
2. Turn "1- 20/ DISC" knob if you wish to change to another of the auto-stored stations.
Another auto-stored station is selected with each turn.
Programming stations 1. Tune in the desired frequency.
2. Press the "1-20/ DISC" knob. Select a number by turning forwards or backwards. Press again to store the selected frequency and station.
Preset To choose a pre-set station, turn "1-20/ DISC" knob to the stored number. The currently selected station is displayed.
Radio Data System (RDS, also referred to as RBDS) - HU- 803 only This feature, which may not work in your area, functions only with FM broadcasts. The HU- 803 radio in your car is equipped with an advanced system allowing information from broadcasters to be transmitted visually, as text, together with the audio signal. This information is then decoded by the radio and made available for several new and unique features. The RDS or Radio Data System operates in the FM band only, and the information transmitted is supplied exclusively by participating broadcasters. Volvo has no control over the accuracy of the data or information. Please refer to the following pages regarding specific descriptions and operation of these functions.
Coverage by local broadcasters may be limited at this time, but as the technology and benefits grow, you will find the radio in your car is equipped to take advantage of this system.
pg. 69 Audio systems HU- 803 - radio
Traffic information (TP) - HU- 803 only This feature may not be apply in your area and only functions with FM broadcasts. (See previous page) Push the "TP" button for traffic information from RDS stations. "TP" is displayed when the function is connected.
When the unit is in Cassette or CD mode, the FM radio function will seek in the background for a station with a strong signal broadcasting traffic information. If a cassette or CD are playing when the radio receives a traffic bulletin, that function is interrupted and the bulletin is broadcast with the volume preselected for traffic information.
When the bulletin is finished the unit immedi- ately returns to the previously set volume and continues playing the cassette or CD.
Traffic information can only be heard when TP and If only TP is displayed, it means that no traffic information is being broadcast from the current transmitter. If you do not wish to listen to an ongoing traffic bulletin, press the TP button. The TP function, however, is still
are displayed at the same time.
connected and the radio waits for the next traffic bulletin.
Press the TP button to switch off the TP function. TP will no longer be shown in the display.
News on/ off - HU- 803 only This feature may not apply in your area and only functions with FM broadcasts. (See previous page)
Press the "NEWS" button to activate the news function. The text NEWS is displayed. Press the "NEWS" button again if you want to switch off the function.
As soon as a news broadcast begins, the news program will interrupt the Cassette, CD or CD changer.
If you do not wish to listen to the news program, press the "NEWS" button again. The news function will remain active and the radio will continue to monitor news programs.
pg. 70 Audio systems HU- 803 - radio
Program type - HU- 803 only The PTY function enables you to select specific types of programs. To search for a particular program type:
1. Press "PTY" button to initiate the function. The currently tuned station's program type is displayed.
2. Scroll through the list of program types by turning the "1- 20/ DISC" knob.
3. When you have reached the program type you require press the
4. "1- 20/ DISC" knob to begin the search.
5. If there is more than one station with the selected program type, you can select using The PTY function is active until the radio finds the selected program type and as long as the selected station transmits that program type.
or the scan button.
6. To return to standby mode, press PTY again. The CD will resume playing until the selected program type is sent again.
7. To deactivate PTY standby, press the PTY button again. The PTY symbol will turn off.
Volume of traffic information/ news/ PTY - HU- 803 only If you change the volume when the TP, PTY or NEWS function is active, the new volume setting will be stored automatically.
pg. 71 Program types (HU- 803 only) Program type News Information Sports Talk
Text displayed News Inform Sports Talk
Rock Cls_ Rock Adlt_ Hit Soft_ Rck Top_ 40
Country Oldies Soft Nostalgia Jazz Classicl R_&_ BRock Classic rock Adult hits Soft rock Top 40
Country Oldies Soft Nostalgia Jazz Classical Rhythm and Blues Soft Rhythm and Blues Soft_ R& B Foreign language Religious music Religious talk Personality Public College WeatherLanguage Rel_ Musc Rel_ Talk Persnlty Public College Weather
Contents | Top of Page
2 0 0 1 VOLVO
S60
Climate control pg. 51 Climate control Climate control systems - general information 52
Air distribution 53
Electronic climate control, ECC (option) 54
Manual climate control with air conditioning, (A/ C) 58pg. 52 Climate control systems - general information Condensation on the inside of the windows Keeping the insides of the windows clean will help reduce the amount of condensation that forms on the windows. Use a commercial window cleaning agent to clean the windows.
Ice and snow Always keep the air intake grille at the base of the windshield free of snow.
Cabin air filter Replace the cabin air filter with a new one at the recommended intervals. The filter should be replaced more often when driving under dirty and dusty conditions. The filter cannot be cleaned and therefore should always be replaced with a new one.
Sensors The sunlight sensor on the dashboard and passenger compartment temperature sensor in the ECC control panel should not be covered in any way as this could cause incorrect information to be sent to the ECC system.
Parking the car in warm weather If your car has been parked in the sun in warm weather, opening the windows and sun roof (option) for several minutes before driving will help release the warm air from the passenger compartment. When the engine is running, close the windows and sun roof and use the recirculation function for several minutes to enable the air conditioning to cool the compartment as quickly as possible.
Windows and optional sun roof The optional ECC system will function best if the windows and optional sun roof are closed. If you drive with the sun roof open, we recommend that you manually adjust the temperature and blower control (the LED in the AUTO switch should be off).
Acceleration The air conditioning is momentarily disengaged during full-throttle acceleration.
Climate control maintenance All maintenance on the climate control systems should be carried out by an authorized Volvo service technician only.
Refrigerant Volvo cares about the environment. The air conditioning system in your car contains a CFC-free refrigerant - R134a.
This substance will not deplete the ozone layer. The system contains 2.2 lbs (1000 g) R134a and uses PAG oil.
Passenger compartment blower Approximately 50 minutes after the ignition is turned off, the blower may come on automati-cally, and run for seven minutes, to remove condensation in the A/ C evaporator.
pg. 53 Air distribution
Air distribution The incoming air is distributed through 14 ventilation points in the passenger compartment.
Air vents in the dash A Open
B Closed
C Horizontal air flow
D Vertical air flow
Direct the outer air vents toward the side windows to defrost. In cold weather, close the air vents in the center of the dash to direct as much air as possible toward the windows.
Air vents in the door pillars (certain models) A Open
B Closed
C Horizontal air flow
D Vertical air flow
Direct the outer air vents toward the side windows to defrost. In cold weather, close the air vents in the center of the dash to direct as much air as possible toward the windows.
pg. 54 Electronic climate control, ECC (option)
pg. 55 Electronic climate control, ECC (option)
AUTO This function automatically regulates the Electronic Climate Control system so that the selected temperatures are maintained. The blower, heating, air distribution (air flow) and air conditioning are controlled. If you prefer to manually set any of these functions, the remaining functions will still be controlled automatically. Pressing the AUTO button overrides any settings that were previously made manually.
Rear window and sideview mirror defrosters This function defrosts/ de-ices the rear window and sideview mirrors. The LED in the switch will light up to indicate that the heating function is engaged. See page 42 for additional information on this function.
Never use ice scrapers made of metal as they can easily scratch the mirror surface.
Temperature These controls are used to individually set the temperature for both sides of the passenger compartment.
Please note that the compartment will not be heated or cooled faster by setting the temperature higher or lower than necessary.
Set the control to the temperature you prefer.
Defroster This function defrosts/ de-ices the windshield and front side windows. The LED in the switch will light up to indicate that the defrost function is engaged. Blower speed increases automatically and the air in the passenger compartment is dehumidified. Recirculation will not function while defrost is engaged.
Blower control Turn the control clockwise to increase or counterclockwise to decrease the blower speed. Pressing the AUTO switch will automatically regulate blower speed and override manual adjustment.
NOTE: Turning the blower control counter-clockwise until an orange LED comes on will turn both the blower and the air conditioning off.
pg. 56 Electronic climate control, ECC (option)
Air distribution Press AUTO to automatically regulate air flow or press any combination of the controls shown in the illustration to manually adjust air flow. An LED in the switch will light up if an air flow control has been pressed.
Heated front seats (option)
Press the switch once for maximum seat heating. Both LEDs in the switch will be lit. Press the switch a second time for comfort heating. One LED in the switch will be lit. Press the switch a third time to turn the heating off completely. The LED will go off. The seat heating for the
passenger seat should be switched off when the seat is not occupied.
A/ C - ON/ OFF Press the switch to turn the air conditioning on or off. The "ON" or "OFF" LED will light up to indicate if the system is switched on or off. Other functions will still be regulated automatically (if the AUTO switch is on).
The air conditioning functions only at temperatures above 32¡ F (0¡ C). While the Defroster function is selected, the air conditioning is temporarily activated to dehumidify the air, even if
you have manually switched the air conditioning off. This will only function if the blower is not switched off.
Recirculation Press this switch to engage the recirculation function (air in the passenger compartment recirculates - no fresh air enters the compartment). The LED in the switch will light up to indicate that the function is engaged.
Use this function if the outside air is contaminated with exhaust gases, smoke, etc or to heat/ cool the car quickly. Recirculation should not be used for more than 15 minutes. If your windows begin to fog or mist, make sure that
the recirculation function is switched off.
Selecting Defroster automatically switches recirculation off. Timer function (cars equipped with the optional Interior Air Quality system do not have the timer function): Pressing and holding the switch for at least 3 seconds activates a timer function. The LED in the switch will flash for approxi- mately 5 seconds. Recirculation will then always operate for periods of 3 to 12 minutes, depending on the ambient temperature, after which it will switch off automatically. Pressing the switch at any time during the recirculation period will disengage the function and allow fresh air into the passenger compartment.
Press and hold the switch again for at least 3 seconds to return the button to its original function (i. e., recirculation will remain on until you switch it off).
pg. 57 Electronic climate control, ECC (option)
Interior air quality sensor (option) Some cars are equipped with a multifilter and air quality sensor. The filter separates gases and particles, thereby reducing the amounts of odors and contaminants entering the car. The air quality sensor detects increased levels of contaminants in the outside air. When the air quality sensor detects contaminated outside air, the air intake closes and the air inside the passenger compartment is recirculated, i. e. no outside air enters the car. The filter also cleans recirculated passenger compartment air. When the ECC system is in the AUTO mode, the green LED will be on
Operation Press
Or:
to operate the air quality sensor (normal setting).
Select one of the following three functions by pressing
.1, 2 or 3 times.
1. The AUT LED lights. The air quality sensor is now activated.
2. No LED lights. Recirculation is not activated unless needed to cool the passenger compartment in a warm climate.
3. The MAN LED lights. Recirculation is now activated.
Keep in mind the following:
Make it a rule to have the air quality sensor activated at all times. Recirculation is limited in cold climates to avoid fogging. If window fogging occurs, you should deactivate the air quality sensor. If fogging occurs, use the defroster functions for the windshield, side windows and rear window. See page 55. The filter should be changed at the intervals recommended in the service schedule. However, if the car is used in a
severely contaminated environment, it may be necessary to change the filter more frequently.
pg. 58 Manual climate control with air conditioning, (A/ C)
pg. 59 Manual climate control with air conditioning, (A/ C)
A/ C - ON/ OFF The air conditioning function is engaged by pressing ON and disengaged by pressing OFF.
When you select Defroster
, the air conditioning is automatically engaged if the fan is not set to position 0.
Blower Blower speed can be increased or decreased by turning the knob. If the knob is set to 0, the air conditioning function is automatically disengaged.
Temperature Turn the control to set the temperature for the driver's and passenger's sides of the car. For cooler air, the air conditioning function must be engaged.
Rear window and sideview mirror defrosters This function defrosts/ de-ices the rear window and sideview mirrors. The LED in the switch will light up to indicate that the heating function is engaged. See page 42 for additional information on this function.
Never use ice scrapers made of metal as they can easily scratch the mirror surface.
Heated front seats (option)
Press the switch once for maximum seat heating. Both LEDs in the switch will be lit. Press the switch a second time for comfort heating. One LED in the switch will be lit. Press the switch a third time to turn the heating off completely. The LED will go off.
The seat heating for the passenger seat should be switched off when the seat is not occupied.
pg. 60 Manual climate control with air conditioning, (A/ C)
Recirculation Recirculation can be used to shut out stale air, exhaust, etc. from the passenger compartment. The air in the passenger compartment is then recirculated, i. e. no air from outside the car is taken into the car when this function is activated. Recirculation (together with the air conditioning system) cools the passenger compartment more quickly in warm weather.
If you allow the air in the car to recirculate, there is a risk of icing and fogging, especially in winter. The timer function minimizes the risk of ice, misting and stale air.
Activate the timer function as follows:
Press
for more than 3 seconds. The LED flashes for 5 seconds. The air recirculates in the car for 3-12 minutes
. To switch off the timer function:
depending on the outside temperature.
The timer function is activated each time you press Press
again for more than 3 seconds. The LED lights for 5 seconds to confirm your selection. Recirculation is
always disconnected when you select
Defroster.
Air distribution Use the air distribution control positions (marked with dots) between the different symbols to fine-tune air distribution for maximum comfort.
Contents | Top of Page
2 0 0 1 VOLVO
S60
pg. 106 Storage compartments
WARNING!
Packages on the rear window shelf can obscure vision and may become dangerous projectiles in the event of a sudden stop or an accident.
Anchor any heavy objects to help prevent them from moving during sudden stops.
pg. 107 Storage compartments
Storage compartments in the center console Cup holder Cup holders are provided for the front seat occupants (optional in the rear seat). You can also use the storage compartment in the center console for CD's, etc.
Coin compartment To remove the coin compartment, pull it straight up.
Ashtray (option) Pull out the insert to empty the astray.
Cup holder in rear seat (option) Press the cup holder in the rear seat center armrest to release it.
pg. 108 Storage compartments
Cup holder in the dashboard (option)
Press the holder to open.
Adjust the holder by pressing the arms inwards. Press the holder in after use.
WARNING!
Never use glass bottles. Remember also that hot drinks may cause burns.
Pen holder The dashboard contains a pen holder.
Glove compartment The glove compartment can be used to store things such as the owner's manual, maps, pens, etc.
pg. 109 Storage compartments
Accessory bracket The side panel on the passenger side of your car is equipped with a bracket for various acces- sories. The bracket has
a cover that must be removed before it can be used.
This can be used to fit a hook for a handbag, waste bin, pocket for personal effects, etc. Consult your Volvo retailer.
Coat hanger Use the coat hanger for clothes of normal weight.
pg. 110 Storage compartments
Waste bin/ bottle holder in the rear seat (option) Do as follows to change the waste bag: 1. Open the holder. 2. Use both hands to press out the bottom of the holder. 3. Fit the bag around the bottom portion and press it back onto the top portion. 4. The bag is ready for use.
The waste bin can also be used as a holder for large bottles, etc.
NOTE! For reasons of safety, glass bottles should never be used anywhere in the car!
pg. 111 Rear seat and trunk
Folding the rear seat backrest Both rear seat backrests can be folded down, together or individually to enable you to transport long objects.
Fold the rear seat backrests as follows:
Check first that the head restraint is folded down. Pull the handle in the cargo compartment as shown in the illustration. Fold the backrest down.
WARNING!
Keep vehicle doors and the luggage compartment locked and keep keys out of a child's reach. Unsupervised children could lock themselves in an open trunk and risk injury. Children should be taught not to play in vehicles.
On hot days, the temperature in the trunk or vehicle interior can rise very quickly. Exposure of people to these high temperatures for even a short period of time can cause heat- related injury or death. Small children are particularly at risk.
WARNING!
When the backrest is returned to the upright position, check that it is properly locked in place. Return the head restraints to the upright position.
Long loads should always be securely anchored to help avoid injury in the event of a sudden stop.
Always turn the engine off and apply the parking brake when loading/ unloading the vehicle.
Place the transmission in the (P) ark position (automatic transmission) to help prevent inadvertent movement of the gear selector. The car features a 60/ 40 split fold- down rear seat. This function is performed by handles inside the trunk, and also provides a means for children and adults to enter the passenger compartment in the event they become locked inside the trunk.
Adults are advised to familiarize themselves with the operation and location of the release handles.
To fold down the rear seats from inside the trunk, pull the release control handles located on either side of the trunk.
pg. 112 Rear seat and trunk
Carrying long loads The center backrest cushion folds forward, allowing you to transport long, light cargo such as skis in the trunk of your car. To lower the backrest:
Pull the right release control handle in the trunk to release the backrest (see page 111). From the rear seat, fold down the right section of the backrest slightly *. Release the flap by pushing the catch (located on the rear side of the backrest) upward and pulling the flap forward. Return the backrest to the upright
Grocery bag holder (option) Open the trunk lid. Hang or secure your grocery bags using the tensioning straps or holders.
Center head restraints The center head restraint can be adjusted according to the passenger's height. The restraint should be carefully adjusted to support the occupant's head.
The head restraint can be raised by pulling straight up or lowered by pressing the catch at the base of the left head restraint support and pushing down.
* If your car is equipped with the optional integrated child booster cushion, this cushion must be folded down before you fold down the backrest (see page 25)
pg. 113 Spare wheel and tools
Spare wheel, tools and jack The spare wheel, jack and tool kit are located under the floor of the trunk. To access the spare tire:
Pull up the floor mats, front and rear Remove the jack and tool kit. Unscrew the spare wheel and lift it out.
WARNING!
Make sure that the spare tire, jack and tool bag are properly secured with the securing bracket to help keep these components in place in the event of a sudden stop.
If the car is equipped with a grocery bag holder:
Turn the two clips, which are located at the rear corner of the mat, 90¡. Pull the front of the floor mat back towards the trunk lid opening. Lift the mat slightly and turn 90¡ to lift it out. Lift the mat out of the trunk.
Unscrew the spare tire and lift it out. Return and secure everything in reverse order.
See also page 157 for more information on using the jack.
pg. 114 Spare wheel and tools
Contents | Top of Page
2 0 0 1 VOLVO
S60
Interior pg. 99 Interior Front seats 100
Interior lighting 104
Floor mats (option) 105
Storage compartments 106
Rear seat and trunk 111
Spare wheel and tools 113pg. 100 Front seats Manual height adjustment - front seat The front edges of the driver and passenger seat cushions can be adjusted to seven different settings and the rear edges to nine different settings.
Lever (A) - adjusting the front edge of the seat.
Lever (B) - adjusting the rear edge of the seat.
Manual front-rear adjustment The seat can be moved forward or rearward by pulling up on the front-rear adjustment bar.
Check that the seat is securely locked into position after adjusting.
WARNING!
Do not adjust the seat while driving. The seat should be adjusted so that the brake pedal can be depressed fully. In addition, position the seat as far rearward as comfort and control allow.
pg. 101 Front seats
Folding the backrests in the front seat The front passenger seat backrest can be folded to a horizontal position to make room for a long load. Fold the backrest as follows:
Move the seat as far back as possible. Adjust the backrest to the upright position. Lift the catches on the rear of the backrest. Without releasing the catches, push the backrest forward. Move the seat as far forward as possible.
WARNING!
Cover sharp edges on the load to help prevent injury to occupants. Secure the load to help prevent shifting during sudden stops.
pg. 102 Front seats Power seat (option) Operation Passenger seat: The seat can only be adjusted if the ignition key is in position I, II or if the engine is running.
Driver's seat: The seat can be adjusted if the ignition key is in position I, II or if the engine is running. It can also be adjusted in the following circumstances:
1. Within 40 seconds of the ignition key being turned to position 0 or removed from the ignition switch.
2. After you have unlocked the driver's door with the key or remote control, the driver's seat can be adjusted during a 10 minute period if the door remains open. If the door is closed, the seat can be adjusted for 40 seconds. The ignition key can be in position 0 or not yet inserted in the ignition switch.
Remote control If you unlock the car with the remote control and open the driver's door, the driver's seat will adjust to the settings it had the last time the car was locked with the same remote control.
Seat adjustment If your Volvo is equipped with power seats, the following may be adjusted with the two switches at the side of the seat: A - Front edge of seat (raise/ lower) B - Front-rear C - Rear edge of seat (raise/ lower) D - Backrest tilt
NOTE! The power seats have an overload protector that activates if a seat is blocked by any object. If this occurs, switch off the ignition (key in position 0) and wait about 20 seconds before operating the seat again.
Please refer to the following page for information on programming the memory function in the driver's seat.
Emergency stop If the seat accidentally begins to move, press one of the buttons to stop the seat.
WARNING!
Because the driver's seat can be adjusted with the ignition off, children should never be left unattended in the car.
Movement of the seat can be STOPPED at any time by pressing any button on the power seat control panel.
Do not adjust the seat while driving. The seat should be adjusted so that the brake pedal can be depressed fully. In addition, position the seat as far rearward as comfort and control allow.
The seat rails on the floor must not be obstructed in any way when the seat is in motion.
pg. 103 Front seats
Programming the memory Please note that only the driver' s seat is equipped with the memory function. Three seat positions can be programmed. To program a seat position:
1. Adjust the seat to the desired position. 2. Hold down the MEM button. 3. While holding down the MEM button, press button 1 to program the current position of the seat. Buttons 2 and 3 can be programmed in the same way.
To move the seat to a programmed position, press and hold down button 1, 2 or 3 until the seat moves to the preset position and stops.
As a safety precaution, the seat will stop automatically if the button is released before the seat has reached the programmed position.
pg. 104 Interior lighting
Courtesy light The courtesy light can be turned on or off by pressing the button. The light also has a timer function which turns the light on for 30 seconds if:
You unlock the car from the outside with the key or remote control. You switch off the ignition (turn the key to position 0).
The courtesy light stays on for 10 minutes if one of the doors is left open after the car is unlocked. The courtesy light switches off if:
The engine is started. The car is locked from the outside with the key or remote control.
The courtesy light can be switched off or on in all situations by briefly pressing the button. When you switch the light on, it remains lit for 10 minutes.
You can disconnect the automatic function by pressing the courtesy light button for more than 3 seconds. Briefly pressing the courtesy light button again automatically reconnects the function.
The courtesy light timer periods can be changed. Contact your Volvo retailer.
Reading lights - front/ rear The reading lights can be switched on or off by pressing the respective buttons. These lights switch off automatically after 10 minutes if the engine is not running. If the engine is running, the lights stay on indefinitely. The lights can be