- Download PDF Manual
-
OVERVIEW
Keyless entry Locking operation
Unlocking operation
Push
NOTE: If a door is not opened within 60 seconds of unlocking, all doors will relock for safety. Remote Air Conditioning system operation
Push ONCE: Driver door
TWICE: All doors
Will automatically shut off after 10 minutes, or if a door is opened.
Panic button
Push and hold
Push and hold
Smart Key system Start function
Green indicator ON
Carrying
Depress brake pedal
Push
Power (without starting Hybrid System) Without depressing the brake pedal, pressing the “POWER” switch will change the operation mode in succession from:
ACCESSORY
Accessories such as the radio will operate.
ON
Power ON; Hybrid System is not engaged.
All systems OFF.
OFF Locking
Unlocking
All-door lock
Driver door unlock*
Touch
Carry remote to lock Back door lock/unlock
Carry remote to unlock
Grasp
Push
Push
Lock
Unlock
Carry remote to lock/unlock * Driver door unlocking function can be programmed to unlock driver door only, or all doors. Grasping passenger door handle or pushing unlock button on rear hatch will unlock all doors. (If equipped)
NOTE: Doors may also be locked/unlocked using remote.
OVERVIEW
Fuel tank door release and cap
Turn to open
Push
Store
Charge port
NOTE: Tighten until one click is heard. If the cap is not tightened enough, Check Engine “ indicator may illuminate.
”
Push
Open
Refer to the Owner’s Manual for more details.
Hood release
Pull
Pull up latch and raise hood
Engage support rod
Light control-Instrument panel
Brightness control
OVERVIEW
Engine maintenance
Engine coolant reservoir Engine oil level dipstick (cid:40)(cid:81)(cid:74)(cid:76)(cid:81)(cid:72)(cid:3)(cid:82)(cid:76)(cid:79)(cid:3)(cid:192)(cid:79)(cid:79)(cid:72)(cid:85)(cid:3)(cid:70)(cid:68)(cid:83) (cid:58)(cid:76)(cid:81)(cid:71)(cid:86)(cid:75)(cid:76)(cid:72)(cid:79)(cid:71)(cid:3)(cid:90)(cid:68)(cid:86)(cid:75)(cid:72)(cid:85)(cid:3)(cid:193)(cid:88)(cid:76)(cid:71)(cid:3)(cid:87)(cid:68)(cid:81)(cid:78)
NOTE: Regularly scheduled maintenance, including oil changes, will help
extend the life of your vehicle and maintain performance. Please refer to the “Warranty & Maintenance Guide.”
10
ELECTRIC VEHICLE SYSTEM
Electric Vehicle System The Prius Plug-in Hybrid system has features of both electric and hybrid vehicles. Electricity received by charging from an external power source can be used to supplement hybrid energy, and the vehicle can also be driven as an electric vehicle using only the electric motor. The EV driving range can be extended by using regenerative braking to store electricity in the traction battery.
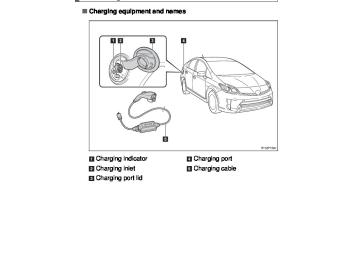
Charging equipment
Charging indicator Charging inlet Charging port lid Charging port Charging cable
The charging cable included with the vehicle is designed to be connected only to an AC 120V power source.
Charging connector Latch release button CCID (Charging Circuit Interrupting Device) Plug Power indicator Error warning indicator Test button Reset button
11
ELECTRIC VEHICLE SYSTEM
Charging (cid:55)(cid:75)(cid:72)(cid:3)(cid:51)(cid:85)(cid:76)(cid:88)(cid:86)(cid:3)(cid:51)(cid:43)(cid:57)(cid:3)(cid:80)(cid:68)(cid:92)(cid:3)(cid:69)(cid:72)(cid:3)(cid:70)(cid:75)(cid:68)(cid:85)(cid:74)(cid:72)(cid:71)(cid:3)(cid:76)(cid:80)(cid:80)(cid:72)(cid:71)(cid:76)(cid:68)(cid:87)(cid:72)(cid:79)(cid:92)(cid:15)(cid:3)(cid:82)(cid:85)(cid:3)(cid:86)(cid:70)(cid:75)(cid:72)(cid:71)(cid:88)(cid:79)(cid:72)(cid:71)(cid:3)(cid:87)(cid:82)(cid:3)(cid:70)(cid:75)(cid:68)(cid:85)(cid:74)(cid:72)(cid:3)(cid:68)(cid:87)(cid:3)(cid:68)(cid:3)(cid:86)(cid:83)(cid:72)(cid:70)(cid:76)(cid:192)(cid:70)(cid:3) time. Before charging, it is recommended that:
-Parking brake is securely set -All lights are turned off -The POWER switch is OFF
Start charging Step 1 Plug the charging cable into the outlet of the external power source. NOTE: Hanging the CCID on a hook is recommended to reduce the strain on the outlet and charging cable plug.
- Make sure to hold the body of the plug and insert
(cid:76)(cid:87)(cid:3)(cid:192)(cid:85)(cid:80)(cid:79)(cid:92)(cid:3)(cid:76)(cid:81)(cid:87)(cid:82)(cid:3)(cid:87)(cid:75)(cid:72)(cid:3)(cid:82)(cid:88)(cid:87)(cid:79)(cid:72)(cid:87)(cid:17)
- Check that the power indicator of the CCID
(Charging Circuit Interrupting Device) is illuminated.
- The surface of the CCID may become hot, but this
does not indicate a malfunction.
Step 2 Press the test button on the CCID to check that the electrical leakage
detection function operates properly.
- If the error warning indicator illuminates when test button is pressed, the function is operating correctly.
- After the test is completed, press reset button to turn off the error warning. Charging cannot occur while error warning is illuminated.
- If the error warning indicator does not come on when test button is pressed, the function may not be operating correctly. Stop charging immediately and contact your Toyota dealer.
12
Step 3 Press the charging port lid to open.
The charging inlet light will illuminate.
Step 4(cid:3)(cid:53)(cid:72)(cid:80)(cid:82)(cid:89)(cid:72)(cid:3)(cid:87)(cid:75)(cid:72)(cid:3)(cid:70)(cid:75)(cid:68)(cid:85)(cid:74)(cid:76)(cid:81)(cid:74)(cid:3)(cid:70)(cid:82)(cid:81)(cid:81)(cid:72)(cid:70)(cid:87)(cid:82)(cid:85)(cid:3)(cid:70)(cid:68)(cid:83)(cid:17)(cid:3)(cid:36)(cid:73)(cid:192)(cid:91)(cid:3)(cid:87)(cid:75)(cid:72)(cid:3)(cid:70)(cid:68)(cid:83)(cid:3)(cid:87)(cid:82)(cid:3)(cid:87)(cid:75)(cid:72)(cid:3)(cid:70)(cid:68)(cid:69)(cid:79)(cid:72)(cid:17)
Step 5 Insert the charging cable connector into the charging inlet.
- Do not press the latch release button
when inserting the connector.
- Align with the guide position shown
on underside of the charging connector, and push it in until it clicks.
Step 6(cid:3)(cid:38)(cid:82)(cid:81)(cid:192)(cid:85)(cid:80)(cid:3)(cid:87)(cid:75)(cid:68)(cid:87)(cid:3)(cid:87)(cid:75)(cid:72)(cid:3)(cid:70)(cid:75)(cid:68)(cid:85)(cid:74)(cid:76)(cid:81)(cid:74)(cid:3)(cid:76)(cid:81)(cid:71)(cid:76)(cid:70)(cid:68)(cid:87)(cid:82)(cid:85)(cid:3)(cid:76)(cid:86)(cid:3)(cid:76)(cid:79)(cid:79)(cid:88)(cid:80)(cid:76)(cid:81)(cid:68)(cid:87)(cid:72)(cid:71)(cid:17)(cid:3)(cid:11)(cid:58)(cid:75)(cid:72)(cid:81)(cid:3)(cid:87)(cid:75)(cid:72)(cid:3)(cid:70)(cid:75)(cid:68)(cid:85)(cid:74)(cid:76)(cid:81)(cid:74)(cid:3)
timer function is in use, the light will turn off several seconds after illuminating.)
- Charging will not start if the charging
indicator does not illuminate when the charging connector is inserted.
- The amount of time until charging
is completed can be checked on the energy monitor by turning the POWER switch to ON mode.
- The charging indicator will turn off
when charging is completed.
Refer to the Owner’s Manual for more details.
13
ELECTRIC VEHICLE SYSTEM
Charging timer Use of the charging timer can suppress deterioration of the hybrid battery (traction battery) and off-peak electricity can be used effectively.
Set the charging timer Step 1 Stop the vehicle and press the charging timer switch.
The Multi-Information Display will switch to the charging timer display.
Step 2 Press and hold the charging timer switch.
The timing display will change from (cid:86)(cid:82)(cid:79)(cid:76)(cid:71)(cid:3)(cid:87)(cid:82)(cid:3)(cid:193)(cid:68)(cid:86)(cid:75)(cid:76)(cid:81)(cid:74)(cid:17)
Step 3 Press the charging timer switch to select the setting mode.
Start time setting mode Finish time setting mode
The mode will switch with each press of the charging timer switch.
14
Step 4 Adjust the set time using the time adjustment button.
Adjust hours Adjust minutes Round to the nearest hour*
* Example: 1:00 to 1:29 -> 1:00
1:30 to 1:59 -> 2:00
Step 5 Press and hold the charging timer switch.
Once set, the time display will (cid:70)(cid:75)(cid:68)(cid:81)(cid:74)(cid:72)(cid:3)(cid:73)(cid:85)(cid:82)(cid:80)(cid:3)(cid:193)(cid:68)(cid:86)(cid:75)(cid:76)(cid:81)(cid:74)(cid:3)(cid:87)(cid:82)(cid:3)(cid:86)(cid:82)(cid:79)(cid:76)(cid:71)(cid:15)(cid:3)(cid:68)(cid:81)(cid:71)(cid:3) the charging timer indicator on the instrument cluster will come on.
Step 6 Turn the POWER switch off. (cid:55)(cid:75)(cid:72)(cid:3)(cid:70)(cid:75)(cid:68)(cid:85)(cid:74)(cid:76)(cid:81)(cid:74)(cid:3)(cid:87)(cid:76)(cid:80)(cid:72)(cid:3)(cid:76)(cid:81)(cid:71)(cid:76)(cid:70)(cid:68)(cid:87)(cid:82)(cid:85)(cid:3)(cid:90)(cid:76)(cid:79)(cid:79)(cid:3)(cid:86)(cid:87)(cid:68)(cid:85)(cid:87)(cid:3)(cid:193)(cid:68)(cid:86)(cid:75)(cid:76)(cid:81)(cid:74)(cid:17) Step 7 Connect the charging cable to the vehicle. Check that the charging indicator has come on. It will turn off after several seconds. If the indicator does not come on, re-insert the charging connector. If it still does not come on, check the power supply status using the power indicator on the CCID (Charging Circuit Interrupting Device).
Cancelling charging timer If the charging timer switch is pressed while the charging timer indicator is (cid:76)(cid:79)(cid:79)(cid:88)(cid:80)(cid:76)(cid:81)(cid:68)(cid:87)(cid:72)(cid:71)(cid:3)(cid:82)(cid:85)(cid:3)(cid:193)(cid:68)(cid:86)(cid:75)(cid:76)(cid:81)(cid:74)(cid:15)(cid:3)(cid:87)(cid:75)(cid:72)(cid:3)(cid:70)(cid:75)(cid:68)(cid:85)(cid:74)(cid:76)(cid:81)(cid:74)(cid:3)(cid:87)(cid:76)(cid:80)(cid:72)(cid:85)(cid:3)(cid:73)(cid:88)(cid:81)(cid:70)(cid:87)(cid:76)(cid:82)(cid:81)(cid:3)(cid:90)(cid:76)(cid:79)(cid:79)(cid:3)(cid:69)(cid:72)(cid:3)(cid:70)(cid:68)(cid:81)(cid:70)(cid:72)(cid:79)(cid:72)(cid:71)(cid:17)(cid:3)(cid:38)(cid:75)(cid:68)(cid:85)(cid:74)(cid:76)(cid:81)(cid:74)(cid:3)(cid:90)(cid:76)(cid:79)(cid:79)(cid:3) commence immediately if the charging cable is connected to the vehicle.
The charging timer indicator will turn off if the charging timer function is canceled.
15
ELECTRIC VEHICLE SYSTEM
After charging Step 1 Pull the charging connector toward you while pressing the latch release
button.
Step 2 Attach the charging connector cap. Step 3 Close the charging port lid. Step 4 Remove the plug from the outlet when the charging equipment will not be
used for a long period of time. Hold the body of the plug when removing. Make sure to put the cable away immediately after disconnecting.
16
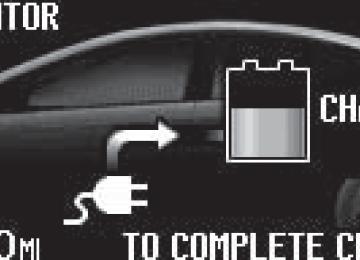
Multi-Information Display-Charging information Remaining charging time Charging information is displayed on the Multi-Information Display.
If the POWER switch is turned to ON mode during charging, the current charging status and the amount of time needed until charging is complete will be displayed on the energy monitor.
(cid:36)(cid:73)(cid:87)(cid:72)(cid:85)(cid:3)(cid:70)(cid:82)(cid:81)(cid:192)(cid:85)(cid:80)(cid:76)(cid:81)(cid:74)(cid:15)(cid:3)(cid:86)(cid:90)(cid:76)(cid:87)(cid:70)(cid:75)(cid:3)(cid:87)(cid:75)(cid:72)(cid:3)(cid:51)(cid:50)(cid:58)(cid:40)(cid:53)(cid:3)(cid:86)(cid:90)(cid:76)(cid:87)(cid:70)(cid:75)(cid:3)(cid:87)(cid:82)(cid:3)(cid:50)(cid:41)(cid:41)(cid:3)(cid:68)(cid:81)(cid:71)(cid:3)(cid:87)(cid:88)(cid:85)(cid:81)(cid:3)(cid:82)(cid:73)(cid:73)(cid:3)(cid:87)(cid:75)(cid:72)(cid:3)(cid:71)(cid:76)(cid:86)(cid:83)(cid:79)(cid:68)(cid:92)(cid:17)(cid:3)(cid:55)(cid:75)(cid:72)(cid:3) POWER switch will turn off automatically after several tens of seconds.
Charging information and warning messages(cid:3)(cid:55)(cid:75)(cid:72)(cid:3)(cid:192)(cid:85)(cid:86)(cid:87)(cid:3)(cid:87)(cid:76)(cid:80)(cid:72)(cid:3)(cid:87)(cid:75)(cid:72)(cid:3)(cid:51)(cid:50)(cid:58)(cid:40)(cid:53)(cid:3)(cid:86)(cid:90)(cid:76)(cid:87)(cid:70)(cid:75)(cid:3)(cid:76)(cid:86)(cid:3) turned to ON mode after charging is completed, a message detailing the results of the charge is shown. Also, if an operation that cannot be carried out during charging was attempted, a warning message will be shown.
Follow the instructions in the message. The message may not be displayed if the Remote Air Conditioning System has been used. See the Owner’s Manual for more details.
17
ELECTRIC VEHICLE SYSTEM
Inspecting electrical leakage detection function As a precaution, inspect the charging cable on a routine basis (at least once a month). Check that the electrical leakage detection function is operating properly by following the procedure below. In the unlikely event that the electrical leakage detection function is not operating properly, contact your Toyota dealer as soon as possible.
Step 1 Insert the charging cable into the outlet of the external power source. Step 2 Press the test button on the CCID (Charging Circuit Interrupting Device).
If the error warning indicator illuminates when the test button is pressed, the function is operating correctly.
Step 3 Press the reset button on the CCID (Charging Circuit Interrupting Device). Turn off the error warning indicator. Charging cannot be carried out while the error warning indicator is illuminated. Charging can be continued by following the normal procedure. If not charging, store the charging cable.
See the Owner’s Manual for important precautionary information.
18
Charging system safety functions - The Hybrid System will not start while the charging cable is attached to the
vehicle, even if the POWER switch is operated.
- If the charging cable is connected while the READY indicator is illuminated, the
Hybrid System will stop automatically and driving will not be possible.
- When the charging cable is connected to the vehicle, the shift position cannot be
changed from P to another position.
- If the latch release button is pressed, charging will not begin even if the charging
cable is connected.
- Charging will stop if the latch release button is pressed and held for several
seconds during charging. When restarting charging, reinsert the charging connector after pulling it out, and check that the charging indicator illuminates.
Plug-in Hybrid Applications Plug-in Hybrid Applications is a service for plug-in hybrid vehicles that is added to the Safety Connect and Entune products. It provides charge support, comfort support and drive support via the vehicle’s navigation system and the owner’s smartphone. Both an active Safety Connect® account and an active Entune® account are required for the services.
®
®
The following functions of the Plug-in Hybrid Applications can be used with the navigation system: Type A Download of nearby charging stations to the map screen. Type B View list of nearby charging stations and corresponding charging station
information (such as voltage supported).
For details, please refer to http://www.toyota.com/entune.
19
FEATURES/OPERATIONS
Hybrid Synergy Drive System The Hybrid Synergy Drive System utilizes a computer-controlled gasoline engine (cid:68)(cid:81)(cid:71)(cid:3)(cid:72)(cid:79)(cid:72)(cid:70)(cid:87)(cid:85)(cid:76)(cid:70)(cid:3)(cid:80)(cid:82)(cid:87)(cid:82)(cid:85)(cid:3)(cid:87)(cid:82)(cid:3)(cid:83)(cid:85)(cid:82)(cid:89)(cid:76)(cid:71)(cid:72)(cid:3)(cid:87)(cid:75)(cid:72)(cid:3)(cid:80)(cid:82)(cid:86)(cid:87)(cid:3)(cid:72)(cid:73)(cid:192)(cid:70)(cid:76)(cid:72)(cid:81)(cid:87)(cid:3)(cid:70)(cid:82)(cid:80)(cid:69)(cid:76)(cid:81)(cid:68)(cid:87)(cid:76)(cid:82)(cid:81)(cid:3)(cid:82)(cid:73)(cid:3)(cid:83)(cid:82)(cid:90)(cid:72)(cid:85)(cid:3)(cid:73)(cid:82)(cid:85)(cid:3)(cid:87)(cid:75)(cid:72)(cid:3) vehicle. To conserve energy, when the brakes are applied the braking force generates electricity which is then sent to the traction battery. In addition, (cid:87)(cid:75)(cid:72)(cid:3)(cid:72)(cid:81)(cid:74)(cid:76)(cid:81)(cid:72)(cid:3)(cid:86)(cid:75)(cid:88)(cid:87)(cid:86)(cid:3)(cid:82)(cid:73)(cid:73)(cid:3)(cid:90)(cid:75)(cid:72)(cid:81)(cid:3)(cid:87)(cid:75)(cid:72)(cid:3)(cid:89)(cid:72)(cid:75)(cid:76)(cid:70)(cid:79)(cid:72)(cid:3)(cid:76)(cid:86)(cid:3)(cid:86)(cid:87)(cid:82)(cid:83)(cid:83)(cid:72)(cid:71)(cid:17)(cid:3)(cid:55)(cid:75)(cid:72)(cid:3)(cid:69)(cid:72)(cid:81)(cid:72)(cid:192)(cid:87)(cid:86)(cid:3)(cid:68)(cid:85)(cid:72)(cid:3)(cid:69)(cid:72)(cid:87)(cid:87)(cid:72)(cid:85)(cid:3)(cid:73)(cid:88)(cid:72)(cid:79)(cid:3) economy, reduced vehicle emissions and improved performance. NOTE: Fuel consumption and energy information of the Hybrid System are
shown on the Multi-Information Display.
Tips for improved fuel economy (cid:16)(cid:40)(cid:81)(cid:86)(cid:88)(cid:85)(cid:72)(cid:3)(cid:87)(cid:76)(cid:85)(cid:72)(cid:3)(cid:83)(cid:85)(cid:72)(cid:86)(cid:86)(cid:88)(cid:85)(cid:72)(cid:86)(cid:3)(cid:68)(cid:85)(cid:72)(cid:3)(cid:80)(cid:68)(cid:76)(cid:81)(cid:87)(cid:68)(cid:76)(cid:81)(cid:72)(cid:71)(cid:3)(cid:68)(cid:87)(cid:3)(cid:79)(cid:72)(cid:89)(cid:72)(cid:79)(cid:86)(cid:3)(cid:86)(cid:83)(cid:72)(cid:70)(cid:76)(cid:192)(cid:72)(cid:71)(cid:3)(cid:76)(cid:81)(cid:3)(cid:87)(cid:75)(cid:72)(cid:3)Owner’s Manual. -When possible, link trips to reduce engine cold starts. -Avoid driving at speeds that are higher than necessary, especially on the highway. -When possible, avoid sudden stops to maximize regenerative braking energy. -Minimize use of the Air Conditioning. Starting your vehicle
(1) Depress the brake pedal, and
press the “POWER” switch (cid:69)(cid:85)(cid:76)(cid:72)(cid:193)(cid:92)(cid:3)(cid:68)(cid:81)(cid:71)(cid:3)(cid:192)(cid:85)(cid:80)(cid:79)(cid:92)(cid:17)
(2) The “READY” light will blink.
After a few seconds, when the light remains steady and a beep sounds, you may begin driving.
Auto lock/unlock Automatic door locks can be programmed to operate in two different modes, or turned OFF. -Doors lock when shifting from Park. -Doors lock when the vehicle speed is approximately 12 mph or higher. -Doors unlock when shifting into Park. -Doors unlock when the driver’s door is opened within 10 seconds after turning the “POWER” switch OFF. Refer to the Owner’s Manual for more details.
20
Transmission
Park button
Reverse
Neutral
Drive
Engine brake*
* The engine brake is the equivalent of downshifting. Shift to “B” when engine braking is desired (i.e. downhill driving, coasting to a stop, etc.). ECO Mode
Push
ECO Mode helps achieve low fuel consumption during trips that involve frequent accelerating and braking.
Refer to the Owner’s Manual for more details.
POWER Mode
Push
Use when a higher level of response is desired, such as when driving in mountainous regions.
Refer to the Owner’s Manual for more details.
21
FEATURES/OPERATIONS
EV/HV Mode
Push
EV/HV Mode allows the electric motor (traction motor), powered by the hybrid battery (traction battery), to be used to drive the vehicle under certain driving conditions.
Refer to the Owner’s Manual for more details.
Tilt and telescopic steering wheel
Lock release lever
Angle
Length
Hold wheel, push lever down, set angle and length, and return lever.
NOTE: Do not attempt to adjust while the vehicle is in motion.
Parking brake
Set: Depress Release: Depress again
22
Seat adjustments-Front Manual seat
Power seat (driver side only)*
* If equipped
Seat position (forward/backward) Height crank (driver side only) Seatback angle Seat position, cushion angle and height Seatback angle Lumbar support
Seats-Head restraints Front
Rear center
Rear outboard
Lock release button
Lock release button
Lock release button
Seats-Folding down rear seats
(1) Press down
(2) Fold down
23
FEATURES/OPERATIONS
Windows-Power
Up
Down
Window lock switch
Automatic operation Push the switch completely down or pull it completely up and release to fully open or close. To stop the window partway, operate the switch in the opposite direction. Window lock switch Deactivates all passenger windows. Driver’s window remains operable. Wipers & washers Front
Adjustment frequency*
Single wipe
* Intermittent windshield
wiper frequency adjustment Rotate to increase/decrease wipe frequency.
Pull to wash and wipe
Interval wipe
Slow
Fast
Rear
Wash and wipe
Wipe
Interval wipe
Wash and wipe
24
Lights & turn signals Headlights Type A
Headlights
Parking lights
Auto DRL OFF
Type B
Headlights
Parking lights
DRL OFF
Low beam
(cid:43)(cid:76)(cid:74)(cid:75)(cid:3)(cid:69)(cid:72)(cid:68)(cid:80)(cid:3)(cid:193)(cid:68)(cid:86)(cid:75)(cid:72)(cid:85)
High beam
Automatic light cutoff system Automatically turns lights off after a delay of 30 seconds, or when lock switch on remote is pushed after all doors are locked.
Front fog lights (if equipped)
Turn
Front fog lights come on only when the headlights are on low beam.
Turn signals
Right turn
Lane change
Lane change
Left turn
25
FEATURES/OPERATIONS
Seat heaters
Front passenger seat
Push
Driver seat
Push
Air Conditioning/Heating
Temperature selector Temperature setting display Air outlet display Fan speed display Fan speed control Windshield defogger Rear defogger (cid:48)(cid:76)(cid:70)(cid:85)(cid:82)(cid:3)(cid:71)(cid:88)(cid:86)(cid:87)(cid:3)(cid:68)(cid:81)(cid:71)(cid:3)(cid:83)(cid:82)(cid:79)(cid:79)(cid:72)(cid:81)(cid:3)(cid:192)(cid:79)(cid:87)(cid:72)(cid:85)(cid:3)(cid:80)(cid:82)(cid:71)(cid:72)(cid:3)(cid:11)(cid:87)(cid:88)(cid:85)(cid:81)(cid:86)(cid:3)(cid:82)(cid:73)(cid:73)(cid:3)(cid:68)(cid:88)(cid:87)(cid:82)(cid:80)(cid:68)(cid:87)(cid:76)(cid:70)(cid:68)(cid:79)(cid:79)(cid:92)(cid:3)(cid:68)(cid:73)(cid:87)(cid:72)(cid:85)(cid:3)(cid:22)(cid:3)(cid:80)(cid:76)(cid:81)(cid:88)(cid:87)(cid:72)(cid:86)(cid:12) Air Conditioning ON/OFF (cid:36)(cid:76)(cid:85)(cid:193)(cid:82)(cid:90)(cid:3)(cid:89)(cid:72)(cid:81)(cid:87) Use “ Air intake control (switch between outside air and recirculated air mode) Automatic climate control ON (cid:36)(cid:71)(cid:77)(cid:88)(cid:86)(cid:87)(cid:76)(cid:81)(cid:74)(cid:3)(cid:87)(cid:75)(cid:72)(cid:3)(cid:87)(cid:72)(cid:80)(cid:83)(cid:72)(cid:85)(cid:68)(cid:87)(cid:88)(cid:85)(cid:72)(cid:3)(cid:86)(cid:72)(cid:87)(cid:87)(cid:76)(cid:81)(cid:74)(cid:3)(cid:90)(cid:76)(cid:79)(cid:79)(cid:3)(cid:70)(cid:68)(cid:88)(cid:86)(cid:72)(cid:3)(cid:87)(cid:75)(cid:72)(cid:3)(cid:68)(cid:76)(cid:85)(cid:193)(cid:82)(cid:90)(cid:3)(cid:89)(cid:72)(cid:81)(cid:87)(cid:86)(cid:15)(cid:3)(cid:68)(cid:76)(cid:85)(cid:3)(cid:76)(cid:81)(cid:87)(cid:68)(cid:78)(cid:72)(cid:3) and fan to adjust automatically. Climate control OFF
” mode to reduce window fogging.
” or “
26
Touch screen display
Turn to tune radio stations manually or select tracks or (cid:192)(cid:79)(cid:72)(cid:86)
Access to navigation system2
Audio
Type 11
Push to turn ON/OFF
Eject CD
Seek station/ CD track select
Push to display audio screen
Type 2 (additional functions)3
Push to select radio or media mode
1 Refer to the “Display Audio System Owner’s Manual.” 2 Refer to the “Navigation System with Entune Quick Reference Guide.” 3 Refer to the “Navigation System Owner’s Manual.”
USB/AUX port
By inserting a mini plug into the USB/AUX port, you can listen to music from a portable audio device through the vehicle’s speaker system while in USB/AUX mode.
27
FEATURES/OPERATIONS
Power outlets
Lower center console
Center console box
Power switch must be set at “ACCESSORY” or “ON” in order to use power outlets.
Steering wheel switches
Audio control
Volume control
Climate control
Temperature selector
Fresh or recirculated cabin air
“MODE” Push to turn audio ON and select an audio mode. Push and hold to mute/ unmute or pause/resume the current operation. v v “ ” Use to search within the selected audio medium (radio, CD, iPod®, etc.).
28
Multi-Information Display
Push “DISP” to change between the following information screens: (1) Energy monitor (2) Hybrid System indicator (3) 5-minute/1-minute interval fuel consumption display (4) Fuel consumption history display (5) EV driving ratio
Push and hold “DISP” to set up the displays.
Cruise control Turning system ON/OFF
System ON/OFF
Resume2
Increase speed
Functions
Cancel1
Set
Decrease speed
1 The set speed may also be cancelled by depressing the brake pedal. 2 The set speed may be resumed once vehicle speed exceeds 25 mph.
29
FEATURES/OPERATIONS
Dynamic Radar Cruise Control (if equipped) Refer to the Owner’s Manual for more details and complete safety precautions before attempting to use “Dynamic Radar Cruise Control.” Fixed speed mode
(1) (cid:55)(cid:82)(cid:3)(cid:86)(cid:72)(cid:79)(cid:72)(cid:70)(cid:87)(cid:3)(cid:70)(cid:82)(cid:81)(cid:89)(cid:72)(cid:81)(cid:87)(cid:76)(cid:82)(cid:81)(cid:68)(cid:79)(cid:18)(cid:192)(cid:91)(cid:72)(cid:71)(cid:3)(cid:86)(cid:83)(cid:72)(cid:72)(cid:71)(cid:3)(cid:70)(cid:82)(cid:81)(cid:87)(cid:85)(cid:82)(cid:79) Push the ON-OFF button. Push the
lever forward and hold until the “
” indicator appears.
(2) To set, cancel and resume a speed Refer to instructions in the Cruise control
section.
Distance control mode
In distance control mode, vehicle will cruise at a set speed, decelerate to maintain selected distance from a slower vehicle traveling in front, and accelerate back up to the selected speed if the vehicle in front changes lanes or speeds up. (1) To select distance control mode Push the ON-OFF button. The “RADAR READY”
(2) To set, cancel or resume a speed Refer to instructions in the Cruise control
or “
” will come on.
section.
LONG
MIDDLE
SHORT
(3) To change the vehicle-to-vehicle distance
Push the distance button to cycle through the settings, which will change progressively from LONG to MIDDLE to SHORT.
30
Clock
H- Hour set M- Minute set :00- Round off
minutes
Refer to the Owner’s Manual for details on adjusting time.
Hill-start Assist Control (HAC)
Brake pedal
HAC helps prevent rolling backwards on an incline. To engage, push further down on brake pedal while at a complete stop until a beep sounds and slip indicator illuminates. HAC holds for approximately two seconds after releasing brake pedal. Refer to the Owner’s Manual for more details.
Garage door opener (HomeLink®)* (if equipped)
Garage door openers manufactured under license from HomeLink®* can be programmed to operate garage doors, estate gates, security lighting, etc.
Refer to “Garage door opener,” Section 3-5 in the Owner’s Manual for more details.
For programming assistance, contact HomeLink® at 1-800-355-3515, or visit http://www.homelink.com.
* HomeLink® is a registered trademark of Johnson Controls, Inc.
31
SAFETY AND EMERGENCY FEATURES
Seat belts
Take up slack
Too high
Keep as low on hips as possible
If belt is fully extended, then retracted even slightly, it cannot be re-extended beyond that point, unless fully retracted again. This feature is used to help hold child restraint systems securely.
(cid:55)(cid:82)(cid:3)(cid:192)(cid:81)(cid:71)(cid:3)(cid:80)(cid:82)(cid:85)(cid:72)(cid:3)(cid:76)(cid:81)(cid:73)(cid:82)(cid:85)(cid:80)(cid:68)(cid:87)(cid:76)(cid:82)(cid:81)(cid:3)(cid:68)(cid:69)(cid:82)(cid:88)(cid:87)(cid:3)(cid:86)(cid:72)(cid:68)(cid:87)(cid:3)(cid:69)(cid:72)(cid:79)(cid:87)(cid:86)(cid:15)(cid:3)(cid:68)(cid:81)(cid:71)(cid:3)(cid:75)(cid:82)(cid:90)(cid:3)(cid:87)(cid:82)(cid:3)(cid:76)(cid:81)(cid:86)(cid:87)(cid:68)(cid:79)(cid:79)(cid:3)(cid:68)(cid:3)(cid:70)(cid:75)(cid:76)(cid:79)(cid:71)(cid:3)(cid:85)(cid:72)(cid:86)(cid:87)(cid:85)(cid:68)(cid:76)(cid:81)(cid:87)(cid:3) system, refer to the Owner’s Manual.
Seat belts-Shoulder belt anchor
Push up, or squeeze lock release to lower
Tire Pressure Monitoring (warning) System If the Tire Pressure Warning indicator “ (cid:87)(cid:76)(cid:85)(cid:72)(cid:3)(cid:83)(cid:85)(cid:72)(cid:86)(cid:86)(cid:88)(cid:85)(cid:72)(cid:86)(cid:3)(cid:87)(cid:82)(cid:3)(cid:73)(cid:68)(cid:70)(cid:87)(cid:82)(cid:85)(cid:92)(cid:16)(cid:86)(cid:83)(cid:72)(cid:70)(cid:76)(cid:192)(cid:72)(cid:71)(cid:3)(cid:79)(cid:72)(cid:89)(cid:72)(cid:79)(cid:86)(cid:17)(cid:13)(cid:3)(cid:55)(cid:75)(cid:72)(cid:3)(cid:79)(cid:76)(cid:74)(cid:75)(cid:87)(cid:3)(cid:90)(cid:76)(cid:79)(cid:79)(cid:3)(cid:87)(cid:88)(cid:85)(cid:81)(cid:3)(cid:82)(cid:73)(cid:73)(cid:3)(cid:68)(cid:73)(cid:87)(cid:72)(cid:85)(cid:3)(cid:68)(cid:3)(cid:73)(cid:72)(cid:90)(cid:3) minutes. The warning light is designed to turn on when tire pressure is critically low, but it may also come on due to temperature changes or changes in tire pressure from natural air leakage. (cid:44)(cid:73)(cid:3)(cid:87)(cid:75)(cid:72)(cid:3)(cid:87)(cid:76)(cid:85)(cid:72)(cid:3)(cid:83)(cid:85)(cid:72)(cid:86)(cid:86)(cid:88)(cid:85)(cid:72)(cid:3)(cid:76)(cid:81)(cid:71)(cid:76)(cid:70)(cid:68)(cid:87)(cid:82)(cid:85)(cid:3)(cid:193)(cid:68)(cid:86)(cid:75)(cid:72)(cid:86)(cid:3)(cid:73)(cid:82)(cid:85)(cid:3)(cid:80)(cid:82)(cid:85)(cid:72)(cid:3)(cid:87)(cid:75)(cid:68)(cid:81)(cid:3)(cid:25)(cid:19)(cid:3)(cid:86)(cid:72)(cid:70)(cid:82)(cid:81)(cid:71)(cid:86)(cid:3)(cid:68)(cid:81)(cid:71)(cid:3)(cid:87)(cid:75)(cid:72)(cid:81)(cid:3)(cid:85)(cid:72)(cid:80)(cid:68)(cid:76)(cid:81)(cid:86)(cid:3) on, take the vehicle to your local Toyota dealer. Refer to the Owner’s Manual for more details.
” illuminates without blinking, adjust
* Refer to load label on door jamb or the Owner’s Manual(cid:3)(cid:73)(cid:82)(cid:85)(cid:3)(cid:87)(cid:76)(cid:85)(cid:72)(cid:3)(cid:76)(cid:81)(cid:193)(cid:68)(cid:87)(cid:76)(cid:82)(cid:81)(cid:3)(cid:86)(cid:83)(cid:72)(cid:70)(cid:76)(cid:192)(cid:70)(cid:68)(cid:87)(cid:76)(cid:82)(cid:81)(cid:86)(cid:17)(cid:3)
32
Door locks
Unlock
Lock
Doors-Child safety locks Rear door
Moving the lever to lock position will allow the door to be opened only from the outside.
Lock
Emergency tire puncture repair kit Tool location
Side deck board
Emergency tire puncture repair kit
Refer to the Owner’s Manual for more details.
33
SAFETY AND EMERGENCY FEATURES
Star Safety SystemTM All new Toyota vehicles come standard with the Star Safety SystemTM, which combines Vehicle Stability Control (VSC), Traction Control (TRAC), Anti-lock Braking System (ABS), Electronic Brake-force Distribution (EBD), Brake Assist (BA) and Smart Stop Technology (SST).
Enhanced Vehicle Stability Control (VSC) Enhanced Vehicle Stability Control provides cooperative control of the ABS, TRAC, VSC and EPS.
Enhanced VSC helps to maintain directional stability when loss of traction occurs during a turn.
Traction Control (TRAC) VSC helps prevent loss of traction during cornering by reducing Hybrid System output, and Traction Control helps maintain traction on loose gravel and wet, icy, or uneven surfaces by applying brake force to the spinning wheel(s).
Toyota’s TRAC sensors are activated when one of the drive wheels starts to slip. TRAC limits Hybrid System output and applies the brakes to the spinning wheel. This transfers power to the wheels that still have traction to help keep you on track.
Anti-Lock Brake System (ABS) ABS helps prevent brakes from locking up by “pulsing” brake pressure to each wheel. This limits brake lockup and helps provide directional control for the current road conditions.
Toyota’s ABS sensors detect which wheels are locking up and limits wheel lockup by “pulsing” each wheel’s brakes independently. Pulsing releases brake pressure repeatedly for fractions of a second. This helps the tires attain the traction that current road conditions will allow, helping you to stay in directional control.
Electronic Brake Force Distribution (EBD) Toyota’s ABS technology has Electronic Brake-force Distribution (EBD) to help maintain control and balance when braking. Abrupt stops can cause a vehicle to tilt forward, reducing the braking power of the rear wheels. EBD responds to sudden stops by redistributing brake force to enhance the braking effectiveness of all four wheels.
Brake Assist (BA) Brake Assist is designed to detect sudden or “panic” braking, and then add braking pressure to help decrease the vehicle’s stopping distance. When there’s only a split second to react, Brake Assist can add additional brake pressure more quickly than just the driver alone can.
34
Smart Stop Technology (SST) Smart Stop Technology automatically reduces driving torque when the accelerator and brake pedals are pressed simultaneously under certain conditions.
Floor mat installation (cid:55)(cid:75)(cid:72)(cid:85)(cid:72)(cid:3)(cid:68)(cid:85)(cid:72)(cid:3)(cid:87)(cid:90)(cid:82)(cid:3)(cid:87)(cid:92)(cid:83)(cid:72)(cid:86)(cid:3)(cid:82)(cid:73)(cid:3)(cid:55)(cid:82)(cid:92)(cid:82)(cid:87)(cid:68)(cid:3)(cid:193)(cid:82)(cid:82)(cid:85)(cid:3)(cid:80)(cid:68)(cid:87)(cid:86)(cid:29)(cid:3)(cid:70)(cid:68)(cid:85)(cid:83)(cid:72)(cid:87)(cid:72)(cid:71)(cid:3)(cid:68)(cid:81)(cid:71)(cid:3)(cid:68)(cid:79)(cid:79)(cid:16)(cid:90)(cid:72)(cid:68)(cid:87)(cid:75)(cid:72)(cid:85)(cid:17)(cid:3)(cid:40)(cid:68)(cid:70)(cid:75)(cid:3)(cid:89)(cid:72)(cid:75)(cid:76)(cid:70)(cid:79)(cid:72)(cid:3) (cid:75)(cid:68)(cid:86)(cid:3)(cid:80)(cid:82)(cid:71)(cid:72)(cid:79)(cid:16)(cid:86)(cid:83)(cid:72)(cid:70)(cid:76)(cid:192)(cid:70)(cid:3)(cid:193)(cid:82)(cid:82)(cid:85)(cid:3)(cid:80)(cid:68)(cid:87)(cid:86)(cid:17)(cid:3)(cid:44)(cid:81)(cid:86)(cid:87)(cid:68)(cid:79)(cid:79)(cid:68)(cid:87)(cid:76)(cid:82)(cid:81)(cid:3)(cid:76)(cid:86)(cid:3)(cid:72)(cid:68)(cid:86)(cid:92)(cid:17)(cid:3)
(cid:55)(cid:82)(cid:3)(cid:78)(cid:72)(cid:72)(cid:83)(cid:3)(cid:92)(cid:82)(cid:88)(cid:85)(cid:3)(cid:193)(cid:82)(cid:82)(cid:85)(cid:3)(cid:80)(cid:68)(cid:87)(cid:3)(cid:83)(cid:85)(cid:82)(cid:83)(cid:72)(cid:85)(cid:79)(cid:92)(cid:3)(cid:83)(cid:82)(cid:86)(cid:76)(cid:87)(cid:76)(cid:82)(cid:81)(cid:72)(cid:71)(cid:15)(cid:3)(cid:73)(cid:82)(cid:79)(cid:79)(cid:82)(cid:90)(cid:3)(cid:87)(cid:75)(cid:72)(cid:86)(cid:72)(cid:3)(cid:86)(cid:87)(cid:72)(cid:83)(cid:86)(cid:29)
(cid:135)(cid:3) (cid:50)(cid:81)(cid:79)(cid:92)(cid:3)(cid:88)(cid:86)(cid:72)(cid:3)(cid:193)(cid:82)(cid:82)(cid:85)(cid:3)(cid:80)(cid:68)(cid:87)(cid:86)(cid:3)(cid:71)(cid:72)(cid:86)(cid:76)(cid:74)(cid:81)(cid:72)(cid:71)(cid:3)(cid:73)(cid:82)(cid:85)(cid:3)(cid:92)(cid:82)(cid:88)(cid:85)(cid:3)(cid:86)(cid:83)(cid:72)(cid:70)(cid:76)(cid:192)(cid:70)(cid:3)(cid:80)(cid:82)(cid:71)(cid:72)(cid:79)(cid:17) (cid:135)(cid:3) (cid:56)(cid:86)(cid:72)(cid:3)(cid:82)(cid:81)(cid:79)(cid:92)(cid:3)(cid:82)(cid:81)(cid:72)(cid:3)(cid:193)(cid:82)(cid:82)(cid:85)(cid:3)(cid:80)(cid:68)(cid:87)(cid:3)(cid:68)(cid:87)(cid:3)(cid:68)(cid:3)(cid:87)(cid:76)(cid:80)(cid:72)(cid:15)(cid:3)(cid:88)(cid:86)(cid:76)(cid:81)(cid:74)(cid:3)(cid:87)(cid:75)(cid:72)(cid:3)(cid:85)(cid:72)(cid:87)(cid:68)(cid:76)(cid:81)(cid:76)(cid:81)(cid:74)(cid:3)(cid:75)(cid:82)(cid:82)(cid:78)(cid:86)(cid:3)(cid:87)(cid:82)(cid:3)(cid:78)(cid:72)(cid:72)(cid:83)(cid:3)(cid:87)(cid:75)(cid:72)(cid:3)(cid:80)(cid:68)(cid:87)(cid:3)(cid:76)(cid:81)(cid:3)
place.
(cid:135)(cid:3) (cid:44)(cid:81)(cid:86)(cid:87)(cid:68)(cid:79)(cid:79)(cid:3)(cid:193)(cid:82)(cid:82)(cid:85)(cid:3)(cid:80)(cid:68)(cid:87)(cid:86)(cid:3)(cid:85)(cid:76)(cid:74)(cid:75)(cid:87)(cid:3)(cid:86)(cid:76)(cid:71)(cid:72)(cid:3)(cid:88)(cid:83)(cid:17)(cid:3)
Always align the (cid:168) marks
35
NOTES
36
O