- Download PDF Manual
-
1. Charging operation
How to charge
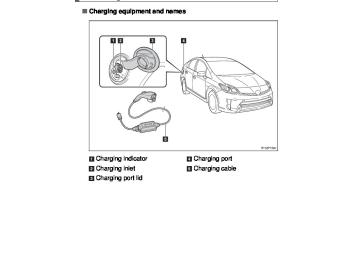
■ Charging equipment and names
Charging indicator Charging inlet Charging port lid
Charging port Charging cable
PLUG-IN QG_U (OM47747U)
1. Charging operation
■ The names of each part of the charging cable
Charging connector Latch release button CCID (Charging Circuit Inter- rupting Device) Plug*
Power indicator Error warning indicator Test button Reset button
*: The shape of the plug differs in accordance with the voltage and the target
region.
PLUG-IN QG_U (OM47747U)
1. Charging operation
■ Confirm the following before recharging
● The parking brake is applied. ● Lights such as the headlights, emergency flashers and interior
lights etc. are switched off. If these light switches are turned ON, then these features will consume electricity, and recharging time will increase.
● The “POWER” switch is OFF.
■ How to charge STEP 1
Prepare the charging cable.
STEP 2
Insert the charging cable into the outlet of the external power source.
Make sure to hold the body of the plug and insert it firmly into the outlet. Check that the power indicator of the CCID (Charging Circuit Inter- rupting Device) is illuminated. In order to lessen the load on the outlet and plug, hang the CCID (Charging Circuit Interrupting Device) on a hook etc. while the plug is inserted.
PLUG-IN QG_U (OM47747U)
STEP 3
1. Charging operation
Press the test button on the CCID (Charging Circuit Interrupt- ing Device) to check that the electrical leakage detection func- tion operates properly.
If the error warning indicator illu- minates when the test button is pressed, the function is operating correctly. After the test has been com- pleted, press the reset button to turn off the error warning indica- tor. Charging cannot be carried out while the error warning indica- tor is illuminated. If the error warning indicator does not come on even if the test but- ton is pressed, it is likely that the function is not operating correctly. Stop charging immediately and contact your Toyota dealer.
PLUG-IN QG_U (OM47747U)
Press the charging port lid to open.
The charging inlet light will illumi- nate.
Remove the charging connector cap.
Affix the cap to the cable.
Insert the charging cable into the charging inlet.
When inserting, make sure not to press the latch release button. Align with the guide position shown on the underside of the charging connector, and push in until a click is heard.
1. Charging operation
STEP 4
STEP 5
STEP 6
PLUG-IN QG_U (OM47747U)
STEP 7
1. Charging operation
Confirm that the charging indica- tor is illuminated. (When the charging timer function is in use, the light will turn off several sec- onds after illuminating.)
Charging cannot be started if the charging indicator does not illumi- nate when the charging cable is inserted. The amount of time until charging is completed can be checked on the energy monitor by turning the “POWER” switch to ON mode. The charging indicator will turn off when charging is completed.
PLUG-IN QG_U (OM47747U)
1. Charging operation
■ After charging STEP 1
Pull the charging connector towards you while pressing the latch release button.
If the charging connector is dis- connected during charging (while the charging is on), charging will be interrupted.
indicator
STEP 2
STEP 3
STEP 4
Attach the charging connector cap. Close the charging port lid. Remove the plug from the outlet when the charging equip- ment will not be used for a prolonged period of time. Hold the body of the plug when removing. Make sure to put the cable away immediately after disconnecting. When leaving the plug inserted, inspect the plug and connector once a month to check if dirt or dust has accumulated.
PLUG-IN QG_U (OM47747U)
1. Charging operation
■ Charging timer function By using the charging timer function, deterioration of the hybrid bat- tery (traction battery) charge can be suppressed, and off-peak elec- tricity can be used effectively. ● A charging time can be assigned by setting the charging start time
or finish time.
● Once the time has been set, the time can be assigned again next
time simply by pressing the charging timer switch.
■ Setting the charging timer function STEP 1
Stop the vehicle and press the charging timer switch.
The multi-information display will switch to timer charging time dis- play. If not changing the set time: go to STEP 6
STEP 2
Press and hold the charging timer switch.
The time display will change from solid to flashing.
PLUG-IN QG_U (OM47747U)
Press the charging timer switch to select a setting mode. Start time setting mode Finish time setting mode The mode will switch with each press of timer switch.
the charging
Adjust the set time using the time adjustment button.
Adjust hours. Adjust minutes. Round to the nearest hour.* *: e.g. 1:00 to 1:29 → 1:00
1:30 to 1:59 → 2:00Press and hold the charging timer switch.
Once set, the time display will change from flashing to solid, and the charging timer indicator on the instrument cluster will come on.
1. Charging operation
STEP 3
STEP 4
STEP 5
10
PLUG-IN QG_U (OM47747U)
1. Charging operation
STEP 6
STEP 7
Turn the “POWER” switch off. The charging timer indicator will start flashing. Connect the charging cable to the vehicle. Check that the charging indicator (→P. 2) has come on. It will turn off after several seconds. If the indicator does not come on, re-insert the charging connector. If it still does not come on, check the power supply status using the power indicator on the CCID (Charging Circuit Interrupting Device).
■ Canceling the charging timer function
If the charging timer switch is pressed while the charging timer indicator is illuminated or flash- ing, the charging timer function will be canceled. Charging will commence immediately if the charging cable is connected to the vehicle.
The charging timer indicator will turn off if the charging timer func- tion is canceled.
11
PLUG-IN QG_U (OM47747U)
1. Charging operation
■ Displays shown on the multi-information display Each type of information related to recharging is displayed on the multi-information display.
Time until charging is complete
If the “POWER” switch is turned to ON mode during charging, the current charging status and the amount of time needed until charging is complete will be dis- played on the energy monitor.
After confirming, switch the “POWER” switch to OFF and turn off the display. The “POWER” switch will turn off automatically after several tens of seconds.
Charging messages
first
time
The the “POWER” switch is turned to ON mode after charging is completed, a message detailing the results of the charging will be displayed. Also, if an operation which can- not be carried out is attempted during charging, a warning mes- sage will be displayed.
Comply with the instructions in the message and carry out any necessary operations. The message may not be dis- played if the Remote Air Condi- tioning System has been used.
12
PLUG-IN QG_U (OM47747U)
1. Charging operation
■ Inspecting the electrical leakage detection function For safety, inspect the charging cable on a routine basis (at least once a month). Check that the electrical leakage detection function operates properly by following the procedure below. In the unlikely event that the electrical leakage detection function does not operate properly, contact your Toyota dealer as soon as possible. STEP 1
Insert the charging cable into the outlet of the external power source.
STEP 2
Press the test button on the CCID (Charging Circuit Interrupt- ing Device).
If the error warning indicator illu- minates when the test button is pressed, the function is operating correctly.
STEP 3
Press the reset button on the CCID (Charging Circuit Inter- rupting Device). Turn off the error warning indicator. Charging cannot be carried out while the error warning indicator is illuminated. Charging can be continued by following the normal procedure. If not charging, put away the charging cable.
13
PLUG-IN QG_U (OM47747U)
1. Charging operation
■Safety functions
●The hybrid system will not start while the charging cable is attached to
the vehicle, even if the “POWER” switch is operated.
●If the charging cable is connected while the “READY” indicator is illumi- nated, the hybrid system will stop automatically and driving will not be possible.
●When the charging cable is connected to the vehicle, the shift position
cannot be changed from P to another position.
●If the latch release button is pressed, charging will not begin even if the
charging cable is connected. Also, charging will be stopped if the latch release button is pressed and held for several seconds during charging. When restarting charging, rein- sert the charging connector after pulling it out, and check that the charg- ing indicator illuminates.
14
PLUG-IN QG_U (OM47747U)
1. Charging operation
CAUTION
■When charging
Follow these points when charging. If you do not follow them, fire or electri- cal shock may occur, possibly resulting in death or serious injury. ●Connect to a power source suitable for charging. ●Check that the outlet, charging cable and charging inlet are not damaged. ●Check that the tips of the plug have not been deformed. ●If the plug is dirty or dusty, clean it before inserting. ●Plugging into the outlet that is located in a spot that is not high above the
ground or floor is recommended.
●Insert the plug firmly into the outlet. ●Do not touch the electrical terminals of the charging connector or short it
with foreign objects.
●Do not get water in the charging inlet.
Do not wash the vehicle while the charging cable is connected to the vehi- cle.
●Do not touch metal objects or pointed objects (needles etc.) to the port of
the charging inlet.
●Do not charge if the charging cable is coiled or bundled. ●Wrapping 120 V charging cable while in-use is not recommended because cable may overheat. Failure to rewrap charging cable when not in-use could result in strangulation or tripping hazard.
●After connecting the charging cable, confirm that it is not bent. ●Do not place heavy objects on the charging cable. ●If charging is interrupted, remove the charging connector before removing
the plug.
15
PLUG-IN QG_U (OM47747U)
1. Charging operation
CAUTION
■When charging
●When charging outdoors, make sure to connect to a weatherproof outlet
for outdoor use. Also, if rain falls during charging, take care that rainwater does not run along the length of cable and enter the outlet.
●Do not insert the plug if the outlet is submerged in water or snow.
If the plug has already been inserted and it is necessary to remove it, first switch the circuit breaker OFF, then remove the plug.
●Follow these points when charging while it is raining or snowing.
• Check that no snow, water or ice has accumulated around the charging connector terminals and the vehicle charging inlet. Tap snow, water or ice gently from connector prior to inserting charging connector into the vehicle’s charging inlet.
• Do not connect the plug if your hands are wet. Also, do not get the plug
or outlet wet.
●Do not charge the vehicle during a lightning storm.
■After charging
Remove the plug if it will not be used for a long time. Dirt and dust may accumulate plug or outlet, which could cause a malfunction or fire, possibly leading to death or serious injury.
16
PLUG-IN QG_U (OM47747U)
1. Charging operation
CAUTION
■Power sources precautions
Observe the following precautions. If you do not follow them, fire, electrical shock or damage may occur, possi- bly resulting in death or serious injury. ●Connect to an AC 120 V outlet (NEMA 5-15R) with a Ground-Fault Circuit- Interrupter (GFCI) supplied by a circuit breaker per your local code. Use of a 15A individual circuit is strongly recommended.
●Do not connect the charging cable to a multi-outlet adapter, multi-plugs, or con- version plug.
ITO12P109
●Connecting the charging cable to an extension cord is strictly prohibited. The extension cord may overheat and does not contain a Ground-Fault Circuit- Interrupter (GFCI).
ITO12P110
●Do not connect to a power strip.
●Use of a block heater for charging is prohibited.
17
PLUG-IN QG_U (OM47747U)
1. Charging operation
CAUTION
■Battery charger
Observe the following precautions. The battery charger is located under the luggage compartment. Failure to do so may cause death or serious injury from burns or electric shocks. ●Do not touch the battery charger during charging, as it becomes hot. ●Do not disassemble, repair or modify the battery charger.
If repair is necessary, consult your Toyota dealer.
■Routine inspection
Check the following points regularly. If use is continued without inspection, fire or electric shock may occur, possibly resulting in death or serious injury. ●The charging cable, plug, charging connector, CCID (Charging Circuit
Interrupting Device) etc. have not been damaged
●The outlet has not been damaged ●The plug does not get extremely hot during use ●The tip of the plug has not been deformed ●The plug is not dirtied by dust etc. Inspect the plug after removing it from the outlet.
■Maintaining the charging cable
When the cable is dirty, first remove the dirt with a hard, wringed cloth, and then wipe the cable with a dry cloth. Do not wash with water, as doing so could cause a fire or electrical shock when charging, which could lead to death or serious injury.
■When not using the charging cable for a long time
Remove the plug from the outlet. Dust could accumulate on the plug or in the outlet, possibly causing overheating which could lead to a fire. Also, keep the cable in a place free from moisture.
18
PLUG-IN QG_U (OM47747U)
2. Plug-in Hybrid Applications
Plug-in Hybrid Applications is a service for plug-in hybrid vehicles. These are added to the Safety Connect and Entune products. The contents provide charge support, comfort support and drive sup- port via the vehicle’s navigation system and the owner’s Smartphone. Both of the following accounts are required for the services. ● Active Safety Connect account ● Active Toyota Entune account
Plug-in Hybrid Applications operation
The following functions can be used with the navigation system. ● Download of nearby charging stations to the map screen (Type A) ● View list of nearby charging stations and corresponding charging
station information (such as voltage supported) (Type B)
The function of Type B is a function added to Entune. For details about the function, refer to http://www.toyota.com/entune/.
19
PLUG-IN QG_U (OM47747U)
3. Basic operation
How to operate the Remote Air Conditioning System
■ Activating the Remote Air Conditioning System
Press and hold the to operate the Remote Air Condi- tioning System.
The system will shut off if a door is opened. The system can be stopped by
pressing the
twice.
■Operating conditions
The system will only operate if all of the following conditions are met: ●The shift position is in P. ●The “POWER” switch is OFF. ●All doors are closed. ●The hood is closed. ●The brake pedal is not being depressed.
20
PLUG-IN QG_U (OM47747U)
3. Basic operation
How to operate unlocking and locking the doors
■ Front door handles (including front passenger door handle if
equipped with entry function)
Grip the driver’s door handle to unlock the door. Grip the passen- ger’s door handle to unlock all the doors.*
Make sure to touch the sensor on the back of the handle. The doors cannot be unlocked for 3 seconds after the doors are locked.
*: The door unlock settings can be “Owner’s
(Refer
to
changed. Manual”.) the
lock sensor
Touch (the indentation on the upper part of the door handle) to lock the doors.
21
PLUG-IN QG_U (OM47747U)
3. Basic operation
■ Back door (vehicles with entry function of front and back
doors)
the unlock button
Press unlock all the doors.
to
The doors cannot be unlocked for 3 seconds after the doors are locked.
Press the lock button to lock all the doors.
22
PLUG-IN QG_U (OM47747U)
3. Basic operation
How to operate the power (ignition) switch
■ Starting the hybrid system STEP 1
Check that the charging cable is disconnected. Check that the parking brake is set. Firmly depress the brake pedal. Check that the “POWER” switch indicator turns green. If the indica- tor does not turn green, the hybrid system cannot be started. When the shift position is N, the hybrid system cannot start. Shift the shift position to P when starting the hybrid system.
STEP 2
STEP 3
STEP 4
Press the “POWER” switch.
The hybrid system can be started from any “POWER” switch mode. Continue depressing the brake pedal until the hybrid system is completely started.
STEP 5
Check that the “READY” indicator is on. If the “READY” indicator changes from a flashing light to a solid light and the buzzer sounds, the hybrid system is starting normally. The vehicle will not move when the “READY” indicator is off. The vehicle can move when the “READY” indicator is on even if the engine is stopped. (The gasoline engine starts or stops automatically in accordance with the state of the vehicle.)
23
PLUG-IN QG_U (OM47747U)
3. Basic operation
■ Stopping the hybrid system STEP 1
Stop the vehicle completely. Set the parking brake.
STEP 2
STEP 3
Shift the shift position to P.
Check that the shift position indi- cator shows P.
STEP 4
STEP 5
Press the “POWER” switch. The hybrid system will stop. Slowly release the brake pedal and check that the indicator on the “POWER” switch is off.
24
PLUG-IN QG_U (OM47747U)
3. Basic operation
■ Changing “POWER” switch modes Modes can be changed by pressing the “POWER” switch with the brake pedal released. (The mode changes each time the switch is pressed.)
Off The emergency flashers can be used. ACCESSORY mode Some electrical components such as the audio system can be used. The “POWER” switch indicator turns amber. ON mode All electrical components can be used. The “POWER” switch indicator turns amber.
25
PLUG-IN QG_U (OM47747U)
3. Basic operation
Shift lever operation
■ Starting procedure STEP 1
the “READY”
When indicator comes on, shift the shift position to D or R and release it with the brake pedal depressed. The D or R position is selected and the lever returns to its home position. Confirm which is selected with the shift position indicator in the instrument clus- ter.
position
STEP 2
Release the parking brake and your foot from the brake pedal gradually, and the vehicle by depressing the accel- erator pedal gently.
then start
26
PLUG-IN QG_U (OM47747U)
3. Basic operation
■ Stopping procedure STEP 1
Stop the vehicle completely by depressing the brake pedal and then apply the parking brake.
STEP 2
the shift position
Shift to P. Check that the shift position indi- cator on the instrument cluster is in P, and release the brake pedal gently after applying the parking brake.
27
PLUG-IN QG_U (OM47747U)
3. Basic operation
■About engine braking
When shift position B is selected, releasing the accelerator pedal will apply engine braking. ●When the vehicle is driven at high speeds, compared to ordinary gaso- line-fueled vehicles, the engine braking deceleration is felt less than that of other vehicles.
●The vehicle can be accelerated even when shift position B is selected. If the vehicle is driven continuously in the B position, fuel efficiency will become low. Usually, shift the shift position to D.
NOTICE
■Hybrid battery (traction battery) charge
If the shift position is in N, the hybrid battery (traction battery) will not be charged. To help prevent the battery from discharging, avoid leaving the N position selected for an extended period of time.
28
PLUG-IN QG_U (OM47747U)
3. Basic operation
How to operate the wipers and washers
■ Windshield wipers and washer Type A
Intermittent wiper operation Low speed wiper operation High speed wiper operation Temporary operation
intermittent
the
Increases windshield wiper frequency Decreases windshield wiper frequency
the
intermittent
Washer/wiper dual operation Wipers operate automatically.
29
PLUG-IN QG_U (OM47747U)
3. Basic operation
Type B
Intermittent wiper operation Low speed wiper operation High speed wiper operation Temporary operation
intermittent
the
Increases windshield wiper frequency Decreases windshield wiper frequency
the
intermittent
Washer/wiper dual operation Wipers operate automatically.
30
PLUG-IN QG_U (OM47747U)
■ Rear window wiper and washer Type A
Type B
3. Basic operation
Intermittent window wiper operation Normal window wiper opera- tion Washer/wiper dual operation Washer/wiper dual operation
Intermittent window wiper operation Normal window wiper opera- tion Washer/wiper dual operation Washer/wiper dual operation
31
PLUG-IN QG_U (OM47747U)
3. Basic operation
Cruise control operation
■ Set the vehicle speed
■ Adjusting the set speed
Press the “ON-OFF” button to activate the cruise control. Press the button again to deacti- vate the cruise control. Accelerate or decelerate the vehicle to the desired speed, and push the lever down to set the speed.
Increases the speed Decreases the speed Fine adjustment: Momentarily move the lever in the desired direction. Large adjustment: Hold the lever in the desired direction.
ITO24P105
The set speed will be increased or decreased as follows: Fine adjustment: By approximately 1 mph (1.6 km/h) each time the lever is operated. Large adjustment: The set speed can be increased or decreased continually until the lever is released.
32
PLUG-IN QG_U (OM47747U)
3. Basic operation
■ Canceling and resuming the constant speed control
Pulling the lever toward you cancels the constant speed control. The speed setting is also can- celed when the brakes are applied. Pushing the lever up resumes the constant speed control. Resuming is available when the vehicle speed than approximately 25 mph (40 km/h).
is more
ITO24P106
■Cruise control can be set when
●The shift position is in D. ●Vehicle speed is above approximately 25 mph (40 km/h).
33
PLUG-IN QG_U (OM47747U)
4. Things you must know
■Regenerative braking
In the following situations, kinetic energy is converted to electric energy and deceleration force can be obtained in conjunction with the recharging of the hybrid battery (traction battery). ●The accelerator pedal is released while driving with the shift position in D
or B.
●The brake pedal is depressed while driving with the shift position in D or
B.
■Gasoline engine operation in EV mode
Even if there is a sufficient amount of electricity remaining in the hybrid bat- tery (traction battery) and EV driving range is being displayed, the gasoline engine may operate automatically in the following circumstances (EV driving will be returned to automatically after EV driving becomes possible again): ●When the heater etc. is in use. ●When the temperature of the hybrid system is high.
The vehicle has been left in the sun, driven on a hill, driven at high speeds, etc.
●When the temperature of the hybrid system is low.
The vehicle has been left in temperatures lower than about 32 °F (0 °C) for a long period of time etc.
●When power is needed temporarily, for example when accelerating sud-
denly.
●When vehicle speed is more than approximately 62 mph (100 km/h). ●When the accelerator pedal is depressed firmly or the vehicle is on a hill
etc.
●When the outside temperature is low (less than 14 °F [-10 °C]) The gasoline engine may also operate in circumstances other than those listed above, depending on conditions.
34
PLUG-IN QG_U (OM47747U)
4. Things you must know
■When continually using EV mode only
After driving for approximately 124 miles (200 km) with the gasoline engine off, the gasoline engine may start for a short amount of time in order to pro- tect the system.
■Conditions in which the gasoline engine may not stop
The gasoline engine starts and stops automatically. However, it may not stop automatically in the following conditions*: ●During gasoline engine warm-up ●When the temperature of the hybrid battery (traction battery) is high or
low
●During hybrid battery (traction battery) charging ●When the heater is switched on *: Depending on the circumstances, the gasoline engine may also not stop
automatically in situations other than those above.
CAUTION
■While driving
Because there is no engine noise when the vehicle is being driven using the electric motor, pedestrians in the vicinity may not notice the vehicle. Even though the vehicle is equipped with the vehicle proximity notification system, drive with care as pedestrians in the vicinity may still not notice the vehicle if the surrounding area is noisy.
35
PLUG-IN QG_U (OM47747U)
4. Things you must know
NOTICE
■Hybrid battery (traction battery) air vents
There are air intake vents on the side of the rear right seatback and on the front corner of the left rear seat cushion for the purpose of cooling the hybrid battery (traction battery). If the vents become blocked, the hybrid battery (traction bat- tery) may overheat, leading to a reduction in hybrid battery (traction battery) output.
●Do not put foreign objects near the air vents. The hybrid battery (traction battery) may overheat, leading to a reduction in hybrid battery (traction battery) output or a malfunction.
●Clean the air vents regularly to prevent the hybrid battery (traction battery)
from overheating.
●Do not wet or allow foreign substances to enter the air vents as this may
cause a short circuit and damage the hybrid battery (traction battery).
●Do not carry large amounts of water such as water cooler bottles in the vehicle. If water spills onto the hybrid battery (traction battery), the battery may be damaged. Have the vehicle inspected by your Toyota dealer.
●If the rear seat belt becomes separated from the guide, it could obstruct the hybrid battery (traction battery) air vent. Set the rear seat belt into the guide to use.
36
PLUG-IN QG_U (OM47747U)
Abbreviation list Abbreviation/Acronym list
ABBREVIATIONS A/C ABS ALR APGS CCID CRS DISP ECO ECU EDR ELR EPS EV GAWR GFCI GPS GVWR HV I/M LATCH
MEANING
Air Conditioning Anti-lock Brake System Automatic Locking Retractor Advanced Parking Guidance System Charging Circuit Interrupting Device Child Restraint System Display Economy/Ecology Electronic Control Unit Event Data Recorder Emergency Locking Retractor Electric Power Steering Electric Vehicle Gross Axle Weight Ratings Ground-Fault Circuit-Interrupter Global Positioning System Gross Vehicle Weight Rating Hybrid Vehicle Emission Inspection and Maintenance Lower Anchors and Tethers for Children
666
PRIUS PHV_OM_OM47818U_(U)
Abbreviation list
ABBREVIATIONS LED MMT M + S MTBE OBD PCS PHV PWR SRS TIN TPMS TRAC TWI VIN VSC
MEANING
Light Emitting Diode Methylcyclopentadienyl Manganese Tricarbonyl Mud and Snow Methyl Tertiary Butyl Ether On Board Diagnostics Pre-Collision System Plug-in Hybrid Vehicle Power Supplemental Restraint System Tire Identification Number Tire Pressure Monitoring (Warning) System Traction Control Treadwear Indicator Vehicle Identification Number Vehicle Stability Control
667
PRIUS PHV_OM_OM47818U_(U)
For your information
Main Owner’s Manual
Please note that this manual applies to all models and explains all equip- ment, including options. Therefore, you may find some explanations for equipment not installed on your vehicle. All specifications provided in this manual are current at the time of printing. However, because of the Toyota policy of continual product improvement, we reserve the right to make changes at any time without notice. Depending on specifications, the vehicle shown in the illustrations may differ from your vehicle in terms of color and equipment.
Noise from under vehicle after turning off the hybrid system
Approximately five hours after the hybrid system is turned off, you may hear sound coming from under the vehicle for several minutes. This is the sound of a fuel evaporation leakage check and, it does not indicate a malfunction.
Accessories, spare parts and modification of your Toyota
A wide variety of non-genuine spare parts and accessories for Toyota vehi- cles are currently available in the market. You should know that Toyota does not warrant these products and is not responsible for their performance, repair, or replacement, or for any damage they may cause to, or adverse effect they may have on, your Toyota vehicle. This vehicle should not be modified with non-genuine Toyota products. Mod- ification with non-genuine Toyota products could affect its performance, safety or durability, and may even violate governmental regulations. In addi- tion, damage or performance problems resulting from the modification may not be covered under warranty.
22
PRIUS PHV_OM_OM47818U_(U)
Installation of a mobile two-way radio system
The installation of a mobile two-way radio system in your vehicle could affect electronic systems such as: ● Multiport fuel injection system/sequential multiport fuel injection system ● Cruise control system ● Anti-lock brake system ● SRS airbag system ● Seat belt pretensioner system Be sure to check with your Toyota dealer for precautionary measures or spe- cial instructions regarding installation. High voltage parts and cables on the hybrid vehicles emit approximately the same amount of electromagnetic waves as the conventional gasoline pow- ered vehicles or home electronic appliances despite of their electromagnetic shielding. Unwanted noise may occur in the reception of the mobile two-way radio.
23
PRIUS PHV_OM_OM47818U_(U)
Vehicle data recordings
Your Toyota is equipped with several sophisticated computers that will record certain data, such as: • Engine speed • Electric motor speed (traction motor speed) • Accelerator status • Brake status • Vehicle speed • Shift position • Hybrid battery (traction battery) status The recorded data varies according to the vehicle grade level and options with which it is equipped. Furthermore, these computers do not record con- versations, sounds or pictures. ● Data usage Toyota may use the data recorded in these computers to diagnose malfunc- tions, conduct research and development, and improve quality. Toyota will not disclose the recorded data to a third party except: • With the consent of the vehicle owner or with the consent of the lessee if
the vehicle is leased In response to an official request by the police, a court of law or a govern- ment agency
• For use by Toyota in a lawsuit • For research purposes where the data is not tied to a specific vehicle or
•
vehicle owner
● Usage of data collected through Safety Connect (U.S. mainland only) If your Toyota has Safety Connect and if you have subscribed to those ser- vices, please refer to the Safety Connect Telematics Subscription Service Agreement for information on data collected and its usage.
24
PRIUS PHV_OM_OM47818U_(U)
Event data recorder
This vehicle is equipped with an event data recorder (EDR). The main pur- pose of an EDR is to record, in certain crash or near crash-like situations, such as an air bag deployment or hitting a road obstacle, data that will assist in understanding how a vehicle’s systems performed. The EDR is designed to record data related to vehicle dynamics and safety systems for a short period of time, typically 30 seconds or less. The EDR in this vehicle is designed to record such data as: • How various systems in your vehicle were operating; • Whether or not the driver and passenger safety belts were buckled/fas-
• How far (if at all) the driver was depressing the accelerator and/or brake
tened;
pedal; and,
• How fast the vehicle was traveling. These data can help provide a better understanding of the circumstances in which crashes and injuries occur. NOTE: EDR data are recorded by your vehicle only if a nontrivial crash situa- tion occurs; no data are recorded by the EDR under normal driving condi- tions and no personal data (e.g., name, gender, age, and crash location) are recorded. However, other parties, such as law enforcement, could combine the EDR data with the type of personally identifying data routinely acquired during a crash investigation. To read data recorded by an EDR, special equipment is required, and access to the vehicle or the EDR is needed. In addition to the vehicle manufacturer, other parties, such as law enforcement, that have the special equipment, can read the information if they have access to the vehicle or the EDR.
25
PRIUS PHV_OM_OM47818U_(U)
● Disclosure of the EDR data Toyota will not disclose the data recorded in an EDR to a third party except when: • An agreement from the vehicle’s owner (or the lessee for a leased vehicle)
is obtained In response to an official request by the police, a court of law or a govern- ment agency
• For use by Toyota in a lawsuit However, if necessary, Toyota may: • Use the data for research on vehicle safety performance • Disclose the data to a third party for research purposes without disclosing
•
information about the specific vehicle or vehicle owner
Scrapping of your Toyota
The SRS airbag and seat belt pretensioner devices in your Toyota contain explosive chemicals. If the vehicle is scrapped with the airbags and seat belt pretensioners left as they are, this may cause an accident such as fire. Be sure to have the systems of the SRS airbag and seat belt pretensioner removed and disposed of by a qualified service shop or by your Toyota dealer before you scrap your vehicle.
Perchlorate Material
Special handling may apply, See www.dtsc.ca.gov/hazardouswaste/perchlorate. Your vehicle has components that may contain perchlorate. These compo- nents may include airbag, seat belt pretensioners, and wireless remote con- trol batteries.
26
PRIUS PHV_OM_OM47818U_(U)
CAUTION
■General precautions while driving
Driving under the influence: Never drive your vehicle when under the influ- ence of alcohol or drugs that have impaired your ability to operate your vehi- cle. Alcohol and certain drugs delay reaction time, impair judgment and reduce coordination, which could lead to an accident that could result in death or serious injury. Defensive driving: Always drive defensively. Anticipate mistakes that other drivers or pedestrians might make and be ready to avoid accidents. Driver distraction: Always give your full attention to driving. Anything that dis- tracts the driver, such as adjusting controls, talking on a cellular phone or reading can result in a collision with resulting death or serious injury to you, your occupants or others.
■General precaution regarding children’s safety
Never leave children unattended in the vehicle, and never allow children to have or use the key. Children may be able to start the vehicle or shift the vehicle into neutral. There is also a danger that children may injure themselves by playing with the windows or other features of the vehicle. In addition, heat build-up or extremely cold temperatures inside the vehicle can be fatal to children.
27
PRIUS PHV_OM_OM47818U_(U)
CAUTION
■Hybrid battery (traction battery)
Never resell, hand over or modify the hybrid battery (traction battery). To pre- vent accidents, hybrid batteries (traction batteries) that have been removed from a disposed vehicle are collected through Toyota dealers. Do not dis- pose of the battery yourself. Unless the battery is properly collected, the following may occur, resulting in death or serious injury: • The hybrid battery (traction battery) may be illegally disposed of or dumped, and someone may touch a high voltage part, resulting in an electric shock.
• The hybrid battery (traction battery) is intended to be used exclusively with your hybrid vehicle. If the hybrid battery (traction battery) is used outside of your vehicle or modified in any way, accidents such as electric shock, heat generation, smoke generation, an explosion and electrolyte leakage may occur.
When reselling or handing over your vehicle, the possibility of an accident is extremely high because the person receiving the vehicle may not be aware of these dangers.
■Disposal of the hybrid battery (traction battery)
If your vehicle is disposed of without the hybrid battery (traction battery) hav- ing been removed, there is a danger of serious electric shock if high voltage parts, cables and their connectors are touched. In the event that your vehicle must be disposed of, the hybrid battery (traction battery) must be disposed of by your Toyota dealer or a qualified service shop. If the hybrid battery (traction battery) is not disposed of properly, it may cause electric shock that can result in death or serious injury.
28
PRIUS PHV_OM_OM47818U_(U)
Symbols used throughout this manual
Cautions & Notices
CAUTION
This is a warning against something which, if ignored, may cause death or serious injury to people. You are informed about what you must or must not do in order to reduce the risk of death or serious injury to yourself and others.
NOTICE
This is a warning against something which, if ignored, may cause damage to the vehicle or its equipment. You are informed about what you must or must not do in order to avoid or reduce the risk of damage to your Toyota and its equipment.
Symbols used in illustrations
Safety symbol
The symbol of a circle with a slash through it means “Do not”, “Do not do this”, or “Do not let this happen”.
Arrows indicating operations
Indicates the action (pushing, turn- ing, etc.) used to operate switches and other devices. Indicates the outcome of an opera- tion (e.g. a lid opens).
ITOPP105
29
PRIUS PHV_OM_OM47818U_(U)
TABLE OF CONTENTS
1 Before driving
Information on the plug-in hybrid system and adjusting and operating features such as door locks, mirrors, and steering column
2 When driving
Driving, stopping and safe-driving information
3 Interior features
Air conditioning and audio systems, as well as other in- terior features for a comfortable driving experience
4 Maintenance
and care
Cleaning and protecting your vehicle, performing do-it- yourself maintenance, and maintenance information
5 When trouble
arises
What to do if the vehicle needs to be towed, gets a flat tire, or is involved in an accident
6 Vehicle
specifications
Detailed vehicle information
7 For owners
Reporting safety defects for U.S. owners, and seat belt and SRS airbag instructions for Canadian owners
Index
Alphabetical listing of information contained in this manual
PRIUS PHV_OM_OM47818U_(U)
Pictorial index
Exterior
Windshield wipers P. 300
Hood P. 442
Outside rear view mirrors P. 169
Fuel filler door P. 174
Front turn signal lights P. 254
Daytime running lights (for the U.S.A.) P. 295
Daytime running lights (for Canada) and headlights Parking lights Front side marker lights
P. 292, 295
P. 292
P. 292Fog lights∗ P. 298
PRIUS PHV_OM_OM47818U_(U)
Back door P. 140
Rear window wiper∗ P. 304
Rear window defoggers P. 375
Charging port P. 73Camera*
License plate lights P. 292
Rear turn signal lights P. 254
Side doors P. 134
Tires ●Rotation ●Replacement ●Inflation pressure ●Information Rear side marker lights P. 292
Tail lights P. 292P. 476
P. 448
P. 619
P. 625∗: If equipped *: Refer to “Display Audio System Owner’s Manual”
or “Navigation System Owner’s Manual”.
PRIUS PHV_OM_OM47818U_(U)
Pictorial index
Interior
Head restraints P. 152
Seat belts P. 156
Cup holders∗ P. 388
Armrest∗ P. 399
SRS front passenger airbag P. 184
Glove boxes P. 386
Rear seats P. 149
SRS side airbags P. 184
Front seats P. 146
Floor mat P. 401
10
PRIUS PHV_OM_OM47818U_(U)
A
Sun visors P. 392
Front interior/personal lights P. 383
Microphone* P. 415Assist grips P. 400
Rear interior light P. 384
SRS curtain shield airbags P. 184
“SOS” button∗ Auxiliary box
P. 415
P. 391Vanity mirrors P. 393
Anti-glare inside rear view mirror Garage door opener switches∗
P. 166
P. 407∗: If equipped *: Refer to “Display Audio System Owner’s Manual”
or “Navigation System Owner’s Manual”.
11
PRIUS PHV_OM_OM47818U_(U)
Pictorial index
Interior
Window lock switch P. 171
Door lock switch P. 134
Inside lock button P. 134
12
PRIUS PHV_OM_OM47818U_(U)
Power window switches P. 171
C
AUX port/USB port* P. 381
Console box P. 387
Power outlet P. 395
Cup holders P. 388
*: Refer to “Display Audio System Owner’s Manual”
or “Navigation System Owner’s Manual”.
13
PRIUS PHV_OM_OM47818U_(U)
Pictorial index
Interior
Seat heater switches P. 397
Auxiliary box P. 391
Power outlet P. 395
14
PRIUS PHV_OM_OM47818U_(U)
Pictorial index
Instrument panel
SRS driver airbag Horn
P. 184
P. 256Headlight switch
P. 292
Turn signal lever
P. 254
Fog light switch∗ P. 298Windshield wipers and washer switch P. 300
Rear window wiper and washer switch∗ P. 304Gauges and meters Multi-information display
P. 257
P. 266
Navigation system*1 Audio system*2 P. 376SRS knee airbag P. 184
Pre-collision braking off switch∗ P. 336
Tire pressure warning reset switch P. 478
Parking brake pedal P. 255
Tilt and telescopic steering control lever P. 165
∗: If equipped *1: Refer to “Navigation System Owner’s Manual”. *2: Refer to “Display Audio System Owner’s Manual”. 15
PRIUS PHV_OM_OM47818U_(U)
Pictorial index
Instrument panel
16
Outside rear view mirror switches P. 169
Headlight cleaner switch∗ P. 307
Fuel filler door opener P. 174
MPH or km/h button P. 259
Instrument panel light control dial P. 260
Hood lock release lever P. 442
PRIUS PHV_OM_OM47818U_(U)
B
“TRIP” button P. 267, 273
Climate remote control switches P. 369
“DISP” button P. 267
Audio remote control switches*1, 2
Cruise control switch∗
P. 308
Dynamic radar cruise control P. 312switch∗
Vehicle-to-vehicle distance button∗ P. 312
∗: If equipped *1: Refer to “Navigation System Owner’s Manual”. *2: Refer to “Display Audio System Owner’s Manual”. 17
Talk switch*1, 2
Telephone switches*1, 2PRIUS PHV_OM_OM47818U_(U)
Pictorial index
Instrument panel
Clock adjustment buttons P. 275
Charging timer switch P. 86
Head-up display switches∗ P. 285
Power (ignition) switch P. 238
18
PRIUS PHV_OM_OM47818U_(U)
D
Air conditioning system P. 358
Rear window and outside rear view mirror defoggers switch P. 375
Emergency flasher switch P. 524
EV/HV mode selection switch
P. 37
Eco drive mode switch Power mode switch
P. 247
P. 247
Shift lever P. 245
P position switch P. 248
∗: If equipped
19
PRIUS PHV_OM_OM47818U_(U)
Pictorial index
Luggage compartment
Luggage compartment light P. 141
Luggage cover P. 404
Auxiliary box P. 403
Auxiliary box P. 403
Cargo hooks P. 403
20
PRIUS PHV_OM_OM47818U_(U)
21
PRIUS PHV_OM_OM47818U_(U)
1-1. Plug-in hybrid system Plug-in hybrid system features
The plug-in hybrid system is a system that has the features of both electric vehicles and hybrid vehicles.
● Electricity received by charging from an external power source can be used, and the vehicle can also be driven as an electric vehicle by driving over certain distances* using only the electric motor (traction motor).
● If the amount of electricity remaining in the hybrid battery (traction battery) becomes low, the vehicle is automatically controlled in such a way that it can be driven as a hybrid vehi- cle through the joint use of the gasoline engine.
*: The driving range will vary in accordance with conditions such as vehi- cle speed, the amount of charge remaining in the hybrid battery (trac- tion battery) and the usage of the air conditioning system. The gasoline engine may also be used simultaneously in accordance with driving conditions.
Gasoline engine Electric motor (traction motor)
32
PRIUS PHV_OM_OM47818U_(U)
1
1-1. Plug-in hybrid system
■ When in EV mode
Driving using only the electric motor (traction motor) is possible (excluding certain situations, such as when accelerating sud- denly), but if the amount of charge remaining in the hybrid bat- tery (traction battery) becomes low, EV mode will be canceled. In order to prolong EV mode driving, observe the following: ● Check the EV driving range using the energy monitor or
Hybrid System Indicator.
● Avoid sudden acceleration and sudden deceleration, and be
sure to drive smoothly. If you repeatedly accelerate, the hybrid battery (traction bat- tery) charge will deplete quickly. Also, the gasoline engine will start, depending on acceleration or the vehicle speed.
● Restrain your speed as much as possible. The EV driving
range will reduce considerably at high speeds.
33
PRIUS PHV_OM_OM47818U_(U)
1-1. Plug-in hybrid system
■ When in HV mode
The vehicle can be used in the same way as a standard hybrid vehicle. In HV mode, controls are primarily carried out as follows in accordance with the driving conditions. ● The gasoline engine stops when the vehicle is stopped. ● During start off, the electric motor (traction motor) drives the
vehicle.
● During normal driving, the gasoline engine and electric motor (traction motor) are controlled effectively, and the vehicle is driven with optimum fuel efficiency. Also, when necessary, the electric motor (traction motor) operates as an electrical gener- ator to charge the hybrid battery (traction battery).
● When the accelerator pedal is depressed heavily, drive force from both the gasoline engine and the electric motor (traction motor) is used to accelerate.
■ When braking (regenerative braking)
The electric motor (traction motor) charges the hybrid battery (traction battery). The EV driving range can be extended by actively using this regenerative braking to store electricity in the hybrid battery (traction battery). Moreover, as fuel consumption is also reduced when in HV mode, the regenerative braking system can be used effectively.
34
PRIUS PHV_OM_OM47818U_(U)
1
1-1. Plug-in hybrid system
Plug-in hybrid system control
The plug-in hybrid system features both EV mode and HV mode, which are switched automatically. When a sufficient amount of elec- tricity is remaining in the hybrid battery (traction battery) the vehicle can be driven as an electric vehicle in EV mode; and when only a lit- tle electricity is remaining in the hybrid battery (traction battery), HV mode is automatically selected and the vehicle can be used in the same manner as a hybrid vehicle. The modes can also be switched using the EV/HV mode selection switch. (→P. 37) ■ EV mode
Using the electricity stored in the hybrid battery (traction battery), the vehicle can be driven using only the electric motor (traction motor). The gasoline engine may also be used temporarily at the same time the speed and load of the vehicle, and with heater usage.
in accordance with
35
PRIUS PHV_OM_OM47818U_(U)
1-1. Plug-in hybrid system
■ HV mode
If only a little electricity is remain- ing in the hybrid battery (traction battery) and the vehicle cannot be driven using the electric motor (traction motor) only, the electric motor (traction motor) and the gasoline engine will be used together. The Hybrid System Indicator can be used to check which mode the plug-in hybrid system is cur- rently being driven in.
The EV drive mode indicator ( is in EV mode, and will turn off if HV mode is switched to.
) will illuminate when your vehicle
36
PRIUS PHV_OM_OM47818U_(U)
1
1-1. Plug-in hybrid system
EV/HV mode selection switch
You can manually switch between EV mode and HV mode when you want to conserve battery power in preparation for EV driving in city areas. Switching to HV mode when driving on a highway or when driving uphill is recommended in order to conserve battery power.* (→P. 67) *: The EV driving range may reduce even after switching to HV mode.
Press the switch
EV mode and HV mode will be switched between with each press. If there is not enough charge remaining in the hybrid battery (traction battery) to allow EV driv- ing, EV mode will not be select- able.
37
PRIUS PHV_OM_OM47818U_(U)
1-1. Plug-in hybrid system
Charging (→P. 80)
In order to drive in EV mode, charge the hybrid battery (trac- tion battery) from an external power source before using your vehicle.
If there is not enough charge remaining in the hybrid battery (traction battery), the EV driving range will become shorter.
Vehicle proximity notification system
When driving with the gasoline engine stopped, a sound, which changes in accordance with the driving speed, will be played in order to warn people nearby of the vehicle’s approach. The sound will stop when the vehicle speed exceeds approximately 15 mph (25 km/h).
38
PRIUS PHV_OM_OM47818U_(U)
1
1-1. Plug-in hybrid system
■Regenerative braking
In the following situations, kinetic energy is converted to electric energy and deceleration force can be obtained in conjunction with the recharging of the hybrid battery (traction battery). ●The accelerator pedal is released while driving with the shift position in D
or B.
●The brake pedal is depressed while driving with the shift position in D or
B.
■EV driving range
●The EV driving range is displayed on the energy monitor and the Hybrid
System Indicator. (→P. 58, 268)
●The EV driving range changes in accordance with the charge status of
the hybrid battery (traction battery), the speed of the vehicle, etc.
■After EV mode has switched to HV mode due to low hybrid battery
(traction battery) charge If the hybrid battery (traction battery) is regenerated by driving continuously down a long slope, the EV driving range will be displayed on the multi-infor- mation display and EV mode will be automatically switched to. If EV mode is not switched to even though EV driving range is being dis- played, EV mode can be switched to by pressing the EV/HV mode selection switch.
39
PRIUS PHV_OM_OM47818U_(U)
1-1. Plug-in hybrid system
■Refilling fuel
Plug-in hybrid vehicles can be driven using electricity charged from an exter- nal power source, however the gasoline engine that is provided on board as an auxiliary power source and as a power source for driving in HV mode needs to be filled with fuel. Check the fuel amount and refill immediately when the fuel level becomes low. (→P. 174)
■Gasoline engine operation in EV mode
Even if there is a sufficient amount of electricity remaining in the hybrid bat- tery (traction battery) and EV driving range (→P. 58, 268) is being displayed, the gasoline engine may operate automatically in the following circum- stances (EV driving will be returned to automatically after EV driving becomes possible again): ●When the heater etc. is in use. ●When the temperature of the hybrid system is high.
The vehicle has been left in the sun, driven on a hill, driven at high speeds, etc.
●When the temperature of the hybrid system is low.
The vehicle has been left in temperatures lower than about 32 °F (0 °C) for a long period of time etc.
●When power is needed temporarily, for example when accelerating sud-
denly.
●When vehicle speed is more than approximately 62 mph (100 km/h). ●When the accelerator pedal is depressed firmly or the vehicle is on a hill
etc.
●When the outside temperature is low (less than 14 °F [-10 °C]) The gasoline engine may also operate in circumstances other than those listed above, depending on conditions.
40
PRIUS PHV_OM_OM47818U_(U)
1
1-1. Plug-in hybrid system
■When continually using EV mode only
After driving for approximately 124 miles (200 km) with the gasoline engine off, the gasoline engine may start for a short amount of time in order to pro- tect the system.
■Conditions in which the gasoline engine may not stop
The gasoline engine starts and stops automatically. However, it may not stop automatically in the following conditions*: ●During gasoline engine warm-up ●When the temperature of the hybrid battery (traction battery) is high or
low
●During hybrid battery (traction battery) charging ●When the heater is switched on *: Depending on the circumstances, the gasoline engine may also not stop
automatically in situations other than those above.
■If the vehicle is not used for a long time
The 12-volt battery may discharge. In this event, charge the 12-volt battery. (→P. 594) In order to prevent the hybrid battery (traction battery) from becoming extremely low in charge, start the hybrid system at least once every 2 or 3
months, and turn the “POWER” switch off after the gasoline engine has stopped automatically. (If the gasoline engine does not start up even after approximately 10 seconds have passed since the “READY” indicator came on, the “POWER” switch can be turned to OFF without any further action.)41
PRIUS PHV_OM_OM47818U_(U)
1-1. Plug-in hybrid system
■Sounds and vibrations specific to a hybrid vehicle
There may be no engine sounds or vibration even though the vehicle is able to move. For safety, apply the parking brake and make sure to shift the shift position to P when parked. The following sounds or vibrations may occur when the hybrid system is operating, and are not a malfunction. ●The brake system operation sound heard from the front of the vehicle
when the driver’s door is opened.
●Motor sounds may be heard from the engine compartment. ●Sounds may be heard from the hybrid battery (traction battery) behind
the rear seat when the hybrid system starts or stops.
●Sounds may be heard from the transmission when the gasoline engine
starts or stops, when driving at low speeds, or during idling.
●Engine sounds may be heard when accelerating sharply. ●Sounds may be heard due to regenerative braking when you press the
brake pedal or release the accelerator pedal.
●Vibration may be felt when the gasoline engine starts or stops. ●Cooling fan sounds may be heard from the air intake vent. (→P. 45) ●The operation sound of the air conditioning system (air conditioning com-
pressor, blower motor).
42
PRIUS PHV_OM_OM47818U_(U)
1
1-1. Plug-in hybrid system
■Vehicle proximity notification system
In the following cases, the vehicle proximity notification system may be diffi- cult for surrounding people to hear. ●In very noisy areas ●In the wind or the rain Also, as the vehicle proximity notification system is installed on the front of the vehicle, it may be more difficult to hear from the rear of the vehicle com- pared to the front.
■Maintenance, repair, recycling, and disposal
Contact your Toyota dealer regarding maintenance, repair, recycling and dis- posal. Do not dispose of the vehicle yourself.
43
PRIUS PHV_OM_OM47818U_(U)
1-1. Plug-in hybrid system Plug-in hybrid system precautions
Take care when handling the hybrid system, as it contains a high voltage system (about 650V at maximum) as well as parts that become extremely hot when the hybrid system is operating. Obey the caution labels attached to the vehicle.