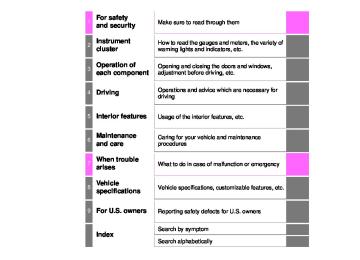
- Download PDF Manual
-
Check that the shift lever is in P. Turn the engine switch to IGNITION ON mode. Adjust the driver’s seat, steering wheel, and outside rear view mirrors to the desired positions. While pressing the “SET” button, or within 3 seconds after is pressed, press button “1”, “2” or the buzzer sounds. If the selected button has already been preset, the previ- ously recorded position will be overwritten.
the “SET” button
“3” until
LC200_OM_OM60M88U_(U)
3-3. Adjusting the seats
137
■ Recall procedure
Check that the shift lever is in P. Turn the engine switch to IGNITION ON mode. Press one of the buttons for the driving position you want to recall until the buzzer sounds.
■To stop the position recall operation part-way through
Perform any of the following: ●Press the “SET” button. ●Press button “1”, “2” or “3”. ●Operate any of the seat adjustment switches (only cancels seat position
recall).
●Operate the tilt and telescopic steering control switch (only cancels steering
wheel position recall).
■Seat position that can be memorized (P. 127)
The adjusted positions other than the position adjusted by lumber support switch can be recorded.
■Operating the driving position memory after turning the engine switch
off Recorded seat positions can be activated up to 180 seconds after the driver’s door is opened and another 60 seconds after it is closed again.
■In order to correctly use the driving position memory function
If a seat position is already in the furthest possible position and the seat is operated in the same direction, the recorded position may be slightly different when it is recalled.
LC200_OM_OM60M88U_(U)
138
3-3. Adjusting the seats
Memory recall function Each electronic key can be registered to recall your preferred driving position. ■ Registering procedure
Record your driving position to button “1”, “2” or “3” before perform- ing the following: Carry only the key you want to register, and then close the driver’s door. If 2 or more keys are in the vehicle, the driving position cannot be recorded properly.
Check that the shift lever is in P. Turn the engine switch to IGNITION ON mode. Recall the driving position that you want to record. While pressing the recalled button, press and hold the door lock switch (either lock or unlock) until the buzzer sounds. If the button could not be regis- tered, the buzzer sounds contin- uously for approximately 3
seconds.■ Recall procedure
Carry the electronic key that has been registered to the driving position, and then unlock and open the driver’s door using the smart key system or wireless remote control.
The driving position will move to the recorded position. If the driving position is in a position that has already been recorded, the seat and outside rear view mirrors will not move.
LC200_OM_OM60M88U_(U)
3
3-3. Adjusting the seats
139
■ Cancelation procedure
Carry only the key you want to cancel and then close the driver’s door. If 2 or more keys are in the vehicle, the driving position cannot be canceled properly.
Turn the engine switch to IGNITION ON mode. While pressing the “SET” button, press and hold the door lock switch (either lock or unlock) until the buzzer sounds twice. If the button could not be canceled, the buzzer sounds continuously for approximately 3 seconds.
■Recalling the driving position using the memory recall function
●Different driving positions can be registered for each electronic key. There- fore, the driving position that is recalled may be different depending on the key being carried.
●If a door other than the driver’s door is unlocked with the smart key system, the driving position cannot be recalled. In this case, press the driving posi- tion button which has been set.
■Customization
The unlock door settings of the memory recall function can be customized. (Customizable features: P. 574)
WARNING
■Seat adjustment caution
Take care during seat adjustment so that the seat does not strike the rear passenger or squeeze your body against the steering wheel.
LC200_OM_OM60M88U_(U)
140
3-3. Adjusting the seats
Head restraints
Head restraints are provided for all seats.
Front seats Vertical adjustment
Up Pull the head restraints up. Down Push the head restraint down while pushing the lock release button.
Angle adjustment (if equipped)
Lock release button
Second seats
Up Pull the head restraints up. Down Press and hold the lock release button when lowering the head restraint.
Lock release button
LC200_OM_OM60M88U_(U)
3-3. Adjusting the seats
141
Third outboard seats To fold the head restraints, pull the head restraint angle lever
■Adjusting the height of the head restraints
Make sure that the head restraints are adjusted so that the center of the head restraint is closest to the top of your ears.
■Removing the head restraints
Front seats
Push a flathead screwdriver into the slot. The slot is located on the right side of the right head restraint anchor.
While pressing in the flathead screwdriver, pull up the head restraint.
Second seats Pull the head restraint up while pressing the lock release button.
Lock release button
LC200_OM_OM60M88U_(U)
142
3-3. Adjusting the seats
Third center seat Pull the head restraint up while pressing the lock release button.
Lock release button
Third outboard seats
Push a flathead screwdriver into the slot. The slot is located on the left side of the left head restraint anchor.
While pressing in the flathead screwdriver, pull up the head restraint.
■Installing the head restraints
Align the head restraint with the installation holes. Push down the head restraint to the lock position.
■When not using the third center seat head restraint
Open the zipper on the back of the third seat and stow the head restraint inside.
WARNING
■Head restraint precautions
Observe the following precautions regarding the head restraints. Failure to do so may result in death or serious injury. ●Use the head restraints designed for each respective seat. ●Adjust the head restraints to the correct position at all times. ●After adjusting the head restraints, push down on them and make sure
they are locked in position.
●Do not drive with the head restraints removed.
LC200_OM_OM60M88U_(U)
3-4. Adjusting the steering wheel and mirrors
143
Steering wheel
Adjustment procedure
Up Down Toward the driver Away from the driver
Auto tilt away When the engine switch is off, the steering wheel its stowed position by moving up and away to enable easier driver entry and exit.
returns
to
Switching to ACCESSORY or IGNITION ON mode will return the steering wheel to the original posi- tion. Horn To sound the horn, press on or close to the
mark.
LC200_OM_OM60M88U_(U)
144
3-4. Adjusting the steering wheel and mirrors
■The steering wheel can be adjusted when The engine switch is in ACCESSORY or IGNITION ON mode*. *: If the driver’s seat belt is fastened, the steering wheel can be adjusted
regardless of engine switch mode.
■Automatic adjustment of the steering position
A desired steering position can be entered to memory and recalled automati- cally by the driving position memory system. (P. 136)
WARNING
Do not adjust the steering wheel while driving. Doing so may cause the driver to mishandle the vehicle and cause an acci- dent, resulting in death or serious injury.
LC200_OM_OM60M88U_(U)
3-4. Adjusting the steering wheel and mirrors
145
Inside rear view mirror
The rear view mirror’s position can be adjusted to enable suffi- cient confirmation of the rear view in accordance with the driver’s seating posture.
Adjusting the height of rear view mirror The height of the rear view mirror can be adjusted to suit your driving posture. Adjust the height of the rear view mirror by moving it up and down.
Anti-glare function Responding to the level of brightness of the headlights of vehicles behind, the reflected light is automatically reduced. Changing automatic anti-glare function mode ON/OFF When the automatic anti-glare function is in ON mode, the indica- tor illuminates. The function will be set to ON mode each time the engine switch is turned to IGNITION ON mode. Pressing the button turns the func- tion to OFF mode. (The indicator also turns off.)
Indicator
LC200_OM_OM60M88U_(U)
146
3-4. Adjusting the steering wheel and mirrors
■To prevent sensor error
To ensure that the sensors operate prop- erly, do not touch or cover them.
WARNING
Do not adjust the position of the mirror while driving. Doing so may lead to mishandling of the vehicle and cause an accident, resulting in death or serious injury.
LC200_OM_OM60M88U_(U)
3
3-4. Adjusting the steering wheel and mirrors
147
Outside rear view mirrors
Adjustment procedure
To select a mirror to adjust, press the switch.
Left Right
To adjust the mirror, press the switch.
Up Right Down Left
Folding and extending the mirrors Press the switch
Pressing again will extended the mirrors.
LC200_OM_OM60M88U_(U)
148
3-4. Adjusting the steering wheel and mirrors
Linked mirror function when reversing When the mirror select switch is in the L or R position, the outside rear view mirrors will automatically angle downwards when the vehicle is reversing in order to give a better view of the ground. To disable this function, move the mirror select switch to the neutral position (between L and R). ■ Adjusting the mirror angle when the vehicle is reversing
With the shift lever in R, adjust the mirror angle at a desired posi- tion. The adjusted angle will be memorized and the mirror will auto- matically tilt to the memorized angle whenever the shift lever is shifted to R from next time.
The memorized downward tilt position of the mirror is linked to the nor- mal position (angle adjusted with the shift lever in other than R). There- fore, if the normal position is changed after adjustment, the tilt position will also change. When the normal position is changed, readjust the angle in reversing.
■Mirror angle can be adjusted when
The engine switch is in ACCESSORY or IGNITION ON mode.
■When the mirrors are fogged up
The outside rear view mirrors can be cleared using the mirror defoggers. Turn on the rear window defogger to turn on the outside rear view mirror defog- gers. (P. 380)
■Auto anti-glare function
When the anti-glare inside rear view mirror is set to auto mode, the outside rear view mirrors will activate in conjunction with the anti-glare inside rear view mirror to reduce reflected light. (P. 145) ■Automatic adjustment of the mirror angle
A desired mirror face angle can be entered to memory and adjusted with the touch of a button. (P. 138)
LC200_OM_OM60M88U_(U)
3
3-4. Adjusting the steering wheel and mirrors
149
WARNING
■Important points while driving
Observe the following precautions while driving. Failing to do so may result in loss of control of the vehicle and cause an accident, resulting in death or serious injury. ●Do not adjust the mirrors while driving. ●Do not drive with the mirrors folded. ●Both the driver and passenger side mirrors must be extended and properly
adjusted before driving. ■When a mirror is moving
To avoid personal injury and mirror malfunction, be careful not to get your hand caught by the moving mirror.
■When the mirror defoggers are operating
Do not touch the rear view mirror surfaces, as they can become very hot and burn you.
NOTICE
■If ice should jam the mirror
Do not operate the control or scrape the mirror face. Use a spray de-icer to free the mirror.
LC200_OM_OM60M88U_(U)
150
3-5. Opening, closing the windows and moon roof
Power windows
Opening and closing procedures The power windows can be opened and closed using the switches. Operating the switch moves the windows as follows:
Closing One-touch closing* Opening One-touch opening*
*: To stop the window partway, oper- ate the switch in the opposite direc- tion.
Window lock switch Press the switch down to lock the passenger window switches.
The indicator will come on. Use this switch to prevent children from accidentally opening or clos- ing a passenger window.
LC200_OM_OM60M88U_(U)
3-5. Opening, closing the windows and moon roof
151
■The power windows can be operated when The engine switch is in IGNITION ON mode.
■Operating the power windows after turning the engine off
The power windows can be operated for approximately 45 seconds even after the engine switch is turned to ACCESSORY mode or turned off. They cannot, however, be operated once either front door is opened.
■Jam protection function
If an object becomes jammed between the window and the window frame while the window is closing, window movement is stopped and the window is opened slightly.
■Catch protection function
If an object becomes caught between the door and window while the window is opening, window movement is stopped.
LC200_OM_OM60M88U_(U)
152
3-5. Opening, closing the windows and moon roof
■When the window cannot be opened or closed
When the jam protection function or catch protection function operates unusually and the door window cannot be opened or closed, perform the fol- lowing operations with the power window switch of that door. ●Stop the vehicle. With the engine switch in IGNITION ON mode, within 4
seconds of the jam protection function or catch protection function activat- ing, continuously operate the power window switch in the one-touch closing direction or one-touch opening direction so that the door window can be opened and closed.●If the door window cannot be opened and closed even when performing the above operations, perform the following procedure for function initialization.
Turn the engine switch to IGNITION ON mode. Pull and hold the power window switch in the one-touch closing direction and completely close the door window. Release the power window switch for a moment and then resume pulling and holding the switch in the one-touch closing direction for approxi- mately 4 seconds. Press and hold the power window switch in the one-touch opening direc- tion. After the door window is completely opened, continue holding the switch for an additional 1 second or more. Pull and hold the power window switch in the one-touch closing direction again. After the door window is completely closed, continue holding the switch for a further 1 second or more.
If you release the switch while the window is moving, start again from the beginning. If the window reverses and cannot be fully closed or opened, have the vehicle inspected by your Toyota dealer.
■Door lock linked window operation ●The power windows can be opened and closed using the mechanical key.* (P. 540) ●The power windows can be opened using the wireless remote control.* (P. 106) *: The settings must be customized at your Toyota dealer.
■Power windows open warning buzzer
The buzzer sounds and a message is shown on the multi-information display in the instrument cluster when the engine switch is turned off and the driver’s door is opened with the power windows open.
■Customization
Settings (e.g. linked door lock operation) can be changed. (Customizable features: P. 574)
LC200_OM_OM60M88U_(U)
3
3-5. Opening, closing the windows and moon roof
153
WARNING
Observe the following precautions. Failing to do so may result in death or serious injury. ■Closing the windows
●The driver is responsible for all the power window operations, including the operation for the passengers. In order to prevent accidental operation, especially by a child, do not let a child operate the power windows. It is possible for children and other passengers to have body parts caught in the power window. Also, when riding with a child, it is recommended to use the window lock switch. (P. 150)
●Check to make sure that all passengers do not have any part of their body
in a position where it could be caught when a window is being operated.
●When using the wireless remote control or mechanical key and operating the power windows, operate the power window after checking to make sure that there is no possibility of any passenger having any of their body parts caught in the window. Also, do not let a child operate window by the wireless remote control or mechanical key. It is possible for children and other passengers to get caught in the power window.
●When exiting the vehicle, turn the engine switch off, carry the key and exit the vehicle along with the child. There may be accidental operation, due to mischief, etc., that may possibly lead to an accident.
■Jam protection function
●Never use any part of your body to intentionally activate the jam protection
function.
●The jam protection function may not work if something gets caught just
before the window fully closes.
■Catch protection function
●Never use hands, arms, clothing, etc., to intentionally activate the catch
protection function.
●The catch protection function may not operate if something gets caught just before the window is fully opened. Be careful not to get hands, arms, clothing, etc., caught in the window.
LC200_OM_OM60M88U_(U)
154
3-5. Opening, closing the windows and moon roof
Moon roof
Use the overhead switches to open and close the moon roof and tilt it up and down.
Opening and closing
Opens the moon roof* The moon roof stops slightly before the fully open position to reduce wind noise. Press the switch again to fully open the moon roof. Closes the moon roof*
*: Lightly press either end of the moon roof switch to stop the moon roof partway.
Tilting up and down
Tilts the moon roof up* Tilts the moon roof down*
*: Lightly press either end of the moon roof switch to stop the moon roof partway.
LC200_OM_OM60M88U_(U)
3
3-5. Opening, closing the windows and moon roof
155
■The moon roof can be operated when
The engine switch is in IGNITION ON mode.
■Operating the moon roof after turning the engine off
The moon roof can be operated for approximately 45 seconds after the engine switch is turned to ACCESSORY mode or turned off. It cannot, how- ever, be operated once either front door is opened.
■Jam protection function
If an object is detected between the moon roof and the frame while the moon roof is closing or tilting down, travel is stopped and the moon roof opens slightly.
■If the moon roof cannot be closed automatically
Keep the switch depressed.
■Sunshade
The sunshade can be opened and closed manually. However, the sunshade will open automatically when the moon roof is opened.
■Door lock linked moon roof operation ●The moon roof can be opened and closed using the mechanical key.* (P. 540) ●The moon roof can be opened using the wireless remote control.* (P. 106) *: The settings must be customized at your Toyota dealer.
■When the moon roof does not close normally
Perform the following procedure: ●If the moon roof closes but then re-opens slightly
Stop the vehicle. Press and hold the “CLOSE” switch.*1
The moon roof will close, re-open and pause for approximately 10 sec- onds.*2 Then it will close again, tilt up and pause for approximately 1 sec- ond. Finally, it will tilt down, open and close. Check to make sure that the moon roof is completely closed and then release the switch.LC200_OM_OM60M88U_(U)
156
3-5. Opening, closing the windows and moon roof
●If the moon roof tilts down but then tilts back up
Stop the vehicle. Press and hold the “UP” switch.*1 until the moon roof moves into the tilt up position and stops. Release the “UP” switch once and then press and hold the “UP” switch again.*1
The moon roof will pause for approximately 10 seconds in the tilt up posi- tion.*2 Then it will adjust slightly and pause for approximately 1 second. Finally, it will tilt down, open and close. Check to make sure that the moon roof is completely closed and then release the switch.*1: If the switch is released at the incorrect time, the procedure will have to
be performed again from the beginning.
*2: If the switch is released after the above mentioned 10 second pause, automatic operation will be disabled. In that case, press and hold the “CLOSE” or “UP” switch, and the moon roof will tilt up and pause for approximately 1 second. Then it will tilt down, open and close. Check to make sure that the moon roof is completely closed and then release the switch.
If the moon roof does not fully close even after performing the above proce- dure correctly, have the vehicle inspected by your Toyota dealer.
■Moon roof open reminder function
The buzzer sounds and message is shown on the multi-information display in the instrument panel when the engine switch is turned off and the driver’s door is opened with the moon roof open.
■Customization
Settings (e.g. linked door lock operation) can be changed. (Customizable features: P. 574)
LC200_OM_OM60M88U_(U)
3
3-5. Opening, closing the windows and moon roof
157
WARNING
Observe the following precautions. Failing to do so may cause death or serious injury. ■Opening the moon roof
●Do not allow any passengers to put their hands or heads outside the vehi-
cle while it is moving.
●Do not sit on top of the moon roof.
■Closing the moon roof
●The driver is responsible for moon roof opening and closing operations.
In order to prevent accidental operation, especially by a child, do not let a child operate the moon roof. It is possible for children and other passen- gers to have body parts caught in the moon roof.
●Check to make sure that all passengers do not have any part of their bod- ies in a position where it could be caught when the moon roof is being operated.
●When using the wireless remote control or mechanical key and operating the moon roof, operate the moon roof after checking to make sure that there is no possibility of any passenger having any of their body parts caught in the moon roof. Also, do not let a child operate moon roof by the wireless remote control or mechanical key. It is possible for children and other passengers to get caught in the moon roof.
●When exiting the vehicle, turn the engine switch off, carry the key and exit the vehicle along with the child. There may be accidental operation, due to mischief, etc., that may possibly lead to an accident.
■Jam protection function
●Never use any part of your body to intentionally activate the jam protection
function.
●The jam protection function may not work if something gets caught just
before the moon roof fully closes.
LC200_OM_OM60M88U_(U)
158
3-5. Opening, closing the windows and moon roof
LC200_OM_OM60M88U_(U)
Driving
159
4-1. Before driving
Driving the vehicle............. 160
Cargo and luggage ........... 169
Vehicle load limits ............. 175
Trailer towing..................... 176 Dinghy towing ................... 1924-2. Driving procedures
Engine (ignition) switch ..... 193
Automatic transmission..... 199
Turn signal lever................ 203
Parking brake.................... 2044-3. Operating the lights
and wipers Headlight switch................ 205
Automatic High Beam ....... 209
Fog light switch ................. 214
Windshield wipers and washer ............................ 215
Rear window wiper and washer ............................ 219
Headlight cleaner switch .............................. 2214-4. Refueling
Opening the fuel tank cap .................................. 222
4-5. Using the driving support
systems Toyota Safety Sense P ..... 226
PCS (Pre-Collision system)..... 233
LDA (Lane Departure Alert) .... 248
Dynamic radar cruise control ............................. 257
Cruise control.................... 269
Intuitive parking assist....... 272
Four-wheel drive system... 280
Crawl Control (with Turn Assist function) ............... 284
Multi-terrain Select ............ 289
Multi-terrain Monitor .......... 293
BSM (Blind Spot Monitor) ........ 343
• BSM function ................ 347
• RCTA function .............. 351
Driving assist systems ...... 3574-6. Driving tips
Off-road precautions ......... 364
Winter driving tips ............. 369LC200_OM_OM60M88U_(U)
160
4-1. Before driving
Driving the vehicle
The following procedures should be observed to ensure safe driving:
Starting the engine P. 193
Driving
With the brake pedal depressed, shift the shift lever to D. (P. 199) Release the parking brake. (P. 204) Gradually release the brake pedal and gently depress the accelera- tor pedal to accelerate the vehicle.
Stopping
With the shift lever in D, depress the brake pedal. If necessary, set the parking brake. If the vehicle is to be stopped for an extended period of time, shift the shift lever to P or N. (P. 199)
Parking the vehicle
With the shift lever in D, depress the brake pedal. Shift the shift lever to P. (P. 199) Set the parking brake. (P. 204) Press the engine switch to stop the engine. Lock the door, making sure that you have the key on your person. If parking on a hill, block the wheels as needed.
Starting off on a steep uphill
Make sure that the parking brake is set and shift the shift lever to D. Gently depress the accelerator pedal. Release the parking brake.
LC200_OM_OM60M88U_(U)
4-1. Before driving
161
■When starting off on an uphill
Hill-start assist control is activated. (P. 357)
■Driving in the rain
●Drive carefully when it is raining, because visibility will be reduced, the win-
dows may become fogged-up, and the road will be slippery.
●Drive carefully when it starts to rain, because the road surface will be espe-
cially slippery.
●Refrain from high speeds when driving on an expressway in the rain, because there may be a layer of water between the tires and the road sur- face, preventing the steering and brakes from operating properly.
■Engine speed while driving
In the following conditions, the engine speed may become high while driving. This is due to automatic up-shifting control or down-shifting implementation to meet driving conditions. It does not indicate sudden acceleration. ●The vehicle is judged to be driving uphill or downhill ●When the accelerator pedal is released ●When the brake pedal is depressed
■Restraining engine output (Brake Override System)
●When the accelerator and brake pedals are depressed at the same time, the
engine output may be restrained.
●A warning message is displayed on the multi-information display while the system is operating. If a warning message is shown on the multi-information display, read the message and follow the instructions.
■Breaking in your new Toyota
To extend the life of the vehicle, observing the following precautions is recom- mended: ●For the first 200 miles (300 km):
Avoid sudden stops.
●For the first 500 miles (800 km):
Do not tow a trailer.
●For the first 600 miles (1000 km):
• Do not drive at extremely high speeds. • Avoid sudden acceleration. • Do not drive continuously in the low gears. • Do not drive at a constant speed for extended periods.
LC200_OM_OM60M88U_(U)
162
4-1. Before driving
■Drum-in-disc type parking brake system
Your vehicle has a drum-in-disc type parking brake system. This type of brake system needs bedding-down of the brake shoes periodi- cally or whenever the parking brake shoes and/or drum are replaced. Have your Toyota dealer, perform the bedding-down operation.
■Operating your vehicle in a foreign country
Comply with the relevant vehicle registration laws and confirm the availability of the correct fuel. (P. 560) ■When turning off the engine
Emission system operating sounds may continue for a short time after the engine is turned off. This is not a malfunction, and helps to ensure optimal performance of the emission system.
LC200_OM_OM60M88U_(U)
4-1. Before driving
163
WARNING
Observe the following precautions. Failure to do so may result in death or serious injury. ■When starting the vehicle
Always keep your foot on the brake pedal while stopped with the engine running. This prevents the vehicle from creeping.
■When driving the vehicle
●Do not drive if you are unfamiliar with the location of the brake and accel-
erator pedals to avoid depressing the wrong pedal. • Accidentally depressing the accelerator pedal instead of the brake
pedal will result in sudden acceleration that may lead to an accident.
• When backing up, you may twist your body around, leading to a diffi- culty in operating the pedals. Make sure to operate the pedals properly. • Make sure to keep a correct driving posture even when moving the vehicle only slightly. This allows you to depress the brake and accelera- tor pedals properly.
• Depress the brake pedal using your right foot. Depressing the brake pedal using your left foot may delay response in an emergency, result- ing in an accident.
●Do not drive the vehicle over or stop the vehicle near flammable materials. The exhaust system and exhaust gases can be extremely hot. These hot parts may cause a fire if there is any flammable material nearby.
●During normal driving, do not turn off the engine. Turning the engine off while driving will not cause loss of steering or braking control, but the power assist to these systems will be lost. This will make it more difficult to steer and brake, so you should pull over and stop the vehicle as soon as it is safe to do so. However, in the event of an emergency, such as if it becomes impossible to stop the vehicle in the normal way: P. 501
●Use engine braking (downshift) to maintain a safe speed when driving
down a steep hill. Using the brakes continuously may cause the brakes to overheat and lose effectiveness. (P. 199)
●Do not adjust the positions of the steering wheel, the seat, or the inside or
outside rear view mirrors while driving. Doing so may result in a loss of vehicle control.
●Always check that all passengers’ arms, heads or other parts of their body
are not outside the vehicle.
●Do not drive in excess of the speed limit. Even if the legal speed limit per- mits it, do not drive over 85 mph (140 km/h) unless your vehicle has high- speed capability tires. Driving over 85 mph (140 km/h) may result in tire failure, loss of control and possible injury. Be sure to consult a tire dealer to determine whether the tires on your vehicle are high-speed capability tires or not before driving at such speeds.
LC200_OM_OM60M88U_(U)
164
4-1. Before driving
WARNING
Observe the following precautions. Failure to do so may result in death or serious injury. ■When driving on slippery road surfaces
●Sudden braking, acceleration and steering may cause tire slippage and
reduce your ability to control the vehicle.
●Sudden acceleration, engine braking due to shifting, or changes in engine
speed could cause the vehicle to skid.
●After driving through a puddle, lightly depress the brake pedal to make sure that the brakes are functioning properly. Wet brake pads may prevent the brakes from functioning properly. If the brakes on only one side are wet and not functioning properly, steering control may be affected.
■When shifting the shift lever
●Do not let the vehicle roll backwards while the shift lever is in a driving
position, or roll forward while the shift lever is in R. Doing so may cause the engine to stall or lead to poor brake and steering performance, resulting in an accident or damage to the vehicle.
●Do not shift the shift lever to P while the vehicle is moving.
Doing so can damage the transmission and may result in a loss of vehicle control.
●Do not shift the shift lever to R while the vehicle is moving forward.
Doing so can damage the transmission and may result in a loss of vehicle control.
●Do not shift the shift lever to a driving position while the vehicle is moving
backward. Doing so can damage the transmission and may result in a loss of vehicle control.
●Moving the shift lever to N while the vehicle is moving will disengage the engine from the transmission. Engine braking is not available when N is selected.
●Be careful not to shift the shift lever with the accelerator pedal depressed. Shifting the shift lever to a gear other than P or N may lead to unexpected rapid acceleration of the vehicle that may cause an accident.
■If you hear a squealing or scraping noise (brake pad wear limit indica-
tors) Have the brake pads checked and replaced by your Toyota dealer as soon as possible. Rotor damage may result if the pads are not replaced when needed. It is dangerous to drive the vehicle when the wear limits of the brake pads and/or those of the brake discs are exceeded.
LC200_OM_OM60M88U_(U)
4-1. Before driving
165
WARNING
Observe the following precautions. Failure to do so may result in death or serious injury. ■When the vehicle is stopped
●Do not race the engine.
If the vehicle is in any gear other than P or N, the vehicle may accelerate suddenly and unexpectedly, causing an accident.
●In order to prevent accidents due to the vehicle rolling away, always keep depressing the brake pedal while the engine is running, and apply the parking brake as necessary.
●If the vehicle is stopped on an incline, in order to prevent accidents caused by the vehicle rolling forward or backward, always depress the brake pedal and securely apply the parking brake as needed.
●Avoid revving or racing the engine. Running the engine at high speed while the vehicle is stopped may cause the exhaust system to overheat, which could result in a fire if combustible material is nearby.
■When the vehicle is parked
●Do not leave glasses, cigarette lighters, spray cans, or soft drink cans in
the vehicle when it is in the sun. Doing so may result in the following: • Gas may leak from a cigarette lighter or spray can, and may lead to a
fire.
• The temperature inside the vehicle may cause the plastic lenses and
plastic material of glasses to deform or crack.
• Soft drink cans may fracture, causing the contents to spray over the interior of the vehicle, and may also cause a short circuit in the vehicle’s electrical components.
●Do not leave cigarette lighters in the vehicle. If a cigarette lighter is in a place such as the glove box or on the floor, it may be lit accidentally when luggage is loaded or the seat is adjusted, causing a fire.
●Do not attach adhesive discs to the windshield or windows. Do not place containers such as air fresheners on the instrument panel or dashboard. Adhesive discs or containers may act as lenses, causing a fire in the vehi- cle.
●Do not leave a door or window open if the curved glass is coated with a metallized film such as a silver-colored one. Reflected sunlight may cause the glass to act as a lens, causing a fire.
LC200_OM_OM60M88U_(U)
166
4-1. Before driving
WARNING
Observe the following precautions. Failure to do so may result in death or serious injury. ■When the vehicle is parked
●Always apply the parking brake, shift the shift lever to P, stop the engine
and lock the vehicle. Do not leave the vehicle unattended while the engine is running.
●If the shift lever is moved before the low speed four-wheel drive indicator turns on/off, the transfer mode may not be shifted completely. The transfer mode disengages both the front and rear driveshafts from the powertrain and allows the vehicle to move regardless of the shift position. (At this time, the indicator blinks and the buzzer sounds.) Therefore, the vehicle is free to roll even if the automatic transmission is in P. You or someone else could be seriously injured. You must complete the shifting of the transfer mode. (P. 280)
●Do not touch the exhaust pipes while the engine is running or immediately
after turning the engine off. Doing so may cause burns.
■When taking a nap in the vehicle
Always turn the engine off. Otherwise, if you accidentally move the shift lever or depress the accelerator pedal, this could cause an accident or fire due to engine overheating. Additionally, if the vehicle is parked in a poorly ventilated area, exhaust gases may collect and enter the vehicle, leading to death or a serious health hazard.
■When braking
●When the brakes are wet, drive more cautiously.
Braking distance increases when the brakes are wet, and this may cause one side of the vehicle to brake differently than the other side. Also, the parking brake may not securely hold the vehicle.
●If the power brake assist function does not operate, do not follow other vehicles closely and avoid hills or sharp turns that require braking. In this case, braking is still possible, but the brake pedal should be depressed more firmly than usual. Also, the braking distance will increase. Have your brakes fixed immediately.
●Do not pump the brake pedal if the engine stalls.
Each push on the brake pedal uses up the reserve for the power-assisted brakes.
●The brake system consists of 2 individual hydraulic systems: If one of the systems fails, the other will still operate. In this case, the brake pedal should be depressed more firmly than usual and the braking distance will increase. Have your brakes fixed immediately.
LC200_OM_OM60M88U_(U)
4
4-1. Before driving
167
WARNING
Observe the following precautions. Failure to do so may result in death or serious injury. ■If the vehicle becomes stuck
Do not spin the wheels excessively when any of the tires is up in the air, or the vehicle is stuck in sand, mud, etc. This may damage the driveline com- ponents or propel the vehicle forward or backward, causing an accident.
NOTICE
■When driving the vehicle
●Do not depress the accelerator and brake pedals at the same time during
driving, as this may restrain the engine output.
●Do not use the accelerator pedal or depress the accelerator and brake
pedals at the same time to hold the vehicle on a hill.
■When parking the vehicle
Always shift the shift lever to P. Failure to do so may cause the vehicle to move or the vehicle may accelerate suddenly if the accelerator pedal is accidentally depressed.
■Avoiding damage to vehicle parts
●Do not turn the steering wheel fully in either direction and hold it there for
an extended period of time. Doing so may damage the power steering pump.
●When driving over bumps in the road, drive as slowly as possible to avoid
damaging the wheels, underside of the vehicle, etc.
■If you get a flat tire while driving
A flat or damaged tire may cause the following situations. Hold the steering wheel firmly and gradually depress the brake pedal to slow down the vehi- cle. ●It may be difficult to control your vehicle. ●The vehicle will make abnormal sounds or vibrations. ●The vehicle will lean abnormally. Information on what to do in case of a flat tire. (P. 524)
LC200_OM_OM60M88U_(U)
168
4-1. Before driving
NOTICE
■When encountering flooded roads
Do not drive on a road that has flooded after heavy rain etc. Doing so may cause the following serious damage to the vehicle: ●Engine stalling ●Short in electrical components ●Engine damage caused by water immersion In the event that you drive on a flooded road and the vehicle is flooded, be sure to have your Toyota dealer check the following: ●Brake function ●Changes in quantity and quality of oil and fluid used for the engine, trans-
mission, transfer, differentials, etc.
●Lubricant condition for the propeller shaft, bearings and suspension joints
(where possible), and the function of all joints, bearings, etc.
LC200_OM_OM60M88U_(U)
4-1. Before driving
169
Cargo and luggage
Take notice of the following information about storage precau- tions, cargo capacity and load:
Roof luggage carrier (if equipped)
Roof rails Cross rails
Adjusting the position of cross rails (if equipped)
Turn the knobs counterclock- wise to release the cross rails.
Slide the cross rails to the appropriate position for loading luggage and turn the knobs clockwise to tighten the cross rails securely.
LC200_OM_OM60M88U_(U)
170
4-1. Before driving
Capacity and distribution Cargo capacity depends on the total weight of the occupants. (Cargo capacity) = (Total load capacity) (Total weight of occupants) Steps for Determining Correct Load Limit (1) Locate the statement “The combined weight of occupants and cargo should never exceed XXX kg or XXX lbs.” on your vehicle’s placard.
(2) Determine the combined weight of the driver and passengers that
will be riding in your vehicle.
(3) Subtract the combined weight of the driver and passengers from
XXX kg or XXX lbs.
(4) The resulting figure equals the available amount of cargo and lug-
gage load capacity. For example, if the “XXX” amount equals 1400 lbs. and there will be five 150 lb passengers in your vehicle, the amount of available cargo and luggage load capacity is 650 lbs. (1400 750 (5150) = 650 lbs.)
(5) Determine the combined weight of luggage and cargo being loaded on the vehicle. That weight may not safely exceed the available cargo and luggage load capacity calculated in Step 4.
(6) If your vehicle will be towing a trailer, load from your trailer will be transferred to your vehicle. Consult this manual to determine how this reduces the available cargo and luggage load capacity of your vehicle. (P. 175)
LC200_OM_OM60M88U_(U)
4
Calculation formula for your vehicle
4-1. Before driving
171
Cargo capacity Total capacity weight) (P. 552)
load capacity
(vehicle
When 2 people with the combined weight of A lb. (kg) are riding in your vehicle, which has a total load capacity (vehicle capacity weight) of B lb. (kg), the available amount of cargo and luggage load capacity will be C lb. (kg) as follows: B*2 lb. (kg) A*1 lb. (kg) = C*3 lb. (kg) *1: A = Weight of people *2: B = Total load capacity *3: C = Available cargo and luggage load
In this condition, if 3 more passengers with the combined weight of D lb. (kg) get on, the available cargo and luggage load will be reduced E lb. (kg) as follows:
C lb. (kg) D*4 lb. (kg) = E*5 lb. (kg) *4: D = Additional weight of people *5: E = Available cargo and luggage load As shown in the example above, if the number of occupants increases, the cargo and luggage load will be reduced by an amount that equals the increased weight due to the additional occupants. In other words, if an increase in the number of occupants causes an excess of the total load capacity (combined weight of occupants plus cargo and luggage load), you must reduce the cargo and luggage on your vehicle.
LC200_OM_OM60M88U_(U)
172
4-1. Before driving
WARNING
■Things that must not be carried in the luggage compartment
The following things may cause a fire if loaded in the luggage compartment: ●Receptacles containing gasoline ●Aerosol cans
■Storage precautions
Observe the following precautions. Failure to do so may prevent the pedals from being depressed properly, may block the driver’s vision, or may result in items hitting the driver or pas- sengers, possibly causing an accident. ●Stow cargo and luggage in the luggage compartment whenever possible. ●Do not stack cargo and luggage in the luggage compartment higher than
the seatbacks.
●Do not place cargo or luggage in or on the following locations.
• At the feet of the driver • On the front passenger or rear seats (when stacking items) • On the instrument panel • On the dashboard • On auxiliary box or tray that has no lid
●Secure all items in the occupant compartment. ●When you fold down the rear seats, long items should not be placed
directly behind the front seats.
●Never allow anyone to ride in the luggage compartment. It is not designed for passengers. They should ride in their seats with their seat belts prop- erly fastened. Otherwise, they are much more likely to suffer death or seri- ous bodily injury, in the event of sudden braking, sudden swerving or an accident.
LC200_OM_OM60M88U_(U)
4
4-1. Before driving
173
WARNING
■Load and distribution
●Do not exceed the maximum axle weight rating or the total vehicle weight
rating.
●Even if the total load of occupant’s weight and the cargo load is less than the total load capacity, do not apply the load unevenly. Improper loading may cause deterioration of steering or braking control which may cause death or serious injury.
■Roof luggage carrier precautions (if equipped)
To use the roof rails as a roof luggage carrier, you must fit the roof rails with two or more genuine Toyota cross rails or their equivalent. Follow the manufacturer’s instructions and precautions when installing the cross rails or their equivalent. When you load cargo on the roof luggage carrier, observe the following: ●Place the cargo so that its weight is distributed evenly between the front
and rear axles.
●If loading long or wide cargo, never exceed the vehicle overall length or
width. (P. 552)
●Before driving, make sure the cargo is securely fastened on the roof lug-
gage carrier.
●Loading cargo on the roof luggage carrier will make the center of gravity of the vehicle higher. Avoid high speeds, sudden starts, sharp turns, sudden braking or abrupt maneuvers, otherwise it may result in loss of control or vehicle rollover due to failure to operate this vehicle correctly and result in death or serious injury.
●If driving for a long distance, on rough roads, or at high speeds, stop the vehicle now and then during the trip to make sure the cargo remains in its place.
●Do not exceed 154 lb. (70 kg) cargo weight on the roof luggage carrier.
■Cross rail adjustment
Make sure the cross rails are locked securely by pushing forward and rear- ward them. Failure to do so may cause an accident or serious injury in the event of emergency braking or a collision.
LC200_OM_OM60M88U_(U)
174
4-1. Before driving
NOTICE
■Cross rail adjustment
Do not remove the cross rail stoppers, or the moon roof may be damage when it is tilted.
■When loading cargo on the roof luggage carrier (if equipped)
Be careful not to scratch the surface of the moon roof.
LC200_OM_OM60M88U_(U)
4-1. Before driving
175
Vehicle load limits
Vehicle load limits include total load capacity, seating capacity, TWR (Trailer Weight Rating) and cargo capacity.
◆ Total load capacity (vehicle capacity weight): P. 552
Total load capacity means the combined weight of occupants, cargo and luggage.
◆ Seating capacity: 8 occupants (Front 2, Rear 6)
Seating capacity means the maximum number of occupants whose estimated average weight is 150 lb. (68 kg) per person.
◆ TWR (Trailer Weight Rating): P. 180, 552
TWR means the maximum gross trailer weight (trailer weight plus its cargo weight) that your vehicle is able to tow.
◆ Cargo capacity
Cargo capacity may increase or decrease depending on the weight and the number of occupants.
■Total load capacity and seating capacity
These details are also described on the tire and loading information label. (P. 472)
WARNING
■Overloading the vehicle
Do not overload the vehicle. It may not only cause damage to the tires, but also degrade steering and braking ability, resulting in an accident.
LC200_OM_OM60M88U_(U)
176
4-1. Before driving
Trailer towing
Your vehicle is designed primarily as a passenger-and-load-car- rying vehicle. Towing a trailer can have an adverse impact on handling, performance, braking, durability, and fuel consump- tion. For your safety and the safety of others, you must not over- load your vehicle or trailer. You must also ensure that you are using appropriate towing equipment, that the towing equipment has been installed correctly and used properly, and that you employ the requisite driving habits. Vehicle-trailer stability and braking performance are affected by trailer stability, brake performance and setting, trailer brakes, the hitch and hitch systems (if equipped). To tow a trailer safely, use extreme care and drive the vehicle in accordance with your trailer’s characteristics and operating conditions. Toyota warranties do not apply to damage or malfunction caused by towing a trailer for commercial purposes. Contact your Toyota dealer for further information about addi- tional requirements such as towing kits, etc.
LC200_OM_OM60M88U_(U)
4
Towing related terms ■ GCWR (Gross Combination Weight Rating)
4-1. Before driving
177
the
The maximum allowable gross combination weight. The gross combination weight is the sum of total vehicle weight (including the occupants, cargo and any optional equipment installed on the vehicle) and the weight of the trailer being towed (including the trailer).
the cargo
in
■ GVWR (Gross Vehicle Weight Rating)
The maximum allowable gross vehicle weight. The gross vehi- cle weight is the total weight of the vehicle. When towing a trailer, it is the sum of the vehi- cle weight (including the occu- pants, cargo and any optional equipment installed on the vehi- cle) and the tongue weight.
LC200_OM_OM60M88U_(U)
178
4-1. Before driving
■ GAWR (Gross Axle Weight Rating)
The maximum allowable gross axle weight. The gross axle weight is the load placed on each axle (front and rear).
■ TWR (Trailer Weight Rating)
The maximum allowable gross trailer weight. The gross trailer weight is the sum of the trailer weight and the weight of the cargo in the trailer. TWR is calculated assuming base vehicle with one driver, one towing package (if available), hitch and hitch systems (if required).
front passenger,
Front GAWR
Rear GAWR
(With brakes)
Additional optional equipment, passengers and cargo in the vehicle will reduce the trailer weight rating so as not to exceed GCWR, GVWR and GAWR. If the gross trailer weight exceeds 3000 lb. (1360 kg), it is recommended to use a trailer with 2 or more axles.
LC200_OM_OM60M88U_(U)
4-1. Before driving
179
■ Unbraked TWR (Unbraked Trailer Weight Rating)
The trailer weight rating for tow- ing a trailer without a trailer ser- vice brake system.
(Without brakes)
■ Tongue Weight
The load placed on the trailer hitch ball. (P. 181)
LC200_OM_OM60M88U_(U)
180
4-1. Before driving
Weight limits ● The gross trailer weight must never exceed 8100 lb. (3670 kg). ● The gross combination weight must never exceed 14400 lb.
(6532 kg).
● The gross vehicle weight must never exceed the GVWR indi- cated on the Certification Label. ● The gross axle weight on each axle must never exceed the GAWR indicated on the Certifi- cation Label.
● If the gross trailer weight is over the unbraked TWR, trailer ser- vice brakes are required.
● If the gross trailer weight is over 2000 lb. (907 kg), a sway control
device with sufficient capacity is required.
● If the gross trailer weight is over 5000 lb. (2268 kg), a weight distrib-
uting hitch with sufficient capacity is required.
GCWR, TWR and Unbraked TWR Confirm that the gross trailer weight, gross combination weight, gross vehicle weight, gross axle weight and tongue weight are all within the limits. ■ GCWR*
14400 lb. (6532 kg)
■ TWR*
8100 lb. (3670 kg) ■ Unbraked TWR* 1000 lb. (454 kg)
*: This model meets the tow-vehicle trailering requirement of SAE Interna-
tional per SAE J2807.
LC200_OM_OM60M88U_(U)
4-1. Before driving
181
Trailer Tongue Weight ● A recommended tongue weight varies in accordance with the types
of trailers or towing as described below.
● To ensure the recommended values shown below, the trailer must
be loaded by referring to the following instructions. • Tongue Weight
The gross trailer weight should be distributed so that the tongue weight is 9 % to 11 %. (Tongue weight/Gross trailer weight 100
= 9 % to 11 %)