- Download PDF Manual
-
Turn the knob to open or close the vent.
LC200_OM_OM60M88U_(U)
382
5-1. Using the air conditioning system and defogger
■Using automatic mode
Fan speed is adjusted automatically according to the temperature setting and the ambient conditions. Therefore, the fan may stop for a while until warm or cool air is ready to flow immediately after
is pressed.
■Fogging up of the windows
●The windows will easily fog up when the humidity in the vehicle is high. Turning “A/C” on will dehumidify the air from the outlets and defog the wind- shield effectively.
●If you turn “A/C” off, the windows may fog up more easily. ●The windows may fog up if the recirculated air mode is used.
■Outside/recirculated air mode
●When driving on dusty roads such as tunnels or in heavy traffic, set the out- side/recirculated air mode button to the recirculated air mode. This is effec- tive in preventing outside air from entering the vehicle interior. During cooling operation, setting the recirculated air mode will also cool the vehicle interior effectively.
●Outside/recirculated air mode may automatically switch depending on the
temperature setting or the inside temperature.
■When outside air temperature is low
The dehumidification function may not operate even when “A/C” is pressed.
■When the outside temperature exceeds 75°F (24°C) and the air condition-
ing system is on ●In order to reduce the air conditioning power consumption, the air condition- ing system may switch to recirculated air mode automatically. This may also reduce fuel consumption.
●Recirculated air mode is selected as a default mode when the engine switch
is turned to IGNITION ON mode.
●It is possible to switch to outside air mode at any time by pressing
■Micro dust and pollen filter
●In order to prevent the windows from fogging up when the outside air is cold,
the following may occur. • Outside air mode does not switch to recirculated air mode. • The dehumidification function operates. • The operation cancels after approximately 1 minute.
●In rainy weather, the windows may fog up. Press ●In extremely humid weather, the windows may fog up. ●The pollens are filtered out even if the micro dust and pollen filter is turned
off.
LC200_OM_OM60M88U_(U)
5-1. Using the air conditioning system and defogger
383
■Ventilation and air conditioning odors
●To let fresh air in, set the air conditioning system to the outside air mode. ●During use, various odors from inside and outside the vehicle may enter into and accumulate in the air conditioning system. This may then cause odor to be emitted from the vents.
●To reduce potential odors from occurring:
• It is recommended that the air conditioning system be set to outside air
mode prior to turning the vehicle off.
• The start timing of the blower may be delayed for a short period of time immediately after the air conditioning system is started in automatic mode.
■The rear window defogger and windshield wiper de-icer (if equipped)
can be operated when The engine switch is in IGNITION ON mode.
■When the windshield wiper de-icer (if equipped) is on
The windshield wiper de-icer will automatically turn off after approximately 15
minutes.■Using the voice command system
Air conditioning system can be operated using voice commands. For details, refer to the “NAVIGATION SYSTEM OWNER’S MANUAL”.
■Air conditioning filter
P. 477
■Customization
Settings (e.g. A/C automatic mode switch operation) can be changed. (Customizable features: P. 574)
LC200_OM_OM60M88U_(U)
384
5-1. Using the air conditioning system and defogger
WARNING
■To prevent the windshield from fogging up
●Do not use
during cool air operation in extremely humid weather. The difference between the temperature of the outside air and that of the windshield can cause the outer surface of the windshield to fog up, blocking your vision.
●Do not place anything on the instrument panel which may cover the air outlets. Otherwise, air flow may be obstructed, preventing the windshield defoggers from defogging.
■To prevent burns
●Do not touch the rear view mirror surfaces when the outside rear view mir-
ror defoggers are on.
●Do not touch the glass at lower part of the windshield or to the side of the front pillars when the windshield wiper de-icer is on. (vehicles with wind- shield wiper de-icer)
NOTICE
■To prevent battery discharge
Do not leave the air conditioning system on longer than necessary when the engine is not running.
LC200_OM_OM60M88U_(U)
5-1. Using the air conditioning system and defogger
385
Rear air conditioning system
Air outlets and fan speed are automatically adjusted according to the temperature setting.
■ Adjusting the temperature setting
Press “” to increase the temperature and “” to decrease the tem-
perature on
The temperature for the right-hand and left-hand seats can be set sepa- rately.
■ Adjusting the fan speed setting
Press “” (increase) or “” (decrease) on
The fan speed is shown on the display. (7 levels)
Press
to turn the fan off.
LC200_OM_OM60M88U_(U)
386
5-1. Using the air conditioning system and defogger
■ Changing the air flow mode
Press
The air flow mode switches each time the button is pressed.
Air flows to the upper body Air flows to the upper body and feet Air flows to the feet
LC200_OM_OM60M88U_(U)
5-1. Using the air conditioning system and defogger
387
Air conditioning controls ■ Using the automatic mode
Press
Adjust the temperature setting.
To stop the operation, press
■ If the system is operated manually in automatic mode
If the fan speed setting or air flow modes are operated, the auto- matic mode indicator goes off. However, automatic mode for func- tions other than that operated is maintained.
Air outlets ■ Location of air outlets
The air outlets and air volume changes according the selected air flow mode.
to
■ Adjusting the position of and opening and closing the air out-
lets
Direct air flow to the left or right, up or down. Turn the knob fully to the back of the vehicle to close the vent.
LC200_OM_OM60M88U_(U)
388
5-1. Using the air conditioning system and defogger
NOTICE
■To prevent battery discharge
Do not leave the air conditioning system on longer than necessary when the engine is not running.
LC200_OM_OM60M88U_(U)
5-1. Using the air conditioning system and defogger
389
Heated steering wheel/seat heaters/seat ventilators
Heated steering wheel and seat heaters heat the side grips of the steering wheel and seats. Seat ventilators maintain good airflow by blowing air from the seats.
WARNING
lenged
●Care should be taken to prevent injury if anyone in the following categories comes in contact with the steering wheel and seats when the heater is on: • Babies, small children, the elderly, the sick and the physically chal-
• Persons with sensitive skin • Persons who are fatigued • Persons who have taken alcohol or drugs that induce sleep (sleeping
drugs, cold remedies, etc.)
●Observe the following precautions to prevent the minor burns or overheat-
ing: • Do not cover the seat with a blanket or cushion when using the seat
heater.
• Do not use seat heater more than necessary.
NOTICE
●Do not put heavy objects that have an uneven surface on the seat and do
not stick sharp objects (needles, nails, etc.) into the seat.
●To prevent battery discharge, do not use the functions when the engine is
not running.
Heated steering wheel (if equipped) Turns the heated steering wheel on/off
The indicator light comes on when the heated steering wheel is oper- ating.
: If equipped
LC200_OM_OM60M88U_(U)
390
5-1. Using the air conditioning system and defogger
●The heated steering wheel can be used when the engine switch is in IGNI-
TION ON mode.
●The heated steering wheel will automatically turn off after about 30 minutes. ●If the indicator light flashes, press the switch to turn the heated steering wheel off and then press the switch again. If the indicator light still flashes, a malfunction may be occurring. Turn the heated steering wheel off and have the vehicle inspected by your Toyota dealer.
Front seat heaters and ventilators
Seat heater switches The indicator light (yellow) on the switch comes on when the seat heater is operating. Seat ventilator switches The indicator light (green) on the switch comes on when the seat ventilator is operating. Level indicator lights The seat heater temperature level or the seat ventilator fan speed level (for front seats only) is dis- played. “AUTO” indicator lights
LC200_OM_OM60M88U_(U)
5-1. Using the air conditioning system and defogger
391
■ Modes and indicators
The mode can be changed by pressing the switch.
Mode Off
Automatic*
Hi Mid Lo
“AUTO” indicator light
Level indicator lights
Off On Off Off Off
Off
3 to 1, or off
*: When automatic mode is selected, the level automatically changes
depending on the air conditioning settings.
■The seat heaters and ventilators can be used when
The engine switch is in IGNITION ON mode.
■Replacing the air filters
Filters are installed in the seat ventilators. For replacement of the filters, con- tact your Toyota dealer.
■Customization
The automatic mode settings for the seat heaters and ventilators can be changed. (P. 574)
LC200_OM_OM60M88U_(U)
392
5-1. Using the air conditioning system and defogger
Second outboard seat heaters (if equipped)
45
For left-hand second seat For right-hand second seat High heating temperature Low heating temperature To turn on the seat heater, press “HI” or “LO”. Off
■The seat heaters can be used when
The engine switch is in IGNITION ON mode.
LC200_OM_OM60M88U_(U)
Interior lights list
5-2. Using the interior lights
393
Front interior lights (P. 394) Front personal lights (P. 395) Rear interior lights (P. 394) Rear personal lights (P. 395) Inside door handle lights
10
Footwell lights Scuff lights Engine switch light Door courtesy lights Ambient lights
LC200_OM_OM60M88U_(U)
394
5-2. Using the interior lights
Interior lights Front
Door position on/off Turns the light on/off
Rear On/door position on
LC200_OM_OM60M88U_(U)
5-2. Using the interior lights
395
Personal lights Front Turns the light on/off
Rear Turns the light on/off
■Illuminated entry system
The lights automatically turn on/off according to engine switch mode, the presence of the electronic key, whether the doors are locked/unlocked, and whether the doors are open/closed.
■To prevent battery discharge
If the interior lights remain on when the engine switch is turned off, the lights will go off automatically after 20 minutes:
■Customization
Settings (e.g. adjust the time elapsed before the interior lights automatically turn off) can be changed. (Customizable features: P. 574)
NOTICE
To prevent battery discharge, do not leave the lights on longer than neces- sary when the engine is not running.
LC200_OM_OM60M88U_(U)
396
5-3. Using the storage features
List of storage features
Card holders (P. 403) Overhead console (P. 399) Glove box (P. 397) Bottle holders (P. 402) Door pockets Auxiliary boxes (P. 403)
WARNING
Console box (P. 398) Cool box (if equipped) (P. 406) Cup holders (P. 400) Auxiliary box (if equipped) (P. 403) Wireless charger (if equipped) (P. 412)
■Items that should not be left in the storage spaces
Do not leave glasses, lighters or spray cans in the storage spaces, as this may cause the following when cabin temperature becomes high: ●Glasses may be deformed by heat or cracked if they come into contact
with other stored items.
●Lighters or spray cans may explode. If they come into contact with other stored items, the lighter may catch fire or the spray can may release gas, causing a fire hazard.
LC200_OM_OM60M88U_(U)
5-3. Using the storage features
397
Glove box
Open (push button) Lock with the mechanical key Unlock with the mechanical key
■Glove box light
The glove box light turns on when the tail lights are on.
■Removing the separate tray
Pull out the separate tray while releasing the clips.
WARNING
Keep the glove box closed while driving. Injuries may result in the event of sudden braking, sudden swerving or an accident.
LC200_OM_OM60M88U_(U)
398
5-3. Using the storage features
Console box Your vehicle is equipped with either a lower console box or cool box. For vehicles with the cool box, refer to page 406. Upper console box Press the tab to open.
Lower console box (if equipped)
Lift the lever to open.
Remove the tray.
WARNING
Keep the console box closed while driving. Injuries may result in the event of sudden braking, sudden swerving or an accident.
LC200_OM_OM60M88U_(U)
5-3. Using the storage features
399
Overhead console Press the button.
WARNING
■Items unsuitable for storing
Do not store items heavier than 0.4 lb. (0.2 kg). Doing so may cause the overhead console to open and the items inside may fall out, resulting in an accident.
■While driving
Do not leave the overhead console open. Items may fall out and cause injury.
LC200_OM_OM60M88U_(U)
400
5-3. Using the storage features
Cup holders Front Press down and release the lid.
You can adjust or remove the sep- arator inside.
Rear
Pull the armrest down. (P. 420) Press the button.
LC200_OM_OM60M88U_(U)
5-3. Using the storage features
401
■Removing the cup holder insert (front cup holders)
Pull up the insert.
Cup holder insert may be removed for cleaning.
WARNING
■Items unsuitable for the cup holder
Do not place anything other than cups or beverage cans in the cup holders. Even with the lid is closed, items must not be stored in the cup holders. Other items may be thrown out of the holders in the event of an accident or sudden braking, cause injury. If possible, cover hot drinks to prevent burns.
■When not in use
Keep the cup holders closed. Injuries may result in the event of sudden braking, sudden swerving or an accident.
NOTICE
■To prevent damage to the cup holders (vehicles with a rear cup holder)
Stow the cup holders before stowing the rear armrest.
LC200_OM_OM60M88U_(U)
402
5-3. Using the storage features
Bottle holders Front seats
Second seats
Third seats
NOTICE
■Items that should not be stowed in the bottle holders
Put the cap on before stowing a bottle. Do not place open bottles in the bot- tle holders, or glasses and paper cups containing liquid. The contents may spill and glasses may break.
LC200_OM_OM60M88U_(U)
5-3. Using the storage features
403
Card holders Sun visor
Instrument panel
Auxiliary boxes Your vehicle is equipped with either a front auxiliary box or wireless charger. For vehicles with wireless charger, refer to page 412. Front (if equipped) Rear (type A)
Press the lid to open.
Rear (type B)
Press the button to open.
LC200_OM_OM60M88U_(U)
404
5-3. Using the storage features
Luggage compartment features
Cargo hooks Raise the hook to use.
The cargo hooks are provided for securing loose items.
Cargo net hooks To hang the cargo net, use the cargo net hooks and rear tie-down hooks.
The cargo net itself is not included as an original equipment.
Warning reflector holder Remove the cover. Hold the warn- ing reflector with the bands.
The warning reflector itself is not included as an original equipment.
LC200_OM_OM60M88U_(U)
5-3. Using the storage features
405
First-aid kit holder Remove the cover. Hold the first- aid kit with a band.
The first-aid kit itself is not included as an original equipment.
WARNING
●To avoid injury, always return the cargo hooks to their positions when not
in use.
●Keep the auxiliary box closed. In the event of sudden braking or sudden swerving, an accident may occur due to an occupant being struck by an open auxiliary box or the items stored inside.
NOTICE
■To prevent damage to the cargo net hooks
Avoid hanging things other than a cargo net on it.
LC200_OM_OM60M88U_(U)
406
5-4. Using the other interior features
Other interior features
Cool box (if equipped) While the engine is running, the cool box, which is cooled by the air conditioning, can be used.
Lift the lid while pulling up the lower lever to release the lock.
Turns the cool box on/off When on, the indicator light comes on. If the front air conditioning system is not in use, the front air condition- ing system is automatically turned on when the cool box is turned on.
■While the cool box is on
The front air conditioning system cannot be turned off.
■When the outside temperature is 0C (32F) or below
The cool box may not operate.
LC200_OM_OM60M88U_(U)
5-4. Using the other interior features
407
WARNING
Keep the cool box closed while driving. Injuries may result in the event of sudden braking, sudden swerving or an accident.
NOTICE
To prevent battery discharge, do not leave the cool box on longer than nec- essary when the engine is not running.
LC200_OM_OM60M88U_(U)
408
5-4. Using the other interior features
Sun visors Main sun visor
To set the visor in the forward position, flip it down. To set the visor in the side posi- tion, flip down, unhook, and swing it to the side. To use the side extender, place the visor in the side position, then slide it backward.
Sub sun visor Flip down with the main sun visor in position
or
Vanity mirror Slide the cover to open.
The light turns on when the cover is opened.
If the vanity lights remain on when the engine switch is turned off, the lights will go off automatically after 20 minutes.
NOTICE
To prevent battery discharge, do not leave the vanity lights on for extended periods when the engine is not running.
LC200_OM_OM60M88U_(U)
5-4. Using the other interior features
409
Clock Refer to “NAVIGATION SYSTEM OWNER’S MANUAL” for adjust- ment.
■The clock is displayed when
The engine switch is in ACCESSORY or IGNITION ON mode. Outside temperature display The temperature ranges from -22F (-30C) up to 122F (50C).
displayed
■The outside temperature is displayed when
The engine switch is in IGNITION ON mode.
■When --- is displayed
The system may be malfunctioning. Take your vehicle to your Toyota dealer.
■Display
In the following situations, the correct outside temperature may not be dis- played, or the display may take longer than normal to change. ●When stopped, or driving at low speeds (less than 12 mph [20 km/h]) ●When the outside temperature has changed suddenly (at the entrance/exit
of a garage, tunnel, etc.)
LC200_OM_OM60M88U_(U)
410
5-4. Using the other interior features
Power outlets The power outlet can be used for the following components: 12 V DC: Accessories that run on less than 10 A 120 V AC: Accessories that use less than 100 W ■ Center of console Front (12 V DC) Press the lid to open.
Rear (12 V DC)
LC200_OM_OM60M88U_(U)
■ Luggage compartment (120 V AC)
5-4. Using the other interior features
411
■The power outlet can be used when
12 V DC: The engine switch is in ACCESSORY or IGNITION ON mode. 120 V AC: The engine switch is in IGNITION ON mode.
NOTICE
■To avoid damaging the power outlets
Close the power outlet lid when not in use. Foreign objects or liquids that enter the power outlet may cause a short cir- cuit.
■To prevent the fuse from being blown
12 V DC: Do not use an accessory that uses more than 12 V 10 A. 120 V AC: Do not use a 120 V AC appliance that requires more than 100 W. If a 120 V AC appliance that consumes more than 100 W is used, the pro- tection circuit will cut the power supply.
■To prevent the battery from being discharged
Do not use the power outlet longer than necessary when the engine is not running.
■Appliances that may not operate properly (120 V AC)
The following 120 V AC appliances may not operate even if their power consumption is under 100 W. ●Appliances with high initial peak wattage ●Measuring devices that process precise data ●Other appliances that require an extremely stable power supply
LC200_OM_OM60M88U_(U)
412
5-4. Using the other interior features
Wireless charger (if equipped) A portable device can be charged by just placing Qi standard wireless charge compatible portable devices according to the Wireless Power Consortium, such as smart phones and mobile batteries, etc., on the charge area. This function cannot be used with portable devices that are larger than the charging area. Also, depending on the portable device, it may not operate as normal. Please read the operation manual for portable devices to be used. ■ The “Qi” symbol
The “Qi” symbol is a trademark of the Wireless Power Consortium.
■ Name for all parts
Power supply switch Operation indicator light Charge area
LC200_OM_OM60M88U_(U)
5-4. Using the other interior features
413
■ Using the wireless charger
Press the lid to open.
the power supply of the wireless
Press switch charger. Switches on and off with each press of the power supply switch. When turned on, the operation indicator light (green) comes on. Even with the engine off, the on/ off state of the power supply switch is memorized. Place the charging side of the portable device down. When charging, the operation indicator light (orange) comes on. If charging is not occurring, try placing the portable device as close to the center of the charg- ing area as possible. When charging is complete, the operation indicator light (green) comes on.
● Recharging function
• When charging is complete and after a fixed time in the charge
suspension state, charging restarts.
• When the portable device is moved, charging is stopped for a
moment and then it restarts.
LC200_OM_OM60M88U_(U)
414
5-4. Using the other interior features
■ Lighting conditions of operation indicator light
Operation indicator light
Conditions
Turning off
Green (comes on)
Orange (comes on)
When the Wireless charger power supply is off On Standby (charging possible state) When charging is complete* When placing the portable device on the charging area (detecting the portable device) Charging
*: Depending on the portable device, there are cases where the operation indicator light will continue being lit up orange even after the charging is complete.
● When the operation indicator light flashes
When an error occurs, the operation indicator light flashes an orange color. Handle the error based on the following table.
Operation indicator
light
repeatedly Flashing once every second (Orange)
Repeatedly flashes 3 times continuously (Orange)
Repeatedly flashes 4 times continuously (Orange)
Suspected causes
Handling method
Vehicle to charger com- munication failure.
Contact your Toyota dealer.
A foreign substance is between the portable device and charge area.
The portable device is out of sync due to the device being shifted from its position. Temperature within the charger.
rising wireless
the
foreign Remove from substance between portable device and the charge area.
the
Place portable device near the center of the charge area.
Stop charging at once and charging again after for a while.
start
LC200_OM_OM60M88U_(U)
5-4. Using the other interior features
415
■The wireless charger can be operated when
The engine switch is in ACCESSORY or IGNITION ON mode.
■Usable portable devices
Qi standard wireless charge standard can be used on compatible devices. However, not all Qi standard devices and compatibility are guaranteed. Starting with mobile phones and smart phones, it is aimed for low power elec- trically supplied portable devices of no more than 5W.
■When covers and accessories are attached to portable devices
Do not charge in situations where cover and accessories not able to handle Qi are attached to the portable device. Depending on the type of cover and accessory, it may not be possible to charge. When charging is not performed even with the portable device placed on the charge area, remove the cover and accessories.
■While charging, noise enters the AM radio
Turn off the wireless charger and confirm that the noise has decreased. If the noise decreases, continuously pushing the power supply switch of the wire- less charger for 2 seconds, the frequency of the charger can be changed and the noise can be reduced. Also, on that occasion, the operation indicator light will flash orange 2 times.
■Important points of the wireless charger
●If the electronic key cannot be detected within the vehicle interior, charging cannot be done. When the door is opened and closed, charging may be temporarily suspended.
●When charging, the wireless charging device and portable device will get
warmer, however this is not a malfunction. When a portable device gets warm while charging, charging may stop due to the protection function on the portable device side. In this case, when the temperature of the portable device drops significantly, charge again.
■Operation sounds
When the power supply is turned on, while searching for the portable device a sound will be produced, however this is not a malfunction.
LC200_OM_OM60M88U_(U)
416
5-4. Using the other interior features
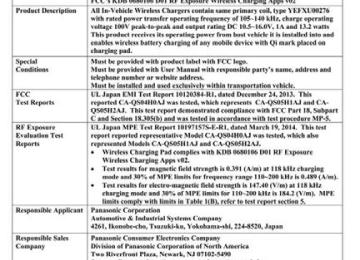
■Certification for the wireless charger
LC200_OM_OM60M88U_(U)
5-4. Using the other interior features
417
LC200_OM_OM60M88U_(U)
418
5-4. Using the other interior features
WARNING
■Caution while driving
When charging a portable device, for safety reasons, the driver should not operate the main part of the portable device while driving. ■Caution regarding interference with electronic devices
People with implantable cardiac pacemakers, cardiac resynchronization therapy-pacemakers or implantable cardioverter defibrillators, as well as any other electrical medical device, should consult their physician about the usage of the wireless charger. The operations of the wireless charger may have an affect on medical devices.
■To prevent damage or burns
Observe the following precautions. Failure to do so may result in a possibility of equipment failure and damage, catch fire, burns due to overheat. ●Do not insert any metallic objects between the charging area and the por-
table device while charging
●Do not attach stickers, metallic objects, etc., to the charger area or porta-
ble device
●Do not cover with cloth, etc., and charge ●Do not charge portable devices other than designated ●Do not attempt to dismantle for disassembly or modifications ●Do not hit or apply a strong force
LC200_OM_OM60M88U_(U)
5-4. Using the other interior features
419
WARNING
■Conditions in which the function may not operate correctly
In the following conditions, it may not operate correctly ●The portable device is fully charged ●There is foreign matter between the charge area and portable device ●The temperature of the portable device gets higher from charging ●The charging surface of the portable device is facing up ●The placement of the portable device is out of alignment with the charge
area
●Near a TV tower, electric power plant, gas station, radio station, large dis- play, airport or other facility that generates strong radio waves or electrical noise
●When the electronic key is in contact with, or is covered by the following
metallic objects • Cards to which aluminum foil is attached • Cigarette boxes that have aluminum foil inside • Metallic wallets or bags • Coins • Hand warmers made of metal • Media such as CDs and DVDs
●When other wireless keys (that emit radio waves) are being used nearby In addition, excluding the above-mentioned, when the charger does not per- form normally or the operation indicator light is flashing continuously, it is considered that the wireless charger is malfunctioning. Contact your Toyota dealer.
■To prevent failure or damage to data
●Do not bring magnetic cards, such as credit cards, or magnetic recording media, etc., close to the charger while charging, otherwise, data may dis- appear under the influence of magnetism. Also, do not bring precision instruments such as wrist watches, etc., close to the charger, as such objects may break.
●Do not leave portable devices in the cabin. The temperature inside the cabin may become high, when under the sun, and cause damage to the device.
■To prevent battery discharge
When the engine is stopped, do not use the wireless charger for a long time.
LC200_OM_OM60M88U_(U)
420
5-4. Using the other interior features
Armrest Fold down the armrest for use.
NOTICE
To prevent damage, do not apply too much load on the armrest.
Coat hooks The coat hooks are provided with the second seat assist grips.
WARNING
Do not hang coat hangers or other hard or sharp objects on the hook. If the SRS curtain shield airbags deploy, these items may become projectiles, causing death or serious injury.
LC200_OM_OM60M88U_(U)
5-4. Using the other interior features
421
Assist grips An assist grip (Type A) can be used to support your body while sitting on the seat. An assist grip (Type B) can be used when getting in or out of the vehi- cle and others.
Assist grip (Type A) Assist grip (Type B)
WARNING
Do not use the assist grip (Type A) when getting in or out of the vehicle or rising from your seat.
NOTICE
To prevent damage, do not hang heavy objects or put a heavy load on the assist grip.
LC200_OM_OM60M88U_(U)
422
5-4. Using the other interior features
Garage door opener
The garage door opener can be programmed to operate garage doors, gates, entry doors, door locks, home lighting systems, security systems, and other devices.
The garage door opener (HomeLink Universal Transceiver) is manufac- tured under license from HomeLink.
Programming HomeLink (for U.S.A. owners) The HomeLink compatible transceiver in your vehicle has 3 buttons which can be programmed to operate 3 different devices. Refer to the programming method below appropriate for the device.
Buttons Indicator
■ Programming HomeLink
the
remote control Point transmitter for the device 1 to 3 in. (25 to 75 mm) from the HomeLink buttons. Keep the HomeLink indicator light in view while programming.
LC200_OM_OM60M88U_(U)
5-4. Using the other interior features
423
indicator
“Reprogramming
Press and hold one of the HomeLink buttons and the transmitter button. When the HomeLink light changes from a slow to a rapid flash, you can release both buttons. If the HomeLink indicator light comes on but does not flash, flashes rapidly for 2 seconds and remains lit, the HomeLink button is already programmed. Use the other buttons or follow the HomeLink button” instructions. (P. 425) Test the HomeLink opera- tion by pressing the newly programmed button. If a HomeLink button has been programmed for a garage door, check to see if the garage door opens and closes. If the garage door does not operate, see if your remote control transmitter is of the rolling code type. Press and hold the programmed HomeLink button. The remote control transmitter is of the roll- ing code type if the HomeLink indicator light flashes rapidly for 2 seconds and then remains lit. If your transmitter is of the roll- ing code type, proceed to the heading “Programming a rolling code system”. Repeat the steps above to program another device for each of the remaining HomeLink buttons.
LC200_OM_OM60M88U_(U)
424
5-4. Using the other interior features
■ Programming a rolling code system
If your device is rolling code equipped, follow the steps under the heading “Programming HomeLink” before proceeding with the steps listed below.
Locate the learn button on the ceiling mounted garage door opener motor. The exact location and color of the button may vary by brand of garage door opener motor. Refer to the operation manual supplied with the garage door opener motor for the location of the learn button. Press the learn button. Following this step, you have 30 seconds in which to initiate Press and hold the vehicle’s programmed HomeLink button for 2 seconds and release it. Repeat this step once again. The garage door may open. If the garage door opens, the programming process is complete. If the door does not open, press and release the button a third time. This third press and release will complete the programming process by opening the garage door. The ceiling mounted garage door opener motor should now recognize the HomeLink signal and operate the garage door. Repeat the steps above to program another rolling code system for any of the remaining HomeLink buttons.
below.
■ Programming an entry gate (for U.S.A. owners)/Programming
all devices in the Canadian market
Place your transmitter 1 to 3 in. (25 to 75 mm) away from the sur- face of the HomeLink. Keep the HomeLink indicator light in view while programming. Press and hold the selected HomeLink button. Repeatedly press and release (cycle) the device’s remote control button for 2 seconds each until When the indicator light on the HomeLink compatible trans- ceiver starts to flash rapidly, release the buttons. Test the operation of the HomeLink by pressing the newly pro- grammed button. Check to see if the gate/device operates cor- rectly. Repeat the steps above to program another device for each of the remaining HomeLink buttons.
is completed.
LC200_OM_OM60M88U_(U)
5-4. Using the other interior features
425
■ Programming other devices
To program other devices such as home security systems, home door locks or lighting, contact your Toyota dealer for assistance.
■ Reprogramming a button
The individual HomeLink buttons cannot be erased but can be reprogrammed. To reprogram a button, follow the “Reprogramming a HomeLink button” instructions.
Operating HomeLink Press the appropriate HomeLink button. The HomeLink indicator light should come on.
The HomeLink compatible transceiver in your vehicle continues to send a signal for up to 20 seconds as long as the button is pressed.
Reprogramming a HomeLink button Press and hold the desired HomeLink button. After 20 seconds, the HomeLink indicator light will start flashing slowly. Next, while still pressing and holding the HomeLink button, press and hold the but- ton on the transmitter until the HomeLink indicator light changes from a slow to a rapid flash.
Erasing the entire HomeLink memory (all three programs) Press and hold the 2 outside but- tons for 10 seconds until the indi- cator light flashes.
If you sell your vehicle, be sure to erase the programs stored in the HomeLink memory.
LC200_OM_OM60M88U_(U)
426
5-4. Using the other interior features
■Before programming
●Install a new battery in the remote control transmitter. ●The battery side of the remote control transmitter must be pointed away
from the HomeLink button.
■Certification for the garage door opener
■When support is necessary
Visit on the web at www.homelink.com or call 1-800-355-3515.
WARNING
■When programming a garage door or other remote control devices
The garage door or other devices may operate, so ensure people and objects are out of danger to prevent potential harm.
■Conforming to federal safety standards
Do not use the HomeLink compatible transceiver with any garage door opener or device that lacks safety stop and reverse features as required by federal safety standards. This includes any garage door that cannot detect an interfering object. A door or device without these features increases the risk of death or serious injury.
LC200_OM_OM60M88U_(U)
5-4. Using the other interior features
427
Safety Connect
Safety Connect is a subscription-based telematics service that uses Global Positioning System (GPS) data and embedded cel- lular technology to provide safety and security features to sub- scribers. Safety Connect is supported by Toyota’s designated response center, which operates 24 hours per day, 7 days per week. Safety Connect service is available by subscription on select, telematics hardware-equipped vehicles. By using the Safety Connect service, you are agreeing to be bound by the Telematics Subscription Service Agreement and its Terms and Conditions, as in effect and amended from time to time, a current copy of which is available at Toyota.com. All use of the Safety Connect service is subject to such then-applicable Terms and Conditions.
System components
Microphone LED light indicators “SOS” button
: If equipped
LC200_OM_OM60M88U_(U)
428
5-4. Using the other interior features
Services Subscribers have the following Safety Connect services available: ● Automatic Collision Notification*
Helps drivers receive necessary response from emergency service providers. (P. 430)
*: U.S. Patent No. 7,508,298 B2
● Stolen Vehicle LocationHelps drivers in the event of vehicle theft. (P. 430)
● Emergency Assistance Button (SOS)
Connects drivers to response-center support. (P. 430)
● Roadside Assistance
Provides drivers various on-road assistance. (P. 430)
Subscription After you have signed the Telematics Subscription Service Agreement and are enrolled, you can begin receiving services. A variety of subscription terms is available for purchase. Contact your Toyota dealer, call 1-800-331-4331, or push the “SOS” button in your vehicle for further subscription details.
■Safety Connect Services Information
●Phone calls using the vehicles Bluetooth® technology will not be possible
during Safety Connect.
●Safety Connect is available beginning Fall 2009 on select Toyota models. Contact with the Safety Connect response center is dependent upon the telematics device being in operative condition, cellular connection availabil- ity, and GPS satellite signal reception, which can limit the ability to reach the response center or receive emergency service support. Enrollment and Telematics Subscription Service Agreement required. A variety of subscrip- tion terms is available; charges vary by subscription term selected.
●Automatic Collision Notification, Emergency Assistance, Stolen Vehicle Location, and Enhanced Roadside Assistance will function in the United States, including Hawaii and Alaska, and in Canada. No Safety Connect services will function outside of the United States in countries other than Canada.
●Safety Connect services are not subject to section 255 of the Telecommuni-
cations Act and the device is not TTY compatible.
LC200_OM_OM60M88U_(U)
5-4. Using the other interior features
429
■Languages
The Safety Connect response center will offer support in multiple languages. The Safety Connect system will offer voice prompts in English and Spanish. Please indicate your language of choice when enrolling.
■When contacting the response center
You may be unable to contact the response center if the network is busy.
■Safety Connect backup battery depletion
An exclusive backup battery is built in to assist the Automatic Collision Notifi- cation, which is activated when impact above a certain level is applied to the vehicle, or when the airbags operate. This battery is a primary battery, and cannot be recharged. The red LED indicator will flash to indicate that the bat- tery should be replaced. The backup battery will need to be replaced if the Automatic Collision Notifi- cation operates for 60 seconds or more. For replacement, consult your Toy- ota dealer. Safety Connect LED light Indicators When the engine switch is turned to IGNITION ON mode, the red indi- cator light comes on for 2 seconds then turns off. Afterward, the green indicator light comes on, indicating that the service is active. The following indicator light patterns indicate specific system usage conditions: ● Green indicator light on = Active service ● Green indicator light flashing = Safety Connect call in process ● Red indicator light (except at vehicle start-up) = System malfunction
(contact your Toyota dealer)
● No indicator light (off) = Safety Connect service not active
LC200_OM_OM60M88U_(U)
430
5-4. Using the other interior features
Safety Connect services ■ Automatic Collision Notification
In case of either airbag deployment or severe rear-end collision, the system is designed to automatically call the response center. The responding agent receives the vehicle’s location and attempts to speak with the vehicle occupants to assess the level of emergency. If the occupants are unable to communicate, the agent automati- cally treats the call as an emergency, contacts the nearest emer- gency services provider to describe the situation, and requests that assistance be sent to the location.
■ Stolen Vehicle Location
If your vehicle is stolen, Safety Connect can work with local author- ities to assist them in locating and recovering the vehicle. After filing a police report, call the Safety Connect response center at 1-800- 331-4331 and follow the prompts for Safety Connect to initiate this service. In addition to assisting law enforcement with recovery of a stolen vehicle, Safety-Connect-equipped vehicle location data may, under certain circumstances, be shared with third parties to locate your vehicle. Further information is available at Toyota.com.
■ Emergency Assistance Button (“SOS”)
In the event of an emergency on the road, push the “SOS” button to reach the Safety Connect response center. The answering agent will determine your vehicle’s location, assess the emergency, and dispatch the necessary assistance required.
If you accidentally press the “SOS” button, tell the response-center agent that you are not experiencing an emergency.
■ Roadside Assistance
Subscribers can press the “SOS” button to reach a Safety Connect response-center agent, who can help with a wide range of needs, such as: towing, flat tire, fuel delivery, etc. For a description of the Roadside Assistance services and their limitations, please see the Safety Connect Terms and Conditions, which are available at Toy- ota.com.
LC200_OM_OM60M88U_(U)
5-4. Using the other interior features