- Download PDF Manual
-
For your safety and comfort,
read carefully and keep in the vehicle.
HILUX (Q) OM71122E
07/12/21
Foreword
thoroughly and have all
Welcome to the growing group of value−conscious people who drive Toyotas. We are proud of the advanced engineering and quality construction of each vehicle we build. This Owner’s Manual explains the operation of your new Toyota. Please read it the occupants follow the instructions carefully. Doing so will help you that you can enjoy many years of safe and trouble−free motoring. For important information about this manual and your Toyota, read the following pages carefully. When it comes to service, remember that your Toyota dealer knows your vehicle very well and is interested in your complete satisfaction. Your Toyota dealer will provide quality maintenance and any other assistance you may require. Please leave this Owner’s Manual in this vehicle at the time of resale. The next owner will need this information also. All information and specifications in this manual are current at the time of printing. However, because of Toyota’s policy of continual product improvement, we reserve the right Please note that this manual applies to all models and explains all equipment, including options. Therefore, you may find some explanations for equipment not installed on your vehicle.
to make changes at any time without notice.
2008 TOYOTA MOTOR CORPORATION All rights reserved. This material may not be reproduced or copied, in whole or in part, without
the written permission of Toyota Motor Corporation.
HILUX (Q) OM71122E
07/12/21
Important information about this manual
Safety and vehicle damage warnings
Safety symbol
Throughout this manual, you will see safety and vehicle damage warnings. You must follow these warnings carefully to avoid possible injury or damage. The types of warnings, what are used in this manual are explained as follows:
they look like, and how they
CAUTION
This is a warning against anything which may cause injury to people if the warning is ignored. You are informed about what you must or must not do in order injury to yourself and others.
to reduce the risk of
NOTICE
This is a warning against anything which may cause damage to the vehicle or its equipment if the warning is ignored. You are informed about what you must or must not do in order to avoid or reduce the risk of damage to your vehicle and its equipment.
ii
the
When you see shown above, “Do not do this”; or “Do not happen”.
symbol it means: “Do not...”; let this
safety
HILUX (Q) OM71122E
07/12/21
Important information about your Toyota
Fuel and fuel
filter
(diesel engine)
The fuel filter for a diesel engine does not need to be replaced periodically.
NOTICE
For long life performance of your vehicle, please follow these instructions: z Only fill your fuel tank at a standard station. z If the fuel system warning light comes on, have your vehicle checked and the warning light re- set by your Toyota dealer as soon as possible. filter should only be replaced at your Toyota dealer to prevent the mixing of fuel with foreign material and impurities.
z The fuel
iii
Occupant restraint systems
Toyota encourages you and your family to take the time to read Section 1−3 of this Owner’s Manual carefully. In terms of helping you understand how you can receive the maximum benefit of the occupant restraint systems this vehicle provides, Section 1−3 of this Owner’s Manu- al is the most important section for you and your family to read. Section 1−3 describes the function and operation con- cerning seats, seat belts, SRS airbags and child re- straint systems of this vehicle and some potential haz- ards you should be aware of. These systems work to- gether along with the overall structure of this vehicle in order in the event of a crash. The effect of each system is enhanced when it is used properly and together with other systems. No single occupant restraint system can, by itself, provide you or your restraint which these systems can provide when used together. That for you and your family to understand the purpose and proper use of each of these systems and how they relate to each other.
family with the equal
to provide occupant
is important
is why it
restraint
level of
HILUX (Q) OM71122E
07/12/21
The purpose of all occupant restraint systems is to help reduce the possibility of death or serious injury in the event of a collision. None of these systems, either indi- vidually or together, can ensure that there is no injury the more you know in the event of collision. However, about these systems and how to use them properly, the greater your chances become of surviving an accident without death or serious injury. Seat belts provide the primary restraint to all occupants of the vehicle, and every occupant of the vehicle should wear seat belts properly at all times. Children should always be secured in child restraint systems that are appropriate for their age and size. SRS (Supplemental Restraint System) airbags are, as their names imply, designed to work with, and be supplemental to, seat belts and are not substitutes for them. SRS airbags can be very effective in reducing the risk of head and chest injuries by preventing contact of the head and chest with interior portions of
the vehicle.
the SRS airbags must deploy In order to be effective, with tremendous speed. The rapid deployment of the SRS airbags makes the SRS airbags themselves poten- tial sources of death or serious injury if an occupant is too close to an airbag, or if an object or some part of his or her body has been placed between the occupant and the airbag at the time of deployment. This is just one example of how the instructions in Section 1−3 of this Owner’s Manual will help ensure proper use of the occupant restraint systems, and increase the safety they can provide to you and your family in the event of an accident. Toyota recommends you to read the provisions in Sec- tion 1−3 carefully and refer to them as needed during your time of ownership of
this vehicle.
iv
HILUX (Q) OM71122E
07/12/21
Accessories, spare parts and modification of your Toyota
Installation of a mobile two−way radio system
fuel
injection system/sequential multiport
As the installation of a mobile two−way radio system in your vehicle could affect electronic systems such as multiport fuel injection system, electronic throttle control system, elec- tronically controlled fuel pump, electronic engine control system, cruise control system, anti−lock brake system, SRS airbag system and seat belt pretensioner system, be sure to check with your Toyota dealer for precaution- ary measures or special instructions regarding installa- tion.
A wide variety of non−genuine spare parts and accessories for Toyota vehicles are currently available in the market. Using these spare parts and accessories which are not genuine Toyota products may adversely affect the safety of your vehicle, even though these parts may be approved by certain authorities in your country. Toyota therefore cannot accept any liability or guarantee spare parts and accesso- ries which are not genuine Toyota products, nor for re- placement or installation involving such parts. This vehicle should not be modified with non−genuine Toyota products. Modification with non−genuine Toyota products could affect its performance, safety or durabili- ty, and may even violate governmental In addition, damage or performance problems resulting from the modification may not be covered under warranty.
regulations.
HILUX (Q) OM71122E
07/12/21
Scrapping of your Toyota
The SRS airbag and seat belt pretensioner devices in your Toyota contain explosive chemicals. the vehicle is scrapped with the airbags and pretensioners left as this may cause an accident such as fire. Be they are, sure to have the systems of the SRS airbag and seat belt pretensioner removed and disposed of by a qualified service shop or by your Toyota dealer before you scrap your vehicle.
If
On−pavement and off−road
driving tips
(on four−wheel drive models)
In addition,
This vehicle will handle and maneuver differently from an ordinary passenger car because it is designed for It has a significantly higher rollover off−road use also. rate than other types of vehicles. this ve- hicle has a higher ground clearance and center of gravi- ty than that of an ordinary passenger car. This vehicle design feature causes this type of vehicle to be more likely to rollover. Failure to operate this vehicle correctly may result in loss of control, accidents or vehicle rol- lover causing death or serious injury. Be sure to read “Off−road vehicle precautions” on page 164 and “Off− road driving precautions” on page 185.
vi
HILUX (Q) OM71122E
07/12/21
Model code
Check the model code to see what type of model your vehicle is.
Basic code
GGN: Models with 1GR−FE engine TGN: Models with 2TR−FE engine KUN: Models with 1KD−FTV engine
Cab type
T: Single−cab C: Extra−cab P: Double−cab
Transmission type
A: 5−speed automatic transmission P: 4−speed automatic transmission M: Manual transmission
T G N 1 6 R − C
M S
Driving system
15, 16: Two−wheel drive models 25, 26: Four−wheel drive models
Grade
S: SR D: DLX
The model code appears on the manufacturer’s plate with the heading “MODEL”. See “Your Toyota’s identification” on page 176 for the manufacturer’s plate location.
vii
HILUX (Q) OM71122E
07/12/21
viii
HILUX (Q) OM71122E
Table of contents
07/12/21
1 OPERATION OF INSTRUMENTS AND CONTROLS
Lights, Wipers and Defogger
1 Overview of instruments and controls 2 Keys and Doors 3 Occupant restraint systems 4 Steering wheel and Mirrors 6 Gauges, Meters and Service reminder indicators 7 Engine (ignition) switch, Transmission and Parking brake 8 Audio system 9 Air conditioning system 10 Other equipment
. . . . . . . . . . . . . . . . . . . . . . . . . . . . . . . . . . . . . . . . . . . . . . . . . . . . . . . . . . . . . . . . . . . . . . . . . . . . . . . . . . . . . . . . . . . . . . . . . . . . . . . . . . . . . . . . . . . . . . . . . . . . . . . . . . . . . . . . . . . . . . . . . . . . . . . . . . . . . . . . . . . . . . . . . . . . . . . . . . . . . . . . . . . . . . . . . . . . . . . . . . . . . . . . . . . . . . . . . . . . . . . . . . . . . . . . . . . . . . . . . . . . . . . . . . . . . . . . . . . . . . . . . . . . . . . . . . . . . . . . . . . . . . . . . . . . . . . . . . . . . . . . . . . . . . . . . . . . . . . . . . . . . . . . . . . . . . . . . . . . . . . . . . . . . . . . . . . . . . . . . . . . . . . . . . . . . . . . . . . . . . . . . . . . . . . . . . . . . . . . . . . . . . . . . . . . . . . . . . . . . . . . . . . . . . . . . . . . . . . . . . . .
2 INFORMATION BEFORE DRIVING YOUR TOYOTA 3 STARTING AND DRIVING 4 IN CASE OF AN EMERGENCY 5 CORROSION PREVENTION AND APPEARANCE CARE 6 MAINTENANCE REQUIREMENTS 7 DO−IT−YOURSELF MAINTENANCE
Page 27
69
73
81
95
111
137
147
163
179
195
221
229Introduction
2 Engine and Chassis 3 Electrical components
. . . . . . . . . . . . . . . . . . . . . . . . . . . . . . . . . . . . . . . . . . . . . . . . . . . . . . . . . . . . . . . . . . . . . . . . . . . . . . . . . . . . . . . . . . . . . . . . . . . . . . . . . . . . . . . . . . . . . . . . . . . . . . . . . . . . . . . . . . . . . . . . . . . . . . . . . . . . . . . . . . . . . . . . . . . . . . . . . . . . . . . . . . . . . . . . . . . . . . . . . . . . . . . . . . . . . . . . . . . . .
8 SPECIFICATIONS 9 INDEX
233
241
253
265
275ix
HILUX (Q) OM71122E
07/12/21
HILUX (Q) OM71122E
07/12/21
SECTION 1− 1
OPERATION OF INSTRUMENTS AND CONTROLS Overview of instruments and controls Instrument panel overview Instrument cluster overview Indicator symbols on the instrument panel
. . . . . . . . . . . . . . . . . . . . . . . . . . . . . . . . . . . . . . . . . . . . . . . . . . . . . . . . . . . . . . . . . . . . . . . . . . . . . . . . . . . . . . . . . . . . .
HILUX (Q) OM71122E
07/12/21
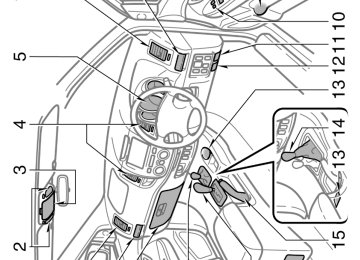
Instrument panel overview "View A
11h010e
. . . . . . . . . . . . . . . . .
Instrument cluster
. . . . . . . . . . . . . . . . . . . . . . . . . . . . . . . . . . . . . . . . . . . . . . . . . . . . . . . . . . . . . . . . . . . . . . . . . . . . . . . .
1. Side vent 2. Personal lights* 3. Auxiliary box* 4. Center vents 5. 6. Cup holder 7. Power door lock switch* 8. Power window switches* 9. Bottle holder 10. Window lock switch* 11. Fuel filler door opener* 12. Hood lock release lever 13. Cup holders* 14. Manual transmission gear
. . . . . . . . . . . . . . . . . . . . . . . . . . . . . . . . . . . . . . . . . . . . . . . . . . . . . . . . . . . . . . . . . . . . . . . . . . . . . . . . . . . . . . . . . . . . . . . . . . . . . . . . . . . . . . . .
144
77
158
144
158
17
18
160
19
23
22
158shift lever
. . . . . . . . . . . . . . . . . . . . . . . . . . . . . . . . . . .
103
10715. Parking brake lever 16. Automatic transmission
selector lever
. . . . . . . . . . . . . . . . . . . . . . . . . . . . . . . . . . . . . . . . . . . . . . . . . . .
97
105
15717. Front drive control lever 18. Glove box *: If equipped
HILUX (Q) OM71122E
07/12/21
"View B
11h011a
1. Front passenger’s seat belt
reminder light
. . . . . . . . . . . . . . . . . . . .
85
2. Clock with multi−information . . . . . . . . . . . . . . . . . . .
display*
. . . . . . . . . . . . . . . . . . . . . . . . . . . . . . . . .
3. Clock 4. Wiper and washer switches 5. Headlight, turn signal and front driving light switches
. . . .
148, 154
154
7774, 76
108. . . . . . . . . . .
6. Cruise control switch* 7. Power rear view mirror
control switches*
8. Power heater switch* 9.
Instrument cluster light control knob*
. . . . . . . . . . . . . . . . . . . . . . . . . . . . .
71
144. . . . . . . . . . . . . . . . . . . .
76
10. Engine immobilizer system
indicator light 11. Engine switch 12. Tilt steering lock release lever 13. Cigarette lighter 14. Rear window defogger switch* 15. Power outlet* 16. Ashtray 17. Air conditioning controls 18. Emergency flasher switch 19. Audio system* *: If equipped
. . . . . . . . . . . . . . . . . . . . . . . . . . . . . . . . . . . . . . . . . . . . . . . . . . . . . . . . . . . . . . . . . . . . . . . . . . . . . . . . . . . . . . . . . . . . . . . . . . . . . . . . . . . . . . . . . . . . . . . . . . . . . . . . . . . . . . . . . . . . . . . .
12
96
70
155
79
156
155
138
75
112HILUX (Q) OM71122E
07/12/21
Instrument cluster overview "With tachometer (type A)
11H012
4. Engine coolant temperature
gauge
5. Fuel gauge
. . . . . . . . . . . . . . . . . . . . . . . . . . . . . . . . . . . . . . . . . . . . . . . . .
6. Trip meter reset knob 7. Odometer and two trip meters
. . . . . . . . . . . . . . . .
84
8482
82. . . . . . . . . . . . . . . . . . . . . .
1. Tachometer 2. Speedometer 3. Service reminder indicators
and indicator lights
. . . . . . . . . . . . . . .
83
85
HILUX (Q) OM71122E
07/12/21
"With tachometer (type B)
11h001
. . . . . . . . . . . . . . . . . . . . . .
1. Tachometer 2. Speedometer 3. Service reminder indicators
and indicator lights
. . . . . . . . . . . . . . .
83
85
4. Engine coolant temperature
gauge
5. Fuel gauge
. . . . . . . . . . . . . . . . . . . . . . . . . . . . . . . . . . . . . . . . . . . . . . . . .
6. Trip meter reset knob 7. Odometer and two trip meters
. . . . . . . . . . . . . . . .
84
8482
82HILUX (Q) OM71122E
07/12/21
"Without tachometer
11H009
3. Service reminder indicators
and indicator lights
. . . . . . . . . . . . . . . . . . . . . . . . . . . . . . . . . . . . .
5. Trip meter reset knob 6. Odometer and two trip meters
. . . . . . . . . . . . . . . .
84
8485
821. Engine coolant temperature
gauge
. . . . . . . . . . . . . . . . . . . . . . . . . . .
82
2. Speedometer
4. Fuel gauge
HILUX (Q) OM71122E
07/12/21
Indicator symbols on the instrument panel
Brake system warning light*1
Anti−lock brake system warning light*1
(on some models)Driver’s seat belt reminder light*1
Open door warning light*1
Front passenger’s seat belt reminder light*1
SRS warning light*1
Charging system warning light*1
Timing belt replacement warning light*1
(diesel engine)Low engine oil pressure warning light*1
Fuel system warning light*1 (diesel engine)
Malfunction indicator lamp*1
or
Low fuel
level warning light*1
Unengaged “Park” warning light*1
(on some models)Automatic transmission fluid temperature warning light*1 (on some models)
HILUX (Q) OM71122E
07/12/21
Tail
light
indicator light (on some models)
Headlight high beam indicator light
Automatic transmission indicator light (on some 5−speed models)
Automatic transmission indicator light (on some 4−speed models)
*1: For details, see “Service reminder
indicators and warning
buzzers” on page 85
*2: If this light flashes, see “Cruise control” on page 108.
Turn signal
indicator lights
Front driving light (on some models)
indicator light
Cruise control (on some models)
indicator light*2
Four−wheel drive indicator light (on some models)
Engine preheating indicator light (diesel engine)
HILUX (Q) OM71122E
07/12/21
SECTION 1− 2
OPERATION OF INSTRUMENTS AND CONTROLS Keys and Doors Keys Engine immobilizer system Wireless remote control Side doors Power windows Quarter windows Tailgate Hood Fuel tank cap
. . . . . . . . . . . . . . . . . . . . . . . . . . . . . . . . . . . . . . . . . . . . . . . . . . . . . . . . . . . . . . . . . . . . . . . . . . . . . . . . . . . . . . . . . . . . . . . . . . . . . . . . . . . . . . . . . . . . . . . . . . . . . . . . . . . . . . . . . . . . . . . . . . . . . . . . . . . . . . . . . . . . . . . . . . . . . . . . . . . . . . . . . . . . . . . . . . . . . . . . . . . . . . . . . . . . . . . . . . . . . . . . . . . . . . . . . . . . . . . . . . . . . . . . . . . . . . . . . . . . . . . . . . . . . . . . . . . . . . . . . . . . . . . . . . . . . . . . . . . . . . . . . . . . . . . . . . . . . . . . . . . . . . . . . . . . . . . . . . . . . . . . . . . . . . . . . . . . . . . . . . . . . . . . . . . . . . . . . . . . . . . . . . . . . . . . . . . . . . . . . . . . . . . . . . . . . . . . . . . .
10
12
13
17
18
20
21
22
23HILUX (Q) OM71122E
07/12/21
Your vehicle is supplied with two kinds of keys. 1. Master keys—These keys work in ev-
ery lock. These keys are equipped with the wire- less remote control
transmitter.
2. Master keys—These keys work in ev-
ery lock.
3. Sub key—This key does not work in
the glove box.
A transponder chip for engine immobilizer system has been placed in the head of the master and sub keys. These chips are needed to enable the system to function correctly, so be careful not to lose these keys. If you make your own duplicate key, you will not be able to cancel the system or start
the engine.
items locked in the glove box leave the sub
Your Toyota dealer will need one of mas- ter keys to make a new key with a built− in transponder chip. To protect when using valet parking, key with the attendant. Since the doors can be locked without a key, you should always carry a spare key in case you accidentally lock your keys inside the vehicle. For the wireless remote control key, see “Wireless remote control” on page 13.
information on use of
12i044a
12H056
Keys
Type A
Type B
10
HILUX (Q) OM71122E
07/12/21
12h005
12h006
12h007
NOTICE
When using a key containing a trans- ponder chip, observe the following precautions: z When starting the engine, do not use the key with a key ring resting on the key grip and do not press the key ring against the key grip. Otherwise the engine may not start, or may stop soon after it starts.
z When starting the engine, do not use the key with other transponder keys around (including keys of oth- er vehicles) and do not press other key plates against the key grip. Otherwise the engine may not start, or may stop soon after it starts. If this happens, remove the key once and then insert it again after remov- ing other transponder keys (includ- ing keys of other vehicles) from the ring or while gripping or covering them with your hand to start the engine.
z Do not bend the key grip. z Do not cover the key grip with any material that cuts off electromagnet- ic waves.
z Do not knock the key hard against
other objects.
z Do not
leave the key exposed to high temperatures for a long period, such as on the dashboard and hood under direct sunlight.
z Do not put
the key in water or
wash it in an ultrasonic washer.
z Do not use the key with electromag-
netic materials.
11
HILUX (Q) OM71122E
07/12/21
Engine immobilizer system
12h003
12h008
12h027
KEY NUMBER PLATE Your key number is shown on the plate. Keep the plate in a safe place such as your wallet, not in the vehicle. if you If you should lose your keys or need additional keys, duplicates can be made by a Toyota dealer using the key number. We recommend writing down the key num- ber and storing it
in a safe place.
The engine immobilizer system is a theft prevention system. When you in- sert the key in the engine switch, the transponder chip in the key’s head transmits an electronic code to the ve- hicle. The engine will start only when the electronic code in the chip corre- sponds to the registered ID code for the vehicle.
light will start
The system is automatically set when the key is removed from the engine switch. The indicator flashing to show the system is set. If any of the following indicator conditions occurs, contact your Toyota dealer. D The indicator light stays on. D The indicator light does not start flash- ing when the key is removed from the engine switch.
D The indicator light flashes inconsistent-
ly.
12
HILUX (Q) OM71122E
07/12/21
Inserting the registered key in the engine switch automatically cancels the system, which enables the engine to start. The indicator light will go off. For your Toyota dealer to make a new key with a built−in transponder chip, your deal- er will need your key number and master key. However, there is a limit to the num- ber of additional keys your Toyota dealer can make for you. If you make your own duplicate key, you will not be able to cancel the sys- tem or start the engine.
NOTICE
Do not modify, remove or disas- semble the engine immobilizer sys- tem. If any unauthorized changes or modifications are made, proper opera- tion of the system cannot be guaran- teed.
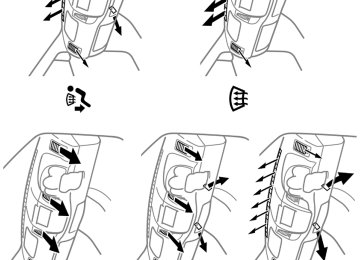
Wireless remote control (on some models)—
12i045b
Indicator light 1. 2. Unlock switch 3. Lock switch The wireless remote control system is designed to lock or unlock all the doors from a distance within approxi- mately 1 m (3 ft.) of the vehicle. When you operate any switch, push it slowly and securely. At this time, the indi- cator light
flashes once.
The wireless remote control key is an electronic component. Observe the follow- ing instructions in order not to cause dam- age to the key. D Do not
leave the key in places where the temperature becomes high such as on the dashboard.
D Do not disassemble it. D Avoid knocking it hard against other
objects or dropping it.
in water.
D Avoid putting it You can use up to 4 wireless remote con- trol keys for the same vehicle. Contact your Toyota dealer for detailed information.
13
HILUX (Q) OM71122E
07/12/21
To lock and unlock all the doors, push the switches of the key slowly and se- curely. To lock: the doors Push the lock switch with all closed. All the doors are locked simulta- neously. At this time, the turn signal lights flash once. Check to see that the doors are securely locked. If door not be performed. If the lock switch is pushed while the key is in the ignition, locking will not be per- formed.
the lock switch is pushed while any locking will
is not securely closed,
If the wireless remote control key does not actuate the doors, or operate from a normal distance or if the indicator light on the key is dimmed or does not come on: D Check for closeness to a radio trans- mitter such as a radio station or an airport which can interfere with normal operation of
the key.
D The battery may have been consumed. Check the battery in the key. To re- place the battery, see “—Replacing bat- tery” on page 15.
If you lose your wireless remote control key, contact your Toyota dealer as soon as possible to avoid the possibility of theft, or an accident. (See “If you lose your keys” on page 219.)
14
—Locking and unlocking doors
12h063a
Locking operation
12h064a
Unlocking operation
HILUX (Q) OM71122E
lights flash twice.
To unlock: Push the unlock switch. All the doors are unlocked simultaneously. At this time, the turn signal You have 30 seconds to open a door after using the wireless remote unlock feature. If a door is not opened by then, all the doors will be automatically locked again. If the lock or unlock switch is kept pressed in, the locking or unlocking opera- tion is not repeated. Release the switch and then push it again.
—Replacing battery For replacement, use a CR2016 lithium battery or equivalent and a flathead screwdriver.
CAUTION
Special care should be taken to pre- vent small children from swallowing the removed battery or components.
NOTICE
z When replacing the battery, be care-
ful not to lose the components.
z Replace only with the same or equivalent type recommended by a Toyota dealer.
z Dispose of used batteries according
to the local
laws.
Replace the battery by following these procedures:
07/12/21
12h015a
1. Open the cover using a flathead screw-
driver wrapped with plastic tape.
15
HILUX (Q) OM71122E
07/12/21
12h059
12h017a
2. Remove the module from the key
frame.
3. Remove the battery cover of the mod-
ule.
NOTICE
Do not bend the terminals.
4. Remove the discharged battery and put in a new battery with positive (+) side up.
NOTICE
z Make sure the positive side and the battery are
negative side of faced correctly.
z Do not replace the battery with wet hands. Water may cause unexpected rust.
z Do not touch or move any compo- nents inside the transmitter, or it may interfere with proper operation. z Be careful not to bend the electrode when inserting the battery and that dust or oils do not adhere to the case.
5. Install the battery cover of the module. 6. Install the module into the key case
and secure the cover.
After replacing the battery, check that the key operates properly. If the key still does not operate properly, contact your Toyota dealer.
16
HILUX (Q) OM71122E
07/12/21
Side doors
12h009
12h010
12h011b
LOCKING AND UNLOCKING WITH KEY Insert the key into the keyhole and turn it. To lock: Turn the key forward. To unlock: Turn the key backward. Vehicles with a power door lock sys- tem—All the doors lock and unlock simul- taneously with the driver’s door.
UNLOCKING WITH
LOCKING AND INSIDE LOCK KNOB Move the lock knob. To lock: Push the knob forward. To unlock: Pull If you want from the outside, set the knob in the lock position before closing the door. The outside door handle must be held up while the front door to lock your keys in the vehicle.
is being closed. Be careful not
the knob backward.
to lock the door
UNLOCKING WITH
LOCKING AND POWER DOOR LOCK SWITCH (on some models) Push the switch. To lock: Push the switch down on the front side. To unlock: Push the switch down on the rear side. All the doors lock or unlock simultaneous- ly.
17
HILUX (Q) OM71122E
CAUTION
Before driving, be sure that the doors are closed and locked, especially when small children are in the ve- hicle. Along with the proper use of locking the doors helps seat belts, prevent the driver and passengers from being thrown out from the ve- hicle in an accident. It also helps pre- vent the doors from being opened un- intentionally.
12h018
to the “LOCK”
REAR DOOR CHILD−PROTECTORS (on double−cab models) Move the lock lever position as shown on the label. is locked, you When the child protector cannot open the rear door by the inside door handle. We recommend using this feature whenever small children are in the vehicle.
18
07/12/21
Power windows (on some models)
12h012
The windows can be operated with the switch on each door. The power windows work when the engine switch is in the “ON” position. OPERATING THE DRIVER’S WINDOW Use the switch on the driver’s door. Normal operation: The window moves as long as you hold the switch. To open: Lightly push down the switch. To close: Pull up the switch.
HILUX (Q) OM71122E
07/12/21
12h013
Window lock switch
12h014
Automatic opening operation: Push the switch completely down and then release it. The window will fully open. To stop the window partway, lightly pull the switch up and then release it.
THE
PASSENGERS’
OPERATING WINDOWS Use the switch on each passenger’s door or the switches on the driver’s door that control each passenger’s win- dow. The window moves as long as you hold the switch. To open: Push down the switch. To close: Pull up the switch. If you push in the window lock switch on the driver’s door, the passengers’ windows cannot be operated.
12h019
19
HILUX (Q) OM71122E
D Be sure to remove the ignition key
when you leave your vehicle.
D Never leave anyone (particularly a small child) alone in your vehicle, especially with the ignition key still inserted. Otherwise, he/she could use the power window switches and get trapped in a window. Unat- tended person (particularly a small child) can be involved in a serious accident.
CAUTION
also make
To avoid death or serious injury, you must do the following. D Before you close the power win- dows, always make sure there is nobody around the power windows. You must the heads, hands and other parts of the bodies of all occupants are kept completely inside the vehicle. If someone’s neck, head or hands get caught it could result in death or serious in- jury. When anyone closes the power windows, make sure he/she oper- ates the windows safely.
in a closing window,
sure
D When small children are in the ve- hicle, never let them use the power window switches without supervi- sion. Use the window lock switch to prevent them from making unex- pected use of the switches.
20
07/12/21
Quarter windows (on extra−cab models)
12H034
the To open the quarter window, pull latch handle toward you and swing it fully out. When closing the window, make sure it is completely closed.
HILUX (Q) OM71122E
Tailgate
12h033b
Type A
Type B
12h020
Type A: To open the tailgate, unlock the latches as shown. Type B: To open the tailgate, pull the handle up. The support cables will hold the tailgate horizontal. See “Luggage stowage precautions” on page 175 for precautions when loading luggage. After closing the tailgate, try pulling it to- ward you to make sure it is securely locked.
CAUTION
If the open tailgate hides the stop/tail lights, rear turn signal lights, back−up lights or rear retro reflectors while you are parked, other road users must be warned of the presence of your vehicle by a warning triangle or other device.
NOTICE
Avoid driving with the tailgate open.
07/12/21
12h021
To lower the tailgate fully, release the support brackets from the lugs as shown.
NOTICE
z Lower the tailgate gently when it is
unhooked.
z Make sure the tailgate is securely caught by the support brackets be- fore closing the tailgate.
21
HILUX (Q) OM71122E
07/12/21
Hood
12h022
12h023a
12h024
To open the hood: 1. Pull the hood lock release lever. The
hood will spring up slightly.
2. In front of the vehicle, pull up the the
auxiliary catch lever and lift hood.
CAUTION
Before driving, be sure that the hood is closed and securely locked. Other- wise, the hood may open unexpected- ly while driving and an accident may occur.
22
3. Hold the hood open by inserting the
support rod into the slot.
forgotten any tools,
Before closing the hood, check to see that you have not rags, etc. and return the support rod to its clip—this prevents rattles. Then lower the hood and make sure it locks into place. If necessary, press down gently on the front edge to lock it.
HILUX (Q) OM71122E
07/12/21
CAUTION
After inserting the support rod into the slot, make sure the rod supports the hood securely preventing from falling down on to your head or body.
NOTICE
Be sure to return the support rod to its clip before closing the hood. Clos- ing the hood with the support rod up could cause the hood to bend.
Fuel tank cap (type A)
12i062
12h025
This indicates that the fuel filler door is on the left side of your vehicle.
1. To open the fuel filler door, pull the
lever up. When refueling, turn off the engine.
23
HILUX (Q) OM71122E
07/12/21
12h026
CAUTION
D Make sure the cap is tightened se- fuel spillage in
curely to prevent the event of an accident.
D Use only a genuine Toyota fuel tank cap for replacement. It is designed to regulate fuel tank pressure.
tank cap,
2. To remove the fuel
turn the cap slowly counterclockwise, then pause slightly before removing it. After removing the cap, hang it on the cap hanger.
It is not unusual to hear a slight swoosh when the cap is opened. When installing, turn the cap clockwise until you hear a click.
CAUTION
D Do not smoke, cause sparks or al- low open flames when refueling. The fumes are flammable.
D When opening the cap, do not re- move the cap quickly. In hot weath- er, fuel under pressure could cause injury by spraying out of the filler neck if the cap is suddenly re- moved.
D Do not fill a fuel container with fuel on a plastic truck bed liner, a rub- ber truck bed mat, or any other in- sulating material. A static electricity charge could cause a spark and fire hazard. The proper procedure is to place an approved fuel container on the ground away from the truck for filling.
24
HILUX (Q) OM71122E
07/12/21
Fuel tank cap (type B)
12i062
12h053
CAUTION
D Do not smoke, cause sparks or al- low open flames when refueling. The fumes are flammable.
D When opening the cap, do not re- move the cap quickly. In hot weath- er, fuel under pressure could cause injury by spraying out of the filler neck if the cap is suddenly re- moved.
This indicates that the fuel filler door is on the left side of your vehicle.
1. To unlock the fuel tank cap,
insert ignition key and turn it counterclock- wise. When refueling, turn off the engine.
25
HILUX (Q) OM71122E
07/12/21
12h054
CAUTION
D Make sure the cap is tightened se- fuel spillage in
curely to prevent the event of an accident.
D Use only a genuine Toyota fuel tank cap for replacement. It is designed to regulate fuel tank pressure.
2. To remove the fuel
turn the cap slowly counterclockwise, then pause slightly before removing it.
tank cap,
It is not unusual to hear a slight swoosh when the cap is opened. When installing, make sure the tabs in the cap are proper- ly aligned with the cutouts in the tank opening. Then lock the cap by turning the fuel
tank cap key clockwise.
26
HILUX (Q) OM71122E
07/12/21
SECTION 1− 3
OPERATION OF INSTRUMENTS AND CONTROLS Occupant restraint systems Seats Front seats Removing rear seat cushions Tumbling rear seat cushion Head restraints Seat belts SRS driver and front passenger airbags Child restraint
. . . . . . . . . . . . . . . . . . . . . . . . . . . . . . . . . . . . . . . . . . . . . . . . . . . . . . . . . . . . . . . . . . . . . . . . . . . . . . . . . . . . . . . . . . . . . . . . . . . . . . . . . . . . . . . . . . . . . . . . . . . . . . . . . . . . . . . . . . . . . . . . . . . . . . . . . . . . . . . . . . . . . . . . . . . . . . . . . . . . . . . . . . . . . . . . . . . . . . . . . . . . . . . . . . . . . . . . . . . . . . . . . . . . . . . . . . . . . . . . . . . . . . . . . . . . . . . . . . . . . . . . . . . . . . . . . . . . . . . . . . . . . . . . . . . . . . . . . . . . . . . . . . . . . . . . . . . . . . . . . . . . . . . . . . . . .
28
28
32
33
34
35
43
4927
HILUX (Q) OM71122E
07/12/21
Seats While the vehicle is being driven, all ve- hicle occupants should have the seatback upright, sit well back in the seat and prop- erly wear the seat belts provided.
CAUTION
D Do not drive the vehicle unless the occupants are properly seated. Do not allow any passengers to sit on top of a folded−down seatback, or in the luggage compartment or car- go area. Persons not properly seated and/or not properly re- strained by seat belts can be killed or severely injured in the event of emergency braking or a collision. D During driving, do not allow any passengers to stand up or move around between seats. Otherwise, death or severe injuries can occur in the event of emergency braking or a collision.
Front seats— —Front seat precautions Driver seat
CAUTION
The SRS driver airbag deploys with considerable force, and can cause death or serious injury especially if the driver is very close to the airbag. Since the risk zone for driver airbag is the first 50 – 75 mm (2 – 3 in.) of inflation, placing yourself 250 mm (10
in.) from your driver airbag provides you with a clear margin of safety. This distance is measured from the center of the steering wheel to your breastbone. If you sit less than 250
mm (10 in.) away now, you can change your driving position in sever- al ways: D Move your seat to the rear as far as you can while still reaching the pedals comfortably.D Slightly recline the back of
the seat. Although vehicle designs vary, many drivers can achieve the 250
mm (10 in.) distance, even with the driver seat all the way forward, sim- ply by reclining the back of the seat somewhat. If reclining the back of your seat makes it hard to see the road, raise yourself by using a firm, non−slippery cushion, or raise the seat if your vehicle has that feature.D If your steering wheel is adjustable, tilt it downward. This points the air- bag toward your chest instead of your head and neck.
The seat should be adjusted as rec- ommended above, while still maintain- ing control of the foot pedals, steer- ing wheel, and your view of the in- strument panel controls.
28
HILUX (Q) OM71122E
07/12/21
Front passenger seat
CAUTION
The SRS front passenger airbag also deploys with considerable force, and can cause death or serious injury es- pecially if the front passenger is very close to the airbag. The front passen- ger seat should be as far from the airbag as possible with the seatback adjusted, so the front passenger sits upright.
—Seat adjustment precautions
CAUTION
D Do not adjust
the seat while the vehicle is moving as the seat may unexpectedly move and cause the driver to lose control of the vehicle. the seat does not
D Be careful
that
hit a passenger or luggage.
D After adjusting the seat position, re- lease the lever and try sliding the seat forward and backward to make sure it is locked in position.
D After adjusting the seatback, push your body back against the seat to make sure the seat is locked in position.
D Do not put objects under the seats. Otherwise, the objects may interfere with the seat−lock mechanism or unexpectedly push up the seat posi- tion adjusting lever and the seat may suddenly move, causing the driver to lose control of the vehicle. D While adjusting the seat, do not put your hands under the seat or near the moving parts. Otherwise, your hands or fingers may be caught and injured.
29
HILUX (Q) OM71122E
07/12/21
CAUTION
Avoid reclining the seatback any more than needed. The seat belts pro- vide maximum protection in a frontal or rear collision when the driver and front passenger are sitting up straight and well back in the seats. If you are reclined, the lap belt may slide past your hips and apply restraint forces directly to the abdomen or your neck may contact the shoulder belt. In the event of a frontal collision, the more the seat is reclined, the greater the risk of death or serious injury.
—Adjusting front seats (separate type)
1. SEAT POSITION ADJUSTING LEVER Hold the center of the lever and pull it up. Then slide the seat to the desired position with slight body pressure and release the lever. 2. SEAT HEIGHT ADJUSTING KNOB
(only driver’s seat of some models)
Turn the knob either way. 3. SEATBACK
ANGLE
LEVER
ADJUSTING
13h003a
Lean forward and pull the lever up. Then lean back to the desired angle and release the lever.
30
HILUX (Q) OM71122E
07/12/21
—Adjusting front seats (bench type)
—Moving front passenger’s seat (on extra−cab models)
1. SEAT POSITION ADJUSTING LEVER Pull the lever up. Then slide the seat to the desired position with slight body pressure and release the lever. 2. SEATBACK
ADJUSTING
ANGLE
LEVER
13H048a
Lean forward and pull the lever up. Then lean back to the desired angle and release the lever.
CAUTION
Avoid reclining the seatback any more than needed. The seat belts pro- vide maximum protection in a frontal or rear collision when the driver and front passenger are sitting up straight and well back in the seats. If you are reclined, the lap belt may slide past your hips and apply restraint forces directly to the abdomen or your neck may contact the shoulder belt. In the event of a frontal collision, the more the seat is reclined, the greater the risk of death or serious injury.
13H054
For easy access to behind the front passenger’s seat: 1. Lift the seatback angle adjusting lever or press the pedal behind the seat- back. The seat will slide forward.
2. Move the seat
tion.
to the front−most posi-
When access is no longer needed, lift up the seatback and return the seat until it locks.
31
HILUX (Q) OM71122E
07/12/21
Removing rear seat cushions (on extra−cab models)
CAUTION
D After putting back the seat,
try pushing the seat forward and rear- ward to make sure it is secured in place.
D Never allow anyone to rest
their foot on the release pedal while the vehicle is moving.
13h097
To remove the seat cushions, unhook the lock release lever by moving it as shown and pull them up and then to- ward the front of vehicle. The seat cushions can be removed sepa- rately.
CAUTION
When removing or reinstalling the seat cushions, observe the following precautions to prevent personal inju- ry: D Do not remove the seat cushions
while the vehicle is moving.
D Be careful not to get your hands or
feet pinched in the seat.
D Be careful not to hit the removed seat cushions against a person or drop it on yourself.
D After installing the seat cushions, push it upward and downward to make sure it is locked in position.
32
HILUX (Q) OM71122E
07/12/21
Tumbling rear seat cushion (on double−cab models)
13H175
13h004a
To prevent death or serious injury in a collision or sudden stop: D When reinstalling the seat cush- ions, be careful not to hit the seat cushions against you or inside of the vehicle.
D Install each seat in the same posi- tion from which it was removed. Failure to do so will prevent rear seat occupants from using seat belts properly.
1. Remove the center head restraint.
2. Pull the strap as shown. The latch under the seat cushion will release, allowing the seat cushion to be raised.
3. Raise the seat cushion as shown and anchor the strap to the bracket behind the rear seat.
4. Replace the center head restraint.
33
HILUX (Q) OM71122E
07/12/21
CAUTION
When returning the seats to their original position, observe the follow- ing precautions in order to prevent death or serious injury in a collision or sudden stop: D Be careful not to get your hands or
feet pinched in the seat.
D Make sure there are no obstacles under the seat which would prevent the seat from properly locking into place.
D Make sure the seat cushion is se- curely locked by trying to pull up- ward and downward on the edge of the seat cushion. Failure to do so will prevent the seat belt from oper- ating properly.
D Make sure the seat belts are not twisted or caught under the seat cushion and are arranged in their proper position and are ready to use.
Head restraints
13h051
Front seats
it up.
For your safety and comfort, adjust the head restraint before driving. To raise: Pull To lower: Push it down while pressing the lock release button. Rear head restraints—When an occupant sits on the rear seat, always pull up the rear head restraint to the lock position. The head restraint is most effective when it is close to your head. Therefore, using a cushion on the seatback is not recom- mended.
CAUTION
D Adjust
the center of
the head re- straint so that it is closest to the top of your ears.
13H167
D After adjusting the head restraint, make sure it is locked in position. D Do not drive with the head re-
straints removed.
34
Rear seats (on double−cab models)
HILUX (Q) OM71122E
Seat belts— —Seat belt precautions Toyota strongly urges that the driver and passengers in the vehicle be properly re- strained at all times with the seat belts provided. Failure to do so could increase the chance of injury and/or the severity of injury in accidents. The seat belts provided for your vehicle are designed for people of adult size, large enough to properly wear them. Child. Use a child restraint system ap- propriate for the child until the child be- comes large enough to properly wear the vehicle’s seat belts. See “Child restraint” on page 49 for details. Single−cab models: If a child is too large for a child restraint system, in the seat and must be restrained using the vehicle’s seat belt. Extra−cab and double−cab models: If a child is too large for a child restraint system, in the rear seat and must be restrained using the vehicle’s seat belt. According to accident statistics, the child is safer when properly restrained in the rear seat than in the front seat.
the child should sit
the child should sit
let
rear or
the force of
in the front seat,
the If a child must sit seat belts should be worn properly. If an accident occurs and the seat belts are not worn properly, the rapid inflation of the airbag may cause death or serious injury to the child. Do not allow any children to stand up or kneel on either front seats. An unrestrained child could suffer serious in- jury or death during emergency braking or a collision. Also, do not the child sit on your lap. Holding a child in your arms does not provide sufficient restraint. Pregnant woman. Toyota recommends the use of a seat belt. Ask your doctor for specific recommendations. The lap belt should be worn securely and as low as possible over the hips and not on the waist. Injured person. Toyota recommends the use of a seat belt. Depending on the inju- ry, first check with your doctor for specific recommendations. If seat belt regulations exist in the country where you reside, please contact your Toyota dealer for seat belt replacement or installation.
07/12/21
CAUTION
the
vehicle
Persons should ride in their seats properly wearing their seat belts whenever is moving. Otherwise, they are much more likely to suffer serious bodily injury or death in the event of sudden braking or a collision. When using the seat belts, observe the following: D Use the belt for only one person at a time. Do not use a single belt for two or more people—even children. D Avoid reclining the seatback any more than needed. The seat belts provide maximum protection in a frontal or rear collision when the driver and the front passenger are sitting up straight and well back in the seats. If you are reclined, the lap belt may slide past your hips and apply restraint forces directly to the abdomen or your neck may In the contact event of a frontal collision, the more the seat is reclined, the great- er the risk of death or serious inju- ry.
the shoulder belt.
35
HILUX (Q) OM71122E
07/12/21
It is essential to replace the entire assembly after it has been worn in a severe impact even if damage to the assembly is not obvious. Belts should not be worn with straps twisted. Each belt assembly must only be used by one occupant; it is danger- ous to put a belt around a child being carried on the occupant’s lap. WARNING: No modifications or additions should be made by the user which will either prevent the seat belt adjusting devices from op- erating to remove slack, or prevent the seat belt assembly from being adjusted to remove slack.