- 2009 Toyota Highlander Owners Manuals
- Toyota Highlander Owners Manuals
- 2004 Toyota Highlander Owners Manuals
- Toyota Highlander Owners Manuals
- 2014 Toyota Highlander Owners Manuals
- Toyota Highlander Owners Manuals
- 2010 Toyota Highlander Owners Manuals
- Toyota Highlander Owners Manuals
- 2005 Toyota Highlander Owners Manuals
- Toyota Highlander Owners Manuals
- 2015 Toyota Highlander Owners Manuals
- Toyota Highlander Owners Manuals
- 2003 Toyota Highlander Owners Manuals
- Toyota Highlander Owners Manuals
- 2001 Toyota Highlander Owners Manuals
- Toyota Highlander Owners Manuals
- 2006 Toyota Highlander Owners Manuals
- Toyota Highlander Owners Manuals
- 2011 Toyota Highlander Owners Manuals
- Toyota Highlander Owners Manuals
- 2002 Toyota Highlander Owners Manuals
- Toyota Highlander Owners Manuals
- 2007 Toyota Highlander Owners Manuals
- Toyota Highlander Owners Manuals
- Download PDF Manual
-
Guarani
Gujarati
Hausa
Hindi
Croatian
Hungarian
Armenian
Interlingua
Interlingue
Inupiak
Indonesian
Icelandic
Hebrew
Yiddish
Javanese
225
’06 HIGHLANDER_U (L/O 0508)
1320
1325
1401
1405
1415
1503
1513
1518
1601
1612
1619
1721
1813
1814
1815
1823
1901
1904
1907
1908
1909
Maltese
Burmese
Nauru
Nepali
Norwegian
Occitan
(Afan) Oromo
Oriya
Punjabi
Polish
Pashto, Pushto
Quechua Rhaeto−Romance Kirundi
Romanian
Kinyarwanda
Sanskrit
Sindhi
Sangho Serbo−Croatian Sinhalese
1911
1912
1913
1914
1915
1917
1918
1919
1920
1921
1923
2001
2005
2007
2008
2009
2011
2012
2014
2015
2018
Slovak
Slovenian
Samoan
Shona
Somali
Albanian
Serbian
Siswati
Sesotho
Sundanese
Swahili
Tamil
Telugu
Tajik
Thai
Tigrinya
Turkmen
Tagalog
Setswana
Tonga
Turkish
Georgian
Kazakh
Greenlandic
Cambodian
Kannada
Kashmiri
Kurdish
Kirghiz
Latin
Lingala
Laothian
Lithuanian
Latvian
Malagasy
Maori
Macedonian
Malayalam
Mongolian
Moldavian
Marathi
Malay
1101
1111
1112
1113
1114
1119
1121
1125
1201
1214
1215
1220
1222
1307
1309
1311
1312
1314
1315
1318
1319
226
2019
2020
2023
2111
2118
2126
2209
2215
2315
2408
2515
2621
Tsonga
Tatar
Twi
Ukrainian
Urdu
Uzbek
Vietnamese
Volapük
Wolof
Xhosa
Yoruba
Zulu
’06 HIGHLANDER_U (L/O 0508)
DVD video
SELECTING THE CHAPTER/TRACK To select the chapter/track, push the “ ” or “ ” side of the (TUNE/TRACK) button on the controller until the number of the chapter/track you want to select appears on the screen.
DVD audio
227
’06 HIGHLANDER_U (L/O 0508)
—DVD player operation (video CD/audio CD/CD text)
5. “
” and “
” switches
Push and hold the “ ” switch to fast forward or reverse a disc. When you release the switch, the DVD player will resume playing.
” or “
SELECTING THE DISC MENU NUMBER (video CD only) Push the “Sel. Number” switch and then the disc menu number search screen will appear. You can also display the screen by pushing the “SEARCH” switch on the controller.
USING THE CONTROL SCREEN When playing a disc, push the “DVD” but- ton on the controller. The control screen will appear on the screen. Details of the specific switches, controls and features are described below. 1. “PICTURE” switch
Push the “PICTURE” switch to turn off the control screen and return to the picture previously displayed.
2. “RPT” switch (DVD audio only)
Push the “RPT” switch while the track is playing. When the track ends, it will automatically replay. To turn off the re- peat feature, push this switch again.
3. “RAND” switch (DVD audio only)
Push the “RAND” switch. The player will play the tracks on the disc in ran- dom order. To turn off the random fea- ture, push this switch again.
4. “SCAN” switch (DVD audio only)
Push the “SCAN” switch. The player will scan all the tracks on the disc you are listening to. To stop scanning, push this switch again. the player has scanned all the tracks on the disc, it will stop scanning.
If
228
’06 HIGHLANDER_U (L/O 0508)
Enter the disc menu number by using the “−”, “+” and “+10” switches and push the “Enter” switch. The player starts playing the disc from the entered disc menu num- ber. The entered disc menu number will appear on the screen. Push the “Back” switch to return to the menu screen. Move up and down the switches by push- ing the “Move Buttons” on the screen.
”, “"”, “AA” AND
” switch: Push this switch to pause the
OPERATING THE “ “""” SWITCHES “ disc. “"” switch: Push this switch to cancel the pause and return to normal playing. “AA” and “""” switches: Push and hold the “AA” or “""” switch to fast forward or reverse. When you release the switch, the DVD player will resume playing. Video CD only— Push the “""” switch/button while paus- ing, the video CD plays the slow−motion video replay.
TURNING ON THE DISC MENU (video CD only) Push the “Return” switch to turn on the menu screen for the disc. You can also turn on the menu screen by pushing the “RETURN” button on the controller. For the operation of the menu screen, see the manual for the video CD.
229
’06 HIGHLANDER_U (L/O 0508)
MULTIPLEX
CHANGING TRANSMISSION (video CD only) Push the “Main/Sub” switch to change a multiplex transmission. The mode changes from Main/Sub to Main to Sub and back to Main/Sub by pushing the “Main/Sub” switch.
CHANGING THE INITIAL SETTING (video CD only) Push the “Set Up” switch on the screen and then the initial setting screen will ap- pear. You can also display the screen by pushing the “SET UP” button on the con- troller. You can change the initial setting. (See “CHANGING THE INITIAL SETTING” on page 220 in this Section for details.) After the setting is done, the player plays from the beginning of the chapter or the track.
CHANGING MENU PAGE OR TRACK (video CD only) Push the “Prev. Page” or “Next Page” switch while the disc menu is displayed. The next or previous page will appear on the screen. Push the “Prev. Page” or “Next Page” switch while the player is playing video. The next or previous track will be searched and played.
230
’06 HIGHLANDER_U (L/O 0508)
USING THE CONTROL SCREEN When playing a disc, push the “DVD” but- ton on the controller. The control screen will appear on the screen. CD text only— The disc title and track title will appear on the screen when pushing the “DVD” but- ton. Details of the specific switches, controls and features are described below. 1. “PICTURE” switch (video CD only)
Push the “PICTURE” switch to turn off the control screen and return to the picture previously displayed.
2. “RPT” switch (audio CD and CD text) Push the “RPT” switch while the track is playing. When the track ends, it will automatically replay. To turn off the re- peat feature, push this switch again.
231
Video CD
CD Text
Audio CD
’06 HIGHLANDER_U (L/O 0508)
—Screen adjustment
You can adjust the color, contrast, tone and brightness of the screen. Push the “DISPLAY” switch on the control- ler and then the “Display” screen will ap- pear. The screen may turn purple to deflect the sunlight. This is not a malfunction.
Each time you push the “+” or “−” switch, you can adjust the color, contrast, tone and brightness of the screen.
+ or “GREEN”
Strengthens the green color Strengthens the contrast
− or “RED”
Strengthens the red color Weakens the contrast
Strengthens the tone
Weakens the tone
COLOR
CONTRAST
TONE
BRIGHTNESS Brightens
Darkens
3. “RAND” switch (audio CD and CD text) Push the “RAND” switch. The player will play the tracks on the disc in ran- dom order. To turn off the random fea- ture, push this switch again.
4. “SCAN” switch (audio CD and CD text) Push the “SCAN” switch. The player will scan all the tracks on the disc. To stop scanning, push this switch again. When the player has scanned all the tracks on the disc, it will stop scan- ning.
5. “
” and “
” switches
” or “
Push the “ ” switch to fast forward or reverse the disc. When you push the switch again, the DVD player will resume playing.
232
’06 HIGHLANDER_U (L/O 0508)
After adjusting the screen, push the “OK” switch to return to the previous screen.
—Selecting the video mode
The audio machine connected to the input terminal adapter can be played the video mode. To select the “VIDEO” button on the controller. You can also select the video mode on the mode selection screen mentioned above.
the video mode, push
in
233
’06 HIGHLANDER_U (L/O 0508)
—DVD video disc information DVD PLAYER AND DVD VIDEO DISCS This DVD player conforms to NTSC col- or TV formats. DVD video discs con- forming to other formats such as PAL or SECAM cannot be used. Region codes: Some DVD video discs have a region code indicating where you can use. If the DVD video disc is not labeled “ALL” or “1”, you cannot use it in this DVD player. If you attempt to play an inappropriate DVD video disc in this play- er, “REGION CODE ERROR” appears on the screen. Even if the DVD video disc does not have a region code, in some cases you cannot use it.
234
Marks shown on DVD video discs:
Indicates NTSC format of color TV.
Indicates the number of audio tracks.
Indicates the number of language subtitles.
Indicates the number of angles.
Indicates the screen to be selected. Wide screen: 16:9
Standard: 4:3Indicates regions in which this video disc can be played. ALL: all countries Number: region code
DVD VIDEO DISC GLOSSARY DVD video discs: Digital Versatile Disc that holds video. DVD video discs have adopted “MPEG2”, one of the world stan- dards of digital compression technologies. The picture data is compressed by 1/40
on average and stored. Variable rate en- coded technology in which the volume of data assigned to the picture is changed depending on the picture format has also been adopted. Audio data is stored using PCM and Dolby digital, which enables higher quality of sound. Furthermore, mul- ti−angle and multi−language features will also help you enjoy the more advanced technology of DVD video. Viewer restrictions: This limits what can be viewed in conformity with the level of restrictions of the country. The level of restrictions varies depending on the DVD video disc. Some DVD video discs cannot be played at all, or violent scenes are skipped or replaced with other scenes. Level 1: DVD video discs for children can be played. Level 2—7: DVD video discs for children and G−rated movies can be played.feature
’06 HIGHLANDER_U (L/O 0508)
Level 8: All types of DVD video discs can be played. Multi−angle feature: You can enjoy the same scene at different angles. Multi−language feature: You can select the language of the subtitles and audio. Region codes: Region codes are provided on DVD players and DVD discs. If the DVD video disc does not have the same region code as the DVD player, you can- not play the disc on the DVD player. For region codes, see page 234. Audio: This DVD player can play liner PCM, Dolby digital, dts and MPEG audio format DVD. Other decoded type cannot be played. Title and chapter: Video and audio pro- grams stored on DVD video discs are di- vided in parts by title and chapter. Title: The largest unit of the video and audio programs stored on DVD video discs. Usually, one piece of a movie, one album, or one audio program is assigned as a title. Chapter: A unit smaller than a title. A title comprises plural chapters.
Manufactured under license from Dolby Laboratories. “Dolby”, “Pro Logic”, and the double−D symbol are trademarks of Dolby Laboratories. Confidential unpub- lished works. E1992−1997 Dolby Laboratories. All rights reserved. incorporates copyright This product protection technology that is protected by method claims of certain U.S. pat- ents and other intellectual property rights owned by Macrovision Corpora- tion and other rights owners. Use of this copyright protection technology must be authorized by Macrovision Cor- poration, and is intended for home and other limited viewing uses only unless otherwise authorized by Macrovision Corporation. Reverse engineering or disassembly is prohibited. “dts” is a trademark of Digital Theater Systems, Inc.
—A/V input adapter The rear entertainment system plays vid- eos and sound when an audio−video equipment is connected to the A/V input adapter. For details, refer to the manufac- turer’s instructions.
235
’06 HIGHLANDER_U (L/O 0508)
—Power outlet (115 VAC)
To use the adapter, open the cover. The A/V input adapter is composed of 3
input adapters. Yellow: Image input adapter Red: Audio input adapter White: Audio input adapterNOTICE
Close the cover when the A/V input adapter is not in use. Inserting any- thing other than an appropriate plug may cause electrical failure or short circuit.
This power outlet is designed for use as a power supply for the audio device con- nected to the input terminal adapter. The key must be in the “ON” position for the power outlet to be used. The maximum capacity for this power out- let is 115 VAC/100W. If you attempt to use an appliance that requires more than 115 VAC or 100W, the protection circuit will activate and cut the power supply. The power supply will restart automatically when you use an appliance that operates within the 115 VAC/100W limits.
Main switch
To use the power outlet, push the main switch on the instrument panel. An indicator light will illuminate to indicate that the power outlet is ready for use. Push the main switch once again to turn the power outlet off. When the power out- let is not in use, make sure that the main switch is turned off.
236
NOTICE
z To prevent the battery from being discharged, do not use the power outlet longer than necessary when the engine is not running.
z Close the power outlet lid when the power outlet is not in use. Inserting anything other than an appropriate plug that fits the outlet may cause electrical failure or short circuit.
The power outlet is not designed for the following electric appliances even if their power consumption is under 115
VAC/100W. These appliances may not operate properly. D Appliances with high initial peak watt- age: cathode−ray tube type televisions, compressor−driven refrigerators, electric pumps, electric tools, etc.D Measuring devices which process pre- cise data: medical equipment, measur- ing instruments, etc.
’06 HIGHLANDER_U (L/O 0508)
—Headphone jacks
D Other appliances requiring an extremely stable power supply: microcomputer− controlled electric blankets, touch sen- sor lamps, etc.
Certain electrical appliances may cause radio noise.
You can enjoy the rear seat entertain- ment system with commercial head- phones. To use the headphones, connect them to the jack. The key must be in the “ACC” or “ON” position.
237
’06 HIGHLANDER_U (L/O 0508)
Audio/video system operating hints
CAUTION
NOTICE
Adjust the volume when you connect the headphones jack. Loud sounds may have a significant impact on the human body.
the
to
To ensure correct audio/video system operation: z Be careful not to spill beverages
over the system.
z Do not put anything other than a cassette tape or Compact Disc into the slot.
z Do not put anything other than a DVD video, DVD audio, video CD, dts−CD and audio CD into the DVD player.
z The use of a cellular phone inside or near the vehicle may cause a noise from the speakers of the sys- tem which you are to. However, this does not indicate a malfunction.
listening
RADIO RECEPTION Usually, a problem with radio reception does not mean there is a problem with your radio—it is just the normal result of conditions outside the vehicle.
To adjust the volume of the headphones, turn the dial. Left side dial: Turn it upward to increase the volume, turn it downward to decrease the volume. Right side dial: Turn it downward to in- crease the volume, turn it upward to de- crease the volume. The maximum volume depends on type of headphones. The recommended headphone impedance is from 16 Ω to 32 Ω. Please contact your Toyota dealer for fur- ther details.
the
238
’06 HIGHLANDER_U (L/O 0508)
reception
In addition,
For example, nearby buildings and terrain can interfere with FM reception. Power lines or telephone wires can interfere with AM signals. And of course, radio signals have a limited range. The farther you are from a station, the weaker its signal will be. conditions change constantly as your vehicle moves. Here are some common reception prob- lems that probably do not indicate a prob- lem with your radio: FM Fading and drifting stations—Generally, the effective range of FM is about 40 km (25
miles). Once outside this range, you may notice fading and drifting, which increase with the distance from the radio transmit- ter. They are often accompanied by distor- tion. Multi−path—FM reflective, making it possible for two signals to reach your antenna at the same time. If this happens, the signals will cancel each oth- er out, causing a momentary flutter or loss of reception.signals are
listening to
Static and fluttering—These occur when signals are blocked by buildings, trees, or other large objects. Increasing the bass level may reduce static and fluttering. the FM signal you Station swapping—If are interrupted or weak- is ened, and there is another strong station nearby on the FM band, your radio may tune in the second station until the origi- nal signal can be picked up again. AM Fading—AM broadcasts are reflected by the upper atmosphere—especially at night. These reflected signals can interfere with those received directly from the radio sta- tion, causing the radio station to sound alternately strong and weak. Station interference—When a reflected sig- nal and a signal received directly from a radio station are very nearly the same frequency, interfere with each other, making it difficult to hear the broad- cast. Static—AM is easily affected by external sources of electrical noise, such as high tension power lines, lightening, or electri- cal motors. This results in static.
they can
CARING FOR YOUR CASSETTE PLAYER AND TAPES For the best performance for your cas- sette player and tapes: Clean the tape head and other parts regu- larly. D A dirty
tape head or tape path can decrease sound quality and tangle your cassette to clean them is by using a cleaning tape. (A wet type is recommended.)
tapes. The easiest way
Use high−quality cassettes. D Low−quality cassette tapes can cause many problems, including poor sound, inconsistent and constant auto−reversing. They can also get stuck or tangled in the cassette player.
playing
speed,
D Do not use a cassette if it has been damaged or tangled or if its label is peeling off.
D Do not leave a cassette in the player if you are not listening to it, especially if it is hot outside.
D Store cassettes in their cases and out
of direct sunlight.
239
’06 HIGHLANDER_U (L/O 0508)
CAUTION
Compact disc players and DVD play- ers use an invisible laser beam which could cause hazardous radiation ex- posure if directed outside the unit. Be sure to operate the players correctly.
Compact disc player D Use only compact discs marked as shown above. The following products may not be playable on your compact disc player. SACD dts−CD Copy−protected CD CD−R (CD−Recordable) CD−RW (CD−Re−writable) CD−ROM
D Avoid using cassettes with a total play- ing time longer than 100 minutes (50
minutes per side). The tape used in these cassettes is thin and could get stuck or tangled in the cassette player. CARING FOR YOUR COMPACT DISC PLAYER, DVD PLAYER AND DISCS D Extremely high temperatures can keep your compact disc player and DVD player from working. On hot days, use the air conditioning to cool the vehicle interior before you use the players.D Bumpy roads or other vibrations may make your compact disc player and DVD player skip.
D If moisture gets into your compact disc the players player and DVD player, may not play even though they appear to be working. Remove the disc from the player and wait until it dries.
240
’06 HIGHLANDER_U (L/O 0508)
Audio CDs
DVD video discs
DVD audio discs
Video CDs
DVD player D Use only discs marked as shown above. The following products may not be playable on your DVD player. SACD Copy−protected CD CD−R (CD−Recordable) CD−RW (CD−Re−writable) CD−ROM DVD−R DVD+R DVD+RW DVD−RW DVD−ROM DVD−RAM
Special shaped discs
Transparent/translucent discs
241
’06 HIGHLANDER_U (L/O 0508)
NOTICE
Do not use special shaped, transpar- ent/translucent, low quality or labeled discs such as those shown in the il- lustrations. The use of such discs may damage the player or changer, or it may be the disc.
impossible
to eject
Low quality discs
Labeled discs
242
Correct
Wrong
inserting
D Handle compact discs carefully, espe- them. cially when you are them on the edge and do not Hold them. Avoid getting fingerprints bend on them, particularly on the shiny side. D Dirt, scratches, warping, pin holes, or other disc damage could cause the player to skip or to repeat a section of a track. (To see a pin hole, hold the disc up to the light.)
D Remove discs from the compact disc player when you are not listening to them. Store them in their plastic cases away from moisture, heat, and direct sunlight.
’06 HIGHLANDER_U (L/O 0508)
To clean a compact disc: Wipe it with a soft, lint−free cloth that has been damp- ened with water. Wipe in a straight line from the center to the edge of the disc (not in circles). Dry it with another soft, lint−free cloth. Do not use a conventional record cleaner or anti−static device.
243
’06 HIGHLANDER_U (L/O 0508)
244
’06 HIGHLANDER_U (L/O 0508)
SECTION 1− 9
OPERATION OF INSTRUMENTS AND CONTROLS Air conditioning system Front manual air conditioning system
Controls Air flow selector settings Operating tips
. . . . . . . . . . . . . . . . . . . . . . . . . . . . . . . . . . . . . . . . . . . . . . . . . . . . . . . . . . . . . . . . . . . . . . . . . . . . . . . . . . . . . . . . . . . . . . . . . . . . . . . . . . . . . . . . . . . . . . . . . . . . . .
246
249
249Front automatic air conditioning system
Controls Air flow selector settings Operating tips
. . . . . . . . . . . . . . . . . . . . . . . . . . . . . . . . . . . . . . . . . . . . . . . . . . . . . . . . . . . . . . . . . . . . . . . . . . . . . . . . . . . . . . . . . . . . . . . . . . . . . . . . . . . . . . . . . . . . . . . . . . . . . . . . . . . . . . . . . . . . . . . . . . . . . . . . . . . . . . . . . . . . . . . . . . . . . . . . . . . . . . . . . . . . . . . . . . . . . . . . . . . . . . . . . . . . . . . . . . . . . . . . . . . . . . . . . . . . . . . . . . . . . . . . . . . . . . . .
Side vents Rear heater system Air conditioning filter
252
255
255
258
259
260For information about the front air conditioning system of a vehicle equipped with Navigation system, please refer to the separate “Navigation System Owner’s Manual”.
245
Front manual air conditioning system— —Controls
’06 HIGHLANDER_U (L/O 0508)
1. Air intake selector 2. “A/C” button 3. Air flow selector 4. Temperature selector 5. Fan speed selector
246
Fan speed selector Turn the knob to adjust the fan speed—to the right to increase, to the left to de- crease. Temperature selector Turn the knob to adjust the temperature— to the right to warm, to the left to cool.
’06 HIGHLANDER_U (L/O 0508)
This position allows the air intake to select FRESH automatically. This is to clean up the front view more quickly. If you want to return the setting to RECIRCULATE mode, press the air in- take selector button once again.
5. Windshield—Air flows mainly from the
Air flow selector Turn the knob to select the vents used for air flow. 1. Panel—Air
flows mainly
from
the
instrument panel vents.
2. Bi−level—Air flows from both the floor vents and the instrument panel vents. 3. Floor—Air flows mainly from the floor
vents.
the
4. Floor/Windshield—Air
flows mainly floor vents and windshield
from vents. the Turning floor/windshield position the defogging function with the purpose of clearing the front view.
to turns on
flow selector
the air
to
flow selector
windshield vents. Turning the the air windshield position turns on the defog- ging function with the purpose of clear- ing the front view. This position allows the air intake to select FRESH automatically. This is to clean up the front view more quickly. It is not possible to return to RECIR- CULATE in this position.
For details about air flow selector settings, see flow selector settings” de- scribed blow.
“—Air
247
’06 HIGHLANDER_U (L/O 0508)
“A/C” button To turn on the air conditioning, press the “A/C” button. The “A/C” button indicator will come on. To turn the air conditioning off, press the button again. If the “A/C” button indicator flashes, there is a problem in the air conditioning system and the air conditioning automatically shuts off. If this happens, take your ve- hicle to a Toyota dealer for service.
Air intake selector Press the button to select the air source. 1. Recirculate—Recirculates the air inside
the vehicle.
2. Fresh—Draws outside air into the sys-
tem.
To prevent fogging up of the windshield, the air intake mode may change automati- cally to FRESH depending on the condi- tion of the air conditioning system.
248
—Air flow selector settings
’06 HIGHLANDER_U (L/O 0508)
—Operating tips D To cool off your Toyota after
it has been parked in the hot sun, drive with the windows open for a few minutes. This vents the hot air, allowing the air conditioning to cool the interior more quickly.
D Make sure the air intake grilles in front of the windshield are not blocked (by leaves or snow, for example).
D On humid days, do not blow cold air on the windshield. The windshield could fog up because of the difference in air temperature on the inside and outside of the windshield.
D Keep the area under the front seats clear to allow air to circulate through- out the vehicle.
for a minute
D On cold days, set the fan speed to high the intake ducts of snow or moisture. This can reduce the amount of fogging on the windows.
to help clear
D When driving on dusty roads, close all windows. If dust thrown up by the ve- hicle is still drawn into the vehicle after closing the windows, it is recommended that the air intake selector be set to FRESH and the fan speed selector to any setting except “OFF”.
249
’06 HIGHLANDER_U (L/O 0508)
D If following another vehicle on a dusty road, or driving in windy and dusty conditions, it is recommended that the air intake selector be temporarily set to RECIRCULATE, which will close off the outside passage and prevent outside air and dust from entering the vehicle interior.
Heating For best results, set controls to:
Fan speed—Any setting except “OFF” Temperature—Towards WARM
(red zone)
Air intake—FRESH (outside air) Air flow—FLOOR Air conditioning—OFF
for a
few minutes. To keep
D For quick heating, select recirculated air the windows from fogging, select fresh af- ter interior has been warmed.
the vehicle
D Press the “A/C” button on for dehumidi-
fied heating.
D Choose floor/windshield air flow to heat the vehicle interior while defrosting or defogging the windshield.
250
Air conditioning For best results, set controls to:
Fan speed—Any setting except “OFF” Temperature—Towards COLD
(blue zone)
Air intake—FRESH (outside air) Air flow—PANEL Air conditioning—ON
D For quick cooling, turning the tempera- ture selector knob fully towards COLD changes the air intake selector mode to RECIRCULATE.
Ventilation For best results, set controls to:
Fan speed—Any setting except “OFF” Temperature—Towards COLD
(blue zone)
Air intake—FRESH (outside air) Air flow—PANEL Air conditioning—OFF
’06 HIGHLANDER_U (L/O 0508)
Defogging The inside of the windshield For best results, set controls to:
Defrosting The outside of the windshield For best results, set controls to:
Fan speed—Any setting except “OFF” Temperature—Towards WARM
Fan speed—Any setting except “OFF” Temperature—Towards WARM
(red zone) to heat; COLD (blue zone) to cool
Air intake—FRESH (outside air) Air flow—WINDSHIELD
turns on
Turning the air flow selector to the wind- shield position the defogging function with the purpose of clearing the front view. When turning the air flow selector to the windshield position, the air intake selector mode changes to FRESH automatically to clean up the front view quickly. It is not possible in this position. D On humid days, do not blow cold air on the windshield—the difference be- tween the outside and inside tempera- tures could make the fogging worse.
to RECIRCULATE
to return
(red zone)
Air intake—FRESH (outside air) Air flow—WINDSHIELD
turns on
Turning the air flow selector to the wind- shield position the defrosting function with the purpose of clearing the front view. When turning the air flow selector to the windshield position, the air intake selector mode changes to FRESH automatically to clean up the front view quickly. It is not possible in this position. D To heat the vehicle interior while de- choose
to RECIRCULATE
windshield,
to return
frosting floor/windshield air flow.
the
251
Front automatic air conditioning system— —Controls
’06 HIGHLANDER_U (L/O 0508)
1. Air intake selector 2. “MODE” button (air flow selector) 3. Fan speed selector 4. “A/C” button 5. “OFF” button 6. Windshield air flow button 7. “AUTO” button 8. Temperature selector
252
“AUTO” button For automatic operation of the air condi- tioning, press the “AUTO” button. An indi- cator light will illuminate to show that the automatic operation mode has been se- lected. In the automatic operation mode, the air conditioning selects the most suitable fan speed, air flow, air intake and on−off of the air conditioning according to the tem- perature. You may use manual controls if you want to select your own settings. Fan speed selector Turn the knob to adjust the fan speed—to the right to increase, to the left to de- crease. In automatic operation, you do not have to adjust the fan speed unless you desire another fan speed mode. Temperature selector Turn the knob to adjust the temperature— to the right to warm, to the left to cool. “OFF” button Push the button to turn off the air condi- tioning system.
’06 HIGHLANDER_U (L/O 0508)
the
Selecting floor/windshield position turns on the defogging function with the purpose of clearing the front view. This position allows the air intake to select FRESH automatically. This is to clean up the front view more quickly. If you want to return the setting to RECIRCULATE mode, press the air in- take selector button once again.
to select
the “MODE” button
“MODE” button (air flow selector) Push vents used for air flow. In automatic operation, you do not have to select the air flow unless you desire another air flow mode. 1. Panel—Air
flows mainly
from
the
the
instrument panel vents.
2. Bi−level—Air flows from both the floor vents and the instrument panel vents. 3. Floor—Air flows mainly from the floor
vents.
4. Floor/Windshield—Air
flows mainly floor vents and windshield
the
from vents.
is pressed, air
this button from
this button once again returns
Windshield air flow button flows When the windshield vents and mainly turns on the defogging function with the purpose of clearing the front view. Pressing the air flow mode to the last one used. This button allows the air intake to select FRESH automatically. This is to clean up the front view more quickly. It is not pos- sible to return to RECIRCULATE in this mode. Pressing flow button turns on the defroster−linked air condition- ing. This is to clean up the front view more quickly. When the “A/C” button is not pressed in, pressing another air flow button turns off the air conditioning.
the windshield air
253
For details about air flow selector settings, see flow selector settings” de- scribed below.
“—Air
’06 HIGHLANDER_U (L/O 0508)
“A/C” button To turn on the air conditioning, press the “A/C” button. The “A/C” button indicator will come on. To turn the air conditioning off, press the button again. If the “A/C” button indicator flashes, there is a problem in the air conditioning system and the air conditioning automatically shuts off. If this happens, take your ve- hicle to a Toyota dealer for service.
Air intake selector Press the button to select the air source. 1. Recirculate—Recirculates the air inside
the vehicle.
2. Fresh—Draws outside air into the sys-
tem.
If the engine coolant temperature becomes extremely high, RECIRCULATE mode will automatically be selected. This is not a malfunction. When the engine coolant tem- perature is the previous mode will resume. To prevent fogging up of the windshield, the air intake mode may change automati- cally to FRESH depending on the condi- tion of the air conditioning system.
lowered,
254
—Air flow selector settings
’06 HIGHLANDER_U (L/O 0508)
—Operating tips D To cool off your Toyota after
it has been parked in the hot sun, drive with the windows open for a few minutes. This vents the hot air, allowing the air conditioning to cool the interior more quickly.
D Make sure the air intake grilles in front of the windshield are not blocked (by leaves or snow, for example).
D On humid days, do not blow cold air on the windshield. The windshield could fog up because of the difference in air temperature on the inside and outside of the windshield.
D Keep the area under the front seats clear to allow air to circulate through- out the vehicle.
for a minute
D On cold days, set the fan speed to high the intake ducts of snow or moisture. This can reduce the amount of fogging on the windows.
to help clear
D When driving on dusty roads, close all windows. If dust thrown up by the ve- hicle is still drawn into the vehicle after closing the windows, it is recommended that the air intake selector be set to FRESH and the fan speed selector to any setting except “OFF”.
255
’06 HIGHLANDER_U (L/O 0508)
D If following another vehicle on a dusty road, or driving in windy and dusty conditions, it is recommended that the air intake selector be temporarily set to RECIRCULATE, which will close off the outside passage and prevent outside air and dust from entering the vehicle interior.
Heating For best results, set controls to: For automatic operation—
Press in the “AUTO” button. Temperature—To the desired
temperature
Air intake—FRESH (outside air) Air conditioning—OFF
Air conditioning For best results, set controls to: For automatic operation—
Press in the “AUTO” button. Temperature—To the desired
temperature
Air intake—FRESH (outside air) Air conditioning—ON
For manual operation—
For manual operation—
Fan speed—To the desired fan speed Temperature—Towards WARM
Fan speed—To the desired fan speed Temperature—Towards COLD
(to the right)
Air intake—FRESH (outside air) Air flow—FLOOR Air conditioning—OFF
(to the left)
Air intake—FRESH (outside air) Air flow—PANEL Air conditioning—ON
for a
few minutes. To keep
D For quick heating, select recirculated air the windows from fogging, select fresh af- ter interior has been warmed.
the vehicle
D For quick cooling, select recirculated
air for a few minutes.
D Press the “A/C” button on for dehumidi-
fied heating.
D Choose floor/windshield air flow to heat the vehicle interior while defrosting or defogging the windshield.
256
’06 HIGHLANDER_U (L/O 0508)
Ventilation For best results, set controls to: For automatic operation—
Press in the “AUTO” button. Temperature—Towards COLD
(to the left)
Air intake—FRESH (outside air) Air conditioning—OFF
For manual operation—
Fan speed—To the desired fan speed Temperature—Towards COLD
(to the left)
Air intake—FRESH (outside air) Air flow—PANEL Air conditioning—OFF
Defogging and defrosting— —The inside of the windshield For best results, set controls to: For automatic operation—
Temperature—Towards WARM
(to the right) to heat; COLD (to the left) to cool
Air intake—FRESH (outside air) Air flow—WINDSHIELD
For manual operation—
Fan speed—To the desired fan speed Temperature—Towards WARM
(to the right) to heat; COLD (to the left) to cool
Air intake—FRESH (outside air) Air flow—WINDSHIELD
When pressing the windshield air flow but- ton, the air intake selects FRESH auto- matically. This is to clean up the front view more quickly. It is not possible to return to RECIRCULATE in this mode. Pressing the windshield button turns on the defroster−linked air conditioning. This is to clean up the front view more quickly. When the “A/C” button is not pressed in, pressing another air flow button turns off the air conditioning. D On humid days, do not blow cold air on the windshield—the difference be- tween the outside and inside tempera- tures could make the fogging worse.
257
’06 HIGHLANDER_U (L/O 0508)
Side vents
When pressing the windshield air flow but- ton, the air intake selects FRESH auto- matically. This is to clean up the front view more quickly. It is not possible to return to RECIRCULATE in this mode. Pressing the windshield button turns on the defroster−linked air conditioning. This is to clean up the front view more quickly. When the “A/C” button is not pressed in, pressing another air flow button turns off the air conditioning. D To heat the vehicle interior while de- choose
windshield,
frosting floor/windshield air flow.
the
If air flow control is not satisfactory, check the side vents. The side vents may be opened or closed as shown.
—The outside of the windshield For best results, set controls to: For automatic operation—
Temperature—Towards WARM
(to the right)
Air intake—FRESH (outside air) Air flow—WINDSHIELD
For manual operation—
Fan speed—To the desired fan speed Temperature—Towards WARM
(to the right)
Air intake—FRESH (outside air) Air flow—WINDSHIELD
258
’06 HIGHLANDER_U (L/O 0508)
Rear heater system
1. Main switch Push the switch to turn the rear heater system on or off. Turning the fan speed selector to the “LO” or “HI” position with the rear heater sys- tem on illuminates the main switch indica- tor. 2. Fan speed selector Turn the knob to adjust the fan speed—to the right to increase, to the left to de- crease. When the rear heater system is off, the fan speed selector will not operate. 3. Rear heater vents Air flows from the vents when the rear heater system is operating.
CAUTION
Do not place feet near the vents for long periods as burns may result.
259
’06 HIGHLANDER_U (L/O 0508)
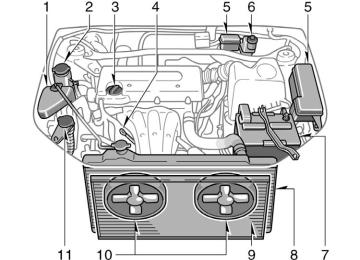
—Checking and replacing the air conditioning filter The air conditioning filter may clog af- ter long use. The filter may need to be replaced if the air flow of the air condi- tioning and heater experiences extreme reductions in operating efficiency, or if the windows begin to fog up easily. To maintain the air conditioning efficiency, inspect and replace the air conditioning filter according to the maintenance sched- ule. In dusty areas or areas with heavy traffic flow, such as inner city or desert areas, early replacement may be required. (For scheduled maintenance information, please refer the “Scheduled Mainte- nance Guide” or “Owner’s Manual Supple- ment”.)
to
Air conditioning filter—
is placed
information The air conditioning filter label in the glove box as shown and indicates that a filter has been installed. The air conditioning filter prevents dust from entering the vehicle through the air conditioning vent.
The air conditioning filter is behind the glove box.
260
’06 HIGHLANDER_U (L/O 0508)
1. Remove the clip with a Phillips−head
screwdriver.
2. Open the glove box and push each side of the glove box to disconnect the claws.
3. Pull the filter cover toward you and
remove it.
4. Remove the filter case toward you.
261
’06 HIGHLANDER_U (L/O 0508)
5. Remove
case.
the
filter
from
the
filter
6. Inspect the filter on the surface. If it is dirty, it should be replaced. When filter and case, keep the arrow pointing up.
installing
the
filter
INFORMATION
The air filter should be installed prop- erly in position. The use of air condi- tioning with filter removed may cause deteriorated dustproof per- formance and then affect air condi- tioning performance.
the air
262
’06 HIGHLANDER_U (L/O 0508)
SECTION 2
INFORMATION BEFORE DRIVING YOUR TOYOTA Information before driving your Toyota Off−road vehicle precautions Break−in period Fuel Fuel pump shut off system Operation in foreign countries Three−way catalytic converters Engine exhaust cautions Facts about engine oil consumption Iridium−tipped spark plugs Brake system Brake pad wear limit indicators Your Toyota’s identification Theft prevention labels Suspension and chassis Tire information Vehicle load limits Cargo and luggage Types of tires
. . . . . . . . . . . . . . . . . . . . . . . . . . . . . . . . . . . . . . . . . . . . . . . . . . . . . . . . . . . . . . . . . . . . . . . . . . . . . . . . . . . . . . . . . . . . . . . . . . . . . . . . . . . . . . . . . . . . . . . . . . . . . . . . . . . . . . . . . . . . . . . . . . . . . . . . . . . . . . . . . . . . . . . . . . . . . . . . . . . . . . . . . . . . . . . . . . . . . . . . . . . . . . . . . . . . . . . . . . . . . . . . . . . . . . . . . . . . . . . . . . . . . . . . . . . . . . . . . . . . . . . . . . . . . . . . . . . . . . . . . . . . . . . . . . . . . . . . . . . . . . . . . . . . . . . . . . . . . . . . . . . . . . . . . . . . . . . . . . . . . . . . . . . . . . . . . . . . . . . . . . . . . . . . . . . . . . . . . . . . . . . . . . . . . . . . . . . . . . . . . . . . . . . . . . . . . . . . . . . . . . . . . . . . . . . . . . . . . . . . . . . . . . . . . . . . . . . . . . . . . . . . . . . . . . . . . . . . . . . . . . . . . . . . . . . . . . . . . . . . . . . . . . . . . . . . . . . . . . . . . . . . . . . . . . . . . . . . . . . . . . . . . . . . . . . . . . . . . . . . . . . . . . . . . . . . . . . . . . . . . . . . . . . . . . . . . . . . . . . . . . . . . . . . . . . . . . . . . . . . . . . . . . . . . . . . . . . . . . . . . . . . . . . . . . . . . . . . . . . . . . . . . . . . . . . . . . . . . . . . . . . . . .
290
291
291
293
294
294
295
296
297
297
301
301
302
303
304
312
313
315289
’06 HIGHLANDER_U (L/O 0508)
This vehicle belongs to the utility ve- hicle class, which has higher ground clearance and narrower tread in relation to the height of its center of gravity to make it capable of performing in a wide variety of off−road applications. Specific design characteristics give it a higher center of gravity than ordinary passen- ger cars. This vehicle design feature causes this type of vehicle to be more likely to rollover. And, utility vehicles have a significantly higher rollover rate than other types of vehicles. An advan- tage of the higher ground clearance is a better view of the road allowing you is not de- to anticipate problems. signed the same speeds as ordinary passenger cars any more than low−slung sports cars de- signed to perform satisfactorily under off−road conditions. Therefore, sharp turns at excessive speeds may cause rollover.
It for cornering at
CAUTION
Always observe the following precau- tions to minimize the risk of serious personal injury or damage to your ve- hicle: D In a rollover crash, an unbelted per- son is significantly more likely to die than a person wearing a seat belt. Therefore, the driver and all passengers should fasten their seat belts whenever the vehicle is mov- ing.
D Avoid sharp turns or abrupt maneu- vers, if at all possible. Failure to operate this vehicle correctly may result in loss of control or vehicle rollover causing death or serious injury.
D Loading cargo on the roof luggage carrier will make the center of the vehicle gravity higher. Avoid high speeds, sudden starts, sharp turns, sudden braking or abrupt maneu- vers, otherwise it may result in loss of control or vehicle rollover due to failure to operate this vehicle cor- rectly.
Off−road vehicle precautions
290
’06 HIGHLANDER_U (L/O 0508)
D Always slow down in gusty cross- winds. Because of its profile and higher center of gravity, your ve- hicle to side winds than an ordinary passenger car. Slowing down will allow you to have better control.
is more sensitive
jump, make sharp
D When driving off−road or in rugged terrain, do not drive at excessive speeds, turns, strike objects, etc. This may cause loss of control or vehicle rollover causing death or serious injury. You are also risking expensive damage to your vehicle’s suspension and chassis.
D Do not drive horizontally across steep slopes. Driving straight up or straight down is preferred. Your ve- hicle (or any similar off−road ve- hicle) can tip over sideways much more easily than forward or back- ward.
Break−in period Drive gently and avoid high speeds. Your vehicle does not need an elaborate break−in. But following a few simple tips for the first 1600 km (1000 miles) can add to the future economy and long life of your vehicle: D Avoid full
throttle acceleration when
starting and driving.
D Avoid racing the engine. D Try to avoid hard stops during the first
300 km (200 miles).
D Do not drive for a long time at any
single speed, either fast or slow.
D Do not tow a trailer during the first 800
km (500 miles).
Fuel FUEL TYPE Your new vehicle must use only un- leaded gasoline. To help prevent gas station mix−ups, your Toyota has a smaller fuel tank opening. The special nozzle on pumps with un- leaded fuel will fit it, but the larger stan- dard nozzle on pumps with leaded gas will not. At a minimum, the gasoline you use should meet the specifications of ASTM D4814 in the U.S.A. and CGSB 3.5−M93
in Canada.NOTICE
Do not use leaded gasoline. Use of leaded gasoline will cause the three− way catalytic converter to lose its ef- fectiveness and the emission control system to function improperly. Also, this can increase maintenance costs.
291
’06 HIGHLANDER_U (L/O 0508)
in
GASOLINE CONTAINING DETERGENT ADDITIVES Toyota recommends the use of gasoline that contains detergent additives to avoid build−up of engine deposits. However, all gasoline sold the U.S. contains detergent additives to keep clean and/or clean intake systems. QUALITY GASOLINE Automotive manufacturers in the U.S., Europe and Japan have developed a specification fuel named World−Wide Fuel Charter (WWFC) that is expected to be applied world wide. The WWFC consists of four categories that depend on required emission lev- els. In the U.S., category 3 or 4 has been adopted. The WWFC improves air quality by providing for better emis- sions in vehicle fleets, and customer satisfaction through better vehicle per- formance.
for quality
CLEANER BURNING GASOLINE Cleaner burning gasoline, including re- formulated gasoline that contains oxy- genates such as ethanol or MTBE is available in many areas. Toyota recommends the use of cleaner burning gasoline and appropriately blended reformulated gasoline. These types of gas- oline provide excellent vehicle perfor- mance, reduce vehicle emissions, and im- prove air quality. OXYGENATES IN GASOLINE Toyota allows the use of oxygenate blended gasoline where the oxygenate content is up to 10% ethanol or 15% MTBE. in your Toyota, be sure that it has an octane rating no lower than 87. Toyota does not recommend the use of gasoline containing methanol.
If you use gasohol
OCTANE RATING 2.4 L 4−cylinder (2AZ−FE) engine: Se- lect Octane Rating 87 (Research Octane Number 91) or higher. 3.3 L V6 (3MZ−FE) engine: Select Oc- tane Rating 87 (Research Octane Num- ber 91) or higher. For improved vehicle performance, use premium unleaded gasoline with an Octane Rating of 91
(Research Octane Number 96) or higher. Use of unleaded gasoline with an octane rating or research octane number lower than stated above will cause persistent heavy knocking. If it is severe, this will lead to engine damage. If your engine knocks... If you detect heavy knocking even when using if you hear steady knocking while holding a steady speed on level roads, consult your Toyota dealer. However, occasionally, you may notice light knocking for a short time while accel- erating or driving up hills. This is normal and there is no need for concern.the recommended
fuel, or
292
’06 HIGHLANDER_U (L/O 0508)
GASOLINE CONTAINING MMT Some gasoline contain an octane en- hancing additive called MMT (Methylcy- clopentadienyl Manganese Tricarbonyl). Toyota does not recommend the use of gasoline that contains MMT. If fuel con- taining MMT is used, your emission con-