- 2000 Nissan Sentra Owners Manuals
- Nissan Sentra Owners Manuals
- 1999 Nissan Sentra Owners Manuals
- Nissan Sentra Owners Manuals
- 2010 Nissan Sentra Owners Manuals
- Nissan Sentra Owners Manuals
- 2003 Nissan Sentra Owners Manuals
- Nissan Sentra Owners Manuals
- 2009 Nissan Sentra Owners Manuals
- Nissan Sentra Owners Manuals
- 1996 Nissan Sentra Owners Manuals
- Nissan Sentra Owners Manuals
- 1998 Nissan Sentra Owners Manuals
- Nissan Sentra Owners Manuals
- 2006 Nissan Sentra Owners Manuals
- Nissan Sentra Owners Manuals
- 2002 Nissan Sentra Owners Manuals
- Nissan Sentra Owners Manuals
- 1997 Nissan Sentra Owners Manuals
- Nissan Sentra Owners Manuals
- 2005 Nissan Sentra Owners Manuals
- Nissan Sentra Owners Manuals
- 2011 Nissan Sentra Owners Manuals
- Nissan Sentra Owners Manuals
- 2001 Nissan Sentra Owners Manuals
- Nissan Sentra Owners Manuals
- 2007 Nissan Sentra Owners Manuals
- Nissan Sentra Owners Manuals
- 2012 Nissan Sentra Owners Manuals
- Nissan Sentra Owners Manuals
- 2008 Nissan Sentra Owners Manuals
- Nissan Sentra Owners Manuals
- 2004 Nissan Sentra Owners Manuals
- Nissan Sentra Owners Manuals
- Download PDF Manual
-
NISSAN dealer. Proper brake inspection intervals should be followed. For more information regard- ing brake inspections, see the appropriate maintenance schedule information in the ‘‘NISSAN Service and Maintenance Guide’’. BRAKE BOOSTER Check the brake booster function as fol- lows: 1. With the engine off, press and release times. When the brake pedal several brake pedal movement (distance of travel) remains the same from one pedal application to the next, continue on to the next step.
2. While depressing the brake pedal, start the engine. The pedal height should drop a little.
3. With the brake pedal depressed, stop the engine. Keeping the pedal depressed for about 30 seconds, the pedal height should not change.
Z X
CLUTCH PEDAL
FUSES
4. Run the engine for one minute without depressing the brake pedal, then turn it off. Depress the brake pedal several times. The pedal travel distance will de- crease gradually with each depression as the vacuum is released from the booster.
If the brakes do not operate properly, see an authorized NISSAN dealer.
WDI0045
LDI0034
CHECKING CLUTCH PEDAL Press the pedal by hand and be sure the free travel is within the limits shown above. If the range shown above, see an authorized NISSAN dealer.
free travel
is out of
CAUTION
Never use a fuse of higher amperage rating than specified on the fuse box cover. This could damage the electrical system or cause a fire.
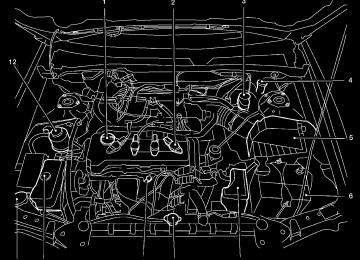
ENGINE COMPARTMENT If any electrical equipment does not come on, check for an open fuse. 1. Be sure the ignition switch and the head-
light switch are OFF.
2. Open the engine hood.
Maintenance and do-it-yourself
8-31
Z X
3. Remove the fuse box cover. 4. Remove the fuse with the fuse puller. The fuse puller is located in the center of the fuse block in the passenger compart- ment.
5. If the fuse is open, replace it with a new
fuse.
6. If a new fuse also opens, have the elec- trical system checked and repaired by an authorized NISSAN dealer.
Fusible links If there is electrical equipment that does not operate and fuses are in good condition, check the fusible links. these fusible links are melted, replace with only genuine NISSAN parts.
If any of
8-32 Maintenance and do-it-yourself
Z X
WDI0055
Maintenance and do-it-yourself
8-33
Z X
3. Remove the fuse with the fuse puller. The fuse puller is located in the center of the fuse block.
4. If the fuse is open, replace it with a new
fuse.
5. If a new fuse also opens, have the elec- trical system checked and repaired by an authorized NISSAN dealer.
ADI1142
CAUTION
Never use a fuse of higher amperage rating than specified. This could dam- age the electrical system or cause a fire.
PASSENGER COMPARTMENT If any electrical equipment does not oper- ate, check for an open fuse. 1. Be sure the ignition switch and the head-
light switch are OFF. 2. Remove the coin box. 8-34 Maintenance and do-it-yourself
Z X
KEYFOB BATTERY REPLACEMENT
Replace the battery in the keyfob as follows: 1. Open the lid using a coin. 2. Remove the battery. 3. Install a new battery.
WPD0023
Recommended battery: Sanyo CR2025 or equivalent. 4. Close the lid securely. 5. Press the LOCK button, then the UN- LOCK button two or three times to check the keyfob operation.
If the battery is removed for any reason other than replacement, perform step five. c An improperly disposed battery can hurt the environment. Always confirm local regulations for battery disposal. c The keyfob is water-resistant; how- ever, if it does get wet, immediately wipe completely dry.
c The operational range of the keyfob extends to approximately 49 ft (15 m) from the vehicle. This range may vary with conditions.
FCC Notice: Changes or modifications not expressly approved by the manufacturer for com- pliance could void the user’s authority to operate the equipment. This device complies with Part 15 of the FCC Rules and RSS-210 of Industry Canada. Operation is subject to the following two conditions: (1) This device may not cause harmful interference, and (2) this device must accept any interference re- ceived, including interference that may cause undesired operation of the device.
Maintenance and do-it-yourself
8-35
Z X
LIGHTS
8-36 Maintenance and do-it-yourself
LDI0026
HEADLIGHTS The headlight is a semi-sealed beam type which uses a replaceable headlight (halo- gen) bulb. A bulb can be replaced from inside the engine compartment without re- moving the headlight assembly.
CAUTION
c High pressure halogen gas is sealed inside the halogen bulb. The bulb may break if the glass envelope is scratched or the bulb is dropped.
c When handling the bulb, do not
touch the glass envelope.
c DO NOT TOUCH THE BULB c Use the same number and wattage
as originally installed: Wattage 65/55
Bulb no. 9007 (HB5)c Do not leave the bulb out of the headlight reflector for a long period of time as dust, moisture, and smoke may enter the headlight body and affect the performance of the head- light.
Removing the headlight bulb 1. Open the hood. 2. Disconnect the negative (-) battery cable. 3. Disconnect the electrical connector from
the rear end of the bulb.
4. Rotate the bulb retainer counterclock-
wise and remove.
5. Pull out the headlight bulb and socket as an assembly. Do not shake or rotate the bulb when removing it. Do not touch the glass envelope.
Replacing the headlight bulb 1. Insert the bulb and socket assembly into
the headlight. DO NOT TOUCH THE BULB.
2. Install and tighten the bulb retainer. 3. Push the electrical connector into the bulb plastic base until it snaps and stops.
4. Connect the negative (-) battery cable. 5. Close the hood. Aiming is not necessary after replacing the bulb.
Z X
equivalent weight placed in the driver’s seat.
1. Open the hood. Turn headlight low beam
on.
2. Adjust
the vertical aim by turning the
adjustment screw.
c Cover the opposite light and ensure the fog lights (if so equipped) are turned off. c Adjust beam pattern until cutoff line is positioned at the same height off ground as bulb center (on H-line).
LDI0027
Adjusting the headlight aim Before performing aiming adjustment, make sure of the following: a. Use an aiming wall screen. b. Keep all of the tires inflated to the correct
pressure.
c. Place the vehicle and screen on level
ground.
d. See that the vehicle is unloaded (except for full levels of coolant, engine oil and fuel, and that the spare tire, jack, and tools are stored). Have the driver or an
Maintenance and do-it-yourself
8-37
Z X
8-38 Maintenance and do-it-yourself
WDI0130
Z X
If the vehicle front body has been repaired and/or the headlight assembly has been replaced, check aiming. Use the aiming chart shown in the illustration. c Basic illuminating area should be within the range shown. Adjust headlights ac- cordingly.
FOG LIGHTS (if so equipped) Replacing the fog light bulb 1. Remove screw. 2. Disconnect connector. 3. Push the fog light assembly towards the front of the vehicle and pull out to expose the rear of the assembly.
4. Rotate the bulb cover counterclockwise
and remove.
5. Lift the spring retainer. 6. Remove the fog light bulb from housing. 7. Disconnect the electrical connector.
Maintenance and do-it-yourself
8-39
LDI0028
Z X
EXTERIOR AND INTERIOR LIGHTS
Item
Headlights Parking and turn signal light Fog light Map light (if so equipped) Interior light Rear combination light
Turn Stop/tail
High-mounted stoplight
Inside Spoiler (if so equipped)
License plate light Backup light Trunk light
Wattage
(W)
Bulb No.*
65/55
9007(HB5)
8/27
3157AK
55
27
27/8H3
68
681156A 1157
18
921
See an
authorized NISSAN dealer for assistance
18
3.4194
921
158*: Always check with the Parts Department at an authorized NISSAN dealer for the latest parts information.
8-40 Maintenance and do-it-yourself
WDI0131
Z X
MDI0006
Replacement procedures All other lights are either type A, B, C or D. When replacing a bulb, first remove the lens and/or cover.
Maintenance and do-it-yourself
8-41
Z X
WDI0029
8-42 Maintenance and do-it-yourself
Z X
WHEELS AND TIRES
WDI0030
DI1033M
If you have a flat tire, see the ‘‘In case of emergency’’ section of this manual. TIRE PRESSURE Maximum inflation pressure Do not exceed the maximum inflation pres- sures shown on the side wall of the tire. Tire inflation pressure Check the tire pressure (including the spare) at least once a month and always prior to long distance trips. tire pressure may adversely affect tire life and vehicle handling. Tire pressure should be 8-43
Maintenance and do-it-yourself
Incorrect
Z X
checked when tires are COLD. Tires are considered COLD after the vehicle has been parked for three or more hours, or driven less than 1 mile (1.6 km) at moderate speeds. COLD tire pressures are shown on the tire placard affixed to the driver’s side rear door pillar.
WARNING
c Improperly inflated tires can fail sud-
denly and cause an accident.
c The vehicle weight capacity is indi- cated on the tire placard. Do not load your vehicle beyond this capacity. Overloading your vehicle may result in reduced tire life, unsafe operating conditions due to premature tire fail- ure, or unfavorable handling charac- teristics and could also lead to a serious accident. Loading beyond the specified capacity may also result in failure of other vehicle components. c Before taking a long trip, or when- ever you heavily load your vehicle, use a tire pressure gauge to ensure that the tire pressures are at the specified level.
8-44 Maintenance and do-it-yourself
c Do not drive your vehicle over 85
MPH (140 km/h) unless it is equipped with high speed rated tires. Driving faster than 85 MPH (140 km/h) may result in tire failure, loss of control and possible injury.c For additional information regarding tires, refer to ‘‘Important Tire Safety Information’’ in the Warranty Infor- mation Booklet (US) or ‘‘Tire Safety Information’’ in the Warranty and Roadside Assistance Information booklet (Canada).
TYPES OF TIRES
WARNING
c When changing or replacing tires, be sure all four tires are of the same type (i.e., summer, all season or snow) and construction. An autho- rized NISSAN dealer may be able to help you with information about tire type, size, speed rating and availabil- ity. Replacement tires may have a lower speed rating than the factory equipped tires, and may not match
the potential maximum vehicle speed. Never exceed the maximum speed rat- ing of the tire. c For additional information regarding tires, refer to ‘‘Important Tire Safety Information’’ in the Warranty Informa- tion Booklet (US) or ‘‘Tire Safety In- formation’’ in the Warranty and Road- side Assistance Information booklet (Canada).
All Season tires NISSAN specifies All Season tires on some models to provide good performance all year round, including snowy and icy road conditions. All Season tires are identified by ‘‘ALL SEASON’’ and/or ‘‘M&S’’ on the tire sidewall. Snow tires have better snow trac- tion than All Season tires and may be more appropriate in some areas. Summer tires NISSAN specifies summer tires on some models to provide superior performance on dry roads. Summer tire performance is sub- stantially reduced in snow and ice. Summer tires do not have the tire traction rating ‘‘M&S’’ on the tire sidewall.
Z X
If you plan to operate your vehicle in snowy or icy conditions, NISSAN recommends the use of ‘‘SNOW’’ tires or ‘‘ALL SEASON’’ tires on all four wheels. Snow tires If snow tires are needed, it is necessary to select tires equivalent in size and load rating to the original equipment tires. If you do not, it can adversely affect the safety and han- dling of your vehicle. Generally, snow tires have lower speed ratings than factory equipped tires and may not match the potential maximum vehicle speed. Never exceed the maximum speed rating of the tire. If you plan to operate your vehicle in snowy or icy conditions, NISSAN recommends the use of ‘‘SNOW’’ tires or ‘‘ALL SEASON’’ tires on all four wheels. For additional traction on icy roads, studded tires may be used. However, some U.S. states and Canadian provinces prohibit their use. Check local, state and provincial laws before installing studded tires. Skid and traction capabilities of studded snow tires on wet or dry surfaces may be poorer than that of non-studded snow tires.
TIRE CHAINS Use of tire chains may be prohibited accord- ing to location. Check the local laws before installing tire chains. When installing tire chains, make sure they are of proper size for the tires on your vehicle and are installed according to the chain manufacturer’s sug- gestions. Use only SAE class “S” chains. Other types may damage your vehicle. Use chain tensioners when recommended by the tire chain manufacturer to ensure a tight fit. Loose end links of the tire chain must be secured or removed to prevent the possibil- ity of whipping action damage to the fenders or underbody. If possible, avoid fully loading your vehicle when using tire chains. In ad- dition, drive at a reduced speed. Otherwise, your vehicle may be damaged and/or ve- hicle handling and performance may be adversely affected. Never install tire chains on a TEMPORARY USE ONLY spare tire. Do not use tire chains on dry roads. Tire chains must be installed only on the front wheels and not on the rear wheels.
ADI1115
CHANGING WHEELS AND TIRES Tire rotation Tire should be rotated every 7,500 miles (12,000 km). See ‘‘Flat tire’’ in the ‘‘In case of emergency’’ section for tire replacing procedures. As soon as possible, tighten the wheel nuts to the specified torque with a torque wrench. Wheel nut tightening torque:
80 ft-lb (108 Nzm)
Maintenance and do-it-yourself
8-45
Z X
The wheel nuts must be kept tightened to specifications at all times. It is recom- mended that wheel nuts be tightened to specification at each tire rotation interval.
WARNING
c After rotating the tires, check and
adjust the tire pressure.
c Retighten the wheel nuts when the vehicle has been driven for 600 miles (1,000 km) (also in cases of a flat tire, etc.).
c Do not include the spare tire in the
tire rotation.
c For additional information regarding tires, refer to ‘‘Important Tire Safety Information’’ in the Warranty Infor- mation Booklet (US) or ‘‘Tire Safety Information’’ in the Warranty and Roadside Assistance Information booklet (Canada).
8-46 Maintenance and do-it-yourself
DI1035M
Tire wear and damage
WARNING
c Tires should be periodically inspected for wear, cracking, bulging, or objects caught in the tread. If excessive wear, cracks, bulging, or deep cuts are found, the tire(s) should be replaced. tires have a built-in tread wear indicator. When the wear indicator is visible, the tire(s) should be replaced.
c The original
c Improper service of the spare tire may result in serious personal in- jury. If it is necessary to repair the spare tire, contact an authorized NISSAN dealer.
c For additional information regarding tires, refer to ‘‘Important Tire Safety Information’’ in the Warranty Infor- mation Booklet (US) or ‘‘Tire Safety Information’’ in the Warranty and Roadside Assistance Information booklet (Canada).
Replacing tires and wheels When replacing a tire, use the same size, tread design, speed rating and load carrying capacity as originally equipped. Recom- mended types and sizes are shown in ‘‘Wheel/Tire Size’’ of the ‘‘Technical and con- sumer information’’ section of this manual.
WARNING
c The use of tires other than those recommended, or the mixed use of tires of different brands, construc- tion(bias, bias-belted, radial), or tread patterns can adversely affect the ride,
Z X
braking, handling, ground clearance, body-to-tire clearance, tire chain clearance, speedometer calibration, headlight aim and bumper height. Some of these effects may lead to accidents and could result in serious personal injury.
c If the wheels are changed for any reason, always replace with wheels which have the same off-set dimen- sion. Wheels of a different offset could cause premature tire wear, de- grade vehicle handling characteris- tics and/or interference with the brake discs/drums. Such interfer- ence can lead to decreased braking efficiency brake pad/shoe wear. Refer to “Wheel/tire size” in the “Technical and con- sumer information” section of this manual for wheel off-set dimen- sions.
and/or
early
c Do not install a deformed wheel or tire even if it has been repaired. Such wheels or tires could have unknown structural damage and could fail without warning.
c The use of retread tires is not recom-
mended.
c For additional information regarding tires, refer to ‘‘Important Tire Safety Information’’ in the Warranty Infor- mation Booklet (US) or ‘‘Tire Safety Information’’ in the Warranty and Roadside Assistance Information booklet (Canada).
Wheel balance Unbalanced wheels may affect vehicle han- dling and tire life. Even with regular use, wheels can get out of balance. Therefore, they should be balanced as required. Wheel balance service should be per- formed with the wheels off the vehicle. Spin balancing the front wheels on the vehicle could lead to transmission damage. c For additional information regarding tires, refer to ‘‘Important Tire Safety Information’’ in the Warranty Informa- tion Booklet (US) or ‘‘Tire Safety In- formation’’ in the Warranty and Road- side Assistance Information booklet (Canada).
Care of wheels c Wash the wheels when washing the
vehicle to maintain their appearance.
c Clean the inner side of the wheels when the wheel is changed or the underside of the vehicle is washed.
c Do not use abrasive cleaners when
washing the wheels.
c Inspect wheel rims regularly for dents or corrosion. Such damage may cause loss of pressure or poor seal at the tire bead. c NISSAN recommends waxing the road wheels to protect against road salt in areas where it is used during winter.
Spare tire (TEMPORARY USE ONLY) Observe the following precautions if the TEM- PORARY USE ONLY spare tire must be used, otherwise your vehicle could be damaged or involved in an accident:
Maintenance and do-it-yourself
8-47
Z X
c Tire tread of the TEMPORARY USE ONLY spare tire will wear at a faster rate than the standard tire. Replace the spare tire as soon as the tread wear indicators appear.
c Do not use the spare tire on other
vehicles.
c Do not use more than one spare tire
at the same time.
c Do not tow a trailer when the TEM- PORARY USE ONLY spare tire is installed.
CAUTION
c Do not use tire chains on the TEMPO- RARY USE ONLY spare tire. Tire chains will not fit properly and may cause damage to the vehicle.
c Because the TEMPORARY USE ONLY spare tire is smaller than the original tire, ground clearance is re- duced. To avoid damage to the ve- hicle, do not drive over obstacles. Also, do not drive the vehicle through an automatic car wash since it might get caught.
WARNING
c The spare tire should be used for emergency use only. It should be replaced with the standard tire at the first opportunity to avoid possible tire or differential damage.
c Drive carefully while the TEMPO- RARY USE ONLY spare tire is in- stalled. Avoid sharp turns and abrupt braking while driving.
c Periodically check spare tire infla- tion pressure. Always keep the pres- sure of the TEMPORARY USE ONLY spare tire at 60 psi (420 kPa, 4.2 bar). c With the TEMPORARY USE ONLY spare tire installed do not drive the vehicle at speeds faster than 50 MPH (80 km/h).
c When driving on roads covered with snow or ice, the TEMPORARY USE ONLY spare tire should be used on the rear wheels and the original tire used on the front wheels (drive wheels). Use tire chains only on the front (original) tires.
8-48 Maintenance and do-it-yourself
Z X
9 Technical and consumer information
Capacities and recommended fuel/lubricants........9-2
Fuel recommendation........................................9-3
Engine oil and oil filter recommendation...........9-5
Recommended SAE viscosity number..............9-6
Air conditioner system refrigerant and lubricant recommendations ...............................9-7
Specifications .........................................................9-8
Engine ...............................................................9-8
Wheels and tires................................................9-9
Dimensions and weights ...................................9-9When traveling or registering your vehicle in another country ....................................................9-10
Vehicle identification ............................................9-10Vehicle identification number (VIN) plate.................................................................9-10
Vehicle identification number (chassis number) ...........................................................9-10
Engine serial number ......................................9-11
F.M.V.S.S. certification label ...........................9-11
Emission control information label ..................9-12Tire placard......................................................9-12
Air conditioner specification label....................9-12
Installing front license plate..................................9-13
Vehicle loading information..................................9-14
Terms...............................................................9-14
Determining vehicle load capacity...................9-14
Loading tips .....................................................9-14
Towing a trailer.....................................................9-15
Maximum load limits........................................9-15
Towing load/specification chart .......................9-16
Towing safety ..................................................9-16
Uniform tire quality grading..................................9-19
Emission control system warranty .......................9-20
Reporting safety defects (US only)......................9-20
Readiness for inspection/maintenance (I/M) test (US only) .......................................................9-21Owner’s manual/service manual order information.......................................................9-22
In the event of a collision ................................9-23Z X
CAPACITIES AND RECOMMENDED FUEL/ LUBRICANTS The following are approximate capacities. The actual refill capacities may be a little different. When refilling, follow the procedure instructed in the ‘‘Do-it-yourself’’ section to determine the proper refill capacity.
US
measure 13-1/4 gal
Capacity (Approximate)
Imp
measure
11 gal
Liter
50
Recommended Fluids and Lubricants
Unleaded gasoline with an octane rating of at least 87 AKI (RON 91)*1
Fuel Engine oil *7
Drain and refill
With oil filter change
Without oil filter change
Cooling system
Without reservoir Manual transmission:
Automatic transmission:
Manual transmission gear oil
Automatic transmission fluid
Power steering fluid
Brake and clutch fluid
QG18DE QR25DE QG18DE QR25DE
QR25DE QG18DE QR25DE QG18DE RS5F70A/V RS5F51A, RS6F51H
2-7/8 qt 4-1/8 qt 2-5/8 qt 3-7/8 qt
6-1/2 qt 6-3/8 qt 6-3/8 qt 6-1/4 qt 6-3/8 pt 4-7/8 qt
2-3/8 qt 3-3/8 qt 2-1/4 qt 3-1/4 qt
5-3/8 qt 5-1/4 qt 5-1/4 qt 5-1/4 qt 5-1/4 pt
4 pt
2.7
3.9
2.5
3.76.1
6.0
6.0
5.9
3.0
2.3Refill to the proper level according to the instructions in the ‘‘Do-it-yourself’’ section.
c API Certification Mark *2 *3
c API grade SG/SH, Energy Conserving I & II or API grade SJ, EnergyConserving *2 *3
c ILSAC grade GF-I & GF-II *2 *3
50% Genuine NISSAN Anti-freeze coolant or equivalent 50% Demineralized or distilled water
API GL-4, Viscosity SAE 75W - 85 only
NISSAN Matic ‘D’ (Continental U.S. and Alaska) or Canada NISSAN Automatic Transmission Fluid.*4
Genuine NISSAN PSF II or equivalent.*8
Genuine NISSAN Brake Fluid*5 or equivalent DOT 3 (US FMVSS No. 116) NLGI No. 2 (Lithium Soap base) HFC-134a (R-134a)*6
NISSAN A/C System Lubricant Type R or equivalent*6Multi-purpose grease Air conditioning system refrigerant Air conditioning system lubricants *1: For further details, see ‘‘Fuel recommendation.’’ *2: For further details, see ‘‘Engine oil and oil filter recommendations.’’ *3: For further details, see ‘‘Recommended SAE engine oil viscosity.’’ *4: DexronTM III/MerconTM or equivalent may also be used. Outside the Continental United States and Alaska contact an authorized NISSAN dealership for more
— —
— —
— —
information regarding suitable fluids, including recommended brand(s) of DexronTM III/MerconTM Automatic Transmission Fluid.
*5: Available in mainland USA through your authorized NISSAN dealer. *6: For further details, see “Air conditioner specification label.” *7: For further details, see ‘‘Changing engine oil.’’ *8: Genuine NISSAN PSF, Canada NISSAN Automatic Transmission Fluid, Dexron™ III/Mercon™, or equivalent ATF may also be used. 9-2 Technical and consumer information
Z X
FUEL RECOMMENDATION For 1.8L/2.5L engines Use unleaded regular gasoline with an oc- tane rating of at least 87 AKI (Anti-Knock Index) number (Research octane number 91). For SE-R SPEC V Use unleaded regular gasoline with an oc- tane rating of at least 87 AKI (Anti-Knock Index) number (Research octane number 91). For improved vehicle performance, NISSAN recommends the use of unleaded premium gasoline with an octane rating of at least 91
AKI number (Research octane number 96). Reformulated Gasoline Some fuel suppliers are now producing re- formulated gasolines. These gasolines are specially designed to reduce vehicle emis- sions. NISSAN supports efforts towards cleaner air and suggests that you use refor- mulated gasoline when available. Gasoline containing oxygenates Some fuel suppliers sell gasoline containing oxygenates such as ethanol, MTBE andmethanol with or without advertising their presence. NISSAN does not recommend the use of fuels of which the oxygenate content and the fuel compatibility for your NISSAN cannot be readily determined. If in doubt, ask your service station manager. If you use oxygenate-blend gasoline, please take the following precautions as the usage of such fuels may cause vehicle performance problems and/or fuel system damage. c The fuel should be unleaded and have an octane rating no lower than that recommended for unleaded gasoline. c If an oxygenate-blend other than a methanol blend is used, it should con- tain no more than 10% oxygenate. (MTBE may, however, be added up to 15%.)
c If a methanol blend is used, it should contain no more than 5% methanol (methyl alcohol, wood alcohol). It should also contain a suitable amount of appropriate cosolvents and corro- sion inhibitors. If not properly formu- lated with appropriate cosolvents and corrosion inhibitors, such methanol blends may cause fuel system dam-
age and/or vehicle performance prob- lems. At this time, sufficient data is not available to ensure that all metha- nol blends are suitable for use in NIS- SAN vehicles.
If any driveability problems such as engine stalling and hard hot-starting are experi- enced after using oxygenate-blend fuels, immediately change to a non-oxygenate fuel or a fuel with a low blend of MTBE. Take care not to spill gasoline during refueling. Gasoline containing oxygen- ates can cause paint damage. Aftermarket Fuel Additives NISSAN does not recommend the use of any fuel additives (i.e., fuel injector cleaners, octane boosters, intake valve deposit re- movers, etc.) which are sold commercially. Many of these additives intended for gum, varnish or deposit removal may contain ac- tive solvents or similar ingredients that can be harmful to the fuel system and engine. Octane rating tips In most parts of North America, you should use unleaded gasoline with an octane rating of at least 87 AKI (Anti-Knock Index). How- Technical and consumer information 9-3
Z X
checked at an authorized NISSAN dealer or other competent service facility. However, now and then you may notice light spark knock for a short time while accelerating or driving up hills. This is not a cause for concern, because you get the greatest fuel benefit when there is light spark knock for a short time under heavy engine load.
ever, you may use unleaded gasoline with an octane rating as low as 85 AKI (Anti- Knock Index) in high altitude areas (over 4,000 ft [1,219 m]) such as: Colorado, Mon- tana, New Mexico, Utah, Wyoming, north- eastern Nevada, southern Idaho, western South Dakota, western Nebraska, and the part of Texas which is directly south of New Mexico. Using unleaded gasoline with an octane rating lower than stated above can cause persistent, heavy ‘‘spark knock.’’ (‘‘Spark knock’’ is a metallic rapping noise.) If severe, this can lead to engine damage. If you detect a persistent heavy spark knock even when using gasoline of the stated octane rating, or if you hear steady spark knock while holding a steady speed on level roads, have an authorized NISSAN dealer correct the condition. Failure to correct the condition is misuse of the vehicle, for which NISSAN is not responsible. Incorrect ignition timing may result in spark knock, after-run and/or overheating, which may cause excessive fuel consumption or engine damage. If any of the above symp- toms are encountered, have your vehicle 9-4 Technical and consumer information
Z X
WTI0033
ENGINE OIL AND OIL FILTER RECOMMENDATION Selecting the correct oil It is essential to choose engine oil with the correct quality and viscosity to ensure sat- isfactory engine life and performance. NIS- SAN recommends the use of a low friction oil (energy conserving oil) in order to im- prove fuel economy and conserve energy. Oils which do not have the specified quality label should not be used as they could cause engine damage. Only those engine oils with the American
Petroleum Institute (API) CERTIFICATION MARK on the front of the container should be used. This type of oil supersedes the existing API SG, SH, or SJ and Energy Conserving I & II categories. If you cannot find engine oil with the API CERTIFICATION MARK, use an API grade SG/SH, Energy Conserving I & II or API grade SJ, Energy Conserving oil. An oil with a single designation SG or SH, or in combi- nation with other categories (for example, SG/CC or SG/CD) may also be used if one with the API CERTIFICATION MARK can- not be found. An ILSAC grade GF-I & GF-II oil can also be used.
Mineral based or synthetic type oils may be used in your NISSAN vehicle. However, these oils must meet the API quality and SAE viscosity ratings specified for your ve- hicle. Do not mix mineral based and syn- thetic type oils in the engine. Oil additives NISSAN does not recommend the use of oil additives. The use of an oil additive is not necessary when the proper oil type is used and maintenance intervals are followed. Oil which may contain foreign matter or has been previously used should not be used. Oil viscosity The engine oil viscosity or thickness changes with temperature. Because of this, it is important to select the engine oil viscos- ity based on the temperatures at which the vehicle will be operated before the next oil change. The chart ‘‘Recommended SAE viscosity number’’ shows the recommended oil viscosities for the expected ambient tem- peratures. Choosing an oil viscosity other than that recommended could cause seri- ous engine damage.
Technical and consumer information 9-5
Z X
Selecting the correct oil filter Your new NISSAN vehicle is equipped with a high-quality genuine NISSAN oil filter. When replacing, use a genuine NISSAN oil filter or its equivalent for the reason de- scribed in ‘‘Change intervals’’. Change intervals The oil and oil filter change intervals for your engine are based on the use of the specified quality oils and filters. Oil and filter other than the specified quality, or oil and filter change intervals longer than recommended could reduce engine life. Damage to the engine caused by improper maintenance or use of incorrect oil and filter quality and/or viscosity is not covered by the new NISSAN vehicle warranties. Your engine was filled with a high quality engine oil when it was built. You do not have to change the oil before the first recom- mended change interval. Oil and filter change intervals depend upon how you use your vehicle.
9-6 Technical and consumer information
RECOMMENDED SAE VISCOSITY NUMBER
Operation under the following conditions may require more frequent oil and filter changes: — repeated short distance driving at cold
outside temperatures,
— driving in dusty conditions, — extensive idling, — towing a trailer.
ATI1028
c SAE 5W-30 viscosity oil is preferred for all temperatures. SAE 10W-30, SAE 10W-40 viscosity oils may be used if the ambient temperature is above 0°F (-18°C).
Z X
when servicing your air conditioner system.
AIR CONDITIONER SYSTEM RE- FRIGERANT AND LUBRICANT RECOMMENDATIONS The air conditioner in your NISSAN ve- hicle must be charged with the refriger- ant HFC-134a (R-134a) and the lubricant, NISSAN A/C system oil Type R or the exact equivalents.
CAUTION
The use of any other refrigerant or lubricant will cause severe damage to the air conditioning system and will require the replacement of all air con- ditioner system components.
The refrigerant HFC-134a (R-134a) in your NISSAN vehicle does not harm the earth’s ozone layer. Although this refrigerant does not affect the earth’s atmosphere, certain governmental regulations require the recov- ery and recycling of any refrigerant during automotive air conditioner system service. Your authorized NISSAN dealer has the trained technicians and equipment needed to recover and recycle your air conditioner system refrigerant. Contact your authorized NISSAN dealer
Technical and consumer information 9-7
Z X
SPECIFICATIONS
ENGINE Model Type Cylinder arrangement Bore × Stroke Displacement Firing order Idle speed Ignition timing degree (B.T.D.C.) at idle speed
in (mm) cu in (cm3)
rpm
degree/rpm
CO percentage at idle speed [No air]
Spark plug
Camshaft operation Spark plug gap (Nominal) Generator belt size Width × Length
in (mm)
in (mm)
QG18DE
Gasoline, 4-cycle, DOHC
4-cylinder in-line
QR25DE
Gasoline, 4-cycle, DOHC
4-cylinder in-line
3.150 × 3.465 (80.0 × 88.0)
3.504 x 3.937 (89.0 x 100.0)
107.94 (1,769)
1-3-4-2
152.55 (2,500)
1-3-4-2
See the ‘‘Emission Control label’’ on the underside of the hood.
Platinum-tipped type
Platinum-tipped type
Hot
Standard
Cold
PLFR4A-11 *1
PLFR5A-11 *1
PLFR6A-11 *1
Timing chain0.043 (1.1)
PLFR4A-11 *1
PLFR5A-11 *1
PLFR6A-11 *1
Timing chain0.043 (1.1)
0.843 x 32.28, (21.4 x 820)
0.843 x 44.09, (21.4 x 1,120)*1
0.559 x 32.68, (14.2 x 830)
0.843 x 40.75, (21.4 x 1,035)*1
*1: Always check with the Parts Department at an authorized NISSAN dealer for the latest parts information. *2: With air conditioner
The spark ignition system of this vehicle meets all requirements of the Canadian Interference-Causing Equipment Regulations.
9-8 Technical and consumer information
Z X
WHEELS AND TIRES
DIMENSIONS AND WEIGHTS
Wheel Dimension
Offset in (mm)
14 × 5.5JJ
1.57 (40)
Road wheel
149 steel w/bottom cover
1.77 (45)
1.77 (45)
1.85 (47)
159 aluminum alloy
15 x 6JJ
169 aluminum alloy
16 × 6JJ
179 aluminum alloy
17 x 7JJ
Conventional tire size
P185/65R/14
P195/60R/15
P195/55R/16
P215/45ZR17Spare tire size T115/70*14
T125/70*15
T135/90*1514 x 5.5JJ 15 x 6JJ 16 x 6JJ 17 x 7JJ
14 × 4T 15 x 4T 15 x 4T
*: “R” or “D” depending on tire manufacturer
Overall length
Overall width
Overall height
Front tread
Rear tread
14 inch
15/16 inch
17 inch
14 inch
15/16 inch
17 inch
Wheelbase
Gross vehicle weight rating
Gross axle weight rating
Front
Rear
in (mm)
in (mm)
in (mm)
in (mm)
in (mm)
in (mm)
in (mm)
in (mm)
in (mm)
in (mm)
lb (kg)
lb (kg)
lb (kg)
SENTRA
177.4 (4505)
67.3 (1710)
55.5 (1410)
58.3 (1480)
57.9 (1470)
57.7 (1466)
57.5 (1460)
57.1 (1450)
56.9 (1446)
99.8 (2,535)
See the ‘‘F.M.V.S.S. cer- tification label’’ on the center pillar between the driver’s side front and rear doors.
Technical and consumer information 9-9
Z X
WHEN TRAVELING OR REGISTERING YOUR VEHICLE IN ANOTHER COUNTRY When planning to travel in another coun- try, you should first find out if the fuel avail- able is suitable for your vehicle’s engine. Using fuel with too low an octane/cetane rating may cause engine damage. All gaso- line vehicles must be operated with un- leaded gasoline. Therefore, avoid taking your vehicle to areas where appropriate fuel is not available. When transferring the registration of your vehicle to another country, state, province or district, it may be necessary to modify the vehicle to meet local laws and regulations. The laws and regulations for motor vehicle emission control and safety standards vary according to the country, state, province or district. Therefore, vehicle specifications may differ. When any vehicle is to be taken into another country, state, province or dis- trict and registered, its modifications, transportation, and registration are the responsibility of the user. NISSAN is not responsible for any inconvenience that may result.
VEHICLE IDENTIFICATION
TI1050M
LTI0007
VEHICLE IDENTIFICATION NUMBER (VIN) PLATE The vehicle identification number (VIN) plate is attached to the top of the instrument panel on the driver’s side. This number is the identification for your vehicle and is used in the vehicle registration.
VEHICLE IDENTIFICATION NUMBER (Chassis number) The chassis number is stamped as shown.
9-10 Technical and consumer information
Z X
LTI0006
WTI0032
WTI0012
ENGINE SERIAL NUMBER The engine serial number is stamped on the engine as shown.
F.M.V.S.S. CERTIFICATION LABEL The Federal Motor Vehicle Safety Standard (F.M.V.S.S.) certification label is affixed as shown. This label contains valuable vehicle information, such as: Gross Vehicle Weight Ratings (GVWR), Gross Axle Weight Rating (GAWR), month and year of manufacture, Vehicle Identification Number, (VIN), etc. Review it carefully.
Technical and consumer information 9-11
Z X
LTI1008
LTI0011
LTI1009
EMISSION CONTROL INFORMA- TION LABEL The emission control attached as shown.
information label
is
TIRE PLACARD The cold tire pressure is shown on the tire placard affixed to the driver’s side rear door pillar.
AIR CONDITIONER SPECIFICA- TION LABEL The air conditioner specification label affixed as shown.
is
9-12 Technical and consumer information
Z X
INSTALLING FRONT LICENSE PLATE
Use the following steps to mount the front license plate: 1. Make holes on the plastic finisher at the location mark (small dimple) using a 0.31
in (8 mm) drill. Apply light pressure to the drill. Install the license plate holder using the two screws provided with the holder. the license plate using two2. Mount
M6-14mm bolts. License plate bolt tightening torque: 3.8 to 4.7 ft-lb (5.10 to 6.37 Nzm)
LTI0010
Technical and consumer information 9-13
Z X
VEHICLE LOADING INFORMATION
WARNING
c It is extremely dangerous to ride in a cargo area inside the vehicle. In a collision, people riding in these ar- eas are more likely to be seriously injured or killed.
the vehicle that
c Do not allow people to ride in any area of is not equipped with seats and seat belts. c Be sure everyone in the vehicle is in a seat with their seat belt properly fas- tened.
TERMS It is important to familiarize yourself with the following terms before loading your vehicle: c Curb Weight (actual weight of your ve- hicle) - vehicle weight including: standard and optional equipment, fluids, emer- gency tools, and spare tire assembly. This weight does not include passen- gers and cargo.
c GVW (Gross Vehicle Weight)
- curb weight plus the combined weight of pas- sengers and cargo.
maximum total weight (load) limit speci- fied for the vehicle.
c GAWR (Gross Axle Weight Rating) - maximum weight (load) limit specified for the front or rear axle.
DETERMINING VEHICLE LOAD CAPACITY The load capacity of this vehicle is deter- mined by weight, not by available cargo space. For example, a luggage rack, bike carrier, cartop carrier or similar equipment does not increase the load carrying capacity of your vehicle. To determine vehicle load capacity: Vehicle weight can be determined by using a commercial-grade scale, found at places such as a truck stop, gravel quarry, grain elevator, or a scrap metal recycling facility. 1) Determine the curb weight of your ve-
hicle.
2) Compare the curb weight amount to the GVWR specified for your vehicle to de- termine how much more weight your vehicle can carry.
c GVWR (Gross Vehicle Weight Rating) - 9-14 Technical and consumer information
3) After loading (cargo and passengers),
re-weigh your vehicle to determine if either GVWR or GAWR for your vehicle is exceeded. If GVWR is exceeded, re- move cargo as necessary. If either the front or rear GAWR is exceeded, shift the load or remove cargo as necessary.
LOADING TIPS c The GVW must not exceed GVWR or GAWR as specified on the F.M.V.S.S. Certification Label.
c Do not load the front and rear axle to the GAWR. Doing so will exceed the GVWR.
WARNING
c Properly secure all cargo to help prevent it from sliding or shifting. Do not place cargo higher than the seat- backs. In a sudden stop or collision, unsecured cargo could cause per- sonal injury.
c Do not load your vehicle any heavier than the GVWR or the maximum front and rear GAWRs. If you do, parts of your vehicle can break, tire it can damage could occur, or change your vehicle handles. This could result in loss of control and cause personal injury.
the way
Z X
TOWING A TRAILER
c Overloading can shorten the life of the vehicle. Failures caused by over- loading are not covered by the vehi- cle’s warranty.
TI1011M
Your new vehicle was designed to be used primarily to carry passengers and cargo. Remember that towing a trailer places ad- ditional loads on your vehicle’s engine, drive train, steering, braking and other systems. A Nissan Trailer Towing Guide (U.S. only) containing information on trailer towing abil- ity and the special equipment required may be obtained from an authorized NISSAN dealer.
MAXIMUM LOAD LIMITS Maximum trailer loads Never allow the total trailer load to exceed 1,000 lb (454 kg). The total trailer load equals trailer weight plus its cargo weight. Towing loads greater than 1,000 lb (454 kg) or using improper towing equipment could adversely affect vehicle handling, braking and performance. The ability of your vehicle to tow a trailer is not only related to the maximum trailer loads, but also the places you plan to tow. Tow weights appropriate for level highway driving may have to be reduced on very steep grades or in low traction situations (for example, on slippery boat ramps).
WARNING
Vehicle damage and/or personal injury resulting from improper towing proce- dures are not covered by NISSAN war- ranties. A NISSAN Trailer Towing Guide (U.S. only) containing information on trailer towing ability and the special equipment required may be obtained from an authorized NISSAN dealer.
Technical and consumer information 9-15
Z X
Tongue load Keep the tongue load between 9 and 11% of the total trailer load. If the tongue load becomes excessive, rearrange cargo to al- low for proper tongue load.
TI1012M
Maximum gross vehicle weight/maximum gross axle weight The gross vehicle weight of the towing vehicle must not exceed the gross vehicle weight rating (GVWR) shown on the F.M.V.S.S. certification label. The gross ve- hicle weight equals the combined weight of the unloaded vehicle, passengers, luggage, hitch, trailer tongue load and any other optional equipment. In addition, front or rear gross axle weight must not exceed the gross axle weight rating (GAWR) shown on the F.M.V.S.S. certification label.
9-16 Technical and consumer information
TOWING LOAD/SPECIFICATION CHART
TOWING LOAD / SPECIFICATION CHART
MAXIMUM TOWING LOAD
MAXIMUM TONGUE LOAD
UNIT: lb (kg)
1,000 (454)
110 (49)
TOWING SAFETY Trailer hitch Choose a proper hitch for your vehicle and trailer. A genuine NISSAN trailer hitch is available from your NISSAN dealer (Canada only). Make sure the trailer hitch is securely attached to the vehicle to help avoid personal injury or property damage due to sway caused by crosswinds, rough road surfaces or passing trucks.
CAUTION
c Do not use axle-mounted hitches. c The hitch should not be attached to or affect the operation of the impact- absorbing bumper.
Z X
c Do not modify the vehicle exhaust system, brake system, etc. to install a trailer hitch.
c To reduce the possibility of addi- tional damage if your vehicle is struck from the rear, where practical, remove the hitch and/or receiver when not in use.
c After the hitch is removed, seal the bolt holes to prevent exhaust fumes, water or dust from entering the pas- senger compartment.
c Regularly check that all hitch mount-
ing bolts are securely mounted.
Tire pressures c When towing a trailer, inflate the vehicle tires to the recommended cold tire pres- sure indicated on the tire placard (lo- cated on the driver’s side rear door pillar).
c Trailer tire condition, size, load rating and proper inflation pressure should be in accordance with the trailer and tire manufacturers’ specifications.
Safety chains Always use suitable safety chains between your vehicle and the trailer. Safety chains should be crossed and should be attached to the hitch, not to the vehicle bumper or axle. Be sure to leave enough slack in the chains to permit turning corners. Trailer lights Trailer lights should comply with federal and/ or local regulations. When wiring the vehicle for towing, connect the stop and tail light pickup into the vehicle electrical circuit. Trailer brakes If your trailer is equipped with a braking system, make sure it conforms to federal and/or local regulations and that it is prop- erly installed.
WARNING
Never connect a trailer brake system directly to the vehicle brake system.
Pre-towing tips c Be certain your vehicle maintains a level position when a loaded and/or unloaded
trailer is hitched. Do not drive the vehicle if it has an abnormal nose-up or nose- down condition; check for improper tongue load, overload, worn suspension or other pos- sible causes of either condition.
c Always secure items in the trailer to
prevent load shift while driving.
c Be certain your rear view mirrors con- form to all federal, state or local regula- tions. If not, install any mirrors required for towing before driving the vehicle.
Trailer towing tips In order to gain skill and an understanding of the vehicle’s behavior, you should prac- tice turning, stopping and backing up in an area which is free from traffic. Steering, stability, and braking performance are somewhat different than under normal driv- ing conditions. c Always secure items in the trailer to
prevent load shift while driving.
c Avoid abrupt starts, acceleration or stops. c Avoid sharp turns or lane changes. c Always drive your vehicle at a moderate
speed.
Technical and consumer information 9-17
Z X
c Always block the wheels on both vehicle and trailer when parking. Parking on a slope is not recommended; however, if you must do so, and if your vehicle is equipped with an automatic transmission, first block the wheels and apply the park- ing brake, and then move the transmis- sion shift selector lever into the P (Park) position. If you move the shift selector lever to the P (Park) position before block- ing the wheels and applying the parking brake, transmission damage could occur. c When going down a hill, shift into a lower gear and use the engine braking effect. When ascending a long grade, down- shift the transmission to a lower gear and reduce speed to reduce chances of engine overloading and/or overheating. c If the engine temperature coolant rises to an extremely high temperature when the air conditioning system is on, turn off the air conditioner. Coolant heat can be additionally vented by opening the win- dows, switching the fan control to high and setting the temperature control to the HOT position.
c Trailer towing requires more fuel than
normal circumstances.
9-18 Technical and consumer information
c Avoid towing a trailer for your vehicle’s
first 500 miles (800 km).
trailer must also pass the other vehicle before you can safely change lanes.
c To maintain engine braking efficiency and electrical charging performance, do not use fifth gear (manual transmission) or overdrive (automatic transmission).
c Avoid holding the brake pedal down too long or too frequently. This could cause the brakes to overheat, resulting in re- duced braking efficiency.
When towing a trailer, change the oil in the transmission more frequently. For additional information see the ‘‘Mainte- nance and do-it-yourself’’ section earlier in this manual.
c Have your vehicle serviced more often than at intervals specified in the recom- mended Maintenance Schedule in the “NISSAN Service and Maintenance Guide”.
c When making a turn, your trailer wheels will be closer to the inside of the turn than your vehicle wheels. To compen- sate for this, make a larger than normal turning radius during the turn.
c Crosswinds and rough roads adversely affect vehicle/trailer handling, possibly causing vehicle sway. When being passed by larger vehicles, be prepared for possible changes in crosswinds that could affect vehicle handling. If swaying does occur, firmly grip the steering wheel, steer straight ahead, and imme- diately (but gradually) reduce vehicle speed. This combination helps to stabi- lize the vehicle. Never increase speed. c Be careful when passing other vehicles. Passing while towing a trailer requires considerably more distance than normal passing. Remember the length of the
Z X
WARNING
The temperature grade for this tire is established for a tire that is properly inflated and not overloaded. Excessive speed, under-inflation, or excessive loading, either separately or in combi- nation, can cause heat build-up and possible tire failure.
UNIFORM TIRE QUALITY GRADING
DOT Quality Grades: All passenger car tires must conform to Federal Safety Require- ments in addition to these grades. Quality grades can be found where appli- cable on the tire sidewall between tread shoulder and maximum section width. For example: Treadwear 200 Traction AA Temperature A Treadwear Treadwear grade is a comparative rating based on tire wear rate when tested under controlled conditions on specified govern- ment test courses. For example, a tire graded 150 would wear one and a half (1-1/2) times as well on the government course as a tire graded 100. However, relative tire performance depends on actual driving conditions, and may vary signifi- cantly due to variations in driving habits, service practices and differences in road characteristics and climate. Traction AA, A, B and C The traction grades, from highest to lowest, are AA, A, B, and C. Those grades repre- sent a tire’s ability to stop on wet pavement as measured under controlled conditions, on specified government test surfaces of asphalt and concrete. A tire marked C may
have poor traction performance.
WARNING
The traction grade assigned to your vehicle tires is based on straight-ahead braking traction tests, and does not include acceleration, cornering, hydro- planing, or peak traction characteris- tics.
Temperature A, B and C Temperature grades are A (the highest), B, and C. They represent a tire’s resistance to heat build-up, and its ability to dissipate heat when tested under controlled condi- tions on a specified indoor laboratory test wheel. Sustained high temperature can cause tire material to degenerate, reducing tire life. Excessive temperatures can lead to sudden tire failure. Grade C corresponds to a performance level which all passenger car tires must meet under the Federal Motor Vehicle Safety Standard No. 109. Grades A and B represent higher levels of perfor- mance on laboratory test wheels than the minimum required by law.
Technical and consumer information 9-19
Z X
c Nissan Canada Inc. 5290 Orbitor Drive Mississauga, Ontario, L4W 4Z5
EMISSION CONTROL SYSTEM WARRANTY
Your NISSAN is covered by the following emission warranties. For US 1) Emission Defects Warranty 2) Emission Performance Warranty Details of these warranties may be found with other vehicle warranties in your War- ranty Information Booklet that comes with your NISSAN vehicle. If you did not receive a Warranty Information Booklet, or it has become lost, you may obtain a replacement by writing to: c Nissan North American, Inc.
Consumer Affairs Department P.O. Box 191
Gardena, CA. 90248-0191For Canada Emission Control System Warranty Details of these warranties may be found with other vehicle warranties in your War- ranty and Roadside Assistance Information Booklet that comes with your NISSAN ve- hicle. If you did not receive a Warranty and Roadside Assistance Information Booklet, or it has become lost, you may obtain a replacement by writing to: 9-20 Technical and consumer information
REPORTING SAFETY DEFECTS (US only)
If you believe that your vehicle has a defect which could cause a crash or could cause injury or death, you should immediately inform the National Highway Traffic Safety Administration (NHTSA) in addition to no- tifying NISSAN. If NHTSA receives similar complaints, it may open an investigation, and if it finds that a safety defect exists in a group of vehicles, it may order a recall and remedy campaign. However, NHTSA cannot be- come involved in individual problems be- tween you, your dealer, or NISSAN. To contact NHTSA, you may either call the Auto Safety Hotline toll-free at (888) 327- 4236. You may also write to: NHTSA, U.S. Department of Transportation, Washington, D.C. 20590. You can also obtain other information about motor vehicle safety from the Hotline. You may notify NISSAN by contacting our Consumer Affairs Department, toll-free, at 1-800-NISSAN-1. In Hawaii call (808) 836-0888.
Z X
3,000 rpm and maintain it for 5 consecu- tive minutes.
12. Stop the vehicle and turn the engine off. 13. Repeat steps one through twelve at
least one more time.
If step one through seven is interrupted, repeat the preceding step. Any safe driving mode is acceptable between steps. Do not stop the engine until step seven is com- pleted.
READINESS FOR INSPECTION/MAINTENANCE (I/M) TEST (US only) Due to legal requirements in some states and Canadian provinces, your vehicle may be required to be in the ready condition for an Inspection/Maintenance (I/M) test of the emission control system. The vehicle is set to the ready condition when it is driven through certain driving pat- terns. Usually, the ready condition can be obtained by ordinary usage of the vehicle. If a powertrain system component is repaired or the battery is disconnected, the vehicle may be reset to a not ready condition. Before taking the I/M test, drive the vehicle through the following pattern to set the vehicle to the ready condition. If you cannot or do not want to perform the driving pattern, an authorized NISSAN dealer can conduct it for you.
WARNING
Always drive the vehicle in a safe and prudent manner according to traffic conditions and obey all traffic laws.
1. Start the engine when the engine coolant temperature gauge needle points to C. Allow the engine to idle until the gauge needle points between the C and H (nor- mal operating temperature).
2. Accelerate the vehicle to 55 mph (88
km/h), then quickly release the accelera- tor pedal completely and keep it released for at least 6 seconds.3. Quickly depress the accelerator pedal for a moment, then drive the vehicle at a speed of 53 to 60 mph (86 to 96 km/h) for at least 5 minutes.
4. Stop the vehicle. 5. Accelerate the vehicle to 35 mph (55
km/h) and maintain the speed for 20
seconds.6. Repeat steps four through five at least
three times.
7. Accelerate the vehicle to 55 mph (88
km/h) and maintain the speed for at least 3 minutes.8. Stop the vehicle [shift selector lever in
the P (Park) or N (Neutral) position].
9. Rev the engine up between 2,500 and 3,500 rpm and hold it for 3 consecutive minutes, then release the accelerator pedal completely.
10. Wait 5 seconds at idle. 11. Rev the engine up between 2,000 and
Technical and consumer information 9-21
Z X
OWNER’S MANUAL/SERVICE MANUAL ORDER INFORMATION A genuine NISSAN Service Manual is the best source of service and repair information for your vehicle. Filled with wiring diagrams, illus- trations and step-by-step diagnostic and ad- justment procedures, this manual is the same one used by the factory trained technicians working at authorized NISSAN dealerships. Also available are genuine NISSAN Owner’s Manuals, and genuine NISSAN Service and Owner’s Manuals for older NISSAN models. In the USA:
For current pricing and availability of genuine NISSAN Service Manuals for the 2000 model year and later, contact:
Tweddle Litho Company 1-800-639-8841
www.nissan-techinfo.comFor current pricing and availability of genuine NISSAN Service Manuals for the 1999 model year and prior, see an authorized NISSAN dealer, or contact:
DDS Distribution Services, Ltd. 20770 Westwood Road Strongsville, OH 44136
1-800-247-5321Z X
9-22 Technical and consumer information
Why should you take a chance? In over 40 states, the law says you must be advised if non-genuine parts are used to repair your vehicle. And some states have enacted laws that restrict insurance compa- nies from authorizing the use of non- genuine collision parts during the new ve- hicle warranty. These laws help protect you, so you can take action to protect yourself. It’s your right! If you should need further information visit us at: www.nissandriven.com.
For current pricing and availability of genuine NISSAN Owner’s Manuals for the 2002
model year and prior, see an authorized NISSAN dealer, or contact:DDS Distribution Services, Ltd. 20770 Westwood Road Strongsville, OH 44136
1-800-247-5321In Canada: To purchase a copy of a Genuine NISSAN Service Manual or Owner’s Manual please contact your nearest NISSAN Dealer. For the phone number and location of a NISSAN Dealer in your area call the NISSAN Customer Service Information Center at 1-800-387-0122
and a bilingual NISSAN representative will assist you. Also available are genuine NISSAN Service and Owner’s Manuals for older NISSAN models. IN THE EVENT OF A COLLISION Unfortunately, accidents do occur. In this unlikely event, there is some important in- formation you should know. Many insurance companies routinely autho-