- 2013 Nissan Rogue Owners Manuals
- Nissan Rogue Owners Manuals
- 2012 Nissan Rogue Owners Manuals
- Nissan Rogue Owners Manuals
- 2011 Nissan Rogue Owners Manuals
- Nissan Rogue Owners Manuals
- 2009 Nissan Rogue Owners Manuals
- Nissan Rogue Owners Manuals
- 2010 Nissan Rogue Owners Manuals
- Nissan Rogue Owners Manuals
- 2008 Nissan Rogue Owners Manuals
- Nissan Rogue Owners Manuals
- Download PDF Manual
-
[ Edit: 2011/ 6/ 22 Model: S35-D ]
Black plate (301,1)
MAINTENANCE PRECAUTIONS
S35-D-110201-B74F7695-55EC-4CC1-AF27-7617EC3FC97C When performing any inspection or mainte- nance work on your vehicle, always take care to prevent serious accidental injury to yourself or damage to the vehicle. The following are general precautions which should be closely observed.
WARNING
. Park the vehicle on a level surface, apply the parking brake securely and block the wheels to prevent the vehicle from moving. Move the selector lever to P (Park).
. Be sure the ignition switch is in the OFF or LOCK position when per- forming any parts replacement or repairs.
If you must work with the engine running, keep your hands, clothing, hair and tools away from moving fans, belts and any other moving parts.
It is advisable to secure or remove any loose clothing and remove any jewelry, such as rings, watches, etc. before working on your vehicle.
. Always wear eye protection when-
ever you work on your vehicle.
If you must run the engine in an enclosed space such as a garage, be sure there is proper ventilation for exhaust gases to escape.
. Never get under the vehicle while it is supported only by a jack. If it is necessary to work under the vehicle, support it with safety stands.
. Keep smoking materials, flame and sparks away from fuel tank and the battery.
The fuel filter or fuel lines should be serviced by a NISSAN dealer be- cause the fuel lines are under high pressure even when the engine is off.
CAUTION
. Do not work under the hood while the engine is hot. Turn the engine off and wait until it cools down.
. Avoid direct contact with used en- gine oil and coolant. Improperly disposed engine oil, and engine coolant and/or other vehicle fluids can damage the environment. Al-
ways conform to local regulations for disposal of vehicle fluid.
. Never leave the engine or the CVT related component harnesses dis- connected while the ignition switch is in the ON position.
. Never connect or disconnect the battery or any transistorized com- ponent while the ignition switch is in the ON position.
. Your vehicle is equipped with an automatic engine cooling fan. It may come on at any time without warn- ing, even if the ignition key is in the OFF position and the engine is not running. To avoid injury, always disconnect the negative battery cable before working near the fan.
This “8. Maintenance and do-it-yourself” section gives instructions regarding only those items which are relatively easy for an owner to perform. A genuine NISSAN Service Manual is also available. (See “Owner’s Manual/Service Man- ual order information” in the “9. Technical and consumer information” section.) You should be aware that improper servicing may result
incomplete or in operating
Maintenance and do-it-yourself 8-5
[ Edit: 2011/ 6/ 22 Model: S35-D ]
Black plate (302,1)
ENGINE COMPARTMENT CHECK LOCATIONS
S35-D-110201-0FD69969-98CF-4B76-993A-772AC6053520
difficulties or excessive emissions, and could affect warranty coverage. If in doubt about any servicing, we recommend that it be done by a NISSAN dealer.
S35-D-110201-CE045E86-1FAB-4B03-A2FF-59AEDA4CE682
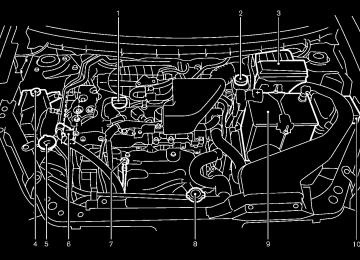
QR25DE ENGINE 1. Engine oil filler cap 2. Brake fluid reservoir 3. Air cleaner 4. Engine coolant reservoir 5. Window washer fluid reservoir 6. Drive belt location
7. Engine oil dipstick 8. Radiator filler cap 9. Battery 10. Fuse/fusible link holder
SDI2127
8-6 Maintenance and do-it-yourself
[ Edit: 2011/ 6/ 22 Model: S35-D ]
Black plate (303,1)
CAUTION
. Never use any cooling system ad- ditives such as radiator sealer. Ad- ditives may clog the cooling system and cause damage to the engine, transmission and/or cooling sys- tem.
. When adding or replacing coolant, be sure to use only Genuine NISSAN Long Life Antifreeze/Cool- ant (blue) or equivalent. Genuine NISSAN Long Life Antifreeze/Cool- ant (blue) is pre-diluted to provide antifreeze protection to −348F (−378C). If additional freeze protec- tion is needed due to weather where you operate your vehicle, add Gen- uine NISSAN Long Life Antifreeze/ Coolant (blue) concentrate follow- ing the directions on the container. If an equivalent coolant other than Genuine NISSAN Long Life Anti- freeze/Coolant (blue) is used, fol- low the coolant manufacturer’s instructions to maintain minimum antifreeze protection to −348F (−378C). The use of other types of coolant solutions other than Genu-
Maintenance and do-it-yourself 8-7
ENGINE COOLING SYSTEM
S35-D-110201-5F27817E-CC25-4EF8-A3FD-71BAFE2E41C5
The engine cooling system is filled at the factory with a pre-diluted mixture of 50% Genuine NISSAN Long Life Antifreeze/Coolant (blue) and 50% water to provide year-round anti-freeze and coolant protection. The antifreeze solution contains rust and corrosion inhibitors. Additional engine cooling system additives are not neces- sary.WARNING
. Never remove the radiator or cool- ant reservoir cap when the engine is hot. Wait until the engine and radiator cool down. Serious burns could be caused by high pressure fluid escaping from the radiator. See precautions in “If your vehicle overheats” in the “6. In case of emergency” section of this manual.
The radiator is equipped with a pressure type radiator cap. To pre- vent engine damage, use only a genuine NISSAN radiator cap.
[ Edit: 2011/ 6/ 22 Model: S35-D ]
SDI2128
S35-D-110201-F68DC4EA-FB8C-4D98-9C23-A8AED598CAE0
Removing the air duct Remove the air duct *A if necessary. 1. Remove the clips *B with a suitable tool. 2. Pull and then
the air duct upward *1
sideways *2 .
Install the air duct securely after any inspection or maintenance work is performed.
.
ine NISSAN Long Life Antifreeze/ Coolant (blue) or equivalent may damage the engine cooling system.
(blue) ,
The life expectancy of the factory-fill coolant is 105,000 miles (168,000
km) or 7 years. Mixing any other type of coolant other than Genuine NISSAN Long Life Antifreeze/Cool- ant including Genuine NISSAN Long Life Antifreeze/Cool- ant (green), or the use of non- distilled water will reduce the life expectancy of the factory-fill cool- ant. Refer to the NISSAN Service and Maintenance Guide for more details.Black plate (304,1)
CHANGING ENGINE COOLANT S35-D-110201-39600194-EC4B-4B12-A3A0-C8B0B7FE6BFC Major cooling system repairs should be per- formed by a NISSAN dealer. The service procedures can be found in the appropriate NISSAN Service Manual. Improper servicing can result in reduced heater performance and engine overheat- ing.
WARNING
To avoid the danger of being scalded, never change the coolant when the engine is hot.
. Never remove the radiator cap when the engine is hot. Serious burns could be caused by high pressure fluid escaping from the radiator.
. Avoid direct skin contact with used coolant. If skin contact is made, wash thoroughly with soap or hand cleaner as soon as possible.
. Keep coolant out of reach of chil-
dren and pets.
Engine coolant must be disposed of properly. Check your local regulations.
SDI2100
CHECKING ENGINE COOLANT LEVEL S35-D-110201-38BC8B2D-EDD2-4248-AF5D-D2E2CA096255
Check the coolant level in the reservoir when the engine is cold. If the coolant level is below the MIN level *2 , open the reservoir cap and add coolant up to the MAX level *1 . If the reservoir is empty, check the coolant level in the radiator when the engine is cold. If there is insufficient coolant in the radiator, fill the radiator with coolant up to the filler opening and also add it to the reservoir up to the MAX level *1 . If the cooling system frequently requires coolant, have it checked by a NISSAN dealer.8-8 Maintenance and do-it-yourself
[ Edit: 2011/ 6/ 22 Model: S35-D ]
Black plate (305,1)
ENGINE OIL
S35-D-110201-513ADAA0-E81C-4358-9E9B-247C261AFF68
opening. Do not overfill *3 .
6. Recheck oil level with the dipstick. It is normal to add some oil between oil maintenance intervals or during the break- in period, depending on the severity of operating conditions.
4. Raise and support
the vehicle using a
suitable floor jack and safety jack stands. . Place the safety jack stands under the
vehicle jack-up points.
. A suitable adapter should be attached to
the jack stand saddle.
CAUTION
CAUTION
Make sure the correct lifting and sup- port points are used to avoid vehicle damage.
SDI2129
CHECKING ENGINE OIL LEVEL S35-D-110201-E85752C2-C790-4D7B-A1A7-889A7C325F8D 1. Park the vehicle on a level surface and apply
the parking brake.
2. Run the engine until
it reaches operating
temperature.
3. Turn off the engine. Wait more than 10
minutes for the oil to drain back into the oil pan.4. Remove the dipstick and wipe it clean.
Reinsert it all the way.
5. Remove the dipstick again and check the oil level. It should be within the range *1 . If the oil level is below *2 , remove the oil filler cap through the and pour
recommended oil
Oil level should be checked regularly. Operating the engine with an insuffi- cient amount of oil can damage the engine, and such damage is not cov- ered by warranty.
CHANGING ENGINE OIL AND FILTER S35-D-110201-EB3C8F8D-B9A5-464F-9C14-F73939411A2E Change the engine oil and filter according to the maintenance log shown in the NISSAN Service and Maintenance Guide.
Vehicle set-up S35-D-110201-953D6A28-DEB2-4D1C-858B-690A9ECD35C6
1. Park the vehicle on a level surface and applythe parking brake.
2. Start the engine and let it idle until it reaches
operating temperature.
3. Turn the engine off and wait more than 10
minutes.
[ Edit: 2011/ 6/ 22 Model: S35-D ]
Maintenance and do-it-yourself 8-9
Black plate (306,1)
Install the plastic cover.
9. 10. Clean and re-install the drain plug with a new washer. Securely tighten the drain plug with a wrench. Drain plug tightening torque:
22 to 29 ft-lb (29 to 39 N·m)
Do not use excessive force.
11. Refill engine with recommended oil through the oil filler opening, and install the oil filler cap securely. See “Capacities and recommended fuel/ lubricants” in the “9. Technical and con- sumer information” section for drain and refill capacity. The drain and refill capacity depends on the oil temperature and drain time. Use these specifications for reference only. Always use the dipstick to determine the proper amount of oil in the engine.
12. Start
the engine and check for
around the drain plug and the oil Correct as required.
leakage filter.
13. Turn the engine off and wait more than 10
minutes. Check the oil level with the dipstick. Add engine oil if necessary.. Waste oil must be disposed of
properly.
. Check your local regulations. Perform steps 4 to 9 when the engine oil filter change is needed.
4. Remove the plastic cover over the oil filter location by removing the small plastic clips. 5. Loosen the oil filter with an oil filter wrench.
Remove the oil filter by turning it by hand.
6. Wipe the engine oil filter mounting surface
with a clean rag.
SDI2120
CAUTION
1. Oil filler cap 2. Oil drain plug 3. Oil filter Engine oil and filter S35-D-110201-EE672A53-2059-4431-9900-0CB4AB10F8FC 1. Place a large drain pan under the drain plug. 2. Remove the oil filler cap. 3. Remove the drain plug with a wrench and
completely drain the oil.
CAUTION
Be sure to remove any old gasket material remaining on the mounting surface of the engine. Failure to do so could lead to engine damage.
7. Coat the gasket on the new filter with clean
engine oil.
8. Screw in the oil filter clockwise until a slight resistance is felt, then tighten additionally more than 2/3 turn. Oil filter tightening torque:
Be careful not to burn yourself, as the engine oil is hot.
11 to 15 ft-lb (14.7 to 20.5 N·m)
8-10 Maintenance and do-it-yourself
[ Edit: 2011/ 6/ 22 Model: S35-D ]
Black plate (307,1)
CONTINUOUSLY VARIABLE TRANSMISSION (CVT) FLUID
BRAKE FLUID
After the operation 1. Lower the vehicle carefully to the ground. 2. Dispose of waste oil and filter properly.
S35-D-110201-60B8C37E-A45B-4E36-943D-A11F3FFE110B
WARNING
. Prolonged and repeated contact with used engine oil may cause skin cancer.
Try to avoid direct skin contact with used oil. If skin contact is made, wash thoroughly with soap or hand cleaner as soon as possible.
. Keep used engine oil out of reach of
children.
S35-D-110201-7025907A-6A12-49EB-839B-E4EDBE85FD64
CAUTION
. Use only Genuine NISSAN CVT Fluid NS-2. Do not mix with other fluids. . Using transmission fluid other than Genuine NISSAN CVT Fluid NS-2
will damage the CVT, which is not covered by the NISSAN new vehicle limited warranty.When checking or replacement is required, we recommend a NISSAN dealer for servicing.
S35-D-110201-7E9EAFC0-0C1F-4352-8FF8-CF6DE7EAF643
For additional brake fluid information, see “Capacities and recommended fuel/lubricants” in the “9. Technical and consumer information” section of this manual.WARNING
. Use only new fluid from a sealed container. Old, inferior or contami- nated fluid may damage the brake system. The use of improper fluids can damage the brake system and affect the vehicle’s stopping ability. . Clean the filler cap before removing. . Brake fluid is poisonous and should be stored carefully in marked con- tainers out of the reach of children.
CAUTION
Do not spill the fluid on any painted surfaces. This will damage the paint. If fluid is spilled, immediately wash the surface with water.
Maintenance and do-it-yourself 8-11
[ Edit: 2011/ 6/ 22 Model: S35-D ]
WINDOW WASHER FLUID
S35-D-110201-08AB7E18-0AB2-4479-9BCC-2BAE1A25E985
SDI2130
SDI2131
Check the fluid level in the reservoir. If the fluid is below the MIN line *1
or the brake warning light comes on, add Genuine NISSAN Super Heavy Duty Brake Fluid or equivalent DOT 3
fluid up to the MAX line *2 . If fluid must be added frequently, the system should be checked by a NISSAN dealer.Type A
8-12 Maintenance and do-it-yourself
Type B
SDI2132
[ Edit: 2011/ 6/ 22 Model: S35-D ]
Black plate (308,1)
Fill the window washer fluid reservoir periodi- cally. Add window washer fluid when the low window washer fluid warning light illuminates (if so equipped). To fill the window washer fluid reservoir, lift the cap and pour the window washer fluid into the reservoir opening. Add a washer solvent to the water for better cleaning. In the winter season, add a windshield washer antifreeze. Follow the manufacturer’s instructions for the mixture ratio. Refill the reservoir more frequently when driving conditions require an increased amount of window washer fluid. Recommended fluid: Genuine NISSAN Windshield Washer Concen- trate Cleaner & Antifreeze or equivalent
CAUTION
. Do not substitute engine anti-freeze coolant for window washer solution. This may result in damage to the paint.
. Do not
fill
the window washer reservoir tank with washer fluid concentrates at full strength. Some methyl alcohol based washer fluid
concentrates may permanently stain the grille if spilled while filling the window washer reservoir tank.
. Pre-mix washer fluid concentrates with water to the manufacturer’s recommended levels before pouring the fluid into the window washer reservoir tank. Do not use the window washer reservoir tank to mix the washer fluid concentrate and water.
Black plate (309,1)
. When working on or near a battery, always wear suitable eye protection and remove all jewelry.
. Battery posts, terminals and related accessories contain lead and lead compounds. Wash hands after handling.
. Keep the battery out of the reach of
children.
Maintenance and do-it-yourself 8-13
BATTERY
S35-D-110201-9895A1BD-E620-4124-903A-FD652172A3E7
. Keep the battery surface clean and dry. Clean the battery with a solution of baking soda and water.. Make certain the terminal connections are
clean and securely tightened. If the vehicle is not to be used for 30 days or longer, disconnect the negative (−) battery terminal cable to prevent discharging it.
WARNING
. Do not expose the battery to flames or electrical sparks. Hydrogen gas generated by the battery is explo- sive. Do not allow battery fluid to contact your skin, eyes, fabrics, or painted surfaces. After touching a battery or battery cap, do not touch or rub your eyes. Thoroughly wash your hands. If the acid contacts your eyes, skin or clothing, immediately flush with water for at least 15
minutes and seek medical attention. . Do not operate the vehicle if the fluid in the battery is low. Low battery fluid can cause a higher load on the battery which can generate heat, reduce battery life, and in some cases lead to an explosion.[ Edit: 2011/ 6/ 22 Model: S35-D ]
Black plate (310,1)
JUMP STARTING S35-D-110201-FDDC2196-BE20-4DFF-95B0-75BBB4535EF5
If jump starting is necessary, see “Jump starting” in the “6. In case of emergency” section. If the engine does not start by jump starting, the battery may have to be replaced. Contact a NISSAN dealer.DI0137MA
SDI1480C
Check the fluid level in each cell. (Remove the battery cover if it is necessary.) It should be between the UPPER LEVEL *1
and LOWER LEVEL *2
If it is necessary to add fluid, add only distilled water to bring the level to the indicator in each filler opening. Do not overfill.lines.
1. Remove the cell plugs *A . 2. Add distilled water up to the UPPER LEVEL
line.
*1
If the side of the battery is not clear, check the distilled water level by looking directly above the cell; the condition *1
indicates OK and the conditions *2
needs more to be added.3. Tighten cell plugs *A . Vehicles operated in high temperatures or under severe conditions require frequent checks of the battery fluid level.
8-14 Maintenance and do-it-yourself
[ Edit: 2011/ 6/ 22 Model: S35-D ]
Black plate (311,1)
DRIVE BELTS
SPARK PLUGS
S35-D-110201-32D18337-FF6D-4A43-A930-F2B2207ED3E2
S35-D-110201-0266E778-F80C-4CAC-8AC5-A90E6EFC3894
the belt is in poor condition or loose, have it replaced or adjusted by a NISSAN dealer.
2. Have the belts checked regularly for condi-
tion.
WARNING
Be sure the engine and ignition switch are off and that the parking brake is engaged securely.
CAUTION
Be sure to use the correct socket to remove the spark plugs. An incorrect socket can damage the spark plugs.
[ Edit: 2011/ 6/ 22 Model: S35-D ]
Maintenance and do-it-yourself 8-15
SDI2090
1. Alternator 2. Water pump 3. Drive belt auto-tensioner 4. Crankshaft pulley 5. Air conditioner compressor
WARNING
Be sure the ignition switch is in the OFF or LOCK position before servicing drive belts. The engine could rotate unex- pectedly.
1. Visually inspect each belt
for signs of unusual wear, cuts, fraying or looseness. If
AIR CLEANER
S35-D-110201-FC8F2C69-51BD-4F6C-93D0-AFC7BAF9651D
Black plate (312,1)
flame if the engine backfires. If it isn’t there, and the engine backfires, you could be burned. Do not drive with the air cleaner removed, and be careful when working on the engine with the air cleaner removed.
. Never pour fuel
into the throttle body or attempt to start the engine with the air cleaner removed. Doing so could result in serious injury.
SDI2020
REPLACING SPARK PLUGS GUID-416121F9-5467-47CE-A990-CE8202B7CEDD If replacement is required, see a NISSAN dealer for servicing.
Iridium-tipped spark plugs S35-D-110201-A5BBA1E7-8DC0-4A27-A0A1-0258FE0396B7
It is not necessary to replace the iridium-tipped spark plugs as frequently as the conventional type spark plugs since they will last much longer. Follow the maintenance log shown in the “NISSAN Service and Maintenance Guide”. Do not reuse spark plugs by cleaning or regapping. Always replace spark plugs with recom- mended or equivalent ones.8-16 Maintenance and do-it-yourself
SDI2106
Push the tabs *1 and pull out the filter element *2 . The air cleaner filter should not be cleaned and reused. Replace it according to the maintenance log shown in the “NISSAN Service and Main- tenance Guide”. When replacing the filter, wipe the inside of the air cleaner housing and the cover with a damp cloth.WARNING
. Operating the engine with the air cleaner removed can cause you or others to be burned. The air cleaner not only cleans the air, it stops
[ Edit: 2011/ 6/ 22 Model: S35-D ]
WINDSHIELD WIPER BLADES
S35-D-110201-53E17982-E39E-49B7-A947-15ED15FB35C8
CLEANING S35-D-110201-73406825-1B4C-487C-8E06-80AA8D836FC2
If your windshield is not clear after using the windshield washer or if a wiper blade chatters when running, wax or other material may be on the blade or windshield. Clean the outside of the windshield with a washer solution or a mild detergent. Your windshield is clean if beads do not form when rinsing with clear water. Clean each blade by wiping it with a cloth soaked in a washer solution or a mild detergent. Then rinse the blade with clear water. If your windshield is still not clear after cleaning the blades and using the wiper, replace the blades.CAUTION
Worn windshield wiper blades can damage the windshield and impair driver vision.
S35-D-110201-4CA420D3-F635-4329-9322-56E2AF5BBC2A
REPLACING Replace the wiper blades if they are worn. 1. Lift the wiper arm away from the windshield. 2. Push and hold the release tab *A , and move the wiper blade down the wiper arm *1 . Insert the new wiper blade onto the wiper arm until a click sounds.
3.
4. Rotate the wiper blade so that the dimple is
in the groove.
[ Edit: 2011/ 6/ 22 Model: S35-D ]
Black plate (313,1)
SDI2048
CAUTION
. After wiper blade replacement, re- turn the wiper arm to its original position; otherwise it may be da- maged when the hood is opened.
. Make sure the wiper blades contact the glass; otherwise the arm may be damaged from wind pressure.
Maintenance and do-it-yourself 8-17
Black plate (314,1)
REAR WINDOW WIPER BLADE
BRAKES
S35-D-110201-1FC3D998-09C7-4922-B13A-8E5CB6338E4A if checking or
Contact a NISSAN dealer replacement is required.
SDI1865
Be careful not to clog the washer nozzle *A . This may cause improper windshield washer operation. If the nozzle is clogged, remove any objects with a needle or small pin *B . Be careful not to damage the nozzle.8-18 Maintenance and do-it-yourself
[ Edit: 2011/ 6/ 22 Model: S35-D ]
S35-D-110201-B17410A9-2500-4B28-BA04-D63D7380523C If the brakes do not operate properly, have the brakes checked by a NISSAN dealer. SELF-ADJUSTING BRAKES S35-D-110201-028DE896-EA01-45A9-899A-FB7698AAB5E4
Your vehicle is equipped with self-adjusting brakes. The disc-type brakes self-adjust every time the brake pedal is applied.WARNING
See a NISSAN dealer for a brake system check if the brake pedal height does not return to normal.
BRAKE PAD WEAR INDICATORS S35-D-110201-8E781783-BE59-4675-AE08-8F80EAB3AD6D The disc brake pads have audible wear warn- ings. When a brake pad requires replacement, it will make a high pitched scraping sound when the vehicle is in motion. This scraping sound will first occur only when the brake pedal is depressed. After more wear of the brake pad, the sound will always be heard even if the brake pedal is not depressed. Have the brakes checked as soon as possible if the wear warning sound is heard. Under some driving or climate conditions, occasional brake squeak, squeal or other noise may be heard. Occasional brake noise during
FUSES
S35-D-110201-72D2AD23-7C13-452F-9C08-5ED0D5BC2474
light to moderate stops is normal and does not affect the function or performance of the brake system. Proper brake inspection intervals should be followed. For additional information, see the maintenance log section of your “NISSAN Service and Maintenance Guide”.
Black plate (315,1)
2. Open the engine hood. 3. Remove the air cleaner duct. (See “Engine compartment check locations” earlier in this section.)
4. Remove the fuse/fusible link holder cover using a suitable tool *1 and pushing the tab *2 .
5. Remove the fuse with the fuse puller located
in the passenger compartment fuse box.
ENGINE COMPARTMENT
S35-D-110201-EF7088A6-CC7C-4081-9EF3-60446453E90D
SDI2107
CAUTION
Never use a fuse of a higher or lower amperage rating than that specified on the fuse box cover. This could damage the electrical system or cause a fire.
If any electrical equipment does not operate, check for an open fuse. 1. Be sure the ignition switch and the headlight
switch are turned off.
[ Edit: 2011/ 6/ 22 Model: S35-D ]
Maintenance and do-it-yourself 8-19
Black plate (316,1)
2. Pull to remove the fuse box cover *1 . 3. Remove the fuse with the fuse puller *2 .
SDI2133
6.
7.
SDI1753
If the fuse is open *A , replace it with a new fuse *B . If a new fuse also opens, have the electrical system checked and repaired by a NISSAN dealer.Fusible links S35-D-110201-236AFFF2-6A85-4D86-8CB6-6A361FB7E742
If any electrical equipment does not operate and fuses are in good condition, check the fusible links. If any of these fusible links are melted, replace only with genuine NISSAN parts.8-20 Maintenance and do-it-yourself
PASSENGER COMPARTMENT
S35-D-110201-ADA929EC-C7B9-4E8D-B793-60C0DEBB37E3
CAUTION
Never use a fuse of a higher or lower amperage rating than that specified on the fuse box cover. This could damage the electrical system or cause a fire.
If any electrical equipment does not operate, check for an open fuse. 1. Be sure the ignition switch and the headlight
switch are turned off.
[ Edit: 2011/ 6/ 22 Model: S35-D ]
Black plate (317,1)
How to remove the extended storage switch: GUID-D73A39BF-43C8-459F-9C24-47B7F579C407
1. To remove the extended storage switch, be sure the ignition switch is in the “OFF” or “LOCK” position.2. Be sure the headlight switch is in the “OFF”
position.
3. Remove the fuse box cover. 4. Pinch the storage switch and pull
it in the
direction illustrated.
4.
5.
SDI1753
If the fuse is open *A , replace it with a new fuse *B . If a new fuse also opens, have the electrical system checked and repaired by a NISSAN dealer.JVM0089X
Extended storage switch (if so equipped) GUID-C7B28862-47E7-4FAE-A01A-DE7370C1F373
If any electrical equipment does not operate, remove the extended storage switch and check for an open fuse. NOTE:If the extended storage switch malfunc- tions, or if the fuse is open, it is not necessary to replace the switch. In this case, remove the extended storage switch and replace it with a new fuse of the same rating.
[ Edit: 2011/ 6/ 22 Model: S35-D ]
Maintenance and do-it-yourself 8-21
BATTERY REPLACEMENT
S35-D-110201-0DEB0410-1191-4FAE-9DC8-B9019D7525D8
CAUTION
Be careful not to allow children to swallow the battery and removed parts.
SDI2134
GUID-A56F8FC6-0D6C-4580-A2AB-B2756D83072F
KEYFOB Replace the battery in the keyfob as follows: 1. Remove the screw. 2.
Insert a small screwdriver into the slit of the corner and twist it to separate the upper part from the lower part. Use a cloth to protect
8-22 Maintenance and do-it-yourself
[ Edit: 2011/ 6/ 22 Model: S35-D ]
Black plate (318,1)
the casing.
3. Replace the battery with a new one.
Recommended battery: CR1620 or equivalent . Do not
touch the internal circuit and electric terminals as doing so could cause a malfunction.
. Hold the battery by the edges. Holding the battery across the contact points will seriously deplete the storage capacity.
. Make sure that
the + side faces the
bottom case.
4. Close the lid securely and install the screw. 5. Operate the buttons to check its operation. See a NISSAN dealer if you need any assistance for replacement. FCC Notice:
For USA:
This device complies with Part 15 of the FCC Rules. Operation is subject to the following two conditions: (1) This device may not cause harmful interference, and (2) this device must accept any interfer- ence received, including interference that may cause undesired operation.
Note: Changes or modifications not ex- pressly approved by the party responsible
for compliance could void the user’s authority to operate the equipment.
For Canada:
This device complies with RSS-210 of Industry Canada. Operation is subject to the following two conditions: this device may not cause interference, and (2) this device must accept any interfer- ence, including interference that may cause undesired operation of the device.
(1)
Black plate (319,1)
2.
Insert a small screwdriver into the slit of the corner and twist it to separate the upper part from the lower part. Use a cloth to protect the casing.
3. Replace the battery with a new one.
Recommended battery: CR2025 or equivalent . Do not
touch the internal circuit and electric terminals as doing so could cause a malfunction.
. Hold the battery by the edges. Holding the battery across the contact points will seriously deplete the storage capacity.
. Make sure that
the + side faces the
bottom case.
SDI2451
INTELLIGENT KEY BATTERY S35-D-110201-6334A362-2949-483B-8BD4-808E92561299
Replace the battery in the Intelligent Key as follows: 1. Remove the mechanical key from the In-telligent Key.
[ Edit: 2011/ 6/ 22 Model: S35-D ]
Maintenance and do-it-yourself 8-23
Black plate (320,1)
may cause undesired operation.
Note: Changes or modifications not ex- pressly approved by the party responsible for compliance could void the user’s authority to operate the equipment.
For Canada:
This device complies with RSS-210 of Industry Canada. Operation is subject to the following two conditions: this device may not cause interference, and (2) this device must accept any interfer- ence, including interference that may cause undesired operation of the device.
(1)
[ Edit: 2011/ 6/ 22 Model: S35-D ]
SDI2452
4. Align the tips of the upper and lower parts *1 , and then push them together *2 until it is securely closed.
5. Operate the buttons to check its operation. See a NISSAN dealer if you need any assistance for replacement. FCC Notice:
For USA:
This device complies with Part 15 of the FCC Rules. Operation is subject to the following two conditions: (1) This device may not cause harmful interference, and (2) this device must accept any interfer- ence received, including interference that
8-24 Maintenance and do-it-yourself
LIGHTS
S35-D-110201-DD4272B1-CED8-4C46-8F26-0A48F1D0C89C
Black plate (321,1)
1. Headlight (high-beam) 2. Front turn signal/park/side marker light 3. Front map light 4. Ceiling light 5. Front fog light 6. Headlight (low-beam) 7. High-mounted stop light 8. Cargo light 9. License plate light 10. Back-up light 11. Rear combination light (stop/tail/side marker light) 12. Rear turn signal light HEADLIGHTS S35-D-110201-FA3BA1AA-EEA0-42B6-9AC0-27B2DC9FEC37
Fog may temporarily form inside the lens of the exterior lights in the rain or in a car wash. A temperature difference between the inside and the outside of the lens causes the fog. This is not a malfunction. If large drops of water collect inside the lens, contact a NISSAN dealer.SDI2668
Maintenance and do-it-yourself 8-25
[ Edit: 2011/ 6/ 22 Model: S35-D ]
Black plate (322,1)
Replacing
S35-D-110201-88130121-CB19-405B-AC32-F8B7A74D8318
Xenon headlight model:
GUID-D73A39BF-43C8-459F-9C24-47B7F579C407
Halogen headlight model: GUID-D73A39BF-43C8-459F-9C24-47B7F579C407
The headlight is a semi-sealed beam type which uses a replaceable headlight (halogen) bulb.High beam:
Wattage: 60
Bulb no.: HB3WARNING
HIGH VOLTAGE
When xenon headlights are on, they produce a high voltage. To prevent an electric shock, never attempt to modify or disassemble. Always have your xe- non headlights replaced at a NISSAN dealer. For additional information, see “Headlight and turn signal switch” in the “2. Instruments and controls” sec- tion.
If replacement is required, see a NISSAN dealer. Use the same number and wattage as originally installed:
Low beam:
Wattage: 35
Bulb no.: D2RHigh beam:
Wattage: 60
Bulb no.: HB38-26 Maintenance and do-it-yourself
CAUTION
. Do not leave the bulb out of the headlight reflector for a long period of time. Dust, moisture, smoke, etc. entering the headlight body may affect bulb performance.
. High pressure halogen gas is sealed inside the halogen bulb. The bulb may break if the glass envelope is scratched or the bulb is dropped.
. Only touch the plastic base when handling the bulb. Never touch the glass envelope.
. Aiming is not necessary after repla- cing the bulb. When aiming adjust- ment is necessary, contact a NISSAN dealer.
Use the same number and wattage as originally installed:
Low beam:
Wattage: 55
Bulb no.: H11[ Edit: 2011/ 6/ 22 Model: S35-D ]
Black plate (323,1)
EXTERIOR AND INTERIOR LIGHTS
S35-D-110201-57CCB661-474F-4B16-A4E0-FA7B38594BB2
Item Front turn signal/parking/side marker light Front fog light (if so equipped)
Rear combination light
back-up turn signal stop/tail/side marker
License plate light Front map light Vanity mirror light (if so equipped) High-mounted stop light* Ceiling light (if so equipped) Cargo light Glove box light*
Wattage (W)
27/8
3518
21
21/5LED
3.4
Bulb No.
S25
H8W16W W21W W21/5W
W5W
— — — — — —
*: See a NISSAN dealer for replacement. NOTE: Always check with the Parts Department at a NISSAN dealer for the latest information about parts.
SDI2137
Disconnect the battery negative cable before replacing bulbs. *A High-beam bulb *B Low-beam bulb
[ Edit: 2011/ 6/ 22 Model: S35-D ]
Maintenance and do-it-yourself 8-27
Black plate (324,1)
SDI2141
Front turn signal/park/side marker light (Halogen
headlight model)
Xenon headlight model: See a NISSAN dealer for replacement. Halogen headlight model: Remove the bulb as illustrated.
SDI2306
Front fog light
SDI2170
Replacement procedures
S35-D-110201-CFA652EC-DF34-4605-85FA-A4F826DD3B31
REMOVE INSTALLAll other lights are either type A, B, C, D or E. When replacing a bulb, first remove the lens and/or cover.
8-28 Maintenance and do-it-yourself
[ Edit: 2011/ 6/ 22 Model: S35-D ]
Black plate (325,1)
SDI2138
SDI2139
SDI2140
Rear combination light (stop/tail/side marker/turn)
Open the lift gate to remove the rear combina- tion light assembly. *A : Clip
Back-up light
License plate light
Open the lift gate to remove the back-up light assembly. One screw is located behind the cover on the lift gate.
The license plate light bulb can be accessed by removing the cover on the inside of the lift gate.
[ Edit: 2011/ 6/ 22 Model: S35-D ]
Maintenance and do-it-yourself 8-29
Black plate (326,1)
Front map light
Cargo light
SDI2030
SDI1500B
Ceiling light
Vanity mirror light
SDI1499A
SDI2032
8-30 Maintenance and do-it-yourself
[ Edit: 2011/ 6/ 22 Model: S35-D ]
WHEELS AND TIRES
S35-D-110201-6C8A2EEE-8AF1-45BF-BAF6-930A9AF115CD If you have a flat tire, see “Flat tire” in the “6. In case of emergency” section. TIRE PRESSURE
GUID-4D963F91-4B9F-407E-9917-79DCDB9F655A
Tire Pressure Monitoring System (TPMS) GUID-FB5E4DC6-E8CB-41DC-8DD9-88899CEDDA08
This vehicle is equipped with the Tire Pressure Monitoring System (TPMS). It monitors tire pressure of all tires except the spare. When the low tire pressure warning light is lit and the CHECK TIRE PRESSURE warning (if so equipped) appears on the vehicle information display, one or more of your tires is significantly under-inflated. The TPMS will activate only when the vehicle is driven at speeds above 16 MPH (25 km/h). Also, this system may not detect a sudden drop in tire pressure (for example a flat tire while driving). For more details, see “Low tire pressure warning light” in the “2. Instruments and controls” section, “Tire Pressure Monitoring System (TPMS)” in the “5. Starting and driving” section and “Tire Pressure Monitoring System (TPMS)” in the “6. In case of emergency” section.Tire inflation pressure S35-D-110201-90006E03-60AC-4BB9-8393-6BE63790C1B6
Check the pressure of the tires (including the spare) often and always prior to long distance trips. The recommended tire pressure specifications are shown on the Tire and Loading Information label under the “Cold Tire Pressure” heading. The Tire and Loading Information label is affixed to the driver side center pillar. Tire pressures should be checked regularly because: . Most tires naturally lose air over time. . Tires can lose air suddenly when driven over potholes or other objects or if the vehicle strikes a curb while parking.The tire pressures should be checked when the tires are cold. The tires are considered COLD after the vehicle has been parked for 3 or more hours, or driven less than 1 mile (1.6 km) at moderate speeds. Incorrect tire pressure, including un- der inflation, may adversely affect tire life and vehicle handling.
[ Edit: 2011/ 6/ 22 Model: S35-D ]
Black plate (327,1)
WARNING
. Improperly inflated tires can fail suddenly and cause an accident. . The Gross Vehicle Weight rating (GVWR) is located on the F.M.V. S.S./C.M.V.S.S. certification la- bel. The vehicle weight capacity is indicated on the Tire and Loading Information label. Do not load your vehicle beyond this capacity. Overloading your vehicle may result in reduced tire life, unsafe operating condi- tions due to premature tire fail- ure, or unfavorable handling characteristics and could also lead to a serious accident. Load- ing beyond the specified capa- city may also result in failure of other vehicle components.
. Before taking a long trip, or whenever you heavily load your vehicle, use a tire pressure gauge to ensure that the tire pressures are at the specified
Maintenance and do-it-yourself 8-31
Black plate (328,1)
level.
. For additional
information re- garding tires, refer to “Important Tire Safety Information” (US) or “Tire Safety Information” (Cana- da) in the Warranty Information Booklet.
GUID-32B0B905-F78C-48F3-BB13-5DB6877F5C98
Tire and Loading Information label *1 Seating capacity: The maximum number of occupants that can be seated in the vehicle. *2 Vehicle load limit: See “Vehicle loading information” in the “9. Technical and consumer information” section.
*3 Original size: The size of
SDI2340
the tires originally installed on the vehicle at the factory. *4 Cold tire pressure: Inflate the tires to this pressure when the tires are cold. Tires are considered COLD after the vehicle has been parked for 3 or more8-32 Maintenance and do-it-yourself
[ Edit: 2011/ 6/ 22 Model: S35-D ]
hours, or driven less than 1 mile (1.6
km) at moderate speeds. The recom- mended cold tire inflation is set by the manufacturer to provide the best bal- ance of tire wear, vehicle handling, driveability, tire noise, etc., up to the vehicle’s GVWR. *5 Tire size — see “Tire labeling” later in *6 Spare tire size or compact spare tirethis section.
size (if so equipped)
Black plate (329,1)
tion shown on the Tire and Loading Information label.
5. Add air to the tire as needed.
If too much air is added, press the core of the valve stem briefly with the tip of the gauge stem to release pressure. Re- check the pressure and add or release air as needed. Install the valve stem cap.
6. 7. Check the pressure of all other tires,
including the spare.
SDI1949
Checking the tire pressure GUID-35F5460B-53F3-48BD-8D36-DF9B4793C040
1. Remove the valve stem cap from thetire.
2. Press the pressure gauge squarely onto the valve stem. Do not press too hard or force the valve stem sideways, or air will escape. the hissing sound of air escaping from the tire is heard while checking the pressure, reposition the gauge to eliminate this leakage.
If
3. Remove the gauge. 4. Read the tire pressure on the gauge stem and compare it to the specifica-
SIZE
P215/70- R16 99H P225/60- R17 98H
P225/55- R18 97V
FRONT
ORIGINAL
TIRE
COLD TIRE INFLATION PRESSURE 230 kPa, 33 PSI 230 kPa, 33 PSI 230 kPa, 33 PSI*1
260 kPa, 38 PSI*2Maintenance and do-it-yourself 8-33
[ Edit: 2011/ 6/ 22 Model: S35-D ]
REAR
ORIGINAL
TIRE
P215/70- R16 99H P225/60- R17 98H
P225/55- R18 97V
SPARE
TIRE
Original tire
T155/90- D16
230 kPa, 33 PSI 230 kPa, 33 PSI 230 kPa, 33 PSI*1
260 kPa, 38 PSI*2
230 kPa, 33 PSI 260 kPa, 38 PSI*3
420 kPa, 60 PSI*1: 2WD models *2: AWD models *3: AWD models with 18 inch tires
Black plate (330,1)
SDI1575
SDI1606
Example
TIRE LABELING GUID-6492823C-D518-40D7-BE6F-A88DD582F0F3
Federal law requires tire manufacturers to place standardized information on the side- wall of all tires. This information identifies and describes the fundamental character- istics of the tire and also provides the tire identification number (TIN) for safety stan- dard certification. The TIN can be used to identify the tire in case of a recall.Example
*1 Tire size (example: P215/60R16 94H) 1. P: The “P” indicates the tire is designed tires
for passenger vehicles. (Not all have this information.)
2. Three-digit number (215): This number gives the width in millimeters of the tire from sidewall edge to sidewall edge.
3. Two-digit number (60): This number, known as the aspect ratio, gives the tire’s ratio of height to width. 4. R: The “R” stands for radial. 5. Two-digit number (16): This number is
the wheel or rim diameter in inches.
8-34 Maintenance and do-it-yourself
[ Edit: 2011/ 6/ 22 Model: S35-D ]
6. Two- or three-digit number (94): This number is the tire’s load index. It is a measurement of how much weight each tire can support. You may not find this information on all tires because it is not required by law.
7. H: Tire speed rating. You should not drive the vehicle faster than the tire speed rating.
Black plate (331,1)
5. Three-digit code: Date of Manufacture 6. Four numbers represent the week and year the tire was built. For example, the numbers 3103 means the 31st week of 2003. If these numbers are missing, then look on the other sidewall of the tire.
*3 Tire ply composition and material
The number of layers or plies of rubber- coated fabric in the tire. Tire manufacturers also must indicate the materials in the tire, which include steel, nylon, polyester, and others. *4 Maximum permissible inflation pressure This number is the greatest amount of air pressure that should be put in the tire. Do not exceed the maximum permissible inflation pressure.
*5 Maximum load rating
This number indicates the maximum load in kilograms and pounds that can be carried by the tire. When replacing the tires on the vehicle, always use a tire that has the same load rating as the factory installed tire.
*6 Term of “tubeless” or “tube type”
Indicates whether the tire requires an
Maintenance and do-it-yourself 8-35
SDI1607
Example
*2 TIN (Tire Identification Number) for a new tire (example: DOT XX XX XXX XXXX)
1. DOT: Abbreviation for the “Department of Transportation”. The symbol can be placed above, below or to the left or right of the Tire Identification Number. 2. Two-digit code: Manufacturer’s identifi-
cation mark
3. Two-digit code: Tire size 4. Three-digit code: Tire type code (Op-
tional)
[ Edit: 2011/ 6/ 22 Model: S35-D ]
Black plate (332,1)
inner tube (“tube type”) or not (“tube- less”).
*7 The word “radial”
The word “radial” is shown, if the tire has radial structure.
*8 Manufacturer or brand name
Manufacturer or brand name is shown.
Other tire-related terminology: In addition to the many terms that are defined throughout this section, Intended Outboard Sidewall is (1) the sidewall that contains a whitewall, bears white lettering or bears manufacturer, brand and/or model name molding that is higher or deeper than the same molding on the other sidewall of the tire, or (2) the outward facing sidewall of an asymmetrical tire that has a particular side that must always face outward when mounted on a vehicle.
TYPES OF TIRES
S35-D-110201-C5EB9331-8635-4B71-B5C5-812F94ED321F
WARNING
. When changing or replacing tires, be sure all four tires are of the same type (Example: Summer, All Season or Snow) and construction. A NISSAN dealer may be able to help you with information about tire type, size, speed rating and availability.
. Replacement tires may have a lower speed rating than the factory equipped tires, and may not match the potential maximum vehicle speed. Never exceed the maximum speed rating of the tire.
. Replacing tires with those not ori- ginally specified by NISSAN could affect the proper operation of the TPMS.
. For additional information regard- ing tires, refer to “Important Tire Safety Information” (US) or “Tire Safety Information” (Canada) in the Warranty Information Booklet.
All season tires S35-D-110201-46ECD967-CB74-4693-95E3-7177E1F912AF NISSAN specifies all season tires on some models to provide good performance all year, including snowy and icy road conditions. All Season tires are identified by ALL SEASON and/or M&S (Mud and Snow) on the tire sidewall. Snow tires have better snow traction than All Season tires and may be more appro- priate in some areas.
Summer tires S35-D-110201-A515578D-1814-444A-A9E9-89BC82BB1F27
NISSAN specifies summer tires on some models to provide superior performance on dry roads. Summer tire performance is substantially reduced in snow and ice. Summer tires do not have the tire traction rating M&S on the tire sidewall. If you plan to operate your vehicle in snowy or icy conditions, NISSAN recommends the use of SNOW tires or ALL SEASON tires on all four wheels.Snow tires S35-D-110201-71AE78AE-072F-4EA0-8789-54B9B210A22B If snow tires are needed, it is necessary to select tires equivalent in size and load rating to the original equipment tires. it can adversely affect the safety and handling of your vehicle. Generally, snow tires will have lower speed ratings than factory equipped tires and may not
If you do not,
8-36 Maintenance and do-it-yourself
[ Edit: 2011/ 6/ 22 Model: S35-D ]
Black plate (333,1)
The tire chain part numbers and Peerless Chain Company phone number are correct at the time of printing that is shown on the back cover of this Owner’s Manual. Always confirm the correct part numbers with Peerless Chain Company before ordering. Only use other types of traction devices if the traction device manufacturer recommends it for use on your specific vehicle and the tire and wheel installed on your vehicle. traction devices may be prohibited Use of according to location. Check the local laws before installing traction devices. When instal- ling traction devices, make sure they are the proper size for the tires on your vehicle and are installed according to the traction device man- ufacturer’s suggestions. When using traction devices, avoid fully loading your vehicle and drive at reduced speeds. Failure to do so may cause damage to the brakes and suspension and adversely affect handling and performance. Traction devices must be installed only on the front wheels and not on the rear wheels. Do not drive with traction devices on paved roads that are clear of snow. Driving with traction devices in such conditions can cause damage to the various mechanisms of the vehicle due to some overstress.
Maintenance and do-it-yourself 8-37
match the potential maximum vehicle speed. Never exceed the maximum speed rating of the tire. If you install snow tires, they must be the same size, brand, construction and tread pattern on all four wheels. For additional traction on icy roads, studded tires may be used. However, some U.S. states their use. and Canadian provinces prohibit Check local, state and provincial laws before installing studded tires. Skid and traction cap- abilities of studded snow tires, on wet or dry surfaces, may be poorer than that of non- studded snow tires.
All-Wheel Drive (AWD) models
GUID-A4E89E8F-8195-4A57-BA99-CD357C8FF81B
CAUTION
. Always use tires of the same type, size, brand, construction (bias, bias- belted or radial), and tread pattern on all four wheels. Failure to do so may result in a circumference differ- ence between tires on the front and rear axles which will cause exces- sive tire wear and may damage the transmission, transfer case and dif- ferential gears.
. ONLY use spare tires specified for
the AWD model.
it
If excessive tire wear is found, is recom- mended that all four tires be replaced with tires of the same size, brand, construction and tread pattern. The tire pressure and wheel alignment should also be checked and corrected as necessary. Contact a NISSAN dealer. TIRE CHAINS
S35-D-110201-B43663A4-F981-4F85-8D61-36021FFAD0E3
CAUTION
NISSAN recommends using the follow- ing tire cables made by Peerless Chain Company for this vehicle due to limited tire clearance. Call 800-533-8056 to order tire chains for your vehicle.
215/70R16 - Sno-trac1000 part num- ber 0103855 with chain tightener part number 2007020
225/60R17, 225/55R18 - Sno- trac1000 part number 0103855 with c h a i n t i g h t e n e r p a r t n u m b e r 2007190
Failure to use the correct traction device will cause damage to the brakes, suspension or other vehicle parts.
[ Edit: 2011/ 6/ 22 Model: S35-D ]
Black plate (334,1)
It is recommended that wheel nuts be tightened to the specification at each tire rotation interval.
WARNING
. After rotating the tires, check
and adjust the tire pressure.
. Retighten the wheel nuts when the vehicle has been driven for 600 miles (1,000 km) (also in cases of a flat tire, etc.).
. Do not include the spare tire or any other small size spare tire in the tire rotation.
. For additional
information re- garding tires, refer to “Important Tire Safety Information” (US) or “Tire Safety Information” (Cana- da) in the Warranty Information Booklet.
CAUTION
. Do not use traction devices on dry
roads.
. Never install traction devices on a T- type spare tire as doing so could damage the brakes, suspension or other vehicle parts.
8-38 Maintenance and do-it-yourself
SDI1662
CHANGING WHEELS AND TIRES
S35-D-110201-D6074349-60FC-438B-BCE0-C84E9A3E862C
Tire rotation S35-D-110201-9D3D3FB2-8299-4665-A8E2-B8657B8A1F32
NISSAN recommends rotating the tires every 7,500 miles (12,000 km). (See “Flat tire” in the “6. In case of emergency” section for tire replacing procedures.) As soon as possible, tighten the wheel nuts to the specified torque with a torque wrench.Wheel nut tightening torque:
80 ft-lb (108 N·m)
The wheel nuts must be kept tigh- tened to the specification at all times.
[ Edit: 2011/ 6/ 22 Model: S35-D ]
Black plate (335,1)
. The original tires have built-in tread wear indicators. When wear indicators are visible, the tire(s) should be replaced.
. Tires degrade with age and use. Have tires, including the spare, over 6 years old checked by a qualified technician, because some tire damage may not be obvious. Replace the tires as necessary to prevent tire failure and possible personal injury.
. Improper service of the spare tire may result in serious perso- nal injury. If it is necessary to repair the spare tire, contact a NISSAN dealer. . For additional
information re- garding tires, refer to “Important Tire Safety Information” (US) or “Tire Safety Information” (Cana- da) in the Warranty Information Booklet.
Replacing wheels and tires GUID-5F49021B-1D68-4060-A4C5-6D4AD42F0837
When replacing a tire, use the same size, tread design, speed rating and load carrying capacity as originally equipped. (See “Specifications” in the “9. Technical and consumer information” section for recommended types and sizes of tires and wheels.)WARNING
The use of tires other than those recommended or the mixed use of tires of different brands, construc- tion (bias, bias-belted or radial), or tread patterns can adversely affect the ride, braking, handling, ground clearance, body-to-tire clearance, tire chain clearance, speedometer calibration, headlight aim and bum- per height. Some of these effects may lead to accidents and could result in serious personal injury.
If the wheels are changed for any reason, always replace with wheels which have the same off-set dimen- sion. Wheels of a different off-set could cause premature tire wear, degrade vehicle handling character- istics and/or interference with the
Maintenance and do-it-yourself 8-39
[ Edit: 2011/ 6/ 22 Model: S35-D ]
SDI1663
1. Wear indicator 2. Wear indicator location mark Tire wear and damage
S35-D-110201-2E6D7DC3-0C7F-4E12-A774-F3C188570BD7
WARNING
. Tires should be periodically in- spected for wear, cracking, bul- ging or objects caught in the tread. If excessive wear, cracks, bulging or deep cuts are found, the tire(s) should be replaced.
Black plate (336,1)
brake discs/drums. Such interfer- ence can lead to decreased braking efficiency and/or early brake pad/ shoe wear. See “Wheels and tires” in the “9. Technical and consumer information” section of this manual for wheel off-set dimensions.
. When a spare tire is mounted or a wheel is replaced, the TPMS will not function and the low tire pressure warning light will flash for approxi- mately 1 minute. The light will remain on after 1 minute. Contact your NISSAN dealer as soon as possible for tire replacement and/ or system resetting.
. Replacing tires with those not ori- ginally specified by NISSAN could affect the proper operation of the TPMS.
. Do not install a damaged or de- formed wheel or tire even if it has been repaired. Such wheels or tires could have structural damage and could fail without warning.
The use of retread tire is not re- commended.
8-40 Maintenance and do-it-yourself
. For additional information regard- ing tires, refer to “Important Tire Safety Information” (US) or “Tire Safety Information” (Canada) in the Warranty Information Booklet.
CAUTION
Always use tires of the same type, size, brand, construction (bias, bias-belted or radial), and tread pattern on all four wheels. Failure to do so may result in a circumference difference between tires on the front and rear axles which will cause excessive tire wear and may damage the transmission, transfer case and differential gears (AWD models).
Wheel balance S35-D-110201-8E10EC16-9CEC-43D7-A91E-D33EB97AE66C Unbalanced wheels may affect vehicle handling and tire life. Even with regular use, wheels can get out of balance. Therefore, they should be balanced as required. Wheel balance service should be per- formed with the wheels off the vehicle. Spin balancing the wheels on the vehicle could lead to mechanical damage.
For additional information regarding tires, refer to “Important Tire Safety Information” (US) or “Tire Safety Information” (Canada) in the War- ranty Information Booklet.
Care of wheels S35-D-110201-0B8C9CF9-E364-45F1-8AD3-5412738974BF See “Cleaning exterior” in the “7. Appearance and care” section for details about care of the wheels.
Spare tire S35-D-110201-E74B415C-3AFD-4581-B7A9-3FD301380EE5
When a spare tire is mounted (TEMPORARY USE ONLY or conventional), the TPMS will not function. Observe the following precautions if the TEM- PORARY USE ONLY spare tire must be used, otherwise your vehicle could be damaged or involved in an accident.WARNING
The TEMPORARY USE ONLY spare tire should be used for emergency use. It should be replaced with the standard tire at the first opportunity to avoid possible tire or differential damage.
. Drive carefully while the TEMPOR- ARY USE ONLY spare tire is in-
[ Edit: 2011/ 6/ 22 Model: S35-D ]
Black plate (337,1)
stalled. Avoid sharp turns and abrupt braking while driving.
. Periodically check spare tire infla- tion pressure. Always keep the pressure of the TEMPORARY USE ONLY spare tire at 60 psi (420 kPa, 4.2 bar). Always keep the pressure of the full size spare tire (if so equipped) at the recommended pressure for standard tires, as in- dicated on the Tire and Loading Information label.
. With the TEMPORARY USE ONLY spare tire installed do not drive your vehicle at speeds faster than 50
MPH (80 km/h).. When driving on roads covered with snow or ice, the TEMPORARY USE