- 2009 Mercedes-Benz CLK Class Coupe Owners Manuals
- Mercedes-Benz CLK Class Coupe Owners Manuals
- 2004 Mercedes-Benz CLK Class Coupe Owners Manuals
- Mercedes-Benz CLK Class Coupe Owners Manuals
- 2008 Mercedes-Benz CLK Class Coupe Owners Manuals
- Mercedes-Benz CLK Class Coupe Owners Manuals
- 2007 Mercedes-Benz CLK Class Coupe Owners Manuals
- Mercedes-Benz CLK Class Coupe Owners Manuals
- 2005 Mercedes-Benz CLK Class Coupe Owners Manuals
- Mercedes-Benz CLK Class Coupe Owners Manuals
- 2003 Mercedes-Benz CLK Class Coupe Owners Manuals
- Mercedes-Benz CLK Class Coupe Owners Manuals
- 2006 Mercedes-Benz CLK Class Coupe Owners Manuals
- Mercedes-Benz CLK Class Coupe Owners Manuals
- Download PDF Manual
-
CLK 320
CLK 500
CLK 55 AMGOur company and staff congratulate you on the purchase of your new Mercedes-Benz. Your selection of our product is a demon- stration of your trust in our company name. Furthermore, it exemplifies your de- sire to own an automobile that will be as easy as possible to operate and provide years of service. Your Mercedes-Benz represents the ef- forts of many skilled engineers and crafts- men. To help assure your driving pleasure, and also the safety of you and your passen- gers, we ask you to make a small invest- ment of time:
앫 Please read this manual carefully, then return it to your vehicle where it will be handy for your reference.
앫 Please follow the recommendations
contained in this manual. They are de- signed to acquaint you with the opera- tion of your Mercedes-Benz.
앫 Please pay attention to the warnings
and cautions contained in this manual. They are designed to help improve the safety of the vehicle operator and oc- cupants.
We extend our best wishes for many miles of safe, pleasurable driving. Mercedes-Benz USA, LLC A DaimlerChrysler Company
At a glance .......................................... 19
Cockpit................................................. 20
Instrument cluster ................................ 22
Multifunction steering wheel ................ 24
Center console ..................................... 25
Upper part ...................................... 25
Lower part ...................................... 26
Overhead control panel ........................ 27
Door control panel................................ 28Introduction.......................................... 9
Product information................................ 9
Operator’s Manual............................... 10
Service and warranty information .. 10
Important notice for California retail buyers and lessees of Mercedes-Benz automobiles .......... 11
Maintenance .................................. 12
Roadside Assistance ...................... 12
Change of address or ownership.... 12
Operating your vehicle outside the USA or Canada............ 13
Where to find it.................................... 14
Symbols............................................... 15
Operating safety .................................. 16
Proper use of the vehicle ............... 16
Problems with your vehicle.................. 17
Reporting safety defects...................... 18
Reporting safety defects ................ 18Contents
Getting started................................... 29
Unlocking ............................................. 30
Unlocking with the SmartKey ......... 30
Unlocking with KEYLESS-GO*......... 32
Adjusting .............................................. 34
Seats .............................................. 34
Steering wheel................................ 37
Mirrors............................................ 38
Driving.................................................. 40
Fastening the seat belts ................. 40
Starting the engine ......................... 43
Switching on headlamps................. 47
Turn signals and high beam ............ 48
Windshield wipers........................... 48
Problems while driving.................... 50
Parking and locking.............................. 51
Parking brake ................................. 52
Switching off headlamps................. 53
Turning off the engine..................... 53Contents
Safety and Security ........................... 57
Occupant safety................................... 58
Airbags ........................................... 59
Seat belts ....................................... 64
Children in the vehicle.................... 68
Blocking of rear side window operation........................... 74
Panic alarm.......................................... 75
Activating ....................................... 75
Deactivating ................................... 75
Driving safety systems......................... 76
ABS ................................................ 76
BAS ................................................ 77
ESP................................................. 78
Anti-theft systems................................ 81
Immobilizer..................................... 81
Anti-theft alarm system.................. 82
Tow-away alarm ............................. 83Memory function ............................... 116
Storing positions into memory..... 117
Recalling positions from memory. 117
Storing exterior rear view mirror parking position ................ 118
Lighting ............................................. 119
Exterior lamp switch .................... 119
Combination switch ..................... 123
Hazard warning flasher ................ 123
Interior lighting ............................ 124
Door entry lamps ......................... 125
Instrument cluster ............................. 126
Instrument cluster illumination .... 126
Coolant temperature indicator..... 127
Trip odometer .............................. 127
Tachometer.................................. 128
Outside temperature indicator..... 128Controls in detail ............................... 85
Locking and unlocking......................... 86
SmartKeys...................................... 86
SmartKey with KEYLESS-GO* ........ 89
Opening the doors from the inside............................... 95
Opening the trunk .......................... 96
Closing the trunk............................ 97
Trunk lid opening/closing system* .............. 98
Trunk lid emergency release ........ 103
Separately locking the trunk ........ 104
Separately unlocking the trunk .... 105
Automatic central locking ............ 105
Locking and unlocking from the inside............................. 106
Seats ................................................. 107
Easy-entry/exit feature ................ 107
Removing and installing front seat head restraints............. 108
Rear seats head restraints ........... 109
Multicontour seat*....................... 112
Seat ventilation* .......................... 113
Seat heating*............................... 114Control system .................................. 129
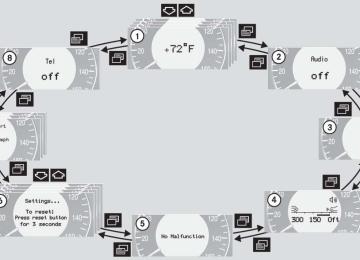
Multifunction display.................... 129
Multifunction steering wheel........ 130
Menus .......................................... 132
Standard display menu ................ 134
AUDIO menu ................................ 134
NAV menu.................................... 137
Distronic* menu........................... 137
Malfunction memory menu .......... 138
Settings menu.............................. 139
Trip computer menu..................... 152
TEL menu* ................................... 154
Automatic transmission..................... 157
One-touch gearshifting................. 158
Gear ranges ................................. 159
Gear selector lever position ......... 160
Steering wheel gearshift control (Speedshift) CLK 55 AMG ............ 161
Program mode selector switch..... 163
Accelerator position..................... 163
Manual shift program CLK 55 AMG ................................ 164
Emergency operation (Limp Home Mode) ...................... 165Good visibility ..................................... 166
Windshield wipers......................... 166
Headlamp cleaning system* ......... 166
Rear view mirror ........................... 167
Sun visors ..................................... 169
Rear window sunshade* ............... 170
Rear window defroster.................. 171
Automatic climate control .................. 172
Setting the temperature................ 175
Adjusting air distribution............... 176
Adjusting air volume ..................... 177
Maximum cooling MAXCOOL ........ 177
Defrosting ..................................... 177
Air recirculation mode .................. 178
Charcoal filter ............................... 179
Deactivating the climate control system ................. 180
Air conditioning............................. 181
Residual heat and ventilation*...... 181
Rear passenger compartment adjustable air vents....................... 182Contents
Audio system...................................... 183
Audio and telephone, operation.... 183
Operating safety ........................... 183
Operating and display elements ... 184
Button and soft key operation ...... 186
Operation...................................... 186
Radio operation ............................ 189
Satellite radio (SAT)* (USA only)... 192
Cassette operation ....................... 196
CD changer* operation................. 199
Telephone* operation................... 203
Power windows .................................. 210Opening and closing the windows ..................... 210
Synchronizing power windows...... 213
Sliding/pop-up roof*.......................... 214Opening and closing the sliding/pop-up roof ................ 214
Synchronizing the sliding/pop-up roof...................... 217
Driving systems.................................. 218
Cruise control ............................... 218
Distronic* ..................................... 221
Parktronic (Parking assist)*.......... 233Contents
Loading .............................................. 237
Roof rack...................................... 237
Ski sack*...................................... 237
Split rear bench seat .................... 240
Loading instructions..................... 242
Cargo tie-down rings .................... 243
Useful features .................................. 244
Interior storage spaces ................ 244
Ashtrays ....................................... 247
Cigarette lighter ........................... 248
Floormats* ................................... 249
Telephone*................................... 250
Tele Aid ........................................ 251
Garage door opener ..................... 259Operation ......................................... 265
The first 1000 miles (1500 km)......... 266
Driving instructions............................ 267
Drive sensibly – save fuel............. 267
Drinking and driving ..................... 267
Pedals .......................................... 267
Power assistance ......................... 267
Brakes.......................................... 268
Driving off .................................... 269
Parking......................................... 269
Tires ............................................. 270
Hydroplaning................................ 271
Tire traction.................................. 271
Tire speed rating .......................... 272
Winter driving instructions ........... 273
Standing water............................. 274
Passenger compartment .............. 274
Driving abroad.............................. 274
Control and operation of radio transmitters .................... 275
Catalytic converter....................... 275
Emission control .......................... 276
Coolant temperature.................... 277At the gas station .............................. 278
Refueling...................................... 278
Check regularly and before a long trip ......................... 280
Engine compartment ......................... 281
Hood ............................................ 281
Engine oil ..................................... 283
Transmission fluid level................ 286
Coolant ........................................ 286
Battery ......................................... 288
Windshield washer system and headlamp cleaning system*......... 289
Tires and wheels................................ 290
Important guidelines .................... 291
Life of tires................................... 291
Direction of rotation..................... 291
Checking tire inflation pressure ... 292
Rotating wheels ........................... 293
Winter driving .................................... 294
Winter tires .................................. 294
Block heater*............................... 295
Snow chains................................. 295Maintenance...................................... 296
Clearing the service indicator ...... 296
Service term exceeded ................ 296
Calling up the service indicator.... 297
Resetting the service indicator..... 297
Vehicle care....................................... 298
Cleaning and care of vehicle ........ 298Practical hints .................................. 305
What to do if …? ................................. 306
Lamps in instrument cluster ......... 306
Lamp in center console................. 313
Messages in the display................ 314
Where will I find...? ............................. 337
First aid kit.................................... 337
Vehicle tool kit.............................. 337
Minispare wheel............................ 340
Unlocking/locking in an emergency... 343
Unlocking the vehicle.................... 343
Locking the vehicle ....................... 344
Changing batteries in the SmartKey/ SmartKey with KEYLESS-GO* ....................... 345
Fuel filler flap ................................ 347
Manually unlocking the gear selector lever .................. 347
Opening/closing in an emergency ..... 348
Sliding/pop-up roof* .................... 348Contents
Replacing bulbs.................................. 350
Bulbs............................................. 350
Replacing bulbs for front lamps .... 352
Side marker lamp bulb.................. 355
Replacing bulbs for rear lamps ..... 356
Replacing wiper blades ...................... 357
Removing wiper blades................. 357
Installing wiper blades .................. 357
Flat tire............................................... 358
Preparing the vehicle .................... 358
Mounting the Minispare wheel...... 358
Battery ............................................... 363
Disconnecting the battery ............ 364
Removing the battery ................... 364
Charging and reinstalling battery.. 364
Reconnecting the battery ............. 365
Jump starting...................................... 366
Towing the vehicle.............................. 368
Towing the vehicle ........................ 368
Installing towing eye bolt.............. 370
Fuses.................................................. 372Fuse box in passenger compartment............... 372
Fuse box in engine compartment . 373
Auxiliary fuse box in trunk ............ 374Contents
Technical data.................................. 375
Spare parts service ............................ 376
Warranty coverage............................. 377Loss of Service and Warranty Information Booklet...................... 377
Identification labels............................ 378
Layout of poly-V-belt drive ................. 379
CLK 320/CLK 500/CLK 55 AMG. 379
Engine................................................ 380
Rims and tires.................................... 381
Same size tires............................. 382
Mixed size tires ............................ 383
Minispare wheel ........................... 384
Electrical system................................ 385
Main dimensions................................ 386
Weights.............................................. 387Fuels, coolants, lubricants, etc. ......... 388
Capacities .................................... 388
Engine oils.................................... 390
Engine oil additives ...................... 390
Air conditioning refrigerant .......... 390
Brake fluid.................................... 390
Premium unleaded gasoline ......... 391
Fuel requirements ........................ 391
Gasoline additives........................ 391
Coolants....................................... 392
Windshield washer system and headlamp cleaning system*......... 394
Consumer information....................... 395
Uniform tire quality grading ......... 395Technical terms............................... 397
Index................................................. 403
왔
Product information
Please observe the following in your own best interest: We recommend using genuine Mercedes-Benz parts as well as conversion parts and accessories explicitly approved by us for your vehicle model. We have tested these parts to determine their reliability, safety and special suitabili- ty for Mercedes-Benz vehicles.
Introduction Product information
We are unable to make an assessment for other products and therefore cannot be held responsible for them, even if in indi- vidual cases an official approval or authori- zation by governmental or other agencies should exist. Use of such parts and acces- sories could adversely affect the safety, performance or reliability of your vehicle. Please do not use them.
Genuine Mercedes-Benz parts as well as conversion parts and accessories ap- proved by us are available at your autho- rized Mercedes-Benz Center where you will receive comprehensive information, also on permissible technical modifications, and where proper installation will be per- formed.
Introduction Operator’s Manual 왔 Operator’s Manual This Operator’s Manual contains a great deal of useful information. We urge you to read it carefully and familiarize yourself with the vehicle before driving. For your own safety and longer service life of the vehicle, we urge you to follow the in- structions and warnings contained in this manual. Ignoring them could result in dam- age to the vehicle or personal injury to you or others. Vehicle damage caused by fail- ure to follow instructions is not covered by the Mercedes-Benz Limited Warranty. Your vehicle may have some or all of the equipment described in this manual. Therefore, you may find explanations for optional equipment not installed in your vehicle. If you have any questions about the operation of any equipment, your au- thorized Mercedes-Benz Center will be glad to demonstrate the proper proce- dures.
10
We continuously strive to improve our product, and ask for your understanding that we reserve the right to make changes in design and equipment. Therefore, infor- mation, illustrations and descriptions in this Operator’s Manual might differ from your vehicle. Optional equipment is also described in this manual, including operating instruc- tions wherever necessary. Since they are special-order items, the descriptions and illustrations herein may vary slightly from the actual equipment of your vehicle. If there are any equipment details that are not shown or described in this Operator’s Manual, your authorized Mercedes-Benz Center will be glad to inform you of correct care and operating procedures. The Operator’s Manual and Service Book- let are important documents and should be kept with the vehicle.
Service and warranty information
The Service and Warranty Information Booklet contains detailed information about the warranties covering your Mercedes-Benz, including: 앫 New Car Limited Warranty, 앫 Emission System Warranty, 앫 Emission Performance Warranty, 앫 California, Maine, Massachusetts, and
Vermont Emission Control System Warranty (California, Maine, Massachusetts, and Vermont only),
앫 State Warranty Enforcement Laws
(Lemon Laws).
(1) the same substantial defect or mal-
function results in a condition that is likely to cause death or serious bodily injury if the vehicle is driven, that de- fect or malfunction has been subject to repair two or more times, and you have directly notified Mercedes-Benz USA, LLC in writing of the need for its repair,
(2) the same substantial defect or mal-
function of a less serious nature than category (1) has been subject to repair four or more times and you have direct- ly notified us in writing of the need for its repair, or
Important notice for California retail buyers and lessees of Mercedes-Benz automobiles
Under California law you may be entitled to a replacement of your vehicle or a refund of the purchase price or lease price, if Mercedes-Benz USA, LLC and/or its au- thorized repair or service facilities fail to fix one or more substantial defects or mal- functions in the vehicle that are covered by its express warranty after a reasonable number of repair attempts. During the pe- riod of 18 months from original delivery of the vehicle or the accumulation of 18000 miles (approx. 29000 km) on the odometer of the vehicle, whichever occurs first, a reasonable number of repair at- tempts is presumed for a retail buyer or lessee if one or more of the following oc- curs:
Introduction Operator’s Manual
(3) the vehicle is out of service by reason of repair of the same or different sub- stantial defects or malfunctions for a cumulative total of more than 30 calender days. Written notification should be sent to us, not a dealer, at Mercedes-Benz USA, LLC, Customer Assistance Center, One Mercedes Drive, Montvale, NJ 07645-0350.
11
Introduction Operator’s Manual
Maintenance
Roadside Assistance
Change of address or ownership
The Service Booklet describes all the nec- essary maintenance work which should be performed at regular intervals. Always have the Service Booklet with you when you take the vehicle to your autho- rized Mercedes-Benz Center for service. The service advisor will record each ser- vice in the booklet for you.
The Mercedes-Benz Roadside Assistance Program provides factory trained technical help in the event of a breakdown. Calls to the toll-free Roadside Assistance number 1-800-FOR-MERCedes (in the USA) 1-800-387-0100 (in Canada) will be answered by Mercedes-Benz Cus- tomer Assistance Representatives 24 hours a day, 365 days a year. For additional information refer to the Mercedes-Benz Roadside Assistance Pro- gram Brochure in your glove box.
If you change your address, be sure to send in the “Change of Address Notice” found in the Service and Warranty Informa- tion Booklet, or simply call the Mercedes-Benz Customer Assistance Center (in the USA) at 1-800-FOR-MERCedes, or Customer Ser- vice (in Canada) at 1-800-387-0100. It is in your own interest that we can contact you should the need arise. If you sell your Mercedes, please leave all literature with the vehicle to make it avail- able to the next operator. If you bought this vehicle used, be sure to send in the “Notice of Purchase of Used Car” found in the Service and Warranty In- formation Booklet, or call the Mercedes-Benz Customer Assistance Cen- ter (in the USA) at 1-800-FOR-MERCedes, or Customer Service (in Canada) at 1-800-387-0100.
12
Operating your vehicle outside the USA or Canada
If you plan to operate your vehicle in for- eign countries, please be aware that: 앫 service facilities or replacement parts
may not be readily available,
앫 unleaded gasoline for vehicles with cat- alytic converters may not be available; the use of leaded fuels will damage the catalysts,
앫 gasoline may have a considerably low- er octane rating, and improper fuel can cause engine damage.
Certain Mercedes-Benz models are avail- able for delivery in Europe under our Euro- pean Delivery Program. For details, consult your authorized Mercedes-Benz Center or write to: In the USA: Mercedes-Benz USA, LLC European Delivery Department One Mercedes Drive Montvale, NJ 07645-0350
In Canada: Mercedes-Benz Canada, Inc. European Delivery Department 849 Eglinton Avenue East Toronto, Ontario M4G 2L5Introduction Operator’s Manual
13
Introduction Where to find it 왔 Where to find it This Operator’s Manual is designed to pro- vide comprehensive support information for you, the vehicle operator. Each section has its own reference color so you can find information quickly.
At a glance Here you will find an overview of all the controls that can be operated from the driver’s seat.
Getting started Here you will find all the information you need for your first drive. You should read this section first if this is your first Mercedes-Benz vehicle or if you are rent- ing or borrowing this vehicle.
Safety and Security Here you will find descriptions of the safety features in your vehicle.
14
Controls in detail Here you will find detailed information about the equipment installed in your vehi- cle. This section expands on the “Getting started” section and also describes techni- cal innovations. If you are already familiar with the basic functions of your vehicle, this section will be of particular interest to you.
Operation Here you will find all the information you need for the proper operation of your vehi- cle.
Practical hints This section provides fast assistance for dealing with problems you may encounter.
Technical data All important technical data for your vehi- cle can be found in this section.
Indexes The glossary provides explanations of the most important technical terms. The table of contents and the index are de- signed to help you find information quickly and easily. The following publications are part of your vehicle documentation: 앫 this Operator’s Manual 앫 the Service Booklet Separate operating instructions will be provided as required depending on the equipment options installed in your vehi- cle.
왔 Symbols The following symbols are found in this Operator’s Manual:
Optional equipment is identified with an asterisk. Since standard equipment varies between models, the descriptions and illustrations in this manual may differ slightly from the actual equipment of your vehicle.
Introduction Symbols
Warning!
왘 This symbol points to instructions for
you to follow.
Warning notices draw your attention to haz- ards that may endanger your health or life, or the health or life of others.
왘 A number of these symbols appearing in succession indicates a multiple-step procedure.
컄 Page
Highlights hazards that may result in damage to your vehicle.
컄컄
Helpful hints or further information you may find useful.
->
This symbol tells you where to look for further information on a topic. This continuation symbol marks an interrupted procedure which will be continued on the next page. In the glossary of technical terms, this symbol is used to in- dicate cross-reference to term definitions.
Display Words appearing in the multi- function display are printed in the type shown here.
15
Introduction Operating safety 왔 Operating safety
Warning!
Warning!
Proper use of the vehicle
Work improperly carried out on electronic components and associated software could cause them to cease functioning. Because the vehicle’s electronic components are in- terconnected, any modifications made may produce an undesired effect on other sys- tems. Electronic malfunctions could seri- ously impair the operating safety of your vehicle.
See your authorized Mercedes-Benz Center for repairs or modifications to electronic components.
Other improper work or modifications on the vehicle could also have a negative impact on the operating safety of the vehicle.
Some safety systems only function while the engine is running. You should therefore nev- er turn off the engine while driving.
Heavy blows against the vehicle underbody or tires/wheels, for example when running over an obstacle, road debris or a pothole, may cause serious damage to and impair the operating safety of your vehicle. If you feel a sudden significant vibration or ride distur- bance, or you suspect that damage to your vehicle has occurred, you should turn on your hazard warning flashers, carefully slow down, and drive with caution to an area which is a safe distance from the road.
Inspect the vehicle underbody and tires/wheels for possible damage. If the ve- hicle appears unsafe, have it towed to the nearest authorized Mercedes-Benz Center or other qualified maintenance or repair fa- cility for further inspection or repairs.
Proper use of the vehicle requires that you are familiar with the following information and rules: 앫 the safety precautions in this manual 앫 the “Technical data” section in this
manual
앫 traffic rules and regulations 앫 motor vehicle laws and safety stan-
dards
Warning!
Various warning labels are attached to your vehicle. These warning labels are intended to make you and others aware of various risks. You should not remove any of these warning labels unless explicitly instructed to do so by information on the label itself. Re- moval of any of these labels may cause you and others to be unaware of certain risks which may result in an accident and/or per- sonal injury.
16
Introduction Problems with your vehicle
왔 Problems with your vehicle If you should experience a problem with your vehicle, particularly one that you believe may affect its safe operation, we urge you to immediately contact your authorized Mercedes-Benz Center to have the problem diagnosed and corrected if required. If the matter is not handled to your satisfaction, please discuss the problem with the Mercedes-Benz Center management, or if necessary contact us at one of the following addresses: In the USA: Customer Assistance Center Mercedes-Benz USA, LLC One Mercedes Drive Montvale, NJ 07645-0350
In Canada: Customer Relations Department Mercedes-Benz Canada, Inc. 849 Eglinton Avenue East Toronto, Ontario, M4G 2L517
Introduction Reporting safety defects 왔 Reporting safety defects For the USA only: The following text is published as required of manufacturers under Title 49, Code of U.S. Federal Regulations, Part 575 pursuant to the “National Traffic and Motor Vehicle Safety Act of 1966”.
Reporting safety defects
If you believe that your vehicle has a defect which could cause a crash or could cause injury or death, you should immediately inform the National Highway Traffic Safety Administration (NHTSA) in addition to notifying Mercedes-Benz USA, LLC. If NHTSA receives similar complaints, it may open an investigation, and if it finds that a safety defect exists in a group of vehicles, it may order a recall and remedy campaign. However, NHTSA cannot become involved in individual problems between you, your dealer, or Mercedes-Benz USA, LLC. To contact NHTSA, you may either call the Auto Safety Hotline toll-free at 1-888-327-4236 (or 366-0123 in Washington, D.C. area) or write to: NHTSA, U.S. Department of Transportation, Washington, D.C. 20590. You can also obtain other information about motor ve- hicle safety from the Hotline.
18
At a glance Cockpit
Instrument cluster
Multifunction steering wheel
Center console
Overhead control panel
Door control panel
19
At a glance Cockpit 왔 Cockpit
20
Item
1 Headlamp washer switch* 2 Combination switch
Page 166
앫 Turn signals 앫 Windshield wipers 앫 High beam
3 Cruise control lever
앫 Cruise control 앫 Distronic*
4 Multifunction steering
wheel
5 Instrument cluster
6 Lever for voice control
system*, see separate op- erating instructions
7 Starter switch
48
48
48218
221
24, 130
22, 12631
Item
8 Front Parktronic* warning
indicator
9 Overhead control panel a Glove box b Center console c Hood lock release d Horn e Steering wheel adjustment
stalk
f Parking brake pedal g Door control panel h Parking brake release j Exterior lamp switch
k Exterior rear view mirror
adjustment
Page 235
27
244
25, 26
28138
46
28
46
47, 119
39At a glance Cockpit
21
At a glance Instrument cluster 왔 Instrument cluster
22
Page 48
310
129
134, 144
134, 138
127
310Item
1 L Left turn signal indi-
cator lamp
2 v ESP warning lamp 3 Speedometer 4 Multifunction display
with: Basic display with outside temperature display Status indicator with mal- function warning message Trip odometer
5 l Distance warning
lamp
Vehicles without Distronic*: Warning lamp without func- tion. It illuminates with the ignition on. It should go out when the engine is running.
Item
6 K Right turn signal indi-
cator lamp
7 Coolant temperature indi-
cator with: Ï Coolant temperature
warning lamp 8 Tachometer with:
1 Supplemental
restraint system indicator lamp
- Antilock Brake Sys- tem (ABS) warning lamp
< Seat belt non-usage
warning lamp
A High beam headlamp
indicator
Page 48
127
309, 323
128
312, 334306
311, 333
1239 Main odometer with:
앫 Gear selector lever posi-
160
tion
앫 Program mode
163
At a glance Instrument cluster
Item
a Clock with:
; Brake warning lamp,
except Canada
3 Brake warning lamp,
Canada only
Page 144
307? Engine malfunction
308
indicator lamp
b Fuel display with:
W Fuel reserve warning
lamp
c Reset button for:
앫 Resetting trip odometer 앫 Adjusting instrument
cluster illumination
311
127
126앫 Confirming new time set-
144
tings
23
Item
Page
4 Menu systems: Press
button è for next system ÿ for previous system
5 Moving within a menu:
Press button j for next display k for previous display
Item
1 Multifunction display
Operating control sys- tem
2 Selecting the submenu or
setting the volume ç down / to decrease æ up / to increase
3 Telephone*: Press button
í to take a call to dial a call ì to end a call
to reject an incom- ing call
Page 129
130155
155
155At a glance Multifunction steering wheel 왔 Multifunction steering wheel
24
왔 Center console Upper part
Item
1 Seat heater*, driver’s side Seat ventilation*, driver’s side
2 Parking assist* (Parktronic
system*) deactivation switch
3 Rear window sunshade* 4 ESP control switch 5 Hazard warning flasher
on/off switch
6 Central locking switch 7 Rear head restraints, fold-
ing down switch
Page 114
236
170
78
123106
110At a glance Center console
Item
8 Tow-away alarm switch
Anti-theft alarm system in- dicator lamp
9 Seat heater*, passenger
side Seat ventilation*, passenger side
a PASS. AIRBAG OFF
indicator lamp
b Audio system or
COMAND* (see separate operating instructions)
c Automatic climate control
Rear window defroster
d Ashtray
Page 83
84114
70, 313
134172, 171
24725
At a glance Center console
Lower part
Item
1 KEYLESS-GO* start/stop
button
2 Storage compartment 3 Thumbwheel for setting
distance in Distronic* 4 Distance warning func-
tion* on/off switch
Item
5 Program mode selector for
automatic transmission 6 Gear selector lever for automatic transmission
Page 163, 164
157Page 33
246
228229
26
왔 Overhead control panel
At a glance Overhead control panel
Item
1 Tele Aid (emergency call
system) button
2 Rear interior lighting
on/off
3 Temperature sensor for au-
tomatic climate control 4 Sliding/pop-up roof* 5 Right reading lamp on/off 6 Interior lighting control
Page 251
125
172
214
125
124Item
7 Hands-free microphone for
Tele Aid (emergency call system), telephone* and voice control system* (see separate operating instruc- tions)
8 Rear view mirror
9 Garage door opener a Left reading lamp on/off
Page 250
38, 167
259
12527
At a glance Door control panel 왔 Door control panel
Item
1 Door handle 2 Seat adjustment
3 Memory function (for stor-
ing seat, exterior mirror and steering wheel set- tings)
4 Switches for opening/clos-
ing front door windows 5 Rear window override
switch
6 Switches for opening/clos-
ing rear windows
7 Remote trunk lid release
switch Trunk lid opening/closing system switch*
28
Page 95
35, 107
116212
74
212
97
98
Getting started Unlocking
Adjusting
Driving
Parking and locking
29
Getting started Unlocking
The “Getting started” section provides an overview of the vehicle’s most basic func- tions. First-time Mercedes-Benz owners should pay special attention to the infor- mation given here. If you are already familiar with the basic functions described here, the “Controls in detail” section will provide you with further information. The corresponding page refer- ences are located at the end of each seg- ment.
Unlocking
왔 Unlocking with the SmartKey
SmartKey with remote control 1 ‹ Lock button 2 Š Opening button for trunk lid 3 Œ Unlock button 4  Panic button (컄 page 75)
왘 Press unlock button Œ on the
SmartKey. All turn signal lamps flash once. The locking knobs in the doors move up.
왘 Get in the vehicle and insert the SmartKey in the starter switch.
Opening a door causes the windows on that side of the car to open slightly. They will return to the up position when the door is closed.
For more information, see “Locking and unlocking” (컄 page 86).
30
Starter switch positions
Starter switch 0 For removing SmartKey 1 Power supply to some electrical con-
sumers, such as seat adjustment
2 Ignition (power supply for all electrical
consumers) and driving position
3 Starting position
Warning!
When leaving the vehicle, always remove the SmartKey from the starter switch, take the SmartKey with KEYLESS-GO* with you and lock the vehicle. Do not leave children unat- tended in the vehicle, or with access to an unlocked vehicle. Unsupervised use of vehi- cle equipment may cause an accident and/or serious personal injury.
The SmartKey can only be removed from the starter switch with the gear selector lever in position P.
Getting started Unlocking
If the SmartKey cannot be turned in the starter switch, the battery may not be sufficiently charged.
왘 Check the battery and charge it
if necessary (컄 page 363).
왘 Get a jump start (컄 page 366).
To prevent accelerated battery dis- charge and a possible dead battery, al- ways remove the SmartKey from the starter switch when the engine is not in operation.
31
Getting started Unlocking
Unlocking with KEYLESS-GO*
If you have the KEYLESS-GO function, your vehicle checks whether the SmartKey with KEYLESS-GO is valid when you pull the door handle. If your SmartKey is valid, the doors will unlock, and you can open them. The function of the SmartKey overrules the KEYLESS-GO function.
Warning!
When leaving the vehicle, always take the SmartKey with KEYLESS-GO with you, and lock the vehicle. Do not leave children unat- tended in the vehicle, or with access to an unlocked vehicle. Unsupervised use of vehi- cle equipment may cause an accident and/or serious personal injury.
To unlock the vehicle, the SmartKey with KEYLESS-GO must be outside the vehicle, no further than approx. 3 feet (1 meter) away from the door.
왘 Pull the door handle.
The turn signal lamps flash once. The locking knobs on the doors move up.
If the SmartKey is inside the vehicle, press- ing the KEYLESS-GO start/stop button on the gear selector lever corresponds to turning the SmartKey to the various starter switch positions.
32
Getting started Unlocking
왘 Make sure the gear selector lever is set
to P.
왘 Do not depress the brake pedal.
Position 1
왘 Press the KEYLESS-GO start/stop but-ton once. This supplies power to some electrical consumers, such as seat adjustment.
If you now press the KEYLESS-GO start/stop button 앫 once again, the ignition (position 2)
is switched on.
앫 twice, the power supply is again
switched off.
Ignition (or position 2) 왘 Press the KEYLESS-GO start/stop but-
ton twice. This supplies power to all electrical consumers. All the lamps in the instru- ment cluster come on.
If you now press the KEYLESS-GO start/stop button once, the power sup- ply is again switched off.
More information can be found in the “Controls in detail” section (컄 page 89). For information on starting the engine us- ing the KEYLESS-GO start/stop button, see “Starting with KEYLESS-GO*” (컄 page 44).
1 KEYLESS-GO start/stop button The SmartKey with KEYLESS-GO must be located in the vehicle. Before you press the KEYLESS-GO start/stop button, the vehicle’s on-board electronics have status 0 (as with SmartKey removed).
33
Getting started Adjusting 왔 Adjusting
Warning!
All seat, head restraint, steering wheel, and rear view mirror adjustments, as well as fas- tening of seat belts, must be done before the vehicle is put into motion.
Seats
Warning!
Do not adjust the driver’s seat while driving. Adjusting the seat while driving could cause the driver to lose control of the vehicle.
Never ride in a moving vehicle with the seat back reclined. Sitting in an excessively re- clined position can be dangerous. You could slide under the seat belt in a collision. If you slide under it, the belt would apply force at the abdomen or neck. That could cause se- rious or fatal injuries. The seat back and seat belts provide the best restraint when the wearer is in an upright position and belts are properly positioned on the body.
34
Your seat must be adjusted so that you can correctly fasten your seat belt (컄 page 40). Never place hands under the seat or near any moving parts while a seat is being adjusted.
Warning!
When leaving the vehicle, always remove the SmartKey from the starter switch, take the SmartKey with KEYLESS-GO* with you, and lock your vehicle.
The power seats can also be operated with the driver’s or passenger door open. Do not leave children unattended in the vehicle, or with access to an unlocked vehicle. Unsu- pervised use of vehicle equipment may cause an accident and/or serious personal injury.
Warning!
Children 12 years old and under must never ride in the front seat, except in a Mercedes-Benz authorized BabySmartTM1 compatible child seat, which operates with the BabySmartTM system installed in the ve- hicle to deactivate the passenger front air- bag when it is properly installed. Otherwise they will be struck by the airbag when it in- flates in a crash. If this happens, serious or fatal injury will result.
According to accident statistics, children are safer when properly restrained in the rear seating positions than in the front seat- ing positions. Infants and small children must ride in back seats and be seated in an appropriate infant or child restraint system, which is properly secured with the vehicle’s seat belt and top tether strap, or secured via lower anchors and top tether strap, fully in accordance with the child seat manufactur- er's instructions.
1 BabySmart TM is a trademark of Siemens
Automotive Corp.
A child’s risk of serious or fatal injuries is significantly increased if the child restraints are not properly secured in the vehicle and the child is not properly secured in the child restraint.
Seat adjustment The seat adjustment switches are located in each door.
1 Head restraint height 2 Seat height 3 Seat cushion tilt 4 Seat fore and aft adjustment 5 Backrest tilt
Getting started Adjusting
왘 Turn the SmartKey in the starter switch
to position 1 or 2 (컄 page 31).
Seat fore and aft adjustment 왘 Press the switch forward or backward
or 왘 Press the KEYLESS GO* start/stop
button once or twice (컄 page 33).
or 왘 Open the driver’s or passenger door.
in the direction of arrow 4. Adjust seat to a comfortable seating position that still allows you to reach the accelerator/brake pedal safely. The position should be as far to the rear as possible, consistent with ability to properly operate controls.
When moving the seat, be sure that there are no items in the footwell or be- hind the seats. Otherwise you could damage the seats. The memory function (컄 page 116) lets you store the setting for the seat posi- tion together with the setting for the steering wheel and the exterior rear view mirrors.
35
Getting started Adjusting
Seat cushion tilt 왘 Press the switch up or down in the di- rection of arrow 3 until your upper legs are lightly supported.
Seat backrest tilt 왘 Press the switch forward or backward in the direction of arrow 5 until your arms are slightly angled when holding the steering wheel.
Seat height 왘 Press the switch up or down in the di-
rection of arrow 2.
Head restraint height 왘 Press the switch up or down in the di-
rection of arrow 1.
Warning!
For your protection, drive only with properly positioned head restraints.
Adjust head restraint so that the center of the head restraint supports the back of the head at eye level. This will reduce the poten- tial for injury to the head and neck in the event of an accident or similar situation.
Do not drive the vehicle without the seat head restraints. Head restraints are intend- ed to help reduce injuries during an acci- dent.
Head restraint tilt
Manually adjust the angle of the head re- straint. 왘 Push or pull on the lower edge of the
head restraint cushion.
For more information, see “Seats” (컄 page 107).
36
Folding backrests forward 왘 Pull release lever 1 forward and fold
the backrest forward. The head restraint will automatically move down.
Folding backrests back 왘 Fold and press the backrest rearward
until it engages in driving position. The head restraint returns to its previ- ous position.
For more information, see “Easy-entry/ex- it feature” (컄 page 107).
Folding front seat backrests forward
1 Release lever
In addition to the front seat backrests, the front seat cushions can also be shifted forward to permit easy access to the rear whenever the seat is located in the rear half of its adjustment range. Swivel backrest forward by pulling the release lever until the seat moves in a combined forward and upward move- ment.
Getting started Adjusting
Steering wheel
Warning!
Do not adjust the steering wheel while driv- ing. Adjusting the steering wheel while driv- ing could cause the driver to lose control of the vehicle.
When leaving the vehicle, always remove the SmartKey from the starter switch, take the SmartKey with KEYLESS-GO* with you and lock your vehicle.
The steering wheel adjustment feature can also be operated with the driver’s door open. Do not leave children unattended in the vehicle, or with access to an unlocked vehicle. Unsupervised use of vehicle equip- ment may cause an accident and/or serious personal injury.
37
Getting started Adjusting
Steering wheel adjustment The stalk for steering wheel adjustment is located on the steering column (lower left).
1 Adjusting steering column, in or out 2 Adjusting steering column, up or down 왘 Turn the SmartKey in the starter switch
to position 1 or 2 (컄 page 31).
or 왘 Press the KEYLESS GO* start/stop
button once or twice (컄 page 33).
or 왘 Open the driver’s door.
38
Adjusting steering column in or out 왘 Move stalk forward or back in the direc-
tion of arrow 1 until a comfortable steering wheel position is reached with your arms slightly bent at the elbow.
Adjusting steering column up or down 왘 Move stalk up or down in the direction
of arrow 2. Make sure your legs can move freely and all the displays (incl. malfunction and indicator lamps) on the instrument cluster are clearly visible.
The memory function (컄 page 116) lets you store the setting for the steering wheel together with the setting for the seat position and exterior rear view mirrors.
Mirrors
Adjust the interior and exterior rear view mirrors before driving so that you have a good view of the road and traffic condi- tions.
Warning!
In the case of an accident, liquid electrolyte may escape the mirror housing if the mirror glass breaks.
Electrolyte has an irritating effect. Do not al- low the liquid to come into contact with eyes, skin, clothing, or respiratory system. In case it does, immediately flush affected area with water, and seek medical help if necessary.
Interior rear view mirror 왘 Manually adjust the interior rear view
mirror.
For more information, see “Rear view mir- ror” (컄 page 167)
Exterior rear view mirror
Warning!
Exercise care when using the passenger side exterior rear view mirror. The mirror surface is convex (outwardly curved surface for a wider field of view). Objects in mirror are closer than they appear. Check your in- terior rear view mirror or glance over your shoulder before changing lanes.
Electrolyte drops coming into contact with the vehicle paint finish can only be completely removed while in their liq- uid state and by applying plenty of wa- ter
The buttons are located above the exterior lamp switch.
1 Adjustment button 2 Passenger-side exterior rear view mir-
ror button
3 Driver’s side exterior rear view mirror
button
왘 Make sure the ignition is switched on. All the lamps in the instrument cluster come on.
왘 Press button 3 for the left mirror or
button 2 for the right mirror.
왘 Push adjustment button 1 up, down, left or right according to the desired setting.
Getting started Adjusting
If an exterior rear view mirror was forc- ibly pushed forward (hit from the rear) or forcibly pushed rearward (hit from the front), reposition it by applying firm pressure until it snaps into place. The mirror housing is now properly posi- tioned and you can adjust the mirror normally.
The memory function (컄 page 116) lets you store the setting for the exterior rear view mirrors together with the set- tings for the steering wheel and seat position.
At low ambient temperatures, the mir- rors will be heated automatically.
For more information, see “Activating exte- rior rear view mirror parking position” (컄 page 168).
39
Getting started Driving 왔 Driving
Warning!
Fastening the seat belts
Do not lay any objects in the driver’s foot- well. Be careful that floor mats or carpets in the driver’s footwell have sufficient clear- ance for the pedals.
During sudden driving or braking maneu- vers, the objects could get caught between the pedals. You could then no longer brake or accelerate.
Warning!
Always fasten your seat belt before driving off. Always make sure your passengers are properly restrained, even those sitting in the rear and pregnant women.
Failure to wear and properly fasten and po- sition your seat belt greatly increases your risk of injuries and their likely severity in an accident. You and your passengers should always wear seat belts.
If you are ever in an accident, your injuries can be considerably more severe without your seat belt properly buckled. Without your seat belt buckled, you are much more likely to hit the interior of the vehicle or be ejected from it. You can be seriously injured or killed.
In the same crash, the possibility of injury or death is lessened if you are wearing your seat belt. The airbags can only protect as ex- pected if the occupants are using their seat belts (컄 page 58).
Warning!
Children 12 years old and under must never ride in the front seat, except in a Mercedes-Benz authorized BabySmartTM1 compatible child seat, which operates with the BabySmartTM system installed in the ve- hicle to deactivate the passenger front air- bag when it is properly installed. Otherwise they will be struck by the airbag when it in- flates in a crash. If this happens, serious or fatal injury will result.
1 BabySmart TM is a trademark of Siemens
Automotive Corp.
40
According to accident statistics, children are safer when properly restrained in the rear seating positions than in the front seat- ing positions. Infants and small children must ride in back seats and be seated in an appropriate infant or child restraint system, which is properly secured with the vehicle's seat belt and top tether strap, or secured via lower anchors and top tether strap, fully in accordance with the child seat manufactur- er's instructions.
A child’s risk of serious or fatal injuries is significantly increased if the child restraints are not properly secured in the vehicle and the child is not properly secured in the child restraint.
Warning!
Never let more people ride in the vehicle than there are seat belts available. Be sure everyone riding in the vehicle is correctly re- strained with a separate seat belt.
Warning!
Never ride in a moving vehicle with the seat backrest reclined. Sitting in an excessively reclined position can be dangerous. You could slide under the seat belt in a collision. If you slide under it, the belt would apply force at the abdomen or neck. This could cause serious or even fatal injuries. The seat backrest and seat belt provide the best re- straint when the wearer is in an upright po- sition and the belt is properly positioned on the body.
Warning!
Read and observe the additional warning no- tices printed in the “Safety and Security” section (컄 page 62).
Getting started Driving
The seat belt presenter for driver and pas- senger makes it easier to put on the seat belt.
1 Seat belt presenter The seat belt presenter slides out when the corresponding door is closed and the SmartKey in the starter switch or KEYLESS-GO* start/stop button are in position 1 or 2.
41
왘 With a smooth motion, pull the belt out
앫 Position the lap belt as low as possible
of the seat belt presenter.
왘 Place the belt over your shoulder. 왘 Push latch plate 1 into buckle 3 until
it clicks.
왘 If necessary, tighten the lap portion to
a snug fit by pulling shoulder portion up.
Proper use of seat belts 앫 Do not twist the belt when fastening. 앫 Adjust seat belt so that the shoulder
portion is located as close as possible to the middle of the shoulder (it should not touch the neck or pass under the arm).
on your hips (over hip joint) and not across the abdomen.
앫 Place the seat backrest in a nearly up-
right position.
앫 Never use a seat belt for more than one
person at a time.
앫 Do not fasten a seat belt around a per-
son and another object at the same time.
앫 Check your seat belt during travel to ensure that it is properly positioned. 앫 Ensure that the seat belt is always fit- ted snugly. You should avoid wearing bulky clothing, such as winter coats, when traveling in the vehicle.
Getting started Driving
1 Latch plate 2 Release button 3 Buckle
42
Getting started Driving
Warning!
The seat belt presenter slides back: 앫 right after you pushed the latch
Starting the engine
Do not pass belts over sharp edges. They could tear.
Do not allow the belt to get caught in the door or in the seat adjustment mechanism. This could damage the belt.
Never attempt to make modifications to seat belts. This could impair the effective- ness of the belts.
Damaged seat belts or belts that were highly stressed in an accident must be replaced. Contact an authorized Mercedes-Benz Cen- ter.
plate 1 into buckle 3 and heard it click.
Warning!
앫 after approximately 30 seconds if you
did not push latch plate 1 into buckle 3.
앫 if your door is opened. 앫 if you turn the SmartKey in the starter
switch to position 0.
앫 if you release a front seat backrest and
fold it forward.
Warning!
The seat belt presenter must be retracted while the vehicle is in motion. Only when the seat belt presenter is retracted can the seat belt be properly positioned on the body and protect the occupant as intended.
Inhalation of exhaust gas is hazardous to your health. All exhaust gas contains carbon monoxide, and inhaling it can cause uncon- sciousness and lead to death.
Do not run the engine in confined areas (such as a garage) which are not properly ventilated. If you think that exhaust gas fumes are entering the vehicle while driving, have the cause determined and corrected immediately. If you must drive under these conditions, drive with at least one window fully open.
43
Getting started Driving
Automatic transmission
Gearshift pattern for automatic transmission P Park position with gear selector lever
lock
R Reverse gear N Neutral D Drive position For more information, see “Automatic transmission” (컄 page 157).
44
Starting with KEYLESS-GO* You can start your vehicle without the SmartKey in the starter switch using the KEYLESS-GO start/stop button on the gear selector lever. The SmartKey with KEYLESS-GO must be located in the vehicle.
Starting with the SmartKey 왘 Make sure the gear selector lever is set
to P.
왘 Do not depress accelerator 왘 Turn the SmartKey in the starter switch to position 3 (컄 page 31) and release it again immediately (“touch-start”). The engine then starts automatically.
왘 Depress the brake pedal.
The gear selector lever lock is released. For information on turning off the engine with the SmartKey, see (컄 page 53).
1 KEYLESS-GO start/stop button
왘 Make sure the gear selector lever is set
to P.
왘 Do not depress accelerator 왘 Depress the brake pedal during the
starting procedure. The gear selector lever lock is released.
왘 Press KEYLESS-GO start/stop
button 1 once. The engine starts automatically if the SmartKey with KEYLESS-GO is in the vehicle.
For information on turning off the engine with KEYLESS-GO, see “Turning off the en- gine with KEYLESS-GO*” (컄 page 54).
Starting difficulties If the engine does not start as described, carry out the following steps: 왘 If you are starting the engine with the
SmartKey, turn SmartKey in starter switch to position 0 and repeat starting procedure.
왘 If you are starting the engine with
KEYLESS-GO*: Close any doors that may be open to allow for better detec- tion of the SmartKey with KEYLESS-GO*. Or: Start the engine with the SmartKey as radio signals from another source may be interfering with the SmartKey with KEYLESS-GO*.
Getting started Driving
왘 Repeat the starting procedure
(컄 page 43). Remember that extended starting attempts can drain the battery.
왘 Get a jump start (컄 page 366). If the engine does not start after several starting attempts, there could be a mal- function in the engine electronics or in the fuel supply system. 왘 Notify an authorized Mercedes-Benz
Center.
45
Getting started Driving
Parking brake
1 Parking brake pedal 2 Parking brake release handle 왘 Release the parking brake by pulling on
handle 2. The indicator lamp ; (USA only) or 3 (Canada only) in the clock goes out.
46
Warning!
When leaving the vehicle, always remove the SmartKey from the starter switch, take the SmartKey with KEYLESS-GO* with you and lock the vehicle. Do not leave children unat- tended in the vehicle, or with access to an unlocked vehicle. Children could release the parking brake, which could result in an acci- dent and/or serious personal injury.
Driving 왘 Depress the brake pedal. 왘 Move gear selector lever in
position D or R.
왘 Release the brake pedal. 왘 Carefully depress the accelerator
pedal.