- 2009 Mercedes-Benz CLK Class Coupe Owners Manuals
- Mercedes-Benz CLK Class Coupe Owners Manuals
- 2004 Mercedes-Benz CLK Class Coupe Owners Manuals
- Mercedes-Benz CLK Class Coupe Owners Manuals
- 2008 Mercedes-Benz CLK Class Coupe Owners Manuals
- Mercedes-Benz CLK Class Coupe Owners Manuals
- 2007 Mercedes-Benz CLK Class Coupe Owners Manuals
- Mercedes-Benz CLK Class Coupe Owners Manuals
- 2005 Mercedes-Benz CLK Class Coupe Owners Manuals
- Mercedes-Benz CLK Class Coupe Owners Manuals
- 2003 Mercedes-Benz CLK Class Coupe Owners Manuals
- Mercedes-Benz CLK Class Coupe Owners Manuals
- 2006 Mercedes-Benz CLK Class Coupe Owners Manuals
- Mercedes-Benz CLK Class Coupe Owners Manuals
- Download PDF Manual
-
Operation Maintenance 왔 Maintenance We strongly recommend that you have your vehicle serviced by your authorized Mercedes-Benz Center, in accordance with the Service Booklet at the times called for by the FSS (Flexible Service System). Failure to have the vehicle maintained in accordance with the Service Booklet at the designated times/mileage called for by the FSS may result in vehicle damage not covered by the Mercedes-Benz Limited Warranty. FSS will notify you when your next service is due. Approximately one month before your next service is due, one of the following mes- sages will appear in the multifunction dis- play while you are driving or when you switch on the ignition (example service A):
Service A in XXXXX miles (km) Service A in XXX days Service A in X day Service A due now!
296
The type of service due is indicated in the multifunction display: 9 Minor service (A) ´ Major service (B)
The interval between services depends on your driving habits. A gentle driving style, moderate engine speeds and the avoidance of short-distance trips will lengthen the interval between services.
Clearing the service indicator
The service indicator is automatically cleared after 30 seconds. You can also clear it yourself. 왘 Press the reset button on the instru-
ment cluster (컄 page 126).
Service term exceeded
If you have exceeded the suggested ser- vice term, you will see the following mes- sage in the multifunction display:
Service A exceeded by XXXXX miles (km) Service A exceeded by XXX days Service A exceeded by X day
An acoustic signal will also sound. The Mercedes-Benz Center will reset the service indicator following a completed service.
Calling up the service indicator
Resetting the service indicator
왘 Switch on ignition.
The standard display of the control sys- tem appears (컄 page 129).
왘 Press button k or j on the mul- tifunction steering wheel until FSS indi- cator with the service symbol 9 or ´ and the service deadline appears in the multifunction display.
If the battery is disconnected, the days of disconnection will not be included in the count shown by the service indica- tor. To arrive at the true service dead- line, you will need to subtract these days from the days shown in the ser- vice indicator. Do not confuse the service indicator with the engine oil level indicator :.
In the event that the service on your vehi- cle is not carried out by an authorized Mercedes-Benz Center, you can reset the service indicator yourself. 왘 Switch on ignition.
The standard display of the control sys- tem appears (컄 page 129).
왘 Press button k or j on the mul- tifunction steering wheel until the FSS indicator with the service symbol 9 or ´ and the service deadline ap- pears in the multifunction display.
왘 Press reset button to the left in the in- strument cluster for about three sec- onds. This message appears in the multifunc- tion display: Service interval... To reset: Press reset button for 3 seconds
Operation Maintenance
왘 To confirm, press reset button until you
hear a signal. The service indicator now displays the reset interval.
If the service indicator was inadvertent- ly reset, have a Mercedes-Benz Center correct it. Only reset if the proper service has been performed. Resetting the system without performing proper service as called for by the FSS will cause the FSS to incorrectly determine the next ser- vice interval which will result in engine damage not covered by the Mercedes-Benz Limited Warranty.
297
Operation Vehicle care 왔 Vehicle care Cleaning and care of vehicle
Warning!
Many cleaning products can be hazardous. Some are poisonous, others are flammable. Always follow the instructions on the partic- ular container. Always open your vehicle’s doors or windows when cleaning the inside.
Never use fluids or solvents that are not de- signed for cleaning your vehicle.
While in operation, even while parked, your vehicle is subjected to varying external in- fluences which, if gone unchecked, can at- tack the paintwork as well as the underbody and cause lasting damage.
298
Such damage is caused not only by ex- treme and varying climatic conditions, but also by: 앫 Air pollution 앫 Road salt 앫 Tar 앫 Gravel and stone chipping To avoid paint damage, you should imme- diately remove: 앫 Grease and oil 앫 Fuel 앫 Coolant 앫 Brake fluid 앫 Bird droppings 앫 Insects 앫 Tree resins, etc. Frequent washing reduces and/or elimi- nates the aggressiveness and potency of the above adverse influences.
More frequent washings are necessary to deal with unfavorable conditions: 앫 near the ocean 앫 in industrial areas (smoke, exhaust
emissions)
앫 during winter operation You should check your vehicle from time to time for stone chipping or other damage. Any damage should be repaired as soon as possible to prevent corrosion. In doing so, do not neglect the underbody of the vehicle. A prerequisite for a thor- ough check is a washing of the underbody followed by a thorough inspection. Dam- aged areas need to be re-undercoated. Your vehicle has been treated at the facto- ry with a wax-base rustproofing in the body cavities which will last for the lifetime of the vehicle. Post-production treatment is neither necessary nor recommended by Mercedes-Benz because of the possibility of incompatibility between materials used in the production process and others ap- plied later.
Operation Vehicle care
We have selected car-care products and compiled recommendations which are specially matched to our vehicles and which always reflect the latest technology. You can obtain Mercedes-Benz approved car-care products at your authorized Mercedes-Benz Center. Scratches, corrosive deposits, corrosion or damage due to negligent or incorrect care cannot always be removed or repaired with the car-care products recommended here. In such cases it is best to seek aid at your authorized Mercedes-Benz Center. The following topics deal with the cleaning and care of your vehicle and give important “how-to” information as well as references to Mercedes-Benz approved car-care prod- ucts. Additional information can be found in the booklet “Vehicle Care Guide“.
Power washer When using a power washer for cleaning the vehicle, always observe the manufac- turer’s operating instructions.
Tar stains Quickly remove tar stains before they dry and become more difficult to remove. A tar remover is recommended.
Vehicles with KEYLESS-GO*: If a door handle is hit by a strong jet of water, and a SmartKey with KEYLESS-GO* is in close proximity, i.e. within approx. 3 ft (approx. 1 m), the vehicle could be inadvertently locked or unlocked.
Never use a round nozzle to power-wash tires. The intense jet of water can result in damage to the tire. Always replace a damaged tire. Always keep the jet of water moving across the surface. Do not aim directly at electrical parts, electrical connec- tors, seals, or other rubber parts.
Paintwork, painted body components Mercedes-Benz approved Paint Care should be applied when water drops on the paint surface do not “bead up”, normally every three to five months, depending on climate and washing detergent used. Mercedes-Benz approved Paint Cleaner should be applied if the paint surface shows signs of embedded dirt (i.e. loss of gloss). Do not apply any of these products or wax if your vehicle is parked in the sun or if the hood is still hot. Use the appropriate MB-Touch-Up Stick for quick and provisional repairs of minor paint damage (i.e. chips from stones, vehi- cle doors, etc.).
299
Operation Vehicle care
Engine cleaning Prior to cleaning the engine compartment, make sure to protect electrical compo- nents and connectors from the intrusion of water and cleaning agents. Corrosion protection, such as MB Anticor- rosion Wax, should be applied to the en- gine compartment after every engine cleaning. Before applying, all control link- age bushings and joints should be lubricat- ed. The poly-V-belt and all pulleys should be protected from any wax.
300
Vehicle washing Do not use hot water or wash your vehicle in direct sunlight. Only use a mild car wash detergent, such as Mercedes-Benz ap- proved Car Shampoo. Thoroughly spray the vehicle with a dif- fused jet of water. Direct only a very weak spray towards the ventilation intake. Use plenty of water and rinse the sponge and chamois frequently. Rinse with clear water and thoroughly dry with a chamois. Do not allow cleaning agents to dry on the finish. Due to the width of the vehicle, fold in out- side mirrors prior to running the vehicle through an automatic car wash to prevent damage to the mirrors. In the winter, thoroughly remove all traces of road salt as soon as possible. When washing the underbody, do not for- get to clean the inner sides of the wheels.
Vehicles with KEYLESS-GO*: If a door handle is hit by a strong jet of water, and a SmartKey with KEYLESS-GO* is in close proximity, i.e. within approx. 3 ft (approx. 1 m), the vehicle could be inadvertently locked or unlocked.
Ornamental moldings For regular cleaning and care of very dirty chrome-plated parts, use a chrome clean- er.
Headlamps, tail lamps, side markers, turn signal lenses Use a mild car wash detergent, such as Mercedes-Benz approved Car Shampoo, with plenty of water. To prevent scratches, never apply strong force and only use a soft, non-scratchy cloth when cleaning the lenses. Do not at- tempt to wipe dirty lenses with a dry cloth or sponge.
Cleaning the Distronic* system sensor cover
Cleaning the Parktronic* system sensors
Operation Vehicle care
To prevent scratches, never apply strong force and only use a soft, non-scratchy cloth when cleaning the sensor. Do not at- tempt to wipe dirty sensors with a dry cloth or sponge.
1 Distronic* system sensor cover 왘 Use a mild car wash detergent, such as
1 Parktronic* system sensors 왘 Use a mild car wash detergent, such as
Mercedes-Benz approved Car Sham- poo, with plenty of water to clean sen- sor cover 1.
Mercedes-Benz approved Car Sham- poo, with plenty of water to clean sensors 1.
To prevent scratches, never apply strong force and only use a soft, non-scratchy cloth when cleaning the sensor cover. Do not attempt to wipe dirty sensors with a dry cloth or sponge.
When using a steam cleaner or power washer, aim nozzle only briefly from a min- imum distance of 4 in (10 cm) at sensors 1.
301
Operation Vehicle care
Wiper blades 왘 Fold wiper arm forward until it snaps
Window cleaning 왘 Fold wiper arm forward until it snaps
into place.
Warning!
into place.
Warning!
For safety reasons, switch off wipers and re- move SmartKey from starter switch before cleaning the wiper blades. Otherwise the wiper motor might suddenly turn on and cause injury.
For safety reasons, switch off wipers and re- move SmartKey from starter switch before cleaning the windshield. Otherwise the wip- er motor might suddenly turn on and cause injury.
왘 Clean the wiper blade inserts with a
왘 Use a window cleaning solution on all
Fold the windshield wiper arms back onto the windshield before turning the SmartKey in the starter switch. Hold on to the wiper when folding the wiper arm back. If released, the force of the impact from the tensioning spring could crack the windshield.
glass surfaces. An automotive glass cleaner is recom- mended.
clean cloth and detergent solution.
Fold the windshield wiper arms back onto the windshield before turning the SmartKey in the starter switch. Hold on to the wiper when folding the wiper arm back. If released, the force of the impact from the tensioning spring could crack the windshield.
302
Light alloy wheels Mercedes-Benz approved Wheel Care should be used for regular cleaning of the light alloy wheels. If possible, clean wheels once a week with Mercedes-Benz approved Wheel Care, us- ing a soft bristle brush and a strong spray of water. Follow instructions on container.
Only use acid-free cleaning materials. Acid may cause corrosion or damage the clear coat.
Instrument cluster Use a gentle dishwashing detergent or mild detergent for delicate fabrics as a washing solution. Wipe with a cloth moist- ened in lukewarm solution. Do not use scouring agents.
Steering wheel and gear selector lever Wipe with a damp cloth and dry thoroughly or clean with Mercedes-Benz approved Leather Care.
Cup holder Use a gentle dishwashing detergent or mild detergent for delicate fabrics as a washing solution. Wipe with a cloth moist- ened in lukewarm solution. Do not use scouring agents.
Hard plastic trim items Pour Mercedes-Benz approved Interior Care onto soft lint-free cloth and apply with light pressure.
Headliner and rear window shelf Clean with soft bristle brush, or use a dry-shampoo cleaner in case of excessive dirt.
Operation Vehicle care
Seat belts The webbing must not be treated with chemical cleaning agents. Only use clear, lukewarm water and soap. Do not dry the webbing at temperatures above 176°F (80°C) or in direct sunlight.
Warning!
Do not bleach or dye seat belts as this may severely weaken them. In a crash they may not be able to provide adequate protection.
303
Operation Vehicle care
Upholstery Using aftermarket seat covers or wearing clothing that have the tendency to give off coloring (e.g. when wet, etc.) may cause the upholstery to become permanently dis- colored. By lining the seats with a proper intermediate cover, contact-discoloration will be prevented.
Nubuck leather upholstery (CLK 55 AMG) The nubuck leather upholstery is treated with a protective coating. Wipe nubuck leather upholstery with damp microfiber cloth to remove dust and other light stains. Carefully dab nubuck leather upholstery with a microfiber cloth to remove oil stains.
Leather upholstery Wipe leather upholstery with a damp cloth and dry thoroughly or clean with Mercedes-Benz approved Leather Care. Exercise particular care when cleaning per- forated leather as its underside should not become wet.
Do not use Mercedes-Benz approved Leather Care or any solvents to clean nubuck leather upholstery. Avoid hard scrubbing on nubuck leath- er upholstery.
Plastic and rubber parts Do not use oil or wax on these parts.
Wood trims Dampen cloth using water and use damp cloth to clean wood trims in your vehicle. Do not use solvents like tar remover or wheel cleaner nor polishes or waxes as these may be abrasive.
304
Practical hints What to do if …?
Where will I find...?
Unlocking/locking in an emergency
Opening/closing in an emergency
Replacing bulbs
Replacing wiper blades
Flat tire
Battery
Jump starting
Towing the vehicle
Fuses
305
Practical hints What to do if …? 왔 What to do if …? Lamps in instrument cluster
General information: If a bulb in the instrument cluster fails to come on during the bulb self-check when
turning the SmartKey in the starter switch to position 2, have it checked and replaced if necessary.
Problem - The yellow ABS malfunction
indicator lamp comes on while driving.
Possible cause The ABS has detected a malfunction and has switched off. The BAS and the ESP are also switched off (see messages in display). The brake system is still functioning normally but without the ABS available.
The charging voltage has fallen below 10 volts. The ABS has switched off.
Suggested solution 왘 Continue driving with added caution. Wheels will lock during hard braking, reducing steering capability.
왘 Have the system checked at an autho- rized Mercedes-Benz Center as soon as possible.
Failure to follow these instructions in- creases the risk of an accident. 왘 Read and observe messages in the
display (컄 page 314).
When the voltage is above this value again, the ABS is operational again. 왘 If necessary, have the generator (al-
ternator) and battery checked.
306
Practical hints What to do if …?
Problem ; (USA only)
(Canada only) The red brake warning lamp comes on while driving and you hear a warning sound. The red brake warning lamp comes on while driving.
Warning!
Driving with the brake warning lamp illumi- nated can result in an accident. Have your brake system checked immediately if the brake warning lamp stays on. Do not add brake fluid before checking the brake system.
Possible cause You are driving with the parking brake set.
Suggested solution 왘 Release the parking brake
(컄 page 46).
There is insufficient brake fluid in the reser- voir.
Overfilling the brake fluid reservoir can re- sult in spilling brake fluid on hot engine parts and the brake fluid catching fire. You can be seriously burned.
왘 Risk of accident! Carefully stop the
vehicle and notify an authorized Mercedes-Benz Center. Do not add brake fluid! This will not solve the problem.
If you find that the brake fluid in the brake fluid reservoir has fallen to the minimum mark or below, have the brake system checked for brake pad thickness and leaks.
307
Possible cause There is a malfunction in: 앫 The fuel management system 앫 The ignition system 앫 The emission control system 앫 Systems which impact emissions Such malfunctions may result in excessive emissions values and may switch the engine to its Limp-Home Mode (emergency opera- tion). The fuel cap is not closed tightly. Your gas tank is empty.
Suggested solution 왘 Have the vehicle checked as soon as
possible by an authorized Mercedes-Benz Center. An on-board diagnostic connector is used by the service station to link the vehicle to the shop diagnostics system. It allows the accurate identification of system malfunctions through the read- out of diagnostic trouble codes. It is lo- cated in the front left area of the footwell next to the parking brake pedal.
왘 Check the fuel cap. 왘 After refuelling, start the engine three or
four times in succession.
The Limp-Home mode is canceled. You do not need to have your vehicle checked.
Practical hints What to do if …?
Problem ? The yellow “CHECK ENGINE”
malfunction indicator lamp comes on while driving.
308
Practical hints What to do if …?
Problem • The red coolant warning lamp comes on when the engine is running.
Possible cause There is insufficient coolant in the reservoir. 왘 Add coolant to prevent engine from
Suggested solution
overheating (컄 page 286).
If this warning lamp comes on frequently, there is a leak in the cooling system. If the coolant level is correct, the electric ra- diator fan may be broken.
• The red coolant warning lamp comes on while driving and you hear a warning sound.
The coolant temperature has exceeded 257°F (125°C).
왘 Have the cooling system checked.
왘 If the coolant temperature is below 257°F (125°C), you can continue driving to the nearest authorized Mercedes-Benz Center.
왘 Avoid high engine loads (e.g. driving
uphill) and stop-and-go driving.
왘 Stop as soon as possible and allow the engine and coolant to cool down.
Warning!
Driving when your engine is badly overheat- ed can cause some fluids which may have leaked into the engine compartment to catch fire. You could be seriously burned.
Steam from an overheated engine can cause serious burns and can occur just by opening the hood. Stay away from the engine if you see or hear steam coming from it.
Turn off the engine, get out of the vehicle and do not stand near the vehicle until the engine has cooled down.
309
Practical hints What to do if …?
Problem l The red Distance warning lamp
comes on while driving.
l The red Distance warning lamp comes on while driving and you hear a warning sound.
v The yellow ESP warning lamp
comes on while driving.
Possible cause You are too close to the vehicle in front of you to maintain selected speed. 앫 You are gaining too rapidly on the vehicle
ahead of you.
앫 The distance warning system has recog- nized a stationary obstacle on your prob- able line of travel.
The ESP is deactivated. Risk of accident! Adapt your speed and driving to the prevail- ing road and weather conditions.
Suggested solution 왘 Apply the brakes immediately to in-
crease the following distance. 왘 Apply the brakes immediately. 왘 Carefully observe the traffic situation. You may need to brake or maneuver to avoid hitting an obstacle.
왘 Switch the ESP back on (컄 page 80). If the ESP cannot be switched back on, have the system checked at an autho- rized Mercedes-Benz Center as soon as possible.
310
Practical hints What to do if …?
Problem v The yellow ESP warning lamp
flashes while driving.
Possible cause The ESP or traction control has come into operation because of detected traction loss in at least one tire. Distronic* is deactivated.
Suggested solution 왘 When driving off, apply as little throt-
tle as possible.
왘 While driving, ease up on the acceler-
ator.
왘 Adapt your speed and driving to the
prevailing road and weather condi- tions.
왘 Do not deactivate the ESP.
Exceptions: (컄 page 79).
Failure to follow these instructions in- creases the risk of an accident. 왘 Refuel at the next gas station
(컄 page 278).
The fuel level has gone below the reserve mark.
The warning lamp reminds you to fasten seat belts.
왘 Fasten your seat belt.
A The yellow fuel tank reserve warning lamp comes on while driving.
< The red seat belt non-usage
warning lamp illuminates briefly after starting the engine.
311
Practical hints What to do if …?
Problem 1 The red SRS indicator lamp
comes on while driving.
Possible cause There is a malfunction in the restraint sys- tems. The airbags or emergency tensioning device (ETD) could deploy unexpectedly or fail to activate in an accident.
Suggested solution 왘 Drive with added caution to the near-
est authorized Mercedes-Benz Cen- ter.
Warning!
In the event that a malfunction of the SRS is indicated as outlined above, the SRS may not be operational. For your safety, we strongly recommend that you visit an autho- rized Mercedes-Benz Center immediately to have the system checked; otherwise the SRS may not be activated when needed in an accident, which could result in serious or fatal injury, or it might deploy unexpectedly and unnecessarily, which could result in an accident and/or injury to you or to others.
312
Lamp in center console
Problem PASS. AIRBAG OFF
The indicator lamp comes on.
PASS. AIRBAG OFF
The indicator lamp does not come on with a BabySmartTM child seat properly installed on the front passenger seat.
Possible cause A BabySmartTM1 child seat is installed on the front passenger seat. Therefore the passen- ger front airbag is switched off. The system is malfunctioning when there is no BabySmartTM child seat installed on the front passenger seat. The system is malfunctioning.
1 BabySmart TM is a trademark of Siemens Automotive Corp.
Practical hints What to do if …?
Suggested solution 왘 Have the system checked as soon as
possible by an authorized Mercedes-Benz Center.
왘 Make sure there is nothing between seat cushion and child seat and check installation of the child seat.
왘 If the light remains out, have the sys- tem checked as soon as possible by an authorized Mercedes-Benz Center. Do not use the BabySmartTM restraint to transport children on the front pas- senger seat until the system has been repaired.
313
Practical hints What to do if …?
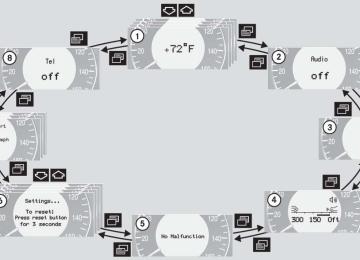
Messages in the display
The control system shows warning and malfunction messages in the multifunction display. Certain warning and malfunction messag- es are accompanied by an audible signal. Address these messages accordingly and follow the additional instructions given in this Operator’s Manual. Selecting the malfunction memory menu in the control system (컄 page 138) displays both cleared and uncleared messages. High-priority messages appear in the mul- tifunction display in red color. Certain messages of high priority cannot be cleared from the multifunction display using the reset button (컄 page 126). Other high priority messages and messag- es of less immediate priority (regular dis- play colors) can be cleared from the multifunction display using the reset but- ton and are then stored in the malfunction message memory (컄 page 138).
314
Turning the SmartKey in starter switch to position 2, or pressing the KEYLESS-GO* start/stop button twice to position 2 causes all lamps as well as the multifunction display to come on. Ensure that they are all in working order before starting your journey.
On the pages that follow, you will find a compilation of the most important warning and malfunction messages that may ap- pear in the display. High priority messages appear on a red background.
Warning!
All categories of messages contain impor- tant information which should be taken note of and, where a malfunction is indicated, ad- dressed as soon as possible at an autho- rized Mercedes-Benz Center.
Failure to repair the condition noted may cause damage not covered by the Mercedes-Benz Limited Warranty, or result in property damage or personal injury.
Warning!
No messages will be displayed if either the instrument cluster or the multifunction dis- play is inoperative.
Contact your nearest authorized Mercedes-Benz Center.
Text messages
Display ABS
Display message Anti-lock braking system not working!
Possible cause The charging voltage has fallen below 10 volts and the ABS has switched off. The brake system is still functioning nor- mally but without the ABS available.
Defective! Visit workshop!
The ABS has detected a malfunction and has switched off. The ESP and the BAS are also deactivated. The brake system is still functioning nor- mally but without the ABS available.
Practical hints What to do if …?
Possible solution 왘 When the voltage is above this value
again, the ABS is operational again.
왘 Continue driving with added caution. Wheels will lock during hard braking, reducing steering capability.
왘 Have the system checked at an autho- rized Mercedes-Benz Center as soon as possible.
Failure to follow these instructions in- creases the risk of an accident. 왘 Continue driving with added caution. Wheels will lock during hard braking, reducing steering capability.
왘 Have the system checked at an autho- rized Mercedes-Benz Center as soon as possible.
Failure to follow these instructions in- creases the risk of an accident.
315
Practical hints What to do if …?
Display ABS
Display message Display defective! Visit workshop!
Possible cause The ABS or the ABS display is malfunc- tioning.
BAS
Defective! Visit workshop
The BAS has detected a malfunction and switched off.
Possible solution 왘 Continue driving with added caution. Wheels will lock during hard braking, reducing steering capability.
왘 Have the system checked at an autho- rized Mercedes-Benz Center as soon as possible.
Failure to follow these instructions in- creases the risk of an accident. 왘 Continue driving with added caution. 왘 Have the system checked at an autho- rized Mercedes-Benz Center as soon as possible.
Failure to follow these instructions in- creases the risk of an accident.
Display defective Visit workshop
BAS or the BAS display is malfunctioning. 왘 Continue driving with added caution. 왘 Have the system checked at an autho- rized Mercedes-Benz Center as soon as possible.
Failure to follow these instructions in- creases the risk of an accident.
316
Display BAS
Display message not available See operator’s manual
Possible cause The charging voltage has fallen below 10 volts and the BAS has switched off. The brake system is still functioning nor- mally but without the BAS available.
Cruise Con- trol
Distronic
Visit workshop!
Cruise control or Distronic* is malfunc- tioning.
External interference Reactivate! Currently unavailable! see oper. manual
Distronic* is switched off and is tempo- rarily unavailable. Distronic* is switched off because the Distronic* cover in the radiator grille is dirty.
Visit workshop!
Distronic* is malfunctioning or the display is malfunctioning.
Practical hints What to do if …?
Possible solution 왘 When the voltage is above this value
again, the BAS is operational again.
왘 Have the system checked at an autho- rized Mercedes-Benz Center as soon as possible.
Failure to follow these instructions in- creases the risk of an accident. 왘 Have cruise control or Distronic*
checked by an authorized Mercedes-Benz Center.
왘 Try activating Distronic* again later.
왘 Clean the Distronic* cover in the radi-
ator grille (컄 page 301).
왘 Restart the vehicle. 왘 Visit an authorized Mercedes-Benz
Center as soon as possible.
317
Practical hints What to do if …?
Display ESP
Display message Defective! Visit workshop!
Possible cause The ESP was deactivated because of a malfunction or interrupted power supply. The ABS might not be operational.
Display defective Visit workshop!
The ESP or the ESP display is malfunction- ing.
not available! See operator’s manual
The charging voltage has fallen below 10 volts and the ESP has switched off.
Possible solution 왘 Continue driving with added caution. 왘 Visit an authorized Mercedes-Benz
Center as soon as possible.
Failure to follow these instructions in- creases the risk of an accident. 왘 Continue driving with added caution. 왘 Visit an authorized Mercedes-Benz
Center as soon as possible.
Failure to follow these instructions in- creases the risk of an accident. When the voltage is above this value again, the ESP is operational again. 왘 If necessary, have the generator (al-
ternator) and battery checked.
The self-diagnosis has not been complet- ed.
The display will clear after driving a short distance at more than 12 mph (20 km/h).
318
Display
Display message Selector lever in park position
Please move selector lever to P or N
Practical hints What to do if …?
Possible solution 왘 Place the gear selector lever in
position P.
왘 Place the gear selector lever in
position P or N.
Possible cause You have turned off the engine with the KEYLESS-GO* start/stop button in gear selector lever position N and opened the driver’s door. or You have attempted to switch off the en- gine with the KEYLESS-GO* start/stop button while the gear selector lever was in position R or D. You have attempted to start the engine with the KEYLESS-GO* start/stop button while the gear selector lever was in position R or D.
319
Practical hints What to do if …?
Symbol messages
Display symbol Display message
Undervoltage Charge battery Undervoltage Switch off consumers VISIT WORKSHOP!
Possible cause The battery has insufficient voltage.
Possible solution 왘 Start the engine (컄 page 43).
The battery has insufficient voltage.
왘 Turn off unnecessary electrical con-
sumers.
The battery was charged with a battery charger or jump started.
왘 Have the battery checked at a service
station.
The battery is no longer charging. Possible causes: 앫 alternator malfunctioning 앫 broken poly-V-belt Do not forget that the brake system re- quires electrical energy and may be oper- ating with restricted capability. Considerably greater brake pedal force is required and the stopping distance is in- creased.
왘 Stop immediately and check the
poly-V-belt. If it is broken: 왘 Do not continue to drive. Otherwise the engine will overheat due to an in- operative water pump which may re- sult in damage to the engine. Notify an authorized Mercedes-Benz Center.
If it is intact: 왘 Drive immediately to the nearest au- thorized Mercedes-Benz Center. Ad- just driving to be consistent with reduced braking responsiveness.
320
Practical hints What to do if …?
Display message Brake wear Visit workshop Parking brake release brake!
Possible cause The brake pads have reached their wear limit. You are driving with the parking brake set. 왘 Release the parking brake
Possible solution 왘 Have the brake pads replaced as soon
as possible.
(컄 page 46).
Brake fluid Visit workshop
There is insufficient brake fluid in the res- ervoir.
Display symbol
; (USA only) ! (Canada only) ; (USA only)
(Canada only)
Warning!
Driving with this message displayed can re- sult in an accident. Have your brake system checked immediately. Do not add brake flu- id before checking the brake system. Over- filling the brake fluid reservoir can result in spilling brake fluid on hot engine parts and the brake fluid catching fire. You can be se- riously burned.
If you find that the brake fluid in the brake fluid reservoir has fallen to the minimum mark or below, have the brake system checked for brake pad thickness and leaks.
왘 Risk of accident! Stop the vehicle and notify an authorized Mercedes-Benz Center. Do not add brake fluid! This will not solve the problem.
Brake pad thickness must be visually checked by a qualified technician at the intervals specified in the Service Book- let.
321
Practical hints What to do if …?
Display symbol Display message Visit workshop!
Coolant Check level
Warning!
Do not spill antifreeze on hot engine parts. Antifreeze contains ethylene glycol which may burn if it comes into contact with hot engine parts. You can be seriously burned.
322
Possible cause There may be a malfunction in the 앫 fuel injection system 앫 ignition system 앫 exhaust system 앫 fuel system The coolant level is too low.
Possible solution 왘 Have the measuring system checked by an authorized Mercedes-Benz Cen- ter.
왘 Add coolant (컄 page 286). 왘 If you have to add coolant frequently, have the cooling system checked by an authorized Mercedes-Benz Center.
Do not ignore the low engine coolant level warning. Extended driving with the message and symbol displayed may cause serious engine damage not covered by the Mercedes-Benz Limited Warranty. Do not drive without sufficient amount of coolant in the cooling system. The engine will overheat, causing major en- gine damage.
Display symbol Display message Ï
Coolant Stop, engine off!
Possible cause The coolant is too hot.
Warning!
Driving when your engine is badly overheat- ed can cause some fluids which may have leaked into the engine compartment to catch fire. You could be seriously burned.
Steam from an overheated engine can cause serious burns and can occur just by opening the hood. Stay away from the engine if you see or hear steam coming from it.
Turn off the engine, get out of the vehicle and do not stand near the vehicle until the engine has cooled down.
During severe operating conditions and stop-and-go city traffic, the coolant tem- perature may rise close to 248°F (120°C).
Practical hints What to do if …?
Possible solution 왘 Stop the vehicle and turn off the en-
gine.
왘 Only start the engine again after the message disappears. You could other- wise damage the engine.
The engine should not be operated with the coolant temperature above 248°F (120°C). Doing so may cause serious engine damage which is not covered by the Mercedes-Benz Limited Warranty.
323
Practical hints What to do if …?
Display symbol Display message Ï
Coolant Stop, engine off!
Possible cause The poly-V-belt could be broken.
Coolant Visit workshop
The cooling fan for the coolant is malfunc- tioning.
324
Possible solution 왘 Stop immediately and check the
poly-V-belt. If it is broken: 왘 Do not continue to drive. Otherwise the engine will overheat due to an in- operative water pump which may re- sult in damage to the engine. Notify an authorized Mercedes-Benz Center.
If it is intact: 왘 Do not continue to drive the vehicle
with this message displayed. Doing so could result in serious engine damage that is not covered by the Mercedes-Benz Limited Warranty.
왘 Observe the coolant temperature dis-
play.
왘 Have the fan replaced as soon as pos-
sible.
Display symbol Display message Display defective Visit workshop!
Possible cause The instrument cluster display is malfunc- tioning.
±
Display defective Visit workshop!
Doors open!
The displays for several systems have malfunctioned. Some systems them- selves may also have malfunctioned. Certain electronic systems are unable to relay information to the control system. The following systems may have failed: 앫 Coolant temperature display 앫 Tachometer 앫 Cruise control display You are attempting to drive with one or more doors open.
Practical hints What to do if …?
Possible solution 왘 Continue driving with added caution. 왘 Visit an authorized Mercedes-Benz
Center as soon as possible.
왘 Have the electronic systems checked by an authorized Mercedes-Benz Cen- ter.
왘 Have the electronic systems checked by an authorized Mercedes-Benz Cen- ter.
왘 Close the doors.
325
Practical hints What to do if …?
Display symbol Display message
USA only: Add 1 qt. engine oil when next refueling
Possible cause The engine oil level is too low.
Possible solution 왘 Add engine oil (컄 page 285) and check
the engine oil level (컄 page 283).
Canada only: Add 1 liter engine oil when next refueling Engine oil level Reduce oil level!
Engine oil level Stop, engine off!
You have added too much engine oil. There is a risk of damaging the engine or the catalytic converter. There is no oil in the engine. There is a danger of engine damage.
왘 Have oil siphoned or drained off. Ob- serve all legal requirements with re- spect to its disposal.
왘 Carefully bring the vehicle to a halt as
soon as possible.
왘 Turn off the engine. 왘 Add engine oil (컄 page 285) and check
the engine oil level (컄 page 283).
326
Display symbol Display message
Engine oil Visit workshop! Engine oil level Visit workshop!
Possible cause It may be that there is water in the engine oil. The engine oil has dropped to a critical level.
Practical hints What to do if …?
Possible solution 왘 Have the engine oil checked.
왘 Check the engine oil level
(컄 page 283) and add oil as required (컄 page 285).
왘 If you must add engine oil frequently, have the engine checked for possible leaks.
The measuring system is malfunctioning. 왘 Have the measuring system checked
When the message Add 1 qt. engine oil when next refueling (Canada: 1 liter) appears while the engine is running and at operating temperature, the engine oil level has dropped to approximately the minimum level.
When this occurs, the warning will first come on intermittently and then stay on if the oil level drops further. Visually check for oil leaks. If no obvious oil leaks are noted, drive to the nearest ser- vice station where the engine oil should be topped to the required level with an ap- proved oil.
by an authorized Mercedes-Benz Center.
The engine oil level warnings should not be ignored. Extended driving with the symbol displayed could result in serious engine damage that is not covered by the Mercedes-Benz Limited Warranty.
327
Practical hints What to do if …?
Display symbol Display message
Reserve fuel
Hood open! Remove key
Replace key!
Key Check battery! Key not recognized!
328
Possible cause The fuel level has dropped below the re- serve mark. You are driving with the hood open. You have forgotten to remove the SmartKey. No additional code available for SmartKey or SmartKey with KEYLESS-GO* The SmartKey with KEYLESS-GO* batter- ies are discharged. The SmartKey with KEYLESS-GO* is not recognized while the engine is running be- cause 앫 the SmartKey is not in the vehicle 앫 there is strong radio-frequency inter-
ference
The SmartKey with KEYLESS-GO* is mo- mentarily not recognized.
Possible solution 왘 Refuel at the next gas station
(컄 page 278).
왘 Close the hood (컄 page 282). 왘 Remove the SmartKey from the start-
er switch.
왘 Visit an authorized Mercedes-Benz
Center as soon as possible.
왘 Change the batteries (컄 page 345).
왘 Stop the vehicle as soon as it is safe to
do so.
왘 Search for the SmartKey. Otherwise the vehicle cannot be centrally locked nor can the engine be started again after the engine has been stopped. 왘 Change the position of the SmartKey
in the vehicle.
왘 Operate the vehicle with the SmartKey
in the starter switch if necessary.
Practical hints What to do if …?
Display symbol Display message
Key recognized in vehicle
Keyless Go Check system Key do not forget key
3rd stop lamp
Back- up lamp, left Back- up lamp, right Display defective! Visit workshop! Front foglamp, left Front foglamp, right
Center as soon as possible.
왘 Visit an authorized Mercedes-Benz
Possible solution 왘 Take the SmartKey out of the vehicle.
왘 Insert SmartKey in the starter switch. 왘 Take the SmartKey with
Possible cause A SmartKey with KEYLESS-GO* left in the vehicle was recognized while locking the vehicle from the outside. The KEYLESS-GO* system is malfunction- ing. This display appears (for a maximum of 60 seconds) if the driver’s door is opened with the engine shut off and no SmartKey in the starter switch. Message is only a reminder. The high mounted brake lamp is malfunc- tioning. 왘 Replace the bulb as soon as possible. The left backup lamp is malfunctioning. The right backup lamp is malfunctioning. 왘 Replace the bulb as soon as possible. The display for the lamps or the system is malfunctioning. The left front fog lamp is malfunctioning. 왘 Replace the bulb as soon as possible. The right front fog lamp is malfunctioning. 왘 Replace the bulb as soon as possible.
KEYLESS-GO* with you when leaving the vehicle.
왘 Visit an authorized Mercedes-Benz
왘 Visit an authorized Mercedes-Benz
Center as soon as possible.
Center as soon as possible.
329
Practical hints What to do if …?
Display symbol Display message High beam, left
High beam, right
Lamp sensor Visit workshop!
License plate lamp. left License plate lamp, right Low beam, left
Low beam, right
330
Possible cause The left high beam lamp is malfunction- ing. The right high beam lamp is malfunction- ing. The lamp sensor is malfunctioning. The headlamps switch on automatically.
Possible solution 왘 Replace the bulb as soon as possible.
왘 Replace the bulb as soon as possible.
왘 In the control system, set lamp opera-
tion to manual (컄 page 145).
왘 Switch on headlamps using the exteri-
or lamp switch.
왘 Visit an authorized Mercedes-Benz
Center as soon as possible.
The left license plate lamp is malfunction- ing. The right license plate lamp is malfunc- tioning. The left low beam lamp is malfunctioning. 왘 Visit an authorized Mercedes-Benz
왘 Replace the bulb as soon as possible.
왘 Replace the bulb as soon as possible.
The right low beam lamp is malfunction- ing.
왘 Visit an authorized Mercedes-Benz
Center as soon as possible.
Center as soon as possible.
Practical hints What to do if …?
Display symbol Display message
Parking lamp, front left Substitute lamp on Parking lamp, front right Substitute lamp on Side marker lamp, front left Side marker lamp front right Stop lamp, left
Possible cause The left parking lamps are malfunctioning. A backup bulb is being used.
Possible solution 왘 Visit an authorized Mercedes-Benz
Center as soon as possible.
The right parking lamps are malfunction- ing. A backup bulb is being used.
왘 Visit an authorized Mercedes-Benz
Center as soon as possible.
The front left side marker lamp is malfunc- tioning. The front right side marker lamp is mal- functioning. The left brake lamp is malfunctioning.
왘 Replace the bulb as soon as possible.
왘 Replace the bulb as soon as possible.
왘 Visit an authorized Mercedes-Benz
Center as soon as possible.
Stop lamp, right
The right brake lamp is malfunctioning.
왘 Visit an authorized Mercedes-Benz
Center as soon as possible.
Stop lamp Visit workshop! Tail lamp, left Substitute lamp on! Tail lamp, right Substitute lamp on!
Stop lamp illumination is delayed or lamp is permanently on. The left tail lamp is malfunctioning. A backup bulb is being used. The right tail lamp is malfunctioning. A backup bulb is being used.
왘 Visit an authorized Mercedes-Benz
Center as soon as possible.
왘 Visit an authorized Mercedes-Benz
Center as soon as possible.
왘 Visit an authorized Mercedes-Benz
Center as soon as possible.
331
Practical hints What to do if …?
Display symbol Display message Turn off lamps!
Turn signal front left Substitute lamp on! Turn signal front right Substitute lamp on! Turn signal in left mirror
Turn signal in right mirror
Turn signal rear left Substitute lamp on! Turn signal rear right Substitute lamp on!
332
Possible cause Lamps have been turned on although the SmartKey in the starter switch is in posi- tion 0. The left front turn signal lamp is malfunc- tioning. A backup bulb is being used. The right front turn signal lamp is malfunc- tioning. A backup bulb is being used. The left turn signal in the side mirror is malfunctioning. This message will only ap- pear if all light emitting diodes have stopped working. The right turn signal in the side mirror is malfunctioning. This message will only ap- pear if all light emitting diodes have stopped working. The left rear turn signal lamp is malfunc- tioning. A backup bulb is being used. The right rear turn signal lamp is malfunc- tioning. A backup bulb is being used.
Possible solution 왘 Turn off the headlamps.
왘 Replace the bulb as soon as possible.
왘 Replace the bulb as soon as possible.
왘 Have the LEDs replaced as soon as
possible.
왘 Have the LEDs replaced as soon as
possible.
왘 Replace the bulb as soon as possible.
왘 Replace the bulb as soon as possible.
Practical hints What to do if …?
Display symbol
Display message Driver’s seat belt Fasten seat belt! Front passenger seat belt Please fasten belt! Seat belt system Visit workshop
Possible cause The display reminds you and your passen- gers to fasten seat belts. The display reminds you and your passen- gers to fasten seat belts.
Possible solution 왘 Fasten the seat belts.
왘 Fasten the seat belts.
The seat belt system is malfunctioning.
왘 Visit an authorized Mercedes-Benz
Center as soon as possible.
333
Practical hints What to do if …?
Display symbol
Display message defective Visit workshop! Tele Aid battery Visit workshop!
Restraint system defective Visit workshop!
Possible cause One or more main functions of the Tele Aid system are malfunctioning. The emergency power battery for the Tele Aid system is malfunctioning. If the vehicle battery is also dead, Tele Aid will not be operational. The system is malfunctioning.
Possible solution 왘 Have the Tele Aid system checked by an authorized Mercedes-Benz Center. 왘 Have the Tele Aid system checked by an authorized Mercedes-Benz Center.
왘 Drive with added caution to the near- est authorized Mercedes-Benz Center.
Warning!
In the event a malfunction of the SRS is indi- cated as outlined above, the SRS may not be operational. For your safety, we strongly recommend that you visit an authorized Mercedes-Benz Center immediately to have the system checked; otherwise the
SRS may not be activated when needed in an accident, which could result in serious or fatal injury, or it might deploy unexpectedly and unnecessarily which could also result in injury.
334
Display symbol Display message
Steering oil Visit workshop!
Possible cause The steering gear oil level is too low. There is a danger of steering gear dam- age.
Possible solution 왘 Have the system checked by an autho-
rized Mercedes-Benz Center.
Practical hints What to do if …?
Warning!
If the level of steering gear oil in reservoir is too low, the steering power assistance could fail. Much greater effort will then be needed to turn the steering wheel.
Do not add steering oil without checking the steering system.
Do not drive the vehicle. Have the system checked at your authorized Mercedes-Benz Center as soon as possible.
335
Possible cause You have opened the driver’s door with the SmartKey removed from the starter switch and the sliding/pop-up roof open. You have opened the driver’s door with the SmartKey removed from the starter switch and the sliding/pop-up roof open. This display appears if button ì or í on the multifunction steering wheel is pressed and the vehicle is not equipped with a telephone. This message will appear whenever the trunk lid is open. The fluid level has dropped to about 1/3 of total reservoir capacity.
Possible solution 왘 Close the sliding/pop-up roof
(컄 page 214).
왘 Close the sliding/pop-up roof
(컄 page 214).
왘 Close the trunk lid.
왘 Add washer fluid (컄 page 289).
Practical hints What to do if …?
Display symbol Display message
Close sunroof!
Close sunroof!
Function Not available
Close trunk lid!
Washer fluid Check level
ì
Ê
336
왔 Where will I find...? First aid kit
The first aid kit is stored in left hand side of the trunk.
왘 Loosen Velcro fastener. 왘 Remove first aid kit.
Check expiration dates and contents for completeness at least once a year and replace missing/expired items.
Practical hints Where will I find...?
Vehicle tool kit
Removing the vehicle tool kit
The vehicle tool kit is stored in the com- partment underneath the trunk floor. The following is included: 앫 Towing eye bolt 앫 Alignment bolt 앫 Wheel wrench 앫 Vehicle jack 앫 Wheel bolts
1 Retaining screw 2 Storage well casing 왘 Lift trunk floor cover and engage trunk
컄컄
floor handle in upper edge of trunk.
337
Practical hints Where will I find...?
컄컄
To prevent damage, always disengage trunk floor handle from upper edge of trunk and lower trunk floor before clos- ing the trunk lid.
왘 Loosen retaining screw 1 in the mid-
dle of storage well casing 2.
왘 Remove storage well casing 2.
338
Arrow 3 on vehicle tool kit storage well casing 5 must point in the direc- tion of travel. Otherwise you cannot place the storage well casing 2 on top and secure the Minispare wheel with retaining screw 1 (컄 page 337).
3 Arrow 4 Minispare wheel 5 Vehicle tool kit storage well casing 6 Vehicle tool kit Wheel wrench Vehicle jack Wheel bolts for Minispare wheel
왘 Remove vehicle tool kit storage well
casing 5.
Vehicle jack
Warning!
The vehicle jack is stored in the space un- derneath the trunk floor together with the vehicle tool kit in the vehicle tool kit stor- age well casing.
Practical hints Where will I find...?
The jack is designed exclusively for jacking up the vehicle at the jack take-up brackets built into both sides of the vehicle. To help avoid personal injury, use the jack only to lift the vehicle during a wheel change. Never get beneath the vehicle while it is supported by the jack. Keep hands and feet away from the area under the lifted vehicle. Always firmly set parking brake and block wheels before raising vehicle with jack.
Do not disengage parking brake while the vehicle is raised. Be certain that the jack is always vertical (plumb line) when in use, es- pecially on hills. Always try to use the jack on a level surface. Make sure the jack arm is fully seated in the jack take-up bracket. Al- ways lower the vehicle onto sufficient ca- pacity jackstands before working under the vehicle.
왘 Remove the vehicle jack from its com-
partment.
왘 Push the crank handle up.
왘 Turn the crank handle clockwise until it
engages (operational position).
Before storing the vehicle jack in its com- partment: 앫 It should be fully collapsed 앫 The handle must be folded in (storage
position)
339
Removing the Minispare wheel 왘 Lift trunk floor cover and engage trunk
floor handle in upper edge of trunk.
왘 Loosen the retaining screw
(컄 page 337) in the middle of storage well casing.
왘 Remove storage well casing
(컄 page 337).
왘 Remove vehicle tool kit storage well
casing 4.
왘 Remove Minispare wheel 3.
Storing the Minispare wheel 왘 Place Minispare wheel 3 in wheel
well.