- 2011 Mercedes-Benz C Class Coupe Owners Manuals
- Mercedes-Benz C Class Coupe Owners Manuals
- 2005 Mercedes-Benz C Class Coupe Owners Manuals
- Mercedes-Benz C Class Coupe Owners Manuals
- 2003 Mercedes-Benz C Class Coupe Owners Manuals
- Mercedes-Benz C Class Coupe Owners Manuals
- 2004 Mercedes-Benz C Class Coupe Owners Manuals
- Mercedes-Benz C Class Coupe Owners Manuals
- 2002 Mercedes-Benz C Class Coupe Owners Manuals
- Mercedes-Benz C Class Coupe Owners Manuals
- 2013 Mercedes-Benz C Class Coupe Owners Manuals
- Mercedes-Benz C Class Coupe Owners Manuals
- Download PDF Manual
-
These settings should only be selected for a short time.
Activating 왘 Press button P or 0
(컄 page 173). The indicator lamp on the button comes on.
The air conditioning switches automatical- ly to the following functions:
Deactivating 왘 Press button P or 0
(컄 page 173). The indicator lamp on the button goes out. Defrosting is turned off.
Air recirculation mode
Switch to air recirculation mode to prevent unpleasant odors from entering the vehicle from the outside. This setting cuts off the intake of outside air and recirculates the air in the passenger compartment.
ì•« maximum blowing and heating
Warning!
power
ì•« air flows onto the windshield and
the front side windows
ì•« the air recirculation mode is
switched off
When the outside temperature is below 41°F (5°C), only switch to air recirculation mode for short periods to prevent window fogging.
Window fogging may impair visibility and endanger you and others.
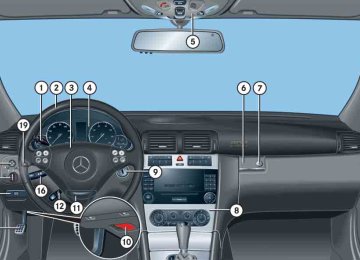
Controls in detail Climate control
Activating 왘 Press button , (컄 page 173). The indicator lamp on the button comes on.
If you keep button , pressed the side windows and panorama roof with power tilt/sliding panel* will close.
Warning!
Never operate the side windows and the panorama roof with power tilt/sliding pan- el* if there is the possibility of anyone being harmed by the closing procedure.
Vehicles without panorama roof with power tilt/sliding panel*: In the event that the procedure causes potential danger, the opening and closing of the side windows can be immediately halted by pressing or pulling the respective window switch.
컄컄
177
Controls in detail Climate control
컄컄
Vehicles with panorama roof with power tilt/sliding panel*: In the event that the procedure causes po- tential danger, the opening and closing of the side windows can be immediately halted by releasing the , button or by pressing or pulling the respective window switch. The opening and closing of the panorama roof with power tilt/sliding panel* can be imme- diately halted by releasing the , button or by moving the panorama roof with power tilt/sliding panel switch in the overhead control panel in any direction.
178
The air recirculation mode is activated automatically at high outside tempera- tures. The indicator lamp on the , button is not lit when the air recirculation mode is automatically switched on. After approximately 30 minutes, out- side air is added to the air inside the vehicle. If you have turned off the air condi- tioning (컄 page 179) or the outside temperature is below 41°F (5°C), the air recirculation mode will not switch on automatically.
Deactivating 왘 Press button , (컄 page 173).
The indicator lamp on the button goes out.
If you keep button , pressed, the side windows and panorama roof with power tilt/sliding panel* will return to their previous position.
The air recirculation mode is deactivated automatically: ì•« after five minutes if the outside
temperature is below approximately 41°F (5°C)
ì•« after five minutes if the air conditioning
is turned off
ì•« after 30 minutes if the outside
temperature is above approximately 41°F (5°C)
At outside temperatures above 79°F (26°C) the system will not automatically switch back to outside air. A quantity of outside air is added after approximately 30 minutes.
Deactivating It is possible to deactivate the air condi- tioning (cooling) function of the climate control system. The air in the vehicle will then no longer be cooled or dehumidified.
Air conditioning
The air conditioning is operational while the engine is running and cools the interior air to the temperature set by the operator.
Condensation may drip out from under- neath the vehicle. This is normal and not an indication of a malfunction.
Warning!
If you turn off the cooling function, the vehi- cle will not be cooled when weather condi- tions are warm. The windows can fog up more quickly. As a result, you can no longer observe traffic situations around you and could cause an accident.
Climate control panel design A 왘 Press button ± (컄 page 173). The indicator lamp on the button comes on. The cooling function switches off after a short delay.
Climate control panel design B 왘 Press button 2 (컄 page 173).
The indicator lamp on the button goes out. The cooling function switches off after a short delay.
Controls in detail Climate control
Activating Moist air can fog up the windows. You can dehumidify the air with the air condition- ing.
Climate control panel design A 왘 Press button ± (컄 page 173).
The indicator lamp on the button goes out.
Climate control panel design B 왘 Press button 2 (컄 page 173). The indicator lamp on the button comes on.
The air conditioning uses the refrigerant R134a. This refrigerant is free of CFCs which are harmful to the ozone layer.
179
Controls in detail Climate control
If the air conditioning cannot be turned on again, this indicates that the air conditioning is losing refrigerant. The compressor has turned itself off. Have the air conditioning checked at the nearest authorized Mercedes-Benz Center.
Rear passenger compartment adjustable air vents
The air conditioning for the rear passenger compartment is controlled via the climate control panel (컄 page 173).
The temperature at the center air vents for the rear passenger compartment 1 and 3 is the same as at the dashboard center air vents.
The air vents for the rear passenger compartment are located in the rear center console.
1 Left center air vent 2 Thumbwheel for air volume control for
center air vents
3 Right center air vent
180
Adjusting air distribution 왘 Push the slide for the left center
Adjusting air volume 왘 Turn thumbwheel 2 up or down.
The air volume is increased or decreased.
vent 1 or right center vent 3 to the left, right, up or down. The air flow is directed in the corre- sponding direction.
For draft-free ventilation, push slides 1 and 3 upward.
Controls in detail Climate control
181
Controls in detail Automatic climate control*
182
Item
1 Left side defroster vent, fixed 2 Left side air vent, adjustable 3 Thumbwheel for air volume control
for left side air vent
4 Thumbwheel for air volume control
for left center air vent
5 Left center air vent, adjustable 6 Right center air vent, adjustable 7 Thumbwheel for air volume control
for right center air vent
8 Thumbwheel for air volume control
for right side air vent
9 Right side air vent, adjustable a Right side defroster vent, fixed b Automatic climate control panel
For draft-free ventilation, move the sliders for the air vents 2, 5, 6, and 9 to the middle position.
Depending on production date, your vehicle is equipped with either automatic climate control panel design A or B.
Automatic climate control panel design A
Controls in detail Automatic climate control*
Item
1 Left side air distribution control 2 Defrosting 3 Temperature control, left, raising 4 Display 5 Air volume control, raising 6 Temperature control, right, raising 7 Rear window defroster 8 Right side air distribution control 9 Charcoal filter a AC cooling on/off (ACOFF or A/C)
Residual heat/ventilation
b Temperature control, right, lowering c Air volume control, lowering d Temperature control, left, lowering e Air recirculation f Automatic climate control on/off
(complete system)
Automatic climate control panel design B
g Air distribution and air volume
(automatic mode)
183
Controls in detail Automatic climate control*
Feature availability is based on prelimi- nary information at time of printing. The automatic climate control may not be available as optional equipment on all models.
The automatic climate control is operation- al whenever the engine is running. You can operate the climate control system in ei- ther the automatic or manual mode. The system cools or heats the interior depend- ing on the selected interior temperature and the current outside temperature.
184
Warning
Warning!
When operating the automatic climate control, the air that enters the passenger compartment through the air vents in the footwell can be very hot or very cold (depending on the set temperature). This may cause burns or frostbite on unprotected skin in the immediate area of the air vents. Always keep sufficient distance between unprotected parts of the body and the foot- well air vents. If necessary change the air flow using the air distribution controls to direct the air away from the footwell air vents (컄 page 186).
Nearly all dust particles, pollutants and odors are filtered out before outside air enters the passenger compartment through the air distribution system. The air conditioning will not engage (no cooling) if the mode ACOFF is activated or mode A/C is deactivated (컄 page 192).
Follow the recommended settings for heating and cooling given on the following pages. Otherwise the windows could fog up, impairing visibility and endangering you and others.
Severe conditions (e.g. strong air pollution) may require replacement of the filter before its scheduled interval. A clogged filter will reduce the air volume to the interior. If the vehicle interior is hot, ventilate the interior before driving off, see “Opening (Summer opening feature)†(컄 page 245). Keep the air intake grille in front of the windshield free of snow and debris. Do not obstruct air flow by placing objects on the air flow-through exhaust slots below the rear window.
Deactivating the automatic climate control system
Reactivating 왘 Press button ´ (컄 page 183).
The indicator lamp on the button ´ goes out. The automatic climate control system is reactivated.
Deactivating It is possible to deactivate the automatic climate control system. 왘 Press button ´ (컄 page 183).
The indicator lamp on the button ´ comes on. The automatic climate control system is deactivated.
When the air conditioning is switched off, the outside air supply and circula- tion are also switched off. Only choose this setting for a short time. Otherwise the windows could fog up.
Controls in detail Automatic climate control*
Setting the temperature
Use temperature controls 3 and d for the left side or 6 and b for the right side (컄 page 183) to separately adjust the air temperature on each side of the passenger compartment. You should raise or lower the temperature setting in small incre- ments, preferably starting at 72°F (22°C).
When operating the automatic climate control system in automatic mode, you will only rarely need to adjust the temperature, air volume and air distribution.
185
Controls in detail Automatic climate control*
Display 1 Temperature, left 2 Blower speed 3 Temperature, right
Increasing 왘 Push temperature control 3
and/or 6 (컄 page 183). The automatic climate control system will correspondingly adjust the interior air temperature.
Decreasing 왘 Push temperature control b
and/or d (컄 page 183). The automatic climate control system will correspondingly adjust the interior air temperature.
186
Adjusting air distribution
Use the button U for automatic mode or air distribution controls 1 and 8 (컄 page 183) to separately adjust the air distribution on each side of the passenger compartment. The following symbols are found on the controls:
Symbol Function Z Directs air to the windshield and the side defroster vents
b Directs air into the entire
vehicle interior
Y Directs air to the footwells a Directs air through the center,
side and rear passenger compartment air vents
Adjusting manually 왘 Turn air distribution control 1 or 8 (컄 page 183) to the desired symbol. The indicator lamp on the button U goes out. The automatic air distribution is switched off. The air distribution is controlled according to the selected control setting.
Adjusting automatically 왘 Press button U (컄 page 183). The indicator lamp on the button comes on. The air volume is controlled automati- cally for the entire vehicle, and the air distribution is controlled automatically for each separate half of the vehicle.
Windshield fogged on the outside 왘 Switch the windshield wipers on
(컄 page 53).
왘 Switch to manual mode. 왘 Turn air distribution control 1 or 8
to a or Y (컄 page 183).
Adjusting air volume
Use button U for automatic mode or air volume controls ˜ or Q (컄 page 183) to adjust air volume manually.
Adjusting manually Seven blower speeds are available. 왘 Press air volume control ˜ or Q
(컄 page 183) until the requested blower speed is attained. The indicator lamp on the button U goes out. The automatic air distribution remains switched on.
Controls in detail Automatic climate control*
Adjusting automatically 왘 Press button U (컄 page 183). The indicator lamp on the button comes on. The air volume is controlled automati- cally for the entire vehicle, and the air distribution is controlled automatically for each separate half of the vehicle.
187
Deactivating 왘 Press button P or 0
(컄 page 183). The indicator lamp on the button goes out. Defrosting is turned off. The previous settings are once again in effect.
Maximum cooling MAXCOOL
If the left and right air distribution controls as well as the airflow volume control are set to U (컄 page 183) and there is a high need for cooling, the display “MAXCOOL†appears. This provides the fastest possible cooling of the vehicle interior (when side windows and panorama roof with power tilt/sliding panel* are closed).
Controls in detail Automatic climate control*
Defrosting
These settings should only be selected for a short time.
Activating 왘 Press button P or 0
(컄 page 183). The indicator lamp on the button comes on.
The air conditioning switches automatically to the following functions:
ì•« maximum blowing and heating
power
ì•« air flows onto the windshield and
the front side windows
ì•« the air recirculation mode is
switched off
188
Air recirculation mode
Switch to air recirculation mode to prevent unpleasant odors from entering the vehicle from the outside. This setting cuts off the intake of outside air and recirculates the air in the passenger compartment.
Warning!
When the outside temperature is below 41°F (5°C), only switch to air recirculation mode for short periods to prevent window fogging.
Window fogging may impair visibility and endanger you and others.
Activating 왘 Press button , (컄 page 183). The indicator lamp on the button comes on.
If you keep button , pressed, the side windows and panorama roof with power tilt/sliding panel* will close.
Warning!
Never operate the side windows and the panorama roof with power tilt/sliding pan- el* if there is the possibility of anyone being harmed by the closing procedure.
Vehicles without panorama roof with power tilt/sliding panel*: In the event that the procedure causes potential danger, the opening and closing of the side windows can be immediately halted by pressing or pulling the respective window switch.
Vehicles with panorama roof with power tilt/sliding panel*: In the event that the procedure causes po- tential danger, the opening and closing of the side windows can be immediately halted by releasing the , button or
Controls in detail Automatic climate control*
by pressing or pulling the respective window switch. The opening and closing of the pan- orama roof with power tilt/sliding panel* can be immediately halted by releasing the , button or by moving the panorama roof with power tilt/sliding panel switch in the overhead control panel in any direction.
189
Deactivating 왘 Press button , (컄 page 183).
The indicator lamp on the button goes out.
If you keep button , pressed, the side windows and panorama roof with power tilt/sliding panel* will return to their previous position.
The air recirculation mode is deactivated automatically: ì•« after five minutes if the outside
temperature is below approximately 41°F (5°C)
ì•« after five minutes if the air conditioning
is turned off
ì•« after 30 minutes if the outside
temperature is above approximately 41°F (5°C)
At outside temperatures above 79°F (26°C) the system will not automatically switch back to outside air. A quantity of outside air is added after approximately 30 minutes.
Controls in detail Automatic climate control*
The air recirculation mode is activated automatically: ì•« at high outside temperatures ì•« if the concentration of carbon mon-
oxide and nitrogen oxide in the outside air increases, for example in a tunnel (charcoal filter must be activated for the air recirculation mode to be activated automatically) The indicator lamp on the button , is not lit when the air recirculation mode is automatically switched on. After approximately 30 minutes, out- side air is added to the air inside the vehicle. If you have turned off the air conditioning (컄 page 192) or the out- side temperature is below 41°F (5°C), the air recirculation mode will not switch on automatically.
190
Charcoal filter
An activated charcoal filter markedly reduces bad odors and removes pollutants from air entering the passenger compart- ment. The charcoal filter can be activated or deactivated. The system switches automatically to the air recirculation mode, if the ì•« carbon monoxide (CO)
or
ì•« nitrogen oxide (NOX) concentration of the outside air increases beyond a predetermined level.
The automatic air recirculation mode does not function if the ACOFF mode is activated (indicator lamp on button ° illuminated) or A/C mode is deactivated (indicator lamp on button 2 not lit), or if the outside temperature has fallen below 41°F (5°C).
Activating 왘 Press button e (컄 page 183). The indicator lamp on the button comes on.
If you keep button e pressed, the side windows and panorama roof with power tilt/sliding panel* will close.
The activated charcoal filter should be switched off when windows fog up on the inside, or if the passenger compart- ment needs to be quickly heated or cooled down.
Warning!
Never operate the side windows and the panorama roof with power tilt/sliding pan- el* if there is the possibility of anyone being harmed by the closing procedure.
Controls in detail Automatic climate control*
Vehicles without panorama roof with power tilt/sliding panel*: In the event that the procedure causes potential danger, the opening and closing of the side windows can be immediately halted by pressing or pulling the respective window switch.
Vehicles with panorama roof with power tilt/sliding panel*: In the event that the procedure causes po- tential danger, the opening and closing of the side windows can be immediately halted by releasing the e button or by pressing or pulling the respective window switch. The opening and closing of the panorama roof with power tilt/sliding panel* can be imme- diately halted by releasing the e button or by moving the panorama roof with power tilt/sliding panel switch in the overhead control panel in any direction.
191
Controls in detail Automatic climate control*
Deactivating 왘 Press button e (컄 page 183).
The indicator lamp on the button goes out.
If you keep button e pressed, the side windows and panorama roof with power tilt/sliding panel* will return to their previous position.
Air conditioning
The air conditioning is operational while the engine is running and cools the interior air to the temperature set by the operator.
Condensation may drip out from under- neath the vehicle. This is normal and not an indication of a malfunction.
Warning!
If you turn off the cooling function, the vehicle will not be cooled when weather conditions are warm. The windows can fog up more quickly. Window fogging may impair visibility and endanger you and others.
Deactivating It is possible to deactivate the air condi- tioning (cooling) function of the automatic climate control system. The air in the vehicle will then no longer be cooled or dehumidified.
Automatic climate control panel design A 왘 Press button ° (컄 page 183). The indicator lamp on the button comes on. The cooling function switches off after a short delay.
Automatic climate control panel design B 왘 Press button 2 (컄 page 183).
The indicator lamp on the button goes out. The cooling function switches off after a short delay.
192
Activating Moist air can fog up the windows. You can dehumidify the air with the air condi- tioning.
Automatic climate control panel design A 왘 Press button ° (컄 page 183) again. The indicator lamp on the button goes out. The cooling function is switched on.
Automatic climate control panel design B 왘 Press button 2 (컄 page 183) again.
The indicator lamp on the button comes on. The cooling function is switched on. The air conditioning uses the refrigerant R134a. This refrigerant is free of CFCs which are harmful to the ozone layer.
If the air conditioning cannot be turned on again, this indicates that the air conditioning is losing refrigerant. The compressor has turned itself off. Have the air conditioning checked at the nearest authorized Mercedes-Benz Center.
Residual heat and ventilation (available on automatic climate control panel design A only)
With the engine switched off, it is possible to continue to heat or ventilate the interior for up to 30 minutes. This feature makes use of the residual heat produced by the engine.
Activating 왘 Switch off the ignition (컄 page 58). 왘 Press button ° (컄 page 183). The indicator lamp on the button comes on.
Controls in detail Automatic climate control*
Deactivating 왘 Press button ° (컄 page 183).
The indicator lamp on the button goes out.
The residual heat is automatically turned off: ì•« when the ignition is switched on ì•« after about 30 minutes ì•« if the battery voltage drops
How long the system will provide heating depends on ì•« the coolant temperature ì•« the temperature set by the operator The blower will run at speed setting 1 regardless of the air distribution control setting.
193
Adjusting air distribution 왘 Push the slide for the left center
vent 1 or right center vent 3 to the left, right, up, or down. The air flow is directed in the corresponding direction.
For draft-free ventilation, push slides 1 and 3 upward.
Adjusting air volume 왘 Turn thumbwheel 2 up or down.
The air volume is increased or decreased.
1 Left center air vent 2 Thumbwheel for air volume control for
center air vents
3 Right center air vent
Controls in detail Automatic climate control*
Rear passenger compartment adjustable air vents
The air conditioning for the rear passenger compartment is controlled via the auto- matic climate control panel (컄 page 183).
The temperature at the center air vents for the rear passenger compartment 1 and 3 is the same as at the dashboard center air vents.
The air vents for the rear passenger compartment are located in the rear center console.
194
ì™” Audio system Audio and telephone, operation
These instructions are intended to help you become familiar with your Mercedes-Benz audio system. They con- tain useful tips and a detailed description of the user functions.
Warning!
In order to avoid distraction which could lead to an accident, the driver should enter system settings with the vehicle at a stand- still and operate the system only when road and traffic conditions permit. Always pay full attention to traffic conditions first before operating system controls while driving.
Bear in mind that at a speed of just 30 mph (approximately 50 km/h), your car is cover- ing a distance of 44 feet (approximately 14 m) every second.
Operating safety
Warning!
Any alterations made to electronic compo- nents can cause malfunctions.
The radio, amplifier, CD changer*, satellite radio* and telephone* are interconnected. When one of the components is not opera- tional or has not been removed/replaced properly, the function of other components may be impaired.
This condition might seriously impair the operating safety of your vehicle.
We recommend that you have any service work on electronic components carried out by an authorized Mercedes-Benz Center.
Controls in detail Audio system
195
Controls in detail Audio system
Operating and display elements
196
Controls in detail Audio system
Item
1 CD changer mode selector
AUX mode selector
2 Single CD mode selector 3 Radio mode selector 4 Mute function (radio)
Pause (CD)
5 Volume distribution 6 Sound settings 7 Display 8 Alphanumeric keypad
Page 213
203
215207
219
201
199Item
Page
Item
9 Speed dialing memory
(telephone) in descending order
a Accepting a call
(telephone)
b Telephone mode selector c Speed dialing memory
(telephone) in ascending order
d Terminating a call
(telephone)
e CD slot f CD ejection
225
220
222226
215
g Soft keys h Volume j Switching on/off k Manual tuning / seek
tuning (radio) Track search, reverse (CD)
l Manual tuning / seek
tuning (radio) Track search, fast forward (CD)
Page 198
199
198
205218
205218
197
Controls in detail Audio system
Button and soft key operation
Operation
In these instructions, the alphanumeric keypad (right side of radio panel) and the function buttons (left side of radio panel) are referred to as “buttonsâ€. The four keys below the display panel are referred to as “soft keysâ€.
Do not press directly in the display face. Otherwise, the display will be damaged.
Switching the unit on/off
Switching on 왘 Turn the SmartKey in the starter switch
to position 1 or 2.
왘 If the audio system was on as you re- moved the SmartKey from the starter switch, the audio system will automati- cally come back on as you turn the SmartKey to position 1 or 2.
or 왘 Press M button.
If the radio is switched on without the key in the starter switch, it will auto- matically switch off again after approximately 30 minutes. If your vehicle is equipped with a tele- phone, the display may prompt you to enter your PIN (GSM network) or code (TDMA or CDMA network).
198
Switching off 왘 Remove SmartKey from starter switch. or 왘 Press M button.
Should excessively high temperatures occur while the audio system is being operated, the display will dim. If tem- peratures continue to rise, HIGH TEMP will appear in the display, after which the audio system will be switched off for a cooling-down period.
Adjusting the volume 왘 Turn rotary control of N button.
The volume will increase or decrease depending on the direction turned.
If your vehicle equipment includes a Mercedes-Benz specified mobile tele- phone*, you can adjust its volume sep- arately from the volume of the audio system while the telephone is being used.
Adjusting sound functions The bass and treble functions are called up by pressing the O button. Settings for bass and treble are stored sep- arately for the AM and FM wavebands, weather band, CD mode and telephone mode.
Bass 왘 Press O button repeatedly until
BASS appears in the display.
Controls in detail Audio system
왘 Press + or – soft key to increase or
decrease tone level accordingly.
or 왘 Press RES soft key briefly to reset bass
tones to their center level. The radio switches back to the stan- dard radio menu eight seconds after the last soft key is pressed.
199
Sound system* You can either program the sound settings manually (컄 page 199) or choose settings via preset sound characteristics. You can select from among the following settings: 앫 STANDARD: conventional stereo sound. 앫 SURROUND: the sound is set for better three-dimensional acoustic character- istics.
ì•« SPEECH: the sound is optimized for the
spoken word.
왘 Press O button repeatedly until
STANDARD, SURROUND, or SPEECH appears in the display.
왘 Press X or Y soft key repeatedly
until the desired sound setting has been reached. The sound is set accordingly.
or 왘 Press RES soft key briefly.
The sound setting is reset depending on the sound source activated. ì•« Radio mode: STANDARD ì•« CD/AUX mode: SURROUND ì•« Telephone: SPEECH The radio switches back to the stan- dard radio menu eight seconds after the last soft key is pressed.
Controls in detail Audio system
Adjusting treble 왘 Press O button repeatedly until
TREBLE appears in the display.
왘 Press + or – soft key to increase or
decrease tone level accordingly.
or 왘 Press RES soft key briefly to reset treble
tones to their center level. The radio switches back to the stan- dard radio menu eight seconds after the last soft key is pressed.
200
Returning sound functions to factory settings 왘 Press O button to call up settings
menu in the display.
왘 Press RES soft key briefly; the respec-
tive sound function is reset to its center level.
or 왘 Press and hold RES soft key until RESET
appears in the display. The sound settings for bass and treble are returned to their center level and the volume is set to a predefined level.
Vehicles with sound system*: The sound setting is reset depending on the sound source activated. ì•« Radio mode: STANDARD ì•« CD/AUX mode: SURROUND ì•« Telephone: SPEECH
The radio switches back to the standard radio menu four seconds after the last soft key is pressed.
Adjusting volume distribution Call up fader and balance functions by pressing the P button.
Fader 왘 Press P button repeatedly until
FADER appears in the display.
Controls in detail Audio system
왘 Press V or W soft key.
The volume is distributed accordingly between the front and rear of the vehi- cle.
or 왘 Press RES soft key briefly.
The fader is reset to its center level. The radio switches back to the stan- dard radio menu eight seconds after the last soft key is pressed.
201
Controls in detail Audio system
Adjusting balance 왘 Press P button repeatedly until
BALANCE appears in the display.
Returning volume distribution to facto- ry settings 왘 Press P button to call up settings
menu in the display.
왘 Press X or Y soft key.
The volume is distributed between the left and right sides of the vehicle.
or 왘 Press RES soft key briefly.
The balance is reset to its center level. The radio switches back to the stan- dard radio menu eight seconds after the last button is pressed.
202
왘 Press RES soft key briefly; the respec- tive volume distribution is reset to its center (flat) level.
or 왘 Press and hold RES soft key until RESET
appears in the display. The volume distribution settings for fader and balance are set to their cen- ter level. The radio switches back to the stan- dard radio menu four seconds after the last soft key is pressed.
Telephone* muting If your vehicle equipment includes a Mercedes-Benz specified mobile tele- phone*, you can adjust its volume sepa- rately from the volume of the audio system while the telephone is being used.
Controls in detail Audio system
Calling up wavebands for radios without SAT 왘 Press FM or AM soft key to switch be-
tween FM and AM. The FM and AM wavebands are called up one after another.
or 왘 Press WB soft key.
The weather band menu is called up. The waveband currently selected appears in the upper left-hand corner of the display.
Radio operation
Selecting radio mode 왘 Press b button.
Calling up wavebands You can choose from among the FM, AM and WB wavebands. Weather band (컄 page 207).
FM waveband: AM waveband:
87.7......107.9 MHz 530......1710 KHz
Connecting an external audio source (AUX) to the radio* An optional dealer-installed cinch-connec- tor* for connecting an external audio source may become available for your vehicle model. Feature description is based on preliminary information at time of printing. Contact an authorized Mercedes-Benz Center for availability. You can adjust the volume (컄 page 199), the sound settings (컄 page 199) and the volume distribution (컄 page 201) for the AUX input.
Calling up AUX mode 왘 Press and hold Q button until AUX
appears in the display.
Canceling AUX mode 왘 Press any audio source button.
203
Selecting a station The following options are available for se- lecting a station: 앫 Direct frequency input (컄 page 204) 앫 Manual tuning (컄 page 205) 앫 Automatic seek tuning (컄 page 205) 앫 Scan search (컄 page 205) 앫 Station memory (컄 page 206) 앫 Automatic station memory (Autostore)
(컄 page 206)
The station search proceeds in the follow- ing frequency increments: ì•« 200 KHz in FM range ì•« 10 KHz in AM range
Direct frequency input 왘 Select desired waveband.
왘 Press * button. 왘 Enter desired frequency with buttons
1 to R.
Controls in detail Audio system
Calling up wavebands for radios with SAT 왘 Press FM, AM, or WB soft key repeatedly
until desired waveband has been se- lected. The FM, AM, and WB wavebands are called up one after another. The waveband currently selected appears in the upper left-hand corner of the display.
204
i You can only enter frequencies within the respective waveband. If a button is not pressed within four seconds, the radio will return to the last station tuned.
Manual tuning 왘 Select desired waveband. 왘 Press S or T button for approximately three seconds.
왘 Press button repeatedly until desired
frequency has been reached. Step-by-step station tuning takes place in ascending or descending order. Each time the button is pressed, the radio tunes further by 0.2 MHz. During man- ual tuning, the radio is muted.
Controls in detail Audio system
Automatic seek tuning 왘 Select desired waveband. 왘 Press S or T button briefly.
Scan search ì•« Starting scan search
왘 Select desired waveband.
The radio will tune to the next highest or next lowest receivable frequency.
If no station is received after two consecutive scans of the complete frequency range, then the scan stops at the frequency from which it began.
왘 Press SC soft key.
SC will appear in the display. The radio briefly tunes in all receivable stations on the waveband selected.
205
Controls in detail Audio system
ì•« Ending scan search
왘 Press and hold desired station
ì•« Calling up Autostore memory level and
왘 Press SC soft key or S or T. The station last played will be se- lected and SC disappears from the display.
Station memory You can store ten AM and ten FM stations in the memory. ì•« Storing stations
왘 Tune in desired station.
button 1 to R until a brief signal tone is heard. The frequency is stored on the se- lected station button.
ì•« Calling up stations
왘 Press desired station button 1
to R briefly.
Autostore – automatic station memory The Autostore memory function provides an additional memory level. The station memory for manually stored stations is not overwritten.
storing stations
왘 Press AS soft key briefly.
The radio switches to the Autostore memory level. AS and SEARCH ap- pear in the display and the radio finds the ten stations with the strongest signals. These stations are stored on the station buttons 1 to R in order of signal strength.
206
ì•« Calling up stations
ì•« Mute on
왘 Press desired station button 1
왘 Press U button.
to R.
ì•« Leaving the Autostore memory level
The radio mode is interrupted and MUTED appears in the display.
왘 Press FM or AM soft key briefly.
ì•« Mute off
Interrupting radio mode The radio mode is interrupted by an incom- ing call on the telephone* (컄 page 225).
왘 Press U button.
The radio mode is again active.
Weather band
왘 Press WB soft key.
The weather band station last received is tuned in.
Controls in detail Audio system
Selecting a weather band station directly 왘 Select desired weather band station
with buttons 1 to 7. If a station cannot be tuned in, a search is automatically started.
Search 왘 Press S or T button to tune in the next receivable weather band sta- tion.
If no weather band station is received after three consecutive scans of the complete frequency range, then the scan stops at the channel with which it began and NO WB FOUND appears in the display. If this happens, switch back to stan- dard radio mode.
207
Controls in detail Audio system
Scan search 앫 Starting scan search 왘 Press SC soft key.
SC will appear in the display. The ra- dio briefly tunes in all receivable weather band stations.
ì•« Ending scan search
왘 Press SC soft key or S or T.
The weather band station last played will be selected and SC dis- appears from the display.
208
Introduction to satellite radio* (USA only)
SIRIUS satellite radio provides 100 chan- nels of digital-quality radio, among others music, sports, news, and entertainment, free of commercials. SIRIUS satellite radio uses a fleet of high-power satellites to broadcast 24 hours per day, coast to coast, in the contiguous U.S. This diverse, satellite-delivered programming is available for a monthly subscription fee. For more information and service availability, call the SIRIUS Service Center (컄 page 213), or contact www.siriusradio.com
Additional satellite radio equipment and a subscription to a satellite radio service provider are required for the satellite radio operation described here. Contact an authorized Mercedes-Benz Center for details and availability for your vehicle. Note that categories and channels shown in illustrations are dependent on programming content delivered by the service provider. Programming content is subject to change. Therefore, chan- nels and categories shown in illustra- tions and descriptions contained in this manual may differ from the channels and categories delivered by the service provider.
Calling up the SAT main menu 왘 Press SAT soft key.
SAT is displayed in the upper left-hand corner of the display. Prior to activation of the satellite radio service (컄 page 209). After activation of satellite radio ser- vice (컄 page 209).
Prior to activation of the satellite radio service
Satellite radio service may be unavail- able or interrupted from time to time for a variety of reasons, such as envi- ronmental or topographic conditions and other things beyond the service provider’s or our control. Service might also not be available in certain places (e.g., in tunnels, parking garages, or within or next to buildings) or near oth- er technologies.
Program categories The channels are categorized. Categories allow you to tune to stations broadcasting a certain type of program (category mode) (컄 page 211).
The telephone number of the SIRIUS Service Center (888-539-7474) is dis- played.
Controls in detail Audio system
왘 Press ESN soft key.
The twelve-digit electronic serial num- ber (ESN) of the SAT tuner* installed in your vehicle is displayed.
This information is required to call the SIRIUS Service Center for an activation request.
Credit card information may also be re- quired for your application. The activation process takes approxi- mately five to ten minutes after calling the SIRIUS Service Center.
After activation of the satellite radio service The satellite radio main menu appears. The radio station selected last is audible, provided it can be received.
209
Controls in detail Audio system
The system will tune to a default sta- tion if no station had been selected pre- viously.
The first channel 001 is called up and the PTY system changes to all categories. If no station can be received, ACQUIRING appears in the display. If the Satellite radio service is not activated, ACQUIRING will also appear in the radio display and NO SAT will appear in the multifunction display.
210
Selecting a station The following options are available: ì•« Selecting a station using the selected
category (컄 page 211).
ì•« Tuning via station presets
(컄 page 210).
앫 Tuning via scan search (컄 page 212). 앫 Tuning via manual channel input
(컄 page 210).
ì•« Tuning via the program category list
(컄 page 211).
Tuning via station presets Ten satellite radio station presets are avail- able. You can access the presets via number keys.
Accessing via number keys 왘 Enter number of preset you wish to
select, e.g. 1. The radio plays the station stored un- der this number and the PTY function changes to the category corresponding to the station.
Tuning via manual channel input
Example: tuning in channel 16
왘 Press *.
Input line appears in the main radio menu.
왘 Use number keys to enter desired
channel within eight seconds, e.g. 1 6. The system tunes to channel 16. The station you have selected begins to play.
You can only enter available channel numbers.
Tuning via the program category list The category list contains all currently re- ceivable categories of programs. It is arranged alphabetically.
ì•« Selecting a category
왘 Press PTY soft key.
Controls in detail Audio system
The system will automatically switch to a station of the selected category if the currently selected station is not of the selected category. Otherwise, the cur- rently selected station remains tuned.
ì•« Tuning a station within the selected
The current PTY category of the sta- tion is displayed.
왘 Press <<< or >>> soft key.
This switches between the individu- al categories.
When changing the category, the chan- nel selected last in the new category becomes audible.
or
category The channels identified for the current- ly selected category are arranged numerically. Only one entry is visible at a time. 왘 Press S or T button briefly. The next station within the category is started.
왘 Press and hold S or T but-
ton for approximately three seconds until desired station has been reached.
211
Controls in detail Audio system
Tuning via scan search Scan search is characterized as follows: ì•« Scan search plays a channel for ap- proximately eight seconds and then skips to the next channel within the current category.
ì•« Scan search can be terminated manu-
ally.
왘 Press SC soft key.
The search starts. SC appears in the display.
왘 Press SC soft key again.
The search stops.
Obtaining additional text information Additional text information (artist, title) re- lated to the current channel can be dis- played. 왘 Press INF soft key.
The title being played is displayed.
왘 Press INF soft key again.
The name of the artist performing the title being played is displayed.
If a button is not pressed within four seconds, the radio will return to the standard display.
Storing stations 왘 Tune in desired station. 왘 Press and hold desired station button 1 to R until a brief signal tone is heard. The frequency is stored on the selected station button. The radio saves the current station at the memory preset selected. The mem- ory preset selected appears in the sta- tus line, e.g. S3.
There are ten presets available. An existing entry is overwritten in the memory list when a new entry is given.
212
Calling up the ESN information menu 왘 Press INF soft key. 왘 Press ESN soft key.
The twelve-digit electronic serial num- ber (ESN) of the SAT tuner* installed in your vehicle is displayed.
왘 Press RET soft key to exit the menu.
CD mode
Safety precautions
Warning!
The single CD player and the CD changer* are Class 1 laser products. There is a danger of invisible laser radiation if the housing is opened or damaged. Do not open the housing. The single CD player and the CD changer* do not contain any parts that can be serviced by the user. For safety reasons, have any service work which may be necessary performed only by qualified personnel.
Controls in detail Audio system
Warning!
In order to avoid distraction which could lead to an accident, the driver should insert CDs with the vehicle at a standstill and oper- ate the audio system only if permitted by road, weather and traffic conditions. Bear in mind that at a speed of just 30 mph (approximately 50 km/h), your car covers a distance of 44 feet (approximately 14 m) ev- ery second.
General notes The system may not be able to play audio CDs with copy protection. Playing copied CDs may cause malfunc- tions during playback.
213
Controls in detail Audio system
If you affix stickers to the CDs, they can become warped due to the heat that develops in the CD drive or CD chang- er. In certain situations, the CDs can then no longer be ejected and cause dam- age to the drive. Such damage is not covered by the Mercedes-Benz Limited Warranty.
Your CD drive or CD changer has been designed to play CDs which corre- spond to the EN 60908 standard. You can therefore only use CDs with a max- imum thickness of 1.3 mm. If you insert thicker data carriers, e.g. ones that have data on both sides (one side with DVD data, the other side with audio data), they cannot be ejected and will damage the drive.
214
Do not use CDs with an eight cm diameter, not even with a CD adapter. Attempting to play CDs with an eight cm diameter or playing such CDs with an adapter may cause damage to the CD drive. Such dam- age is not covered by the Mercedes-Benz Limited Warranty. Should excessively high or low tempera- tures occur while in CD changer mode*, CD TEMP will appear in the display, and the CD will be muted until the temperature has reached an acceptable level for the system to continue operation. The single CD player and the CD changer* play audio CDs.
Tips on handling CDs ì•« Handle CDs carefully to prevent inter-
ference during playback.
ì•« Avoid scratches, fingerprints and dust
on the CDs.
ì•« Do not write on CDs or apply any labels
or other material to them.
ì•« Clean CDs from time to time with a
commercially available cleaning cloth. Never wipe the CD in a circular motion; instead, wipe it in a straight line start- ing in the center and moving outward. Do not use solvents, anti-static sprays, etc. for cleaning.
ì•« Replace the CD in its case after use. ì•« Protect CDs from heat and direct sun-
light.
Operating the single CD player in the audio system unit
Loading a CD The single CD player in the audio system unit has capacity for one CD. The CD slot for loading the drive is located underneath the soft keys. 왘 Make sure the system is switched on. 왘 Insert CD into CD slot. The label side of
the CD must face upwards. The system automatically pulls the CD into the CD slot. The audio CD begins to play.
If a CD is already loaded, it must be ejected before inserting a new CD. In- serting a second CD in the slot with an- other CD still loaded will cause damage to the CD drive not covered by the Mercedes-Benz Limited Warranty.
If a CD has been inserted incorrectly or cannot be read, WRONG CD0 will appear in the display.
Ejecting a CD 왘 Make sure the system is switched on. 왘 Press EJECT button.
The system ejects the CD. NO CD will appear in the display. 왘 Remove CD from slot.
If you do not take the CD out of the CD slot within approximately 15 seconds, the system automatically pulls the CD back in and plays it. If a CD is pulled back in, press EJECT button for five seconds; the CD will then be ejected.
Controls in detail Audio system
Operational readiness of CD changer* If a CD changer* has been installed in the vehicle, it can be operated from the front control panel of the audio system. A load- ed magazine must be installed to play CDs. The CD changer is located in the glove box.
Loading/unloading the CD magazine
The CD changer* may not be able to play audio CDs with copy protection.
왘 Slide changer door to the right and
press g button.
왘 Magazine will be ejected.
215
Controls in detail Audio system
1 CD 2 CD changer 3 CD tray 4 CD magazine 왘 Remove magazine 4 and pull
CD tray 3 fully out.
왘 Place CD 1 in recess of tray, label side
up.
216
왘 Push tray into magazine in direction of
arrow.
CD changer* 왘 Press Q button.
CD and the selected magazine slot num- ber appear in the upper left-hand cor- ner of the display.
If you have not removed a CD since the last time the CD audio source was activated, the last CD listened to will begin to play at the point where it was switched off. After the last track on a CD has finished, the next CD is automatically played.
CDs which have been inserted improp- erly or are unreadable will not be played.
왘 Push magazine into CD changer* 2 in
direction of arrow and close sliding door.
Playing CDs
Single CD player in the audio unit 왘 Press i button.
CD 0 will appear in the upper left-hand corner of the display.
The CD will resume playback at the point where it was switched off.
Playing tracks You have the following options: ì•« Audio system with CD changer*: se-
lecting CDs
ì•« Direct track entry ì•« Track skip forward/reverse ì•« Fast forward/reverse ì•« Scan ì•« Random tracks ì•« Repeat track
Selecting CDs in the audio unit with CD changer*
왘 You can select from among the
inserted CDs with buttons R to 6. R = CD player in the audio unit 1 to 6 = CDs in the CD changer* The magazine slot number of the se- lected CD appears next to CD in the dis- play, and the number of the currently played track appears next to TRACK.
Controls in detail Audio system
If there is no CD in the selected maga- zine slot, NO CD appears in the display with the corresponding slot number.
Direct track entry
You can make a direct selection from among the tracks on a CD. 왘 Press * button. 왘 Enter track number using buttons 1
컄컄
to R.
217
Controls in detail Audio system
컄컄
The number of the track being played appears next to TRACK in the display. You can only enter available track num- bers.
Skipping tracks forward/backward ì•« Skipping tracks forward
왘 Press S button briefly.
The next track will be played.
ì•« Skipping tracks backward
왘 Press T button briefly.
If the track has been playing for more than ten seconds, the unit skips back to the beginning of the track currently playing. If less than ten seconds have been played, the unit skips back to the beginning of the previous track.
Pressing the T or S button repeat- edly will result in multiple tracks being skipped.
218
Fast forward/reverse ì•« Fast forward
왘 Press and hold S button until desired point has been reached.
ì•« Reverse
왘 Press and hold T button until desired point has been reached.
The track number and the relative time of the track is shown in the display dur- ing the search.
Scan ì•« Starting scan
왘 Press SC soft key.
SC will appear in the display. Each track on the current CD will be played for approximately eight sec- onds in ascending order.
ì•« Ending scan
왘 Press SC soft key or T or S.
Random play The random function (RDM) plays the tracks of the current CD in random order.
When you start the RDM function, the RPT function is automatically switched off.
앫 Switching on random 왘 Press RDM soft key.
RDM appears in the display. A ran- domly selected track is played.
ì•« Switching off random
왘 Press RDM soft key again.
ì•« Switching on repeat
왘 Press RPT soft key.
RPT appears in the display.
ì•« Switching off repeat
왘 Press RPT soft key again.
Repeat The track being played is repeated until the repeat function is switched off.
Pause function The CD changer mode is interrupted by an incoming call on the telephone* (컄 page 225).
When you start the RPT function, the RDM function is automatically switched off.
Controls in detail Audio system
ì•« Switching on pause function
왘 Press U button.
The CD changer mode is interrupt- ed and PAUSE appears in the dis- play.
ì•« Switching off pause function
왘 Press U button.
The CD changer mode is active again.
219
Controls in detail Audio system
Track and time display
GSM network phones
Warning!
A driver’s attention to the road must always be his/her primary focus when driving. For your safety and the safety of others, we recommend that you pull over to a safe location and stop before placing or taking a telephone call. If you choose to use the telephone1 while driving, please use the hands-free device and only use the telephone when weather, road and traffic conditions permit.
Some jurisdictions prohibit the driver from using a cellular telephone while driving a vehicle.