- 2004 Hyundai Tiburon Owners Manuals
- Hyundai Tiburon Owners Manuals
- 2005 Hyundai Tiburon Owners Manuals
- Hyundai Tiburon Owners Manuals
- 2003 Hyundai Tiburon Owners Manuals
- Hyundai Tiburon Owners Manuals
- 2008 Hyundai Tiburon Owners Manuals
- Hyundai Tiburon Owners Manuals
- 2006 Hyundai Tiburon Owners Manuals
- Hyundai Tiburon Owners Manuals
- Download PDF Manual
-
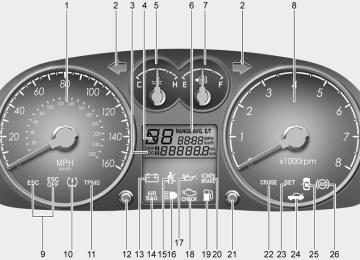
FEATURES OF YOUR HYUNDAI
117
Press this button while the disk is inside the CD DECK to listen to the CD. If the radio was on previously then it will be turned off and CD player will be activated. If you press [CD] button when the disk is ejected and hanging in the opening the system will automatically insert the disk and play the CD.
5. Fast Backward (REW)
Press and hold [REW] button while playing CD then the player will play the disk backwards 5
times the regular speed for first 5 seconds and 15 times faster after that. The sound will be reduced by 12dB while you are holding the button.6. Fast Forward (FF)
Press and hold [FF] button while playing CD then the player will play the disk forward 5 times the regular speed for first 5 seconds and 15
times faster after that. The sound will be re- duced by 12dB while you are holding the button.Button
Press [ ] button to go to the beginning of the song you are listening to while playing the CD. Press the button again to go to the beginning of the song before the song you were listening to. When you press this button while listening to the first track of the CD then the system will move to the beginning of the last track of the CD.
8. Automatic Next Track Selection But-
ton
Press [ ] button to go to the beginning of the song next to the song you are listening to while playing the CD. When you press this button while listening to the last track of the CD then the system will move to the beginning of the first track of the CD.
9. Section Repeat Button (RPT)
Press [RPT] button to repeat the song you are listening to. Press this button again to cancel repetition.
10. Information Display Screen (LCD)
Various status of the CD will be displayed on the screen while listening to the CD such as "CD" while playing the CD, the track title and number and RPT.
1FEATURES OF YOUR HYUNDAI 118
11. SCAN Button If you press this button, the player will play 10
seconds of each track. Press it again to cancel scanning.CAUTION:
o Do not insert warped or poor quality discs into the CD player as damage to the unit may occur.
o Do not insert anything like coins into the player slot as damage to the unit may occur.
o Do not place beverages close to the audio system. The playback mechanism may be damaged if you spill them.
o Do not strike or allow anything to impact the audio system, damage to the system mechanisms could occur.
o Off-road or rough surface driving may cause the compact disc to skip. Do not use the compact disc when driving in such conditions as damage to the com- pact disc face could occur.
o Do not attempt to grab or pull the com- pact disc out while the disc is being pulled into the audio unit by the self- loading mechanism. Damage to the audio unit and compact disc could oc- cur.
H465A01GK-GAT Stereo Radio Operation (H465) (If Installed)
1, 2
FEATURES OF YOUR HYUNDAI
119
1. 2. Power Button and Volume Control 3. Radio Band Selection Button 4. SCAN Button 5. Automatic Channel Selection Button 6. Manual Channel Selection Control (TUNE Control) 7. Preset Button 8. Information Display Screen (LCD) 9. AUDIO Select Button
GK_465_NA
1FEATURES OF YOUR HYUNDAI 120
H465B01GK-GAT 1. Power Button (POWER ON)
Press this button when the ignition switch of the automobile is set to ACC (1st notch) or ON (2nd notch) to turn on the power and the audio system. Press once again when the audio system is on to turn off the power.
2. Volume Control (VOLUME)
Turn the volume control clockwise to increase volume and counterclockwise to reduce. The volume level will be displayed on the screen when you adjust the volume.
3. Radio Band Selection Button (FM/AM)
o Press this button to listen to either FM or AM. o The radio will be set to each of the following
modes each time you press the button. FM1 ➟ FM2 ➟ AM
NOTE: Push this button when the power is off to turn on the power automatically.
4. SCAN Button
Press this button to automatically select chan- nels starting from the current channel and play each channel for 5 seconds. Press again to keep listening to the channel currently selected.
5. Automatic Channel Selection Button
(SEEK)
] button to automatically
Press the [SEEK increase frequency and press the [TRACK ] button to automatically decrease frequency to select and play the next available channel. If the received channel is memorized in the preset buttons then the screen will display the memo- rized channel.
6. Manual Channel Selection Control
(TUNE)
Turn the TUNE control clockwise to increase frequency and counterclockwise to reduce fre- quency by 1 step for each click.
7. Preset Button (1~6)
Press this button to listen to the channels memorized to each button. If you want to memo- rize the current channel to the preset button, press the button for more than 1.5 seconds then the channel will be memorized to the button with a beep.
8. Information Display Screen (LCD) A variety of information will be displayed on the screen including the radio bands (FM1/FM2/ AM) while listening to the radio, frequency of each channel, the number of preset channel and "ST" for FM stereo broadcasting.
9. AUDIO Select Button
Press this button to control tone. Each time you press the button, the mode will switch from BASS➟MIDDLE➟TREBLE➟FADER➟BALANCE and the mode will be displayed on the screen.
BASS
MIDDLE
TREBLE
Turn the TUNE Controller clockwise to increase bass tone and counterclockwise to decrease.
Turn the TUNE Controller clockwise to increase middle tone and counter- clockwise to decrease.
Turn the TUNE Controller clockwise to increase treble tone and counter- clockwise to decrease.
FEATURES OF YOUR HYUNDAI
121
BALANCE
FADER
Turn the TUNE Controller clockwise to increase right speaker volume and coun- terclockwise to increase left speaker volume.
Turn the TUNE Controller clockwise to increase rear speaker volume and coun- terclockwise to increase front speaker volume.
CAUTION:
o Do not place beverages close to the audio system. The audio system mecha- nism may be damaged if you spill them. o Do not strike or allow anything to impact the audio system, damage to the system mechanisms could occur.
1FEATURES OF YOUR HYUNDAI 122
H465C01GK-GAT Compact Disc Player Operation (H465) (If installed)
10
11
15
14
17
1. CD Deck 2. CD Load Button 3. CD Eject Button 4. Information Display Screen (LCD) 5. CD Changer Selection Button 6. Disc Selection Button 7. Fast Backward 8. Fast Forward 9. Automatic Previous Track Selection Button 10. Automatic Next Track Selection Button 11. Repeat Button 12. SCAN Button 13. EQ Button 14. MARK Button 15. RDM Button 16. File Search Knob 17. Scroll Button 18. Directory Search Button
13
12
16
18
GK_465_NA
FEATURES OF YOUR HYUNDAI
123
H465D01GK-GAT 1.CD Deck
The deck will open only when you press [LOAD] button. Make sure the printed side of the disk faces upward when you insert the disk. The CD changer can only play 12cm disks. If you insert video CD or DATA CD, then the screen will display "ERROR DISC," eject the disk and return to the previous mode.
2. CD Load Button
When you press [LOAD] button, the empty lots of the CD Changer will be opened in the order of 1, 2, 3, 4, 5 and 6. When you insert CD, you can listen to the corresponding CD. In this case, the last CD you inserted will be played. If you do not take any actions after pressing (LOAD) then the (LOAD) will be cancelled.
3. CD Eject Button
When you press [ ] button, the currently played CD will be ejected. If you press the button for more than 2 seconds, you will be able to eject all CDs. If currently played CD is in the 3rd slot, the ejection order will be 3, 4, 5, 6, 1 and 2.
4. Information Display Screen (LCD)
This shows the location of disk inside the CD Changer and the corresponding CD deck num- ber will flicker when you load or eject the CD.
5. CD Changer Selection Button
7. Fast Backward (REW)
If the power was turned off when the CD is inside the CD changer or if you press "CD" button when radio was on, the system will play CD. If you press [CD] button when there is no CD in the changer then the system will display "NO DISK" for 2 seconds and return to the previous mode.
NOTE: If you press this button when the power is off and CD is inside the deck, the power will be automatically turned on.
6. Disc Selection Button
If you press [DISC ] button while using CD Changer, the next disc will be played (If you press the button when you are listening to CD 1, the CD 2 will be played). If you wish to listen to the previous CD, then press [DISC ] button then the previous disc will be played (If you press the button when you are listening to CD 2, the CD 1 will be played). If the CD Changer is not fully loaded, this will move to the next available deck. When the player moves from deck to deck, the screen will display the selected deck number.
Press and hold [REW] button while playing CD then the player will play the disk backwards 5
times the regular speed for first 5 seconds and 15 times faster after that. The sound will be reduced by 12dB while you are holding the button.8. Fast Forward (FF)
Press and hold [FF] button while playing CD then the player will play the disk forward 5 times the regular speed for first 5 seconds and 15
times faster after that. The sound will be re- duced by 12dB while you are holding the button.9. Automatic Previous Track Selection
Button
Press [TRACK ] button to go to the beginning of the song you are listening to while playing the CD. Press the button again to go to the beginning of the song before the song you were listening to.
10. Automatic Next Track Selection
Button
] button to go to the beginning Press [SEEK of the song next to the song you are listening to while playing the CD.
1FEATURES OF YOUR HYUNDAI 124
11. Section Repeat Button (RPT)
Press [RPT] button to repeat the song you are listening to. Press this button again to cancel repetition.
12. SCAN Button
If you press this button, the player will play 10
seconds of each track. Press it again to cancel scanning.13. EQ Button
Each time you press this button the sound equalizer from POP➟JAZZ➟ROCK➟CLASSIC➟OFF (Not displayed).
setting will
switch
14. BOOKMARK Button
This button lets you select the songs you want to listen to in the CD. Move to the track and press (MARK) for more than 1 second then the screen will display " M " and select the track. Press the button less than 1 second to play the songs you selected and the system will display " M "
15. RDM (Random) Button Press [RDM] button to play the songs in random order.
NOTE: When you use CD-R or CD-RW, the CD may not be played due to the manufacturing method of CD makers and the recording method of the user. In this case, change CD unless the continuous use of such CDs may cause damage to the system.
16. FILE Search Knob
Turn this knob to the left and right while listening to CD to change track number. If you press the button within 5 seconds then the selected track will be played. If you do not press the button within 5 seconds then it will display the currently played track.
17. SCROLL Button
If the title of MP3 or WMA file is too long, press this button to scroll the entire song title on the LCD screen.
18. Directory Search Button
In case the MP3/WMA CD contains more than 2 folders, press this button up and down to search each directory. You can move to the directory and turn the search knob to search through the tracks. If you do not press the knob within 5 seconds after you select a track then the system will automatically return to the cur- rent track.
CAUTION:
o Do not insert warped or poor quality discs into the CD player as damage to the unit may occur.
o Do not insert anything like coins into the player slot as damage to the unit may occur.
o Do not place beverages close to the audio system. The playback mechanism may be damaged if you spill them.
o Do not strike or allow anything to impact the audio system, damage to the system mechanisms could occur.
o Off-road or rough surface driving may cause the compact disc to skip. Do not use the compact disc when driving in such conditions as damage to the com- pact disc face could occur.
o Do not attempt to grab or pull the com- pact disc out while the disc is being pulled into the audio unit by the self- loading mechanism. Damage to the audio unit and compact disc could oc- cur.
o Avoid using recorded compact discs in your audio unit. Original compact discs are recommended.
FEATURES OF YOUR HYUNDAI
125
CARE OF DISCS
B850A02F-AAT Proper Handling
CARE OF CASSETTE TAPES
Storage
B860A01A-AAT
When not in use, place your discs in their individual case and store them in a cool place away from the sun, heat, and dust. Do not grip or pull out the disc with your hand while the disc is being pulled into the unit by the self loading mechanism.
Keep Your Discs Clean
B850A01L Handle your disc as shown. Do not drop the disc. Hold the disc so you will not leave finger- prints on the surface. If the surface is scratched, it may cause the pickup to skip signal tracks. Do not affix tape, paper, or gummed labels on the disc. Do not write on the disc.
Damaged Disc
Do not attempt to play damaged, warped or cracked discs. These could severely damage the playback mechanism.
B850A02L Fingerprints, dust, or soil on the surface of a disc could cause the pickup to skip signal tracks. Wipe the surface clean with a clean soft cloth. If the surface is heavily soiled, dampen a clean soft cloth in a solution of mild neutral detergent to wipe it clean.
B860A01L Proper care of your cassette tapes will extend the tape life and increase your listening enjoy- ment. Always protect your tapes and cassette cases from direct sunlight, severely cold and dusty conditions. When not in use, cassettes should always be stored in the original protec- tive cassette case. When the vehicle is very hot or cold, allow the interior temperature to become more comfortable before listening to your cas- settes.
1FEATURES OF YOUR HYUNDAI 126
o Never leave a cassette inserted in the player when not being played. This could damage the tape player unit and the cassette tape. o We strongly recommend against the use of tapes longer than C-60 (60 minutes total). Tapes such as C-120 or C-180 are very thin and do not perform as well in the automotive environment.
o Store cassettes in a cool, dry place with the open side facing down to prevent dust from setting in the cassette body.
o Avoid repeated fast reverse usage to replay one given tune or tape section. This can cause poor tape winding to occur, and even- tually cause excessive internal drag and poor audio quality in the cassette. If this occurs, it can sometimes be corrected by fast winding the tape from end to end several times. If this does not correct the problem, do not continue to use the tape in your vehicle.
o The playback head, capstan and pinch roll- ers will develop a coating of tape residue that can result in deterioration of sound quality, such as a wavering sound. They should be cleaned monthly using a commercially avail- able head cleaning tape or special solution available from audio specialty shops. Follow the supplier's directions carefully and never oil any part of the tape player unit.
o Always be sure that the tape is tightly wound on its reel before inserting in the player. Rotate a pencil in the drive sprockets to wind up any slack.
Head
OGK016062
o Be sure that the cassette label is not loose or peeling off or tape ejection may be difficult. o Never touch or soil the actual audio tape
surfaces.
o Keep all magnetized objects, such as elec- tric motors, speakers or transformers away from your cassette tapes and tape player unit.
Cotton applicator
B860A02L
FEATURES OF YOUR HYUNDAI
127
B860A03L
NOTE: Look at a tape before you insert it. If the tape is loose, tighten it by turning one of the hubs with a pencil or your finger. If the label is peeling off, do not put it in the drive mechanism. Do not leave tapes sitting where they are exposed to hot, warm, or high humidity, such as on top of the dashboard or in the player. If a tape is exposed to excessively hot or cold, let it reach a moderate temperature before putting it in the player.
DRIVING YOUR HYUNDAI
Engine Exhaust Can Be Dangerous! ............................ 2-2
Before Starting the Engine ............................................ 2-3
Key Positions ................................................................ 2-4
Starting .......................................................................... 2-5
Operating the Manual Transaxle ................................... 2-6
Automatic Transaxle ..................................................... 2-8
Anti-Lock Brake System (ABS) .................................. 2-12
Electronic Stability Control (ESC) ............................... 2-13
Good Braking Practices .............................................. 2-14
Driving for Economy ................................................... 2-15
Winter Driving ............................................................. 2-16
Trailer or Vehicle Towing ............................................ 2-19
Vehicle Load Limit ....................................................... 2-222 DRIVING YOUR HYUNDAI
WARNING: ENGINE EXHAUST CAN BE DANGEROUS!
C010A01GK-AAT Engine exhaust fumes can be extremely dangerous. If, at any time, you smell exhaust fumes inside the vehicle, open the windows immediately. o Do not inhale exhaust fumes. Exhaust fumes contain carbon monoxide, a colorless, odorless gas that can cause unconsciousness and death by asphyxiation. o Be sure the exhaust system does not leak. The exhaust system should be checked whenever the vehicle is raised to change the oil or for any other purpose. If you hear a change in the sound of the exhaust or if you drive over something that strikes the underneath side of the car, have the exhaust system checked as soon as possible by your Hyundai dealer. o Do not run the engine in an enclosed area. Letting the engine idle in your garage, even with the garage door open, is a hazardous practice. Never run the engine in your garage any longer than it takes to start the engine and back the car out. o Avoid idling the engine for prolonged periods with people inside the car. If it is necessary to idle the engine for a prolonged period with people inside the car, be sure to do so only in an open area with the air intake set at "Fresh" and fan operating at one of the higher speeds so fresh air is drawn into the interior. If you must drive with the tail gate open because you are carrying objects that make this necessary: 1. Close all windows. 2. Open side vents. 3. Set the air intake control at "Fresh", the air flow control at "Floor" or "Face" and the fan at one of the higher speeds. To assure proper operation of the ventilation system, be sure the ventilation air intakes located just in front of the windshield are kept clear of snow, ice, leaves or other obstructions.
PROPOSITION 65 WARNING:
Engine exhaust and a wide variety of automobile components and parts, including components found in the interior furnishings in a vehicle, contain or emit chemicals known to the State of California to cause cancer and birth defects and reproductive harm. In addition, certain fluids contained in vehicles and certain products of component wear contain or emit chemicals known to the State of California to cause cancer and birth defects or other reproductive harm.
BEFORE STARTING THE ENGINE
C020A02A-AAT Before you start the engine, you should always:
1. Look around the vehicle to be sure there are no flat tires, puddles of oil, water or other indications of possible trouble.
2. After entering the car, check to be sure the
parking brake is engaged.
3. Check that all windows, and lights are clean. 4. Check that the interior and exterior mirrors
are clean and in position.
5. Check your seat, seatback and headrest to be sure they are in their proper positions.
6. Close all the doors. 7. Fasten your seat belt and be sure that all
other occupants have fastened theirs.
8. Turn off all lights and accessories that are
not needed.
9. When you turn the ignition switch to "ON", check that all appropriate warning lights are operating and that you have sufficient fuel. 10.Check the operation of warning lights and all
bulbs when key is in the "ON" position.
! WARNING:
o All passengers must be properly belted whenever the vehicle is moving. Refer to pages: 1-16 through 1-20 for more infor- mation on their proper use.
o Always check the surrounding areas near your vehicle for people, especially chil- dren, before putting a car into 'drive.'
o Always wear appropriate shoes when
operating your vehicle. Unsuitable shoes (high heels, ski boots, etc.) may interfere with your ability to use the brake and accelerator pedal, and the clutch (if installed).
DRIVING YOUR HYUNDAI
TO START THE ENGINE
C030A01A-AAT Combination Ignition Switch
o If your Hyundai is equipped with a manual transaxle, place the shift lever in neutral and depress the clutch pedal fully.
o If your Hyundai has an automatic transaxle,
place the shift lever in "P" (park).
o To start the engine, insert the ignition key and turn it to the "START" position. Release it as soon as the engine starts. Do not hold the key in the "START" position for more than 15
seconds.NOTE: o For safety, the engine will not start if the clutch pedal is not depressed fully (Manual transaxle) or the shift lever is not in "P" or "N" Position (Automatic transaxle).
o The ignition key cannot be turned from "ACC" position to "LOCK" position un- less the shift lever is in the "P" (Park) position or the negative battery terminal is disconnected from the battery. To remove the key, always confirm that the shift lever is securely positioned in "P" (Park) (For Automatic transaxle)
2 DRIVING YOUR HYUNDAI KEY POSITIONS
C040A02A-AAT
WARNING:
The engine should not be turned off or the key removed from the ignition key cylinder while the vehicle is in motion. The steering wheel is locked by removing the key.
ACC
LOCK
ON
NOTE: Do not hold the key in the "START" position
for more than 15 seconds.
o "ON"
When the key is in the "ON" position, the ignition is on and all accessories may be turned on. If the engine is not running, the key should not be left in the "ON" position. This will discharge the battery and may also damage the ignition sys- tem.
o "ACC"
With the key in the "ACC" position, some elec- trical accessories (radio, etc.) may be oper- ated.
START
o "LOCK"
The key can be removed or inserted in this position. To protect against theft, the steering wheel locks by removing the key.
C040A01E-1
o "START"
The engine is started in this position. It will crank until you release the key.
NOTE: If difficulty is experienced in turning the ignition key to the START position, turn the steering wheel right and left to release the tension and then turn the key.
C070C03A-AAT To Remove the Ignition Key
ACC
LOCK
ON
START
C070C01E-1
1. Turn the ignition key counterclockwise from the "ACC" position to the "LOCK" position. 2. The key can be removed in the "LOCK"3. The key can be removed in the "LOCK"
position.
position.
STARTING
C050A01A-AAT
LOCK
C050B02A-AAT Normal Conditions: The Starting Procedure:
ON
START
C050A01E-1
WARNING:
Never run the engine in a closed or poorly ventilated area any longer than is needed to move your car in or out of the area. The carbon monoxide gas emitted is odorless and can cause serious injury or death.
Insert key, and fasten the seat belt.
1. 2. Depress the clutch pedal fully and place the gearshift lever (manual transaxle) in neutral or the selector lever (automatic transaxle) in "P" (park) position.
3. After turning the ignition key to the "ON" position, make certain all warning lights and gauges are functioning properly before start- ing the engine.
WARNING:
Be sure that the clutch is fully depressed when starting a manual transaxle vehicle. Your manual transaxle equipped vehicle will not start unless the clutch pedal is fully depressed. On a manual transaxle equipped vehicle that can be started without de- pressing the clutch, there is the potential to cause damage to the vehicle or injury to someone inside or outside the vehicle as a result of the forward or backward move- ment of the vehicle that will occur if the clutch is not depressed when the vehicle is started.
DRIVING YOUR HYUNDAI
4. Turn the ignition key to the "Start" position
and release it when the engine starts. After the engine has started, allow the engine to run for 10 to 20 seconds prior to placing the vehicle in gear. The starter should not be operated for more than 15 seconds at a time. Wait 15-30 sec- onds between starting attempts to protect the starter from overheating.
! WARNING:
Always fully depress the brake pedal before and while shifting out of the "P" Park posi- tion into another position to avoid inad- vertent motion of the vehicle which could injure persons in or around the car.
2 DRIVING YOUR HYUNDAI
OPERATING THE MANUAL TRANSAXLE
C070A04GK-AAT
Type A
Type B
Type B
Mis-shift prevention tab
HGK3023
Your Hyundai's manual transaxle has a con- ventional shift pattern. This shift pattern is im- printed on the shift knob. The transaxle is fully synchronized in all forward gears so shifting to either a higher or a lower gear is easily accom- plished.HGK3024
When shifting into reverse gear, pull the mis- shift prevention tab and shift into reverse gear position. (B Type: 6 speed type)NOTE: o To shift into reverse, rest the lever in neutral for at least 3 seconds after your car is completely stopped. Then move the lever into the reverse position.
o During cold weather, shifting may be difficult until the transaxle lubricant has warmed up. This is normal and not harm- ful to the transaxle.
o If you 've come to a complete stop and it's hard to shift into 1st or R(Reverse), put the shift lever in N(Neutral) position and release the clutch. Press the clutch pedal down, and then shift into 1st or R(Reverse) gear position.
o Do not use the shift lever as a handrest during driving, as this can result in pre- mature wear of the transaxle shift forks.
CAUTION:
o Do not downshift more than 2 gears or downshift the gear when the engine is running at high speed (5,000 RPM or higher). Such downshifting may dam- age the engine.
o When downshifting from fifth gear to fourth gear, caution should be taken not to inadvertently press the gear shift lever sideways in such a manner that second gear is engaged. Such a drastic down- shift may cause the engine speed to increase to the point that the tachometer will enter the red zone. Such over revving of the engine may possibly cause engine damage.
C070B01A-AAT Using the Clutch
C070D04A-AAT Good Driving Practices
The clutch should be pressed all the way to the floor before shifting, then released slowly. The clutch pedal should always be fully returned to the original position. Do not rest your foot on the clutch pedal while driving. This can cause un- necessary wear. Do not partially engage the clutch to hold the car on an incline. This causes unnecessary wear. Use the foot brake or parking brake to hold the car on an incline. Do not operate the clutch pedal rapidly and repeatedly.
o Never take the car out of gear and coast down a hill. This is extremely hazardous. Always leave the car in gear.
o Don't "ride" the brakes. This can cause them to overheat and malfunction. Instead, when you are driving down a long hill, slow down and shift to a lower gear. When you do this, engine braking will help slow the car.
o Slow down before shifting to a lower gear. This will help avoid over-revving the engine, which can cause damage.
o Slow down when you encounter cross winds. This gives you much better control of your car.
o Be sure the car is completely stopped before you attempt to shift into reverse. The transaxle can be damaged if you do not. To shift into reverse, depress the clutch, move the shift lever to neutral, wait three seconds, then shift to the reverse position.
o Exercise extreme caution when driving on a slippery surface. Be especially careful when braking, accelerating or shifting gears. On a slippery surface, an abrupt change in ve- hicle speed can cause the drive wheels to lose traction and the vehicle to go out of control.
DRIVING YOUR HYUNDAI
WARNING:
o Always buckle-up! In a collision, an unbelted occupant is significantly more likely to be seriously injured or killed than a properly belted occupant.
o Avoid high speeds when cornering or
turning.
o Do not make quick steering wheel move- ments, such as sharp lane changes or fast, sharp turns.
o The risk of rollover is greatly increased if you lose control of your vehicle at high- way speeds.
o Loss of control often occurs if two or more wheels drop off the roadway and the driver oversteers to reenter the road- way.
o In the event your vehicle leaves the road- way, do not steer sharply. Instead, slow down before pulling back into the travel lanes.
o Never exceed posted speed limits.
2 DRIVING YOUR HYUNDAI
AUTOMATIC TRANSAXLE
C070E01GK-AAT Recommended Shift Points
C090A03Y-AAT
The shift points as shown below are recom- mended for optimum fuel economy and perfor- mance.
Type A (5 speed)
The first few shifts on a new vehicle, or if the battery has been disconnected, may be somewhat abrupt. This is a normal condi- tion, and the shifting sequence will adjust after shifts are cycled a few times by the T.C.M (Transaxle Control Module).
Shift
from-to
1-2
2-3
3-4
4-5
Type B (6 speed)
Shift
from-to
1-2
2-3
3-4
4-5
5-6
Recommended
15 mph (20 km/h)
25 mph (40 km/h)
35 mph (55 km/h)
45 mph (75 km/h)
Recommended
10 mph (15 km/h)
20 mph (35 km/h)
30 mph (50 km/h)
45 mph (70 km/h)
60 mph (95 km/h)
HGK3025
The highly efficient Hyundai automatic transaxle has four forward speeds and one reverse speed. The individual speeds are selected au- tomatically, depending on the position of the speed selector lever. The selector lever has 2
gates; the main gate and the manual gate.NOTE: For information on manual gate operation, refer to "Sports Mode".
In the main gate, the selector lever has 4
positions, and is equipped with a button to avoid inadvertent selection.HGK3040
CAUTION:
Never shift into "R" or "P" position while the vehicle is moving.
DRIVING YOUR HYUNDAI
C090C01A-AAT o R(Reverse):
C090F02GK-GAT Sports Mode
Use for backing up the vehicle. Bring the car to a complete stop before shifting the selector lever to "R" position.
NOTE:
Depress the brake pedal and push the button when shifting. Push the button when shifting. The selector lever can be shifted freely.
The indicator lights in the instrument cluster indicate the selector lever position when the ignition is switched "ON". During the sports mode operation, the gear currently in use dis- plays in the numeral indicator.
C090B01A-AAT The function of each position is as fol- lows:
C090D02O-AAT o N (Neutral):
In the "N" position, the transaxle is in neutral, which means that no gears are engaged. The engine can be started with the shift lever in "N" position, although this is not recommended except if the engine stalls while the car is moving.
o P (Park):
C090E02O-AAT o D(Drive):
Use to hold the vehicle in place when parked or while starting the engine. Whenever parking the car, apply the parking brake and shift the selec- tor lever to the "P" (Park) position.
Use for normal driving. Bring the car to a complete stop before shifting the selector lever to "D" position. The transaxle will automatically shift through a four gear sequence.
CAUTION:
Never place the selector lever in the "P" (Park) position unless the vehicle is fully stopped. Failure to observe this caution will cause severe damage to the transaxle.
HGK3027
Whether the vehicle is stationary or in motion, sports mode is selected by pushing the selector lever from the "D" position into the manual gate. To return to "D" range operation, push the selector lever back into the main gate. In sports mode, moving the selector lever back- wards and forwards can make rapid gearshifts simple. In contrast to a manual transaxle, the sports mode allows gearshifts with the accel- erator pedal depressed. UP (+) : Push the lever forward once to shift up one gear. DOWN (-) : Pull the lever backwards once to shift down one gear.2 DRIVING YOUR HYUNDAI 10
CAUTION:
o In sports mode, the driver must execute shifts in accordance with prevailing road conditions, taking care to keep the en- gine speed below the red zone.
o For engine protection, upward shifts are made automatically when the engine rpm reaches the red zone.
o By rapidly moving the selector lever backwards (-) twice it is possible to skip one gear by using the sports mode. Since sudden engine braking and/or rapid acceleration can cause a loss of traction, however, downshifts must be made carefully in accordance with the vehicle's speed.
NOTE: o In sports mode, only the four forward gears can be selected. To select reverse or park, move the selector lever to the "R" or "P" position as required.
o In sports mode, downward shifts are made automatically when the vehicle slows down. When the vehicle stops, 1st gear is automatically selected.
o To maintain the required levels of ve- hicle performance and safety, the sys- tem may not execute certain gearshifts when the selector lever is operated.
o Before driving away from a stop on a slippery road, push the selector lever forward into the +(UP) position. This causes the transaxle to shift into 2nd gear which is better for smooth driving away on a slippery road. Push the selec- tor lever to the -(DOWN) side to shift back to 1st gear.
C090H01L-GAT NOTE: o For smooth and safe operation, depress the brake pedal when shifting from "Neu- tral" position or "Park" position to a forward or reverse gear.
o The ignition key must be in the "ON" position and the brake pedal fully de- pressed in order to move the shift lever from the "P" (Park) position to any of the other positions.
o It is always possible to shift from "R", "N", "D" position to "P" position. The vehicle must be fully stopped to avoid transaxle damage.
C090I04L-GAT
CAUTION:
o Shift into "R", "D" and "P" position only when the vehicle has completely stopped.
o Do not accelerate the engine in reverse or any of the forward positions with the brakes applied.
o Always apply the footbrake when shift- ing from "P" or "N", to "R", "D"position. o Do not use the "P" (Park) position in place of the parking brake. Always set the parking brake, shift the transaxle into "P" (Park) position and turn off the ignition when you leave the vehicle, even momentarily. Never leave the vehicle unattended while the engine is running. o Check the automatic transaxle fluid level
regularly, and add fluid as necessary.
o When accelerating from a stop on a steep hill, the vehicle may have a ten- dency to roll backwards. Shifting the shift lever into 2nd gear while in Sport mode will help prevent the vehicle from rolling backwards.
o See the maintenance schedule for the
proper fluid recommendation.
DRIVING YOUR HYUNDAI
11
WARNING:
If your vehicle becomes stuck in snow, mud, sand, etc., then you may attempt to rock the vehicle free by moving it forward and backward. Do not attempt this proce- dure if people or objects are anywhere near the vehicle. During the rocking operation the vehicle may suddenly move forward or backward as it becomes unstuck, causing injury or damage to nearby people or ob- jects.
o Optimum vehicle performance and economy is obtained by smoothly depressing and releasing the accelerator pedal.
WARNING:
o Always buckle-up! In a collision, an unbelted occupant is significantly more likely to be seriously injured or killed than a properly belted occupant.
o Avoid high speeds when cornering or
turning.
o Do not make quick steering wheel move- ments, such as sharp lane changes or fast, sharp turns.
o The risk of rollover is greatly increased if you lose control of your vehicle at high- way speeds.
o Loss of control often occurs if two or more wheels drop off the roadway and the driver oversteers to reenter the road- way.
o In the event your vehicle leaves the road- way, do not steer sharply. Instead, slow down before pulling back into the travel lanes.
o Never exceed posted speed limits.
C090N06O-AAT Good Driving Practices
o Never move the gear selector lever from "P" or "N" to any other position with the accelera- tor pedal depressed.
o Never move the gear selector lever into "P"
when the vehicle is in motion.
o Be sure the car is completely stopped before
you attempt to shift into "R" or "D".
o Never take the car out of gear and coast down a hill. This may be extremely hazard- ous. Always leave the car in gear when moving.
o Do not "ride" the brakes. This can cause them to overheat and malfunction. Instead, when you are driving down a long hill, slow down and shift to a lower gear. When you do this, engine braking will help slow the car. o Slow down before shifting to a lower gear. Otherwise, the lower gear may not be en- gaged.
o Always use the parking brake. Do not de- pend on placing the transaxle in "P" to keep the car from moving.
o Exercise extreme caution when driving on a slippery surface. Be especially careful when braking, accelerating or shifting gears. On a slippery surface, an abrupt change in ve- hicle speed can cause the drive wheels to lose traction and the vehicle to go out of control.
2 DRIVING YOUR HYUNDAI 12
ANTI-LOCK BRAKE SYSTEM (ABS)
C120A03A-AAT (If installed)
The Anti-Lock Brake System (ABS) is designed to prevent wheel lock-up during sudden braking or on hazardous road surfaces. The ABS con- trol module monitors the wheel speed and con- trols the pressure applied to each brake. Thus, in emergency situations or on slick roads, ABS will increase vehicle control during braking.
NOTE: o A click sound may be heard in the engine compartment when the vehicle begins to move after the engine is started. These conditions are normal and indicate that the anti-lock brake system (Electronic Stability Program) is functioning prop- erly.
o During ABS operation, a slight pulsation may be felt in the brake pedal when the brakes are applied. Also, a noise may be heard in the engine compartment while braking. These conditions are normal and indicate that the anti-lock brake system is functioning properly.
WARNING:
ABS will not prevent accidents due to im- proper or dangerous driving maneuvers. Even though vehicle control is improved during emergency braking, always main- tain a safe distance between you and ob- jects ahead. Vehicle speeds should always be reduced during extreme road condi- tions. The braking distance for cars equipped with an anti-lock braking system may be longer than for those without it in the following road conditions. During these conditions the vehicle should be driven at reduced speeds.
o Rough, gravel or snow-covered roads. o With tire chains installed. o Roads where the road surface is pitted or
has different surface height.
The safety features of an ABS equipped vehicle should not be tested by high speed driving or cornering. This could endanger the safety of yourself or others.
ELECTRONIC STABILITY CONTROL (ESC) SYSTEM
C310A04JM-AAT (If installed)
WARNING:
Never drive too fast for the road conditions or too quickly when cornering. Electronic stability control (ESC) will not prevent ac- cidents. Excessive speed in turns, abrupt maneuvers and hydroplaning on wet sur- faces can still result in serious accidents. Only a safe and attentive driver can prevent accidents by avoiding maneuvers that cause the vehicle to lose traction. Even with ESC installed, always follow all the normal precautions for driving - including driving at safe speeds for the conditions.
DRIVING YOUR HYUNDAI
13
C310B01JM-AAT ESC ON/OFF Mode
When the ESC is operating, the ESC indicator in the instrument cluster will blink. If you turn the system off by pressing the ESC switch, the ESC-OFF indicator will come on and stay on. In the ESC-OFF mode, the stability control will be deactivated. Adjust your driving accordingly. To turn the system back on, press the switch again. The ESC-OFF indicator should go off.
NOTE: The ESC mode will automatically be turned ON after the engine is turned off and re- started.
CAUTION:
Driving with varying tire or wheel size may cause the ESC system to malfunction. When replacing tires, make sure they are the same size as your original tires.
OGK056303N
WARNING:
Electronic stability control is only a driving aid; all normal precautions for driving in inclement weather and on slippery road surfaces should be observed.
The Electronic Stability Control (ESC) system is designed to stabilize the vehicle during cor- nering manuevers. ESC checks where you are steering and where the vehicle is actually going. ESC applies the brakes at individual wheels and intervenes in the engine management system to stabilize the vehicle.
The Electronic Stability Control (ESC) system is an electronic system designed to help the driver maintain vehicle control under adverse conditions. It is not a substitute for safe driving practices. Factors including speed, road conditions and driver steering input can all affect whether ESC will be effective in preventing a loss of control. It is still your responsibility to drive and corner at reasonable speeds and to leave a sufficient margin of safety.
2 DRIVING YOUR HYUNDAI 14
C310D01JM-AAT Indicators and Warning
The indicators should illuminate when the igni- tion key is turned to ON or START but should go out after three seconds. If the indicators do not illuminate, or the ESC or ESC-OFF indicator does not go out after 3
seconds, have the vehicle checked by an authorized dealer.Should there be any unusual conditions in the device while driving, ESC-OFF indicator illumi- nates as a warning. If ESC-OFF indicator illuminates, pull your car to a safe place and stop the engine. Then, start the engine again to check if the ESC- OFF indicator goes out.
If the indicator remains lit even after the engine has been started, have your car checked by an authorized Hyundai dealer.
GOOD BRAKING PRACTICES
C130A02A-AAT
WARNING:
o Whenever leaving vehicle or parking, always set the parking brake as far as possible and fully engage the vehicle's transaxle into the park position. Ve- hicles not fully engaged in park with the parking brake set are at risk for moving inadvertently and injuring yourself or others.
o All vehicles should always have the park- ing brake fully engaged when parking to avoid inadvertent movement of the car which can injure occupants or pedestri- ans.
o Nothing should be carried on top of the shelf panel behind the rear seat. If there were an accident or a sudden stop, such objects could move forward and cause damage to the vehicle or injure the occu- pants.
o After being parked, check to be sure the parking brake is not engaged and that the parking brake indicator light is out before driving away.
o Driving through water may get the brakes wet. They can also get wet when the car is washed. Wet brakes can be dangerous! Your car will not stop as quickly if the brakes are wet. Wet brakes cause the car to pull to one side. To dry the brakes, apply the brakes lightly while driving slowly until the braking action returns to normal, taking care to keep the car under control at all times. If the braking action does not return to normal, stop as soon as it is safe to do so and call your Hyundai dealer for assistance.
o Don’t coast down hills with the car out of gear. This is extremely hazardous. Keep the car in gear at all times, use the brakes to slow down, then shift to a lower gear so that engine braking will help you maintain a safe speed. o Don’t "ride" the brake pedal. Resting your foot on the brake pedal while driving can be dangerous because it can result in the brakes overheating and losing their effectiveness. It also increases the wear of the brake com- ponents.
o If a tire goes flat while you are driving, apply the brakes gently and keep the car pointed straight ahead while you slow down. When you are moving slowly enough for it to be safe to do so, pull off the road and stop in a safe place.
o If your car is equipped with an automatic transaxle, don’t let your car creep forward. To avoid creeping forward, keep your foot on the brake pedal when the car is stopped.
o Use caution when parking on a hill. Firmly engage the parking brake and place the gear selector lever in "P" (automatic transaxle) or in first or reverse gear (manual transaxle). If your car is facing downhill, turn the front wheels into the curb to help keep the car from rolling. If your car is facing uphill, turn the front wheels away from the curb to help keep the car from rolling. If there is no curb or if it is required by other conditions to keep the car from rolling, block the wheels.
o Under some conditions your parking brake can freeze in the engaged position. This is most likely to happen when there is an accumulation of snow or ice around or near the rear brakes or if the brakes are wet. If there is a risk that the parking brake may freeze, apply it only temporarily while you put the gear selector lever in "P" (automatic) or in first or reverse gear (manual transaxle) and block the rear wheels so the car cannot roll. Then release the parking brake.
o Do not hold the vehicle on the upgrade with the accelerator pedal. This can cause the transmission to overheat. Always use the brake pedal or parking brake.
DRIVING FOR ECONOMY
C140A02A-AAT You can save fuel and get more miles from your car if you follow these suggestions:
o Drive smoothly. Accelerate at a moderate rate. Don't make "jack-rabbit" starts or full- throttle shifts and maintain a steady cruising speed. Don't race between stoplights. Try to adjust your speed to that of the other traffic so you don't have to change speeds unnec- essarily. Avoid heavy traffic whenever pos- sible. Always maintain a safe distance from other vehicles so you can avoid unneces- sary braking. This also reduces brake wear. o Drive at a moderate speed. The faster you drive, the more fuel your car uses. Driving at a moderate speed, especially on the high- way, is one of the most effective ways to reduce fuel consumption.
o Don't "ride" the brake or clutch pedal. This can increase fuel consumption and also increase wear on these components. In addition, driving with your foot resting on the brake pedal may cause the brakes to over- heat, which reduces their effectiveness and may lead to more serious consequences. o Take care of your tires. Keep them inflated to the recommended pressure. Incorrect inflation, either too much or too little, results in unnecessary tire wear. Check the tire pressures at least once a month.
DRIVING YOUR HYUNDAI
15
o Be sure that the wheels are aligned cor- rectly. Improper alignment can result from hitting curbs or driving too fast over irregular surfaces. Poor alignment causes faster tire wear and may also result in other problems as well as greater fuel consumption.
o Keep your car in good condition. For better fuel economy and reduced maintenance costs, maintain your car in accordance with the maintenance schedule in Section 5. If you drive your car in severe conditions, more frequent maintenance is required (see Section 5 for details).
o Keep your car clean. For maximum service, your Hyundai should be kept clean and free of corrosive materials. It is especially impor- tant that mud, dirt, ice, etc. not be allowed to accumulate on the underside of the car. This extra weight can result in increased fuel consumption and also contribute to corro- sion.
o Travel lightly. Don't carry unnecessary weight in your car. Weight reduces fuel economy.
o Don't let the engine idle longer than neces- sary. If you are waiting (and not in traffic), turn off your engine and restart only when you're ready to go.
o Remember, your Hyundai does not require extended warm-up. After the engine has started, allow the engine to run for 10 to 20
seconds prior to placing the vehicle in gear. In very cold weather, however, give your engine a slightly longer warm-up period.2 DRIVING YOUR HYUNDAI 16
o Don't "lug" or "over-rev" the engine. Lugging is driving too slowly in too high a gear result- ing in the engine bucking. If this happens, shift to a lower gear. Over-revving is racing the engine beyond its safe limit. This can be avoided by shifting at the recommended speeds.
o Use your air conditioning sparingly. The air conditioning system is operated by engine power so your fuel economy is reduced when you use it.
SMOOTH CORNERING
WINTER DRIVING
C150A01A-AAT Avoid braking or gear changing in corners, especially when roads are wet. Ideally, corners should always be taken under gentle accelera- tion. If you follow these suggestions, tire wear will be held to a minimum.
C160A01A-AAT The more severe weather conditions of winter result in greater wear and other problems. To minimize the problems of winter driving, you should follow these suggestions:
C160B01A-AAT Snowy or Icy Conditions
To drive your vehicle in deep snow, it may be necessary to use snow tires or to install tire chains on your tires. If snow tires are needed, it is necessary to select tires equivalent in size and type to the original equipment tires. Failure to do so may adversely affect the safety and handling of your car. Speeding, rapid accelera- tion, sudden brake applications, and sharp turns are potentially very hazardous practices. During deceleration, use engine braking to the fullest extent. Sudden brake applications on snowy or icy roads may cause skids to occur. You need to keep sufficient distance between the vehicle in front and your vehicle. Also, apply the brake gently. It should be noted that installing tire chains on the tire will provide a greater driving force, but will not prevent side skids.
NOTE: Tire chains are not legal in all states. Check state laws before fitting tire chains.
DRIVING YOUR HYUNDAI
17
C160C01A-AAT Use High Quality Ethylene Glycol Cool- ant
C160E01A-AAT Change to "Winter Weight" Oil if Neces- sary
C160H02A-AAT Use Approved Window Washer Anti- Freeze in System
Your Hyundai is delivered with high quality ethylene glycol coolant in the cooling system. It is the only type of coolant that should be used because it helps prevent corrosion in the cool- ing system, lubricates the water pump and prevents freezing. Be sure to replace or replen- ish your coolant in accordance with the main- tenance schedule in Section 5. Before winter, have your coolant tested to assure that its freezing point is sufficient for the temperatures anticipated during the winter.
C160D01F-AAT Check Battery and Cables
Winter puts additional burdens on the battery system. Visually inspect the battery and cables as described in Section 6 (See page 6-19). The level of charge in your battery can be checked by your Hyundai dealer or a service station.
In some climates it is recommended that a lower viscosity "winter weight" oil be used during cold weather. See Section 9 for recommendations. If you aren’t sure what weight oil you should use, consult your Hyundai dealer.
C160F01F-AAT Check Spark Plugs and Ignition System
Inspect your spark plugs as described in Sec- tion 6 (See page 6-10) and replace them if necessary. Also check all ignition wiring and components to be sure they are not cracked, worn or damaged in any way.
C160G01A-AAT To Keep Locks from Freezing
To keep the locks from freezing, squirt an approved de-icer fluid or glycerine into the key opening. If a lock is covered with ice, squirt it with an approved de-icing fluid to remove the ice. If the lock is frozen internally, you may be able to thaw it out by using a heated key. Handle the heated key with care to avoid injury.
To keep the water in the window washer system from freezing, add an approved window washer anti-freeze solution in accordance with instruc- tions on the container. Window washer anti- freeze is available from Hyundai dealers and most auto parts outlets. Do not use engine coolant or other types of anti-freeze as these may damage the paint finish.
C160I01A-AAT Don’t Let Your Parking Brake Freeze
Under some conditions your parking brake can freeze in the engaged position. This is most likely to happen when there is an accumulation of snow or ice around or near the rear brakes or if the brakes are wet. If there is a risk the parking brake may freeze, apply it only tempo- rarily while you put the gear selector lever in "P" (automatic) or in first or reverse gear (manual transaxle) and block the rear wheels so the car cannot roll. Then release the parking brake.
2 DRIVING YOUR HYUNDAI 18
C160J01A-AAT Don’t Let Ice and Snow Accumulate Underneath
Under some conditions, snow and ice can build up under the fenders and interfere with the steering. When driving in severe winter condi- tions where this may happen, you should peri- odically check underneath the car to be sure the movement of the front wheels and the steering components is not obstructed.
C160K01A-AAT Carry Emergency Equipment
Depending on the severity of the weather where you drive your car, you should carry appropri- ate emergency equipment. Some of the items you may want to carry include tire chains, tow straps or chains, flashlight, emergency flares, sand, a shovel, jumper cables, a window scraper, gloves, ground cloth, coveralls, a blanket, etc.
HIGHER SPEED MOTORING
C170A02A-AAT Pre-Trip Inspections 1. Tires: Adjust the tire inflation pressures to specifica- tion. Low tire inflation pressures will result in overheating and possible failure of the tires. Avoid using worn or damaged tires which may result in reduced traction or tire failure.
NOTE: Never exceed the maximum tire inflation pressure shown on the tires.
2. Fuel, engine coolant and engine oil: High speed travel consumes more fuel than urban motoring. Do not forget to check both engine coolant and engine oil.
3. Drive belt: A loose or damaged drive belt may result in overheating of the engine.
WARNING:
o Underinflated or overinflated tires can cause poor handling, loss of vehicle control, and sudden tire failure leading to accidents, injuries, and even death. Always check tires are properly inflated before driving. Refer to pages 8-2~8-3
for proper tire pressures and further information.o Driving on tires with no or insufficient tread is dangerous. Worn-out tires can result in loss of vehicle control, colli- sions, injury, and even death. Worn-out tires should be replaced as soon as possible and should never be used for driving. Always check tire tread before driving your car.
USE OF LIGHTS
TRAILER OR VEHICLE TOWING
C180A01A-AAT Check your lights regularly for correct opera- tion and always keep them clean. When driving during the day in conditions of poor visibility, it is helpful to drive with headlights on low beam. This enables you to be seen, as well as to see.
C190A01S-AAT If you are considering towing with your car, you should first check with your State's Department of Motor Vehicles to determine their legal re- quirements. Since laws vary from State to State, the require- ments for towing trailers, cars, other types of vehicles, or apparatus may differ. Ask your Hyundai dealer for further details before towing.
CAUTION:
Do not do any towing with your car during its first 1,200 miles (2,000 km) in order to allow the engine to properly break in. Fail- ure to heed this caution may result in seri- ous engine or transaxle damage.
DRIVING YOUR HYUNDAI
19
C190B01S-AAT Trailer Hitches
Select the proper hitch and ball combination, making sure that its location is compatible with that of the trailer or vehicle being towed. Use a quality non-equalizing hitch which distributes the tongue load uniformly throughout the chas- sis.
The hitch should be bolted securely to the car and installed by a qualified technician. DO NOT USE A HITCH DESIGNED FOR TEMPORARY INSTALLATION AND NEVER USE ONE THAT ATTACHES ONLY TO THE BUMPER.
C190C03S-AAT Trailer Brakes
If your trailer is equipped with a braking system, make sure it conforms to federal and/or local regulations and that it is properly installed and operating correctly.
NOTE: If you tow a trailer or vehicle, your car will require more frequent maintenance due to the additional load. See "Maintenance Un- der Severe Usage Conditions" on page 5-6.
2 DRIVING YOUR HYUNDAI 20
CAUTION:
o Never connect a trailer brake system
directly to the vehicle brake system.
o When towing a trailer on steep grades (in excess of 6%) pay close attention to the engine coolant temperature gauge to ensure the engine does not overheat. If the needle of the coolant temperature gauge moves across the dial towards "H" (HOT), pull over and stop as soon as it is safe to do so, and allow the engine to idle until it cools down. You may proceed once the engine has cooled sufficiently.
C190D01S-AAT Safety Chains
Should the hitch connection between your vechile and the trailer or vehicle you are towing fail, the trailer or vehicle could wander danger- ously across other lanes of traffic and ultimately leave the roadway. To eliminate this potentially dangerous situation, safety chains, attached between your car and the trailer or towed vehicle, are required in most states.
C190E02GK-AAT Trailer Weight Limit
Tongue load
Total trailer weight
C190E01L Tongue loads can be increased or decreased by redistributing the load in the trailer. This can be verified by checking the total weight of the loaded trailer and then checking the load on the tongue.
NOTE: 1. Never load the trailer with more weight in the back than in the front. About 60% of the trailer load should be in the front half on the trailer and the remaining 40% in the rear.
Gross axle weight Gross vehicle weight
C190E02L 2. The total gross vehicle weight with trailer must not exceed the Gross Vehicle Weight Rating (GVWR) shown on the vehicle identification plate (see page 8- 1). The total gross vehicle weight is the combined weight of the vehicle, driver, all passengers and their luggage, cargo, hitch, trailer tongue load and other op- tional equipment.
3. The front or rear axle weight must not exceed the Gross Axle Weight Rating (GAWR) shown on the vehicle identifi- cation plate (see page 8-2). It is possible that your towing package does not ex- ceed the GVWR but exceeds the GAWR. Improper trailer loading and/or too much luggage in the trunk can overload the rear axle. Redistribute the load and check the axle weight again.
!
CAUTION:
The following specifications are recom- mended when towing a trailer. The loaded trailer weight cannot safely exceed the val- ues in the chart below.
Lbs. (kg)
Maximum Towable Weight
Trailer
1000 (453)
Tongue 100 (45)
WARNING:
o Improperly loading your vehicle and trailer can seriously affect its steering and braking performance causing a crash which could cause serious injury or death.
o Towing a trailer affected vehicle han-
dling and braking.
o Drive more slowly when towing a trailer and allow more distance when braking. o Be careful when driving in slippery and
windy conditions.
o Be careful when turning and while driv-
ing up and down hills.
C190F01S-AAT Trailer or Vehicle Towing Tips
1. Before towing, check hitch and safety chain connections as well as proper operation of the trailer running lights, brake lights, and turn signals.
2. Always drive your vehicle at a moderate
speed. (Less than 60 mph)
3. Trailer towing requires more fuel than normal
conditions.
4. To maintain engine braking efficiency and electrical charging performance, do not use fifth gear (manual transaxle) or overdrive (automatic transaxle).
5. Always secure items in the trailer to prevent
load shift while driving.
6. Check the condition and air pressure of all tires on the trailer and your car. Low tire pressure can seriously affect the handling. Also check the spare tire.
7. The vehicle/trailer combination is more af-
fected by crosswind and buffeting. When being passed by a large vehicle, keep a constant speed and steer straight ahead. If there is too much wind buffeting, slow down to get out of the other vehicle's air turbulence. 8. When parking your car and trailer, especially on a hill, be sure to follow all the normal precautions. Turn your front wheel into the curb, set the parking brake firmly, and put the transaxle in 1st or Reverse (manual) or Park
DRIVING YOUR HYUNDAI
21
9.
(automatic). In addition, place wheel chocks at each of the trailer's tires. If the trailer has electric brakes, start your vehicle and trailer moving, and then apply the trailer brake controller by hand to be sure the brakes are working. This lets you check your electrical connection at the same time. 10.During your trip, occasionally check to be sure that the load is secure, and that the lights and any trailer brakes are still working. 11.Avoid jerky starts, sudden acceleration or
sudden stops.
12.Avoid sharp turns and rapid lane changes. 13.Avoid holding the brake pedal down too long or too frequently. This could cause the brakes to overheat, resulting in reduced braking efficiency.
14.When going down a hill, shift into a lower gear
and use the engine braking effect. When ascending a long grade, downshift the transaxle to a lower gear and reduce speed to reduce chances of engine overloading and/or overheating.
15.If you have to stop while going uphill, do not hold the vehicle in place by pressing on the accelerator. This can cause the automatic transaxle to overheat. Use the parking brake or footbrake.
NOTE: When towing check transaxle fluid more frequently.
2 DRIVING YOUR HYUNDAI 22
CAUTION:
If overheating should occur when towing, (the temperature gauge reads near red zone), taking the following action may reduce or eliminate the problem.
VEHICLE LOAD LIMIT
C190F01GK-AAT Tire and Loading Information Label Type A
Type C
1. Turn off the air conditioner. 2. Reduce highway speed. 3. Select a lower gear when going uphill. 4. While in stop and go traffic, place the gear selector in park or neutral and idle the engine at a higher speed.
Type B
I030A03GK1
I030A03GK3
The tire label located on the driver's side of the center pillar outer panel gives the original tire size, cold tire pressures recommended for your ve- hicle, the number of people that can be in your vehicle and vehicle capacity weight.
I030A03GK2
DRIVING YOUR HYUNDAI
23
Vehicle capacity weight: 700 lbs (317 kg) Vehicle capacity weight is the maxi- mum combined weight of occupants and cargo. If your vehicle is equipped with a trailer, the combined weight in- cludes the tongue load.
Seating capacity: Total: 4 persons
(Front seat: 2 persons, Rear seat: 2 persons)
Seating capacity is the maximum num- ber of occupants including a driver, your vehicle may carry. However the seating capacity may be reduced based upon the weight of all of the occupants, and the weight of the cargo being carried or towed. Do not overload the vehicle as there is a limit to the total weight, or load limit including occupants and cargo, the vehicle can carry.
Towing capacity: Towing capacity is the maximum trailer weight including its cargo weight, your vehicle can tow. See the section "Trailer or Vehicle Towing" for specifications about the trailer weight.