- 2007 Hyundai Sonata Owners Manuals
- Hyundai Sonata Owners Manuals
- 2006 Hyundai Sonata Owners Manuals
- Hyundai Sonata Owners Manuals
- 2003 Hyundai Sonata Owners Manuals
- Hyundai Sonata Owners Manuals
- 2004 Hyundai Sonata Owners Manuals
- Hyundai Sonata Owners Manuals
- 2011 Hyundai Sonata Owners Manuals
- Hyundai Sonata Owners Manuals
- 2013 Hyundai Sonata Owners Manuals
- Hyundai Sonata Owners Manuals
- 2005 Hyundai Sonata Owners Manuals
- Hyundai Sonata Owners Manuals
- 2009 Hyundai Sonata Owners Manuals
- Hyundai Sonata Owners Manuals
- 2008 Hyundai Sonata Owners Manuals
- Hyundai Sonata Owners Manuals
- 2010 Hyundai Sonata Owners Manuals
- Hyundai Sonata Owners Manuals
- Download PDF Manual
-
WARNING:
o The TPMS cannot alert you to severe and sudden tire damage caused by external factors.
o If you feel any vehicle instability, imme- diately take your foot off the accelerator and slowly move to a safe position off the road.
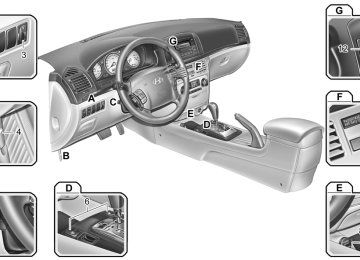
INSTRUMENT CLUSTER
B280A01NF-AAT FUEL GAUGE
B280A01NF The needle on the gauge indicates the approxi- mate fuel level in the fuel tank. The fuel capacity is given in section 9.
NOTE: The " " symbol means, the fuel filler lid is located on the left side of the vehicle.
FEATURES OF YOUR HYUNDAI
57
B290A03A-AAT ENGINE COOLANT TEMPERATURE GAUGE
B330A03A-AAT TACHOMETER
The normal range is approximately in the middle between "H" and "C". If it moves across the dial to "H" (HOT), pull over and stop as soon as possible and turn off the engine. Then open the hood and, after the engine has cooled, check the coolant level (See "If the engine overheats" on the page 3-4.) and the water pump drive belt. If you suspect cooling system trouble, have your cool- ing system checked by a Hyundai dealer as soon as possible.
Red Zone
WARNING:
Never remove the radiator cap when the engine is hot. The engine coolant is under pressure and could erupt and cause severe burns. Wait until the engine is cool before adding coolant to the reservoir.
B290A01NF
The tachometer registers the speed of your engine in revolutions per minute (rpm).
B330A01NF
CAUTION:
The engine should not be raced to such a speed that the needle enters the red zone on the tachometer face. This can cause severe engine damage and may void your warranty coverage.
1FEATURES OF YOUR HYUNDAI 58
B300A02A-AAT SPEEDOMETER 2.4L
B310B01NF-AAT ODOMETER/TRIP ODOMETER With Automatic Transaxle
2. Trip Odometer
(Without Trip Computer)
With Manual Transaxle
3.3L
1. Odometer
B300A02NF-A
B310B01NF-A
The odometer records the total distance trav- eled in miles. You will also find the odometer useful to determine when periodic maintenance should be performed.
NOTE: Federal law forbids alteration of the odom- eter of any vehicle with the intent to change the mileage registered on the odometer. The alteration may void your warranty cov- erage.
Your Hyundai's speedometer is calibrated in miles per hour and kilometers per hour.
B300A01NF-A
B400B01NF-A
Pushing in the TRIP switch behind the left side of the steering wheel when the ignition switch is turned "ON" will display two trip odometers in miles.
With Automatic Transaxle
To shift from TRIP A to TRIP B, press the TRIP switch.
B400B01NF-AAT (With Automatic Transaxle)(If Installed)
FEATURES OF YOUR HYUNDAI
TRIP COMPUTER
59
TRIP A: Distance you have traveled from your origination point to a first des- tination.
TRIP B: Distance from the first destination to
the final destination.
With Manual Transaxle
B310B03NF-A
B310B02NF-A When the RESET switch is pressed for 1 sec- ond, the trip odometer will reset to 0.
B310B04NF-A
B400B08NF-A
The trip computer is a microcomputer-con- trolled driver information gauge that displays information related to driving, such as estimated tripmeter, drive time, average speed, average fuel consumption and distance to empty on the LCD.
1FEATURES OF YOUR HYUNDAI 60
TRIP SWITCH
RESET SWITCH
1. Tripmeter (Miles)
Tripmeter
Odometer
B400B03NF-A
o This mode indicates the total distance trav- elled since the last tripmeter reset. Total distance is also reset to zero if the battery is disconnected.
o Pressing the RESET switch for more than 1
second, when the tripmeter is being dis- played, clears the tripmeter to zero.o The meter's working range is from 0 to 999.9
miles.
B400B01NF-A Pushing in the TRIP switch when the ignition switch is in "ON" position changes the display as follows;
B310B02NF-A Push in the RESET switch more than 1 second to initialize the displayed information such as tripmeter, average speed, average fuel con- sumption and drive time.
TRIPMETER
DRIVE TIME
AVERAGE SPEED
AVERAGE FUEL CONSUMPTION
DISTANCE TO EMPTY
2. Drive Time
3. Average Speed (MPH)
4. Average Fuel Consumption (MPG)
Drive time
Average speed
Average fuel consumption
FEATURES OF YOUR HYUNDAI
61
Odometer
Odometer
Odometer
B400B04NF-A o This mode indicates the total time from the starting of the engine to the ignition key "OFF" after resetting. When the RESET switch is pushed, it will be initialized to '0:00'. o The drive time will be initialized to '0:00' after
being displayed to '99:59'.
B400B05NF-A
HNF2084-A
o This mode indicates the average speed from the starting of the engine to the ignition key "OFF".
o Average speed is reset to zero if the battery
is disconnected.
o To reset the average speed to zero (---), press the RESET switch for more than 1
second.o When you drive 0.5 mile and less after resetting, the average speed will be dis- played to '---'.
o This mode calculates the average fuel con- sumption from the total fuel used and the distance since the last average consump- tion reset.
o The total fuel used is calculated from the fuel
consumption input.
o Average fuel consumption is reset to zero if
the battery is disconnected.
o To reset the average fuel consumption to zero (--), press the RESET switch for more than 1 second.
o When you drive 0.5 mile and less after resetting, the average fuel consumption will be displayed to '--'.
1FEATURES OF YOUR HYUNDAI 62
5. Distance to Empty (Miles)
Distance to empty
Distance to empty letter
Odometer
B400B06NF-A
o This mode indicates the estimated distance to empty from the current fuel level in the fuel tank.
o The trip computer may not register additional fuel if less than 1.36 gallons (6 liters) of fuel are added to the vehicle.
B400B07NF-A
o When the distance to empty is less than 30
miles (50 km), the distance to empty digits (- ---) will blink until more fuel is added.NOTE: o The distance to empty can differ from the actual tripmeter according to driving conditions.
o The distance to empty can vary accord- ing to the driving conditions, driving pattern or vehicle speed.
MULTI-FUNCTION LIGHT SWITCH
B340A01A-AAT COMBINATION TURN SIGNAL, HEADLIGHT AND HIGH-BEAM SWITCH Turn Signal Operation
Pulling down on the lever causes the turn signals on the left side of the car to blink. Pushing upwards on the lever causes the turn signals on the right side of the car to blink. As the turn is completed, the lever will automatically return to the center position and turn off the turn signals at the same time. If either turn signal indicator light blinks more rapidly than usual, goes on but does not blink, or does not go on at all, there is a malfunction in the system. Check for a burned- out fuse or bulb or see your Hyundai dealer.
B340B01A-AAT Lane Change Signal
B340C04A-AAT Headlight Switch
FEATURES OF YOUR HYUNDAI
63
o With this feature, the parklight will be turned off automatically if the driver parks on the side of road at night. If necessary, to keep the lights on when the ignition key is removed, perform the follow- ing : 1) Open the driver-side door. 2) Turn the parking lights OFF and ON again using the light switch on the steering column.
B340D01A-AAT High-beam Switch
B340B01NF To indicate a lane change, move the lever up or down to a point where it begins flashing. The lever will automatically return to the center position when released.
B340C01NF To operate the headlights, turn the barrel on the end of the multi-function switch. The first posi- tion turns on the parking lights, sidelights, tail lights and instrument panel lights. The second position turns on the headlights. NOTE: The ignition must be in the "ON" position to turn on the headlights.
Parking Light Auto Off
o The purpose of this feature is to prevent the battery from being discharged. The system automatically turns off the headlights and parking lights when the driver removes the ignition key and opens the driver- side door.
B340D01NF-A To turn on the headlight high beams, push the lever forward (away from you). The High Beam Indicator Light will come on at the same time. For low beams, pull the lever back toward you.
1FEATURES OF YOUR HYUNDAI 64
B340E01A-AAT Headlight Flasher
B340G01LZ-AAT Auto Light (If Installed)
Auto light sensor
B340G02NF-A
B340E01NF To flash the headlights, pull the switch lever toward you, then release it. The headlights can be flashed even though the headlight switch is in the "OFF" position.
HNF2094
To operate the automatic light feature, turn the barrel on the end of the multi-function switch. If you set the multi-function switch to "AUTO", the tail lights and headlights will be turned automati- cally on or off according to external illumination conditions.
NOTE: Turn the lights manually in foggy, cloudy and rainy conditions.
NOTE: o Never place anything over the sensor located on the instrument panel to en- sure better auto light system control.
o Don't clean the sensor using a window
cleaner.
o If your vehicle has window tint or other types of coating on the windshield, the AUTO light system may not work prop- erly.
FRONT FOG LIGHT SWITCH
B360B01L-AAT (If Installed)
WINDSHIELD WIPER AND WASHER SWITCH
B350A01A-AAT
FEATURES OF YOUR HYUNDAI
65
B350B01O-GAT Windshield Washer Operation
B360B02NF-A
To turn on the front fog lights, place the switch in the "ON" position. They will light when the headlight switch is in the second position.
NOTE: If you turn on the headlight high beams, the front fog lights will be turned off.
(1)
(2)
(3)
The windshield wiper switch has three posi- tions:
ONF017001A
Intermittent wiper operation
1. 2. Low-speed operation 3. High-speed operation
NOTE: To prevent damage to the wiper system, do not attempt to wipe away heavy accumula- tions of snow or ice. Accumulated snow and ice should be removed manually. If there is only a light layer of snow or ice, operate the heater in the defrost mode to melt the snow or ice before using the wiper.
ONF017003A To use the windshield washer, pull the wiper/ washer lever toward the steering wheel. When the washer lever is operated, the wipers auto- matically make two passes across the wind- shield. The washer continues to operate until the lever is released.
NOTE: o Do not operate the washer more than 15
seconds at a time or when the fluid reservoir is empty.o In icy or freezing weather, be sure the wiper blades are not frozen to the glass prior to operating the wipers.
o In areas where water freezes in winter,
use windshield washer antifreeze.
1FEATURES OF YOUR HYUNDAI 66
Mist Wiper Operation
B350C01NF-AAT Adjustable Intermittent Wiper Operation
B370A01A-AAT
HAZARD WARNING SYSTEM
ONF017004A
If a single wipe is desired to clear mist, push the windshield wiper and washer control lever up- wards.
ONF017002A To use the intermittent wiper feature, place the wiper switch in the "INT" position. With the switch in this position, the interval between wipes can be varied from approximately 1 to 18
seconds by turning the interval adjuster barrel.B370A01NF-A The hazard warning system should be used whenever you find it necessary to stop the car in a hazardous location. When you must make such an emergency stop, always pull off the road as far as possible. The hazard warning lights are turned on by pushing in the hazard switch. This causes all turn signal lights to blink. The hazard warning lights will operate even though the key is not in the ignition. To turn the hazard warning lights off, push the switch a second time.
REAR WINDOW DEFROSTER SWITCH B380A02NF-AAT With Manual A/C
CAUTION:
Do not clean the inner side of the rear window glass with an abrasive type of glass cleaner or use a scraper to remove foreign deposits from the inner surface of the glass as this may cause damage to the defroster elements.
With Automatic A/C
NOTE: The engine must be running for the rear window defroster to operate.
HNF2113-A
The rear window defroster switch also acti- vates the outside rearview mirror heaters. The rear window defroster and heated outside rearview mirrors are turned on by pushing in the switch. To turn the defroster off, push the switch a second time. The rear window defroster automatically turns itself off after about 20 min- utes. To restart the defroster cycle, push in the switch again after it has turned itself off.
FEATURES OF YOUR HYUNDAI
DIGITAL CLOCK
B400A01NF-GAT
67
B400A01NF-A
There are three control buttons for the digital clock. Their functions are: H - Push "H" to advance the hour indicated. M - Push "M" to advance the minute indicated. R - Push "R" to reset minutes to ":00" to facilitate resetting the clock to the correct time. When this is done: Pressing "R" between 11 : 01 and 11 : 29
changes the readout to 11 : 00. Pressing "R" between 11 : 30 and 11 : 59
changes the readout to 12 : 00. Push the "R" button for 5 seconds to display a 12 or 24-hour clock (If Installed).1FEATURES OF YOUR HYUNDAI 68
INSTRUMENT PANEL LIGHT CONTROL (RHEOSTAT)
CIGARETTE LIGHTER
B410A01A-AAT
B420A02A-AAT
CAUTION:
Do not use electric accessories or equip- ment other than the Hyundai genuine parts in the socket.
The instrument panel lights can be made brighter or dimmer by turning the instrument panel light control knob.
B410A01NF-A
B420A01NF
For the cigarette lighter to work, the key must be in the "ACC" position or the "ON" position. To use the cigarette lighter, push it all the way into its socket. When the element has heated, the lighter will pop out to the "ready" position. Do not hold the cigarette lighter pressed in. This can damage the heating element and create a fire hazard. If it is necessary to replace the cigarette lighter, use only a genuine Hyundai replacement or its approved equivalent.
POWER OUTLETS
B500D02NF-AAT (If Installed)
These supply 12V electric power to operate electric accessories or equipment only when the key is in the "ON" or "ACC" position.
HNF2182
CAUTION:
o Use the power outlets only when the engine is running and remove the plug from the power outlet after using the electric device. Using the power outlets when the engine stops or keeping the electric device plugged in for many hours may cause the battery to discharge.
o Do not use the power outlet to connect electric accessories or equipment that are not designed to operate on 12 volts. o Some electronic devices can cause elec- tronic interference when plugged into the power outlet. These devices may cause excessive audio noise and mal- functions in other electronic systems or devices in your vehicle.
FEATURES OF YOUR HYUNDAI
DRINK HOLDER
B450A01NF-GAT Front Drink Holder
69
The drink holder for holding cups or cans is located on the main console. The drink holder can be used by lifting its cover.
HNF2184
1FEATURES OF YOUR HYUNDAI 70
B450B01NF-GAT Rear Drink Holder
WARNING:
o Use caution when using the drink hold- ers. A spilled beverage that is very hot can injure you or your passengers. Spilled liquids can damage interior trim and electrical components.
o Do not place objects other than cups or cans in the drink holder. These objects can be thrown out in the event of a sudden stop or an accident, possibly injuring the passengers in the vehicle.
SHOPPING BAG HOLDER
B540A01NF-AAT
HNF2185
The rear drink holder for holding cups or cans is located in the center of the rear seat armrest.Shopping bag holder is located on the left side of the glove box.
HNF2179
CAUTION:
Place the drink holder in its closed position while not in use.
CAUTION:
Do not hang a bag beyond 7lbs (3 kg). It may cause damage to the shopping bag holder.
SEATBACK POCKET
SUNROOF
B540B01E-GAT (If Installed)
B460A02Y-AAT (If Installed) Sun Shade
FEATURES OF YOUR HYUNDAI
71
B460B01TG-GAT Opening the Sunroof System
HNF2042
The seatback pockets for holding papers are located on the backside of the front seats.Your HYUNDAI is equipped with a sliding sun- shade which you can manually adjust to let in light with the sunroof closed, or to block sunlight.
B460A01NF
WARNING:
Never adjust the sunshade while driving. This could result in loss of control and an accident that may cause death, serious injury, or property damage.
B460B01NF If your vehicle is equipped with this feature, you can slide or tilt your sunroof with the sunroof control buttons located on the overhead con- sole. The sunroof can only be opened, closed, or tilted when the ignition switch is in the "ON" position.
1FEATURES OF YOUR HYUNDAI 72
Auto slide open
Auto Reverse
To use the auto slide feature, momentarily (more than 1 second) press the SLIDE OPEN button on the overhead console. The sunroof will slide all the way open. To stop the sunroof sliding at any point, press any sunroof control button.
Manual slide open
Press the SLIDE OPEN button on the overhead console for less than 0.5 second.
Auto slide close
To close the sunroof, press the TILT UP button on the overhead console for more than 1 sec- ond. The sunroof will slide all the way close. To stop at the desired point, press any sunroof control button.
If an object or part of the body is detected while the sunroof is closing automatically, it will re- verse direction, and then stop. Auto reverse function does not work if a tiny obstacle is blocked between the sliding glass and the sunroof sash. You should always check that all passengers and objects are away from the sunroof before closing it.
WARNING:
Be careful that someone’s head, hands and body are not trapped by a closing sunroof.
Manual slide close
Press the TILT UP button on the overhead console for less than 0.5 second.
B460C01TG-GAT Tilting the Sunroof System
B460B01NF
Auto tilt up
To use the auto tilt feature, momentarily (more than 1 second) press the TILT UP button on the overhead console. The sunroof will tilt all the way open. To stop the sunroof tilting at any point, press any sunroof control button.
Manual tilt up
Press the TILT UP button on the overhead console for less than 0.5 second.
!
CAUTION:
o Do not open the sunroof in severely cold temperatures or when it is covered with ice or snow.
o Periodically remove any dirt that may
have accumulated on the guide rails.
o Do not press any sunroof control button longer than necessary. Damage to the motor or system components could occur.
FEATURES OF YOUR HYUNDAI
73
B460D01NF-AAT Manual Operation of Sunroof
If the sunroof does not operate electrically:
1. Open the sunglass holder. 2. Remove the two mounting screws of the
front overhead console with a (+) driver.
HNF2028
Manual tilt down
To close the sunroof, press the SLIDE OPEN button on the overhead console and hold it until the sunroof is closed.
NOTE: After washing the car or after there is rain, be sure to wipe off any water that is on the sunroof before operating it.
WARNING:
o Do not close a sunroof if anyone's hands, arms or body are between the sliding glass and the sunroof sash, as this could result in injury.
o Do not place your head or arms out of the
sunroof opening at any time.
o While the vehicle is moving, always keep the head, hands and other parts of the body of all occupants away from the roof opening. Otherwise, you could be seri- ously injured if the vehicle stops sud- denly or if the vehicle is involved in an accident.
1FEATURES OF YOUR HYUNDAI 74
B460E01TG-GAT Resetting the sunroof
Whenever the vehicle battery is disconnected or discharged, or you use the emergency handle to operate the sunroof, you have to reset your sunroof system as follows:
3.
HNF2029
Insert the hexagonal head wrench provided with the vehicle into the socket. This wrench can be found in the vehicle's trunk or glove box.4. Turn the wrench clockwise to open or coun-
terclockwise to close the sunroof.
1. Turn the ignition key to the "ON" position. 2. Press the TILT UP button for more than 1
second to tilt up the sunroof completely when the sunroof is fully closed. Then, release the button.3. Press and hold the TILT UP button once again until the sunroof has returned to the original position of TILT UP after it is raised a little higher than the maximum TILT UP position. Then, release the button.
4. Press and hold the TILT UP button within 5
seconds until the sunroof is operated as follows; TILT DOWN → SLIDE OPEN → SLIDE CLOSEThen, release the button.
INTERIOR LIGHT
B480B01Y-AAT Map Light Without sunroof
With sunroof
B480B01NF Push in the map light switch to turn the light on or off. This light produces a spot beam for convenient use as a map light at night or as a personal light for the driver and the passenger.
CAUTION:
If the sunroof is not reset, it may not operate properly.
B490A02NF-AAT Interior Light
o ON
B491A03O-AAT
In the "ON" position, the light stays on at all times.
FEATURES OF YOUR HYUNDAI
SUNGLASS HOLDER
75
HNF2110
The interior courtesy light has two buttons. The two buttons are:o DOOR
In the "DOOR" position, the interior courtesy light comes on when any door is opened or when a door is unlocked by the transmitter. The light goes out gradually 30 seconds after the door is closed. However if the ignition switch is ON or all vehicle doors are locked when the door is closed, interior light will turn off even within 30
seconds.CAUTION:
Do not leave this button pressed for an extended period of time when the vehicle is not running.
HNF2183
The sunglass holder is located on the front overhead console. Push the end of the cover to open the sunglass holder.WARNING:
o Do not keep objects except sunglass inside the sunglass holder. Such ob- jects can be thrown from the holder in the event of a sudden stop or an acci- dent, possibly injuring the passengers in the vehicle.
o Do not open the sunglass holder while the vehicle is moving. The rear view mirror of the vehicle can be blocked by an open sunglass holder.
1FEATURES OF YOUR HYUNDAI 76
STORAGE BOX
B500A01Y-AAT GLOVE BOX
B500B01NF-GAT Illuminated Glove Box (If Installed)
Opening the glove box will automatically turn on the light when the multi-function switch is turned to the first position.
B500A01NF-GAT ACCESSORY BOX
B500B01HP-DAT MULTI BOX
HNF2175
The accessory box may be opened by pushing the knob downward. It is used for storing small articles.
B500A01NF
WARNING:
To avoid the possibility of injury in case of an accident or a sudden stop, the glove box door should be kept closed when the car is in motion.
o To open the glove box, pull on the glove box
release lever.
o The glove box door can be locked (and
unlocked) with the key.
The multi box may be opened by pulling it out by its grip. It is used for storing small articles.
B500B02NF-A
CENTER CONSOLE COMPARTMENT
B505A01NF-GAT Center Console Box
FEATURES OF YOUR HYUNDAI
77
The center console box is used for storing cassette tapes or small articles. To use the center console box, pull up the handle and lift the lid as shown.
B505B01NF-GAT Center Console Armrest (If Installed)
WARNING:
To avoid the possibility of injury in case of an accident or a sudden stop, the center console box lid should be kept closed when the car is in motion.
Sliding
HNF2178
The center console box can be used as arm- rest. To use the console armrest, pull out the console box lid by pulling up the handle as shown.NOTE: When not in use, always be sure it is locked in position properly.
HNF2176-A
HNF2177-A
1FEATURES OF YOUR HYUNDAI 78
WARNING:
Do not place cups or cans in the drink holder when the console box lid is used as an armrest. It may result in spilling the beverage. A spilled beverage that is very hot can injure you or your passengers. Spilled liquids can damage interior trim and elec- tric components.
OUTSIDE REARVIEW MIRROR
B510B01Y-AAT Electric Type
CAUTION:
o Do not operate the switch continuously
for an unnecessary length of time.
o Scraping ice from the mirror face could cause permanent damage. To remove any ice, use a sponge, soft cloth or approved de-icer.
WARNING:
Be careful when judging the size or dis- tance of any object seen in the passenger side rearview mirror. It is a convex mirror with a curved surface, and any objects seen in this mirror are closer than they appear.
B510B01NF The outside rearview mirrors can be adjusted to your preferred rear vision, both directly be- hind the vehicle, and to the rear of the left and right sides. The remote control outside rearview mirror switch controls the adjustments for both right and left outside mirrors.
To adjust the position of either mirror:
1. Move the selecting switch to the right or left to activate the adjustable mechanism for the corresponding door mirror.
2. Adjust mirror angle by depressing the appro-
priate perimeter switch as illustrated.
B510D01HP-AAT OUTSIDE REARVIEW MIRROR HEATER With Manual A/C
B520A01A-AAT Manual Type
DAY/NIGHT INSIDE REARVIEW MIRROR
FEATURES OF YOUR HYUNDAI
79
B520A01NF Your Hyundai is equipped with a day/night inside rearview mirror. The "night" position is selected by flipping the tab at the bottom of the mirror toward you. In the "night" position, the glare of headlights of cars behind you is reduced.
With Automatic A/C
HNF2113-A The outside rearview mirror heater is actuated in connection with the rear window defroster. To heat the outside rearview mirror glass, push in the switch for the rear window defroster. The rearview mirror glass will be heated for defrosting or defogging and will give you improved rear vision in inclement weather conditions. Push the switch again to turn the heater off. The outside rearview mirror heater automatically turns itself off after 20 minutes.
1FEATURES OF YOUR HYUNDAI HOMELINK MIRROR 80
B520C01NF-AAT Automatic-Dimming Mirror with Z-Nav™ Electronic Compass Dis- play and HomeLink® (If Installed)
Your vehicle comes with a Gentex Automatic- Dimming Mirror with a Z-Nav™ Electronic Com- pass Display and an Integrated HomeLink® Wireless Control System. During nighttime driv- ing, this feature will automatically detect and reduce rearview mirror glare while the compass indicates the direction the vehicle is pointed. The HomeLink® Universal Transceiver allows you to activate your garage door(s), electric gate, home lighting, etc.
1. Channel 1 Button 2. Channel 2 Button 3. Status Indicator LED 4. Channel 3 Button
5. Rear Light Sensor 6. Dimming On/Off Button 7. Compass Control Button 8. Display
B520C01NF
Automatic-Dimming Night Vision Safety™ (NVS®) Mirror
The NVS® Mirror in your vehicle is the most advanced way to reduce annoying glare in the rearview mirror during any driving situation. For more information regarding NVS® mirrors and other applications, please refer to the Gentex website: www.gentex.com.
CAUTION:
The NVS® Mirror automatically reduces glare during driving conditions based upon light levels monitored in front of the vehicle and from the rear of the vehicle. These light sensors are visible through openings in the front and rear of the mirror case. Any object that would obstruct either light sensor will degrade the automatic dimming control feature.
Automatic-Dimming Function
Z-Nav™ Compass Display
FEATURES OF YOUR HYUNDAI
81
Your mirror will automatically dim upon detect- ing glare from the vehicles traveling behind you. The auto-dimming function can be controlled by the Dimming ON/OFF Button:
1. Pressing the
button turns the auto-dim- ming function OFF which is indicated by the green Status Indicator LED turning off.
2. Pressing the
button again turns the auto- dimming function ON which is indicated by the green Status Indicator LED turning on.
NOTE: The mirror defaults to the "ON" position each time the vehicle is started.
The NVS™ Mirror in your vehicle is also equipped with a Z-Nav™ Compass that shows the vehicle Compass heading in the Display Window using the 8 basic cardinal headings (N, NE, E, SE, etc.).
Compass Function The Compass can be turned ON and OFF and will remember the last state when the ignition is cycled. To turn the display feature ON/OFF: 1. Press and release the button to turn the
display feature OFF.
2. Press and release the button again to
turn the display back ON.
Additional options can be set with press and hold sequences of the button and are detailed below.
There is a difference between magnetic north and true north. The compass in the mirror can compensate for this difference when it knows the Magnetic Zone in which it is operating. This is set either by the dealer or by the user. The operating Zone Numbers for North America are shown in the figure on the following section.
1FEATURES OF YOUR HYUNDAI 82
To adjust the Zone setting: 1. Determine the desired Zone Number based upon your current location on the Zone Map. 2. Press and hold the button for more than 3 but less than 6 seconds, the current Zone Number will appear on the display.
3. Pressing and holding the button again will cause the numbers to increment (Note: they will repeat …13, 14, 15, 1, 2, …). Releasing the button when the desired Zone Number appears on the display will set the new Zone.
4. Within about 5 seconds the compass will start displaying a compass heading again.
There are some conditions that can cause changes to the vehicle magnets. Items such as installing a ski rack or a CB antenna or even some body repair work on the vehicle can cause changes to the vehicle's magnetic field. In these situations, the compass will need to be re-calibrated to quickly correct for these changes. To re-calibrate the compass: 1. Press and hold the button for more than 6 seconds. When the compass memory is cleared a "C" will appear in the display.
2. To calibrate the compass, drive the vehicle in 2 complete circles at less than 5 MPH (8
Km/h).B520C05NF
Integrated HomeLink® Wireless Control System
The HomeLink® Wireless Control System pro- vides a convenient way to replace up to three hand-held radio-frequency (RF) transmitters with a single built-in device. This innovative feature will learn the radio frequency codes of most current transmitters to operate devices such as gate operators, garage door openers, entry door locks, security systems, even home lighting. Both standard and rolling code-equipped transmitters can be programmed by following the outlined procedures. Additional HomeLink® information can be found at: www.homelink.com or by calling 1-800-355-3515.
CAUTION:
Before programming HomeLink® to a ga- rage door opener or gate operator, make sure that people and objects are out of the way of the device to prevent potential harm or damage. Do not use HomeLink® with any garage door opener that lacks the safety stop and reverse features as required by U.S. federal safety standards (this includes any garage door opener model manufac- tured before April 1, 1982). A garage door that cannot detect an object - signaling the door to stop and reverse - does not meet current U.S. federal safety standards. Using a garage door opener without these fea- tures increases the risk of serious injury or death.
Retain the original transmitter of the RF device you are programming for use in other vehicles as well as for future HomeLink® programming. It is also suggested that upon the sale of the vehicle, the programmed HomeLink® buttons be erased for security purposes.
FEATURES OF YOUR HYUNDAI
83
Programming HomeLink®
NOTE: o When programming a garage door opener, it is advised to park the vehicle outside of the garage.
o It is recommended that a new battery be placed in the hand-held transmitter of the device being programmed to HomeLink® for quicker training and ac- curate transmission of the radio-fre- quency signal.
o Some vehicles may require the ignition switch to be turned to the second (or "accessories") position for program- ming and/or operation of HomeLink.
o In the event that there are still program- ming difficulties or questions after fol- lowing the programming steps listed below, at: www.homelink.com or 1-800-355-3515.
contact HomeLink®
1FEATURES OF YOUR HYUNDAI 84
Standard Programming
Rolling Code Programming
To train most devices, follow these instructions: 1. For first-time programming, press and hold the two outside buttons, HomeLink® Channel 1 and Channel 3 Buttons, until the indicator light begins to flash (after 20 seconds). Release both buttons. Do not hold the but- tons for longer than 30 seconds.
2. Position the end of your hand-held transmit- ter 1-3 inches (2-8 cm) away from the HomeLink® buttons while keeping the indica- tor light in view.
3. Simultaneously press and hold both the HomeLink® and hand-held transmitter but- ton. DO NOT release the buttons until step 4 has been completed.
4. While continuing to hold the buttons the red Indicator Status LED will flash slowly and then rapidly after HomeLink® successfully trains to the frequency signal from the hand- held transmitter. Release both buttons.
5. Press and hold the just-trained HomeLink® button and observe the red Status Indicator LED. If the indicator light stays on constantly, programming is complete and your device should activate when the HomeLink® button is pressed and released.
6. To program the remaining two HomeLink®
buttons, follow steps 2 through 5.
Rolling code devices which are "code-pro- tected" and manufactured after 1996 may be determined by the following: o Reference the device owner's manual for
verification.
o The handheld transmitter appears to pro- gram the HomeLink Universal Transceiver but does not activate the device.
o Press and hold the trained HomeLink button. The device has the rolling code feature if the indicator light flashes rapidly and then turns solid after 2 seconds.
To train rolling code devices, follow these in- structions: 1. At the garage door opener receiver (motor- head unit) in the garage, locate the "learn" or "smart" button. This can usually be found where the hanging antenna wire is attached to the motor-head unit. Exact location and color of the button may vary by garage door opener brand. If there is difficulty locating the training button, reference the device owner's manual or please visit our Web site at www.homelink.com.
2. Firmly press and release the "learn" or "smart" button (which activates the "training light").
NOTE: There are 30 seconds in which to initiate step3.
3. Return to the vehicle and firmly press, hold for two seconds and then release the de- sired HomeLink® button. Repeat the "press/ hold/release" sequence a second time to complete the programming. (Some devices may require you to repeat this sequence a third time to complete the programming.)
4. Press and hold the just-trained HomeLink® button and observe the red Status Indicator LED. If the indicator light stays on constantly, programming is complete and your device should activate.
5. To program the remaining two HomeLink® buttons, follow either steps 1 through 4
above for other Rolling Code devices or steps 2 through 5 in Standard Programming for standard devices.Gate Operator & Canadian Programming
During programming, your handheld transmit- ter may automatically stop transmitting. Con- tinue to press the Integrated HomeLink® Wire- less Control System button (note steps 2 through 4 in the Standard Programming portion of this document) while you press and re-press ("cycle") your handheld transmitter every two seconds until the frequency signal has been learned. The indicator light will flash slowly and
FEATURES OF YOUR HYUNDAI
85
WARNING:
The transceiver has been tested and com- plies with FCC and Industry Canada rules. Changes or modifications not expressly approved by the party responsible for com- pliance could void the user's authority to operate the device.
NVS® is a registered trademark and Z-Nav™ is a trademark of the Gentex Corporation, Zeeland, Michigan. HomeLink® is a registered trademark owned by Johnson Controls, Incorporated, Milwaukee, Wisconsin.
then rapidly after several seconds upon suc- cessful training.
Operating HomeLink®
To operate, simply press and release the pro- grammed HomeLink® button. Activation will now occur for the trained device (i.e. garage door opener, gate operator, security system, entry door lock, home/office lighting, etc.). For con- venience, the hand-held transmitter of the de- vice may also be used at any time.
Reprogramming a Single HomeLink® But- ton To program a new device to a previously trained HomeLink® button, follow these steps: 1. Press and hold the desired HomeLink® but- ton. Do NOT release until step 4 has been completed.
2. When the indicator light begins to flash slowly (after 20 seconds), position the handheld transmitter 1 to 3 inches away from the HomeLink® surface.
3. Press and hold the handheld transmitter button. The HomeLink® indicator light will flash, first slowly and then rapidly.
4. When the indicator light begins to flash rap-
idly, release both buttons.
5. Press and hold the just-trained HomeLink®
button and observe the red Status Indicator LED. If the indicator light stays on constantly, programming is complete and your new device should activate.
Erasing HomeLink® Buttons
Individual buttons cannot be erased. However, to erase all three programmed buttons: 1. Press and hold the two outer HomeLink® buttons until the indicator light begins to flash-after 20 seconds.
2. Release both buttons. Do not hold for longer
than 30 seconds.
The Integrated HomeLink® Wireless Control System is now in the training (learn) mode and can be programmed at any time following the appropriate steps in the Programming sections above.
FCC ID: NZLZTVHL3
IC: 4112A-ZTVHL3This device complies with Part 15 FCC Rules. Operation is subject to the following two condi- tions: (1) this device may not cause harmful interference, and (2) this device must accept any interference received, including interfer- ence that may cause undesired operation.
1FEATURES OF YOUR HYUNDAI PARKING BRAKE 86
B530A03A-AAT
CAUTION:
Driving with the parking brake applied will cause excessive brake pad (or lining) and brake rotor wear.
o To release the parking brake, first apply the foot brake and pull up the parking brake lever slightly. Secondly, depress the release but- ton and lower the parking brake lever while holding the button.
WARNING:
Whenever leaving vehicle or parking always set the parking brake as far as possible and fully engage the vehicle's transaxle into the park position. Vehicles not fully engaged in park with the parking brake set are at risk for moving inadvertently and injuring yourself or others.
B530A01NF Always engage the parking brake before leav- ing the vehicle. This also turns on the parking brake indicator light when the key is in the "ON" or "START" position. Before driving away, be sure that the parking brake is fully released and the indicator light is off.
o To engage the parking brake, first apply the foot brake and then without pressing the release button in, pull the parking brake lever up as far as possible. In addition it is recom- mended that when parking the vehicle on a gradient, the shift lever should be positioned in the appropriate low gear on manual trans- mission vehicles or in the Park position on automatic transmission vehicles.
TRUNK LID
B540A01S-GAT Remote Trunk Lid Release
B540A01NF To open the trunk lid without using the key, pull up the lid release lever. To close, lower the trunk lid, then press down on it until it locks. To be sure the trunk lid is securely fastened, always check by trying to pull it up again.
FEATURES OF YOUR HYUNDAI
87
B540B03E-AAT Trunk Lid Emergency Latch Release
lid by using the remote release. In this instance, use the master key to unlock and open the trunk lid. To allow the trunk lid to be opened with the remote release, push the trunk lid lock knob down, then to the opposite direction of the "LOCK" position.
WARNING:
Doors and trunk should be kept locked and the keys should be kept out of the reach of children. Never let children play in or around an unattended vehicle. Even very young children may inadvertently cause the ve- hicle to move, entangle themselves in the windows, or lock themselves or others in- side the trunk. Parents must teach their children about the dangers of playing in unattended vehicles.
HNF2016-A
Your vehicle is equipped with a glow-in-the dark emergency trunk release lever located inside the trunk. It will glow after the trunk is closed. When pulled, this lever will release the trunk latch mechanism and open the trunk.
! WARNING:
The trunk lid should always be kept com- pletely closed while the vehicle is in motion. If it is left open or ajar, poisonous exhaust gases may enter the car and serious illness or death may result. See additional warn- ings concerning exhaust gases on page 2- 2.
B540B05Y-AAT Trunk Lid Lock Knob
HNF2014-A
If the trunk lid lock knob (located near the latch) is in the "LOCK" position when the trunk lid is closed, it will not be possible to open the trunk
1FEATURES OF YOUR HYUNDAI 88
WARNING:
o If a person becomes locked in the trunk, pull the emergency trunk release lever of the inside panel in the trunk to open the trunk lid.
o Keep cars locked and keys out of the reach of children. HYUNDAI recommends parents teach children about the emer- gency trunk release lever in their vehicle and how to open the trunk lid if they are accidentally locked in the trunk.
B540C01Y-AAT To unlock using the key
B550A02Y-AAT
HIGH-MOUNTED REAR STOP LIGHT
HNF2012-A To open the trunk lid, insert the key and turn it clockwise to unlock. The trunk compartment light illuminates when the trunk lid is opened.
In addition to the lower-mounted rear stop lights on either side of the car, the high mounted rear stop light in the center of the rear window also lights when the brakes are applied.
B550A01NF-A
REMOTE FUEL-FILLER LID RELEASE
B560A04Y-AAT
B560A02NF
The fuel-filler lid may be opened from inside the vehicle by pushing the fuel-filler lid opener switch located on the driver's door.
NOTE: If the fuel-filler lid will not open because ice has formed around it, tap lightly or push on the lid to break the ice and release the lid. Do not pry on the lid. If necessary, spray around the lid with an approved de-icer fluid (do not use radiator anti-freeze) or move the vehicle to a warm place and allow the ice to melt.
HNF2021
WARNING:
o Gasoline vapors are dangerous. Before refueling, always stop the engine and never smoke or allow sparks and open flames near the filler area.
o Never operate your vehicle without a filler cap properly installed, flammable vapors and gasoline could leak out in dangerous situations such as a collision or rollover. If the filler cap must be replaced, only use genuine Hyundai re- placement parts.
FEATURES OF YOUR HYUNDAI
89
WARNING:
o After refueling, make sure the fuel cap is installed securely to prevent fuel spill- age in the event of an accident
o Tighten the cap until it clicks, otherwise
the "
" light will illuminate
o If you open the fuel filler cap during high ambient temperatures, a slight "pres- sure sound" may be heard. This is nor- mal and not a cause for concern. Whenever you open the fuel filler cap, turn it slowly.
o Do not "top off" after the nozzle auto-
matically shuts off when refueling.
o Automotive fuels are flammable/explo- sive materials. When refueling, please note the following guidelines carefully. - Before touching the fuel nozzle or fuel filler cap, have one's hands in contact with metal parts away from the filler neck to discharge static electricity.
- Do not get back in the vehicle while refueling. Do not operate anything that can produce static electricity. Static electricity discharge can ignite fuel vapors resulting in an explosion.
1FEATURES OF YOUR HYUNDAI 90
WARNING:
- When using a portable fuel container, be sure to place the container on the ground while refueling. Static electric- ity discharge from the container can ignite fuel vapors causing a fire. While starting refueling, contact should be maintained until the filling is complete. - Do not use cellular phones around a gas station. The electric current or elec- tronic interference from cellular phones can ignite fuel vapors causing a fire. - When refueling, always turn the engine off. Sparks by engine compartment electrical equipment can ignite fuel vapors causing a fire. After refueling, check to make sure the fuel filler cap is securely closed, and then start the engine.
- Do not smoke or try to light cigarettes around a gas station. Automotive fuels are flammable.
B560B01L-GAT Manual Fuel Filler Lid Release
B570A01NF-GAT
HOOD RELEASE
HNF2022
If the fuel filler lid cannot be opened using the remote opener, a manual opener handle is located inside the trunk on the left side. Open the fuel filler lid by pulling on this handle as shown in the illustration.B570A01NF 1. Pull the release knob to unlatch the hood.
2. Pull the secondary latch up and lift the hood.
HNF2024-E
FEATURES OF YOUR HYUNDAI
91
WARNING:
o Do not place the sun visor in such a manner that it obscures visibility of the roadway, traffic or other objects.
o Do not move the sun visor out to cover the side window if there is an item at- tended to it such as a garage door re- mote control, pens, air fresheners or the like. These objects could cause injury if the curtain airbag is deployed.
SUN VISOR
3. Raise the hood by hand.
B580A01NF-AAT
When closing the hood, slowly close the hood and make sure it locks into place.
WARNING:
o Always double check to be sure that the hood is firmly latched before driving away. If it is not latched, the hood could fly open while the vehicle is being driven, causing a total loss of visibility, which might result in an accident.
o Do not move the vehicle with the hood in the raised position, as vision is ob- structed and the hood could fall or be damaged.
B580A01NF
Your Hyundai is equipped with sun visors to give the driver and front passenger either frontal or sideward shade. To reduce glare or to shut out direct rays of the sun, turn the sun visor down. Vanity mirrors are provided on the back of the sun visor for the driver and front passenger.
NOTE: The Supplemental Restraint System (SRS) label containing useful information can be found on the back of each sun visor.
1FEATURES OF YOUR HYUNDAI 92
STEERING WHEEL
B500B01B-GAT Illuminated Vanity Mirror
B600A01NF-GAT Tilt type
B600B01NF-GAT Tilt and telescopic type (If Installed)
HNF2172
HNF2067
Opening the lid of the vanity mirror will automati- cally turn on the mirror light.
To adjust the steering wheel:
1. Pull the lever toward you and hold it to unlock. 2. Raise or lower the steering wheel to the
desired position.
3. After adjustment, release the lever.
To adjust the steering wheel:
B600B01NF-A
1. Push the lever downward fully to unlock. 2. Adjust upward or downward and forward or backward to set the steering wheel to the desired position.
3. After adjustment, securely tighten the lever
by pulling it upward.
!
CAUTION:
After adjusting the steering wheel, try mov- ing it up and down to make sure it is locked in position.
WARNING:
Do not attempt to adjust the steering wheel while driving as this may result in loss of control of the vehicle and serious injury or death.
FRONT DOOR WARNING LIGHT B620A01S-AAT
HORN
B610A01L-GAT
FEATURES OF YOUR HYUNDAI
93
B620A01NF A red light comes on when the front door is opened. The purpose of this light is to assist when you get in or out and also to warn passing vehicles.
Press the pad on the steering wheel to sound the horn.
B610A01NF
1FEATURES OF YOUR HYUNDAI 94
REAR SEAT ARMREST
B611A01Y-AAT
B611A01NF-A This armrest is located in the center of the rear seatback.
B660B02NF-AAT To Set the Cruise Speed
CRUISE CONTROL
B660A02S-AAT The cruise control system provides automatic speed control for your comfort when driving on straight, open freeways, toll roads, or other noncongested highways. This system is de- signed to function above approximately 25 mph (40 km/h).
NOTE: Cruise control is not recommended for city driving, winding roads, slippery roads, heavy rain, or other bad weather condi- tions.
B660A01NF 1. Pull the cruise control ON/OFF switch. The "CRUISE" indicator light in the instrument cluster will illuminate. This turns the system on.
2. Accelerate to desired cruising speed above
40 km/h (25 mph).
FEATURES OF YOUR HYUNDAI
95
NOTE: If the vehicle speed decreases more than 9 mph (15 km/h) below the set speed or decreases below 25 mph (40 km/h), the cruise control system will automatically cancel the set speed.
o Shift the selector lever to "N" position (Auto-
matic transaxle).
o Decrease the vehicle speed lower than the
memory speed by 9 mph (15 km/h).
o Decrease the vehicle speed to less than 25
mph (40 km/h).
o Release the cruise control ON/OFF switch.
B660C01NF-AAT To Cancel the Cruise Speed
B660D01NF-AAT To Resume the Preset Speed
B660B02NF
3. Push the "SET" (COAST) switch after you have set the vehicle speed at the desired speed. If the "SET (COAST)" switch is selected, the cruise "SET" indicator light in the instrument cluster will illuminate.
4. Remove your foot from the accelerator pedal and the desired speed will automatically be maintained.
5. To increase speed, temporarily depress the accelerator pedal enough for the vehicle to exceed the preset speed. When you remove your foot from the accelerator pedal, the vehicle will return to the speed you have set.
B660C01NF To disengage the cruise control system, push the control switch "CANCEL". Additionally, the following actions will disengage the system:
o Depress the brake pedal. o Depress the clutch pedal (Manual transaxle).
B660D01NF
The vehicle will automatically resume the speed set prior to cancellation when you push the control switch "RESUME (ACCEL)" and re- lease it to return (when travelling above 25
mph).1FEATURES OF YOUR HYUNDAI 96
If the control switch "RESUME(ACCEL)" is selected, the cruise "SET" indicator in the in- strument cluster will illuminate.
B660F01NF-AAT To Reset at a Slower Speed
B660E01NF-GAT To Reset at a Faster Speed
1. Push the control switch "RESUME (ACCEL)"
and hold it. If the control switch "RESUME(ACCEL)" is selected, the cruise "SET" indicator in the instrument cluster will illuminate.
2. Accelerate to desired speed and release the control switch. While the control switch is held, the vehicle will gradually gain speed.
B660B02NF 1. Push the control switch "SET (COAST)" and hold it. While the control switch is pushed, the vehicle speed will gradually decrease. If the "SET(COAST)" switch is selected, the cruise "SET" indicator light in the instrument cluster will illuminate.
2. When the desired speed is obtained, release
the control switch.
WARNING:
o Keep the cruise control ON/OFF switch off when not using the cruise control to avoid inadvertently setting a speed.
o Use the cruise control system only when traveling on open highways in good weather.
o Do not use the cruise control when it may not be safe to keep the car at a constant speed, for instance, driving in heavy or varying traffic, or on slippery (rainy, icy or snow-covered) or winding roads or over 6% up-hill or down-hill roads.
o Pay particular attention to the driving conditions whenever using the cruise control system.
o During cruise-speed driving of a manual transaxle vehicle, do not shift into neu- tral without depressing the clutch pedal, since the engine will be overrevved. If this happens, depress the clutch pedal or release the cruise control ON/OFF switch.
o During normal cruise control operation, when the "SET" switch is activated or reactivated after applying the brakes, the cruise control will energize after ap- proximately 3 seconds. This delay is normal.
AUDIO REMOTE CONTROL SWITCH B610A03NF-AAT (If Installed)
SEEK/PRESET (
) Switch
MUTE Switch
FEATURES OF YOUR HYUNDAI
97
o If the button is pressed for 0.8 second or more, it will work as follows in each mode.
RADIO mode It will function as the AUTO SEEK select button.
CDP mode It will function as the FF/REW button.
CDC mode It will function as the DISC UP/DOWN button.
o Pull the MUTE switch to slience the sound. o Once again press the MUTE switch to re-
store the sound.
VOL ( / ) Switch
o Press the VOL ( ) switch to increase
o Press the VOL ( ) switch to decease
volume.
volume.
o If the button is pressed for less than 0.8
second, it will work as follows in each mode.B610A02NF
NOTE: Do not operate audio remote control switches simultaneously.
RADIO mode It will function as the PRESET STATION select buttons.
MODE Switch
Press the MODE switch to select Radio, CD (Compact Disc) and CDC (Compact Disc Changer). Each press of the switch changes the display as follows:
RADIO (FM1 → FM2 → AM) → CD → CDC →
CDP mode It will function as the TRACK UP/DOWN button.
CDC mode It will function as the TRACK UP/DOWN button.
1FEATURES OF YOUR HYUNDAI 98
HEATING AND COOLING CONTROL
B710A01E-GAT
B710B01NF-GAT Center Ventilator/Side Ventilator
The center ventilators are located in the middle of the dashboard. The side ventilators are located on each side of the dashboard. To change the direction of the air flow, turn the control knob under the vents. To control the amount of air, turn the control knob on the left side of the vents. The vents are opened when the vent knob is moved to " " position. The vents are closed when the vent knob is moved to " ". Keep these vents clear of any obstructions.
1. Side Defroster Nozzle 2. Side Ventilator 3. Windshield Defroster Nozzle 4. Center Ventilator
B710A01NF-A
HEATING AND VENTILATION
FEATURES OF YOUR HYUNDAI
9999
B670A01NF-GAT Rotary and Push Button Type
B670E01A-AAT Temperature Control
B670B02O-AAT Fan Speed Control (Blower Control)
Cool
Warm
HNF2118-A
HNF2126
This is used to turn the heating system on and off and to select the degree of heating desired.1. Temperature control 2. Fan speed control 3. Air flow control 4. Air conditioning switch 5. Air intake control 6. Rear window defroster switch
HNF2125-A
This is used to select the blower fan speed. The blower fan speed, and therefore the volume of air delivered from the system, may be con- trolled manually by setting the blower control between the "1" and "4" position. 1 is the lowest fan speed and 4 is the highest fan speed.
1FEATURES OF YOUR HYUNDAI 100
B670D04O-AAT Air Flow Control
HNF2119-A This is used to turn the blower fan on/off and to direct the flow of air. Air can be directed to the floor, dashboard outlets, or windshield. Five symbols are used to represent Face, Bi-Level, Floor, Floor-Defrost and Defrost air position. The MAX A/C mode is used to cool the inside of the vehicle faster. The "OFF" mode is used to turn the blower fan off.
HNF2120
HNF2121
Face-Level
Bi-Level
Selecting the "Face" mode will cause air to be discharged through the face level vents.
Air is discharged through the face vents and the floor vents. This makes it possible to have cooler air from the dashboard vents and warmer air from the floor outlets at the same time.
FEATURES OF YOUR HYUNDAI
101101