- 2009 Hyundai Santa FE Owners Manuals
- Hyundai Santa FE Owners Manuals
- 2005 Hyundai Santa FE Owners Manuals
- Hyundai Santa FE Owners Manuals
- 2004 Hyundai Santa FE Owners Manuals
- Hyundai Santa FE Owners Manuals
- 2010 Hyundai Santa FE Owners Manuals
- Hyundai Santa FE Owners Manuals
- 2006 Hyundai Santa FE Owners Manuals
- Hyundai Santa FE Owners Manuals
- 2003 Hyundai Santa FE Owners Manuals
- Hyundai Santa FE Owners Manuals
- 2007 Hyundai Santa FE Owners Manuals
- Hyundai Santa FE Owners Manuals
- 2008 Hyundai Santa FE Owners Manuals
- Hyundai Santa FE Owners Manuals
- 2012 Hyundai Santa FE Owners Manuals
- Hyundai Santa FE Owners Manuals
- Download PDF Manual
-
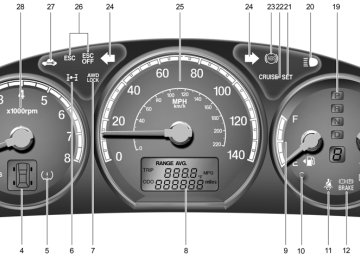
OCM051012L
WARNING:
Never remove the radiator cap when the engine is hot. The engine coolant is un- der pressure and could erupt and cause severe burns. Wait until the engine is cool before adding coolant to the reser- voir.
The needle on the engine coolant tempera- ture gauge should stay in the normal range. If it moves across the dial to "H" (HOT), pull over and stop as soon as possible and turn off the engine. Then open the hood and, after the engine has cooled, check the coolant level and the water pump drive belt.
The tachometer registers the speed of your engine in revolutions per minute (rpm).
OCM015014L
CAUTION:
The engine should not be raced to such a speed that the needle enters the red zone on the tachometer face. This can cause severe engine damage and may void your warranty.
B300A01A-AAT Speedometer
B310B01CM-AAT Odometer/Tripmeter
2. Tripmeter
FEATURES OF YOUR HYUNDAI
71
OCM051016L Your Hyundai's speedometer is calibrated in miles per hour (on the outer scale) and kilometers per hour (on the inner scale).
OCM052203R
1. Odometer The odometer records the total driving distance in miles, and is useful for keeping a record for maintenance intervals.
NOTE: Federal law forbids alteration of the odom- eter of any vehicle with the intent to change the number of the odometer. The alteration may void your warranty cov- erage.
OCM052055
Pushing in the TRIP switch when the igni- tion switch is turned "ON" will display two tripmeters in kilometers or miles.1FEATURES OF YOUR HYUNDAI 72
TRIP COMPUTER
B400B01CM-AAT (If Installed)
OCM052204R
To shift from TRIP A to TRIP B, press the TRIP switch.
TRIP A: First distance you have traveled from your origination point to a first destination.
TRIP B: Second distance from the first destination to the final destina- tion.
OCM051018L When the RESET switch is pressed for 1
second, the tripmeter will reset to 0.OCM051017A
Trip computer is a microcomputer-controlled driver information system that displays in- formation related to driving on the LCD.
FEATURES OF YOUR HYUNDAI
73
Tripmeter
Odometer
OCM052205R
Trip Switch
Reset Switch
1. Tripmeter
OCM052055
Pushing in the TRIP switch for when the ignition switch is in "ON" position changes the display as follows;OCM051018L Push in the RESET switch more than 1
second to initialize the displayed informa- tion.TRIPMETER
DISTANCE TO EMPTY
AVERAGE FUEL CONSUMPTION
OUTSIDE TEMPERATURE
(If installed)
o This mode indicates the total distance travelled since the last tripmeter reset. Total distance is also reset to zero if the battery is disconnected.
o Pressing the RESET switch for more than 1 second when the tripmeter is being displayed clears the tripmeter to zero.
o The meter's working range is from 0 to
999.9.
1FEATURES OF YOUR HYUNDAI 74
2. Distance to Empty
Distance to empty
Distance to Empty letter
Odometer
OCM052206A
o This mode indicates the estimated dis- tance to empty from the current fuel level in the fuel tank.
o The trip computer may not register ad- ditional fuel if less than 1.36 gallons (6
liters) of fuel are added to the vehicle.OCM052207A
o When the estimated distance to empty is less than 30 miles, the distance to empty digits (---) will blink until more fuel is added.
NOTE: o The estimated distance to empty can differ from the actual tripmeter ac- cording to driving conditions.
o The estimated distance to empty can vary according to the driving condi- tions, driving pattern or vehicle speed.
3. Average Fuel Consumption
Average fuel consumption
Odometer
OCM052208A
o This mode calculates the average fuel consumption from the total fuel used and the distance since the last average consumption reset.
o The total fuel used is calculated from the
fuel consumption input.
o Average fuel consumption is reset to zero (---) if the battery is disconnected. o To reset the average fuel consumption to zero (---), press and hold the RESET switch for more than 1 second.
o When you drive 0.5 mile and less after resetting, the average fuel consump- tion will be displayed to '---'.
4. Outside temperature (If installed)
Outside temperature
Odometer
OCM052210R
This mode indicates the outside tempera- ture between -40°F and 167°F.
MULTI-FUNCTION LIGHT SWITCH
B340A01A-AAT Combination Turn Signal, Headlight and High-beam Switch Turn signal operation Pulling down on the lever causes the turn signals on the left side of the car to blink. Pushing upwards on the lever causes the turn signals on the right side of the car to blink. As the turn is completed, the lever will automatically return to the center posi- tion and turn off the turn signals at the same time. If either turn signal indicator light blinks more rapidly than usual, goes on but does not blink, or does not go on at all, there is a malfunction in the system. Check for a burned-out fuse or bulb or see your Hyundai dealer.
FEATURES OF YOUR HYUNDAI
75
B340B01A-AAT Lane Change Signal
OCM028065
To indicate a lane change, move the lever up or down to a point where it begins flashing. The lever will automatically return to the center position when released.1FEATURES OF YOUR HYUNDAI 76
B340C01CM-AAT Headlight Switch
OCM028060
To operate the headlights, turn the barrel on the end of the multi-function switch. The first position turns on the parking lights, sidelights, tail lights and instrument panel lights. The second position turns on the headlights. NOTE: The ignition must be in the "ON" position to turn on the headlights.Parking Light Auto Off o The purpose of this feature is to prevent the battery from being discharged. The system automatically turns off the head- lights and parking lights when the driver removes the ignition key and opens the driver- side door.
o With this feature, the parklight will be turned off automatically if the driver parks on the side of road at night. If necessary, to keep the lights on when the ignition key is removed, perform the following : 1) Open the driver-side door. 2) Turn the parking lights OFF and ON again using the light switch on the steering column.
B340D01A-AAT High-beam Switch
OCM028063
To turn on the headlight high beams, push the lever forward (away from you). The High Beam Indicator Light will come on at the same time. For low beams, pull the lever back toward you.B340E01A-AAT Headlight Flasher
B340G01LZ-AAT Auto Light (If Installed)
OCM029064L To flash the headlights, pull the switch lever toward you, then release it. The head- lights can be flashed even though the headlight switch is in the "OFF" position.
OCM029061
To operate the automatic light feature, turn the barrel on the end of the multi-function switch. If you set the multi-function switch to "AUTO", the tail lights and headlights will be turned automatically on or off ac- cording to external illumination conditions.NOTE: Turn the lights manually in foggy, cloudy and rainy conditions.
FEATURES OF YOUR HYUNDAI
77
Auto light sensor
OCM052062
NOTE: o Never place anything over the sensor located on the instrument panel to ensure better auto light system con- trol.
o Don't clean the sensor using a win-
dow cleaner.
o If your vehicle has window tint or other types of coating on the windshield, the AUTO light system may not work prop- erly.
1FEATURES OF YOUR HYUNDAI 78 WINDSHIELD WIPER AND
WASHER SWITCH Windshield wiper/washer
Type A
Rear window wiper/washer (if installed) Type A
Type B
Type B
AUTO
OCM0280907/OCM0280902/OCM0280908/OCM0280903
A : Wiper speed control
· MIST – Single wipe · OFF – Off · INT/AUTO – Intermittent wipe or Auto control wipe (If installed)
· LO – Low wiper speed · HI – High wiper speed
B : Intermittent or Auto control wipe time
adjustment
C : Wash with brief wipes
D : Rear wiper/washer control - Spraying washer fluid
· · ON - Continuous wipe · OFF - Off ·
- Wash with brief wipes
FEATURES OF YOUR HYUNDAI
79
NOTE: To prevent damage to the wiper system, do not attempt to wipe away heavy accu- mulations of snow or ice with the windsheild wipers. Accumulated snow and ice should be removed manually. If there is only a light layer of snow or ice, operate the heater in the defrost mode to melt the snow or ice before using the wiper or activate the windshield wiper blade deicer.(if installed)
MIST : For a single wiping cycle, push the lever upward and release it with the lever in the OFF position. The wipers will operate continuously if the lever is pushed upward and held.
OFF : Wiper is not in operation INT : Wiper operates intermittently at the same wiping intervals. Use this mode in a light rain or mist. To vary the speed setting, turn the speed control knob(1). (If installed)
LO : Normal wiper speed HI
: Fast wiper speed
B350A01CM-AAT Windshield wiper Type A
Type B
OCM0280906
OCM028067
Operates as follows when the ignition switch is turned ON.If the ignition switch is turned "ON" when the wiper switch is set in "AUTO" mode, or the wiper switch is set in "AUTO" mode when the ignition switch is "ON", or the speed control knob is turned upward when the wiper switch is in "AUTO" mode, the wiper will operate once to perform a self- check of the system. Set the wiper to the "OFF" position when the wiper is not in use.
NOTE: If there is heavy accumulation of snow or ice on the windshield glass, there will be a 10 minute waiting period prior to the operation of the automatic windshield wipers system.
1FEATURES OF YOUR HYUNDAI 80
B350B02CM-AAT Auto Wiper Operation (If Installed) Type A
Type B
OCM027071A
OCM028071
When the windshield wiper switch is placed in the "AUTO" position, the rain sensor located on the upper end of windshield glass senses the amount of rainfall and controls for the appropriate length of the intervals between wipes appropriately.Rain Sensor
OCM052300
WARNING:
When the ignition switch is on and the windshield wiper switch is placed in the "AUTO" mode, please use caution to avoid any hand injury: The wiper system may automatically activate. The fingers or hand might be caught in the wiper. o Do not touch the upper end of the wind-
shield glass facing the rain sensor.
o Do not wipe the upper end of the wind-
shield glass with a cloth.
o Do not put pressure on the windshield
glass.
B350B02O-GAT Windshield Washer Operation Type A
Type B
OCM027069A
When the washer lever is operated, the wipers automatically make two passes across the windshield. The washer contin- ues to operate until the lever is released.
NOTE: o Do not operate the washer more than 15 seconds at a time or when the washer fluid reservoir is empty.
o In icy or freezing weather, be sure the wiper blades are not frozen to the glass prior to operating the wipers. o In areas where water freezes in win- ter, use windshield washer fluid ap- propriate for cold weather.
FEATURES OF YOUR HYUNDAI
81
Mist Wiper Operation
Type A
Type B
OCM027074A
OCM028069
To use the windshield washer, pull the wiper/washer lever toward the steering wheel.OCM028070
If a single wipe is desired in mist, push the windshield wiper and washer control lever upwards.
: Wash with brief wipes
ON : Normal wiper operation OFF : Wiper is not in operation
: Spraying washer fluid and wiping
NOTE: Do not operate the washer continuously for more than 15 seconds or when the fluid reservoir is empty; this could dam- age the system. Do not operate the wiper when the window is dry; this can result in scratching as well as premature wiper blade wear. For the same reason, do not operate the washer when the washer fluid reservoir is empty.
1FEATURES OF YOUR HYUNDAI 82
B350C01CM-AAT Adjustable Intermittent Wiper Operation (if installed) Type A
B390A02CM-GAT Rear Window Wiper and Washer (if installed) Type A
Type B
Type B
OCM027072A
OCM027073A
OCM028072
To use the intermittent wiper feature, place the wiper switch in the "INT" position. With the switch in this position, the interval between wipes can be varied by turning the interval adjuster barrel.OCM028073
Turn the switch to desired position to oper- ate the rear wiper and washer.FRONT FOG LIGHT SWITCH
HAZARD WARNING SYSTEM
B360A01CM-AAT (If installed)
B370A01A-AAT
FEATURES OF YOUR HYUNDAI
REAR WINDOW DEFROSTER SWITCH B380A01CM-AAT
83
OCM052074
To turn on the front fog lights, push the switch in the "ON" position. They will light when the headlight switch is in the second position.OCM052075N The hazard warning system should be used whenever you find it necessary to stop the car in a hazardous location. When you must make such an emergency stop, always pull off the road as far as possible. The hazard warning lights are turned on by pushing in the hazard switch. This causes all turn signal lights to blink. The hazard warning lights will operate even though the key is not in the ignition. To turn the hazard warning lights off, push the switch a second time.
OCM052080N The rear window defroster and heated outside rear view mirrors are turned on by pushing in the switch when the engine is running. At the same time, the rear window defroster indicator light on the switch is turned on. To turn the defroster off, push the switch a second time. The rear window defroster automatically turns itself off after about 20 minutes. To restart the defroster cycle, push in on the switch again after it has turned itself off.
1FEATURES OF YOUR HYUNDAI 84
Front Windshield Deicer (If Installed) If your vehicle is installed with the front windshield deicer, it will be operating at the same time when you operate the rear window defroster. This function helps release stuck wind- shield wipers, especially in winter time and cold regions.
Outside Rearview Mirror Heater (If Installed) If your vehicle is installed with the outside rearview mirror heater, it will operate at the same time when you operate the rear window defroster.
CAUTION:
Do not clean the inner side of the rear window glass with an abrasive type of glass cleaner or use a scraper to re- move foreign deposits from the inner surface of the glass as this may cause damage to the defroster elements.
NOTE: Use the rear window defroster only when the engine is running.
DIGITAL CLOCK
INSTRUMENT PANEL LIGHT CONTROL (RHEOSTAT)
B400A01NF-GAT
B410A01A-AAT
OCM052056
The instrument panel lights can be made brighter or dimmer by turning the instru- ment panel light control knob.OCM052116A There are three control buttons for the digital clock. Their functions are: H - Push "H" to advance the hour indi-
cated.
cated.
M - Push "M" to advance the minute indi-
R - Push "R" to reset minutes to ":00" to facilitate resetting the clock to the correct time. When this is done: Pressing "R" between 11 : 01 and 11
: 29 changes the readout to 11 : 00. Pressing "R" between 11 : 30 and 11
: 59 changes the readout to 12 : 00. Push the "R" button for 5 seconds to display a 12 or 24-hour clock.CIGARETTE LIGHTER
B420A02A-AAT
FEATURES OF YOUR HYUNDAI
85
ASHTRAY
B430A01CM-AAT Front Ashtray
HHR2098A
OCM052120
For the cigarette lighter to work, the key must be in the "ACC" position or the "ON" position. To use the cigarette lighter, push it all the way into its socket. When the element has heated, the lighter will pop out to the "ready" position. Do not hold the cigarette lighter pressed in. This can dam- age the heating element and create a fire hazard. If it is necessary to replace the cigarette lighter, use only a genuine Hyundai replacement or its approved equivalent.CAUTION:
Do not use electric accessories or equip- ment other than the Hyundai genuine parts in this socket.
OCM052127
The front ashtray may be opened by push- ing and releasing the ashtray lid. To re- move the ashtray to empty or clean it, lift the ashtray upward and pull it out.1FEATURES OF YOUR HYUNDAI 86
POWER OUTLETS
B500D01TG-AAT
(If installed)
(If installed)
OCM052121
OCM052123
The power outlets are designed to provide power for mobile telephones or other de- vices designed to operate with vehicle electrical systems. The devices should draw less than 10 amps with the engine running.OCM052122L
CAUTION:
o Use the power outlets only when the engine is running. Remove the plug from the power outlet after using the electric device. Using the power out- lets when the engine stops or keeping the electric device plugged in for many hours may cause the battery to dis- charge.
o Do not use the power outlet to connect electric accessories or equipment that are not designed to operate on 12
volts.o Some electronic devices can cause electronic interference when plugged into the power outlet. These devices may cause excessive audio noise and malfunctions in other electronic systems or devices in your vehicle.
B505A01CM-AAT AC Inverter (If installed)
These supply 115VAC/150W electric power to operate electric accessories or equipment when the key is in the "ON" position or engine is running. The AC Inverter is turned on by pushing in the switch. To turn the AC Inverter off, push the switch a second time.
NOTE: When pushing the AC inverter switch, the switch indicator illumination is de- layed momentarily while the system conducts a self-check.
OCM052124A
OCM036305A
FEATURES OF YOUR HYUNDAI
87
CAUTION:
o When not using the AC Inverter, make sure that the switch is turned off, and is closed the AC Inverter cover.
o Only use when the engine is running, and remove the plug from the AC Inverter after using the accessory. Using when the engine is not running or leaving the accessory plugged in for long time may cause the battery to discharge.
o Do not use the electric accessories or equipment with maximum electric power consumption greater than 150W (115VAC).
o Some electronic devices can cause electronic interference when plugged into the AC Inverter. These devices may cause excessive audio noise and malfunctions in other electronic systems or devices used in your ve- hicle.
o Do not use broken electric accesso- ries or equipment, as they may dam- age the AC Inverter and vehicle's elec- trical system.
o Do not use two or more electric ac- cessories or equipment at the same time.
o When input voltage is under 11V, the outlet LED and indicator will blink, and will automatically turn off.
1FEATURES OF YOUR HYUNDAI 88
DRINK HOLDER
! WARNING:
The AC Inverter can be dangerous! When using the AC Inverter, carefully observe the following precautions to avoid seri- ous injuries. o Do not use heated electric products (coffeepot, toaster, heater, iron, etc.). o Do not insert a foreign objects into or touch the AC Inverter; you may get shocked.
o Do not let children operate or touch
o When not using the AC Inverter, close
the AC Inverter.
the cover.
B450A01CM-AAT Front Drink Holder
B450B01NF-GAT Rear Drink Holder
OCM052131
The front drink holder is located on the main console.OCM052132
The rear drink holder for holding cups or cans is located in the center of the rear seat armrest.!
CAUTION:
Place the drink holder in its closed posi- tion when not in use.
! WARNING:
o Use caution when using the drink hold- ers. A spilled beverage that is very hot can injure you or your passen- gers. Spilled liquids can damage inte- rior trim and electrical components. o Do not place objects other than cups or cans in the drink holder. These objects can be thrown out in the event of a sudden stop or an accident, pos- sibly injuring the passengers in the vehicle.
SEATBACK POCKET
SUNROOF
B540B02E-AAT (If Installed)
B460A03Y-AAT (If Installed) Sun Shade
FEATURES OF YOUR HYUNDAI
89
OCM051022L The seatback pockets for holding papers are located on the backside of the front seats.
WARNING:
To avoid injury, do not place large or hard objects in the seat back pockets.
OCM051023L Your vehicle is equipped with a sliding sunshade which you can manually adjust to let in light with the sunroof closed, or to block sunlight.
WARNING:
Never adjust the sunshade while driv- ing. This could result in loss of control and an accident that may cause death, serious injury, or property damage.
1FEATURES OF YOUR HYUNDAI 90
B460B01CM-AAT Opening the Sunroof System
OCM051024L If your vehicle is equipped with this feature, you can slide or tilt your sunroof with the sunroof control buttons located on the overhead console. The sunroof can only be opened, closed, or tilted when the ignition switch is in the "ON" position.
Auto slide open To use the auto slide feature, momentarily (more than 1 second) press the OPEN button on the overhead console. The sunroof will slide all the way open. To stop the sunroof sliding at any point, press any sunroof control button.
Manual slide open Press the OPEN button on the overhead console for less than 0.5 second.
Auto slide close To close the sunroof, press the CLOSE button on the overhead console for more than 1 second. The sunroof will slide all the way close. To stop at the desired point, press any sunroof control button.
Auto Reverse If an object is detected while the sunroof is closing automatically, it will reverse direc- tion, and then stop. Auto reverse function does not work if a small obstacle is blocked between the sliding glass and the sunroof sash. You should always check that all passengers and objects are away from the sunroof before closing it.
WARNING:
Be careful that someone’s head, hands and body are not trapped by a closing sunroof.
Manual slide close Press the CLOSE button on the overhead console for less than 0.5 second.
FEATURES OF YOUR HYUNDAI
91
WARNING:
o Do not close a sunroof if anyone's hands, arms or body are between the sliding glass and the sunroof sash, as this could result in injury.
o Do not place your head or arms out of
the sunroof opening at any time.
o While the vehicle is moving, always keep the head, hands and other parts of the body of all occupants away from the roof opening. Otherwise, you could be seriously injured if the ve- hicle stops suddenly or if the vehicle is involved in an accident.
B460C01CM-GAT Tilting the Sunroof System
Close To close the sunroof, press the CLOSE button on the overhead console and hold it until the sunroof is closed.
NOTE: After washing the car or after there is rain, be sure to wipe off any water that is on the sunroof before operating it.
OCM051025L
Auto tilt open To use the autotilt feature, momentarily (more than 1 second) press the TILT UP button on the overhead console. The sunroof will tilt all the way open. To stop the sunroof tilting at any point, press any sunroof control button. Manual tilt open Press the TILT UP button on the overhead console for less than 0.5 second.
1FEATURES OF YOUR HYUNDAI 92
CAUTION:
o Do not open the sunroof in severely cold temperature or when it is cov- ered with ice or snow.
o Periodically remove any dirt that may have accumulated on the guide rails. o Do not press any sunroof control but-
ton longer than necessary. Damage to the motor or system com- ponents could occur.
INTERIOR LIGHT
B480B01CM-AAT Map Light
(cid:129)
: Push in the map light switch to turn the light on or off. This light pro- duces a spot beam for convenient use as a map light at night or as a personal light for the driver and the passenger.
B490A01CM-AAT Interior Light
FEATURES OF YOUR HYUNDAI
93
OCM052077A
The light comes on when any door is opened regardless of the ignition switch position. If a door is opened with the ignition switch in the ACC or LOCK position, the light stays on for about 20 minutes. However, if a door is opened with the ignition switch in the ON position, the light stays on continuously. When doors are unlocked by the transmit- ter, the light comes on for approximately 30
seconds as long as any door is not open. The light goes out gradually after approxi- mately 30 seconds if the door is closed. However, if the ignition switch is ON or all doors are locked, the light will turn off immediately.OCM052079L
The interior courtesy light has two buttons. The two buttons are:
o DOOR The courtesy light turns on when a door is opened or when a door is unlocked by the transmitter (if installed). The interior light goes out slowly after 30 seconds after the door is closed. However if the ignition switch is ON or all vehicle doors are locked when the door is closed, interior light will turn off even within 30 seconds.
1FEATURES OF YOUR HYUNDAI 94
SUNGLASS HOLDER
o ON In the "ON" position, the light stays on at all times.
B540C01JM-GAT Luggage Compartment Light
B491A04O-AAT
CAUTION:
Do not leave this button pressed for an extended period of time when the ve- hicle is not running.
Luggage compartment light has a 3-posi- tion switch. The three positions are:
OCM052078L
OCM052130
The sunglass holder is located on the front overhead console. Push the end of the cover to open the sunglass holder.o In the "DOOR" position, the luggage compartment light comes on when the tail gate is opened, then goes out when it is closed.
o In the "ON" position, the light stays on at
o In the "OFF" position, the light stays off
all times.
at all times.
WARNING:
o Do not keep objects other than eye- glasses inside the sunglass holder. Such objects can be thrown from the holder in the event of a sudden stop or an accident, possibly injuring the pas- sengers in the vehicle.
o Do not open the sunglass holder while the vehicle is moving. The rear view mirror of the vehicle can be blocked by an open sunglass holder.
CONVERSATION MIRROR
STORAGE BOX
B525A01CM-AAT (If Installed)
B500A01Y-AAT Glove Box
FEATURES OF YOUR HYUNDAI
95
B500B01O-AAT Illuminated Glove Box Opening the glove box will automatically turn on the light when the multi-function switch is turned to the first/second position.
OCM052151
To use the mirror, push the cover and open it. Adjust mirror angle to the desired posi- tion. Close the cover after use.WARNING
Do not adjust the mirror angle or look at rear passengers while driving. This could result in loss of control, and an accident causing death, serious injury, or prop- erty damage.
OCM052128
! WARNING:
To avoid the possibility of injury in case of an accident or a sudden stop, the glove box door should be kept closed when the car is in motion.
o To open the glove box, pull on the glove
box release lever.
o The glove box door can be locked (and
unlocked) with the key (if installed).
1FEATURES OF YOUR HYUNDAI 96
B505A02NF-GAT Center Console Box
B505C01CM-AAT Rear Console Box
B505B01CM-GAT Center facia upper tray (If Installed)
OCM052129
The center console box is used for storing small articles. To use the center console box, pull up the button and lift the lid to open it.OCM051021L The rear console box is located on the rear main console and may be used for small articles. It is opened by pulling forward.
OCM051020L The center facia upper tray is used for storing small articles. To use the center facia upper tray, pull up the button and lift lid to open it.
WARNING:
To avoid the possibility of injury in case of an accident or a sudden stop, the center console box lid should be kept closed when the car is in motion.
WARNING:
To avoid the possibility of injury in case of an accident or a sudden stop, the tray should be kept closed when the car is in motion.
! WARNING:
o Do not store cigarette lighters, pro- pane cylinders, or other flammable/ explosive materials in the vehicle. These items may catch fire and/or explode if the vehicle is exposed to hot temperatures for extended peri- ods.
o To avoid the possibility of injury in case of an accident or a sudden stop, the center facia upper tray lid should be kept closed when the car is in motion.
FEATURES OF YOUR HYUNDAI
97
To adjust the position of either mirror: 1. Move the selecting switch to the right or left to activate the adjustable mecha- nism for the corresponding door mirror. 2. Adjust mirror angle by depressing the appropriate perimeter switch as illus- trated.
OUTSIDE REARVIEW MIRROR
B510B01TG-AAT The outside rearview mirrors can be ad- justed to your preferred rear vision, both directly behind the vehicle, and to the rear of the left and right sides. The remote control outside rearview mir- ror switch controls the adjustments for both right and left outside mirrors.
NOTE: Before driving away, always check that your mirrors are positioned so you can see behind you, both to the left and right sides, as well as directly behind your vehicle.
CAUTION:
If the mirror is jammed with ice, do not adjust the mirror by force. Use an ap- proved spray de-icer (not radiator anti- freeze) to release the frozen mecha- nism or move the vehicle to a warm place and allow the ice to melt.
OCM052053
1FEATURES OF YOUR HYUNDAI 98
CAUTION:
o Do not operate the switch continu- ously for an unnecessary length of time.
o Scraping ice from the mirror face could cause permanent damage. To remove any ice, use a sponge, soft cloth or approved de-icer.
WARNING:
Be careful when judging the size or dis- tance of any object seen in the passen- ger side rearview mirror. It is a convex mirror with a curved surface, and any objects seen in this mirror are closer than they appear.
B510D01CM-AAT Outside Rearview Mirror Heater (If Installed)
B510C01TG-AAT Folding The Outside Rearview Mirrors (Manual Type)
OCM052080N
B510C01CM
To fold the outside rearview mirrors, push them towards the rear. The outside rearview mirrors can be folded rearward for parking in narrow areas.
The outside rearview mirror heater is actu- ated in connection with the rear window defroster. To heat the outside rearview mirror glass, push in the switch for the front/ rear window defroster. The rearview mir- ror glass will be heated for defrosting or defogging and will give you improved rear vision in inclement weather conditions. Push the switch again to turn the heater off. The outside rearview mirror heater auto- matically turns itself off after 20 minutes.
DAY/NIGHT INSIDE REAR- VIEW MIRROR
B520A01A-AAT Manual Type
FEATURES OF YOUR HYUNDAI
99
B520C01CM-AAT Automatic Dimming Rearview Mirror with Compass (If installed)
CAUTION:
If the mirror is jammed with ice, do not adjust the mirror by force. Use an ap- proved spray de-icer (not radiator anti- freeze) to release the frozen mecha- nism or move the vehicle to a warm place and allow the ice to melt.
! WARNING:
Do not adjust or fold the outside rearview mirrors while the vehicle is moving. This could result in loss of control, and an accident causing death, serious injury or property damage.
B520A01CM
Your Hyundai is equipped with a day/night inside rearview mirror. The "night" position is selected by flipping the tab at the bottom of the mirror toward you. In the "night" position, the glare of headlights of cars behind you is reduced.
B520C08JM
1. Status Indicator LED 2. Feature Control Button 3. Rear Light Sensor 4. Display Window
Automatic dimming rearview mirrors auto- matically controls the glare from head- lights behind you when the function is turned on by pressing and holding the Feature Control Button for more than 3 but less than 6 seconds. This feature can be turned off by pressing and holding the button for the same amount of time once more.
1FEATURES OF YOUR HYUNDAI 100
To operate Compass feature Press and release the button, then the vehicle's directional heading will be dis- played. Pressing and releasing the button again will turn off the display. Heading display - E : East - W : West - S : South - N : North ex) NE : North East
Calibration procedure If the compass is not properly calibrated, set to the correct variance zone, or the vehicle is driven in certain environments (tunnel, underground or in-building park- ing garage, near transformer substation), the following may occur :
“C” is displayed.
- The compass heading become inaccu-
- The compass heading does not
- Some compass headings are not dis-
rate.
changed.
played.
- The compass headings are inaccurate
in long distance driving.
If the vehicle’s compass headings become inaccurate, the compass should be cali- brated as follows: 1. Ensure the vehicle is not located near large steel structures or under electric power lines.
2. Turn on the compass by pressing the
button.
3. Press and hold the
button for more than 6 but less than 9 seconds. The current zone number will appear in the but- display. Release then press the ton until your zone number appears in the display.
4. Check the mirror angle by pressing and button for more than
holding the 12seconds. Release then press the button to “L”(for steering wheel on the Left side of the vehicle). (if installed)
5. Press and hold the
and 12 seconds. Release the when a “C” appears in the display.
button between 9
button6. Drive the vehicle in 2 complete circles at less than 5mph(8km/h) or until the compass heading appears.
CAUTION:
Be sure the area is free of traffic, pedes- trians, and obstructions.
FEATURES OF YOUR HYUNDAI
101
Setting the compass zone 1. Determine the Zone Number based on your current location in the Zone Map.
B520C06JM 2. Press and hold the button for more than 6 but less than 9 seconds. The current zone number will appear in the display. 3. Release then press the button to incre-
ment to new your zone number.
4. Drive the vehicle in 2 complete circles at less than 5mph(8km/h) or until the compass heading appears.
CAUTION:
o Do not install a ski rack, antenna, etc. which are attached to the vehicle by means of a magnet. They affect the operation of the compass.
o If the compass deviates from the cor- rect indication soon after repeated adjustment, have the compass checked at an authorized dealer.
o The compass may not indicate the correct indication in tunnels or while driving up or down a steep hill.(The compass returns to the correct com- pass point when the vehicle moves to an area where the geomagnetism is stabilized.)
o When cleaning the mirror, use a paper towel or similar material dampened with glass cleaner. Do not spray glass cleaner directly on the mirror as that may cause the liquid cleaner to enter the mirror housing.
1FEATURES OF YOUR HYUNDAI 102
HOMELINK MIRROR
B520C01CM-AAT Automatic-Dimming Mirror with Z-Nav™ Electronic Compass Display and HomeLink® (If Installed) Your vehicle comes with a Gentex Auto- matic-Dimming Mirror with a Z-Nav™ Elec- tronic Compass Display and an Integrated HomeLink® Wireless Control System. Dur- ing nighttime driving, this feature will auto- matically detect and reduce rearview mir- ror glare while the compass indicates the direction the vehicle is pointed. The HomeLink® Universal Transceiver allows you to activate your garage door(s), elec- tric gate, home lighting, etc.
1. Channel 1 Button 2. Channel 2 Button 3. Status Indicator LED 4. Channel 3 Button
B520C01CM
5. Rear Light Sensor 6. Dimming On/Off Button 7. Compass Control Button 8. Display
Automatic-Dimming Night Vision Safety™ (NVS®) Mirror The NVS® Mirror in your vehicle is the most advanced way to reduce glare in the rear- view mirror during any driving situation. For more information regarding NVS® mir- rors and other applications, please refer to the Gentex website: www.gentex.com.
CAUTION:
Too close the NVS® Mirror automatically reduces glare during driving conditions based upon light levels monitored in front of the vehicle and from the rear of the vehicle. These light sensors are visible through openings in the front and rear of the mirror case. Any object that would obstruct either light sensor will degrade the automatic dimming control feature.
FEATURES OF YOUR HYUNDAI
103
Automatic-Dimming Function Your mirror will automatically dim upon detecting glare from the vehicles traveling behind you. The auto-dimming function can be controlled by the Dimming ON/OFF Button:
Z-Nav™ Compass Display The NVS™ Mirror in your vehicle is also equipped with a Z-Nav™ Compass that shows the vehicle Compass heading in the Display Window using the 8 basic cardinal headings (N, NE, E, SE, etc.).
1. Pressing the
button turns the auto- dimming function OFF which is indi- cated by the green Status Indicator LED turning off.
2. Pressing the
button again turns the auto-dimming function ON which is in- dicated by the green Status Indicator LED turning on.
NOTE: The mirror defaults to the "ON" position each time the vehicle is started.
Compass Function The Compass can be turned ON and OFF and will remember the last state when the ignition is cycled. To turn the display fea- ture ON/OFF: 1. Press and release the
button to turn
the display feature OFF.
2. Press and release the
button again
to turn the display back ON.
Additional options can be set with press button and and hold sequences of the are detailed below.
There is a difference between magnetic north and true north. The compass in the mirror can compensate for this difference when it knows the Magnetic Zone in which it is operating. This is set either by the dealer or by the user. The operating Zone Numbers for North America are shown in the figure on the following section.
1FEATURES OF YOUR HYUNDAI 104
To adjust the Zone setting: 1. Determine the desired Zone Number based upon your current location on the Zone Map.
2. Press and hold the
button for more than 3 but less than 6 seconds, the current Zone Number will appear on the display.
3. Pressing and holding the
button again will cause the numbers to incre- ment (Note: they will repeat …13, 14, 15, 1, 2, …). Releasing the button when the desired Zone Number appears on the display will set the new Zone.
4. Within about 5 seconds the compass will start displaying a compass heading again.
There are some conditions that can cause changes to the vehicle magnets. Items such as installing a ski rack or a CB an- tenna or even some body repair work on the vehicle can cause changes to the vehicle's magnetic field. In these situa- tions, the compass will need to be re- calibrated to quickly correct for these changes. To re-calibrate the compass:
B520C05NF
1. Press and hold the
button for more than 6 seconds. When the compass memory is cleared a "C" will appear in the display.
2. To calibrate the compass, drive the vehicle in 2 complete circles at less than 5 MPH (8 Km/h) or until the compass heading appears.
CAUTION:
Be sure the area is free of traffic, pedes- trians, and obstructions.
Integrated HomeLink® Wireless Control System The HomeLink® Wireless Control System provides a convenient way to replace up to three hand-held radio-frequency (RF) transmitters with a single built-in device. This innovative feature will learn the radio frequency codes of most current transmit- ters to operate devices such as gate op- erators, garage door openers, entry door locks, security systems, even home light- ing. Both standard and rolling code- equipped transmitters can be programmed by following the outlined procedures.
FEATURES OF YOUR HYUNDAI
105
Programming HomeLink®
NOTE: o When programming a garage door opener, it is advised to park the ve- hicle outside of the garage.
o It is recommended that a new battery be placed in the hand-held transmit- ter of the device being programmed to HomeLink® for quicker training and accurate transmission of the radio- frequency signal.
o Some vehicles may require the igni- tion switch to be turned to the second (or "accessories") position for pro- gramming and/or operation of HomeLink.
o In the event that there are still pro- gramming difficulties or questions after following the programming steps listed below, contact HomeLink® at: www.homelink.com or 1-800-355- 3515.
Additional HomeLink® information can be found at: www.homelink.com or by calling 1-800-355-3515.
CAUTION:
Before programming HomeLink® to a garage door opener or gate operator, make sure that people and objects are out of the way of the device to prevent potential harm or damage. Do not use HomeLink® with any garage door opener that lacks the safety stop and reverse features as required by U.S. federal safety standards (this includes any ga- rage door opener model manufactured before April 1, 1982). A garage door that cannot detect an object - signaling the door to stop and reverse - does not meet current U.S. federal safety standards. Using a garage door opener without these features increases the risk of serious injury or death.
Retain the original transmitter of the RF device you are programming for use in other vehicles as well as for future HomeLink® programming. It is also sug- gested that upon the sale of the vehicle, the programmed HomeLink® buttons be erased for security purposes.
1FEATURES OF YOUR HYUNDAI 106
Standard Programming To train most devices, follow these instruc- tions: 1. For first-time programming, press and hold the two outside buttons, HomeLink® Channel 1 and Channel 3 Buttons, until the indicator light begins to flash (after 20 seconds). Release both buttons. Do not hold the buttons for longer than 30
seconds.2. Position the end of your hand-held trans- mitter 1-3 inches (5-14 cm) away from the HomeLink® buttons while keeping the indicator light in view.
3. Simultaneously press and hold both the HomeLink® and hand-held trans- mitter button. DO NOT release the but- tons until step 4 has been completed. 4. While continuing to hold the buttons the red Indicator Status LED will flash slowly and then rapidly after HomeLink® suc- cessfully trains to the frequency signal from the hand-held transmitter. Release both buttons.
5. Press and hold the just-trained HomeLink® button and observe the red Status Indicator LED. If the indicator light stays on constantly, programming is complete and your device should activate when the HomeLink® button is pressed and released.
6. To program the remaining two HomeLink® buttons, follow steps 2
through 5.Rolling Code Programming Rolling code devices which are "code- protected" and manufactured after 1996
may be determined by the following: o Reference the device owner's manualfor verification.
o The handheld transmitter appears to program the HomeLink Universal Trans- ceiver but does not activate the device. o Press and hold the trained HomeLink button. The device has the rolling code feature if the indicator light flashes rap- idly and then turns solid after 2 seconds.
To train rolling code devices, follow these instructions:
1. At the garage door opener receiver (motor-head unit) in the garage, locate the "learn" or "smart" button. This can usually be found where the hanging antenna wire is attached to the motor- head unit. Exact location and color of the button may vary by garage door opener brand. If there is difficulty locat- ing the training button, reference the device owner's manual or please visit our Web site at www.homelink.com.
2. Firmly press and release the "learn" or "smart" button (which activates the "train- ing light").
NOTE: There are 30 seconds in which to initiate step3.
3. Return to the vehicle and firmly press, hold for two seconds and then release the desired HomeLink® button. Repeat the "press/hold/release" sequence a second time to complete the program- ming. (Some devices may require you to repeat this sequence a third time to complete the programming.)
4. Press and hold the just-trained HomeLink® button and observe the red Status Indicator LED. If the indicator light stays on constantly, programming is complete and your device should activate.
5. To program the remaining two HomeLink® buttons, follow either steps 1 through 4 above for other Rolling Code devices or steps 2 through 5 in Standard Programming for standard devices.
Gate Operator & Canadian Programming During programming, your handheld trans- mitter may automatically stop transmitting. Continue to press the Integrated HomeLink® Wireless Control System but- ton (note steps 2 through 4 in the Standard Programming portion of this document) while you press and re-press ("cycle") your handheld transmitter every two seconds until the frequency signal has been learned. The indicator light will flash slowly and then rapidly after several seconds upon successful training.
Operating HomeLink® To operate, simply press and release the programmed HomeLink® button. Activa- tion will now occur for the trained device (i.e. garage door opener, gate operator, security system, entry door lock, home/ office lighting, etc.). For convenience, the hand-held transmitter of the device may also be used at any time.
Reprogramming a Single HomeLink® Button To program a new device to a previously trained HomeLink® button, follow these steps: 1. Press and hold the desired HomeLink® button. Do NOT release until step 4 has been completed.
2. When the indicator light begins to flash slowly (after 20 seconds), position the handheld transmitter 1 to 3 inches away from the HomeLink® surface.
3. Press and hold the handheld transmit- ter button. The HomeLink® indicator light will flash, first slowly and then rapidly. 4. When the indicator light begins to flash
rapidly, release both buttons.
FEATURES OF YOUR HYUNDAI
107
5. Press and hold the just-trained HomeLink® button and observe the red Status Indicator LED. If the indicator light stays on constantly, programming is complete and your new device should activate.
Erasing HomeLink® Buttons Individual buttons cannot be erased. How- ever, to erase all three programmed but- tons: 1. Press and hold the two outer HomeLink® buttons until the indicator light begins to flash-after 20 seconds.
2. Release both buttons. Do not hold for
longer than 30 seconds.
The Integrated HomeLink® Wireless Con- trol System is now in the training (learn) mode and can be programmed at any time following the appropriate steps in the Pro- gramming sections above.
1FEATURES OF YOUR HYUNDAI 108
FCC ID: NZLZTVHL3
IC: 4112A-ZTVHL3
This device complies with Part 15 of the FCC Rules. Operation is subject to the following two conditions: (1) this device may not cause harmful interference, and (2) this device must accept any interfer- ence received, including interference that may cause undesired operation.! WARNING:
The transceiver has been tested and complies with FCC and Industry Canada rules. Changes or modifications not ex- pressly approved by the party respon- sible for compliance could void the user's authority to operate the device.
NVS® is a registered trademark and Z- Nav™ is a trademark of the Gentex Corpo- ration, Zeeland, Michigan. HomeLink® is a registered trademark owned by Johnson Controls, Incorporated, Milwaukee, Wis- consin.
PARKING BRAKE
B530A02CM-AAT
Type A
Before driving away, be sure that the park- ing brake is fully released and the indicator light is off.
Type A (with manual transaxle) o To engage the parking brake, pull the
lever up as far as possible.
o To release the parking brake, pull up the lever and press the thumb button. Then, while holding the button in, lower the brake lever.
Type B
OCM053002
Type A
Type B (with automatic transaxle) o To engage the parking brake, depress
the parking brake pedal.
o To release the parking brake, depress the parking brake pedal a second time.
NOTE: The parking brake pedal should be checked periodically for proper stroke.
B535A01CM-GAT Parking brake warning chime (if installed) The parking brake warning chime reminds you that the parking brake is applied when you are driving above 6mph(10km/h). Al- ways release the parking brake before you drive.
Type B
OCM053007
Always engage the parking brake before leaving the car. This also turns on the parking brake indicator light when the key is in the "ON" or "START" position.
FEATURES OF YOUR HYUNDAI
109
LUGGAGE COMPARTMENT
B640A01S-AAT Cargo Security Screen (If installed)
TAIL GATE
B540A01CM-AAT
WARNING:
The tail gate should always be kept com- pletely closed while the vehicle is in motion. If it is left open or ajar, poisonous exhaust gases may enter the car result- ing in serious illness or death to the occupants. See additional warnings con- cerning exhaust gases on page 2-2.
o The tail gate is opened by pulling the outside handle up, raising the tail gate manually.
o To close, lower the tail gate, then press down on it until it is closed. To be sure the tail gate is fully closed, always try to pull it up again without using the outside handle.
OCM052123L
To use the security screen, pull it out of the retractor and hook it to the anchors as illustrated.
WARNING:
o Whenever leaving vehicle or parking always set the parking brake as far as possible and fully engage the vehicle's transaxle into the park position. Ve- hicles not fully engaged in park with the parking brake set are at risk for moving inadvertently and injuring yourself or others.
o To prevent unintentional movement when stopped and leaving the vehicle, do not use the gearshift lever in place of the parking brake. Set the parking brake AND make sure the gearshift lever is securely positioned in 1st (First) gear or R (Reverse) for manual transaxle equipped vehicles and in P (Park) for automatic transaxle equipped vehicles.
o Never allow a person who is unfamil- iar with the vehicle or children to touch the parking brake. If the parking brake is released unintentionally, serious injury may occur.
1FEATURES OF YOUR HYUNDAI 110
B650A01S-AAT
Stowage Precautions 1. Do not place objects on the cargo secu- rity screen. Such objects may be thrown about inside the vehicle and possibly injure vehicle occupants during an ac- cident or when braking.
2. For better fuel economy, do not carry
unnecessary weight.
3. Never allow anyone to ride in the lug- gage compartment. It is designed for luggage only.
4. Try to maintain the balance of the ve- hicle and locate the weight as far for- ward as possible.
B540D02O-AAT Luggage Net
WARNING:
Avoid eye injury. DO NOT overstretch. The luggage net ALWAYS keep your face and body out of its recoil path. DO NOT use when the strap has visible signs of wear or damage.
B545B01CM-AAT Luggage Under Tray
OCM052133L-1
When loading objects in the luggage com- partment, use the four rings located in the luggage compartment to attach the lug- gage net as shown illustration. This will help prevent the objects from sliding.CAUTION:
To prevent damage to the goods or the vehicle, care should be taken when car- rying fragile or bulky objects in the lug- gage compartment.
OCM054008
There is a multipurpose receipt space under the luggage mat. Before using, remove the luggage mat (if installed). Raise the cover by using grip.
FEATURES OF YOUR HYUNDAI
111
CAUTION:
o The crossbars should be placed in the proper load carrying positions prior to placing items onto the roof rack.
o If the vehicle is equipped with a sunroof, be sure not to position cargo onto the roof rack in such a way that it could interfere with sunroof opera- tion.
o When carrying cargo on the roof rack, take the necessary precautions to make sure the cargo does not dam- age the roof of the vehicle.
o When carrying large objects on the roof rack, make sure they do not ex- ceed the overall roof length or width.
ROOF RACK
B630A01CM-AAT (If installed)
B635A01CM-GAT To move the front crossbar (If Installed)
OCM052135L
➀ Roof rack ➁ Crossbar (if installed) If your Hyundai has a roof rack, you can load certain items on top of your vehicle. Crossbars and attaching components to adapt the roof rack on your vehicle may be obtained from an authorized Hyundai dealer. To move the crossbars, pull the lock re- lease lever and release it after the desired position is achieved.
OCM052135L-D You can reposition the front crossbar more to the frontside of the vehicle to transport ski equipment or other goods. After remov- ing the bumper molding ➀ and mounting bolt ➁, move the crossbar frontside of the vehicle and fix it up with a bolt into the hole. And then reinstall the bumper molding.
NOTE: When do not use the roof rack, to prevent severe noise of the wind while you driv- ing, place the front crossbar at the ex- treme rearward.
1FEATURES OF YOUR HYUNDAI 112
! WARNING:
o The following specification is the maximum weight that can be loaded onto the roof rack. Distribute the load as evenly as possible across the crossbars and roof rack and secure the load firmly.
o The vehicle is center of gravity will be higher when items are loaded onto the roof rack. Avoid sudden starts, brak- ing, sharp turns, abrupt maneuvers or high speeds that may result in loss of vehicle control or rollover causing an accident.
ROOF RACK
220 lbs (100 kg) EVENLY DISTRIBUTED
WARNING:
o Always drive slowly and turn corners carefully when carrying items on the roof rack. Severe wind updrafts, caused by passing vehicles or natu- ral causes. Can cause sudden up- ward pressure on items loaded on the roof rack. This is especially true when carrying large, flat items.
o To prevent damage or loss of cargo while driving, check frequently to make sure the items on the roof rack are securely fastened.
HIGH-MOUNTED REAR STOP LIGHT
B550A01A-AAT
OCM055027
In addition to the lower-mounted rear stop- lights on either side of the car, the high mounted rear stoplight in the center of the rear window also lights when the brakes are applied.
FEATURES OF YOUR HYUNDAI
113
! WARNING:
o After refueling, make sure the fuel cap is installed securely to prevent fuel spillage in the event of an acci- dent
o Tighten the cap until it clicks, other-
wise the "
" light will illuminate
REMOTE FUEL-FILLER LID RELEASE
B560A01CM-AAT
OCM052014
The fuel-filler lid may be opened from inside the vehicle by pulling up on the fuel- filler lid opener located on the driver's door.NOTE: If the fuel-filler lid will not open because ice has formed around it, tap lightly or push on the lid to break the ice and release the lid. Do not pry on the lid. If necessary, spray around the lid with an approved de-icer fluid (do not use radia- tor anti-freeze) or move the vehicle to a warm place and allow the ice to melt.