- 2011 Hyundai Elantra Owners Manuals
- Hyundai Elantra Owners Manuals
- 2008 Hyundai Elantra Owners Manuals
- Hyundai Elantra Owners Manuals
- 2010 Hyundai Elantra Owners Manuals
- Hyundai Elantra Owners Manuals
- 2003 Hyundai Elantra Owners Manuals
- Hyundai Elantra Owners Manuals
- 2004 Hyundai Elantra Owners Manuals
- Hyundai Elantra Owners Manuals
- 2006 Hyundai Elantra Owners Manuals
- Hyundai Elantra Owners Manuals
- 2007 Hyundai Elantra Owners Manuals
- Hyundai Elantra Owners Manuals
- Download PDF Manual
-
is safe to do so.
2. Place the gear selector lever in P (automatic transaxle) or neutral (man- ual transaxle) and set the parking brake. If the air conditioning is on, turn it off.
3. If engine coolant is running out under the car or steam is coming out from the hood, stop the engine. Do not open the hood until the coolant has stopped running or the steaming has stopped. If there is no visible loss of engine coolant and no steam, leave the engine running and check to be sure the engine cooling fan is operating. If the fan is not running, turn the engine off.
4. Check to see if the water pump drive belt is missing. If it is not missing, check to see that it is tight. If the drive belt seems to be satisfactory, check for coolant leaking from the radiator, hoses or under the car. (If the air con- ditioning had been in use, it is normal for cold water to be draining from it when you stop).
What to do in an emergency
WARNING
While the engine is running, keep hair, hands and clothing away from moving parts such as the fan and drive belts to prevent injury.
5. If the water pump drive belt is broken or engine coolant is leaking out, stop the engine immediately and call the nearest authorized Hyundai dealer for assistance.
WARNING
Do not remove the radiator cap when the engine is hot. This can allow coolant to be blown out of the opening and cause serious burns.
6 5
What to do in an emergency
6.If you cannot find the cause of the overheating, wait until the engine tem- perature has returned to normal. Then, if coolant has been lost, carefully add coolant to the reservoir to bring the fluid level in the reservoir up to the halfway mark.
7.Proceed with caution, keeping alert for further signs of overheating. If over- heating happens again, call an author- ized Hyundai dealer for assistance.
CAUTION
Serious loss of coolant indicates there is a leak in the cooling system and this should be checked as soon as possible by an authorized Hyundai dealer.
66
TIRES PRESSURE MONITORING SYSTEM (TPMS) (IF EQUIPPED) As an added safety feature, your vehicle has been equipped with a Tire Pressure Monitoring System (TPMS) that illuminates a low tire pressure telltale when one or more of your tires is significantly under- inflated. Accordingly, when the low tire pressure telltale illuminates, you should stop and check your tires as soon as possible, and inflate them to the proper pressure. Driving on a significantly under-inflated tire caus- es the tire to overheat and can lead to tire failure. Under-inflation also reduces fuel efficiency and tire tread life, and may affect the vehicle’s han- dling and stopping ability.
(1) Low Tire Pressure Telltale (2) TPMS Malfunction Indicator
OHD060001
Each tire, including the spare (if pro- vided), should be checked monthly when cold and inflated to the inflation pressure recommended by the vehi- cle manufacturer on the vehicle plac- ard or tire inflation pressure label. (If your vehicle has tires of a different size than the size indicated on the vehicle placard or tire inflation pres- sure label, you should determine the proper inflation pressure for those tires.)
Please note that the TPMS is not a substitute for proper tire mainte- nance, and it is the driver’s responsi- bility to maintain correct tire pres- sure, even if under-inflation has not reached the level to trigger illumina- tion of the TPMS low tire pressure telltale.
What to do in an emergency
significant
When temperature changes occur, the tire pressures will need to be adjusted. The pressure will drop approximately 1 psi for each 12 degree temperature drop. If set- ting tire pressure in a warm garage during the winter, it is possible the TPMS telltale will illuminate after the car has been parked outside. It is important for the safety of the occu- pants that the tire preform the TPMS system are set correctly.
6 7
What to do in an emergency
Your vehicle has also been equipped with a TPMS malfunction indicator to indicate when the system is not operating properly. The TPMS mal- function indicator is provided by a separate telltale, which displays the symbol "TPMS" when illuminated. When the malfunction indicator is illuminated, the system may not be able to detect or signal low tire pres- sure as intended. TPMS malfunc- tions may occur for a variety of rea- sons, including the installation of replacement or alternate tires or wheels on the vehicle that prevent the TPMS from functioning properly. Always check the TPMS malfunction indicator after replacing one or more tires or wheels on your vehicle to ensure that the replacement or alter- nate tires and wheels allow the TPMS to continue to function properly.
86
CAUTION
In winter or cold weather, the low tire pressure telltale may be illuminated if the tire pressure was adjusted to the recom- mended tire inflation pressure in warm weather. It does not mean your TPMS is malfunction- ing because the decreased tem- perature leads to a proportional lowering of tire pressure. When you drive your vehicle from a warm area to a cold area or from a cold area to a warm area,or the outside temperature is greatly higher or lower, you should check the tire inflation pressure and adjust the tires to the recommended tire inflation pressure.
Low tire pressure tell- tale
When the tire pressure monitoring system warning telltale is illuminat- ed, one or more of your tires is sig- nificantly under-inflated. Immediately reduce your speed, avoid hard cornering and anticipate increased stopping distances. You should stop and check your tires as soon as possible. Inflate the tires to the proper pressure as indicated on the vehicle’s placard or tire inflation pressure label located on the driver’s side center pillar outer panel. If you cannot reach a service station or if the tire cannot hold the newly added air, replace the low pressure tire with the compact spare tire. Because the compact spare tire is not equipped with a tire pressure sensor, the TPMS malfunction indicator may go on and the Low Tire Pressure telltale still turn on after restarting and about 20 minutes of continuous driving before you have the low-pressure tire repaired and replaced on the vehicle.
WARNING - Low pressure
damage
Significantly low tire pressure makes the vehicle unstable and can contribute to loss of vehicle control and increased braking distances. Continued driving on low pres- sure tires will cause the tires to overheat and fail.
TPMS
TPMS (Tire Pressure Monitoring System) malfunction indicator
The TPMS malfunction indicator comes on and stays on when there is a problem with the Tire Pressure Monitoring System. If the system is able to correctly detect an under- inflation warning at the same time as system failure then it will illuminate both the TPMS malfunction and the low tire pressure telltale e.g. If Front Left sensor fails, the TPMS malfunc- tion indicator comes on, but if Front Right, Rear Left, or Rear Right tire is under-inflated, the low tire pressure telltale may come on with the TPMS malfunction indicator. Have the system checked by an authorized HYUNDAI dealer as soon as possible to determine the cause of the problem.
What to do in an emergency
CAUTION
• The TPMS malfunction indica- tor may be illuminated if the vehicle is moving around elec- tric power supply cable or radio transmitter such as police stations, government and public offices,broadcast- ing stations, military installa- tions,airports,or transmitting tower,etc.which can interfere with normal operation of the Tire Pressure Monitoring System (TPMS).
(cid:129) The TPMS malfunction indica- tor may be illuminated if snow chains are used or some sep- arate electronic devices such as notebook computer,mobile charger,remote starter or nav- igation etc., are used in the vehicle.This can interfere with normal operation of the Tire Pressure Monitoring System (TPMS).
6 9
What to do in an emergency
Changing a tire with TPMS If you have a flat tire, the Low Tire Pressure Telltale will turn on. Have the flat tire repaired by an authorized HYUNDAI dealer as soon as possi- ble or replace the flat tire with the compact spare tire.
CAUTION
NEVER use a puncture-repair- ing agent to repair and/or inflate a low pressure tire.If used,you will have to replace the tire pres- sure sensor.
Each wheel is equipped with a tire pressure sensor mounted inside the tire behind the valve stem. You must use TPMS specific wheels. It is rec- ommended that you always have your tires serviced by an authorized HYUNDAI dealer as soon as possi- ble.
10
After you replace the low pressure tire with the compact spare tire, the TPMS malfunction indicator may illu- minate and the low tire pressure tell- tale still illuminate after restarting and about 20 minutes of continuous driving. Once the low pressure tire is re-inflat- ed to the recommended pressure and installed on the vehicle, the TPMS malfunction indicator and the low tire pressure telltale will be extin- guished. If the low pressure and TPMS malfunction indicators are not extinguished after about 20 minutes of continuous driving, please visit an authorized HYUNDAI dealer. You may not be able to identify a low tire by simply looking at it. Always use a good quality tire pressure gauge to measure the tire's inflation pressure. Please note that a tire that is hot (from being driven) will have a higher pressure measurement than a tire that is cold (from sitting stationary for at least 3 hours and driven less than 1 mile (1,6 km) during that 3 hour period). Allow the tire to cool before measuring the inflation pressure.
Always be sure the tire is cold before inflating to the recommended pres- sure. A cold tire means the vehicle has been sitting for 3 hours and driven for less than 1 mile (1.6 km) in that 3
hour period.CAUTION
(cid:129) Do not use any tire sealant if your vehicle is equipped with a Tire Pressure Monitoring System.The liquid sealant can damage the tire pressure sen- sors.
(cid:129) In order for the system to cor- rectlymonitor tires for under- inflation, there should be a total of exactly 4 sensors fit- ted to each of the four driven wheel positions. There should be no other sensors in the vehicle including spare tire since this could cause the system to monitor the wrong sensors.
WARNING - TPMS
(cid:129) The TPMS cannot alert you to severe and sudden tire dam- age caused by external fac- tors such as nails or road debris.
(cid:129) If you feel any vehicle instabil- ity, immediately take your foot off the accelerator, apply the brakes gradually and with light force, and slowly move to a safe position off the road.
WARNING - Protecting
TPMS
Tampering with, modifying, or disabling the Tire Pressure Monitoring System (TPMS) components may interfere with the system's ability to warn the driver of low tire pressure con- ditions and/or TPMS malfunc- tions. Tampering with, modify- ing, or disabling the Tire Pressure Monitoring System (TPMS) components may void the warranty for that portion of the vehicle.
What to do in an emergency
This device complies with Part 15
of the FCC rules. Operation is subject to the following two conditions: 1. This device may not cause harm-ful interference, and
2. This device must accept any inter- ference received, including inter- ference that may cause undesired operation.
WARNING
Changes or modifications not expressly approved by the party responsible for compliance could void the user’s authority to operate the equipment.
6 11
Jacking instructions The jack is provided for emergency tire changing only. To prevent the jack from “rattling” while the vehicle is in motion, store it properly. Follow jacking instructions to reduce the possibility of personal injury.
WARNING - Changing tires (cid:129) Never attempt vehicle repairs in the traffic lanes of a public road or highway.
(cid:129) Always move the vehicle com- pletely off the road and onto the shoulder before trying to change a tire. The jack should be used on level firm ground. If you cannot find a firm, level place off the road, call a tow- ing service company for assistance.
(cid:129) Be sure to use the correct front and rear jacking posi- tions on the vehicle; never use the bumpers or any other part of the vehicle for jack support.
(Continued)
What to do in an emergency
IF YOU HAVE A FLAT TIRE
OHD066002N
Jack and tools The spare tire, jack, jack handle, wheel lug nut wrench are stored in the luggage compartment. Remove the luggage under tray out of the way to reach this equipment. 1. Jack handle 2. Jack 3. Wheel lug nut wrench
12
(Continued) (cid:129) The vehicle can easily roll off the jack causing serious injury or death. No person should place any portion of their body under a vehicle that is supported only by a jack; use vehicle support stands.
(cid:129) Do not start or run the engine while the vehicle is on the jack.
(cid:129) Do not allow anyone to remain in the vehicle while it is on the jack.
(cid:129) Make sure any children pres- ent are in a secure place away from the road and from the vehicle to be raised with the jack.
What to do in an emergency
OHD066003
1VQA4022
Removing and storing the spare tire Turn the tire hold-down wing bolt counterclockwise. Store the tire in the reverse order of removal. To prevent the spare tire and tools from “rattling” while the vehicle is in motion, store them properly.
Changing tires 1. Park on a level surface and apply
2. Shift
the shift
the parking brake firmly. lever
into R (Reverse) with manual transaxle or P (Park) with automatic transaxle.
3. Activate the hazard warning flash-
er.
6 13
WARNING - Changing a tire (cid:129) To prevent vehicle movement while changing a tire, always set the parking brake fully, and always block the wheel diagonally opposite the wheel being changed.
(cid:129) We
that
recommend
the wheels of the vehicle be chocked, and that no person remain in a vehicle that is being jacked.
OHD066004
6. Loosen the wheel lug nuts coun- terclockwise one turn each, but do not remove any nut until the tire has been raised off the ground.What to do in an emergency
1JBA6504
4. Remove the wheel lug nut wrench, jack, jack handle, and spare tire from the vehicle.5. Block both the front and rear of the wheel that is diagonally opposite the jack position.
14
What to do in an emergency
9. Loosen
the wheel nuts and remove them with your fingers. Slide the wheel off the studs and lay it flat so it cannot roll away. To put the wheel on the hub, pick up the spare tire, line up the holes with the studs and slide the wheel onto them. If this is difficult, tip the wheel slightly and get the top hole in the wheel lined up with the top stud. Then jiggle the wheel back and forth until the wheel can be slid over the other studs.
6 15
OUN046018
8. Insert the jack handle into the jack and turn it clockwise, raising the vehicle until the tire just clears the ground. This measurement is approximately 1.2 in (30 mm). Before removing the wheel lug nuts, make sure the vehicle is sta- ble and that there is no chance for movement or slippage.1JB6025
7. Place the jack at the front or rear jacking position closest to the tire you are changing. Place the jack at the designated locations under the frame. The jacking positions are plates welded to the frame with two tabs and a raised dot to index with the jack.WARNING - Jack location
To reduce the possibility of injury, be sure to use only the jack provided with the vehicle and in the correct jack position; never use any other part of the vehicle for jack support.
What to do in an emergency
WARNING
from
Wheels and wheel covers may have sharp edges. Handle them carefully to avoid possible severe injury. Before putting the wheel into place, be sure that there is nothing on the hub or wheel (such as mud, tar, gravel, etc.) that prevents with the wheel fitting solidly against the hub. If there is, remove it. If there is not good contact on the mount- ing surface between the wheel and hub, the wheel nuts could come loose and cause the loss of a wheel. Loss of a wheel may result in loss of control of the vehicle. This may cause serious injury or death.
16
10. To reinstall the wheel, hold it on the studs, put the wheel nuts on the studs and tighten them finger tight. The nuts should be installed with their tapered small diameter ends directed inward. Jiggle the tire to be sure it is completely seated, then tighten the nuts as much as possible with your fin- gers again.
11. Lower the car to the ground by turning the wheel nut wrench counterclockwise.
OUN046019
Then position the wrench as shown in the drawing and tighten the wheel nuts. Be sure the socket is seated completely over the nut. Do not stand on the wrench handle or use an extension pipe over the wrench han- dle. Go around the wheel tightening every other nut until they are all tight. Then double-check each nut for tightness. After changing wheels, have a technician tighten the wheel nuts to their proper torque as soon as possible. Wheel nut tightening torque: Steel wheel & aluminum alloy wheel: 65~79 lb.ft (9~11 kg.m)If you have a tire gauge, remove the valve cap and check the air pressure. If the pressure is lower than recom- mended, drive slowly to the nearest service station and inflate to the cor- rect pressure. If it is too high, adjust it until it is correct. Always reinstall the valve cap after checking or adjusting tire pressure. If the cap is not replaced, air may leak from the tire. If you lose a valve cap, buy another and install it as soon as pos- sible. After you have changed wheels, always secure the flat tire in its place and return the jack and tools to their proper storage locations.
What to do in an emergency
CAUTION
Your vehicle has metric threads on the wheel studs and nuts. Make certain during wheel removal that the same nuts that were removed are reinstalled - or, if replaced, that nuts with metric threads and the same chamfer configuration are used. Installation of a non-metric thread nut on a metric stud or vice-versa will not secure the wheel to the hub properly and will damage the stud so that it must be replaced. Note that most lug nuts do not have metric threads.Be sure to use extreme care in checking for thread style before installing aftermarket lug nuts or wheels. If in doubt, consult an author- ized Hyundai dealer.
WARNING - Wheel studs
If the studs are damaged, they may lose their ability to retain the wheel. This could lead to the loss of the wheel and a collision resulting in serious injuries.
To prevent the jack, jack handle, wheel lug nut wrench and spare tire from rattling while the vehicle is in motion, store them properly.
WARNING - Inadequate spare tire pressure
Check the inflation pressures as soon as possible after installing the spare tire. Adjust it to the specified pressure, if necessary. Refer 8, to Specifications.
Section
6 17
What to do in an emergency
Important - use of compact spare tire Your vehicle is equipped with a com- pact spare tire. This compact spare tire takes up less space than a regu- lar-size tire. This tire is smaller than a conventional tire and is designed for temporary use only.
CAUTION
(cid:129) You should drive carefully when the compact spare is in use. The compact spare should be replaced by the proper conventional tire and rim at the first opportunity.
(cid:129) The operation of this vehicle is not recommended with more than one compact spare tire in use at the same time.
WARNING
The temporary spare tire is for emergency use only. Do not operate your vehicle on this temporary spare at speeds over 50 mph (80 kmh). The original tire should be repaired or replaced as soon as is possible to avoid failure of the spare possibly leading to personal injury or death.
The compact spare should be inflat- ed to 60 psi (420 kPa).
✽✽ NOTICE Check the inflation pressure after installing the spare tire. Adjust it to the specified pressure, as necessary.
When using a compact spare tire, observe the following precautions: (cid:129) Under no circumstances should you exceed 50 mph (80 km/h); a higher speed could damage the tire.
(cid:129) Ensure
that you drive slowly enough for the road conditions to avoid all hazards. Any road hazard, such as a pothole or debris, could seriously damage the compact spare.
(cid:129) Any continuous road use of this tire could result in tire failure, loss of vehicle control, and possible per- sonal injury.
(cid:129) Do not exceed the vehicle’s maxi- mum load rating or the load-carry- ing capacity shown on the sidewall of the compact spare tire.
(cid:129) Avoid driving over obstacles. The compact spare tire diameter is smaller than the diameter of a con- ventional tire and reduces the ground clearance approximately 1
inch (25 mm), which could result in damage to the vehicle.18
(cid:129) The temporary spare tire should not be used on any other wheels, nor should standard tires, snow tires, wheel covers or trim rings be used with the temporary spare wheel. If such use is attempted, damage to these items or other car components may occur.
(cid:129) Do not use more than one tempo-
rary spare tire at a time.
(cid:129) Do not tow a trailer while the tem-
porary spare tire is installed.
(cid:129) Do not take this vehicle through an automatic car wash while the com- pact spare tire is installed.
(cid:129) Do not use tire chains on the com- pact spare tire. Because of the smaller size, a tire chain will not fit properly. This could damage the vehicle and result in loss of the chain.
(cid:129) The compact spare tire should not be installed on the front axle if the vehicle must be driven in snow or on ice.
(cid:129) Do not use the compact spare tire on any other vehicle because this tire has been designed especially for your vehicle.
(cid:129) The compact spare tire’s tread life is shorter than a regular tire. Inspect your compact spare tire regularly and replace worn com- pact spare tires with the same size and design, mounted on the same wheel.
What to do in an emergency
6 19
What to do in an emergency
TOWING
It is acceptable to tow the vehicle with the rear wheels on the ground (without dol- lies) and the front wheels off the ground. If any of the loaded wheels or suspen- sion components are damaged or the vehicle is being towed with the front wheels on the ground, use a towing dolly under the front wheels. When being towed by a commercial tow truck and wheel dollies are not used, the front of the vehicle should always be lift- ed, not the rear.
dolly
CAUTION
Before towing, check the level of the automatic transaxle fluid.If it is below the "HOT" range on the dip- stick, add fluid. If you cannot add fluid,a towing dolly must be used.
HNF4015
Towing service If emergency towing is necessary, we recommend having it done by an author- ized Hyundai dealer or a commercial tow-truck service. Proper lifting and tow- ing procedures are necessary to prevent damage to the vehicle. The use of wheel dollies or flatbed is recommended. For trailer towing guidelines information, refer to section 5 “Driving your vehicle”.
20
D080B02NF
D080B01NF
CAUTION
(cid:129) Do not tow the vehicle backwards with the front wheels on the ground as this may cause dam- age to the vehicle.
(cid:129) Do not tow with sling-type equip- ment. Use wheel lift or flatbed equipment.
Front
When towing your vehicle in an emer- gency without wheel dollies : 1. Set the ignition switch in the ACC posi-
tion.
2. Place the transaxle shift lever in N
(Neutral).
3. Release the parking brake.
CAUTION
Failure to place the transaxle shift lever in N (Neutral) may cause inter- nal damage to the transaxle.
Rear
What to do in an emergency
Use extreme caution when towing the vehicle. A driver must be in the vehicle to steer it and operate the brakes. Towing in this manner may be done only on hard-surfaced roads for a short dis- tance and at low speeds. Also, the wheels, axles, power train, steering and brakes must all be in good condition. (cid:129) Do not use the tow hooks to pull a vehi- cle out of mud, sand or other condi- tions from which the vehicle cannot be driven out under its own power.
(cid:129) Avoid towing a vehicle heavier than the
vehicle doing the towing.
(cid:129) The drivers of both vehicles should communicate with each other frequent- ly.
OHD066005
OMG065013
Emergency towing If towing is necessary, we recommend you to have it done by an authorized Hyundai dealer or a commercial tow truck service. If towing service is not available in an emergency, your vehicle may be tem- porarily towed using a cable or chain secured to the emergency towing hook under the front (or rear) of the vehicle.
6 21
What to do in an emergency
CAUTION
(cid:129) Attach a towing strap to the tow
hook.
(cid:129) Using a portion of the vehicle other than the tow hooks for tow- ing may damage the body of your vehicle.
(cid:129) Use only a cable or chain specifi- cally intended for use in towing vehicles. Securely fasten the cable or chain to the towing hook provided.
(cid:129) Before emergency towing, check that
the hook is not broken or damaged.
(cid:129) Fasten the towing cable or chain
securely to the hook.
(cid:129) Do not jerk the hook. Apply steady and
even force.
(cid:129) To avoid damaging the hook, do not pull from the side or at a vertical angle. Always pull straight ahead.
WARNING
Use extreme caution when towing the vehicle. (cid:129) Avoid sudden starts or erratic driving maneuvers which would place excessive stress on the emergency towing hook and tow- ing cable or chain. The hook and towing cable or chain may break and cause serious injury or dam- age.
(cid:129) If the disabled vehicle cannot be moved, do not forcibly continue the towing. Contact an authorized Hyundai dealer or a commercial tow truck service for assistance. (cid:129) Tow the vehicle as straight ahead
as possible.
(cid:129) Keep away from the vehicle dur-
ing towing.
22
OUN046024
(cid:129) Use a towing strap less than 16 feet (5
m) long. Attach a white or red cloth (about 12 inches (30 cm) wide) in the middle of the strap for easy visibility.(cid:129) Drive carefully so that the towing strap
is not loosened during towing.
Emergency towing precautions (cid:129) Turn the ignition switch to ACC so the
steering wheel isn’t locked.
(cid:129) Place the transaxle shift lever in N
(Neutral).
(cid:129) Release the parking bake. (cid:129) Press the brake pedal with more force than normal since you will have reduced brake performance.
(cid:129) More steering effort will be required because the power steering system will be disabled.
(cid:129) If you are driving down a long hill, the brakes may overheat and brake per- formance will be reduced. Stop often and let the brakes cool off.
CAUTION - Automatic transaxle
(cid:129) If the car is being towed with all four wheels on the ground,it can be towed only from the front.Be sure that the transaxle is in neu- tral. Be sure the steering is unlocked by placing the ignition switch in the ACC position. A driver must be in the towed vehi- cle to operate the steering and brakes.
(cid:129) To avoid serious damage to the automatic transaxle, limit the vehicle speed to 15 km/h (10 mph) and drive less than 1.5 km (1
mile) when towing.(cid:129) Before towing, check the auto- matic transaxle fluid leak under your vehicle. If the automatic transaxle fluid is leaking, a flatbed equipment or towing dolly must be used.
What to do in an emergency
Tie-down hook (for flatbed towing)
OHD066006L
WARNING
Do not use the hooks under the front of the vehicle for towing pur- poses. These hooks are designed ONLY for transport tie-down. If the tie-down hooks are used for tow- ing, the tie-down hooks or front bumper will be damaged and this could lead to serious injury.
6 23
Engine compartment / 7-2
Maintenance services / 7-3
Owner maintenance / 7-5
Scheduled maintenance service / 7-7
Explanation of scheduled maintenance items / 7-12
Engine oil / 7-15
Engine coolant / 7-16
Brakes and clutch fluid / 7-19
Automatic transaxle fluid / 7-20
Washer fluid / 7-22
Parking brake / 7-22
Air cleaner / 7-23
Climate control air filter / 7-25
Wiper blades / 7-27
Battery / 7-29
Tires and wheels / 7-32Maintenance
Fuses / 7-45
Light bulbs / 7-54
Appearance care / 7-59
Emission control system / 7-65
California perchlorate notice / 7-67Maintenance
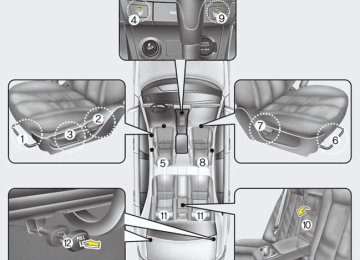
ENGINE COMPARTMENT
■■ Gasoline Engine (2.0L)
27
1. Engine coolant reservoir 2. Engine oil filler cap 3. Brake fluid reservoir 4. Air cleaner 5. Fuse box 6. Negative battery terminal 7. Positive battery terminal 8. Auto transaxle oil dipstick* 9. Radiator cap 10. Engine oil dipstick 11. Windshield washer fluid reservoir * : if equipped
OHD076002
Maintenance
Repairs and adjustments required as a result of improper maintenance or a lack of required maintenance are not covered. We recommend you have your vehicle maintained and repaired by an author- ized Hyundai dealer. An authorized Hyundai dealer meets Hyundai’s high service quality standards and receives technical support from Hyundai in order to provide you with a high level of service satisfaction.
MAINTENANCE SERVICES You should exercise the utmost care to prevent damage to your vehicle and injury to yourself whenever performing any maintenance or inspection proce- dures. Should you have any doubts concerning the inspection or servicing of your vehi- cle, we strongly recommend that you have an authorized Hyundai dealer per- form this work. An authorized Hyundai dealer has facto- ry-trained technicians and genuine Hyundai parts to service your vehicle properly. For expert advice and quality service, see an authorized Hyundai deal- er. Inadequate, incomplete or insufficient servicing may result in operational prob- lems with your vehicle that could lead to vehicle damage, an accident, or person- al injury.
Owner’s responsibility
✽✽ NOTICE Maintenance Service and Record Retention are the owner's responsibility.
You should retain documents that show proper maintenance has been performed on your vehicle in accordance with the scheduled maintenance service charts shown on the following pages. You need this information to establish your compli- ance with the servicing and maintenance requirements of your vehicle warranties. Detailed warranty information is provided in your Owner’s Handbook & Warranty Information Book.
7 3
Maintenance
Owner maintenance precautions Improper or incomplete service may result in problems. This section gives instructions only for the maintenance items that are easy to perform. As explained earlier in this section, sev- eral procedures can be done only by an authorized Hyundai dealer with special tools.
✽✽ NOTICE Improper owner maintenance during the warranty period may affect warran- ty coverage. For details, read the sepa- rate Owner’s Handbook & Warranty Information Book provided with the vehicle. If you're unsure about any serv- icing or maintenance procedure, have it done by an authorized Hyundai dealer.
WARNING - Maintenance
work
(cid:129) Performing maintenance work on a vehicle can be dangerous. You can be seriously injured while performing some maintenance procedures. If you lack sufficient knowledge and experience or the proper tools and equipment to do the work, have it done by an authorized Hyundai dealer.
(cid:129) Working under the hood with the engine running is dangerous. It becomes even more dangerous when you wear jewelry or loose clothing. These can become entangled in moving parts and result in injury. Therefore, if you must run the engine while work- ing under the hood, make certain that you remove all jewelry (espe- cially rings, bracelets, watches, and necklaces) and all neckties, scarves, and similar loose cloth- ing before getting near the engine or cooling fans.
47
OWNER MAINTENANCE The following lists are vehicle checks and inspections that should be performed by the owner or an authorized Hyundai dealer at the frequencies indicated to help ensure safe, dependable operation of your vehicle. Any adverse conditions should be brought to the attention of your dealer as soon as possible. These Owner Maintenance Checks are generally not covered by warranties and you may be charged for labor, parts and lubricants used.
Owner maintenance schedule When you stop for fuel: (cid:129) Check the engine oil level. (cid:129) Check coolant level in coolant reser-
voir.
(cid:129) Check the windshield washer fluid
level.
(cid:129) Look for low or under-inflated tires.
WARNING
Be careful when checking your engine coolant level when the engine is hot. Scalding hot coolant and steam may blow out under pressure. This could cause burns or other serious injury.
Maintenance
While operating your vehicle: (cid:129) Note any changes in the sound of the exhaust or any smell of exhaust fumes in the vehicle.
(cid:129) Check for vibrations in the steering wheel. Notice any increased steering effort or looseness in the steering wheel, or change in its straight-ahead position.
(cid:129) Notice if your vehicle constantly turns slightly or “pulls” to one side when trav- eling on smooth, level road.
(cid:129) When stopping, listen and check for unusual sounds, pulling to one side, increased brake pedal travel or “hard- to-push” brake pedal.
(cid:129) If any slipping or changes in the oper- ation of your transaxle occurs, check the transaxle fluid level.
(cid:129) Check automatic transaxle P (Park)
function.
(cid:129) Check parking brake. (cid:129) Check for fluid leaks under your vehicle (water dripping from the air condition- ing system during or after use is nor- mal).
7 5
At least once a year : (cid:129) Clean body and door drain holes. (cid:129) Lubricate door hinges and checks, and
hood hinges.
(cid:129) Lubricate door and hood locks and
latches.
(cid:129) Lubricate door rubber weatherstrips. (cid:129) Check the air conditioning system. (cid:129) Inspect and
lubricate automatic
transaxle linkage and controls.
(cid:129) Clean battery and terminals. (cid:129) Check the brake (and clutch) fluid
level.
Maintenance
At least monthly: (cid:129) Check coolant level in the engine
coolant reservoir.
(cid:129) Check the operation of all exterior lights, including the stoplights, turn sig- nals and hazard warning flashers.
(cid:129) Check the inflation pressures of all
tires including the spare.
At least twice a year (i.e.,every Spring and Fall) : (cid:129) Check radiator, heater and air condi-
tioning hoses for leaks or damage.
(cid:129) Check windshield washer spray and wiper operation. Clean wiper blades with clean cloth dampened with wash- er fluid.
(cid:129) Check headlight alignment. (cid:129) Check muffler, exhaust pipes, shields
and clamps.
(cid:129) Check the lap/shoulder belts for wear
and function.
(cid:129) Check for worn tires and loose wheel
lug nuts.
67
SCHEDULED MAINTENANCE SERVICE Follow Normal Maintenance Schedule if the vehicle is usually operated where none of the following conditions apply. If any of the following conditions apply, fol- low Maintenance Under Severe Usage Conditions. (cid:129) Repeated short distance driving. (cid:129) Driving in dusty conditions or sandy
If your vehicle is operated under the above conditions, you should inspect, replace or refill more frequently than the following Normal Maintenance Schedule. After 120 month or 150,000 miles (240,000 km) continue to follow the pre- scribed maintenance intervals.
areas.
(cid:129) Extensive use of brakes. (cid:129) Driving in areas where salt or other
corrosive materials are being used.
(cid:129) Driving on rough or muddy roads. (cid:129) Driving in mountainous areas. (cid:129) Extended periods of idling or low
speed operation.
(cid:129) Driving for a prolonged period in cold temperatures and/or extremely humid climates.
(cid:129) More than 50% driving in heavy city traffic during hot weather above 90°F (32°C).
Maintenance
7 7
Maintenance
NORMAL MAINTENANCE SCHEDULE The following maintenance services must be performed to ensure good emission control and performance. Keep receipts for all vehicle emission services to protect your warranty. Where both mileage and time are shown, the frequency of service is deter- mined by whichever occurs first.
R : Replace
I : Inspect and, after Inspection, clean, adjust, repair or replace if necessary.
MILES X 1000
7.5
15
22.5
30
37.5
45
52.5
60
67.5
75
82.5
90
97.5 105 112.5 120 127.5 135 142.5 150
No.
DESCRIPTION
KILOMETERS X 1000
12
MONTHS
24
12
36
18
48
24
60
30
72
36
84
42
96
108 120 132 144 156 168 180 192 204 216
228 240
48
54
60
66
72
78
84
90
96
102 108
114 120
EMISSION CONTROL ITEMS
ENGINE OIL AND FILTER
FUEL FILTER
FUEL LINES, FUEL HOSES AND CONNECTIONS
VACUUM HOSE
CRANKCASE VENTILATION HOSE
VAPOR HOSE AND FUEL FILLER CAP
AIR CLEANER FILTER
SPARK PLUGS
VALVE CLEARANCE *1
PLATINUM COATED
IRIDIUM COATED
10
FUEL TANK AIR FILTER
11
ELECTRONIC THROTTLE CONTROL
Replace every 7,500 miles or 12 months
Replace every 100,000 miles
*1 : Inspect for excessive tappet noise and/or engine vibration and adjust if necessary.
87
Maintenance
NORMAL MAINTENANCE SCHEDULE (CONT.) R : Replace I : Inspect and, after inspection, clean, adjust, repair or replace if necessary
MILES X 1000
7.5
15
22.5
30
37.5
45
52.5
60
67.5
75
82.5
90
97.5 105 112.5 120 127.5 135 142.5 150
No.
DESCRIPTION
KILOMETERS X 1000
12
MONTHS
24
12
36
18
48
24
60
30
72
36
84
42
96
108 120 132 144 156 168 180 192 204 216
228 240
48
54
60
66
72
78
84
90
96
102 108
114 120
GENERAL ITEMS
DRIVE BELT (ALTERNATOR, A/CON, W/PUMP)
Inspect every 7,500 miles or 12 months
COOLANT
TIMING BELT
TENSIONER/IDLER-TIMING BELT
MANUAL TRANSAXLE OIL
AUTOMATIC TRANSAXLE FLUID
BRAKE FLUID
BRAKE HOSES AND LINES
REAR BRAKE DRUMS/LININGS, PARKING BRAKE
10
BRAKE PADS, CALIPERS AND ROTORS
At first, replace at 60,000 miles or 60 months
After that, replace every 30,000 miles or 24 months
Inspect every 40,000 miles or 48 months
Inspect every 40,000 miles or 48 months
7 9
Maintenance
NORMAL MAINTENANCE SCHEDULE (CONT.) R : Replace I : Inspect and, after inspection, clean, adjust, repair or replace if necessary
MILES X 1000
7.5
15
22.5
30
37.5
45
52.5
60
67.5
75
82.5
90
97.5 105 112.5 120 127.5 135 142.5 150
No.
DESCRIPTION
KILOMETERS X 1000
12
MONTHS
24
12
36
18
48
24
60
30
72
36
84
42
96
108 120 132 144 156 168 180 192 204 216
228 240
48
54
60
66
72
78
84
90
96
102 108
114 120
GENERAL ITEMS
11
EXHAUST PIPE AND MUFFLER
12
SUSPENSION MOUNTING BOLTS
STEERING GEAR BOX, LINKAGE & BOOTS
13
/LOWER ARM BALL JOINT, UPPER ARM BALL
JOINT
14
DRIVE SHAFTS AND BOOTS
15
AIR CONDITIONING REFRIGERANT
CLIMATE CONTROL AIR FILTER
16
(FOR EVAPORATOR AND BLOWER UNIT)
10
MAINTENANCE UNDER SEVERE USAGE CONDITIONS The following items must be serviced more frequently on cars normally used under severe driving conditions. Refer to the chart below for the appropriate maintenance intervals. R : Replace I : Inspect and, after inspection, clean, adjust, repair or replace if necessary
MAINTENANCE ITEM
MAINTENANCE
OPERATION
MAINTENANCE
INTERVALS
DRIVING
CONDITION
Maintenance
ENGINE OIL AND FILTER
AIR CLEANER FILTER
SPARK PLUGS
BRAKE PADS, CALIPERS AND ROTORS
REAR BRAKE DRUMS/LININGS, PARKING BRAKE
STEERING GEAR BOX, LINKAGE & BOOTS/
LOWER ARM BALL JOINT, UPPER ARM BALL JOINT
DRIVE SHAFTS AND BOOTS
TIMING BELT/IDLER/TENSIONER
MANUAL TRANSAXLE OIL
AUTOMATIC TRANSAXLE FLUID
CLIMATE CONTROL AIR FILTER
(FOR EVAPORATOR AND BLOWER UNIT)
SEVERE DRIVING CONDITIONS A - Repeatedly driving short distance of less than 5miles (8km) in nor- mal temperature or less than 10miles (16km) in freezing temperature
B - Extensive engine idling or low speed driving for long distances C - Driving on rough, dusty, muddy, unpaved, graveled or salt- spread
D - Driving in areas using salt or other corrosive materials or in very cold
roads
weather
EVERY 3,750 MILES OR 6 MONTHS
A, B, C, D, E, F, G, H, I, K
MORE FREQUENTLY
MORE FREQUENTLY
MORE FREQUENTLY
MORE FREQUENTLY
MORE FREQUENTLY
EVERY 7,500 MILES OR 6 MONTHS
EVERY 60,000 MILES OR 48 MONTHS
EVERY 80,000 MILES
EVERY 60,000 MILES
C, E
B, H
C, D, G, H
C, D, G, H
C, D, E, F, G, H, I
C, D, E, F, H
B, C, D, E, F, G
A, C, D, E, F, G, H, I, J
A, C, E, F, G, H, I
MORE FREQUENTLY
C, E
E - Driving in sandy areas F - Driving in heavy traffic area over 90°F (32°C) G - Driving on uphill, downhill, or mountain road H - Towing a Trailer, or using a camper, or roof rack