- Download PDF Manual
-
subsequent activation lasts seven and one-half minutes. Notice: Do not use anything sharp on the inside of the rear window. If you do, you could cut or damage the warming grid, and the repairs would not be covered by your warranty. Do not attach a temporary vehicle license, tape, a decal or anything similar to the defogger grid.
Outlet Adjustment Use the air outlets located in the center and on the side of your instrument panel to direct the airflow. Your vehicle has air outlets that allow you to adjust the direction and amount of airflow inside the vehicle.
Move the louvers up or down to change the direction of the airflow. Use the thumbwheel under the outlets to change the direction of the airflow from left to right. Operation Tips (cid:129) Enable recirculation mode for maximum air
conditioning performance.
(cid:129) Clear away any ice, snow or leaves from the air
inlets at the base of the windshield that may block the flow of air into your vehicle.
(cid:129) Use of non-GM approved hood deflectors may adversely affect the performance of the system.
(cid:129) Keep the path under the front seats clear of objects to help circulate the air inside of your vehicle more effectively.
Warning Lights, Gages, and Indicators This part describes the warning lights and gages on your vehicle. The pictures help to locate them. Warning lights and gages can signal that something is wrong before it becomes serious enough to cause an expensive repair or replacement. Paying attention to the warning lights and gages could also save you or others from injury.
Warning lights come on when there may be or is a problem with one of your vehicle’s functions. As the details show on the next few pages, some warning lights come on briefly when you start the engine just to let you know they are working. If you are familiar with this section, you should not be alarmed when this happens. Gages can indicate when there may be or is a problem with one of your vehicle’s functions. Often gages and warning lights work together to let you know when there is a problem with your vehicle. When one of the warning lights comes on and stays on as you are driving, or when one of the gages shows there may be a problem, check the section that tells you what to do about it. Please follow this manual’s advice. Waiting to do repairs can be costly and even dangerous. So please get to know your vehicle’s warning lights and gages. They can be a big help. Your vehicle may also have a Driver Information Center (DIC) that works along with the warning lights and gages. See Driver Information Center (DIC) on page 3-40 for more information.
3-25
Instrument Panel Cluster Your instrument panel cluster is designed to let you know at a glance how your vehicle is running. You will know how fast you are going, about how much fuel you have used, and many other things you will need to know to drive safely and economically.
United States 3.7L L5 Automatic Transmission version shown, 5.3L V8, Canada and Manual
Transmission similar
3-26
Speedometer and Odometer The speedometer lets you see your speed in both miles per hour (mph) and kilometers per hour (km/h). The odometer shows how far your vehicle has been driven, in either miles (used in the United States) or kilometers (used in Canada). The odometer mileage can be checked without the vehicle running by pressing the trip information stem. See “Odometer” under DIC Operation and Displays on page 3-40 for more information. If the cluster is replaced the new one will automatically detect and update the vehicle’s accumulated mileage.
Trip Odometer Your vehicle has a trip odometer that can tell you how far your vehicle has been driven since you last set the trip odometer to zero. See “Trip Odometer” under DIC Operation and Displays on page 3-40 for more information.
Tachometer
The tachometer displays the engine speed in revolutions per minute (rpm).
3.7L L5 Shown, 5.3L V8 Similar
If you operate the engine with the
Notice: tachometer in the shaded warning area, your vehicle could be damaged, and the damages would not be covered by your warranty. Do not operate the engine with the tachometer in the shaded warning area.
3-27
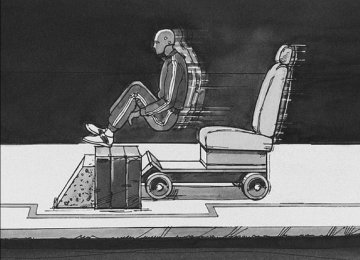
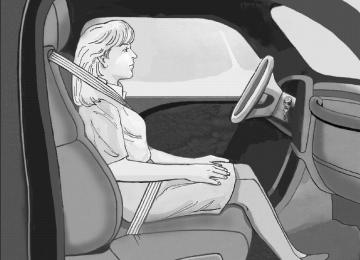
Safety Belt Reminders Safety Belt Reminder Light When the engine is started, a chime will come on for several seconds to remind people to fasten their safety belts, unless the driver’s safety belt is already buckled.
The safety belt light will also come on and stay on for several seconds, then it will flash for several more.
Passenger Safety Belt Reminder Light Several seconds after the engine is started, a chime will sound for several seconds to remind the front passenger to buckle their safety belt. This would only occur if the passenger airbag is enabled. See Passenger Sensing System on page 1-62 for more information. The passenger safety belt light, located on the instrument panel, will come on and stay on for several seconds and then flash for several more.
This chime and light are repeated if the passenger remains unbuckled and the vehicle is in motion.
This chime and light is repeated if the driver remains unbuckled and the vehicle is in motion. If the driver’s belt is already buckled, neither the chime nor the light will come on.
If the passenger’s safety belt is buckled, neither the chime nor the light will come on.
3-28
Airbag Readiness Light There is an airbag readiness light on the instrument panel cluster, which shows the airbag symbol. The system checks the airbag’s electrical system for malfunctions. The light tells you if there is an electrical problem. The system check includes the airbag sensor, the pretensioners, the airbag modules, the wiring and the crash sensing and diagnostic module. For more information on the airbag system, see Airbag System on page 1-54.
This light will come on when you start your vehicle, and it will flash for a few seconds. The light should go out and the system is ready.
If the airbag readiness light stays on after you start the vehicle or comes on when you are driving, your airbag system may not work properly. Have your vehicle serviced right away.
{CAUTION:
If the airbag readiness light stays on after you start your vehicle, it means the airbag system may not be working properly. The airbags in your vehicle may not inflate in a crash, or they could even inflate without a crash. To help avoid injury to yourself or others, have your vehicle serviced right away if the airbag readiness light stays on after you start your vehicle.
The airbag readiness light should flash for a few seconds when you start the engine. If the light does not come on then, have it fixed immediately. If there is a problem with the airbag system, an airbag Driver Information Center (DIC) message may also come on. See DIC Warnings and Messages on page 3-43 for more information.
3-29
{CAUTION:
If the on indicator comes on when you have a rear-facing child restraint installed in the right front passenger’s seat, it means that the passenger sensing system has not turned off the passenger’s frontal airbag. A child in a rear-facing child restraint can be seriously injured or killed if the right front passenger’s airbag inflates. This is because the back of the rear-facing child restraint would be very close to the inflating airbag. Do not use a rear-facing child restraint in the right front passenger’s seat if the airbag is turned on.
Passenger Airbag Status Indicator Your vehicle has the passenger sensing system. Your instrument panel has a passenger airbag status indicator.
United States
Canada
When you start the vehicle, the passenger airbag status indicator will light ON and OFF, or the symbol for on and off, for several seconds as a system check. Then, after several more seconds, the status indicator will light either ON or OFF, or either the on or off symbol to let you know the status of the right front passenger’s frontal airbag. If the word ON or the on symbol is lit on the passenger airbag status indicator, it means that the right front passenger’s frontal airbag is enabled (may inflate).
3-30
{CAUTION:
Even though the passenger sensing system is designed to turn off the right front passenger’s frontal airbag if the system detects a rear-facing child restraint, no system is fail-safe, and no one can guarantee that an airbag will not deploy under some unusual circumstance, even though it is turned off. We recommend that rear-facing child restraints be secured in the rear seat, even if the airbag is off.
If the word OFF or the off symbol is lit on the airbag status indicator, it means that the passenger sensing system has turned off the right front passenger’s frontal airbag. See Passenger Sensing System on page 1-62
for more on this, including important safety information.If, after several seconds, both status indicator lights remain on, or if there are no lights at all, there may be a problem with the lights or the passenger sensing system. See your dealer/retailer for service.
{CAUTION:
If the airbag readiness light in the instrument panel cluster ever comes on and stays on, it means that something may be wrong with the airbag system. If this ever happens, have the vehicle serviced promptly, because an adult-size person sitting in the right front passenger’s seat may not have the protection of the airbag(s). See Airbag Readiness Light on page 3-29 for more on this, including important safety information.
3-31
Charging System Light
Up-Shift Light
This light will come on briefly when you turn on the ignition, but the engine is not running, as a check to show you it is working.
Your vehicle may have an up-shift light.
It should go out once the engine is running. If it stays on, or comes on while you are driving, you may have a problem with the charging system. A charging system Driver Information Center (DIC) message may also appear. See DIC Warnings and Messages on page 3-43
for more information. This light could indicate that you have problems with a generator drive belt, or another electrical problem. Have it checked right away. If you must drive a short distance with the light on, be certain to turn off all your accessories, such as the radio and air conditioner.When this light comes on, you should shift to the next higher gear if weather, road, and traffic conditions allow you to. See Manual Transmission Operation on page 2-26 for more information.
3-32
Brake System Warning Light Your vehicle’s hydraulic brake system is divided into two parts. If one part is not working, the other part can still work and stop you. For good braking, though, you need both parts working well. If the warning light comes on, there could be a brake problem. Have your brake system inspected right away.
United States
Canada
This light should come on briefly when you turn the ignition key to ON. If it does not come on then, have it fixed so it will be ready to warn you if there is a problem.
When the ignition is on, the brake system warning light will also come on when you set your parking brake. See Parking Brake on page 2-32 for more information. The light will stay on if your parking brake does not release fully. If it stays on after your parking brake is fully released, it means you have a brake problem. If the light comes on while you are driving, pull off the road and stop carefully. You may notice that the pedal is harder to push, or the pedal may go closer to the floor. It may take longer to stop. If the light is still on, have the vehicle towed for service. See Towing Your Vehicle on page 4-48.
{CAUTION:
Your brake system may not be working properly if the brake system warning light is on. Driving with the brake system warning light on can lead to an accident. If the light is still on after you have pulled off the road and stopped carefully, have the vehicle towed for service.
3-33
Antilock Brake System Warning Light
Traction Off Light
For vehicles with the Antilock Brake System (ABS), this light will come on briefly when you start the engine.
That is normal. If the light does not come on then, have it fixed so it will be ready to warn you if there is a problem. If the ABS light stays on, turn the ignition off, if the light comes on when you are driving, stop as soon as it is safely possible and turn the ignition off. Then start the engine again to reset the system. If the ABS light still stays on, or comes on again while you are driving, your vehicle needs service. If the regular brake system warning light is not on, you still have brakes, but you do not have antilock brakes. If the regular brake system warning light is also on, you do not have antilock brakes and there is a problem with your regular brakes. See Brake System Warning Light on page 3-33
For vehicles with a Driver Information Center (DIC), see DIC Warnings and Messages on page 3-43 for all brake related DIC messages.3-34
If you have the Traction Control System (TCS), this light will come on when the TCS has been turned off.
This light will come on briefly when the ignition is turned to ON, if it does not the system may require service. For more information on the traction off light, see Traction Control System (TCS) on page 4-5. StabiliTrak® Not Ready Light
If you have the StabiliTrak® system, this light will come on when the StabiliTrak® system has been turned off.
This light will come on briefly when the ignition is turned to ON, if it does not the system may require service. For more information, see StabiliTrak® System on page 4-7.
Engine Coolant Temperature Gage
Tire Pressure Light
This light comes on briefly when the engine is started.
United States
Canada
This gage shows the engine coolant temperature. If the gage pointer is in the shaded area of the gage, the engine is too hot. It means that your engine coolant has overheated. If you have been operating your vehicle under normal driving conditions, you should pull off the road, stop your vehicle and turn off the engine as soon as possible. See Engine Overheating on page 5-29 for more information.
This light will also come on when one or more of your tires are significantly underinflated. A tire pressure message in the Driver Information Center (DIC), may accompany the light. See DIC Warnings and Messages on page 3-43 for more information. Stop and check your tires as soon as it is safe to do so. If underinflated, inflate to the proper pressure. See Tires on page 5-54 for more information. If a problem is detected with the Tire Pressure Monitor System, this light will flash for approximately 60 seconds and then stay on solid for the remainder of the ignition cycle. See Tire Pressure Monitor System on page 5-63 for more information.
3-35
Malfunction Indicator Lamp Check Engine Light A computer system called OBD II (On-Board Diagnostics-Second Generation) monitors operation of the fuel, ignition, and emission control systems. It makes sure that emissions are at acceptable levels for the life of the vehicle, helping to produce a cleaner environment.
The check engine light comes on to indicate that there is an OBD II problem and service is required.
Malfunctions often are indicated by the system before any problem is apparent. This can prevent more serious damage to your vehicle. This system is also designed to assist your service technician in correctly diagnosing any malfunction. Notice: If you keep driving your vehicle with this light on, after a while, the emission controls might not work as well, your vehicle’s fuel economy might not be as good, and the engine might not run as smoothly. This could lead to costly repairs that might not be covered by your warranty.
3-36
Notice: Modifications made to the engine, transmission, exhaust, intake, or fuel system of your vehicle or the replacement of the original tires with other than those of the same Tire Performance Criteria (TPC) can affect your vehicle’s emission controls and can cause this light to come on. Modifications to these systems could lead to costly repairs not covered by your warranty. This could also result in a failure to pass a required Emission Inspection/Maintenance test. See Accessories and Modifications on page 5-3. This light comes on, as a check to show it is working, when the ignition is turned ON/RUN but the engine is not running. If the light does not come on, have it repaired. This light also comes on during a malfunction in one of two ways:
Light Flashing — A misfire condition has been detected. A misfire increases vehicle emissions and could damage the emission control system on your vehicle. Diagnosis and service might be required. Light On Steady — An emission control system malfunction has been detected on your vehicle. Diagnosis and service might be required.
(cid:129) (cid:129) If the Light is Flashing The following can prevent more serious damage to your vehicle: (cid:129) Reduce vehicle speed. (cid:129) Avoid hard accelerations. (cid:129) Avoid steep uphill grades.
If you are towing a trailer, reduce the amount of cargo being hauled as soon as it is possible.
If the light stops flashing and remains on steady, see “If the Light Is On Steady” following. If the light continues to flash, when it is safe to do so, stop the vehicle. Find a safe place to park the vehicle. Turn the ignition off, wait at least 10 seconds, and restart the engine. If the light remains on steady, see “If the Light Is On Steady” following. If the light is still flashing, follow the previous steps and see your dealer/retailer for service as soon as possible. If the Light Is On Steady You might be able to correct the emission system malfunction by considering the following: Did you recently put fuel into your vehicle? If so, reinstall the fuel cap, making sure to fully install the cap. See Filling the Tank on page 5-8. The diagnostic system can determine if the fuel cap has
been left off or improperly installed. A loose or missing fuel cap allows fuel to evaporate into the atmosphere. A few driving trips with the cap properly installed should turn the light off. Did you just drive through a deep puddle of water? If so, your vehicle’s electrical system might be wet. The condition is usually corrected when the electrical system dries out. A few driving trips should turn the light off. Have you recently changed brands of fuel? If so, be sure to fuel your vehicle with quality fuel. See Gasoline Octane on page 5-5. Poor fuel quality causes the engine not to run as efficiently as designed. You might notice this as stalling after start-up, stalling when you put the vehicle into gear, misfiring, hesitation on acceleration, or stumbling on acceleration — these conditions might go away once the engine is warmed up. This will be detected by the system and cause the light to turn on. If you experience one or more of these conditions, change the fuel brand you use. It will require at least one full tank of the proper fuel to turn the light off. If none of the above steps have made the light turn off, your dealer/retailer can check the vehicle. Your dealer/retailer has the proper test equipment and diagnostic tools to fix any mechanical or electrical problems that might have developed.
3-37
(cid:129) Emissions Inspection and Maintenance Programs Some state/provincial and local governments have or might begin programs to inspect the emission control equipment on your vehicle. Failure to pass this inspection could prevent you from getting a vehicle registration. Here are some things you need to know to help your vehicle pass an inspection: Your vehicle will not pass this inspection if the check engine light is on or not working properly. Your vehicle will not pass this inspection if the OBD (on-board diagnostic) system determines that critical emission control systems have not been completely diagnosed by the system. The vehicle would be considered not ready for inspection. This can happen if you have recently replaced the battery or if the battery has run down. The diagnostic system is designed to evaluate critical emission control systems during normal driving. This can take several days of routine driving. If you have done this and your vehicle still does not pass the inspection for lack of OBD system readiness, your dealer/retailer can prepare the vehicle for inspection.
3-38
Oil Pressure Light
{CAUTION:
Do not keep driving if the oil pressure is low. If you do, your engine can become so hot that it catches fire. You or others could be burned. Check your oil as soon as possible and have your vehicle serviced.
Notice: Lack of proper engine oil maintenance may damage the engine. The repairs would not be covered by your warranty. Always follow the maintenance schedule in this manual for changing engine oil.
This light will come on briefly when you start your engine. If it does not, have your vehicle serviced.
When the light comes on and stays on, it means that oil is not flowing through your engine properly. You could be low on oil and you might have some other system problem.
Security Light
Highbeam On Light
For information regarding this light and the vehicle’s security system, see Content Theft-Deterrent on page 2-14.
This light comes on when the high-beam headlamps are in use.
Cruise Control Light
See Headlamp High/Low-Beam Changer on page 3-9
for more information.This light comes on whenever you set the cruise control.
The light goes out when the cruise control is turned off. See Cruise Control on page 3-11 for more information.
3-39
Fuel Gage
United States
Canada
When the ignition is on, the fuel gage tells you about how much fuel you have remaining in the fuel tank. Here are three things that some owners ask about. None of these indicate a problem with your fuel gage: (cid:129) At the gas station, the gas pump shuts off before
the gage reads full. It takes a little more or less fuel to fill up than the gage indicated. For example, the gage may have indicated the tank was half full, but it actually took a little more or less than half the tank’s capacity to fill the tank. The gage moves a little when you turn a corner or speed up.
3-40
When the fuel in the fuel tank is low, you will see a LOW FUEL message on the Driver Information Center (DIC) display. See DIC Warnings and Messages on page 3-43 for more information. Driver Information Center (DIC) The Driver Information Center (DIC) displays information such as the trip odometer, personalization features, and warning messages. The DIC display is located on the instrument panel cluster.
DIC Operation and Displays The Driver Information Center (DIC) comes on when the ignition is on. If a problem is detected, a warning message appears on the display. Pressing and releasing the trip odometer reset stem on the DIC acknowledges some current warnings or service messages. Some messages only clear after the required action has been taken. The DIC has different modes which can be accessed by pressing the trip odometer reset stem on the DIC. These modes are explained in the following section. The DIC trip odometer reset stem is located on the instrument panel cluster next to the DIC display. To scroll through the available functions, press and release the reset stem.
(cid:129) (cid:129) Trip Information Odometer The odometer is automatically displayed on the DIC when you start the vehicle. The odometer shows the total distance the vehicle has been driven in either miles for the United States or kilometers for Canada. Trip Odometer Press and release the reset stem until TRIP appears on the DIC display. The trip odometer shows the current distance traveled since the last reset of the trip odometer in either miles for the United States or kilometers for Canada. To reset the trip odometer, press and hold the reset stem until the display returns to zero. Engine Oil Life System With the engine off, turn the key to ON/RUN and then press the reset stem until OIL LIFE RESET appears — alternating between OIL LIFE and RESET — on the DIC display. The CHANGE OIL message alerts you to change the oil on a schedule consistent with your driving conditions. Always reset the OIL LIFE message after an oil change. To reset the message, see Engine Oil Life System on page 5-18.
In addition to the engine oil life system monitoring the oil life, additional maintenance is recommended in the Maintenance Schedule in this manual. See Engine Oil on page 5-15 and Scheduled Maintenance on page 6-4 for more information. Language This feature allows you to choose the language in which the DIC display shows information. To set your choice for this feature: 1. With the engine off, turn the key to ON/RUN, but do
not start the engine.
2. Close all doors so the DOORS message does not
display in the DIC.
3. Momentarily press and release the reset stem until the current language is displayed: English (default), Spanish, or French.
4. To select a different language, press and hold the
reset stem until the next language appears. 5. Repeat Step 4 until the desired language is
displayed. Once the desired language is shown on the DIC display, the language is set.
6. To exit the language selection, momentarily press and release the reset stem. All DIC messages will now display in the language selected.
3-41
Automatic Door Locks This feature allows you to program the door locks to a preferred setting. To set your choice for this feature: 1. With the engine off, turn the key to LOCK/OFF.
Do not remove the key from the ignition.
2. Press and hold the power door lock button until the
DIC display shows the current door lock mode.
3. To view the next available mode, press and hold the reset stem until the mode appears. Release the reset stem and press and hold again to view the next mode.
4. Once the desired mode is shown on the DIC
display, briefly press the reset stem to set your choice. The DIC display then clears.
The following are the available modes:
Lock 1 (default): On vehicles with an automatic transmission, this mode locks all of the doors when the vehicle is shifted out of PARK (P) and unlocks all of the doors when the vehicle is shifted into PARK (P).
On vehicles with a manual transmission, this mode locks all of the doors when the vehicle speed is greater than 15 mph (24 km/h) and unlocks all of the doors when the key is removed from the ignition.
3-42
Lock 2: On vehicles with an automatic transmission, this mode locks all of the doors when the vehicle is shifted out of PARK (P) and unlocks the driver’s door when the vehicle is shifted into PARK (P). On vehicles with a manual transmission, this mode locks all of the doors when the vehicle speed is greater than 15 mph (24 km/h) and unlocks the driver’s door when the key is removed from the ignition. Lock 3: On vehicles with an automatic transmission, this mode locks all of the doors when the vehicle is shifted out of PARK (P). The doors will not automatically unlock. On vehicles with a manual transmission, this mode locks all of the doors when the vehicle speed is greater than 15 mph (24 km/h). The doors will not automatically unlock. Remote Keyless Entry (RKE) Feedback This feature allows you to program the Remote Keyless Entry (RKE) feedback to a preferred setting. To set your choice for this feature: 1. With the engine off, turn the key to LOCK/OFF.
Do not remove the key from the ignition.
2. Press and hold the lock and unlock buttons on the
RKE transmitter at the same time. Hold both buttons until the DIC display shows the current RKE feedback mode.
3. To view the next available mode, press and hold the reset stem until the mode appears. Release the reset stem and press and hold again to view the next mode.
4. Once the desired mode is shown on the DIC
display, briefly press the reset stem to set your choice. The DIC display then clears.
The following are the available modes:
RFA 1 (default): This mode flashes the parking lamps when you press the lock or unlock buttons on the RKE transmitter.
RFA 2: This mode flashes the parking lamps and sounds the horn when you press the lock button on the RKE transmitter. This mode also flashes the parking lamps when you press the unlock button on the RKE transmitter.
RFA 3: This mode flashes the parking lamps and sounds the horn when you press the lock or unlock buttons on the RKE transmitter.
RFA 4: This mode disables RKE feedback. There will be no feedback when you press the lock or unlock buttons on the RKE transmitter.
DIC Warnings and Messages Messages are displayed on the DIC to notify the driver that the status of the vehicle has changed and that some action may be needed by the driver to correct the condition. Multiple messages may appear one after another. The messages are displayed for several seconds each. Some messages may not require immediate action, but you should press and release the trip odometer reset stem to acknowledge that you received the messages and to clear them from the display. Each message must be acknowledged individually. Some messages cannot be cleared from the DIC display because they are more urgent. These messages require action before they can be cleared. You should take any messages that appear on the display seriously and remember that clearing the messages only makes the messages disappear, not correct the problem. The following are the possible messages that can be displayed and some information about them.
3-43
AC (Air Conditioning) OFF This message displays when the engine coolant temperature is too high and the air conditioning in your vehicle needs to be turned off. See Engine Overheating on page 5-29 and Climate Control System on page 3-22 for more information. This message displays along with the ENG HOT message. ABS (Antilock Brake System) FAULT This message displays if there is a problem with the Antilock Brake System (ABS). Check the ABS as soon as possible and have your vehicle serviced by your dealer/retailer. See Brakes on page 5-38 and Antilock Brake System Warning Light on page 3-34 for more information. Press and release the reset stem to acknowledge the message and clear it from the display. BRAKES This message displays if there is a problem with the brakes. Check the brakes as soon as possible and have your vehicle serviced by your dealer/retailer. See Brakes on page 5-38 and Brake System Warning Light on page 3-33 for more information. Press and release the reset stem to acknowledge the message and clear it from the display.
CHANGE OIL This message displays when the oil needs to be changed. Check the oil in your vehicle as soon as possible and have your vehicle serviced by your dealer/retailer. See Engine Oil on page 5-15 and Scheduled Maintenance on page 6-4 for more information. Press and release the reset stem to acknowledge the message and clear it from the display. DOORS This message displays when one or more of the doors is ajar. Check all the doors on your vehicle to make sure they are closed. The message clears from the display after all of the doors are closed. ENG (Engine) HOT This message displays when the engine coolant temperature is hot. Check the engine coolant temperature gage. See Engine Coolant Temperature Gage on page 3-35. Have your vehicle serviced by your dealer/retailer as soon as possible if you suspect the engine is overheating. See Engine Overheating on page 5-29 for more information.
3-44
FLUID This message displays if the brake fluid is low. Check the brake fluid as soon as possible and have your vehicle serviced by your dealer/retailer. See Brakes on page 5-38 for more information. Press and release the reset stem to acknowledge the message and clear it from the display. FUEL CAP This message displays if the vehicle’s fuel cap is either off or loose. Pull over as soon as possible and check to see if the fuel cap is secure. You may also see the check engine light on the instrument panel cluster. If the check engine light does come on when the fuel cap was loose, it may take a few driving trips before the light turns off. See Malfunction Indicator Lamp on page 3-36 for more information if the light still remains on. Press and release the reset stem to acknowledge the message and clear it from the display. LOW FUEL This message displays if the level of fuel in the vehicle is low. Also check the fuel gage. See Fuel Gage on page 3-40 for more information. Refill the fuel tank as soon as possible.
LOW TIRE This message displays if a low tire pressure is detected in any of the vehicle’s tires. Press and release the reset stem to acknowledge the message and clear it from the display. The message appears at each ignition cycle until the tires are inflated to the correct inflation pressure. See Tires on page 5-54 and Inflation - Tire Pressure on page 5-62 for more information on tires and the correct inflation pressures. OIL This message displays when the oil pressure is low. See Oil Pressure Light on page 3-38 and Engine Oil on page 5-15 for more information. PARK BRK (Brake) This message displays when the parking brake is set. See Parking Brake on page 2-32 and Brake System Warning Light on page 3-33 for more information. The message clears from the display after the parking brake is released or by pressing and releasing the reset stem.
3-45
SERV (Service) TPM (Tire Pressure Monitor) This message displays if a part on the Tire Pressure Monitor System (TPMS) is not working properly. The tire pressure light also flashes and then remains on during the same ignition cycle. See Tire Pressure Light on page 3-35. Several conditions may cause this message to appear. See Tire Pressure Monitor Operation on page 5-65 for more information. If the warning comes on and stays on, there may be a problem with the TPMS. See your dealer/retailer. SERV (Service) VEH (Vehicle) This message displays if your vehicle needs service. Have your vehicle serviced by your dealer/retailer as soon as possible.
REDUCED POWER This message displays when the vehicle’s engine power is reduced. Reduced engine power can affect the vehicle’s ability to accelerate. If this message is on, but there is no reduction in performance, proceed to your destination. The performance may be reduced the next time the vehicle is driven. The vehicle may be driven at a reduced speed while this message is on, but acceleration and speed may be reduced. Anytime this message stays on, the vehicle should be taken to your dealer/retailer for service as soon as possible. Press and release the reset stem to acknowledge the message and clear it from the display. SERV (Service) 4WD (Four-Wheel Drive) This message displays when there is a problem with the transfer case control system. Check the transfer case on your vehicle and have it serviced by your dealer/retailer. See Full-Time Four-Wheel Drive on page 2-27 for more information about the transfer case. Press and release the reset stem to acknowledge the message and clear it from the display.
3-46
SERVICE CHARG (Charge) SYS (System) This message displays if there is a problem with the battery charging system. Under certain conditions, the battery warning light may also turn on in the instrument panel cluster. See Charging System Light on page 3-32. The battery will not be charging at an optimal rate and the vehicle will lose the ability to enter the fuel economy mode. The vehicle is safe to drive, however have the electrical system checked by your dealer/retailer. Press and release the reset stem to acknowledge the message and clear it from the display. SERVICE STAB (Stability) SYS (System) This message displays if there is a problem with the StabiliTrak® system. Have your vehicle serviced by your dealer/retailer. See StabiliTrak® System on page 4-7
for more information. STAB (Stability) SYS (System) OFF This message displays when the StabiliTrak® system is turned off. See StabiliTrak® System on page 4-7 for more information.TRAC (Traction) OFF This message along with the traction off light displays when the Traction Control System (TCS) is turned off by pressing the TCS button. See Traction Off Light on page 3-34 and Traction Control System (TCS) on page 4-5 for more information. TRACTION FAULT This message displays if there is a problem with the Traction Control System (TCS). Check the TCS as soon as possible and have your vehicle serviced by your dealer/retailer. See Traction Control System (TCS) on page 4-5 for more information. Press and release the reset stem to acknowledge the message and clear it from the display. TURN SIGNAL This message displays when the turn signal is on for about 0.75 miles (1.2 km) of travel. Press and release the reset stem to acknowledge the message and clear it from the display.
3-47
Audio System(s) Determine which radio your vehicle has and then read the pages following to familiarize yourself with its features.
{CAUTION:
This system provides you with far greater access to audio stations and song listings. Giving extended attention to entertainment tasks while driving can cause a crash and you or others can be injured or killed. Always keep your eyes on the road and your mind on the drive — avoid engaging in extended searching while driving.
Keeping your mind on the drive is important for safe driving. See Defensive Driving on page 4-2. Here are some ways in which you can help avoid distraction while driving. While your vehicle is parked:
Familiarize yourself with all of its controls. Familiarize yourself with its operation.
3-48
(cid:129) Set up your audio system by presetting your favorite radio stations, setting the tone, and adjusting the speakers. Then, when driving conditions permit, you can tune to your favorite radio stations using the presets and steering wheel controls if the vehicle has them.
Notice: Before adding any sound equipment to your vehicle, such as an audio system, CD player, CB radio, mobile telephone, or two-way radio, make sure that it can be added by checking with your dealer/retailer. Also, check federal rules covering mobile radio and telephone units. If sound equipment can be added, it is very important to do it properly. Added sound equipment may interfere with the operation of your vehicle’s engine, radio, or other systems, and even damage them. Your vehicle’s systems may interfere with the operation of sound equipment that has been added. Your vehicle has a feature called Retained Accessory Power (RAP). With RAP, the audio system can be played even after the ignition is turned off. See Retained Accessory Power (RAP) on page 2-20 for more information.
Setting the Time Press and hold H until the correct hour and AM or PM displays. Press and hold M until the correct minute displays. The time can be set with the ignition on or off.
(cid:129) (cid:129) Radio(s)
Radio with Single CD
Radio with Six-Disc CD Player
Your vehicle has one of these radios as its audio system.
3-49
Playing the Radio P (Power/Volume): Press to turn the system on and off.
Turn clockwise or counterclockwise to increase or to decrease the volume.
DISP (Display): Press to switch the display between the radio station frequency and the time. When the ignition is turned off, press to display the time.
For XM™ (if equipped), press the DISP button while in XM™ mode to retrieve four different categories of information related to the current song or channel: Artist, Song Title, Category or PTY (program type), Channel Number/Channel Name.
To change the default on the display, press the DISP button until you see the desired display, then hold this knob for two seconds. The radio produces one beep and the selected display becomes the default.
AUTO VOL (Automatic Volume): With automatic volume, the audio system adjusts automatically to make up for road and wind noise as you drive.
Set the volume at the desired level. Press to select LOW, MEDIUM, or HIGH. Each higher setting allows for more volume compensation at faster vehicle speeds. Then as you drive, automatic volume increases the volume, as necessary, to overcome noise at any
3-50
speed. The volume level should always sound the same to you as you drive. NONE displays if the radio cannot determine the vehicle speed. To turn automatic volume off, press until AVOL OFF displays. Finding a Station
BAND: Press to switch between FM1, FM2, AM, or XM1 or XM2 (if equipped). The selection displays. e (Tune): Turn to select radio stations.
t SEEK u: Press and release the arrows to go to the next or to the previous station and stay there.
To scan stations, press and hold either arrow for more than two seconds. SCN or SCAN displays and the radio produces one beep. The radio goes to a station, plays for a few seconds, then goes to the next station. Press either arrow again or one of the pushbuttons to stop scanning presets.
To scan preset stations, press and hold either arrow for more than four seconds. PSC or PSCN displays and the radio produces two beeps. The radio goes to a preset station, plays for a few seconds, then goes to the next preset station. Press either arrow again or one of the pushbuttons to stop scanning presets.
The radio only seeks and scans stations with a strong signal that are in the selected band.
4 (Information) (XM™ Satellite Radio Service): If the current station has a message, the information symbol displays. Press to see the message. The message can display the artist, song title, call in phone numbers, etc.
If the entire message is not displayed, parts of the message appears every three seconds. To scroll through the message, press and release this button. A new group of words display after every press of this button. Once the complete message has displayed, the information symbol disappears from the display until another new message is received. The last message can be displayed by pressing the 4 button. You can view the last message until a new message is received or a different station is tuned to.
When a message is not available from a station, NO INFO displays.
1-6 (Preset Pushbuttons) (Radio with Six-Disc CD Player): Press to play stations that are programmed on the radio preset pushbuttons.
The radio only seeks preset stations with a strong signal that are in the selected band.
Setting Preset Stations Up to 30 stations (six FM1, six FM2, and six AM, six XM1 and six XM2 (if equipped)), can be programmed on the six numbered pushbuttons, by performing the following steps: 1. Turn the radio on. 2. Press BAND to select FM1, FM2, AM, or
XM1 or XM2.
3. Tune in the desired station. 4. Press AUTO EQ to select the equalization. 5. Press and hold one of the six numbered
pushbuttons until a beep sounds. When that numbered pushbutton is pressed, the station that was set, returns and the equalization that was selected, is stored for that pushbutton. 6. Repeat the steps for each pushbutton.
3-51
Adjusting the Speakers (Balance/Fade) e (Balance/Fade): To adjust the balance between the right and the left speakers, press and release until BAL displays. Turn to move the sound toward the right or the left speakers.
To adjust the fade between the front and the rear speakers, press and release until FAD or FADE displays. Turn to move the sound toward the front or the rear speakers.
To adjust the balance and the fade to the middle position, press this knob, then press it again and hold it until one beep sounds.
To adjust all tone and speaker controls to the middle position, press and hold when no tone or speaker control is displayed. CEN or ALL CENTERED displays and a beep sounds.
Setting the Tone (Bass/Treble) e (Bass/Treble): Press and release until BAS/BASS, or TRE/TREB displays. Turn to increase or to decrease. The display shows the bass or the treble level. If a station is weak or has static, decrease the treble.
To adjust the bass and the treble to the middle position, press and hold this knob. The radio produces one beep.
To adjust all tone and speaker controls to the middle position, press and hold when no tone or speaker control is displayed. CEN or ALL CENTERED displays and a beep sounds.
AUTO EQ (Automatic Equalization): Press to select customized equalization settings designed for country/western, jazz, talk, pop, rock, and classical.
To return the bass and treble to the manual mode, press and release the e knob until MANUAL displays. For the Radio with Six-Disc CD Player, the equalization one through seven options are included only if your vehicle is equipped with the Bose® system. Press the AUTO EQ button to select equalization settings designed for equalization one through seven.
To return the bass and treble to the manual mode, push and release this knob until BASS and TREB displays.
3-52
Finding a Category (CAT) Station (XM™ Satellite Radio Service Only) To select and find a desired category perform the following: 1. Press the CAT button to activate program type
select mode. A category displays.
2. Press the CAT button to select a category.
For the Radio with Six-Disc CD Player, turn the e knob to select a category.
3. Once the desired category is displayed, press either
SEEK arrow to select and to take you to the categories first station.
4. To go to another station within that category and the category is displayed, press the CAT button once. If the category is not displayed, press the CAT button twice to display the category and then to go to another station.
For the Radio with Six-Disc CD Player, press either SEEK arrow to go to another station within that category and the category is displayed. 5. Press CAT to exit program type select mode.
If CAT times out and is no longer on the display, go back to Step 1.
If the radio cannot find the desired program type, NONE or NOT FOUND displays and the radio returns to the last station you were listening to.
BAND (Alternate Frequency) (Radio with Single CD): Alternate frequency allows the radio to switch to a stronger station with the same category. To turn alternate frequency on, press and hold BAND for two seconds. AF ON displays. The radio can switch to stations with a stronger frequency.
To turn alternate frequency off, press and hold BAND again for two seconds. AF OFF displays. The radio does not switch to other stations.
This function does not apply for XM™ Satellite Radio Service. Radio Messages
CAL ERR (Calibration Error): The audio system has been calibrated for your vehicle from the factory. If CAL ERR displays it means that the radio has not been configured properly for your vehicle and it must be returned to your dealer/retailer for service.
LOC (Locked): This message is displayed when the THEFTLOCK® system has locked up. Take your vehicle to your dealer/retailer for service.
If any error occurs repeatedly or if an error cannot be corrected, contact your dealer/retailer.
3-53
(cid:129) (cid:129) XM™ Satellite Radio Service XM™ is a satellite radio service that is based in the 48 contiguous United States and 10 Canadian provinces. XM™ Satellite Radio has a wide variety of programming and commercial-free music, coast-to-coast, and in digital-quality sound. During your trial or when you subscribe, you will get unlimited access to XM™ Radio Online for when you are not in your vehicle. A service fee is required to receive the XM™ service. For more information, contact XM™ at www.xmradio.com or call 1-800-929-2100 in the U.S. and www.xmradio.ca or call 1-877-438-9677 in Canada. Radio Messages for XM™ Only See XM Radio Messages on page 3-60 later in this section for further detail. Playing a CD Insert a CD partway into the slot, label side up. The player pulls it in and the CD should begin playing. If you want to insert a CD with the ignition off, first press the Z (eject) button or the DISP knob. If the ignition or radio is turned off with a CD in the player it stays in the player. When the ignition or radio is turned on, the CD starts to play where it stopped, if it was the last selected audio source.
3-54
When the CD is inserted, the CD symbol displays. As each new track starts to play, the track number displays. The CD player can play the smaller 3 inch (8 cm) single CDs with an adapter ring. Full-size CDs and the smaller CDs are loaded in the same manner. Care of Your CDs If playing a CD-R, the sound quality can be reduced due to CD-R quality, the method of recording, the quality of the music that has been recorded, and the way the CD-R has been handled. Handle them carefully. Store CD-R(s) in their original cases or other protective cases and away from direct sunlight and dust. The CD player scans the bottom surface of the disc. If the surface of a CD is damaged, such as cracked, broken, or scratched, the CD does not play properly or not at all. Do not touch the bottom side of a CD while handling it; this could damage the surface. Pick up CDs by grasping the outer edges or the edge of the hole and the outer edge. If the surface of a CD is soiled, take a soft, lint free cloth or dampen a clean, soft cloth in a mild, neutral detergent solution mixed with water, and clean it. Make sure the wiping process starts from the center to the edge.
If a label is added to a CD, or more than one
Care of Your CD Player Do not add any label to a CD, it could get caught in the CD player. If a CD is recorded on a personal computer and a description label is needed, try labeling the top of the recorded CD with a marking pen. The use of CD lens cleaners for CDs is not advised, due to the risk of contaminating the lens of the CD optics with lubricants internal to the CD player mechanism. Notice: CD is inserted into the slot at a time, or an attempt is made to play scratched or damaged CDs, the CD player could be damaged. While using the CD player, use only CDs in good condition without any label, load one CD at a time, and keep the CD player and the loading slot free of foreign materials, liquids, and debris. If an error displays, see “CD Messages” later in this section. For vehicles that have a radio with a Six-Disc CD player, see the following:
LOAD: Press to load CDs into the CD player. This CD player holds up to six CDs. To insert one CD, do the following: 1. Turn the ignition on. 2. Press and release the LOAD button.
3. Wait for the indicator light, located to the right of the
slot, to turn green.
4. Load a CD. Insert the CD partway into the slot,
label side up. The player pulls the CD in.
To insert multiple CDs, do the following: 1. Turn the ignition on. 2. Press and hold the LOAD button for two seconds. A beep sounds and the indicator light, located to the right of the slot, begins to flash and LOAD # displays.
3. Once the light stops flashing and turns green, INSERT CD # displays, load a CD. Insert the CD partway into the slot, label side up. The player pulls the CD in. Once the CD is loaded, the indicator light begins flashing again. Once the light stops flashing and turns green, you can load another CD. The CD player takes up to six CDs.
To load more than one CD but less than six, complete Steps 1 through 3. When finished loading CDs, press the LOAD button to cancel the loading function. The radio begins to play the last CD loaded. If more than one CD has been loaded, a number for each CD displays.
3-55
Playing a Specific Loaded CD For every CD loaded, a number displays. To play a specific CD, first press the CD button, then press the numbered pushbutton that corresponds to the CD. A small bar appears under the CD number that is playing and the track number displays. If an error displays, see “CD Messages” later in this section. Z (Eject): Press to eject CD(s). To eject the CD that is currently playing, press and release this button. To eject multiple CDs, do the following: 1. Press and hold for five seconds.
A beep sounds and the indicator light, located to the right of the slot, begins to flash and EJECT ALL displays.
2. Once the light stops flashing and turns green, REMOVE CD # displays. The CD ejects and can be removed. Once the CD is removed, the indicator light begins flashing again and another CD ejects. To stop ejecting the CDs, press the LOAD or the eject button.
3-56
If the CD is not removed, after 25 seconds, the CD automatically pulls back into the player. If CD is pushed back into the player, before the 25 second time period is complete, the player senses an error and tries to eject the CD several times before stopping. Do not repeatedly press the CD eject button to eject a CD after you have tried to push it in manually. The player’s 25-second eject timer resets at each press of the eject button, causing the player to not eject the CD until the 25-second time period has elapsed. Z (Eject) (Radio with Single CD): Press to eject a CD. Eject can be activated with either the ignition or radio off. CDs can be loaded with the ignition and radio off if this button is pressed first. 1 r (Previous) (Radio with Single CD): Press to go to the start of the current track if more than eight seconds have played. The previous symbol and the track number displays. If this button is held or pressed more than once, the player continues moving backward through the CD. r (Reverse) (Radio with Six-Disc CD Player): Press to reverse within the track. 2 [ (Next) (Radio with Single CD): Press to go to the next track. The next symbol and the track number displays. If this button is held or pressed more than once, the player continues moving forward through the CD.
[ (Fast Forward) (Radio with Six-Disc CD Player): Press to fast forward within the track.
N (Repeat): With repeat, one track or an entire CD can be repeated.
To use repeat, do the following:
To repeat the track you are listening to, press and release this button. RPT ON displays. Press again to turn off repeat play. RPT OFFdisplays. To repeat the CD you are listening to, press and hold this button for two seconds. RPT ON displays. Press again to turn off repeat play. RPT OFF displays.
4 y (Random) (Radio with Single CD): Press to hear the tracks in random, rather than sequential, order. The random symbol displays. Press again to turn off random play.
y (Random) (Radio with Six-Disc CD Player): With random, you can listen to the tracks in random, rather than sequential, order, on one CD or on all of the CDs. To use random, do one of the following:
To play the tracks on the CD you are listening to in random order, press and release this button. RANDOM ONE displays. Press again to turn off random play.
To play the tracks on all of the CDs that are loaded in random order, press and hold this button for more than two seconds. A beep sounds and RANDOM ALL displays. Press again to turn off random play.
t SEEK u (Radio with Single CD): Press the left arrow to go to the start of the current or the previous track. Press the right arrow to go to the start of the next track. Pressing either arrow for more than two seconds searches the previous or next tracks at two tracks per second. Release either arrow to stop searching and to play the track. t SEEK u (Radio with Six-Disc CD Player): Press the left arrow to go to the start of the current track, if more than ten seconds have played. Press the right arrow to go to the next track. If either arrow is held or pressed more than once, the player continues moving backward or forward through the CD.
To scan one CD, press and hold either arrow for more than two seconds until SCAN displays and a beep sounds. The radio goes to the next track, plays for 10 seconds, then goes to the next track. Press either arrow again, to stop scanning.
3-57
(cid:129) (cid:129) (cid:129) (cid:129) To scan all loaded CDs, press and hold either arrow for more than four seconds until CD SCAN displays and a beep sounds. Use this feature to listen to 10 seconds of the first track of each loaded CD. Press either arrow again, to stop scanning.
DISP (Display): Press to see how long the current track has been playing. The elapsed time of the track displays. To change the default on the display, track or elapsed time, press until you see the desired display, then hold for two seconds. The radio produces one beep and the selected display becomes the default.
BAND: Press to listen to the radio when a CD is playing. The inactive CD(s) remains inside the radio for future listening.
B (CD): Press to play a CD while listening to the radio. The CD symbol displays when a CD is loaded.
AUTO EQ (Automatic Equalization): Press to select an equalization setting while playing a CD. The equalization is set when a CD is played. See “AUTO EQ” listed previously for more information. If you select an EQ setting for your CD, it is activated each time you play a CD.
Using Song List Mode (Radio with Six-Disc CD Player)
R (Song List): The six-disc CD changer has a feature called song list. This feature is capable of saving 20 track selections. To save tracks into the song list feature, perform the following steps: 1. Turn the CD player on and load it with at least one CD. See “LOAD CD” listed previously in this section for more information.
2. Check to see that the CD changer is not in song list
mode. S-LIST should not display. If S-LIST is present, press the R button to turn it off.
3. Select the desired CD by pressing the numbered
pushbutton and then use the right u SEEK arrow to locate the track to be saved. The track begins to play.
4. Press and hold the R button to save the track
into memory. When this button is pressed, one beep sounds. After two seconds of continuously pressing this button, two beeps sounds to confirm the track has been saved.
5. Repeat Steps 3 and 4 for saving other selections.
3-58
To delete the entire song list, perform the following steps: 1. Turn the CD player on. 2. Press the R button to turn song list on. S-LIST
displays.
3. Press and hold the R button for more than four seconds. One beep sounds, followed by two beeps after two seconds, and a final beep sounds after four seconds. S-LIST EMPTY displays indicating the song list has been deleted.
If a CD is ejected, and the song list contains saved tracks from that CD, those tracks are automatically deleted from the song list. Any tracks saved to the song list again are added to the bottom of the list.
To end song list mode, press the R button. One beep sounds and S-LIST is removed from the display.
S-LIST FULL displays if you try to save more than 20 selections.
To play the song list, press the R button. One beep sounds and S-LIST displays. The recorded tracks begins to play in the order they were saved. Seek through the song list by using the SEEK arrows. Seeking past the last saved track returns to the first saved track. To delete tracks from the song list, perform the following steps: 1. Turn the CD player on. 2. Press the R button to turn song list on. S-LIST
displays.
3. Press either SEEK arrow to select the desired track
to be deleted.
4. Press and hold the R button for two seconds. When this button is pressed, one beep sounds. After two seconds of continuously pressing this button, two beeps sound to confirm that the track has been deleted.
After a track has been deleted, the remaining tracks are moved up the list. When another track is added to the song list, the track is added to the end of the list.
3-59
CD Messages
XM Radio Messages
CHECK CD: If this message displays and/or the CD comes out, it could be for one of the following reasons:
It is very hot. When the temperature returns to normal, the CD should play.
(cid:129) You are driving on a very rough road. When the
road becomes smoother, the CD should play. The CD is dirty, scratched, wet, or upside down. The air is very humid. If so, wait about an hour and try again. The format of the CD might not be compatible. There could have been a problem while burning the CD. The label could be caught in the CD player.
If the CD is not playing correctly, for any other reason, try a known good CD. If any error occurs repeatedly or if an error cannot be corrected, contact your dealer/retailer. If the radio displays an error message, write it down and provide it to your dealer/retailer when reporting the problem.
xL (Explicit Language Channels): These channels, or any others, can be blocked at a customer’s request, by calling 1-800-852-XMXM (9696).
Updating: The encryption code in the receiver is being updated, and no action is required. This process should take no longer than 30 seconds.
No Signal: The system is functioning correctly, but the vehicle is in a location that is blocking the XM™ signal. When the vehicle is moved into an open area, the signal should return.
Loading XM: The audio system is acquiring and processing audio and text data. No action is needed. This message should disappear shortly.
CH Off Air: This channel is not currently in service. Tune in to another channel.
CH Unavail: This previously assigned channel is no longer assigned. Tune to another station. If this station was one of the presets, choose another station for that preset button.
No Info: No artist, song title, category, or text information is available at this time on this channel. The system is working properly.
3-60
(cid:129) (cid:129) (cid:129) (cid:129) (cid:129) (cid:129) Not Found: There are no channels available for the selected category. The system is working properly.
XM Locked: The XM™ receiver in your vehicle may have previously been in another vehicle. For security purposes, XM™ receivers cannot be swapped between vehicles. If this message is received after having your vehicle serviced, check with your dealer/retailer.
Radio ID: If tuned to channel 0, this message will alternate with the XM Radio 8 digit radio ID label. This label is needed to activate the service.
Unknown: If this message is received when tuned to channel 0, there may be a receiver fault. Consult with your dealer/retailer.
Chk XMRcvr: If this message does not clear within a short period of time, the receiver may have a fault. Consult with your dealer/retailer.
Navigation/Radio System Your vehicle may have a navigation radio system. The navigation system has built-in features intended to minimize driver distraction. Technology alone, no matter how advanced, can never replace your own judgment. See the Navigation System manual for some tips to help you reduce distractions while driving.
Theft-Deterrent Feature THEFTLOCK® is designed to discourage theft of your vehicle’s radio. The feature works automatically by learning a portion of the Vehicle Identification Number (VIN). If the radio is moved to a different vehicle, it does not operate and LOCKED displays. When the radio and vehicle are turned off, the blinking red light indicates that THEFTLOCK® is armed. With THEFTLOCK® activated, the radio does not operate if stolen.
Radio Reception Frequency interference and static during normal radio reception can occur if items such as cellphone chargers, vehicle convenience accessories, and external electronic devices are plugged into the accessory power outlet. If there is interference or static, unplug the item from the accessory power outlet.
3-61
Fixed Mast Antenna The fixed mast antenna can withstand most car washes without being damaged. If the mast should ever become slightly bent, straighten it out by hand. If the mast is badly bent, replace it. Check occasionally to make sure the mast is still tightened to its base. If tightening is required, tighten by hand, then with a wrench one quarter turn.
XM™ Satellite Radio Antenna System The XM™ Satellite Radio antenna is located on the roof of your vehicle. Keep this antenna clear of snow and ice build up for clear radio reception. If your vehicle has a sunroof, the performance of the XM™ system may be affected if the sunroof is open. Loading items onto the roof of your vehicle can interfere with the performance of the XM™ system. Make sure the XM™ Satellite Radio antenna is not obstructed.
AM The range for most AM stations is greater than for FM, especially at night. The longer range can cause station frequencies to interfere with each other. For better radio reception, most AM radio stations boost the power levels during the day, and then reduce these levels during the night. Static can also occur when things like storms and power lines interfere with radio reception. When this happens, try reducing the treble on your radio. FM Stereo FM stereo gives the best sound, but FM signals reach only about 10 to 40 miles (16 to 65 km). Tall buildings or hills can interfere with FM signals, causing the sound to fade in and out. XM™ Satellite Radio Service XM™ Satellite Radio Service gives digital radio reception from coast-to-coast in the 48 contiguous United States, and in Canada. Just as with FM, tall buildings or hills can interfere with satellite radio signals, causing the sound to fade in and out. In addition, traveling or standing under heavy foliage, bridges, garages, or tunnels may cause loss of the XM™ signal for a period of time. The radio may display NO SIGNAL to indicate interference.
3-62
Section 4
Driving Your Vehicle
Your Driving, the Road, and Your Vehicle ..........4-2
Defensive Driving ...........................................4-2
Drunk Driving .................................................4-2
Control of a Vehicle ........................................4-3
Braking .........................................................4-3
Antilock Brake System (ABS) ...........................4-4
Braking in Emergencies ...................................4-5
Traction Control System (TCS) .........................4-5
Locking Rear Axle ..........................................4-6
StabiliTrak® System ........................................4-7
Steering ........................................................4-8
Off-Road Recovery .......................................4-10
Passing .......................................................4-10
Loss of Control .............................................4-10
Off-Road Driving ...........................................4-12
Assist Steps .................................................4-31Driving at Night ............................................4-32
Driving in Rain and on Wet Roads ..................4-33
Before Leaving on a Long Trip .......................4-34
Highway Hypnosis ........................................4-34
Hill and Mountain Roads ................................4-34
Winter Driving ..............................................4-35
If Your Vehicle is Stuck in Sand,Mud, Ice, or Snow .....................................4-39
Rocking Your Vehicle to Get It Out .................4-40
Recovery Loops ...........................................4-40
Loading Your Vehicle ....................................4-42
Towing ..........................................................4-48
Towing Your Vehicle .....................................4-48
Recreational Vehicle Towing ...........................4-48
Towing a Trailer ...........................................4-50
Trailer Recommendations ...............................4-624-1
Your Driving, the Road, and Your Vehicle
Defensive Driving Defensive driving means “always expect the unexpected.” The first step in driving defensively is to wear your safety belt — See Safety Belts: They Are for Everyone on page 1-10.
{CAUTION:
Assume that other road users (pedestrians, bicyclists, and other drivers) are going to be careless and make mistakes. Anticipate what they might do and be ready. In addition:
(cid:129) Allow enough following distance between
you and the driver in front of you.
(cid:129) Focus on the task of driving.
Driver distraction can cause collisions resulting in injury or possible death. These simple defensive driving techniques could save your life.
4-2
Drunk Driving
{CAUTION:
Drinking and then driving is very dangerous. Your reflexes, perceptions, attentiveness, and judgment can be affected by even a small amount of alcohol. You can have a serious — or even fatal — collision if you drive after drinking. Do not drink and drive or ride with a driver who has been drinking. Ride home in a cab; or if you are with a group, designate a driver who will not drink.
Death and injury associated with drinking and driving is a global tragedy. Alcohol affects four things that anyone needs to drive a vehicle: judgment, muscular coordination, vision, and attentiveness. Police records show that almost 40 percent of all motor vehicle-related deaths involve alcohol. In most cases, these deaths are the result of someone who was drinking and driving. In recent years, more than 17,000 annual motor vehicle-related deaths have been associated with the use of alcohol, with about 250,000 people injured.
For persons under 21, it is against the law in every U.S. state to drink alcohol. There are good medical, psychological, and developmental reasons for these laws. The obvious way to eliminate the leading highway safety problem is for people never to drink alcohol and then drive. Medical research shows that alcohol in a person’s system can make crash injuries worse, especially injuries to the brain, spinal cord, or heart. This means that when anyone who has been drinking — driver or passenger — is in a crash, that person’s chance of being killed or permanently disabled is higher than if the person had not been drinking.
Control of a Vehicle The following three systems help to control your vehicle while driving — brakes, steering, and accelerator. At times, as when driving on snow or ice, it is easy to ask more of those control systems than the tires and road can provide. Meaning, you can lose control of your vehicle. See Traction Control System (TCS) on page 4-5. Adding non-dealer/non-retailer accessories can affect your vehicle’s performance. See Accessories and Modifications on page 5-3.
Braking See Brake System Warning Light on page 3-33. Braking action involves perception time and reaction time. First, you have to decide to push on the brake pedal. That is perception time. Then you have to bring up your foot and do it. That is reaction time. Average reaction time is about three-fourths of a second. But that is only an average. It might be less with one driver and as long as two or three seconds or more with another. Age, physical condition, alertness, coordination, and eyesight all play a part. So do alcohol, drugs, and frustration. But even in three-fourths of a second, a vehicle moving at 60 mph (100 km/h) travels 66 feet (20 m). That could be a lot of distance in an emergency, so keeping enough space between your vehicle and others is important. And, of course, actual stopping distances vary greatly with the surface of the road, whether it is pavement or gravel; the condition of the road, whether it is wet, dry, or icy; tire tread; the condition of the brakes; the weight of the vehicle; and the amount of brake force applied. Avoid needless heavy braking. Some people drive in spurts — heavy acceleration followed by heavy braking — rather than keeping pace with traffic.
4-3
This is a mistake. The brakes might not have time to cool between hard stops. The brakes will wear out much faster if you do a lot of heavy braking. If you keep pace with the traffic and allow realistic following distances, you will eliminate a lot of unnecessary braking. That means better braking and longer brake life. If your vehicle ever loses electrical power while you are driving, brake normally but do not pump the brakes. If you do, the pedal could get harder to push down. If your vehicle loses electrical power, you will still have some power brake assist. But you will use it when you brake. Once the power assist is used up, it can take longer to stop, the brake pedal will be harder to push, and you might experience longer pedal travel. Adding non-dealer/non-retailer accessories can affect your vehicle’s performance. See Accessories and Modifications on page 5-3.
Antilock Brake System (ABS) Your vehicle has the Antilock Brake System (ABS), an advanced electronic braking system that will help prevent a braking skid. When you start the engine and begin to drive away, ABS will check itself. You might hear a momentary motor or clicking noise while this test is going on. This is normal.
If there is a problem with ABS, this warning light will stay on. See Antilock Brake System Warning Light on page 3-34.
Let us say the road is wet and you are driving safely. Suddenly, an animal jumps out in front of you. You slam on the brakes and continue braking. Here is what happens with ABS: A computer senses that wheels are slowing down. If one of the wheels is about to stop rolling, the computer will separately work the brakes at each wheel.
4-4
ABS can change the brake pressure faster than any driver could. The computer is programmed to make the most of available tire and road conditions. This can help you steer around the obstacle while braking hard. As you brake, the computer keeps receiving updates on wheel speed and controls braking pressure accordingly. Remember: ABS does not change the time you need to get your foot up to the brake pedal or always decrease stopping distance. If you get too close to the vehicle in front of you, you will not have time to apply the brakes if that vehicle suddenly slows or stops. Always leave enough room up ahead to stop, even though you have ABS. Using ABS Do not pump the brakes. Just hold the brake pedal down firmly and let antilock work for you. You might feel the brakes vibrate or notice some noise, but this is normal.
Braking in Emergencies With ABS, you can steer and brake at the same time. In many emergencies, steering can help you more than even the very best braking.
Traction Control System (TCS) Your vehicle has a Traction Control System (TCS) that limits wheel spin. This is especially useful in slippery road conditions. The system operates only if it senses that any of the wheels are spinning or beginning to lose traction. When this happens, the system applies the brakes to limit wheel spin and also reduces engine power. You may feel or hear the system working, but this is normal. The Traction Control System may operate on dry roads under some conditions. When this happens, you may notice a reduction in acceleration or a pumping sound. This is normal and doesn’t mean there’s a problem with your vehicle. Examples of these conditions include hard acceleration in a turn, an abrupt upshift or downshift of the transmission or driving on rough roads. If your vehicle is in cruise control when the TCS begins to limit wheel spin, the cruise control will automatically disengage. When road conditions allow you to safely use it again, you may re-engage the cruise control. See Cruise Control on page 3-11. If your vehicle has a Driver information Center (DIC), a TRACTION FAULT message will appear when a Traction Control System or Anti-Lock Brake System problem has been detected and the vehicle needs service. See DIC Warnings and Messages on page 3-43
for more information.4-5
When this message is on, the system will not limit wheel spin. Adjust your driving accordingly. The traction control system automatically comes on whenever you start your vehicle. To limit wheel spin, especially in slippery road conditions, you should always leave the system on. But you can turn the traction control system off if you ever need to.
To turn the system off, press and hold the TCS button for five seconds.
This light will come on steady when the traction control system has been turned off. This light flashes when TCS is active.
If you press and hold the TC button for five seconds, the traction control system will turn off and a TRAC OFF message will appear on the DIC. Press the TC button again to turn the system back on. The TRAC OFF message will then go off. The traction control system will reset itself at each ignition cycle. Adding non-dealer/non-retailer accessories can affect your vehicle’s performance. See Accessories and Modifications on page 5-3 for more information. Locking Rear Axle Your vehicle may have this feature. The locking rear axle can give your vehicle additional traction from the rear wheels when traveling in off-road situations such as mud, snow, sand, steep hills and uneven terrain.
The button used to turn this feature on or off is located to the right of the transfer case buttons on the center of the instrument panel.
4-6
To lock the rear axle, do the following: 1. Place the transfer case in the 4LO Lock mode. This
is the only mode which will allow the rear axle to lock. See Full-Time Four-Wheel Drive on page 2-27
for more information regarding the transfer case and 4LO Lock mode.2. Press the button with the vehicle stopped or moving
less than 2 mph (3 km/h).
If you try to lock the rear axle while your
You must wait for the light in the button to stop flashing and remain illuminated before the rear axle is locked. Notice: vehicle is stuck and the tires are spinning, you could damage your vehicle’s drivetrain. The repairs would not be covered by your warranty. Always lock the rear axle before attempting situations and/or navigating terrain which could possibly cause the vehicle to become stuck. The locking rear axle will be disengaged when the wheel speed is greater than 20 mph (32 km/h), if the vehicle’s battery is low and/or the transfer case is shifted out of 4LO Lock mode. Notice: pavement, you could damage your vehicle’s drivetrain. The repairs would not be covered by your warranty. Do not use the locking rear axle on pavement. If you need four-wheel drive when traveling on pavement, use only 4HI.
If you lock the rear axle while driving on
StabiliTrak® System Your vehicle has a vehicle stability enhancement system called StabiliTrak®. It is an advanced computer controlled system that assists you with directional control of the vehicle in difficult driving conditions. StabiliTrak® activates when the computer senses a discrepancy between your intended path and the direction the vehicle is actually traveling. StabiliTrak® selectively applies braking pressure at any one of the vehicle’s brakes to assist the driver with keeping the vehicle on the intended path. When you first start your vehicle and begin to drive away, the system performs several diagnostic checks to insure there are no problems. You may hear or feel the system working. This is normal and does not mean there is a problem with your vehicle. If there is a problem detected with StabiliTrak®, a SERVICE STAB SYS message will be displayed on the Driver Information Center (DIC). See DIC Warnings and Messages on page 3-43 for more information. When this message is displayed, the system is not operational. Adjust your driving accordingly.
4-7
StabiliTrak® comes on automatically whenever you start your vehicle. However, when the transfer case is placed in Four-Wheel-Low Lock mode, StabiliTrak® is automatically disabled. See Full-Time Four-Wheel Drive on page 2-27 for more information. To help assist you with directional control of the vehicle, you should always leave the system on. You can turn StabiliTrak® off if you ever need to using the TC (traction control) on/off button. If you press and hold the TC button for five seconds, the StabiliTrak® system and the traction control system will turn off. When this is done, the STAB SYS OFF message will be displayed on the DIC. Press the TC button again to turn StabiliTrak® back on. See Traction Control System (TCS) on page 4-5. If your vehicle is in cruise control when the StabiliTrak® activates, the cruise control will automatically disengage. When road conditions allow you to safely use it again, you may reengage the cruise control. See Cruise Control on page 3-11 for more information.
Steering Power Steering If you lose power steering assist because the engine stops or the system is not functioning, you can steer but it will take much more effort.
4-8
Steering Tips It is important to take curves at a reasonable speed. A lot of the “driver lost control” accidents mentioned on the news happen on curves. Here is why: Experienced driver or beginner, each of us is subject to the same laws of physics when driving on curves. The traction of the tires against the road surface makes it possible for the vehicle to change its path when you turn the front wheels. If there is no traction, inertia will keep the vehicle going in the same direction. If you have ever tried to steer a vehicle on wet ice, you will understand this. The traction you can get in a curve depends on the condition of the tires and the road surface, the angle at which the curve is banked, and your speed. While you are in a curve, speed is the one factor you can control. Suppose you are steering through a sharp curve. Then you suddenly accelerate. Both control systems — steering and acceleration — have to do their work where the tires meet the road. Adding the sudden acceleration can demand too much of those places. You can lose control. See Traction Control System (TCS) on page 4-5 and StabiliTrak® System on page 4-7. What should you do if this ever happens? Ease up on the accelerator pedal, steer the vehicle the way you want it to go, and slow down.
Speed limit signs near curves warn that you should adjust your speed. Of course, the posted speeds are based on good weather and road conditions. Under less favorable conditions you will want to go slower. If you need to reduce your speed as you approach a curve, do it before you enter the curve, while the front wheels are straight ahead. Try to adjust your speed so you can drive through the curve. Maintain a reasonable, steady speed. Wait to accelerate until you are out of the curve, and then accelerate gently into the straightaway. Adding non-dealer/non-retailer accessories can affect your vehicle’s performance. See Accessories and Modifications on page 5-3. Steering in Emergencies There are times when steering can be more effective than braking. For example, you come over a hill and find a truck stopped in your lane, or a car suddenly pulls out from nowhere, or a child darts out from between parked cars and stops right in front of you. You can avoid these problems by braking — if you can stop in time. But sometimes you cannot; there is not room. That is the time for evasive action — steering around the problem. Your vehicle can perform very well in emergencies like these. First apply the brakes. See Braking on page 4-3. It is better to remove as much speed as you can from a possible collision. Then steer around the problem, to the left or right depending on the space available.
An emergency like this requires close attention and a quick decision. If you are holding the steering wheel at the recommended 9 and 3 o’clock positions, you can turn it a full 180 degrees very quickly without removing either hand. But you have to act fast, steer quickly, and just as quickly straighten the wheel once you have avoided the object. The fact that such emergency situations are always possible is a good reason to practice defensive driving at all times and wear safety belts properly.
4-9
Off-Road Recovery You may find that your right wheels have dropped off the edge of a road onto the shoulder while you are driving.
If the level of the shoulder is only slightly below the pavement, recovery should be fairly easy. Ease off the accelerator and then, if there is nothing in the way, steer so that your vehicle straddles the edge of the pavement. You can turn the steering wheel up to one-quarter turn until the right front tire contacts the pavement edge. Then turn the steering wheel to go straight down the roadway.
4-10
Passing Passing another vehicle on a two-lane road can be dangerous. To reduce the risk of danger while passing, we suggest the following tips:
Look down the road, to the sides, and to crossroads for situations that might affect a successful pass. If in doubt, wait.
(cid:129) Watch for traffic signs, pavement markings, and lines that could indicate a turn or an intersection. Never cross a solid or double-solid line on your side of the lane.
(cid:129) Do not get too close to the vehicle you want to
pass. Doing so can reduce your visibility.
(cid:129) Wait your turn to pass a slow vehicle. (cid:129) When you are being passed, ease to the right.
Loss of Control Let us review what driving experts say about what happens when the three control systems — brakes, steering, and acceleration — do not have enough friction where the tires meet the road to do what the driver has asked. In any emergency, do not give up. Keep trying to steer and constantly seek an escape route or area of less danger.
(cid:129) Skidding In a skid, a driver can lose control of the vehicle. Defensive drivers avoid most skids by taking reasonable care suited to existing conditions, and by not overdriving those conditions. But skids are always possible. The three types of skids correspond to your vehicle’s three control systems. In the braking skid, the wheels are not rolling. In the steering or cornering skid, too much speed or steering in a curve causes tires to slip and lose cornering force. And in the acceleration skid, too much throttle causes the driving wheels to spin. A cornering skid is best handled by easing your foot off the accelerator pedal. Remember: Any traction control system helps avoid only the acceleration skid. If your traction system is off, then an acceleration skid is also best handled by easing your foot off the accelerator pedal. See Traction Control System (TCS) on page 4-5
and StabiliTrak® System on page 4-7.If your vehicle starts to slide, ease your foot off the accelerator pedal and quickly steer the way you want the vehicle to go. If you start steering quickly enough, your vehicle may straighten out. Always be ready for a second skid if it occurs. Of course, traction is reduced when water, snow, ice, gravel, or other material is on the road. For safety, you will want to slow down and adjust your driving to these conditions. It is important to slow down on slippery surfaces because stopping distance will be longer and vehicle control more limited. While driving on a surface with reduced traction, try your best to avoid sudden steering, acceleration, or braking, including reducing vehicle speed by shifting to a lower gear. Any sudden changes could cause the tires to slide. You may not realize the surface is slippery until your vehicle is skidding. Learn to recognize warning clues — such as enough water, ice, or packed snow on the road to make a mirrored surface — and slow down when you have any doubt. Remember: Any Antilock Brake System (ABS) helps avoid only the braking skid.
4-11
Before You Go Off-Roading There are some things to do before you go out. For example, be sure to have all necessary maintenance and service work done. Check to make sure all underbody shields are properly attached. Make sure any equipment you may need — first aid kit, cell phone, flashlight, etc. — is securely stored in the vehicle. Be sure you read all the information about your four-wheel-drive vehicle in this manual. Is there enough fuel? Is the spare tire fully inflated? Are the fluid levels up where they should be? What are the local laws that apply to off-roading where you will be driving? If you do not know, you should check with law enforcement people in the area. Will you be on someone’s private land? If so, be sure to get the necessary permission.
Off-Road Driving This off-road guide is meant to provide advice for when you drive your vehicle off paved roads. Also, see Braking on page 4-3. Off-road driving can be great fun. But it does have some definite hazards. The greatest of these is the terrain itself. The airbag system is designed to work properly under a wide range of conditions, including off-road usage. Observe safe driving speeds, especially on rough terrain. As always, wear your safety belt. “Off-roading” means you have left the great North American road system behind. Traffic lanes are not marked. Curves are not banked. There are no road signs. Surfaces can be slippery, rough, uphill or downhill. In short, you have gone right back to nature. Off-road driving involves some new skills. And that is why it is very important that you read this guide. You will find many driving tips and suggestions. These will help make your off-road driving safer and more enjoyable.
4-12
There are some important things to remember about how to load your vehicle.
The heaviest things should be on the load floor and forward of your rear axle. Put heavier items in the rear area, as far forward as you can.
(cid:129) Be sure the load is secured properly, so driving on
the off-road terrain does not toss things around.
You will find other important information in this manual. See Loading Your Vehicle on page 4-42 and Tires on page 5-54.
Loading Your Vehicle for Off-Road Driving
{CAUTION:
(cid:129) Cargo on the load floor piled higher than
the seatbacks can be thrown forward during a sudden stop. You or your passengers could be injured. Keep cargo below the top of the seatbacks.
(cid:129) Unsecured cargo on the load floor can be
tossed about when driving over rough terrain. You or your passengers can be struck by flying objects. Secure the cargo properly.
(cid:129) Heavy loads on the roof raise the vehicle’s
center of gravity, making it more likely to roll over. You can be seriously or fatally injured if the vehicle rolls over. Put heavy loads inside the cargo area, not on the roof. Keep cargo in the cargo area as far forward and low as possible.
4-13
(cid:129) Traveling to Remote Areas It makes sense to plan your trip, especially when going to a remote area. Know the terrain and plan your route. You are much less likely to get bad surprises. Get accurate maps of trails and terrain. Try to learn of any blocked or closed roads. It is also a good idea to travel with at least one other vehicle. If something happens to one of them, the other can help quickly. Does your vehicle have a winch? If so, be sure to read the winch instructions. In a remote area, a winch can be handy if you get stuck. But you will want to know how to use it properly.
High Mobility Characteristics Your vehicle has a 10 inch (25.4 cm) running ground clearance (A), a 9 inch (22.8 cm) axle to ground