- 1996 Honda Odyssey Owners Manuals
- Honda Odyssey Owners Manuals
- 2012 Honda Odyssey Owners Manuals
- Honda Odyssey Owners Manuals
- 2010 Honda Odyssey Owners Manuals
- Honda Odyssey Owners Manuals
- 2005 Honda Odyssey Owners Manuals
- Honda Odyssey Owners Manuals
- 1995 Honda Odyssey Owners Manuals
- Honda Odyssey Owners Manuals
- 2001 Honda Odyssey Owners Manuals
- Honda Odyssey Owners Manuals
- 2013 Honda Odyssey Owners Manuals
- Honda Odyssey Owners Manuals
- 2000 Honda Odyssey Owners Manuals
- Honda Odyssey Owners Manuals
- 1997 Honda Odyssey Owners Manuals
- Honda Odyssey Owners Manuals
- 2011 Honda Odyssey Owners Manuals
- Honda Odyssey Owners Manuals
- 1999 Honda Odyssey Owners Manuals
- Honda Odyssey Owners Manuals
- 1998 Honda Odyssey Owners Manuals
- Honda Odyssey Owners Manuals
- 2009 Honda Odyssey Owners Manuals
- Honda Odyssey Owners Manuals
- 2008 Honda Odyssey Owners Manuals
- Honda Odyssey Owners Manuals
- Download PDF Manual
-
TOC
Index
Home
164
2012 Odyssey 12 US ODYSSEY-31TK8610.book 165 ページ 2011年6月21日 火曜日 午前9時35分
■ Removing the Second Row Center Seat* Your vehicle’s multi-functional second row center seat is removable. Adjustment Strap
1. Store the center seat belt first. Insert a key
into the slot on the side of the anchor buckle.
Lock Release Strap
2. Retract the seat belt into the holder on the
ceiling.
2 Seat Belt with Detachable Anchor P. 35
3. Pull up the adjustment strap, and fold down
the seat-back.
4. Pull the lock release strap under the seat
cushion, and lift the rear of the seat. u To lift the seat, hold the seat-back.
5. Pull the seat-back slightly, then pivot it
upward. u This unhooks the front of the seat from
the floor.
* Not available on all models
Continued
uuAdjusting the SeatsuRear Seats
1Removing the Second Row Center Seat
Do not remove the seat while driving.
The multi-functional center seat can be used as the beverage holder when folded down.
2 Beverage Holders P. 174
To reinstall the seat, hook the front of the seat to the floor first. Pushing the rear of the seat-back locks the seat in place. Make sure the seat is latched before driving.
QRG
TOC
Index
Home
165
2012 Odyssey 12 US ODYSSEY-31TK8610.book 166 ページ 2011年6月21日 火曜日 午前9時35分
uuAdjusting the SeatsuRear Seats
■ Tucking away the One-Motion Third row magic Seat®
1. Store the center seat belt first. Insert a key
into the slot on the side of the anchor buckle.
2. Retract the seat belt into the holder on the
ceiling.
2 Seat Belt with Detachable Anchor P. 35
3. Lower the head restraints to their lowest
position.
4. The right and left halves can be tucked
away separately. Pull either strap to release the front leg lock of the third row seat.
5. Continue pulling the strap to tuck the seat
and strap away into the cargo area.
Straps
1Tucking away the One-Motion Third Row Magic Seat
Remove any items from the cargo area before you tuck away the third row seat.
The instruction label is attached at the back of the third row seat-back.
When you tuck away one side of the third row seats and use the non-recessed part of the cargo area, make sure to secure the cargo. Loose items can fly forward and cause injury if you have to brake hard.
QRG
TOC
Index
Home
166
2012 Odyssey 12 US ODYSSEY-31TK8610.book 167 ページ 2011年6月21日 火曜日 午前9時35分
uuAdjusting the SeatsuRear Seats
■ To return the seat to the upright position:
1. Grab the handle from outside.
Pull up the folded seat and pivot it forward.
1To return the seat to the upright position
Make sure the seat is latched before driving.
Straps
Handle
2. The front leg automatically latches.
Pull the strap to put the seat-back(s) upright.
QRG
TOC
Index
Home
167
2012 Odyssey 12 US ODYSSEY-31TK8610.book 168 ページ 2011年6月21日 火曜日 午前9時35分
uuAdjusting the SeatsuArmrest
QRG
Armrest ■ Using the Front and Second Row Outer Seat Armrest
Pull down the armrest.
Front seat with adjustable armrest Pivot down the armrest all the way, then pull it up to a desired angle.
TOC
Index
Home
168
■ Using the Second and Third Row Seat Armrest*
Pull down the armrest of the center seat-back.
* Not available on all models
2012 Odyssey 12 US ODYSSEY-31TK8610.book 169 ページ 2011年6月21日 火曜日 午前9時35分
Interior Lights/Interior Convenience Items
Interior Lights ■ Interior Light Switches
Off
On
Door Activated Position
■ ON The interior lights come on regardless of whether the doors or the tailgate are open or closed.
■ Door activated The interior lights come on in the following situations:
Front: • When any of the doors or the tailgate are
opened.
• You unlock the driver's door.
• You remove the key from the ignition switch.
Cargo area: When the tailgate is open.
■ OFF The interior lights remain off regardless of whether the doors or the tailgate are open or closed.
Off
Continued
Door Activated Position
On
1Interior Light Switches
In the door activated position, the interior lights fade out and go off about 30 seconds after the doors are closed. The lights go off after 30 seconds in the following situations: • When you unlock the driver's door but do not open
it.
• When you remove the key from the ignition switch
but do not open a door. Models with multi-information display You can change the interior light dimming time.
2 Customized Features P. 101
All models The interior lights go off immediately in the following situations: • When you lock the driver's door. • When you close the driver's door with the key in
the ignition switch.
• When you turn the ignition switch to ON (w.
If you leave any of the doors open without the key in the ignition switch, the interior lights go off after about 15 minutes.
If you leave the tailgate open without the key in the ignition switch, the cargo area light goes off after about 30 minutes.
QRG
TOC
Index
Home
169
2012 Odyssey 12 US ODYSSEY-31TK8610.book 170 ページ 2011年6月21日 火曜日 午前9時35分
uuInterior Lights/Interior Convenience ItemsuInterior Lights
QRG
■ Map Lights
■ Front The map lights can be turned on and off by pressing the lenses.
1Map Lights
When the front interior light switch is in the door activated position and any door is open, the map light will not go off when you press the lens.
■ Second and third row The map lights can be turned on and off by pressing the lenses when the front interior light switch is in the door activated position.
TOC
Index
Home
170
2012 Odyssey 12 US ODYSSEY-31TK8610.book 171 ページ 2011年6月21日 火曜日 午前9時35分
uuInterior Lights/Interior Convenience ItemsuInterior Convenience Items
Interior Convenience Items ■ Glove Box
Pull the handle to open the glove box. You can lock the glove box with the master key.
■ Removable Center Console*
Lever
Pull up on the lever to open the console compartment.
■ Removing the center console Pull up the handle on the front lower side and unlock the console from the floor. Raise it forward to remove.
Handle
1Glove Box
3WARNING
An open glove box can cause serious injury to your passenger in a crash, even if the passenger is wearing the seat belt.
Always keep the glove box closed while driving.
1Removable Center Console
When you reinstall the center console, place the rear side on the floor first, and align the marks on the sides with the marks on the floor. Push the center console down and lock it. Make sure it is securely latched before driving.
* Not available on all models
Continued
Marks
QRG
TOC
Index
Home
171
2012 Odyssey 12 US ODYSSEY-31TK8610.book 172 ページ 2011年6月21日 火曜日 午前9時35分
uuInterior Lights/Interior Convenience ItemsuInterior Convenience Items
QRG
■ Flip-up Trash Bag Ring*
Tab
Pull up the ring until it clicks, and lift the tab. Put a plastic bag in the ring. Push the tab down to hold the bag.
1Flip-up Trash Bag Ring
The ring is designed to hold light items only. Store the ring when it is not in use.
TOC
Ring
Index
Home
172
* Not available on all models
2012 Odyssey 12 US ODYSSEY-31TK8610.book 173 ページ 2011年6月21日 火曜日 午前9時35分
uuInterior Lights/Interior Convenience ItemsuInterior Convenience Items
■ Center Pocket
Press the button to open the center pocket.
Button
■ Using the center pocket as a cool box *
1Using the center pocket as a cool box
While the air conditioner is in use, you can store items in the center pocket to keep them cool.
Press the COOL BOX button to cool inside the center pocket (indicator on).
NOTICE Do not put opened cans, or loose ice and containers. Spilled liquids can damage the upholstery and electrical components in and around the cool box.
The cool box is not a refrigerator. It only keep chilled beverage cool.
The climate control system continues to cool the cool box when the heater is turned on.
Pressing the COOL BOX button automatically turns on the air conditioning system.
The cool box automatically turns off if: • The air conditioning system is turned off • You turn the ignition switch to LOCK (0
* Not available on all models
Continued
QRG
TOC
Index
Home
173
2012 Odyssey 12 US ODYSSEY-31TK8610.book 174 ページ 2011年6月21日 火曜日 午前9時35分
uuInterior Lights/Interior Convenience ItemsuInterior Convenience Items
QRG
■ Beverage Holders
Holder Arm
■ Front panel beverage holder Pull the beverage holder arm inside the front panel tray until the arm contacts the tray front.
1Beverage Holders
NOTICE Spilled liquids can damage the upholstery, carpeting, and electrical components in the interior.
Be careful when you are using the beverage holders. Hot liquid can scald you.
TOC
Tray
■ Removable center console beverage
holders *
■ Front seat beverage holders *
Index
Home
174
* Not available on all models
2012 Odyssey 12 US ODYSSEY-31TK8610.book 175 ページ 2011年6月21日 火曜日 午前9時35分
uuInterior Lights/Interior Convenience ItemsuInterior Convenience Items
■ Second row seat beverage holders * To use the beverage holder, fold the seat- back.
2 Using the Second and Third Row Seat
Armrest* P. 168
■ Third row seat beverage holders
* Not available on all models
Continued
QRG
TOC
Index
Home
175
2012 Odyssey 12 US ODYSSEY-31TK8610.book 176 ページ 2011年6月21日 火曜日 午前9時35分
uuInterior Lights/Interior Convenience ItemsuInterior Convenience Items
■ Accessory Power Sockets The accessory power sockets can be used when the ignition switch is in ACCESSORY (q or ON (w.
■ Accessory power socket(s) (console
panel)
Open the cover to use it.
■ Accessory power socket (cargo area) Open the cover to use it.
1Accessory Power Sockets
NOTICE Do not insert an automotive type cigarette lighter element. This can overheat the power socket.
The accessory power socket is designed to supply power for 12 volt DC accessories that are rated 120 watts or less (10 amps).
To prevent battery drain, only use the power socket with the engine running.
When each sockets is being used simultaneously, the combined power rating of the accessories should not exceed 120 watts (10 amps).
QRG
TOC
Index
Home
176
2012 Odyssey 12 US ODYSSEY-31TK8610.book 177 ページ 2011年6月21日 火曜日 午前9時35分
uuInterior Lights/Interior Convenience ItemsuInterior Convenience Items
■ AC Power Outlet* The AC power outlet can be used when the engine is running.
Open the cover to use it. Plug in the appliance slightly, turn it 90° clockwise, then push it all the way.
1AC Power Outlet
NOTICE Do not use the AC power outlet for electric appliances that require high initial peak wattage, such as cathode-ray tube type televisions, refrigerators, electric pumps, etc. It is not suitable for devices that process precise data, such as medical equipment, and that require an extermely stable power supply, such as microcomputer-controlled electric blankets, touch sensor lamps, etc.
The AC power outlet is designed to supply power for up to 115 volt appliances that are rated 150 watts or less.
* Not available on all models
Continued
QRG
TOC
Index
Home
177
2012 Odyssey 12 US ODYSSEY-31TK8610.book 178 ページ 2011年6月21日 火曜日 午前9時35分
uuInterior Lights/Interior Convenience ItemsuInterior Convenience Items
■ Coat Hooks
Second row
There are coat hooks on the both side of the grab handle and the window frame. Pull it down to use it.
1Coat Hooks
The coat hooks are not designed for large or heavy items.
Third row
■ Cargo Hooks
Use the floor cargo hooks to secure luggage in the cargo area.
QRG
TOC
Index
Home
178
2012 Odyssey 12 US ODYSSEY-31TK8610.book 179 ページ 2011年6月21日 火曜日 午前9時35分
uuInterior Lights/Interior Convenience ItemsuInterior Convenience Items
■ Grocery Bag Hooks
■ Front Pull out the hook on the instrument panel from the side.
1Grocery Bag Hooks
The hooks are designed to hold light items. Heavy objects may damage the hook.
Hook
■ Rear
Hooks
Continued
QRG
TOC
Index
Home
179
2012 Odyssey 12 US ODYSSEY-31TK8610.book 180 ページ 2011年6月21日 火曜日 午前9時35分
uuInterior Lights/Interior Convenience ItemsuInterior Convenience Items
QRG
TOC
Index
Home
180
■ Sunglasses Holder
To open the sunglasses holder, push and release the indent. To close, push it again until it latches.
Push
You can store eyeglasses and other small items in this holder.
1Sunglasses Holder
Keep the holder closed while driving except when accessing stored items.
■ Conversation mirror * The sunglasses holder comes with a mirror. Open the sunglasses holder fully, then push it back to the first detent. You can use the mirror to view the rear seats.
* Not available on all models
2012 Odyssey 12 US ODYSSEY-31TK8610.book 181 ページ 2011年6月21日 火曜日 午前9時35分
uuInterior Lights/Interior Convenience ItemsuInterior Convenience Items
■ Seat Heaters*
The ignition switch must be in ON (w to use the seat heaters. The HI setting heats the seats faster than the LO setting.
There is no heater in the passenger's seat- back due to the side airbag cutoff system.
The appropriate indicator will be on while the seat heater is on. Each time you press the switch, the mode changes to HI, LOW and OFF.
1Seat Heaters
3WARNING
Heat induced burns are possible when using seat heaters.
Persons with a diminished ability to sense temperature (e.g., persons with diabetes, lower-limb nerve damage, or paralysis) or with sensitive skin should not use seat heaters.
Do not use the seat heaters even in LO when the engine is off. Under such conditions, the battery may be weakened, making the engine difficult to start.
* Not available on all models
Continued
QRG
TOC
Index
Home
181
2012 Odyssey 12 US ODYSSEY-31TK8610.book 182 ページ 2011年6月21日 火曜日 午前9時35分
uuInterior Lights/Interior Convenience ItemsuInterior Convenience Items
QRG
TOC
Index
Home
182
■ Integrated Sunshades*
Second Row
Hooks
■ Second row sunshades Pull the tab and roll up the sunshade all the way. Use the hooks to hang it.
Use the sunshades only when the windows are fully closed. Using the shade while a window is open can unhook and blow off the shade, hitting and hurting anyone sitting near the window.
1Integrated Sunshades
■ Third row sunshades Pull the tab and roll up the sunshade all the way. Attach the tab to the hook.
Tab
Third Row Hook
Tab
* Not available on all models
2012 Odyssey 12 US ODYSSEY-31TK8610.book 183 ページ 2011年6月21日 火曜日 午前9時35分
Heating and Cooling *
Using Vents, Heating and A/C
Dashboard vents
Dashboard and floor vents
Floor vents
Floor and defroster vents
Temperature Control Dial Adjusts the interior temperature.
Fan Control Dial Adjusts the fan speed.
(On/Off) Button
A/C Button Press to cool the interior or dehumidify while heating.
Mode Button Change airflow.
Button
Turns on the A/C, selects airflow from the dashboard vents, and switches the mode to recirculation.
* Not available on all models
(Recirculation) Button
button and switch
Press the the mode depending on environmental conditions.
Recirculation Mode (indicator on): Recirculates air from the vehicle’s interior through the system.
Fresh Air Mode (indicator off): Maintains outside ventilation. Keep the system in fresh air mode in normal situations.
Windshield Defroster Button Turns on the A/C, selects airflow from the defroster vents at the base of the windshield, and switches the mode to fresh air.
Continued
183
QRG
TOC
Index
Home
2012 Odyssey 12 US ODYSSEY-31TK8610.book 184 ページ 2011年6月21日 火曜日 午前9時35分
uuHeating and Cooling *uUsing Vents, Heating and A/C
QRG
■ Heating
The heater uses heat from the engine coolant to warm the air. 1. Adjust the fan speed using the fan control
dial.
2. Press the mode button to select
3. Adjust the temperature using the
temperature control dial.
■ To rapidly warm up the interior 1. Set the fan to the maximum speed.
2. Select
3. Set the temperature to maximum heat.
4. Press the
button (indicator on).
■ To dehumidify the interior When used in combination with the heater, the air conditioning system makes the interior warm and dry and can prevent the windows from fogging up. 1. Adjust the fan speed using the fan control dial.
2. Press the A/C button to turn on the air conditioning.
3. Select
4. Adjust the temperature using the temperature control dial.
* Not available on all models
TOC
Index
Home
184
1Heating
When you select switches to fresh air.
, the mode automatically
1To rapidly warm up the interior
Change to fresh air mode as soon as the interior gets warm enough. The windows may fog up if kept in recirculation mode.
2012 Odyssey 12 US ODYSSEY-31TK8610.book 185 ページ 2011年6月21日 火曜日 午前9時35分
■ Cooling
1. Adjust the fan speed using the fan control
dial.
2. Press the mode button to select 3. Adjust the temperature using the
temperature control dial.
4. Press the A/C button (indicator on).
■ To rapidly cool down the interior 1. Set the fan to the maximum speed. 2. Set the temperature to maximum cool. 3. Press the
button (indicator on).
■ Defrosting the Windshield and Windows
button turns the air
Pressing the conditioning system on and automatically switches the system to fresh air mode.
■ To rapidly defrost the windows 1. Set the fan to the maximum speed. 2. Press the 3. Press the 4. Set the temperature to maximum heat.
button. button.
* Not available on all models
uuHeating and Cooling *uUsing Vents, Heating and A/C
1To rapidly cool down the interior
If the interior is very warm, you can cool it down more rapidly by partially opening the windows.
1Defrosting the Windshield and Windows
For your safety, make sure you have a clear view through all the windows before driving. Do not set the temperature near the upper or lower limit. When cold air hits the windshield, the outside of the windshield may fog up. If the side windows fog up, adjust the vents so that the air hits the side windows.
1To rapidly defrost the windows
After defrosting the windows, switch over to fresh air mode. If you keep the system in recirculation mode, the windows may fog up from humidity. This impedes visibility.
QRG
TOC
Index
Home
185
2012 Odyssey 12 US ODYSSEY-31TK8610.book 186 ページ 2011年6月21日 火曜日 午前9時35分
uuHeating and Cooling *uRear A/C Controls
Rear A/C Controls
QRG
Rear ceiling vents
Rear floor vents
Rear ceiling vents and floor vents
TOC
Rear Temperature Control Button
Rear Temperature Control Button
Mode Button
(Rear On/Off)
Button
Use the system when the engine is running. 1. Press the
button.
(Rear
Fan Control) Buttons
2. Adjust the temperature and the fan speed using the appropriate buttons. Select
the air flow to the rear passenger compartment using the mode button.
Index
3. To turn off the rear A/C, press the
button again.
Home
186
* Not available on all models
2012 Odyssey 12 US ODYSSEY-31TK8610.book 187 ページ 2011年6月21日 火曜日 午前9時35分
Climate Control System *
Using Automatic Climate Control The automatic climate control system maintains the interior temperature you select. The system also selects the proper mix of heated or cooled air that will as quickly as possible, raise or lower the interior temperature to your preference.
Floor and defroster vents
Floor vents
Dashboard and floor vents
Dashboard vents
Mode Button
AUTO Button
Driver’s Side Temperature Control Dial
SYNC (Synchronized) Button
(On/Off) Button
(Recirculation) Button Passenger’s Side Temperature Control Dial (Windshield
Defroster) Button A/C (Air Conditioning) Button (Fan Control) Buttons
button to cancel.
Use the system when the engine is running. 1. Press the AUTO button. 2. Adjust the interior temperature using the temperature control dial. 3. Press the ■ Switching between the recirculation and fresh air modes Press the button and switch the mode depending on environmental conditions. Recirculation Mode (indicator on): Recirculates air from the vehicle’s interior through the system. Fresh Air Mode (indicator off): Maintains outside ventilation. Keep the system in fresh air mode in normal situations. * Not available on all models
Continued
1Using Automatic Climate Control
If any buttons are pressed while using the climate control system in AUTO, the function of the button that was pressed will take priority. The AUTO indicator will go off, but functions unrelated to the button that was pressed will be controlled automatically.
The compressor may turn on to prevent window fogging, even if the display reads A/C OFF.
To prevent cold air from blowing in from outside, the fan may not start immediately when the AUTO button is pressed.
Once you have set the desired temperature, do not use the temperature control dials more than necessary. Doing so may delay the time it takes to reach the set temperature.
If the interior is very warm, you can cool it down more rapidly by partially opening the windows, turning the system on AUTO, and setting the temperature to low. Change the fresh air mode to recirculation mode until the temperature cools down.
When you set the temperature to the lower or upper limit, Lo or Hi is displayed.
button switches the climate
Pressing the control system between on and off. When turned on, the system returns to your last selection.
QRG
TOC
Index
Home
187
2012 Odyssey 12 US ODYSSEY-31TK8610.book 188 ページ 2011年6月21日 火曜日 午前9時35分
uuClimate Control System *uUsing Automatic Climate Control
■ Defrosting the Windshield and Windows
button turns the air
Pressing the conditioner system on and automatically switches the system to fresh air mode.
■ To rapidly defrost the windows
1. Press the
button.
2. Press the
button.
1Defrosting the Windshield and Windows
For your safety, make sure you have a clear view through all the windows before driving.
Do not set the temperature near the upper or lower limit.
When cold air hits the windshield, the outside of the windshield may fog up.
If the side windows fog up, adjust the vents so that the air hits the side windows.
1To rapidly defrost the windows
After defrosting the windows, switch over to fresh air mode.
If you keep the system in recirculation mode, the windows may fog up from humidity. This impedes visibility.
QRG
TOC
Index
Home
188
2012 Odyssey 12 US ODYSSEY-31TK8610.book 189 ページ 2011年6月21日 火曜日 午前9時35分
Synchronized Mode
uuClimate Control System *uSynchronized Mode
1Synchronized Mode
When the system is in dual mode, the driver side temperature, the passenger side temperature and the rear passenger compartment (if it is on) can be set separately.
You can set the temperature synchronously for the driver side, the passenger side and the rear passenger compartment in synchronized mode. 1. Press the SYNC button.
uThe system will switch to synchronized mode.
2. Adjust the temperature using driver’s side temperature control dial.
Press the SYNC button to return to dual mode.
QRG
TOC
Index
Home
189
2012 Odyssey 12 US ODYSSEY-31TK8610.book 190 ページ 2011年6月21日 火曜日 午前9時35分
uuClimate Control System *uRear Climate Control System
Rear Climate Control System ■ Using the Rear Climate Control System From the Front Panel 1Rear Climate Control System
AUTO LOCK appears on the rear control panel while the rear lock is on.
If the rear lock is on while in SYNC mode, the rear control panel is disabled. AUTO LOCK SYNC appears on the rear control panel.
Rear Temperature Control Button
Rear Temperature Control Button
Use the system when the engine is running. 1. Press the REARLOCK button.
u LOCK appears on the front control panel. The rear system changes to AUTO
mode.
2. The system automatically adjusts the fan speed and airflow levels to maintain the
set rear temperature. u Change the temperature if necessary.
3. To turn off the rear climate control system, press and hold the REARLOCK button
for a few seconds.
QRG
TOC
Index
Home
190
2012 Odyssey 12 US ODYSSEY-31TK8610.book 191 ページ 2011年6月21日 火曜日 午前9時35分
uuClimate Control System *uRear Climate Control System
■ Using the Rear Climate Control System From the Rear Panel 1Using the Rear Climate Control System From the Rear Panel When the REARLOCK button on the front control panel is off, the temperature of the rear passenger compartment can be controlled independently.
Rear floor vents
Rear ceiling vents and floor vents
Rear ceiling vents
Rear Temperature Control Bar
(Rear Fan
Control Bar
(On/Off) Button
Rear MODE Button Rear AUTO Button
Use the system when the engine is running. 1. Press the AUTO button.
2. Adjust the interior temperature using the rear temperature control bar.
3. To turn off the rear climate control system, press
button.
QRG
TOC
Index
Home
191
2012 Odyssey 12 US ODYSSEY-31TK8610.book 192 ページ 2011年6月21日 火曜日 午前9時35分
uuClimate Control System *uAutomatic Climate Control Sensors
Automatic Climate Control Sensors
QRG
Sunlight Sensor
The automatic climate control system is equipped with a sunlight sensor, an interior temperature and humidity sensor. Do not cover or spill any liquid on them.
Temperature and humidity Sensor
TOC
Index
Home
192
2012 Odyssey 12 US ODYSSEY-31TK8610.book 193 ページ 2011年6月21日 火曜日 午前9時35分
This chapter describes how to operate technology features on models without the navigation system.
Features
QRG
Audio System
About Your Audio System................ 194
USB Adapter Cable* ........................ 195
Auxiliary Input Jack .......................... 195
Audio System Theft Protection* ....... 196Models without audio/information screen Audio System Basic Operation....... 197
Adjusting the Sound ........................ 197
Playing the AM/FM Radio................. 198
Playing a CD .................................... 200Models with audio/information screen Audio System Basic Operation ...... 202
Audio Remote Controls.................... 203
Adjusting the Sound ........................ 204
Playing the AM/FM Radio................. 205
Playing the XM® Radio ..................... 209
Playing a CD .................................... 212
Playing CD Library............................ 216
Playing an iPod®............................... 222
Playing a USB Flash Drive ................. 226
Playing Bluetooth® Audio................. 230Audio Error Messages
CD Player......................................... 235
iPod®/USB Flash Drive*..................... 236
General Information on the Audio System XM® Radio Service* ......................... 237
Recommended CDs ......................... 238
Compatible iPod®* and USB Flash Drives* ........ 240
Rear Entertainment System * ........... 241
HomeLink® Universal Transceiver *.. 257
Bluetooth® HandsFreeLink®*
Using HFL ........................................ 259
HFL Menus ...................................... 261
Compass * .......................................... 282* Not available on all models
Index
Home
193
2012 Odyssey 12 US ODYSSEY-31TK8610.book 194 ページ 2011年6月21日 火曜日 午前9時35分
Audio System
QRG
About Your Audio System On models with navigation system, see the Navigation System Manual for operation of the audio system, Bluetooth®HandsFreeLink®, and voice commands for these features.
The audio system features AM/FM radio and the XM® Radio Service *. It can also play audio CDs, WMA/MP3/AAC files, iPods®*, USB flash drives *, and Bluetooth®* devices.
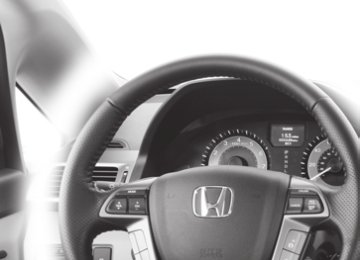
You can operate the audio system from the buttons and switches on the panel, or the remote controls on the steering wheel *.
Remote Control
XM® Radio
iPod®
USB Flash Drive
TOC
Index
Home
194
* Not available on all models
1About Your Audio System
XM® Radio is available on a subscription basis only. For more information on XM® Radio, contact a dealer.
2 General Information on the Audio System
P. 237
XM® Radio is available in the United States and Canada, except Hawaii, Alaska, and Puerto Rico.
XM® Radio is a registered trademark of Sirius XM Radio, Inc.
Video CDs, DVDs, and 3-inch (8-cm) mini CDs are not supported.
iPod® is a registered trademark owned by Apple Inc.
MP3 and AAC are standard audio compression formats. WMA is an audio compression format developed by Microsoft Corporation.
2012 Odyssey 12 US ODYSSEY-31TK8610.book 195 ページ 2011年6月21日 火曜日 午前9時35分
USB Adapter Cable*
1. Unclip the USB connector and loosen the
1USB Adapter Cable
uuAudio SystemuUSB Adapter Cable*
adapter cable.
2. Install the iPod® dock connector or the USB
flash drive to the USB connector.
Auxiliary Input Jack Use the jack to connect standard audio devices.
1. Open the AUX cover.
2. Connect a standard audio device to the
input jack using a 1/8 inch (3.5 mm) stereo miniplug. u The audio system automatically switches
to the AUX mode.
• Do not leave the iPod® or USB flash drive in the
vehicle. Direct sunlight and high temperatures may damage it.
• Do not use an extension cable with the USB
adapter cable.
• Do not connect the iPod® or USB flash drive using a
hub.
• Do not use a device such as a card reader or hard
disk drive, as the device or your files may be damaged.
• We recommend backing up your data before using
the device in your vehicle.
• Displayed messages may vary depending on the
device model and software version.
If the audio system does not recognize the iPod®, try reconnecting it a few times or reboot the device. To reboot, follow the manufacturer's instructions provided with the iPod® or visit www.apple.com/ipod.
1Auxiliary Input Jack
To switch the mode, press any of the audio mode buttons. You can return to the AUX mode by pressing the AUX button.
You cannot use the auxiliary input jack if you replace the audio system.
State or local laws may limit the circumstances in which you can launch or control your attached audio device.
* Not available on all models
QRG
TOC
Index
Home
195
2012 Odyssey 12 US ODYSSEY-31TK8610.book 196 ページ 2011年6月21日 火曜日 午前9時35分
uuAudio SystemuAudio System Theft Protection*
QRG
Audio System Theft Protection* The audio system is disabled when it is disconnected from the power source, such as when the battery is disconnected or goes dead.
■ Reactivating the audio system 1. Turn the ignition switch to ON (w, and turn on the audio system.
u If you turn the ignition switch to ACCESSORY (q, you will be requested to
enter the audio security code. See step 3.
2. Press and hold the power volume knob again for more than two seconds.
u The audio system is reactivated when the system’s control unit recognizes that
the system is in your vehicle. If the control unit fails to recognize, ENTER CODE appears on the audio/ information screen.
3. Enter the audio security code using the preset buttons. If you enter an incorrect
digit, continue to the last digit, then try again. If you do not enter the code correctly after 10 tries, leave the system for one hour before trying again, or visit a dealer to have the system reset.
TOC
1Audio System Theft Protection
Find the audio system's security code and serial number label in your owner’s manual kit.
We recommend that you write down the serial number in this owner’s manual.
Do not store the label in your vehicle. If you lose the label, you must first retrieve the serial number, and then obtain the code.
You can find out about your serial number and security code from a dealer.
U.S. models You can register the security code at Owner Link (owners.honda.com.), and find information on how to retrieve the serial number and obtain the code at radio-navicode.honda.com.
Index
Home
196
* Not available on all models
2012 Odyssey 12 US ODYSSEY-31TK8610.book 197 ページ 2011年6月21日 火曜日 午前9時35分
Audio System Basic Operation
Models without audio/information screen To use the audio system function, the ignition switch must be in ACCESSORY (q or ON (w.
1Audio System Basic Operation
These indications are used to show how to operate the TUNE/ Rotate Press
(sound) knob.
to select.
to enter.
Adjusting the Sound
Press
and rotate
to adjust the setting.
Each time you press switches as follows.
, a sound mode
1Adjusting the Sound
When the adjustment level reaches the center, you will see C in the display.
The SVC has four modes: OFF, LOW, MID, and HIGH. SVC adjusts the volume level based on the vehicle speed. As you go faster, audio volume increases. As you slow down, audio volume decreases.
TUNE/
(sound) Knob
BASS is selectable.
Speed-sensitive Volume Compensation
QRG
TOC
Index
Home
197
2012 Odyssey 12 US ODYSSEY-31TK8610.book 198 ページ 2011年6月21日 火曜日 午前9時35分
uuAudio System Basic OperationuPlaying the AM/FM Radio
Playing the AM/FM Radio
QRG
FM Button AM Button Press to select a band.
TITLE Button Press to switch the RDS name on and off. SCAN Button Press to sample each of the strongest stations on the selected band for 10 seconds. To turn off scan, press the button again.
A.SEL (Auto Select) Button Press to scan both bands and store the strongest station in each preset. To turn off auto select, press the button again. This restores the presets you originally set.
SKIP Buttons Press to search up and down the selected band for a station with a strong signal.
TOC
Index
Home
198
(Power/volume) Knob
VOL/ Press to turn the audio system ON and OFF. Turn to adjust the volume.
Preset Buttons (1-6) To store a station: 1. Tune to the selected station. 2. Pick a preset button and hold it
until you hear a beep.
To listen to a stored station, select a band, then press the preset button.
FOLDER Bar Press to display and select an RDS category.
(Sound) Knob
TUNE/ Turn to tune the radio frequency. Press and turn to adjust the sound settings
2012 Odyssey 12 US ODYSSEY-31TK8610.book 199 ページ 2011年6月21日 火曜日 午前9時35分
uuAudio System Basic OperationuPlaying the AM/FM Radio
■ Radio Data System (RDS) Provides text data information related to your selected RDS capable FM station.
■ RDS INFO ON Press the TITLE button while listening to an RDS capable station. RDS INFO ON appears, and the station name is displayed.
■ To find an RDS station from your selected program category
1. Press the FOLDER bar to display and select
RDS Category
an RDS category.
2. Use SKIP or SCAN to select an RDS station.
1Playing the AM/FM Radio
The ST indicator appears on the display indicating stereo FM broadcasts. Stereo reproduction in AM is not available.
Switching the Audio Mode Press the MODE button on the steering wheel.
2 Audio Remote Controls P. 203
You can store six AM stations and twelve FM stations into the preset button memory. FM1 and FM2 let you store six stations each.
A.SEL function scans and stores up to six AM stations and twelve FM stations with a strong signal into the preset button memory.
If you do not like the stations auto select has stored, you can manually store your preferred frequencies.
1Radio Data System (RDS)
The display shows up to 14 characters of text data. Press and hold the TITLE button to see additional characters. indicates that the text data continues. The display goes back to the previous screen if you press and hold the button again.
QRG
TOC
Index
Home
199
2012 Odyssey 12 US ODYSSEY-31TK8610.book 200 ページ 2011年6月21日 火曜日 午前9時35分
uuAudio System Basic OperationuPlaying a CD
QRG
Playing a CD Your audio system supports audio CDs, CD-Rs, and CD-RWs in either MP3, WMA or AAC format. With the CD loaded, press the CD button.
SCAN Button You will get a 10-second sampling of each song. ● Press to sample all tracks on the CD
(all files in the current folder in MP3, WMA or AAC).
● Press two times to sample the first file
in each of the main folders (MP3, WMA or AAC).
● To turn off scan, press and hold the
button.
TITLE Button Press to display the text data on a CD (if it was recorded with text data).
RDM (Random) Button ● Press to play all tracks/files on a disc in
random order.
● Press two times to play all files in the
current folder (MP3 or WMA) in random order.
● To turn off random, press and hold
the button.
RPT (Repeat) Button ● Press to replay a track/file continuously. ● Press two times to replay all files in the
current folder.
● To turn off repeat, press and hold the
button.
TOC
Index
Home
200
(Power/volume) Knob
VOL/ Press to turn the audio system ON and OFF. Turn to adjust the volume.
CD Button Press to play a CD.
CD Slot Insert a CD about halfway into the CD slot.
(CD Eject) Button
Press to eject a CD.
FOLDER Bar Press to skip to the next folder, to skip to the beginning of and – the previous folder in MP3, WMA or AAC.
SKIP Buttons Press or (files in MP3, WMA or AAC). Press and hold to move rapidly within a track/file.
to change tracks
2012 Odyssey 12 US ODYSSEY-31TK8610.book 201 ページ 2011年6月21日 火曜日 午前9時35分
uuAudio System Basic OperationuPlaying a CD
QRG
1Playing a CD
NOTICE Do not use CDs with adhesive labels. The label can cause the CD to jam in the unit.
WMA files protected by digital rights management (DRM) cannot be played. The audio system displays UNSUPPORTED, then skips to the next file.
Text data appears on the display under the following circumstances: • When you select a new folder, file, or track. • When you change the audio mode to CD. • When you insert a CD.
The display shows up to 14 characters of text data.
TOC
If you eject the CD but do not remove it from the slot, the system reloads the CD automatically after several seconds.
Index
Home
201
2012 Odyssey 1Audio System Basic Operation
These indications are used to show how to operate the selector knob. Rotate Press
to select.
to enter.
12 US ODYSSEY-31TK8610.book 202 ページ 2011年6月21日 火曜日 午前9時35分
Audio System Basic Operation
Models with audio/information screen To use the audio system function, the ignition switch must be in ACCESSORY (q or ON (w.
SETUP Button
Use the selector knob or SETUP button to access some audio functions.
to switch between the normal and
Press extended display for some functions.
RETURN Button
Selector Knob
Selector knob: Rotate left or right to scroll through the available choices. Press your selection.
to set
SETUP button: Press to select any mode such as the Auto Select, Sound Settings, Play Mode, Resume/Pause, or compass.
RETURN button: Press to go back to the previous display.
QRG
TOC
Index
Home
202
2012 Odyssey 12 US ODYSSEY-31TK8610.book 203 ページ 2011年6月21日 火曜日 午前9時35分
Audio Remote Controls Allows you to operate the audio system while driving. MODE Button Cycles through the audio modes as follows: FM1FM2AMXM1 *XM2 *CD CD-LAUX
MODE Button
VOL (Volume) Button
CH (Channel) Button
uuAudio System Basic OperationuAudio Remote Controls
1Audio Remote Controls
The CD mode appears only when a CD is loaded.
When in the AUX mode, the following are operable from the remote controls: • iPod®/USB flash drive connected to the USB
adapter cable
• Bluetooth® Audio (with some phones only)
VOL Button Press Press
: Increases the volume. : Decreases the volume.
CH Button • When listening to the radio
–
Press Press Press and hold Press and hold
: Selects the next preset radio station. : Selects the previous preset radio station. : Selects the next strong station. : Selects the previous strong station.
–
• When listening to a CD, CD Library, iPod® or USB flash drive.
Press Press
–
: Skips to the next song. : Goes back to the beginning of the current or previous song.
• When listening to a CD or CD Library.
Press and hold