- Download PDF Manual
-
Use these links (and links throughout this manual) to navigate through this reference. For a printed owner's manual, click on authorized manuals or go to www.helminc.com.
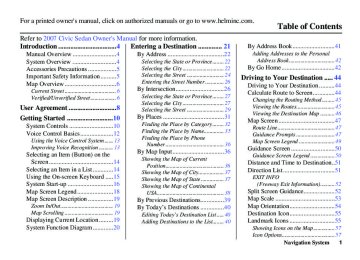
Table of Contents
Refer to 2007 Civic Sedan Owner's Manual for more information. Introduction ..................................4
Manual Overview ............................4
System Overview ............................4
Accessories Precautions ..................5
Important Safety Information ..........5
Map Overview .................................6
Current Street .................................... 6
Verified/Unverified Street.................. 6
User Agreement ............................8
Getting Started ...........................10
System Controls ............................10
Voice Control Basics.....................12
Using the Voice Control System ...... 13
Improving Voice Recognition .......... 13Entering a Destination .............. 21
By Address ....................................22
Selecting the State or Province........22
Selecting the City .............................22
Selecting the Street .......................... 24
Entering the Street Number ............. 26
By Intersection...............................26
Selecting the State or Province........ 27
Selecting the City ............................. 27
Selecting the Street .......................... 29
By Places .......................................31
Finding the Place by Category ........ 32
Finding the Place by Name.............. 35
Finding the Place by PhoneNumber ......................................... 36
By Map Input.................................36Selecting an Item (Button) on the
Screen .........................................14
Selecting an Item in a List.............14
Using the On-screen Keyboard .....15
System Start-up .............................16
Map Screen Legend.......................18
Map Screen Description ................19
Zoom In/Out..................................... 19
Map Scrolling .................................. 19
Displaying Current Location .........19
System Function Diagram .............20Showing the Map of Current
Position......................................... 36
Showing the Map of City.................. 37
Showing the Map of State ................ 37
Showing the Map of ContinentalUSA............................................... 38
By Previous Destinations...............39
By Today’s Destinations ...............40
Editing Today’s Destination List ..... 40
Adding Destinations to the List........ 40By Address Book...........................41
Adding Addresses to the Personal
Address Book................................ 42
By Go Home ..................................42
Driving to Your Destination ..... 44
Driving to Your Destination ..........44
Calculate Route to Screen..............44
Changing the Routing Method......... 45
Viewing the Routes........................... 45
Viewing the Destination Map .......... 46
Map Screen ....................................47
Route Line ........................................ 47
Guidance Prompts ........................... 47
Map Screen Legend ......................... 49
Guidance Screen ............................50
Guidance Screen Legend ................. 50
Distance and Time to Destination..51
Direction List.................................51EXIT INFO
(Freeway Exit Information).......... 52
Split Screen Guidance....................52
Map Scale ......................................53
Map Orientation.............................54
Destination Icon.............................55
Landmark Icons .............................55
Showing Icons on the Map............... 57
Icon Options..................................... 57Navigation System
st Table of Contents
Going Off the Route ......................59
Off-road Tracking..........................59
Viewing/Saving the CurrentLocation......................................60
Pop-ups and Disclaimers ...............61
Changing the Route .......................62
Change Route By Screen ................. 62
Waypoints ........................................ 62
Reroute: Avoid Streets ..................... 64
Reroute: Detour............................... 64
Reroute: Change Routing Method... 64
Changing Your Destination...........65
Find Nearest (Voice command)....... 65
Go Home (Voice command) ............ 65
Using Joystick to ChangeDestination ................................... 65
Entering a Destination from the
Menu Screen (while on route) ...... 66
Continue Trip Screen.....................66
Information Features .................67
Information Screen ........................67
Voice Command Help ...................67
Map Legend...................................68
Calendar.........................................68
Entering Your Schedule ................... 69
Calculator ......................................70
Unit Conversion............................... 70Navigation System
System Set-up............................. 71
Set-up Mode ..................................71
Setup Screen (first) ........................71
Brightness ........................................ 71
Volume ............................................. 71
Display............................................. 72
Guidance Prompts ........................... 73
Contrast ........................................... 73
Setup Screen (second) ...................73
Personal Information .....................74
Address Book ................................... 74
Home Address.................................. 77
PIN Number ..................................... 78
User Name ....................................... 79
Previous Destinations...................... 79
Routing & Guidance......................80
Rerouting ......................................... 80
Unverified Area Routing.................. 81
Edit Avoid Area................................ 85
Edit Waypoint Search Area ............. 87
Guidance Mode................................ 88
Vehicle...........................................88
Off-road Tracking............................ 88
Correct Vehicle Position.................. 89
System Information .......................90
Basic Settings ................................90
Keyboard Layout ............................. 90Units (mile or km) ............................ 90
Voice Recognition Feedback ........... 90
Voice ................................................ 90
Clock Settings................................91
Clock Adjustment ............................. 91
Clock Type ....................................... 92
Color ..............................................93
Map Color........................................ 93
Menu Color ...................................... 93
System Initialization .................. 94
System Initialization ......................94
Entering the Security Code............94
GPS Initialization...........................95
Map Matching................................95
System Limitations .................... 96
Database Limitations................. 98
Customer Assistance.................. 99
Reporting Errors ............................99
Honda Automobile CustomerService ........................................99
Visiting Your Dealer....................100
Obtaining a Navigation UpdateDVD..........................................100
Changing the DVD ......................101
PC Card Operation with Navi......102st Inserting the PC Card.................... 102
Voice Control of PC CardFunctions.................................... 102
CD/CD-R Operation with Navi...102
Voice Control of CD Functions ..... 103
Coverage Areas.........................104
Map Coverage .............................104
U.S. Detailed Coverage Areas....... 104
Canada Detailed Coverage Areas. 108
Frequently Asked Questions....113
Troubleshooting........................122
Glossary.....................................123
Glossary.......................................123
Voice Command Index.............126
Global Commands.......................126
Navigation General Commands ..126
Navigation Display Commands...127
Find Place Commands.................128
Radio Voice Commands..............129
CD Voice Commands..................130
PC Card Voice Commands..........130
Information Screen VoiceCommands................................131
Setup Screen (first) Commands...131On-Screen Commands.................132
On-Screen Commands Assist......... 132
Index ......................................... 134Table of Contents
Navigation System
st The navigation system is easy to use. The locations of many places of business and entertainment are already entered in the system. You can select any of them as a destination by using the touch screen, joystick or voice control.
There are several ways to enter a destination, such as by point of interest (POI), by address, by phone number, and by selecting it from the map. The last 50 destinations are saved for reuse at a later date. The system also allows you to store a home address to simplify returning home from your destination.
Introduction
Manual Overview The manual is divided into the following sections: (cid:127) Getting started - A basic introduction that discusses the controls and how to communicate with the system.
(cid:127) Entering a Destination - How to enter an address or locate a point of interest (POI).
(cid:127) Driving to your Destination – An explanation of the map features, guidance, and cautions.
(cid:127) Information Features - Voice Command Help, Map Legend, Calendar, and Calculator.
(cid:127) System Set-up - How to set up and tailor the system for your personal use and use the Address Book.
The back of this manual contains: (cid:127) Frequently Asked Questions (FAQs) (cid:127) Troubleshooting Guide (cid:127) Glossary of Terms (cid:127) Voice Command List
Navigation System
System Overview Your navigation system is a highly sophisticated location system with voice control that uses satellites and a map database to show you where you are and to help guide you to a desired destination.
The navigation system receives signals from the global positioning system (GPS), a network of 24 satellites in orbit around the earth. By receiving signals from several of these satellites, the navigation system can determine the latitude, longitude, and elevation of your vehicle. In addition, a gyroscopic yaw sensor and a vehicle speed sensor in your vehicle keep track of the direction and speed of travel at all times.
The navigation system applies this location, direction, and speed information to the maps and calculates a route to the destination you enter. As you drive to that destination, the system provides map and voice guidance.
Main Menust Important Safety Information The navigation system can distract your attention from the road if you focus on the screen or operate the system’s controls while driving.
Enter as much information as possible into the system before you begin driving, or when the vehicle is stopped. Then, as you drive, listen to the audio instructions and use voice commands when possible.
Accessories Precautions If you have front window tinting installed, be aware that if the tint has metallic properties, it can seriously degrade or prevent GPS reception. This is because the GPS antenna is located under the dash board.
If you plan to install electronic components such as radar detectors, vehicle location devices, remote starters, additional amplifiers, or other audio components ensure that they are not located near the navigation control unit under the dash board, near the navigation screen in the dash, or near the GPS antenna under the dash board. Signal noise emanating from these devices can cause intermittent disruption of the navigation system.
Introduction
WARNING
Using the navigation system while driving can take your attention away from the road, causing a crash in which you could be seriously injured or killed. Follow all operating instructions and safety information in this manual.
While driving, do not look at the screen or operate the system controls for more than a second or so at a time, and only after deciding you can do so safely. Pull to the side of the road if you need more time to look at the screen or operate the controls.
Navigation System
Main Menust Map Overview
Current Street The current street on which your vehicle is, appears at the bottom of the map screen (see page 18). A message saying “Not on a digitized road” may appear instead when you drive half a mile away from a mapped road. For more details, see Off-road Tracking on page 59.
Verified/Unverified Street Your navigation system has two kinds of streets: verified (dark colored) and unverified (light colored). The differences between the two types of streets are contrasted in the chart on page 7.
“Unverified” Road
“Verified” Road
Introduction
The navigation system is designed to provide route information to help you reach your destination. However, this route guidance may sometimes conflict with current road conditions such as street closures, road construction, detours, and out-of-date map data.
Additionally, the system itself has certain limitations (see page 96). Therefore, you must verify the audio and visual route information provided by the system by carefully observing the roadway, signs and signals, etc. If you are unsure, proceed with caution. Always use your own good judgment, and obey traffic laws while driving.
Navigation System
Main Menust Introduction
Verified streets (dark colored)
Unverified streets (light colored)
When displayed
Street color
Map Quality
These roads are found within metropolitan areas, and include interstate freeways and major roads connecting cities. Shown on daytime map screen as black or red, such as interstate freeways. The database vendor has verified these streets. Information like turn restrictions, average speed, and whether it is a one way street have been gathered and used when creating your route to a destination.
Routing differences
Cautions
Guidance voice Time and distance “to go”
While driving to your destination, the displayed route line is solid blue. The system provides voice and map guidance to your destination. There are no pop-up boxes urging extra caution during a route. However, because roads constantly change, you are urged to use common sense, and always obey posted traffic restrictions. Voice guidance issues maneuvers such as “In a half mile make a right turn.” The time and distance “to go,” displayed while on route to a destination, is based on the average speed and distance for the roads used for your route.
These roads are found in rural areas, and typically include residential streets away from the center of a town.
Shown on the daytime map screen as light brown.
These streets have not been verified by the database vendor. The system does not contain information about one-way streets, turn restrictions, or the road’s average speed. They are shown on the map for reference and can have errors in map location, naming, and address range. Your route line is either a blue dotted “vector line,” or a dashed pink/blue line. For information on selecting this option, and the routing differences, see Unverified Area Routing on page 81. Regardless of whether the user chooses route guidance, there are cautionary screens before and during the route urging the user to be extra cautious, and obey all traffic restrictions (see Unverified Area Routing on page 81). The suffix “if possible” is added to each guidance maneuver. For example: “In a half mile make a right turn, if possible.” Because the average speed of these roads is not known, the time and distance “to go” is based on a fixed average speed of 25 mph for these roads.
Navigation System
Main Menust (cid:127) The DVD may not be copied,
duplicated, or otherwise modified, in whole or in part, without the express written permission of the Licensors. (cid:127) The DVD may not be transferred or
sublicensed to any third party for profit, rent or loan, or licensed for reuse in any manner.
(cid:127) The DVD may not be decompiled,
reverse engineered or otherwise disassembled, in whole or in part.
(cid:127) The DVD may not be used in a
network or by any other manner of simultaneous use in multiple systems.
(cid:127) The DVD is intended solely for
personal use (or internal use where the end-user is a business) by the consumer. The DVD is not to be used for commercial purposes.
(cid:127) The Licensors do not guarantee to the customer that the functions included in the DVD meet the specific objectives of the user.
(cid:127) Licensor shall not be responsible for any damages caused by the use of the DVD to the actual user or to any third party.
(cid:127) The warranty on the DVD shall not extend to an exchange or refund due to misspelling, omission of letters, or any other cosmetic discrepancy in the contents of the DVD.
(cid:127) The right to use the DVD shall expire
either when the user destroys the DVD or software, or when any of the terms of this Agreement are violated and the Licensors exercise the option to revoke the license to use the DVD or software.
User Agreement
In using this DVD “Satellite Linked Navigation System” (the “DVD”), which includes HONDA MOTOR CO., LTD. software, ALPINE ELECTRONICS, INC. software, NAVTEQ database contents, INFO USA CORPORATION database, and ZENRIN CO. database contents (hereinafter referred to as “Licensors”), you are bound by the terms and conditions set forth below. By using your copy of the DVD, you have expressed your Agreement to the terms and conditions of this Agreement. You should, therefore, make sure that you read and understand the following provisions. If for any reason you do not wish to be bound by the terms of this Agreement, please return the DVD to your dealer.
Navigation System
Main Menust (cid:127) The terms and conditions hereof apply to all subsequent users and owners as well as to the original purchaser.
(cid:127) The use of oil company logos in the display are for your information and convenience, and in no way implies any sponsorship, approval or endorsement of these companies, or their products. The logos are trademarks of their respective owners.
The user shall indemnify and save harmless the Licensors, and their officers, employees and agents, from and against any claim, demand or action, irrespective of the nature of the cause of the claim, demand or action, alleging loss, costs, expense, damages or injuries (including injuries resulting in death) arising out of the use or possession of the DVD or software.
User Agreement
Use, duplication, or disclosure of this DVD by or on behalf of the United States government is subject to “Restricted Rights” as set forth at FAR 52.227-14, -19 or DFARS 252.227- 7013, as applicable. Manufacturers are the Licensors, including HONDA MOTOR CO., LTD., 2-1-1 Minami Aoyama Minato-Ku Tokyo 107-8556 JAPAN., Alpine Electronics, Inc., 20-1 Yoshima Kogyodanchi, Iwaki, Fukushima 970-1192 JAPAN., NAVTEQ Corporation, 222 Merchandise Mart, Suite 900, Chicago, IL, 60654, INFO USA CORPORATION, 5711 South 86th Circle, Omaha, NE 68127., and ZENRIN CO., LTD., 1-1-1 Muromachi, Kokurakita-ku, Kitakyushu, Fukuoka 803-8630, JAPAN.
Navigation System
Main Menust Getting Started
System Controls
AUDIO button
OPEN button
Screen
Joystick/ENT button
OPEN button Tilts the screen down to access the CD, DVD, and PC Card slots.
CLOSE button Return the screen to the original position.
Pressing the OPEN button tilts the screen down.
PC Card Slot
CD Slot
INFO button
MAP/GUIDE button MENU button SET UP button CANCEL button
CLOSE button
Navi DVD Slot (Located behind drop-down cover)
NOTE: The Premium Audio System logo is only used on models equipped with that system.
ZOOM IN/OUT buttons
10 Navigation System
NOTE: (cid:127) Voice commands are disabled when
the screen is tilted down.
(cid:127) Press the CLOSE button to return
the screen to the upright position.
Main Menust Joystick/ENT button Moves left, right, up and down, to move the highlighting around the display, to scroll through lists, or to look around a displayed map. After making a selection in a menu or list, push in on the joystick to enter the selection into the system. In almost all cases, you can enter a selection into the system by using the voice control system, highlighting the item and pushing in on the joystick, or by touching the appropriate item you wish to select.
INFO button Displays the screen for selecting Voice Command Help, Map Legend, Calendar, and Calculator. See page 67.
MAP/GUIDE button Displays the map. When on a route, switches among the map, guidance, and Direction list screens. See page 18 or 49.
MENU button Displays the Enter destination by screen. When on a route, displays the Change route by screen. See page 21.
SETUP button Displays the Setup screens to change and update information in the system. See page 71.
CANCEL button Cancels the current screen and returns to the previous screen display.
NOTE: The NAVI BACK button performs the same basic function.
ZOOM IN / OUT buttons Press ZOOM IN to zoom in (to show more detail), or ZOOM OUT to zoom out (to show more area and less detail) while a map screen is displayed. ZOOM IN reduces the scale (showing less area with greater detail). ZOOM OUT increases the scale (showing more area with less detail).
AUDIO button Press to display the audio screen. For more information on audio system features, see the Audio section of the Owner’s manual.
Getting Started
Other buttons See the Audio section of the Owner’s manual.
Screen All selections and instructions are displayed on the screen. In addition, the display is a “touch screen” – you can enter information into the system by touching the images (icons) on the screen with your finger.
For example, if you need to enter a street name, a keyboard will be displayed. You can type in the street name by saying or selecting the individual characters on the screen.
Clean the screen with a soft damp cloth. You may use a mild cleanser intended for use on liquid crystal displays (LCDs). Harsher chemicals may damage the screen.
Navigation System 11
Main Menust NAVI BACK button This button has the same function as the CANCEL button. When you press and release it, the display returns to the previous screen. When the previous screen appears, the system replays the last prompt. This button is enabled for the navigation system commands only. However, it can be used to cancel an audio voice command up to one second after the command confirmation.
Microphone (on the ceiling)
NAVI TALK button This button activates the voice control system. Press and release it when you want to give a voice command. See Voice Command Index on page 126 for a list of voice commands.
Getting Started
Voice Control Basics Your vehicle has a voice control system that allows hands-free operation of most of the navigation system functions. You can also control the audio system. The voice control system uses the NAVI TALK and NAVI BACK buttons on the steering wheel and a microphone near the map light on the ceiling.
NAVI TALK button
NAVI BACK button
(Sedan Controls shown)
NOTE: While using the voice control system, all of the speakers are muted.
12 Navigation System
Main Menust Using the Voice Control System You should use the voice control system as much as possible, and consider manual entry using the joystick as a “back-up” method of entry.
Most of the system’s functions can be controlled by voice commands activated with the NAVI Talk button. To control your navigation system by voice: (cid:127) Press and release the NAVI Talk
button.
(cid:127) Wait for the beep. (cid:127) Give a voice command.
Once the microphone picks up your command, the system changes the display in response to the command and prompts you for the next command. Using the NAVI Talk button, answer the prompts as required.
If the system does not understand a command or you wait too long to give a command, it responds with “Pardon,” “Please repeat,” or “Would you say again.” If the system cannot perform a command or the command is not appropriate for the screen you are on, it sounds a beep.
Anytime you are not sure of what voice commands are available on a screen, you can always say “Help” at any screen. The system can then read the list of commands to you.
When you speak a command, the system generally either repeats the command as a confirmation or asks you for further information. If you do not wish to hear this feedback, you can turn it off. See the Voice Recognition Feedback setting in Setup.
If you hear a prompt such as “Please use the touch screen to...” or “Please choose an area with the joystick.” the system is asking for input that cannot be performed using the voice control system.
Getting Started
Improving Voice Recognition To achieve optimum voice recognition, the following guidelines should be followed:
NOTE: Make sure the correct screen is displayed for the voice command that you are using. See Voice Command Index on page 126.
(cid:127)
Adjust the airflow from both the dashboard and side vents so they do not blow against the microphone on the ceiling. Place your hand over the microphone; if you feel any airflow, adjust the vents. Close the windows and the sunroof.
(cid:127) (cid:127) Set the fan speed to 1 or 2. (cid:127) After pressing the NAVI Talk button,
wait for the beep, then give a voice command.
(cid:127) Give a voice command in a clear,
natural speaking voice without pausing between words.
Navigation System 13
Main Menust Getting Started
(cid:127) If the system cannot recognize your
command because of background noise, speak louder.
(cid:127) If more than one person is speaking at
the same time, the system may misinterpret your command.
(cid:127) If you are still having trouble with the voice control system, refer to Voice Command Help on the Information screen.
14 Navigation System
Selecting an Item (Button) on the Screen On most screens, there are items that can be selected (like buttons with titles such as OK or Return). To select an item on any screen, do one of the following: (cid:127) Use the voice control system and say the name of the desired item. Almost all selectable items on the screen, including some listed items, is recognized by the voice control system.
(cid:127) Touch the desired item on the screen. (cid:127) Move the highlighting to the desired item with the joystick, then push in on the joystick.
Tip: If items are grayed out (are very dark colored), this means that they cannot be selected.
Selecting an Item in a List To scroll through a list, do one of the following: (cid:127) Use the joystick to scroll through the
list item by item.
(cid:127) Use the voice control system and say “Next” or “Previous” or use the “on screen” scroll up or down buttons, or the ZOOM buttons to scroll through the list page by page.
If you cannot find the desired name, or have made an error, return to the previous screen by pressing the CANCEL or the NAVI BACK button.
To select the desired item in the list, do one of the following: (cid:127) Use the voice control system, and say
the item number of the desired item.
(cid:127) Touch the item on the screen. (cid:127) Use the joystick to move the
highlighting to the item, then push in on the joystick.
Main Menust The names that can be used for each letter are shown below. For additional keyboard symbols, see page 132.
Getting Started
Alpha Apple
Bravo Boy
Charlie
Delta Dog
Echo Edward
Foxtrot Frank
Golf
George
Hotel Henry
India Igloo
Juliet John
Apostrophe
Kilo King
Lima Larry
Mike Mary
November
Nancy
Oscar
Papa Paul
Quebec Queen
Romeo Robert
Sierra Sam
Tango Tom
Ampersand
Uniform Uncle
Victor
Whiskey William
X-Ray
Yankee Yellow
Zulu Zebra
Slash
Using the On-screen Keyboard When the system needs input from you, the display changes to a keyboard. Use the displayed letters to enter the information. Enter each letter by one of the following methods: (cid:127) Using the voice control system, say
the desired letter on the screen.
(cid:127) Move the highlighting to the desired letter using the joystick, then push in on the joystick.
(cid:127) Touch the desired letter on the screen.
When speaking the letters or using “spell mode,” you can substitute the name that represents each letter or symbol. This improves recognition. The system will only respond to the names shown in the following graphic. For example: (cid:127) To select the letter “A”: Say, “A”;
“Alpha”; or “Apple.”
(cid:127) To select the letter “M”: Say, “M”;
“Mike”; or “Mary.”
Navigation System 15
Main Menust Getting Started
Each entered letter will appear at the top of the display. Say or select Space to enter a space between words. Say or select Delete to erase a letter entered incorrectly. When entering an address, the system searches the database for words that match the letters you are entering. As a result, you will notice that some letters are no longer available.
When the system finds only one entry that matches, it completes the entry of the name for you. If the system finds more than one entry that matches your input, the system displays a list.
Tip: If you are unsure of the spelling of a name, enter the letters that you are sure of, and then select List. The system displays a list of names that most closely matches your input.
16 Navigation System
You can choose to have your keyboard displayed in alphabetized format as shown below:
System Start-up When you turn the ignition to ON (II), it takes several seconds for the navigation system to boot up.
The first screen to appear is the navigation system globe screen. The screen then changes to the Disclaimer screen:
Or in a regular keyboard (QWERTY) format as shown below:
See Keyboard Layout in the Setup screen (second).
NOTE: The OK button does not appear immediately. It appears after the software is loaded.
Main Menust Read this disclaimer carefully so you understand it before continuing. Push in on the joystick, or touch OK, and the map screen will appear on the display. The “OK” cannot be activated by voice.
NOTE: If you do not select OK, and then enter the Setup or Information screens, some items are not available, and will show up as darkened buttons (grayed out). See System Function Diagram on page 20.
If you do not press the joystick or touch OK, the screen will turn to the clock screen after 30 seconds.
To return to the Disclaimer screen, press any navigation or voice control button.
By touching CLOCK TYPE, you can change the design of the clock screen. For details of the clock type, see page 92.
If you have entered any Calendar reminders, they are displayed after you select OK.
Getting Started
If you select OK, the reminder will not show up again. If you wish to have the reminder show up again later in the day, touch the Remind Later button.
If you press the CANCEL button, the message will be displayed the next time you start the vehicle.
NOTE: The system will display the current message and any older or previously unread messages, with the newest message listed first.
The Calendar reminder screen remains displayed until you select OK, Remind Later or press the CANCEL button.
If you are not planning to use the navigation system at this time, touch DISPLAY OFF to turn off the screen.
Navigation System 17
Main Menust Getting Started
Map Screen Legend Map Orientation (see page 54)
“North Up”
“Heading Up”
“Breadcrumbs”
(see Off-road Tracking on page 59)
GPS Signal Strength
: Best Reception : Good Reception
Missing: Poor/No Reception
Map Scale (see page 53)
ICON Button (see page 57)
Vehicle Position (see page 60) (Use voice command “Display the current location.” or touch the icon to show current location.) Status Bar Current Street name or audio information is displayed. You can switch this information by touching CURRENT STREET/AUDIO INFO. (For information on the Current Street, see page 6.) NOTE: See Map Legend on the Information screen for further explanation.
Clock (see page 87)
CURRENT STREET/AUDIO INFO
18 Navigation System
Landmark Icon (see page 55)
Honda Dealer Hospital Grocery Store Gas Station Hotel/Lodging Parking Garage Freeway Exit Information
Acura Dealer School Restaurant ATM Parking Lot Post Office
Streets (see Map Overview on page 6) Red: Interstates or Freeways Black: Verified Streets Light Brown: Unverified Streets
Map Features Dark Green: Park Light Blue: Hospital Brown: Shopping Mall Light Brown: Indian Reservation Green: Golf Course Gray: Airport/Stadium/Business Blue: Body of Water Blue/Green: Cemetery Matte Blue: University
NOTE: If you move the joystick over an area (map features shown above), the name is displayed on the screen.
Main Menust Map Screen Description
Zoom In/Out Use the ZOOM buttons to change the scale of the map. Zooming in increases the detail, while zooming out gives you a wide view area. After changing the scale, give the system a few moments to update the display. Map Scrolling To view other areas on the map, move the joystick left, right, up, or down. The map will shift in that direction. To return the map to your current location, press either the MAP/GUIDE, the CANCEL, or the NAVI BACK button.
The display automatically changes to the map screen when you reach your destination. Press the MENU button to return to the Enter destination by screen.
Getting Started
Displaying Current Location You can say “Display current location.” or touch the vehicle position icon at any time to see the current address, latitude, longitude and elevation. The screen will change to:
You can say “Save current location.” or select Save on the screen to save the current location in your Address Book.
Select Return to return to the previous screen.
NOTE: The elevation will not appear when the system is temporarily lacking proper GPS information. The system elevation may not agree with elevations shown on roadside elevation signs, and may fluctuate plus or minus 100 feet or more.
Navigation System 19
Main Menust Getting Started
System Function Diagram This diagram shows the navigation system features, starting at the center and working outward in layers. The navigation program starts at “Key ON,” and then displays the globe screen (blue). If OK is selected on the Disclaimer screen, the functions in the yellow segments of the diagram become available in the Setup and Information screens. The white segments of the diagram are available anytime, even if you do not select OK.
The items above the map screen show various methods to begin driving to your destination (orange). You are provided with map/voice guidance, routing cautions, and a direction list. While driving to your destination, use the voice control system as much as possible to interact with the navigation and audio systems (green).
20 Navigation System
( p
" M
U I D
"INFOR M ATION VOICE: SCREEN" (pg. 67) E: ELP" VOIC (pg. 126) (ALL) "H
E : U " (to O I C c h a n g e ro ute) (p g. 6 2) - D R I V I N G (MAP/V OIC E "GO HOME" VOICE: (pg. 42) INFO SCREEN (pg. 131) AUDIO (pg. 129-130) NAVIGATION DISPLAY
(pg. 127)
TH E
ENTER (pg. 69) L i S T ( p g . 6 8 ) 7 0 ) ( p g . M A T H ( p g . 7 0 ) C O N V E R T g . 6
T ( D I O V I, A 7 ) g . 6
( pL I S
CALENDAR C A L C U L A T O R E G E N D M A E H
P L O I C
elci
CD
D / B A L A N C E V O L FUNCTIO NS PC CARD FUNCTIONS ees,noira .launa
rofni s're
"DISPLAY (OR SAVE) CURRENT LOCATION"
VOICE:
(pg. 60)
V O I C E : " H O W F A R T O T H E D E S T I N A T I O N ? g . 1
6 )
VOICE: "WHAT TIME IS IT?" (pg. 126)
(pg. 129-130) T O Y OUR DESTINATIO N C E , R O U TING CAUTIONS,DIR
OIC E: DIO"
"A
5 )
T A T I O T I N W I T T I C g . 6
( pVOICE: "FIND NEAREST..." ATM, ETC. (pg. 128)
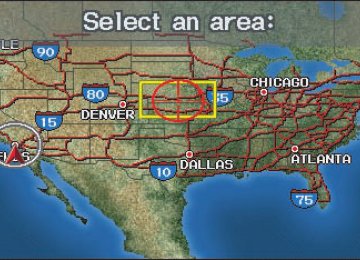
VOICE: "MENU" FOR ENTER DESTINATION SCREEN (pg. 21) A P S CREEN(pg.
TI
g. 4
C A LENDAR E M I N DERS(pg.17) S C REEN(pg. LO B E SCR
NKEY ON
P R E S S O K
LAIM
IS
7 )
V O I C E : 3 , 1
g . 5
( p" Z O O M I N / Z O O M O U T " "HIDE/DISPLAY ICONS"
VOICE:
(pg. 57, 127)
PERSONAL
ADD BOOK (pg. 74)
BASIC ROUTING GUIDANCE
PINs (pg. 78)
UNITS MI/KM (pg. 90) VOICE MALE/F (pg. 90) UNVERIFIED (pg. 81) AVOID AREAS (pg. 85) E (pg. 91)
T S
E Z
O K N O T P R E S S E D
SET U P B UTT O N (pg. 71)
TIM
LIG
F-
(p g. 5
V. (p
D T 9, 8
g. 9
1)
8)
KIN
Main Menust When you press the MENU button, the display changes to:
Address (see page 22)