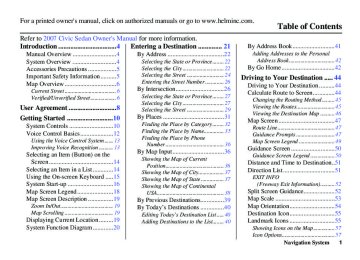
- Download PDF Manual
-
“pit stop” while traveling to a destination. For instance, you may want to stop for gas or food, and then continue on to your destination. Although you can enter up to 5 waypoints at a time, typically you may never use more than one at a time. Waypoints are routed to in the order they were entered (number 1 first, etc.), with your final destination routed to last. If you wish to create a custom route of several destinations, and then control the order of routing, the function “Today’s Destinations” is probably a better choice (see By Today’s Destinations on page 40).
Driving to Your Destination
Changing the Route While on route, you may wish to alter your route, add an interim “Waypoint” (pit stop), choose a different destination, or cancel your current destination.
To change your present route, you can do any of the following:
Say “Menu,” or press the MENU button to view the Change route by screen: (cid:127) Add a Waypoint or pit stop (page 63). (cid:127) Avoid a certain street or streets
(page 64).
(cid:127) Detour (page 64). (cid:127) Change routing method (page 64). (cid:127) Cancel the current route (page 65). (cid:127) Back to the current route (page 65).
62 Navigation System
Main Menust When you enter waypoints, they appear on the map screen as small red flags numbered 1-5.
Adding Waypoints From the Change route by screen, if you say or select Search Places on Route, then the Select a search method screen is displayed. Select either Places Along the Route or Places Around the Destination.
Driving to Your Destination
Next, select your “Waypoint Category,” then follow the menu prompts to select a destination. When the system performs a search from Places Along the Route, it displays matches that lie within a corridor on either side and in front of you, along your route. From Places Around the Destination, the system displays matches in a spiral pattern outward from the destination. The search “corridor” distance value can be changed in Edit Waypoint Search Area in Setup (see page 87).
To add another waypoint, press the MENU button and repeat the procedure. If Search Places on Route is grayed out, the maximum of 5 waypoints has been entered.
NOTE: The system does not allow you to select the roads you want to use to get to a destination. However, after you enter a destination, you can select intersections or POI “waypoints” that the system will use to “tailor” your route.
Navigation System 63
Main Menust Driving to Your Destination
Deleting Waypoints From the Change route by screen, if you say “Delete” or select Delete, then the Select a waypoint to delete screen is displayed. Say the line number of the waypoint(s) you wish to delete, or select them by using the joystick. Say or select Done to return to the map screen.
The route is re-calculated to reflect the changes you made to the waypoint(s).
Reroute: Avoid Streets From the Change route by screen, if you say or select Avoid Streets, the system displays a list of streets that will get you to your destination. This feature allows you to avoid a street or streets along your route. This is helpful if you know of road construction, closures, or excessive traffic along the route. Simply select the street or streets you wish to avoid. You cannot avoid your current street, or the streets of your waypoint(s) or destination (system beeps if selected).
NOTE: Although you can choose streets to avoid, you cannot choose specific streets you want to use.
Reroute: Detour Calculates a detour route for you if you encounter an unexpected obstacle such as a closed road or extremely heavy traffic congestion. If detour is selected, the system will attempt to re-calculate a new route, avoiding the next 2 miles (while on a freeway) or 1/2 mile (while on a surface street). Reroute: Change Routing Method From the Change route by screen, if you say or select Change Routing Method, then the Select routing method screen is displayed (see Changing the Routing Method on page 45).
64 Navigation System
Main Menust Cancel Current Route Cancels the current route (and any waypoints) and returns you to the map screen. Back to Current Route Returns you to the original map screen.
Changing Your Destination There are other methods by which you can change or add a waypoint to your route. These are: Find Nearest (Voice command) From the map screen, say one of the “Find Nearest...” voice commands to locate the nearest gas station, ATM, restaurant or other point of interest. See the “Find Nearest” voice commands listing on page 128. Go Home (Voice command) From the map screen, say, “Go home.” If you have entered a “Go home” address, then the system will display a confirmation screen.
Driving to Your Destination
Using Joystick to Change Destination While following a calculated route, you can select a new destination with the map screen and the joystick.
With the map screen displayed, use the joystick to move the position icon. It will change to cross hairs. Use the joystick to position the cross hair on your desired new destination, street, or icon, then push in on the joystick. The address within the cross hairs will be displayed. If this is your desired new destination, push in on the joystick again. If not, reposition the cross hairs with the joystick, then push in on the joystick again to see the new address.
Navigation System 65
Main Menust Driving to Your Destination
With the desired address displayed, push in on the joystick. The Calculate route to screen is displayed. Say or select OK. Say or select either Set as New Destination or Set as Waypoint on the pop-up screen. The system will return to the map screen, and recalculate the route to your new destination or waypoint.
NOTE: When you scroll the map screen while on route to a destination, some voice controls will not function. These include:
(cid:127) Display “Heading up” (cid:127) Display “North up”
66 Navigation System
Continue Trip Screen If you restart the vehicle, without having completed your prior trip, you will see the following screen:
Entering a Destination from the Menu Screen (while on route) If you say “Menu” or press the MENU button twice, the system displays the Enter destination by screen. Follow the procedure described in Entering a Destination, which begins on page 21. After selecting OK to the Calculate route to screen, your new location can be used either as a waypoint or as a replacement destination.
(cid:127) To continue to your destination or other waypoints, say or select OK.
(cid:127) To cancel your destination, press the
CANCEL button or the NAVI BACK button on the steering wheel, or using the voice control system, say “Cancel” or “Back.”
(cid:127) If you wish to change the route
method, say or select CHANGE METHOD.
(cid:127) For additional information on
changing the routing method, see Changing the Routing Method on page 45.
Main Menust Information Screen When you say “Information” or press the INFO button, the display changes to:
Voice Command Help When you say or select Voice Command Help, you will see the following screen:
Information Features
There is a tutorial available for the voice command help. Say or select Getting started, and the display changes to:
NOTE: If some items appear to be grayed out, and cannot be selected, it is because you did not select OK on the initial Disclaimer screen (see System Start-up on page 16).
NOTE: You can select an item by saying either the line number or the item name.
Select the line number of the desired tutorial you want to view, and the tutorial will automatically be read out. Press Stop to stop the reading.
Navigation System 67
Main Menust Information Features
When you make a selection, you will see the help commands that can be used with the voice control. You can say or select Read List, and the system will read the list to you.
Map Legend You can use the Map legend screens to learn the meaning of map features, icons, colors, etc. used in this system. When you say or select Map Legend, the display changes to:
Calendar The Calendar option allows you to enter events and be reminded of them in the future. When you say or select Calendar, the system shows the calendar with the current calendar day highlighted.
For a listing of all voice commands, see Voice Command Index on page 126.
Say or select the desired item or item number to view each section of the map legend.
Dates with an icon next to them indicate there is an entry for that date.
68 Navigation System
Main Menust You can scroll through the calendar day by day by pushing the joystick or select the day by voice. To change the month, say “Next” or “Previous,” use the ZOOM buttons, or touch the triangles at the top of the screen.
If you say or select List, your entries are listed. Press the CANCEL button to return to the Calendar screen.
Entering Your Schedule Set your schedule by selecting the day on the calendar, and the display changes to:
Reminder The default for Reminder is On. This allows the system to remind you of the calendar item the next time you start the vehicle (see System Start-up on page 16). Edit Date This allows you to move your calendar entry to a different date. If you say or select Edit Date, the Calendar screen is displayed with existing entries grayed out. Select a new day and the Edit schedule screen is re-displayed with the new date.
Information Features
to change the line.
Edit Title Say or select Edit Title, then enter the name of your title using the on-screen keyboard. Once you have entered the title, say or select Done. Edit Message Say or select Edit Message, and the system will show the Edit Message screen. You can enter a message on two lines. Use Once you have entered the message, say or select Done. Message Icon Say or select Message Icon, and the system displays a list of icons you can select to help identify the type of message you entered. The message icon you choose will be displayed alongside the specified date on the Calendar screen. Delete From the Calendar screen, select the date of the schedule you wish to remove. To remove the schedule, say or select Delete.
Navigation System 69
Main Menust Information Features
Done Once you have finished entering the schedule, say or select Done. The Calendar screen is re-displayed and a message icon appears.
Calculator When you say or select Calculator, the display changes to:
NOTE: (cid:127) You can only enter one message per
day.
(cid:127) A maximum of 50 entries can be
stored in the schedule.
(cid:127) To re-activate a previous message,
turn the Reminder setting from Off to On. If it is not turned on, the reminder will not be displayed when you start vehicle.
(cid:127) The system displays active calendar entries only after you answer OK on the Disclaimer screen.
(cid:127) For more information, refer to
System Start-up on page 16.
70 Navigation System
Use the touch screen to use the following features: Calculator The calculator function operates like a standard hand held calculator. Unit Conversion Values entered on the calculator can be converted from one unit to another (e.g., inches-to-millimeters).
Unit Conversion To perform a conversion: 1. Enter a numeric value to be converted
(for example, 100).
2. Select the type of unit you want to convert (for example, weight). The screen for that conversion type appears (see illustration in step 3).
3. Select the base unit (like pounds) that
you wish to convert to some other unit. So, in the example below, 100 lbs converts to 1600 ounces, 0.05 ton (US), etc.
NOTE: (cid:127) If you do not enter a value to be
converted, only “Temperature” units are selectable.
(cid:127) Conversions using negative value
may produce meaningless or physically impossible values.
Main Menust Set-up Mode The Setup function consists of two different screens, that allow you to change and update information in the system. To display the Setup screens, use the voice control system and say “Setup,” or press the SETUP button, and then select an item, say or select More in the upper right corner of the screen.
On any of the Setup screens, you can use the voice control system to select any item on the screen.
NOTE: (cid:127) If some items appear to be grayed
out, and cannot be selected, it is because you did not select OK on the initial Disclaimer screen. See System Start-up on page 16. For information on the available voice commands, see Voice Command Index on page 126.
(cid:127)
Setup Screen (first) From any screen, say “Setup” or press the SETUP button and the following screen appears:
Brightness The screen brightness has 11 settings. To change the brightness, use the voice control system and say “Brightness up” or “Brightness down.” You can also select the Bright. bar and move the cursor by pushing the joystick left or right, or by touching the arrowhead in the bar.
Tip: If you are having trouble viewing the screen in bright lighting conditions, try increasing the brightness.
System Set-up
NOTE: You can have a separate daytime and nighttime setting for brightness. Adjust each setting when the display is in either daytime or nighttime mode. Volume The navi voice volume is adjustable in 10 steps, and also can be turned off. To adjust the volume, use the voice control system and say “Volume up” or Volume down.” You can also select the “ Volume bar and move the cursor by pushing the joystick left or right, or by touching the arrowheads in the bar. After adjusting the volume, you will hear beeps at the new volume level. You can also select volume off. NOTE: If you turn the volume off, you will not hear route guidance or voice command confirmations.
Navigation System 71
Main Menust System Set-up
Display There are two screen display modes:
Day Mode
Night Mode
Day and Night. The recommended setting is Auto, which automatically switches the screen between Day and Night modes as you turn the headlights on or off.
You can select Day or Night mode to override the Auto mode. This is a useful feature for driver’s that like to use headlights during the day, and want to temporarily override Night mode. However, the screen in Day mode will be extremely bright at night.
72 Navigation System
Display Mode
Auto (factory default)
How setting affects display mode: Automatically switches between Day and Night mode by sensing if the headlights are on.
Day
Stays in Day mode.
Night
Stays in Night mode.
Clock
Turns the screen to the clock screen.
To override setting while driving:
But remember:
Override night display: With headlights on, repeatedly press the gauge brightness (+) button until full bright. Override day display: Turn on the headlights and ensure the dash brightness is not at full bright. Push and hold the joystick for 10 seconds (switches to Night mode).
Push and hold the joystick for 10 seconds (switches to Day mode).
To return to the previous screen, press NAVI TALK button, and select the mode by voice.
Remember to adjust the dash brightness back to normal to allow auto switching by sensing headlights.
There is no auto Night/ Day mode change with the headlights on/off. You control the setting. There is no auto Night/ Day mode change with the headlights on/off. You control the setting. Remember, your route guidance stops when the clock screen is displayed.
Main Menust Guidance Prompts While you drive to your destination, the system displays and announces guidance prompts for your next maneuver. This setting allows you to adjust the number of guidance prompts before each maneuver. The settings Min, Normal, and Max are described below. The factory default is Normal, so you can adequately prepare for the next maneuver. If you wish to change the number of guidance prompts, select your preferred setting, as shown in the following table.
Setting
Distance before maneuver About 1/2 mile
Just before maneuver
About 1/4 mile Yes
Min Normal (factory default) Max Yes *Uses street name in guidance phrase.
Yes*
Yes*
Yes
Yes
System Set-up
Setup Screen (second) Say or select More to view additional Setup functions and the following screen appears:
NOTE: To temporarily turn off voice guidance prompts, select Off for the “Volume” setting in Setup. Contrast You can adjust the contrast and black level. Changes to the display are very subtle – this is normal.
NOTE: You can have separate daytime and nighttime settings for Brightness, Contrast, and Black Level. Adjust each setting when the display is in either daytime or nighttime mode.
Navigation System 73
Main Menust You may choose to use a Personal Identification Number (PIN) to protect your privacy. However, PINs are optional, and if you decide to use one, record it in case you forget the number (see page 78).
You can do the following functions in the address book: (cid:127) Entering an address (see page 75) (cid:127) Edit an existing address (see page 77) (cid:127) Delete an existing address (see
page 77)
Accessing the Address Book List After selecting Address Book, the system prompts you to select User 1 or User 2.
If an Address Book PIN has been set, the system prompts you to enter your PIN. Verify that the right user is displayed, then enter your PIN. After entering your PIN, say or select Done, and the system displays your Address Book.
If no Address Book PIN has been set, the system displays your Address Book after selecting User 1 or User 2.
NOTE: Personal information cannot be backed up or moved to another Navigation system.
System Set-up
Personal Information From the Setup screen (second), say or select Personal Information and the following screen appears:
Address Book The Address Book function allows for up to a total of 200 address entries. After 200 entries, the ADD TO Address Book button is grayed out. The 200 addresses are shared between User 1 and User 2. For example, if User 1 has 150 addresses, User 2 can only have 50. You can add, modify, and delete information in the personal Address Book list.
74 Navigation System
Main Menust Entering an Address Book After you select User 1 or User 2, your Address Book list appears:
Edit Name You may use the “Name” field to give the entry a name or title that you will recognize later, such as “Doctor Smith” or “Broadway Theatre.” If you do not give the address a name, the system will assign one (Address 001, etc.).
System Set-up
Edit Address When you say or select Edit Address, the display changes to:
Select New Address in the upper right corner on the screen when beginning to build your Address Book list.
Current Position - Allows you to use your current position as the address.
Address - Requires you to enter the city and address you wish to store. The operation is the same as selecting Address from the Enter destination by screen (see page 22).
Say or select Edit Name. Then use the on-screen keyboard to enter the name. Touch Done when finished.
NOTE: You can always re-enter, edit, or make changes to any entry. “Address” is the only required field.
Navigation System 75
Main Menust System Set-up
Places - Allows you to select one of the Point of Interest (POI) locations already stored in the system as one of your personal addresses. This operation is the same as selecting Places from the Enter destination by screen (see page 31).
Previous Destinations - Allows you to choose one of the locations in the Previous Destinations list for your Address Book list. This operation is the same as selecting Previous Destinations from the Enter destination by screen (see page 39).
After you have used one of these four options to enter the address, the initial screen for entering the personal address is re-displayed, with the address shown in the “Address” field. If you have entered the address using Places, the phone number corresponding to the address also appears in the “Phone Number” field.
76 Navigation System
Edit Phone Number You can enter the telephone number of the address. If the address was chosen with Places, and it has a telephone number, that number is entered automatically.
Say or select Edit Phone Number to display the Enter phone number screen. Enter the telephone number, including the area code, by using the voice control system (say the entire phone number one digit at a time), or by using the on-screen keyboard. Say or select Done when finished.
Edit Category If desired, you can specify the category of the address. Say or select Edit Category to display the Select a category screen.
Scroll the screen and select a category by saying the number next to your choice, or by touching the item.
If you wish to set, add, or edit a new category, select Edit Category in the upper right corner on the screen. The system will show the Select a category to edit screen. Follow the on- screen prompts to add, change or delete a category. If you delete a category that was used to categorize addresses, the category for those addresses becomes “UNFILED.”
Main Menust Edit/Delete an Address This feature allows you to select an address to edit or delete. Once an address is selected, choose the appropriate function.
System Set-up
Home Address This feature lets you return “Home” from any location simply by saying “Go home” at the map screen. Alternately, you can select Go Home on the Enter destination by screen (see By Go Home on page 42).
NOTE: You may have up to 100 categories. These are shared between User 1 and User 2.
The system will then display everything that you have entered. If all the information is correct, say or select Done. This will return you to the Address Book list.
If you want to enter another address, select New Address in the upper right corner on the screen, then repeat the procedures above. If not, press the CANCEL button.
Enter the Name, address, and phone number in the same way as entering a personal address, then say or select Done. To leave the screen, press the CANCEL button.
NOTE: If your Home address cannot be found in the system then, while located on the street close to your home, select “Current Position” when entering the “Edit Address” field.
Navigation System 77
Main Menust System Set-up
PIN Number You can set a four-digit PIN (Personal Identification Number) for accessing and changing personal addresses and your home address if desired. Once you set the PIN on this screen, the system asks you to enter the PIN when you access a personal address or your home address.
NOTE: PINs are optional. If you choose to use a PIN, make sure you remember it. If you forget your PIN, the dealer will have to reset it for you.
When you select PIN Number, the display changes to:
Address Book PIN If you choose to enter a PIN for the personal Address Book, you will have to enter it anytime you edit your Address Book (see page 74), or select Address Book on the Enter destination by screen (see page 41). 1. Select Address Book PIN. 2. Select either User 1 or User 2. The
display changes to:
4. If you have entered the PIN correctly, the display changes to the Please re- enter new PIN screen. Enter the same number, then touch Done to validate the number you have selected.
5. If you have entered the same number both times, the display returns to the Edit personal information screen. If not, incorrect PIN appears in the upper right corner of the screen. Enter your PIN again.
NOTE: If you wish to remove your PIN, return to the same screen and, after entering your PIN, touch the Do not use PIN button.
3. Enter your four-digit PIN and select
Done. If you do not wish to use a PIN, select Do not use PIN.
NOTE: The factory default is no PIN.
78 Navigation System
Main Menust Go Home PIN 1. Select Go Home PIN, and the
system displays the Enter your new PIN screen.
2. Enter your PIN in the same way as
entering the Address Book PIN.
NOTE: The factory default is no PIN. If you choose to use a PIN, you will have to enter it whenever you say “Go Home” at the map screen, or select Go Home on the Enter destination by screen. User Name You can change User 1 and User 2 to a desired name. Choose either User 1 or User 2 on the Select the user name to edit screen. Enter the name, and say or select Done to leave the screen.
System Set-up
Previous Destinations Allows you to delete some or all of your previous destinations. 1. Select this option, and the display
changes to:
4. Say or select Done to perform the deletion, and the display returns to the previous screen.
Tip: You can delete all addresses by selecting Delete All.
2. Scroll through the list and find the
address you want to delete.
3. Select the address to delete by saying the line number, using the joystick, or touching it on the screen.
NOTE: To cancel the deletion of Previous Destinations, press the CANCEL button before performing step 4.
Navigation System 79
Main Menust System Set-up
Routing & Guidance From the Setup screen (second), say or select Routing & Guidance and the following screen appears:
Rerouting If Rerouting is set to Automatic and you deviate from the route, you will see “Recalculating...” at the top of the screen for several seconds as the system calculates a new route. This is followed by new routing instructions.
If Rerouting is set to Manual, you will hear a tone when the “Off-route” message is displayed. Say “Recalculate” or touch the Recalc. button on the screen to make the system recalculate your new route.
NOTE: (cid:127) If you live in an area with poor
mapping, you may wish to set Rerouting to Manual to avoid constant recalculation. However, you will have to manually touch Recalc. on the screen to have the system plot a new route.
(cid:127) It is strongly recommended that you
leave the system set to the factory default (Automatic).
80 Navigation System
Main Menust System Set-up
Unverified Area Routing Allows you to receive turn-by-turn map and voice guidance in unverified areas when on route to a destination (see Map Overview on page 6). The chart below illustrates the routing differences with this setting On or Off.
Decision: Why choose On or Off?
What you will see…
Cautionary messages
Guidance (map/voice)
Directions list
Unverified Area Routing: Off (factory default) The driver wishes to navigate manually by using the navigation map and choosing the streets that lead to the destination. The driver understands that unverified roads may not be accurate, and can contain errors in location, naming, and address range. A blue dotted vector line is displayed on the map that continually points to your destination. The driver should stop and then use the map to select streets that lead to the destination. There are cautionary pop-up screens and voice announcements, before and during the route. These serve as reminders that you should obey all traffic restrictions. There is no turn-by-turn map or voice guidance.
A direction list is typically not available. However, depending on your route, directions are provided to help you reach the first available verified road.
Unverified Area Routing: On The driver chooses to let the navigation system suggest possible routing. The driver understands that in some cases guidance may not be appropriate. Unverified roads may not be accurate, and can contain errors in location, naming, and address range.
A blue-pink dashed route line highlights suggested unverified streets on the map while traveling to your destination. This is in sharp contrast to the normal blue route line displayed in verified areas. There are cautionary pop-up screens and voice announcements, before and during the route. These serve as reminders that you should exercise additional caution, and obey all traffic restrictions. Voice guidance commands end with the words “If possible.” This is to remind the driver to verify all traffic restrictions before making a maneuver. A direction list is provided showing street names and turn symbols in pink.
Navigation System 81
Main Menust System Set-up
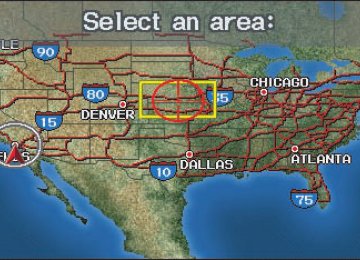
Unverified Area Routing When driving to your destination, you have the choice of using or not using “unverified” roads. You make this choice in Setup screen (second). The next few pages contain an example of a route to a destination in an unverified area explaining the routing differences found in unverified areas.
With Unverified Area Routing Off, the system tries to use verified roads whenever possible. In this example, since only verified streets are used, it created a longer route than necessary.
With Unverified Area Routing On, the route is shorter, but consists of unverified (light colored) streets that may not be accurate. Because the streets are unverified, there may be errors in street location, name, or address range. Additional caution is recommended in these areas. Always obey posted traffic restrictions.
82 Navigation System
Because both routes bypass or use unverified streets, an initial Disclaimer screen is provided. It is recommended that you stop and review the map.
Unverified Area Routing “Off”
Unverified Area Routing “On”
NOTE: Unverified roads are shown only when viewing the map in the 1/20, 1/8, and 1/4 mile map scales, or the 80, 200, and 400 meter map scales.
Main Menust Unverified Area Routing “Off”
Unverified Area Routing “On”
System Set-up
With Unverified Area Routing Off, the driver chose to take a shortcut, and avoid the long route. The moment you enter an unverified street, a caution box appears on the screen, and is read by the voice. This lets you know that you are about to enter an unverified area and that you will be following a dotted “vector line” that points to your destination.
With Unverified Area Routing On, a caution box appears on the screen and is read by the voice. In this case you will be presented with a dashed blue/pink line instead of the regular blue route line. You cannot assume that all guidance is appropriate. This is your signal to pay attention to posted traffic restrictions.
In both cases, when you actually enter the unverified street, a short caution will remind you. You will see and hear this short caution message whenever you enter unverified areas.
Navigation System 83
Main Menust Unverified Area Routing “Off”
Unverified Area Routing “On”
NOTE: There is no Voice button shown on the screen. With Unverified Area Routing “Off,” no Direction List is provided.
System Set-up
With Unverified Area Routing Off, you are presented with a blue “vector line” that always points to the destination. You must manually choose streets from the map that will lead to your destination. No guidance is provided, and there are no directions to the destination.
With Unverified Area Routing On, a blue/pink route line is shown for unverified segments. Voice guidance commands in unverified areas always end with “if possible.” This is your signal that you should use additional caution, and obey all traffic restrictions. The maneuver window “arrow” shows any portions of unverified turns in blue/ pink dashes.
These guidance maneuvers are only a suggestion. You should always confirm that the maneuver is possible. A direction list is also provided that shows any unverified roads in a blue color, with pink arrows pointing to the next maneuver.
84 Navigation System
Main Menust Edit Avoid Area This function allows you to select areas you wish to avoid when calculating a route to your destination. You can select up to 5 areas to avoid. You may wish to set up an “avoid area” to route around long term road construction, closures, or any area you wish to avoid. If you enter a route that takes you through or into an “avoid area,” a pop-up box will warn you that your route takes you into one of these areas. However, you can still choose destinations in an avoided area.
When you select Edit, for the Setup item “Edit Avoid Area,” the following list screen is displayed.
System Set-up
Say or select Edit Name, and use the keyboard to enter the name on the Enter avoid area name screen (19 characters max). Say or select Done to return to the previous screen. Say or select Edit Area, to create the area to be avoided. The following screen appears.
You can select New Area, or select (by touch) one of your existing areas to modify. If you choose New Area, the following screen is displayed:
Navigation System 85
Main Menust System Set-up
Either select Address or Map Input on the Enter avoid area by screen. Each choice provides a slightly different way to locate the approximate map display for drawing the area you wish to avoid. After selecting the choice, a map screen will be displayed.
Use the ZOOM buttons to select the map scale (available scales are 1/20, 1/ 8, and 1/4 mile scales). Use the joystick to move the crosshairs (red circle) to the desired start point and push in the joystick to “set” the start point. Then move the joystick in a straight or diagonal direction to encompass the area to be avoided.
86 Navigation System
NOTE: The maximum size of the “Avoid area” is 1/4 of the navigation display screen regardless of the map scale setting.
The selected area will be displayed as a shaded box with an orange border. Push in on the joystick to set the end point of the avoided area. To “re-draw” the area, touch Cancel and repeat the area selection process. If your selected area contains a freeway, the system will prompt you with a pop-up box saying, “Do you want to avoid freeways?” Answering “No” allows you to enter a route through an avoided area on a freeway, and skip the “Avoid area caution box” (see Pop-ups and Disclaimers on page 61).
Say or select Done to return to the Edit area screen. When you return, the “Vicinity” field is automatically filled in by the system. Re-edit the area “Name” if desired. Select Done on the Edit avoid area screen to finish editing. Your new avoided area will now appear on the “Avoid area” list screen, and be viewable on the map screen.
NOTE: (cid:127) You can select areas to avoid,
however you cannot select roads or areas that you want the system to use for routing.
(cid:127) If you are drawing a box around a
road as an area to avoid, ensure the following: When you draw the box, make sure that the road or portion of a road that you encircled includes an intersection. For instance, in the example above, highway 213 will be avoided, but Van Ness will not be avoided because it lacks an intersection in the enclosed box.
Main Menust Edit Waypoint Search Area When driving on route to your destination, you can select a temporary destination “waypoint” (marked with a small flag on the map) along your route for gas, a restaurant, or other POI. When you resume your trip from the “waypoint,” the system continues the trip to your original destination. To use this feature, see Waypoints on page 62.
This Setup item allows you to select the distance from your highlighted route line (on either side of your route), that the system will search for a “waypoint.” From the Routing & Guidance screen, select Edit for “Edit Waypoint Search Area,” and then choose the desired search distance for either “On Freeways” or “On Surface Street.”
The diagram below shows how the system handles the search for places “Along the route” or “Around the destination” (see Waypoints on page 62).
System Set-up
For “Places along the route,” the system looks in front of you within a corridor width specified by your values for “On Freeways” or “On Surface Street.” The system checks the upcoming area, based on your input.
For “Places around the destination,” the system searches outwards in a spiral from the destination. In this case, specific search values are not needed; the matches are displayed in order of distance from destination.
NOTE: These settings do not affect the search range used for the voice commands like, “Find nearest gas station,” that are also available when viewing the map screen.
Navigation System 87
Main Menust System Set-up
Guidance Mode Allows you to select the guidance display mode: Single Screen or Split Screen.
Vehicle From the Setup screen (second), say or select Vehicle and the following screen appears:
To get to Guidance Mode from the Setup screen, select in sequence, "More", "Routing & Guidance", and "Guidance Mode".
Off-road Tracking With this On, the system will provide white off-road tracking dots (“breadcrumbs”) on the map screen whenever you drive into an area where the map does not show any roads. See Map Screen Legend on page 18.
The default setting is Single Screen.
NOTE: The Guidance Mode can also be selected on the Icon Selection screen. See Showing Icons on the Map on page 57.
88 Navigation System
After you have traveled approximately 1/2 mile away from a mapped road, the system will display a series of white dots on the map screen to show the path you have traveled. This is provided so you can follow the dots to backtrack to the mapped road you originally left. Tracking continues until you reach a mapped road. See Off-road Tracking on page 59.
Tracking is shown only in the 1/20, 1/8, 1/4, and 1/2 mile, or the 80, 200, 400, and 800 meter scales. Use the ZOOM buttons to change the scales if necessary.
NOTE: To clear existing dots, turn this feature off and exit Setup. To re-enable this feature, return to Setup and turn it on again.
Main Menust Correct Vehicle Position The system relies on satellites for positioning information. Buildings, tunnels, and other objects can block or reflect these signals, requiring the system to use “dead reckoning” to determine your location and direction. This can sometimes lead to small errors in positioning, such as showing you on an adjacent street.
NOTE: Using this function to adjust vehicle position is not recommended. When the system acquires a GPS signal, it will automatically place the vehicle in the correct location.
If you choose to do this, follow these steps: 1. Stop the vehicle. 2. Select Adjust, and the system will
display a map adjustment screen.
System Set-up
NOTE: If you continually have to do this, there are either problems in the database or GPS reception problems. See Accessories Precautions on page 5.
4. When you have finished, press the joystick or select Done to return to the previous screen.
5. As you drive, the current road will be displayed at the bottom of the screen.
3. Use the ZOOM buttons and the
joystick to move the location arrowhead to the correct location. Touch the arrow buttons on the bottom of the screen to rotate the direction arrows so the vehicle position is pointing in the correct direction.
Navigation System 89
Main Menust Keyboard Layout Allows you to select the displayed keypad screen: Alphabet or QWERTY. Units (mile or km) Allows you to select the units for the entire system (mile or km). Voice Recognition Feedback Allows you to turn voice control system prompts On or Off. When Off, you will not hear the voice control system confirmations or prompts. Voice Allows you to select the guidance voice: Female or Male.
System Set-up
System Information From the Setup screen (second), say or select System Information and the following screen appears:
Basic Settings From the Setup screen (second), say or select Basic Settings and the following screen appears:
Displays the information about the navigation system software. This information is for dealer use only. For ordering updates, use the version number stamped on the label (as Ver. X. XX) of the navigation DVD (see Obtaining a Navigation Update DVD on page 100).
When finished, say or select Return to return to the previous screen.
90 Navigation System
Main Menust Clock Settings From the Setup screen (second), say or select Clock Settings and the following screen appears:
(cid:127) Daylight Saving Time (DST)
(Default = On)
(cid:127) Auto Time Zone by GPS
(Default = On)
(cid:127) DST selection (Change DST schedule) (cid:127) Time adjustment (Adjust your clock) (cid:127) Reset button (resets this screen’s
settings to factory defaults) Auto Daylight Saving Time Sets automatic daylight saving time On or Off. If set to On the navi clock will automatically "spring ahead" or "fall behind" by one hour when a daylight savings time change occurs. If you reside in a state or area where daylight saving time is not used, then you may want to turn this feature off. NOTE: If you set Auto Daylight Saving Time to On, the Daylight Saving Time function is activated even in an area that does not adopt the Daylight Saving Time system.
Clock Adjustment From the Setup screen (second), say or select Clock Adjustment and the following screen appears:
This screen allows you to set or adjust the following:
System Set-up
The federal government has mandated that, starting in 2007, daylight savings time will change in March & November instead of the old schedule in April & October. The new government daylight savings time schedule is subject to review and possible cancellation in 2008. The dates that the navi switches between standard and daylight savings time are stored in the navi software, and is not triggered by GPS satellite signals. Therefore, your navi clock will change based on the daylight savings time schedule. If you need to adjust the clock for daylight savings time, go to the Clock adjustment screen in the Setup, and simply adjust the navi time by or
one hour.
Navigation System 91
Main Menust System Set-up
Auto Time Zone by GPS Sets automatic time zone selection by GPS to On or Off. If you are driving across the country and passing through time zones, then this feature will automatically set the time to the time zone you are traveling through. However, if you live and work in two different time zones, you may want to turn this feature off.
NOTE: When driving near a time zone boundary, the displayed time zone may fluctuate between the two zone times.
DST selection (Change DST schedule) This option lets you select the schedule (April–October, or March–November) when daylight saving time will automatically occur in your navi. The system default is the new 2007 "March– November" schedule as mandated by the US government. During 2008–2009, it is possible that this new change will be canceled by the government, and returned back to the previous "April– October" schedule. If so, simply change the schedule in this setting.
Time Adjustment Adjusts the current time in hours and minutes. You can reset the adjustment by selecting Reset. Selecting Done returns you to the previous screen.
NOTE: Selecting Reset also clears any changes you made to “Auto Daylight Saving” or “Auto Time Zone” settings.
Clock Type Allows you to choose the design of the clock screen from one of three Clock Types and one of two Background images.
92 Navigation System
Say or select Return to return to the previous screen.
Main Menust Color From the Setup screen (second), say or select Color and the following screen appears:
Map Color Allows you to choose the map color from one of four colors for the Day and Night mode.
Menu Color Allows you to choose the menu color from one of five colors for each Base and Window.
System Set-up
Say or select Return to return to the previous screen.
Say or select Return to return to the previous screen.
NOTE: (cid:127) Choose Beige (factory default) as
the Day color to obtain the best daytime display contrast.
(cid:127) Choose Black (factory default) as the Night color to obtain the best nighttime display contrast.
NOTE: (cid:127) Choose Black (factory default) as the Base color to obtain the best display contrast.
(cid:127) Choose Blue2 (factory default) as
the Window color to obtain the best display contrast.
Navigation System 93
Main Menust Entering the Security Code If the battery goes dead or is disconnected for any reason, you will have to enter a security code for the navigation system before you can use it again.
When you purchased the vehicle, you should have received a card that has the system’s security code and serial number. Keep this card in a safe place in case you need the code. If you lose the card, you must obtain the security code from your dealer.
Enter the four-digit security code, then select Done. If you have entered it correctly, the display changes to the Disclaimer screen. If you make a mistake, the system will display “incorrect PIN.” Re-enter your 4-digit security code. You have ten chances to enter the correct code. If all ten are incorrect, turn the ignition to OFF, then back to ON (II) to have ten more chances to enter the correct code.
NOTE: The anti-theft security code is unrelated to your optional Navigation system PIN (for Personal or Home Address).
System Initialization
System Initialization If for any reason, you lose power to the navigation system (like the battery was disconnected), the navigation system will require initialization. Once completed, your system will be ready to use.
This initialization requires the following: (cid:127) Entry of the 4-digit anti-theft security
code to “unlock” the navigation system.
(cid:127) GPS initialization (may not be needed
depending on the length of time the system was without power).
(cid:127) Map matching to align the GPS
coordinates to a place on the map (displays current street at the bottom of the map).
94 Navigation System
Main Menust GPS Initialization Depending on the length of time the battery was disconnected, your system may require GPS initialization. If it does, the following screen appears:
If this procedure is not necessary, the system proceeds directly to the Disclaimer screen (see page 16). During initialization, the system searches for all available GPS satellites, and obtains their orbital information. During this procedure the vehicle should be out in the open with a clear view of the sky.
If the navigation system finds the satellites properly, this box clears, and changes to the Disclaimer screen. If within ten minutes the system fails to locate a sufficient number of satellites to locate your position, the following screen appears:
Navigation system is unable to acquire a proper GPS signal. - Move vehicle to another location. - Turn the ignition switch off. - Disconnect the battery for 30 minutes to clear the GPS receiver’s memory. - Reconnect the battery and follow the screen prompts.
After 30 minutes with this screen displayed, turn off the engine and restart the car. If you now see the Disclaimer screen, the GPS initialization is complete. The green GPS icon should appear in the upper left corner of the screen.
System Initialization
NOTE: (cid:127) The average acquiring time is less than 10 minutes, but it can take as long as 45 minutes.
(cid:127) If the system is still unable to acquire
a signal, follow the instructions on the screen, or contact your local dealer for assistance.
Map Matching This part of the initialization matches the GPS coordinates found above with a road on the map screen. To perform this part of the procedure, ensure that the navigation system is displaying a map, and drive the vehicle on a mapped road (a road shown on the map screen). Do not enter a destination at this time. When the name of the current road you are driving on appears at the bottom of the screen, the entire procedure is complete. Your system is now ready to use.
Navigation System 95
Main Menust System Limitations
Although your navigation system is one of the most highly sophisticated pieces of equipment you will find in a modern automobile, you may find during its use, that it has certain limitations.
The system uses signals from the Global Positioning System (GPS) to aid in determining its current location. The GPS is operated by the U.S. Department of Defense. For security reasons, there are certain inaccuracies built into the GPS that the navigation system must constantly compensate for. This can cause occasional positioning errors of up to several hundred feet.
For example, in urban areas where streets are close together, this could cause the system to show that you are traveling on a street that parallels the street you are actually on. The system will, under most circumstances, correct itself while you drive.
96 Navigation System
Also, depending on your current view of the sky and the position of the satellites, the elevation may be shown incorrectly. You may also notice some delay of the vehicle position icon at intersections; this is normal. GPS Reception Issues The signals received from the GPS satellites are extremely weak (less than a millionth of the strength of a local FM station), and require an unobstructed view of the sky. The signal can easily be interrupted or interfered with by the following: (cid:127) Aftermarket metallic window tint
above or to the sides of the GPS antenna (located under the dash)
(cid:127) Cell phones, PDA’s, or other
electronic devices docked in a cradle or laying loose on the dash
(cid:127) Radar detectors mounted on the dash (cid:127) Remote starters, or “hidden” vehicle
location systems mounted near the navigation unit
(cid:127) Other aftermarket audio electronic
devices mounted near the navigation unit
(cid:127) Trees, tall buildings, freeway
overpasses, tunnels or overhead electrical power wires
Although the system will direct you to your desired destination, it may not always generate what you consider to be the most direct route. Try changing the method of routing (see Changing the Routing Method on page 45). You may also have Unverified Area Routing set to “OFF” (see Unverified Area Routing on page 81).
Additionally, the mapping database contains verified and unverified maps. See Map Overview on page 6. A Disclaimer screen will warn you if your route includes unverified streets. Unverified streets may be missing from the map, in the wrong location, or have an incorrect name or address range. Exercise additional caution when driving in these unverified areas.
Main Menust The destination icon shows the approximate location of the destination. This occurs because a city block can have as many as 100 possible addresses (for example, the 1400 block is followed by the 1500 block.) Since most cities use only a portion of the 100 possible addresses (for example, in the 1400 block, the addresses may only go up to 1425 before the 1500 block starts), the address 1425 will be shown a quarter of the way down the block by the system instead of at the end of the block where the destination is actually located.
You may find that the system occasionally “reboots.” This is indicated by the display returning to the globe screen. A reboot can be caused by a number of things, such as extreme temperatures or shock from bumpy roads. It does not necessarily indicate a problem that requires service. If this happens frequently, please see your dealer.
System Limitations
Navigation System 97
Main Menust Database Limitations
You will find that some points of interest (POI) may be missing when you search the database. This can be caused if at the time the database was gathered, the name was misspelled, the place was improperly categorized, or the POI change is not yet in the database. This means you may not find places listed that you know exist. This is also true for police agencies and hospitals. In outlying areas, facilities listed may not be the closest. Always check with local information sources if you need law enforcement or hospital services.
Every effort has been made to verify that the system’s database was accurate at the time it was created. However, businesses do fail or move to new locations, and new businesses start in the old locations. For this reason, you may occasionally find “inaccurate” information when you select and drive to a point of interest (for example, a restaurant is now a jewelry store). The number of these inaccuracies increases the longer you go without an update.
98 Navigation System
The digitized map database reflects conditions as they existed at various points in time before production. Accordingly, your DVD may contain inaccurate or incomplete data or information due to the passage of time, road construction, changing conditions, or other causes.
In addition, this database does not include, analyze, process, consider, or reflect any of the following categories of information: (cid:127) Neighborhood quality or safety (cid:127) Population density (cid:127) Availability or proximity of law
enforcement
(cid:127) Emergency, rescue, medical, or other
assistance
(cid:127) Construction work, zones, or hazards (cid:127) Road and lane closures (cid:127) Legal restrictions (such as vehicular type, weight, load, height, and speed restrictions)
(cid:127) Road slope or grade
(cid:127) Bridge height, width, weight, or other
limits
(cid:127) Road, traffic or traffic facilities
safety, or conditions (cid:127) Weather conditions (cid:127) Special events (cid:127) Pavement characteristics or
conditions
(cid:127) Traffic congestion (cid:127) Travel time
We assume no liability for any incident that may result from an error in the program, or from changed conditions not noted above. Copyrights (cid:127) infoUSA-Data: Certain business data provided by infoUSA, Inc., Omaha, Nebraska, Copyright © 2003, All Rights Reserved.
(cid:127) EXIT-Data: © ZENRIN CO., LTD.
2003. All Rights Reserved.
Main Menust (cid:127) If the error does not involve the database, such as if the vehicle position icon does not follow the road, screen error messages, or other GPS related errors, see Frequently Asked Questions on page 113, System Limitations on page 96, or Troubleshooting on page 122.
Reporting Errors Occasionally, you may encounter database errors. (cid:127) If the error pertains to freeways and
main “verified” roads shown in black on the map, then report it either online at http://update.navteq.com/, or to Honda Customer Services.
(cid:127) If the error involves a light brown
“unverified” road, then do not report it. These areas have not been verified, and are provided for reference only (see Map Overview on page 6).
(cid:127) For errors in points of interest (POI), like a business that has changed their name, do not report them. Keep in mind that depending on when the data was collected, and when your DVD was purchased, the database can be out of date. The business may have not reported the change(s), or not be in the database at all. Update Navigation DVDs are available for purchase, usually in the fall of each year.
Customer Assistance
Honda Automobile Customer Service Telephone: (800) 999-1009
Fax: (310) 783-3273Honda Navi America Honda Motor Co., Inc. Honda Customer Service MS 500-2N-7A 1919 Torrance Blvd. Torrance, CA 90501-2746
If you desire more detailed information on detailed map coverage, contact any Honda dealer. You may also contact Honda Customer Services. Map coverage information is at the Navigation DVD order link, “ordering a Navigation DVD” at: www.honda.com
Navigation System 99
Main Menust Customer Assistance
Visiting Your Dealer We strive to make this manual as complete as possible and to answer all questions regarding operation of the system. Occasionally you may run into a specific issue that you cannot find in the book. You may save yourself a trip to the dealer by first consulting the following resources: (cid:127) The Troubleshooting section (see
page 122)
(cid:127) The Frequently Asked Questions
(FAQs) section (see page 113)
(cid:127) The navi FAQs found on the on-line
DVD order site (see “Obtaining a DVD”)
(cid:127) For detailed questions regarding
audio or other systems that interact with the navigation system, see the main vehicle Owner’s manual, or the Quick Start Guide
(cid:127) Call Honda Customer Relations (see
“Honda Automobile Customer Service”)
(cid:127) For database or POI issues, follow the guidelines in the “Reporting Errors” section (see page 99)
If your question is still unanswered and you wish to visit the dealer, please be prepared to demonstrate the issue to the service writer. That way, the writer can document the issue for the factory to allow more efficient troubleshooting. Some issues may at first seem random, but you may notice a pattern, like it only occurs when you enter some specific address, or when driving on a certain road, or just when it’s cold. This information is very useful to the service writer. Be patient, the tech may be unfamiliar with your specific issue.
100 Navigation System
Obtaining a Navigation Update DVD Honda is continually expanding the scope of the navigation system. Upgraded software may be made available to navigation system owners periodically, usually in the fall of each year.
To purchase an updated DVD or a replacement DVD, call (888) 291- 4675. You can also order on-line at the Navigation DVD order link, “ordering a Navigation DVD” at: www.honda.com
NOTE: (cid:127) DVDs are not available at your dealer. However, the dealer may order a DVD for you as a courtesy. There is no program for free DVD updates.
(cid:127) The DVD order line staff cannot
answer technical questions regarding navigation operation, coverage, or POIs.
Main Menust Changing the DVD
NOTE: The system’s database is stored on a removable DVD. The system will not work without the DVD. Ensure the DVD remains inserted at all times.
1. Remove the DVD while the ignition switch is in the Accessory (I) position or in the ON (II) position.
2. Press the OPEN button to tilt the
screen down.
3. Press down on the DVD cover release
tab
, then lower the cover
CLOSE button
NOTE: Be sure to close the DVD cover completely before closing the screen. The DVD cover may be damaged.
Customer Assistance
4. Press the MAP (Eject) button. The
DVD will automatically come out and an error message will display on the screen. This is normal.
5. Pull the DVD straight out. Hold the
DVD by the edges. Fingerprints, scratches, or other contamination on the playing surface can make the DVD unreadable.
To install the Navigation DVD, make sure the turquoise (blue/green) label is facing up. Slide the DVD into the DVD slot. The DVD is automatically pulled into the navigation system. Make sure you close the navigation DVD cover, then close the screen using the CLOSE button on the bottom of the screen.
Navigation System 101
Main Menust Customer Assistance
PC Card Operation with Navi A PC card with WMA or MP3 audio files can be played through the Audio system, and controlled using the navigation voice control system. PC card (PCMCIA) adaptors and various media chips can be purchased at any computer store. Tested media chips include Compact Flash, and SD media, up to 2GB. Other media types and storage capacities may work, but have not been tested. Hard disc drive type media are not recommended because they can fail in a hot vehicle. See the FAQs section for additional information.
PC card slot
102 Navigation System
Inserting the PC Card Ensure that the PCMCIA PC card adaptor contains the media chip, and that the card adaptor is fully inserted in the slot, otherwise the display door will not close. Once the card is inserted and the door closed, there is a delay while the system reads the tag information (the folders, song titles, etc.). Once the tag information is read, the “CARD” or “TRACK LIST” buttons will function. For more information on the search feature, see the audio section of the Owner's Manual.
Voice Control of PC Card Functions The navigation voice control system can be used to select the first 30 tracks directly by using the command, “Card play track x” (x=1-30). Additional voice commands allow the card tracks, artists, and albums to be played in a random, repeat, or in a scan mode. See the complete list of “Card” voice commands starting on page 130.
CD/CD-R Operation with Navi A CD or a burned CD-R with MP3 or WMA media files can be played by the audio system and controlled using the navigation voice commands. The display door will not close with a partially inserted CD in the slot. Once the display closes, there may be a slight delay before the “CD” or “TRACK LIST” buttons function. This is because the system has to read the tag information (artist album, and track names) to allow searches to function. For more information on the search feature, see the audio section of the Owner’s Manual.
NOTE: Ensure that burned CD-R disc do not have “stick-on” paper labels. The label adhesive can melt in a hot vehicle, and allow the label to curl up and jam the CD mechanism. Use a felt tipped marker to label your CD-R discs.
Main Menust Voice Control of CD Functions The navigation voice control system can be used to select the first 30 tracks directly by using the command, “CD play track x” (x=1-30). Additional voice commands allow CD tracks, and folders be played in a random, repeat, or in a scan mode. See the complete list of “CD” voice commands starting on page 130.
Customer Assistance
Navigation System 103
Main Menust Coverage Areas
Map Coverage The system provides map coverage for the following 48 US states, and southern Canada. The US map coverage consists of accurately mapped (verified) metropolitan areas (in the following list), and a less accurate (unverified) rural database. Canada coverage consists of major metropolitan areas, and major roads connecting the metropolitan areas within about 100 miles north of the U.S. border. If you need additional North Canada coverage, you may purchase the Canadian DVD (see Obtaining a Navigation Update DVD on page 100). See Map Overview on page 6 for a discussion of map coverage.
The cities and metropolitan areas in the following list are fully mapped. Only major streets, roads, and freeways have been verified outside these areas. If your route passes through these areas, routing may be limited in these areas, depending on your routing choices (see Unverified Area Routing on page 81).
104 Navigation System
U.S. Detailed Coverage Areas Alabama
Birmingham/Tuscaloosa Huntsville Mobile
Arizona
Phoenix Metro Sedona Tucson Arkansas
Fayetteville Hot Springs Little Rock
California
Bakersfield Fresno Los Angeles/San Diego Metro Merced Modesto Sacramento Metro San Francisco Bay (approximately Monterey to Sonoma) - including Monterey County and Hollister San Luis Obispo Stockton
Colorado
Denver/Boulder/Colorado Springs/ Ski Resorts Metro area - including Ft. Collins Connecticut Bridgeport Danbury Hartford Metro New Haven Metro Norwalk Stamford
Delaware
Entire state - including Dover, Wilmington Metro area, New Castle County
Florida
Cape Canaveral/Cocoa Beach/ Titusville Florida Keys Fort Myers Metro area - including Naples Fort Pierce Gainesville Jacksonville Metro - including St. Johns County Miami/Fort Lauderdale/West Palm Beach Metro Orlando/Daytona Beach/Melbourne area - including Osceola County
Main Menust Pensacola Tallahassee Tampa Bay/St. Petersburg Metro - including Pasco and Manatee Counties Vero Beach
Georgia Athens Atlanta Metro Augusta/Aiken Metro Macon
Idaho
Boise Sun Valley Ski Resorts