- Download PDF Manual
-
This selection requires you to enter the city (and possibly the state), and the address that you want to go to.
Intersection (see page 26) This selection allows you to enter the names of two intersecting streets in a city. This is useful if you know the general location of your destination, but not the exact address.
Places (see page 31) The system has been programmed with the locations of many businesses, parks, hospitals, etc. This selection lets you search these by category, name, or phone number.
Map Input (see page 36) This selection allows you to point to a destination on the map using the joystick. This allows you to enter a destination or address that may not be listed in the database.
Previous Destinations (see page 39) When you enter a destination with any of the available selections (except Address Book and Go Home), the last 50 destinations are saved by the system. Use this selection to choose a destination again.
NOTE: If Previous Destinations is gray out, there is no Previous Destination entered.
Entering a Destination
Today’s Destinations (see page 40) You can enter and sort up to five destinations and store them in the Today’s destinations list. You can then use the Today’s Destinations selection.
NOTE: If Today’s Destinations is grayed out, there is no Today’s Destination entered.
Address Book (see page 41) This selection allows you to select a stored address. The system can store up to a combined total of 200 User 1 and User 2 addresses.
Go Home (see page 42) This selection allows you to select your home or a common place as a destination.
NOTE: If you have no home address entered, the system prompts you for one.
Navigation System 21
Main Menust NOTE: If you find that your city is not listed, it may be part of a larger metropolitan area. Try entering the street first. Selecting the State or Province The state you are in is displayed at the top of the screen. If your desired destination is in another state, select Change State.
The display then changes to the Enter state name screen. Use the voice control system and say the name of the state or use the on-screen keyboard to enter the name of the state. Selecting the City The city you are in is displayed on the screen. If the city you want is displayed on the screen, say “Select current city.” If your desired destination is in another city, say or enter that city.
By Voice Control: Say “City” on the Find address by screen, and the display changes to the Say city name screen. Say the city name and the searching will begin.
To enter the city name by voice spelling, say or select CHANGE TO Spell Mode on the Say city name screen, and the display will change to the Enter city name screen.
Entering a Destination
By Address After you select Address from the Enter destination by screen, the display changes to:
Tip: (cid:127) When entering an address by voice, it is more efficient to say the city name first, then the street name.
(cid:127) When entering an address by touch, it
is usually easier to enter the street first. A city or cities that the street appears in will be displayed. For your convenience, you do not have to enter both city and street.
22 Navigation System
Main Menust Say the city name by saying individual letters, one at a time.
The system has a talkback function. If your spoken letter is not recognized, the system will talk back to you. For example, if you say “E” but the system does not recognize the command, it will ask you “Please select the number of the input letter from the list” and the following pop-up box will appear:
Entering a Destination
By Touch Control: This is helpful if the street runs through several cities, and you know what city the street is in. Select City, and the display then changes to the Enter city name screen. Use the on-screen keyboard to enter the name of the city.
The system will display a list of city names, with the closest match to the name you entered at the top of the list. Select the number (1-6) of the desired city from the list.
You should select a letter by saying the number.
Alternately, to improve voice recognition, you can say “Echo” or “Edward” instead of “E.” See page 15 for a list of available words for each letter.
Navigation System 23
Main Menust Selecting the Street By Voice Control: After you have selected the city, or if you say “Street” on the Find address by screen, the display changes to the Say street name screen. Say the street name and the searching will begin.
Say the street name by saying individual letters or numbers, one at a time.
To enter the street name by voice spelling, say or select CHANGE TO Spell Mode on the Say street name screen, and the display will change to the Enter street name screen.
Entering a Destination
If the system does not find an exact match, select List when you finish entering the name of the city. Most of the cities and towns for that state are listed.
Listings of cities and towns in the non- detailed coverage area may have an asterisk “*” next to their names. If you select one, no detailed street data is available, and an address cannot be entered. Try entering the street first, and then select the city if available.
Select View Dest. Map and use the joystick to select an icon, approximate area, or street you wish to choose as your destination. Otherwise, a central location of the city will be selected. If you select a point of interest (POI) or road in an unverified area, you may or may not have routing in these areas. See Map Overview on page 6.
24 Navigation System
Main Menust The system has a talkback function. If your spoken letter is not recognized, the system will talk back to you. For example, if you say “E” but the system does not recognize the command, it will ask you “Please select the number of the input letter from the list” and the following pop-up box will appear:
By Touch Control: After you have selected the city, or if you selected Street in the beginning, the display changes to the Enter street name screen. Use the on-screen keyboard to enter the name of the street (like ELM or 42ND) that is your destination.
Entering a Destination
The system will display a list of street names, with the closest match to the name you entered at the top of the list. Select the number (1-6) of the desired street from the list.
To enter the name of a major highway, you must use the full name, including a hyphen. For interstates, use an “I” (I-10). For U.S. highways, use US (US-18). For state highways, use the two character state designation (CA-101). For county roads, use the appropriate designation (G-2, for example).
Tip: When entering a street, you do not need to enter the direction (N, S, E, W) or the type (St, Ave, etc.). The system will automatically determine that for you, based on your entered city and street number.
You should select a letter by saying the number. Alternately, to improve voice recognition, you can say “Echo” or “Edward” instead of “E.” See page 15 for a list of available words for each letter.
Navigation System 25
Main Menust Tip: If the particular address you want cannot be found, select Map Input and use the joystick to select the appropriate location on the map (see By Map Input on page 36).
Select View Dest. Map and use the joystick to select an icon, approximate area, or street you wish to choose as your destination. Otherwise, a central location of the street will be selected. If you select a point of interest (POI) or road in an unverified area, you may or may not have routing in these areas (see Map Overview on page 6).
By Intersection After you select Intersection from the Enter destination by screen, the display changes to:
Tip: When entering an address, it is usually easier to enter the street first. A city or cities that the street appears in will be displayed. For your convenience, you do not have to enter both city and street.
Entering a Destination
Entering the Street Number After you have completed the street name, the display changes to the Enter street number screen. Use the voice control system and say the address number as a continuous string of numbers. For example, the address 1527 should be spoken as “One, five, two, seven.” You can also use the on-screen keyboard to enter the street number.
If you try to enter a number outside that range, you will be shown an error message. The system displays the acceptable address range.
If you did not select a city in the beginning, the street name you selected might appear in more than one city. The system will give you a list of cities that the street appears in. Select the desired city from the list. The system then displays the Calculate route to screen (see Driving to Your Destination on page 44).
26 Navigation System
Main Menust NOTE: (cid:127) If you find that your city is not listed,
it may be part of a larger metropolitan area. Try entering the street first.
(cid:127) Prior to departure, you can set areas
to avoid. The system then includes them in its calculations for the destination you have entered. See Edit Avoid Area on page 85.
Selecting the State or Province The state you are in is displayed at the top of the screen. If your desired destination is in another state, select Change State.
The display then changes to the Enter state name screen. Use the voice control system and say the name of the state or use the on-screen keyboard to enter the name of the state.
Entering a Destination
To enter the city name by voice spelling, say or select CHANGE TO Spell Mode on the Say city name screen, and the display will change to the Enter city name screen.
Say the city name by saying individual letters, one at a time.
Selecting the City This is helpful if the street runs through several cities, and you know what city includes the street. The city you are in is displayed on the screen. If the city you want is displayed on the screen, say “Select current city.” If your desired destination is in another city, say or enter another city. By Voice Control: Say “City” on the Find intersection by screen, and the display changes to the Say city name screen. Say the city name and the searching will begin.
Navigation System 27
Main Menust By Touch Control: Select City, and the display then changes to the Enter city name screen. Use the on-screen keyboard to enter the name of the city.
If the system does not find an exact match, select List when you finish entering the name of the city. Most of the cities and towns for that state are listed.
The system will display a list of city names, with the closest match to the name you entered at the top of the list. Select the number (1-6) of the desired city from the list.
Listings of cities and towns in the non- detailed coverage area may have an asterisk “*” next to their names. If you select one, no detailed street data is available, and an address cannot be entered (see Map Coverage on page 104).
Select View Dest. Map and use the joystick to select an icon, approximate area, or street you wish to choose as your destination. Otherwise, a central location of the city will be selected. If you select a point of interest (POI) or road in an unverified area, you may or may not have routing in these areas (see Map Overview on page 6).
Entering a Destination
The system has a talkback function. If your spoken letter is not recognized, the system will talk back to you. For example, if you say “E” but the system does not recognize the command, it will ask you “Please select the number of the input letter from the list” and the following pop-up box will appear:
You should select a letter by saying the number.
Alternately, to improve voice recognition, you can say “Echo” or “Edward” instead of “E.” See page 15 for a list of available words for each letter.
28 Navigation System
Main Menust Say the street name by saying individual letters or numbers, one at a time.
Selecting the Street By Voice Control: After you have selected the city, or if you say “Street” on the Find intersection by screen, the display changes to the Say street name screen. Say the street name and the searching will begin.
Entering a Destination
The system has a talk back function. If your spoken letter is not recognized, the system will talk back to you. For example, if you say “E” but the system does not recognize the command, it will ask you “Please select the number of the input letter from the list” and the following pop-up box will appear:
After you have completed the first name, the display changes to the Say intersecting street screen. Say the name of the other intersecting street.
To enter the street name by voice spelling, say or select CHANGE TO Spell Mode on the Say street name screen, and the display will change to the Enter street name screen.
You should select a letter by saying the number.
Alternately, to improve voice recognition, you can say “Echo” or “Edward” instead of “E.” See page 15 for a list of available words for each letter.
Navigation System 29
Main Menust The system will display a list of street names, with the closest match to the name you entered at the top of the list. Select the number (1-6) of the desired street from the list.
After you have completed the first street name, the display changes to the Enter intersecting street screen. Enter the name of the other intersecting street using the on-screen keyboard.
If you did not select a city in the beginning, and the intersection appears in more than one city, you will see the Select a city screen. The system will give you a list of cities that the intersection appears in. Select the desired city from the list. If more than one intersection appears in the city, select the desired intersection from the Select an intersection screen. The system then displays the Calculate route to screen (see Driving to Your Destination on page 44).
Tip: If the particular intersection you want cannot be found, select Map Input and use the joystick to select the appropriate location on the map (see By Map Input on page 36).
Entering a Destination
By Touch Control: After you have selected the city, or if you select Street in the beginning, the display changes to the Enter street name screen. Use the on-screen keyboard to enter one of the names (like ELM or 42ND) of the intersecting streets.
To enter the name of a major highway, you must use the full name, including a hyphen. For interstates, use an “I” (I-10). For U.S. highways, use US (US-18). For state highways, use the two character state designation (CA-101). For county roads, use the appropriate designation (G-2, for example).
Tip: When entering a street, you do not need to enter the direction (N, S, E, W) or the type (St, Ave, etc.). The system will automatically determine that for you.
30 Navigation System
Main Menust Select View Dest. Map and use the joystick to select an icon, approximate area, or street you wish to choose as your destination. Otherwise, a central location of the street will be selected. If you select a point of interest (POI) or road in an unverified area, you may or may not have routing in these areas (see Map Overview on page 6).
By Places After you select Places from the Enter destination by screen, the display changes to:
Entering a Destination
(cid:127) The second best method is to select Category, then Restaurant, and enter the keyword “Bucks.” The list will include all restaurants that have the letters “bucks” anywhere in the name.
(cid:127) You can try to enter “Bucks” using Name, but you may have to search through a list that might include Bucks Welding, Bucks Surplus, etc.
NOTE: (cid:127) Prior to departure, you can set areas
to avoid. The system then includes them in its calculations for the destination you have entered. See Edit Avoid Area on page 85.
(cid:127) You can enter the desired destination
using the voice control system. For information on the available voice commands, see Voice Command Index on page 126.
There are three ways to find a place or point of interest (POI), by Category, Name, or Phone Number.
Let’s assume you want to find a coffee shop (restaurant) called “Bucks.” (cid:127) If you know the phone number of the coffee shop, select Phone Number, then enter the 10-digit number with area code. This is the quickest way to find it.
Navigation System 31
Main Menust Auto Service The subcategories are: Acura Dealers, Honda Dealers, gas stations, etc.
Banking The subcategories are: ATM, Bank, etc.
Community The subcategories are: City Hall, Civic/ Community Center, Convention/ Exhibition Center, Court House, Higher Education, Library, Post Office, School, etc.
Emergency The subcategories are: Hospital, Police Station, Roadside Assistance, etc.
Lodging The subcategories are: Bed & Breakfast, Hotel/Motel, etc.
Leisure The subcategories are: Amusement Park, Golf Course, Historical Monument, Marina, Movie Theater, Museum, Park/Recreation Area, Performing Arts, Sports Complex, Tourist Attraction.
Restaurant This category is broken down into types of food, giving you a selection by each type: All Types, American, French, Japanese, etc.
Tip: When trying to find a specific restaurant, select the category “All Types.” Some restaurants may be miscategorized.
Entering a Destination
Finding the Place by Category The Category option gives you a list of categories or types of businesses to select from with the following screen:
Tip: If you are not sure of the spelling of a place, the best way to find it is to use the keyword search. Select Category, choose a category and subcategory from the menus, then select Place Name by Keyword, and enter the partial name.
32 Navigation System
Main Menust Entering a Destination
After selecting a category, the system will give you the options of Place Name by Keyword, Sort by Distance to Travel, City Vicinity, or Place Name.
With the following screen:
Advanced If you do not find the category or subcategory you need in the other options, you can find the categories with a keyword. When you select this option, the display changes to the Enter keyword for category screen. Enter the keyword using the on-screen keyboard.
When the system finds the categories with the keyword you entered, the display changes to the Select a category screen. Select the desired category.
Shopping The subcategories are: All Shopping, Accessories/Jewelry, Auto Parts & Electronics, Books/Music/Video, Clothing, Groceries, Home Improvement, Mall/Department Store, Office Supplies/Electronics, Pharmacy/ Drug Store, Pet Food/Supplies, Sewing/ Linen, Shoes/Bags, Sporting Goods, and Toys/Arts/Crafts.
Tip: When trying to find a specific shopping store, select the category “All Shopping.” Some stores may not be in the right category.
Travel The subcategories are: Airport, Automobile Club, Bed & Breakfast, Bus Station, Camping, Commuter Rail Station, Ferry Terminal, Hotel/Motel, Named Place, Park & Ride, Parking Garage/House, Parking Lot, Rental Car Agency, Resort, Rest Area, Tourist Information, Train Station, etc.
Navigation System 33
Main Menust Entering a Destination
Place Name by Keyword If you do not know the exact name of the destination, you can find the place with a keyword. When you select this option, the display changes to:
You can find your destination with keyword using the Sort by Distance to Travel option or City Vicinity option.
If you select the Sort by Distance to Travel option, the Enter keyword for place screen appears. Enter the keyword using the on-screen keyboard. If the system does not find an exact match, select List when you finish entering the keyword. The system starts searching for places that match the entered keyword. If you see your desired place, select it from the list. If not, scroll through the list to find the desired place.
If you select the City Vicinity option, the Enter city name screen appears. Enter the name of the city using the on- screen keyboard. The system will display a list of city names, with the closest match to the name you entered at the top of the list. Select your desired city name from the list. Once you have selected your desired city name, the Enter keyword for place screen appears. Enter the keyword using the on-screen keyboard to specify the desired place.
Once you select a place, the system then displays the Calculate route to screen (see Driving to Your Destination on page 44).
34 Navigation System
Main Menust City Vicinity The system allows you to find points of interest in the vicinity of the city you entered. When you select this option, the display changes to Enter city name screen. Enter the name of the city using the on-screen keyboard. If the system does not find an exact match, select List when you finish entering the name of the city. Select a desired city from the list.
Once you have selected the city, the display changes to Enter a place name screen. Enter the name of the place using the on-screen keyboard.
Once you select a place, the system then displays the Calculate route to screen (see Driving to Your Destination on page 44).
Entering a Destination
Place Name When you select this option, the display changes to Enter a place name screen. Enter your selection, using the on- screen keyboard.
Once you select a place, the system then displays the Calculate route to screen (see Driving to Your Destination on page 44). Finding the Place by Name The Name option allows you to enter the name of a business, and then shows you a list of businesses with the same or similar names to select from. Use the name option only if you know the exact spelling of the place. If unsure, use the Category option.
Sort by Distance to Travel When you select this option, the system gives you a list of all the places in the subcategory. This list is arranged by distance from your current location, with the closest at the top of the list.
The distance and direction to the destination at the top of the list are shown in the screen. The distance shown is straight line distance (“as the crow flies”), not driving distance. Select the number (1-4) of the desired destination from the list.
Once you select a place, the system then displays the Calculate route to screen (see Driving to Your Destination on page 44).
Navigation System 35
Main Menust Entering a Destination
Finding the Place by Phone Number The Phone Number option allows you to select a destination by its telephone number. Only telephone numbers stored in the system under the Places (of business) option are recognized. The system does not contain residential telephone numbers, or numbers you may have entered in your personal Address Book.
Tip: If you know the phone number of a point of interest (POI), its uniqueness makes it the fastest entry method. When using the voice control system, the entry should be spoken as a continuous string of numbers. For example, the telephone number (310) 555-4000 should be spoken as “Three, one, zero, five, five, five, four, zero, zero, zero.”
36 Navigation System
By Map Input After you select Map Input from the Enter destination by screen, the display changes to:
Showing the Map of Current Position The Current Position selection assumes that you are looking for a destination in the immediate area. The display changes to:
NOTE: (cid:127) Prior to departure, you can set areas
to avoid. The system then includes them in its calculations for the destination you have entered. See Edit Avoid Area on page 85.
(cid:127) For information on the available
voice commands, see Voice Command Index on page 126.
The red arrow indicates your vehicle position. Find your desired destination by pushing the joystick left, right, up, or down. The map and cross hairs will move in the same direction.
Use the joystick to position the cross hairs on the desired icon, map feature, or road. If desired, use the ZOOM buttons to change the map scale. Then push in on the joystick. The address of the road segment will appear at the top of the screen.
Main Menust The yellow box indicates the area you will see when you click on the current map with the joystick.
Showing the Map of City With the City selection, the display changes to the Enter city name screen.
When you have entered the desired city, the display changes to a map. The starting location will be the central position in the selected city.
See Showing the Map of Current Position on page 36 for instructions on finding and entering your desired destination.
NOTE: The address of the road segment will be displayed on the 1/20, 1/8, 1/4, or 1/2 mile (80, 200, 400, or 800 meter) scale map.
If this is the desired destination, push in on the joystick again. If not, use the joystick to reposition the cross hairs, then push in on the joystick again to display the new address.
Once you select an address, the system then displays the Calculate route to screen (see Driving to Your Destination on page 44).
Entering a Destination
Showing the Map of State With the State selection, the display changes to the Enter state name screen.
After you select the desired state, the display changes to a map of the state, with the cross hairs located near the middle.
Use the joystick to move the cross hairs to the area of the state close to your intended destination. If desired, use the ZOOM buttons to change the map scale. When you have the cross hairs in the desired area, push in on the joystick. The map scale changes to a closer view.
Navigation System 37
Main Menust Entering a Destination
Move the cross hairs to the desired destination, then push in on the joystick. The address of the location you have selected will appear at the top of the screen.
The yellow box indicates the area you will see when you click on the current map with the joystick.
NOTE: The address of the road segment will be displayed on the 1/20, 1/8, 1/4, or 1/2 mile (80, 200, 400, or 800 meter) scale map.
If this is the desired address, push in on the joystick again. If not, use the joystick to reposition the cross hairs, then push in on the joystick again to display the new address.
Once you select an address, the system then displays the Calculate route to screen (see Driving to Your Destination on page 44).
38 Navigation System
The yellow box indicates the area you will see when you click on the current map with the joystick.
NOTE: The address of the road segment will be displayed on the 1/20, 1/8, 1/4, or 1/2 mile (80, 200, 400, or 800 meter) scale map.
If this is the desired address, push in on the joystick again. If not, use the joystick to reposition the cross hairs, then push in on the joystick again to display the new address.
Once you select an address, the system then displays the Calculate route to screen (see Driving to Your Destination on page 44).
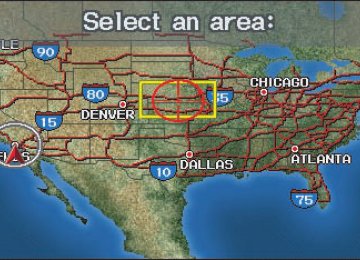
Showing the Map of Continental USA With the Continental USA selection, the display changes to:
Use the joystick to move the cross hairs to the area of the country for your intended destination. Then push in on the joystick.
The map scale changes to display a closer view of the area you selected. Use the joystick to move the cross hairs on the desired icon, map feature, or road. If desired, use the ZOOM buttons to change the map scale. The address of the location you have selected will appear at the top of the screen.
Main Menust By Previous Destinations Every time you route to a destination, that destination is saved by the system. Up to 50 destinations can be stored. Select Previous Destinations from the Enter destination by screen to choose one of those destinations.
After you select Previous Destinations, the display lists the last 50 destinations entered, with the most recent appearing first.
NOTE: (cid:127)If Previous Destination is grayed
out, there is no Previous Destination entered.
(cid:127) When finishing a “Today’s
Destinations” trip, the Today’s Destination list entries are stored to this list, beginning with the date (e.g., item 1 shown above).
(cid:127) Because both the Home and personal Address Book list can be protected by a PIN, they do not show up in the previous destination list.
Entering a Destination
NOTE: (cid:127) Prior to departure, you can set areas
to avoid. The system then includes them in its calculations for the destination you have entered. See Edit Avoid Area on page 85.
(cid:127) For information on the available
voice commands, see Voice Command Index on page 126.
Scroll through the list and say the line number (1-6) of the destination, or touch the desired destination you want.
Once you select the desired destination, the system then displays the Calculate route to screen (see Driving to Your Destination on page 44).
Navigation System 39
Main Menust Editing Today’s Destination List If you change your plans, you can modify the Today’s Destination list order by distance, or by order of entry.
Say or select Entry to sort the list by the entry order, and say or select Distance to sort the list by the distance order. To delete a destination, say or select Delete and the display changes to Select a destination to delete screen. Select the destinations to delete. Say or select Done to perform the deletion, and the display returns to the previous screen. To cancel the deletion, press the CANCEL button.
NOTE: For information on the available voice commands, see Voice Command Index on page 126.
Adding Destinations to the List After you have used any of the other selections from the Enter destination by screen to select a destination, the display changes to:
To add this to the Today’s Destination list, select ADD TO Today’s Dest.
NOTE: If ADD TO Today’s Dest. is grayed out, you already have the maximum numbered (5) of today’s destinations entered.
Entering a Destination
By Today’s Destinations You can create a “trip” by combining multiple destinations previously selected on the Calculate route to screen.
Select Today’s Destinations from the Enter destination by screen and the display changes to:
NOTE: If Today’s Destination is grayed out, there is no Today’s Destination entered.
40 Navigation System
Main Menust The display then changes to show you all the current entries on the Today’s Destination list. Press Done to return to the Enter destination by screen.
The system automatically sorts the destinations stored in the Today’s Destination list for the best path.
NOTE: When finishing a “Today’s Destinations” trip, the Today’s Destination list entries are stored to the Previous Destination list, beginning with the date (e.g., item 1 shown below). This entry contains all the destinations that were included in the Today’s Destinations itinerary. This allows you to re-select the entire Today’s Destinations content at a later date.
If the displayed list shows your plans, select the first destination. The system will guide you to the destination according to the order of the list. When you reach the destination, it will be automatically removed from the list.
Entering a Destination
By Address Book This selection allows you to choose a personal address entry for a destination. After you select Address Book from the Enter destination by screen, the display changes to:
If an Address Book PIN has been set in Setup, the system prompts you to enter your PIN after you select User 1 or User 2. Say or enter your PIN, and say or select Done.
If the PIN has not been entered, the system displays the list after you select User 1 or User 2.
Navigation System 41
Main Menust Entering a Destination
NOTE: PINs are optional. If you choose to use a PIN, make sure you remember it. If you forget your PIN, your dealer will have to reset it for you.
The system then displays a list of the places entered in your personal Address Book. You can sort the displayed addresses by Category: ALL, BUSINESS, PERSONAL or by other categories you may create.
Adding Addresses to the Personal Address Book There are two ways to enter addresses to the personal Address Book: (cid:127) Entering them in the personal
Address Book feature in Setup (see page 74).
(cid:127) Adding them in the Address Book
directly from the Calculate route to screen (see page 44).
NOTE: (cid:127) Destinations chosen from the Address
Book do not show up in Previous Destinations.
(cid:127) Prior to departure, you can set areas
to avoid. The system then includes them in its calculations for the destination you have entered. See Edit Avoid Area on page 85.
(cid:127) For information on the available
voice commands, see Voice Command Index on page 126.
Scroll through the list to find your desired destination. After you select it, the system then displays the Calculate route to screen (see Driving to Your Destination on page 44).
42 Navigation System
By Go Home Selecting Go Home from the Enter destination by screen takes you home or to a frequently used address you have chosen.
If a Go Home PIN has been set in Setup, the system prompts you to enter your PIN. Say or enter your PIN, and say or select Done. The system will then display the Calculate route to screen (see Driving to Your Destination on page 44).
If a Go Home PIN has not been set, the system displays the Calculate route to screen after you select Go Home (see Driving to Your Destination on page 44).
Main Menust NOTE: (cid:127) To edit Home Address, see Home
Address in System Set-up on page 77. (cid:127) Prior to departure, you can set areas
to avoid. The system then includes them in its calculations for the destination you have entered. See Edit Avoid Area on page 85.
(cid:127) PINs are optional. If you choose to use a PIN, make sure you remember it. If you forget your PIN, your dealer will have to reset it for you.
(cid:127) If a PIN is desired, enter it using the
Personal preference PIN number feature in Setup. See page 79 for information on entering your Go Home PIN.
Entering a Destination
Navigation System 43
Main Menust Driving to Your Destination
Driving to Your Destination A route typically has three phases. (cid:127) Initial route calculation (Calculate
route to screen) (see page 44) Change the route while en route (see page 62).
(cid:127)
Calculate Route to Screen
(cid:127) Resume the route when restarting the engine (see Continue Trip Screen on page 66).
Say or select OK. The system calculates the route using the method shown on the screen (see Map Screen on page 47).
NOTE: (cid:127) Prior to departure, you can set areas
to avoid. The system then includes them in its calculations for the destination you have entered.
(cid:127) For information on the available
voice commands, see Voice Command Index on page 126.
44 Navigation System
Further selections from the Calculate route to screen include: ADD TO Address Book Allows you to add the destination to your Address Book (see By Address Book on page 41).
NOTE: If the button is grayed out, the destination is already in your Address Book.
ADD TO Today’s Destination Allows you to add the destination to your Today’s Destination list (see By Today’s Destinations on page 40).
NOTE: If the button is grayed out, the destination is already in your Today’s Destination list, or the Today’s Destination list is already full (five destinations have been stored).
Main Menust ) or
) buttons.
Changing the Routing Method The system lets you select the way you want to drive to your destination. Select the desired method using the CHANGE METHOD scroll bar back ( forward ( The following methods are available to change after you have set a destination: While on a map screen, press the MENU button. The Change route by screen will be displayed. Say or select Change Routing Method, and the screen changes to:
(cid:127) "Easy Route" produces a route with
the least turns.
(cid:127) "Maximize Freeways", "Minimize
Freeways", and "Minimize Toll Roads" are also available.
NOTE: If the trip is greater than 100 miles, then "Minimize Freeways" and "Minimize Toll Roads" may be grayed out. This is normal. The generated route may not be the route you would choose. For safety reasons, the system generally applies the following rules to your route: (cid:127) It tries to avoid "short cuts" through
residential areas.
(cid:127) Right turns are favored over left turns
or U-turns.
(cid:127) Restricted turns (turns that cannot be
made during certain hours), are not used for routing during any time of the day.
(cid:127) "Direct Route" (the factory default) is the route that is the quickest (least time) and is usually the best choice. If you choose any other method, it becomes the new default for all future routing . Make sure to check the routing method if the displayed route is not what you expected to see.
Driving to Your Destination
Viewing the Routes Touching View Routes allows you to scroll through and view the various routes (Direct, Easy, Maximize Freeways, etc.) to your destination. If you select View Routes, the display changes to:
You can change the method for calculating the route by using the voice control system and saying “Next” or “Previous” or by touching Next or Prev. The system will display another calculated route.
Navigation System 45
Main Menust NOTE: Distances and times shown for each method in the Summary are approximate.
After calculating the route with the new method, the system displays a map of your current location. The calculated route will be highlighted as a blue line, and a voice prompt will tell you how to proceed along the highlighted route. Touch Voice to have the guidance repeated.
Viewing the Destination Map Touching View Dest. Map displays a map of the destination vicinity. Press the CANCEL or NAVI BACK button to return. You can view the destination map anytime while on route saying “Display destination map.”
Driving to Your Destination
NOTE: (cid:127) It may take several minutes (the
system displays an hour glass while it is calculating) to show all route methods, and it is not unusual for the different methods to pick the same route. Voice commands cannot be used while the system is calculating. (cid:127) If the trip is greater than 100 miles,
then “Minimize Freeways” and “Minimize Toll Roads” may be grayed out. This is normal.
(cid:127) Zoom IN/OUT to view route details is not available on this screen. After you choose a “route method,” you can then zoom in or out on the map screen to view your route in details.
Say or select Summary to display the distance and time to go for each route. Based on the summary data, you can change the routing by using the Next and Prev. buttons. Once you confirm your selection, say “OK” or select OK on the screen.
46 Navigation System
Main Menust Map Screen When you select OK on the Calculate route to screen, the map screen appears, showing your highlighted route in real time. Route Line When driving to a destination on verified roads in a metropolitan area, the route line is displayed as a blue line. When driving in rural areas on unverified streets (light brown color), the route line changes to either a blue dotted “vector line” pointing to your destination, or a blue-pink line. See Unverified Area Routing on page 81 for a detailed explanation of how to enable unverified routing, and the related cautions and disclaimers.
NOTE: You can always view the entire route by simply saying, “Display entire route.”
“Vector line” (unverified routing off)
Blue-pink unverified route line (unverified routing on)
Driving to Your Destination
Guidance Prompts As you get near the maneuver, you will hear a voice reminder, and see a pop-up window showing you the maneuver. The number of reminders that you will hear before a maneuver is determined by Guidance Prompts in Setup on page 73.
With the factory default (Normal), typically you will hear two prompts: (cid:127) The first is about 1/4 mile from the
maneuver.
(cid:127) The final prompt is close to your
actual turn.
If the distance between the next two driving maneuvers is very small, both maneuvers are displayed on the screen in a single window, and the voice will remind you of both of them at the same time.
Navigation System 47
Main Menust Driving to Your Destination
NOTE: (cid:127) You can say “Voice” or select Voice
on the screen at any time to be reminded of the next maneuver.
(cid:127) Typically a pop-up guidance window
shows your next turn, and a voice guidance prompt is heard. The timing of these prompts varies, depending on the type of road you are on, and the distance to your next maneuver.
When given guidance in unverified areas, the words, “If Possible,” are inserted before each guidance prompt. See the Set-up section “unverified routing” for more details about unverified routing.
48 Navigation System
Main Menust Time to Destination (see page 51)
Waypoint (When on route) (see page 62)
“Breadcrumbs”
(see Off-road Tracking on page 59)
Map Screen Legend Distance to Destination (see page 51)
Direction of Destination (When on route)
Map Orientation (see page 54)
“North Up”
“Heading Up”
Map Scale Adjustment (Mile or km per half inch appears only when you ZOOM IN or OUT.) Map Scale (see page 53)
ICON Button (see page 57)
Voice (see page 47) (Announces next driving instruction)
Vehicle Position (see page 60) (Use voice command, “Display current location,” or touch the icon to show the current location.)
Driving to Your Destination
Map Features Dark Green: Park Light Blue: Hospital Brown: Shopping Mall Blue: Body of Water Light Brown:
Blue/Green: Cemetery Indian Reservation Matte Blue: University
Gray:
Airport/Stadium/Business
Green: Golf Course
NOTE: If you move the joystick over an area (map features shown above), the name is displayed on the screen.
Destination Icon (see page 55) Streets (see Map Overview on page 6, or Unverified Area Routing on page 81) Red: Interstates or Freeways Black: Verified Street Light Brown: Unverified Street Landmark Icon (see page 55)
CURRENT STREET/ AUDIO INFO
Blue Line (see page 47) Calculated route
Honda Dealer Hospital Grocery Store Gas Station Hotel/Lodging Parking Garage Freeway Exit Information
Acura Dealer School Restaurant ATM Parking Lot Post Office
Current Street (see page 6) (When audio information is displayed, touch CURRENT STREET/AUDIO INFO to display the current street name.) NOTE: See Map Legend from the Information screen for further explanation.
Navigation System 49
Main Menust Driving to Your Destination
Guidance Screen The guidance screen offers an alternative way to view your route information. Many of the icons and screen features are similar to those on the map screen. While driving to your destination, press the MAP/GUIDE button to switch to the guidance screen. The guidance screen shows you:
Milestone to Destination – the position of the small circular icon shows your trip progress. As you get closer to your destination, the indicator will approach “DEST.”
Vehicle Heading – the black portion of the compass symbol indicates north.
Guidance Screen Legend
Freeway Exit Information (see page 52)
Direction of Destination, “as the crow flies” (see page 51)
Vehicle Heading (black indicates North) (see page 50)
Scroll: to view guidance maneuvers
Distance to Next Driving Maneuver
Street Name of Next Driving Maneuver
Distance to Destination (see page 51)
Time to Destination (see page 51)
NOTE: (cid:127) The map and voice guidance in
unverified areas differ from those in verified areas.
(cid:127) Current maneuvers and those within
1000 feet will show on the Countdown bar, indicating the distance until the next maneuver.
50 Navigation System
CURRENT STREET/AUDIO INFO
Current Street (see page 6) (When audio information is displayed, touch CURRENT STREET/ AUDIO INFO. to display the current street name.)
Voice Button (see page 47) (announces next driving instruction)
Milestone to Destination (see page 50)
Main Menust Distance and Time to Destination When you select a destination, the distance to the destination is the actual road distance of the calculated route, and “not as the crow flies.” When viewing a list of destinations (points of interest), such as restaurants, the distance is “as the crow flies” (see Sort by Distance to Travel on page 35).
The displayed time to destination may differ from the actual travel time because the time is calculated based on the posted road speed data and your current speed. If part of your route includes unverified roads, the “distance” and “time to go” for that portion is estimated using 25 mph as an average speed.
Direction List When you press the MAP/GUIDE button on the guidance screen, the display changes to:
Driving to Your Destination
You can see the directions list and the distance to each maneuver. Press the MAP/GUIDE button to return to the map screen.
You can scroll through the direction list by screen or by using the scroll bar, or one instruction at a time, using the joystick.
NOTE: (cid:127) The map and voice guidance in
unverified areas differ from those in verified areas. See Unverified Area Routing on page 81.
(cid:127) Only maneuvers that occur at
freeway exits or contain freeway exit information will show the exit info icon (“i” icon) on the right end of the items in the direction list. If no exit info icon is shown on the list, the Exit Info. is grayed out.
Navigation System 51
Main Menust Split Screen Guidance When on route to a destination, you have two display options: single screen mode (the factory default) and the split screen mode.
Single screen mode – a map is displayed with occasional guidance pop-up windows as you approach a maneuver.
Split screen mode – the map is always displayed on the left of the screen, and the maneuver or direction list is displayed on the right hand side of the screen.
Guidance mode can be changed in either Setup (see Guidance Mode on page 88), or by accessing the icon bar (see Guidance Mode on page 57).
When you get near the maneuver, the map screen changes to:
On the map screen, the location of the maneuver is marked with a small yellow square. The guidance window is simply an enlargement of the area indicated by the yellow square. After you complete the maneuver, the display returns to a full map screen when the single screen mode is set, or to a map and direction list screen when the split screen mode is set.
Driving to Your Destination
EXIT INFO (Freeway Exit Information) You can search freeway exit information and add new destinations or waypoints to the calculated route as a new destination or waypoint. The exit info icon (“i” icon) on the right end of the items in the direction list indicates that there is freeway exit information available. Say or select Exit Info., and choose the exit and place to set as a new destination or waypoint.
On the map screen, you can display freeway exit information using the joystick. The exit info icon will only be displayed on the map screen if there is any freeway exit information available. Choose the 1/4, 1/2, and 1 mile scale, then move the cross hairs to the desired exit info icon and click on it. Choose a place from the list and set as a new destination or waypoint.
NOTE: To turn on “Freeway exit information” on the map screen, display the icon bar and select the “i” icon (see page 57).
52 Navigation System
Main Menust Driving to Your Destination
Map Scale Use the ZOOM buttons or a voice command such as “Display 1/2 mile scale” (see page 127) to change the scale of the map. Zooming in increases the detail, while zooming out gives you a view of a wider area. After changing the scale, give the system a few moments to update the display. Functions available at various map scales Map Scale (English and Metric) For selecting units, see page 90.
150 mi. 350 mi. 1/20 mi. 1/8 mi. 80 m 200 m 400 m 800 m 1.6 km 3 km 8 km 24 km 80 km 240 km 560 km
1/4 mi.
1/2 mi.
15 mi.
50 mi.
1 mi.
5 mi.
2 mi.
page 55 X
POI icon symbols (like ATM) Breadcrumbs (off-road tracking dots) page 59X Freeway exit information icons page 52 Unverified road display (light brown) page 81 X Map orientation “Heading up” page 54X Map orientation “North up” page 54X Map features (like park, golf course) page 49X Avoid area shown on map page 85 X Avoid area scales (when creating) page 85 X Waypoint “flag” icons page 62X
NOTE: (cid:127) You can change between miles or kilometers in Setup (see Units on page 90). (cid:127) For information on the available voice commands, see Voice Command Index on page 126.
Navigation System 53
Main Menust The display automatically changes to the map screen when you reach your destination. Press the MENU button to return to the Enter destination by screen.
NOTE: (cid:127) For information on the available
voice commands, see Voice Command Index on page 126.
(cid:127) If you are on a route and the joystick is moved, the “Time to Destination” indications are replaced with an indicator showing distance from the current vehicle location.
Driving to Your Destination
Map Orientation The map can be oriented two ways: (cid:127) North-up: North pointing up as you would normally view a paper map. (cid:127) Heading-up: The map constantly
rotates so the road you are driving on always points up as you see the road through your front windshield.
“North Up”
“Heading Up”
NOTE: The red arrow in both heading symbols always shows the direction north.
Touch the Map Orientation icon on the map screen to switch between the available orientation, or say “Display heading up” or “Display north up.”
In the larger map scales (above 2 mile or 3 kilometer), the map is always oriented with north facing upward. You cannot change the orientation.
To view other areas on the map, move the joystick left, right, up, or down. The map will shift in that direction. To return the map to your current location, press either the MAP/GUIDE, the CANCEL, or the NAVI BACK button on the steering wheel.
54 Navigation System
Main Menust Destination Icon The destination icon only shows the approximate location of the destination. This occurs because a city block can have as many as 100 possible addresses (for example, the 1400 block is followed by the 1500 block.) Since most cities use only a portion of the 100 possible addresses (for example, in the 1400 block, the addresses may only go up to 1425 before the 1500 block starts). Therefore, the address 1425 will be shown a quarter of the way down the block by the system instead of near the end of the block where the destination is actually located.
Tip: When on a route, you can view a map showing your destination. Using voice control, say “Display destination map.”
Landmark Icons Landmark icons are shown in the map screen on 1/20 and 1/8 mile scale, or 80 and 200 meter scale. The Freeway exit information is displayed on the 1/4, 1/2, and 1 mile scales. The icons are:
Honda Dealer Hospital Grocery Store Gas Station Hotel/Lodging Parking Garage Freeway Exit Information
Acura Dealer School Restaurant ATM Parking Lot Post Office
Driving to Your Destination
Some icons can be turned on or off; you can either display them or hide them from the ICON button on the lower left corner (see page 49) or using voice commands (see page 126).
You can select most landmark icons with the joystick to display the icon’s information. See the table on the following page for exceptions.
NOTE: (cid:127) The same list can be viewed on the screen by selecting Map Legend from the Information screen. (cid:127) When there are overlapping
landmark icons, a list of the points of interest (POIs) is displayed.
(cid:127) For information on the available
voice commands, see Voice Command Index on page 126.
Navigation System 55
Main Menust Driving to Your Destination
For some icons you can choose either to show or hide them on the map, while others like Honda Dealers, are always shown. The table below shows the features for each icon type. Some Points of Interest (POIs) like Police Stations are not shown as an icon, but you can still locate the nearest one with the voice command, “Find nearest Police station.”
Icon can be manually hidden
POI type
Icon can be manually displayed Honda/Acura dealer Yes, always No Hospital Yes Yes School Yes Yes ATM Yes Yes Gas station*1
Yes Yes Restaurants*2
Yes Yes Post office Yes Yes Grocery store Yes Yes Yes Lodging (Hotel/Motel) Yes Police station No icon No icon No icon Shopping, Tourist attraction, Bank No icon Yes Parking garage Yes Parking lot Freeway exit information YesYes Yes Yes
Icon selection by voice
No Yes Yes Yes Yes Yes Yes Yes Yes No No Yes Yes Yes
Icon can be selected as a destination on the map screen with the joystick Yes Yes Yes Yes Yes Yes Yes Yes Yes No No Yes Yes Yes (choose POI)
POI can be found on the map screen using voice command “Find...” Yes Yes Yes Yes Yes Yes Yes Yes Yes Yes Yes Yes Yes No
*1 When gas station icons are selected for view on the map, some icons are shown as “brand icons.” *2 From the ICON button on the lower left corner, specialty types of restaurants, like Chinese or Italian, can be individually displayed or hidden. See Showing Icons on the Map on page 57. Also see the Voice Command Index on page 127 for the “Display,” “Hide,” and “Find” commands.
56 Navigation System
Main Menust Icon Options This feature allows you to “fine tune” some of the icons on the Icon bar (See Icon Options below for more information). Guidance Mode When on route, this item allows you to select between a single screen (with occasional pop-up guidance windows), or a split screen (containing one half map, and one half guidance/directions list window). see page 52 for an explanation of this feature, and see page 88 for Setup. Exit Screen Select Return to return to the map screen.
Driving to Your Destination
Icon Options Selecting Icon Options displays the following screen:
This feature allows you to “fine tune” some of the icons on the Icon bar. The three icon choices, “Parking” (lot or garage), “Restaurant” (specific type or types of food), and “Other icons” (hospitals, schools, etc.), can each be tailored to your needs.
Showing Icons on the Map Touching the ICON button on the map screen displays the following screen:
The screen consists of the following items: Icon Bar (row of icon symbols) Allows you manually select the icons that are displayed on the map (see page 55 for a list of these icons). In the screen above, both gas station and restaurants are selected. Touch the icons to select (goes blue) or remove them (symbol is gray). You can also display or hide the same icons by using the “Display” or “Hide” voice commands (see page 127)
Navigation System 57
Main Menust NOTE: (cid:127) When viewing the map screen, you can turn some icons on using voice control.
(cid:127) See Voice Command Index on
page 127 for the available “Display” and “Hide” icon command.
Driving to Your Destination
For instance, let’s assume that your hospital is not displayed on the map, and you want to make sure that your settings are correct. You would do the following: (cid:127) First you would ensure that the
“OTHER ICON” button on the Icon bar is blue (See Icon Bar above).
(cid:127) Second, you select Icon Options
and verify that hospital option is also on (blue). This procedure is explained below.
If you select Other Icons from the Select category for icon settings screen, the other icons options are displayed:
In the example above, POST OFFICE and SCHOOL are selected and will show up on the map. To also see HOSPITAL on the map, this would need to be turned on to select it so it appears as below.
Exit, and save your settings by selecting Done.
58 Navigation System
Main Menust Going Off the Route If you leave the calculated route, “Recalculating...” is displayed at the top of the screen. The system will recalculate the route from your current location and direction to the desired destination then give you a new route instruction. This is done automatically if you have set Rerouting to Automatic on the Setup screen (second) (see page 80).
If the Rerouting option in Setup is set to Manual, “Off route” appears at the top of the screen when you leave the calculated route. Say “Recalculate,” or touch Recalc. button whenever you wish the system to perform a recalculation.
Off-road Tracking If you drive more than half a mile from a mapped road, “Not on a digitized road.” appears at the bottom of the screen.
The map screen starts displaying a series of dots (breadcrumbs) to show the path you have taken if Off-road Tracking on the Setup screen (second) is set to On (see page 88).
Driving to Your Destination
By following the dots, you can backtrack to the mapped road you originally left. “Breadcrumbs” may occasionally be displayed in urban areas, such as large parking lots in shopping malls, or in new subdivisions where the roads are not yet in the database. In other cases you may see dots, if the system temporary goes off route, like in a parking garage where the GPS signal is unavailable.
These dots appear only in the 1/20, 1/8, 1/4, and 1/2 mile (or 80, 200, 400, and 800 meter) map scales. Use the ZOOM buttons to change scales if necessary.
Tracking continues for approximately 150 miles; dots at the beginning of the trail will start disappearing when you exceed that distance. When you reach a mapped road, the system stops displaying dots.
Navigation System 59
Main Menust Driving to Your Destination
Viewing/Saving the Current Location Whenever you are on a map screen, you can always obtain your current location either by touching the Vehicle Position icon or by using the voice control system and saying “Display current location.” A screen pops up which shows the address of your current location, as well as the latitude, longitude, and elevation.
NOTE: The elevation will not appear when the system is temporarily lacking proper GPS information. The system elevation may not agree with elevations shown on roadside elevation signs, and may fluctuate plus or minus 100 feet or more.
You can store the current location for later use. It does not change or cancel your current route.
For example, you are following the system’s directions to get to a destination. While sitting at a stoplight you notice a curio shop on the corner, but do not have time to visit it right now. You can save the location to select as a destination at a later date.
To save the location, say “Save current location.” or select Save on the screen. When you select “User 1” or “User 2,” the Edit address book screen with the current location data will appear. You can edit the name, phone number, or category name to be saved in your personal Address Book.
After the location is saved, select Return to return to the map screen. You can then use Address Book from the Enter destination by screen to select the saved location, and return to the same spot.
60 Navigation System
Main Menust Driving to Your Destination
(cid:127) Your route passes near an unverified area (see Unverified Area Routing on page 81).
(cid:127) You are about to enter an unverified area (see Unverified Area Routing on page 81).
Pop-ups and Disclaimers When you say “OK” in the Calculate Route to screen, or if you change your route, the system checks your route and provides you with “pop-up” messages for the following situation: (cid:127) Your route takes you into an area that
you previously set as an “Avoid Area” (see Edit Avoid Area on page 85).
(cid:127) Your route includes unverified areas
(see Unverified Area Routing on page 81).
(cid:127) You actually enter an unverified area
(see Unverified Area Routing on page 81).
Navigation System 61
Main Menust Choose a different destination (other methods): (cid:127) Saying, “Find nearest...” to find a POI
(page 65).
(cid:127) Saying, “Go home” (page 65). (cid:127) Using the joystick to select a different POI or address on the map (page 65).
(cid:127)Pressing the MENU button twice to get to the Enter destination by screen (page 66).
Change Route By Screen Pressing the MENU button displays the Change route by screen:
Waypoints