- 1993 Honda Accord Wagon Owners Manuals
- Honda Accord Wagon Owners Manuals
- 1995 Honda Accord Wagon Owners Manuals
- Honda Accord Wagon Owners Manuals
- 1991 Honda Accord Wagon Owners Manuals
- Honda Accord Wagon Owners Manuals
- 1996 Honda Accord Wagon Owners Manuals
- Honda Accord Wagon Owners Manuals
- 1997 Honda Accord Wagon Owners Manuals
- Honda Accord Wagon Owners Manuals
- 1994 Honda Accord Wagon Owners Manuals
- Honda Accord Wagon Owners Manuals
- 1992 Honda Accord Wagon Owners Manuals
- Honda Accord Wagon Owners Manuals
- Download PDF Manual
-
new.
Polishes — Polishes and cleaner/ waxes can restore the shine to paint that has oxidized and lost some of its shine. They normally
contain mild abrasives and solvents that remove the top layer of the finish. You should use a polish on your Honda if the finish does not have its original shine after using a wax.
Cleaning tar, insects, etc. with removers also takes off the wax. Remember to rewax those areas, even if the rest of the car does not need waxing.
Aluminum Wheels EX models Clean your Honda's aluminum alloy wheels as you do the rest of the exterior. Wash them with the same solution, and rinse them thoroughly.
The wheels have a protective clear-coat that keeps the aluminum from corroding and tarnishing. Using harsh
Exterior Care
chemicals, including some commercial wheel cleaners or stiff brushes can damage this clear-coat. Only use a mild detergent and soft brush or sponge to clean the wheels.
Paint Touch-Up Your dealer has touch-up paint to match your car's color. The color code is printed on a sticker on the driver's doorjamb. Take this code to your dealer so you are sure to get the correct color.
TOUCH-UP PAINT
continued
Appearance Care
Exterior Care, Interior Care
Inspect your car frequently for chips or scratches in the paint. Repair them right away to prevent corrosion of the metal underneath. Use the touch-up paint on small chips and scratches. More extensive damage should be repaired by a professional.
Carpeting Vacuum the carpeting frequently to remove dirt. Ground-in dirt will make the carpet wear out faster. Periodically shampoo the carpet to keep it looking new. Use one of the foam-type carpet cleaners on the market: Follow the instructions that come with the cleaner, applying it with a sponge or soft brush. Keep the carpeting as dry as possible by not adding water to the foam.
Appearance Care
Fabric Vacuum dirt and dust out of the material frequently. For general cleaning, use a solution of mild soap and lukewarm water, letting it air dry. To clean off stubborn spots, use a commercially available fabric cleaner. Test it on a hidden area of the fabric first, to make sure it does not bleach or stain the fabric. Follow the instructions that come with the cleaner.
Vinyl Remove dirt and dust with a vacuum cleaner. Wipe the vinyl with a soft cloth dampened in a solution of mild soap and water. Use the same solution with a soft-bristle brush on more difficult spots. You can also use commercially available spray or foam-type vinyl cleaners.
Seat Belts If your seat belts get dirty, you can use a soft brush to clean them with a mixture of mild soap and warm water. Do not use bleach, dye, or cleaning solvents. They can weaken the belt material. Let the belts air-dry before you use the car.
METAL LOOP
Dirt buildup in the metal loops of the seat belt anchors can cause the belts to retract slowly. Wipe the insides of the loops with a clean cloth dampened in mild
Interior Care, Corrosion Protection
soap and warm water or isopropyl alcohol.
Windows Clean the windows, inside and out, with a commercially available glass cleaner. You can also use a mixture of one part white vinegar to ten parts water. This will remove the haze that builds up on the inside of the windows. Use a soft cloth or paper towels to clean all glass and clear plastic surfaces.
NOTICE
The rear window defogger wires are bonded to the inside of the glass. Wiping vigorously up and down can dislodge and break the defogger wires. When cleaning the rear window, use gentle pressure and wipe side to side.
Air Fresheners If you want to use an air freshener/deodorizer in the interior of your Accord, you should use a solid type. Some liquid air fresheners contain chemicals that may cause parts of the interior trim and fabric to crack or discolor.
If you use a liquid air freshener, make sure you fasten it securely so it does not spill as you drive.
Corrosion Protection Two factors normally contribute to causing corrosion in your car: 1. Moisture trapped in body cavities. Dirt and road salt that collects in hollows on the underside of the car stays damp, promoting corrosion in that area.
2. Removal of paint and
protective coatings from the exterior and underside of the car.
Many corrosion-preventive measures are built into your Honda. You can help keep your car from corroding by performing some simple periodic maintenance:
Repair chips and scratches in the paint as soon as you discover them. Inspect and clean out the drain holes in the bottom of the doors and body. Check the floor coverings for dampness. Carpeting and floor mats may remain damp for a long time, especially in winter. This dampness can eventually cause the floor panels to corrode.
continued
Appearance Care
Corrosion Protection, Body Repairs
When reporting your collision to the insurance company, tell them you want genuine Honda parts used in the repair. Although most insurers recognize the quality of original parts, some may try to specify that the repairs be done with other available parts. You should investigate this before any repairs are begun.
Take your car to your authorized Honda dealer for inspection after the repairs are completed. He can make sure that quality materials were used and that corrosion-preventive coatings were applied to all repaired and replaced parts.
Have the corrosion-preventive coatings on the underside of your car inspected and repaired periodically.
Body Repairs Body repairs can affect your car's resistance to corrosion. If your car needs repairs after a collision, pay close attention to the parts used in the repair and the quality of the work.
Make sure the repair facility uses genuine Honda replacement body parts. Some companies make sheet metal pieces that seem to duplicate the original Honda body parts, but are actually inferior in fit, finish, and corrosion resistance. Once installed, they do not give the same high-quality appearance.
Appearance Care
Taking Care of the Unexpected
This section covers the more common problems that motorists experience with their cars. It gives you information about how to safely evaluate the problem and what to do to correct it. If the problem has stranded you on the side of the road, you may be able to get going again. If not, you will also find instructions on getting your car towed.
Changing a Flat Tire . . . . . . .. 156
If Your Engine Won't Start . .. 160Nothing Happens or the Starter Motor Operates Very Slowly . . . . . . . . . . .. 160
The Starter Operates
Normally . . . . . . . . . . . . .. 161
Jump Starting . . . . . . . . . . . .. 162
If Your Engine Overheats . . .. 163
Low Oil Pressure Indicator .. 165
Charging System Indicator .. 166
Malfunction Indicator Lamp . 167
Closing the Moonroof . . . . .. 168
Fuses . . . . . . . . . . . . . . . . . . . .. 169
Checking and Replacing .. 169
. . . . . . . . . . . . . . . . . .. 174Towing
Taking Care of the Unexpected
Changing a Flat Tire
If you have a flat tire while driving, stop in a safe place to change it. Stopping in traffic or on the shoulder of a busy road is dangerous. Drive slowly along the shoulder until you get to an exit or an area to stop that is far away from the traffic lanes.
The car can easily roll off the jack, seriously injuring anyone underneath.
Follow the directions for changing a tire exactly, and never get under the car when it is supported only by the jack.
1. Park the car on firm, level ground away from traffic. Turn on the hazard warning
Taking Care of the Unexpected
4. Take the tool kit out of the
cargo area.
5. Unscrew the wing bolt, and
take the spare tire out of its well.
lights, and turn the ignition to LOCK (0).
2. Put the transmission in Park
(automatic) or Reverse (5-speed). Set the parking brake. Have all of the passengers get out of the car when you change the tire.
3. Open the tailgate. Raise the cargo area floor by lifting up on the back edge. Attach the hook to the roof line.
6. Turn the end bracket on the
jack counterclockwise to loosen it, and then remove the jack.
7. Loosen the four wheel nuts one-half turn with the wheel wrench.
point. Make sure the jacking point tab is resting in the jack notch.
9. Use the extension and wheel
wrench as shown.
WHEEL NUTS
EXTENSION
Changing a Flat Tire
8. Locate the jacking point
nearest the tire you need to change. It is pointed to by an arrow molded into the underside of the body. Place the jack under the jacking point. Turn the end bracket clockwise until the top of the jack contacts the jacking
JACKING POINT
WHEEL WRENCH
Taking Care of the Unexpected
continued
Changing a Flat Tire
10. Raise the Gar until the flat tire
is off the ground.
11. Remove the wheel nuts and
flat tire.
12. Before mounting the spare
tire, wipe any dirt off the mounting surface of the wheel and hub with a clean cloth.
BRAKE HUB
Temporarily place the flat tire on the ground with the outside surface of the wheel facing up. Putting the wheel face down could mar the wheel's finish.
Taking Care of the Unexpected
13. Put on the spare tire. Put the
wheel nuts back on finger- tight, and tighten them in a crisscross pattern with the wheel wrench until the wheel is firmly against the hub. Do not try to tighten them fully.
14. Lower the car to the ground,
and remove the jack.
Changing a Hat Tire
15. Tighten the wheel nuts
securely in the same crisscross pattern. Have the wheel nut torque checked at the nearest automotive service facility. Tighten the wheel nuts to 110 N.m (11 kg-m, 80 Ib-ft).
16. Remove the wheel cover or center cap. Place the flat tire face down in the spare tire well.
continued
Taking Care of the Unexpected
Changing a Flat Tire, If Your Engine Won't Start
17. Remove the spacer cone from
the wing bolt, turn it over, and put it back on the bolt.
18. Secure the flat tire by
screwing the wing bolt back into its hole.
Taking Care of the Unexpected
Loose items can fly around the interior in a crash and could seriously injure the occupants.
Store the wheel, jack and tools securely before driving.
19. Store the jack in the cargo
area with the end bracket on the right side. Turn the end bracket on the jack clockwise to lock it in place. Store the tool kit.
20. Store the wheel cover or
center cap in the trunk. Make sure it does not get scratched or damaged.
If Your Engine Won't Start Diagnosing why your engine won't start falls into two areas, depending on what you hear when you turn the key to START (III):
You hear nothing, or almost nothing. The engine's starter motor does not operate at all, or operates very slowly. You can hear the starter motor operating normally, but the engine does not start up and run.
Nothing Happens or the Starter Motor Operates Very Slowly When you turn the ignition switch to START (III), you do not hear the normal noise of the engine trying to start. You may hear a clicking sound or series of
clicks, or nothing at all. Check these things:
Check the transmission interlock. If you have a 5-speed, the clutch pedal must be pushed all the way to the floor or the starter will not operate. With an automatic transmission, it must be in Park or Neutral. Turn the ignition switch to ON (II). Turn on the headlights and check their brightness. If the headlights are very dim or don't light at all, the battery is discharged. See Jump Starting.
If Your Engine Won't Start
Turn the ignition switch to START (III). If the headlights do not dim, check the condition of the fuses. If the fuses are OK, there is probably something wrong with the electrical circuit for the ignition switch or starter motor. You will need a qualified technician to determine the problem. See Towing on page 174.
If the headlights dim noticeably or go out when you try to start the engine, either the battery is discharged or the connections are corroded. Check the condition of the battery and terminal connections (see page 132). You can then try jump starting the car from a booster battery (see page 162).
The Starter Operates Normally In this case, the starter motor sounds normal when you turn the ignition switch to START (III), but the engine does not run.
Are you using the proper starting procedure? Refer to Starting the Engine on page 94. Do you have fuel? Turn the ignition switch to ON (II) for a minute, and watch the fuel gauge. There may be an electrical problem, such as no power to the fuel pump. Check all the fuses (see page 169).
If you find nothing wrong, you will need a qualified technician to find the problem. See Towing on page 174.
Taking Care of the Unexpected
3. Connect one jumper cable to
the positive (+) terminal on the booster battery. Connect the other end to the positive (+) terminal on your Honda's battery.
Jump Starting
If your car's battery has run down, you may be able to start the engine by using a booster battery. Although this seems like a simple procedure, you should take several precautions.
A battery can explode if you do not follow the correct procedure, seriously injuring anyone nearby. Keep all sparks, open flames, and smoking materials away from the battery.
You cannot start a Honda with an automatic transmission by pushing or pulling it.
Taking Care of the Unexpected
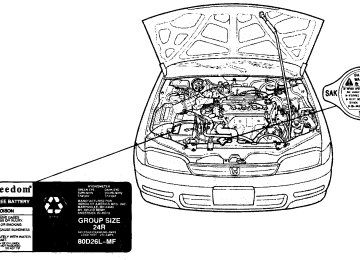
To jump start your car follow these directions closely: 1. Open the hood and check the
physical condition of the battery (see page 132). In very cold weather, check the condition of the electrolyte. If it seems slushy or like ice, do not try jump starting until it thaws. NOTICE
If a battery sits in extreme cold, the electrolyte inside can freeze. Attempting to jump start with a frozen battery can cause it to rupture or explode.
2. Turn off all the electrical accessories: heater, A/C, stereo system, lights, etc. Put the transmission in Neutral or Park, and set the parking brake.
Jump Starting, If Your Engine Overheats
4. Connect the second jumper
cable to the negative (—) terminal on the booster battery. Connect the other end to the grounding strap as shown. Do not connect this jumper cable to any other part of the engine.
6. Start your car. If the starter motor still operates slowly, check the jumper cable connections to make sure they have good metal-to-metal contact.
CHARGED VEHICLE (BOOSTER BATTERY)
DISCHARGED VEHICLE (DEAD BATTERY)
5.
If the booster battery is in another car, have an assistant start that car and run it at a fast idle.
7. Once your car is running,
disconnect the negative cable from your car and then from the booster battery. Disconnect the positive cable from your car and then from the booster battery.
If Your Engine Overheats The pointer of your car's temperature gauge should stay in the midrange under most conditions. It may go higher if you are driving up a long steep hill on a very hot day. If it climbs to the red mark, you should determine the reason.
NOTICE
Driving with the temperature gauge pointer at the red mark can cause serious damage to your engine.
Taking Care of the Unexpected
continued
If Your Engine Overheats
Your car can overheat for several reasons, such as lack of coolant or a mechanical problem. The only indication may be the temperature gauge climbing to or above the red mark. Or you may see steam or spray coming from under the hood. In either case, you should take immediate action.
Steam and spray from an overheated engine can seriously scald you.
Do not open the hood if steam is coming out.
1. Safely pull to the side of the
road. Put the transmission in Neutral or Park, and set the parking brake. Turn off the
Taking Care of the Unexpected
heating and cooling system and all other accessories. Turn on the hazard warning indicators.
2. If you see steam and/or spray coming from under the hood, turn off the engine.
3. If you do not see steam or
spray, leave the engine running and watch the temperature gauge. If the high heat is due to overloading (climbing a long, steep hill on a hot day with the A/C running, for example), the engine should start to cool down almost immediately. If it does, wait until the temperature gauge comes down to the midpoint, and then continue driving.
4. If the temperature gauge
stays at the red mark, turn off the engine.
5. Wait until you see no more
signs of steam or spray; then open the hood.
6. Look for any obvious
coolant leaks, such as a split radiator hose. Everything is still extremely hot, so use caution. If you find a leak, it must be repaired before you continue driving (see Towing on page 174).
7. If you don't find an obvious
leak, check the coolant level in the radiator reserve tank (see page 87). If the level is below the MIN mark, add coolant to halfway between the MIN and MAX marks.
8. If there was no coolant in the
reserve tank, you may also have to add coolant to the radiator. Let the engine cool down until the pointer reaches the
If Your Engine Overheats, Low Oil Pressure Indicator
middle of the temperature gauge, or lower, before checking the radiator.
Removing the radiator cap while the engine is hot can cause the coolant to spray out, seriously scalding you.
Always let the engine and radiator cool down before removing the radiator cap.
9. Using gloves or a large heavy
cloth, turn the radiator cap counterclockwise, without pushing down, to the first stop. This releases any remaining pressure in the cooling system. After the pressure releases, push down on the cap and turn it until it comes off.
10. Start the engine and set the
heater control lever to maximum. Add coolant to the radiator up to the base of the fill neck. If you do not have the proper coolant mixture available, you can add plain water. Remember to have the cooling system drained and refilled with the proper mixture as soon as you can.
11. Put the radiator cap back on
tightly. Run the engine and watch the temperature gauge. If it goes back to the red mark, the engine needs repair. (See Towing on page 174.)
12. If the temperature stays
normal, check the coolant level in the radiator reserve tank. If it has gone down, add coolant to the MAX mark. Put the cap back on tightly.
Low Oil Pressure Indicator This indicator should light when the ignition is ON (II), and go out after the engine starts. If it comes on when the engine is running, it indicates that the oil pressure has dropped and serious engine damage is possible. Take immediate action.
LOW OIL PRESSURE INDICATOR
continued
Taking Care of the Unexpected
Low Oil Pressure Indicator, Charging System Indicator
NOTICE
Running the engine with low oil pressure can cause serious mechanical damage almost immediately. Turn off the engine as soon as you can safely get the car stopped.
1. Safely pull off the road and
shut off the engine.
2. Let the car sit for a minute.
Open the hood and check the oil level (see page 86). Although oil level and oil pressure are not directly connected, an engine that is very low on oil can lose pressure during cornering and other driving maneuvers.
3.
If necessary, add oil to bring the level back to the full mark on the dipstick (see page 118).
Taking Care of the Unexpected
4. Start the engine and watch the oil pressure indicator. If the indicator does not go out within 10 seconds, turn off the engine. There is a mechanical problem that needs to be repaired before you can continue driving. (See Towing on page 174.)
Charging System Indicator This indicator should come on when the ignition is ON (II), and go out after the engine starts. If it comes on brightly when the engine is running, it indicates that the charging system has stopped charging the battery.
CHARGING SYSTEM INDICATOR
Immediately turn off all electrical accessories: radio, heater, A/C, rear defogger, cruise control, etc.
Charging System Indicator, Malfunction Indicator Lamp
Try not to use other electrically operated controls such as the power windows. Keep the engine running and take extra care not to stall it. Starting the engine will discharge the battery rapidly.
By eliminating as much of the electrical load as possible, you can drive several miles before the battery is too discharged to keep the engine running. Drive to a service station or garage where you can get technical assistance.
Malfunction Indicator Lamp This indicator comes on for a few seconds when you turn the switch ON (II). If it comes on at any other time, it indicates one of the engine's emissions control systems may have a problem. Even though you may feel no difference in your car's performance, it can reduce your
fuel economy and cause your car to put out excessive emissions. Continued operation may cause serious damage.
MALFUNCTION INDICATOR LAMP
If this indicator comes on, safely pull off the road and turn off the engine. Restart the engine and watch the indicator. If it stays on, have your car checked by the dealer as soon as possible. Drive moderately until the dealer has inspected the problem. Avoid
full-throttle acceleration and driving at high speed.
You should also have the dealer inspect your car if the indicator comes on frequently, even though it goes off when you follow the above procedure.
NOTICE
If you keep driving with the malfunction indicator lamp/check engine light on, you can damage your car's emission controls and engine. Those repairs may not be covered by your car's warranties.
Taking Care of the Unexpected
4. Use a screwdriver or coin to
remove the round plug in the center of the headliner.
5. Insert the moonroof wrench
into the socket behind this plug. Turn the wrench until the moonroof is fully closed.
ROUND PLUG
SOCKET
6. Remove the wrench. Replace
the round plug.
Closing the Moonroof
If the electric motor will not close the moonroof, do the following: 1. Check the fuse for the moonroof motor (see page 169). If the fuse is blown, replace it with one of the same or lower rating.
2. Try closing the moonroof. If
the new fuse blows immediately or the moonroof motor still does not operate, you can close the moonroof manually.
3. Get the tool out of the tool kit located under the cargo area floor.
Taking Care of the Unexpected
Fuses
Only cars equipped with ABS have an ABS fuse box. It is in the front of the engine compartment on the passenger's side.
The interior fuse box is underneath the dashboard on the driver's side. To open, turn the knob.
ABS FUSE BOX
All the electrical circuits in your car have fuses to protect them from a short circuit or overload. These fuses are located in two or three fuse boxes.
The under-hood fuse box is located in the front of the engine compartment on the passenger's side. To open, push the tab as shown.
UNDER-HOOD FUSE BOX
TAB
INTERIOR FUSE BOX
KNOB
Checking and Replacing If something electrical in your car stops working, the first thing you should check for is a blown fuse. Determine from the chart on the fuse box cover or inside the fuse box which fuse or fuses control that component. Check
continued
Taking Care of the Unexpected
Fuses
those fuses first, but check all the fuses before deciding that a blown fuse is not the cause. Replace any blown fuses, and check the component's operation. 1. Turn the ignition switch to
LOCK (0). Make sure the headlights and all other accessories are off.
2. Remove the cover from the
fuse box.
3. Check each of the large fuses
in the under-hood fuse box by looking through the top at the wire inside. Removing these fuses requires a Phillips screwdriver.
BLOWN
Taking Care of the Unexpected
4. Check the smaller fuses in the
under-hood fuse box and all the fuses in the interior fuse box by pulling out each fuse with the fuse puller provided in the interior fuse box.
5. Look for a burned wire inside
the fuse. If it is burned out, replace it with one of the spare fuses of the same rating or lower.
BLOWN
If you cannot drive the car without fixing the problem, and you do not have a spare fuse, take a fuse of the same rating or a lower rating from one of the other circuits. Make sure you can do without that circuit
Fuses
6.
If the replacement fuse of the same rating burns out in a short time, there is probably a serious electrical problem in your car. Leave the blown fuse in that circuit and have your car checked by a qualified technician.
temporarily (such as the cigarette lighter or radio).
If you replace the blown fuse with a spare fuse that has a lower rating, it might blow out again. This does not indicate anything wrong. Replace the fuse with one of the correct rating as soon as you can.
NOTICE
Replacing a fuse with one that has a higher rating greatly increases the chances of damaging the electrical system. If you do not have a replacement fuse with the proper rating for the circuit, install one with a lower rating.
Taking Care of the Unexpected
Fuses
UNDERHOOD FUSE BOX
* EX
Taking Care of the Unexpected
ABS FUSE BOX
INTERIOR FUSE BOX
Fuses
Taking Care of the Unexpected
Towing
If your car needs to be towed, call a professional towing service or, if you belong to one, an organization that provides roadside assistance. Never tow your car behind another car with just a rope or chain. It is very dangerous.
Emergency Towing There are three popular methods of towing a car:
Flatbed Equipment — The operator loads your car on the back of a truck. This is the best way of transporting your Honda.
Wheel Lift Equipment — The tow truck uses two pivoting arms that go under the tires (front or rear) and lift them off the ground. The other two tires remain on the ground.
Taking Care of the Unexpected
Sling-Type Equipment — The tow truck uses metal cables with hooks on the ends. These hooks go around parts of the frame or suspension, and the cables lift that end of the car off the ground. Your car's suspension and body can be seriously damaged if this method of towing is attempted. If your Honda cannot be trans- ported on a flatbed truck, it should be towed with the front wheels off the ground. If, due to damage, your car must be towed with the front wheels on the ground, do the following: 5-Speed Manual Transmission
Release the parking brake. Shift the transmission to Neutral.
Automatic Transmission
Release the parking brake. Start the engine.
Shift to D4, then to N. Turn off the engine.
NOTICE Improper towing preparation will damage the transmission. Follow the above procedure exactly. If you cannot shift the transmission or start the engine (automatic transmission), your car must be transported on a flatbed.
It is best to tow the car no farther than 50 miles (80 km), and keep the speed below 35 mph (55 km/h). NOTICE Trying to lift or tow your car by the bumpers will cause serious damage. The bumpers are not designed to support the car's weight.
The diagrams in this section give you the dimensions and capacities of your Honda and the locations of the identification numbers. The explanations of several electronic and mechanical systems on your Honda are for the more technically oriented owner.
Identification Numbers . . . .. 176
Specifications . . . . . . . . . . . .. 178
Tire Information . . . . . . . . . .. 180
Tire Size Designation . . . .. 180
Wheel Size Designation .. 180
Tire Speed Ratings . . . . . .. 180
Tire Pressure Adjustmentfor High Speed Driving .. 180
DOT Tire Quality Grading . 181
Treadwear . . . . . . . . . .. 181
Traction . . . . . . . . . . . .. 181
Temperature . . . . . . . .. 182
Emissions Controls . . . . . . . .. 182
The Clean Air Act . . . . . . .. 182Crankcase Emissions
Control System . . . . .. 183
Evaporative Emissions
Control System . . . . .. 183
Technical Information
Exhaust Emissions
Controls . . . . . . . . . . . . . .. 183
PGM-FI System . . . . . . .. 183
Ignition TimingControl System . . . . .. 183
Three-Way Catalytic
Converter . . . . . . . . .. 183
Exhaust Gas
Recirculation (EGR) System . . . . . . . . . . . .. 184
Replacement Parts . . .. 184Three-Way Catalytic
Converter . . . . . . . . . . . . . . .. 184
Anti-Lock Brake System . . .. 185Technical Information
Identification Numbers
Your car has several identifying numbers located in various places.
The Vehicle Identification Number (VIN) is the 17-digit number your Honda dealer uses to register your car for warranty purposes. It is also necessary for licensing and insuring your car.
The easiest place to find the VIN is on a plate fastened to the top of the dashboard. You can see it by looking through the windshield on the driver's side. It is also on the Certification Label attached to the driver's doorjamb, and it is stamped on the engine compartment bulkhead. The VIN is also provided in bar code on the Certification Label.
Technical Information
VEHICLE IDENTIFICATION NUMBER
CERTIFICATION LABEL
The Engine Number is stamped into the engine block.
The Transmission Number is on a label on top of the transmission.
Identification Numbers
MANUAL TRANSMISSION NUMBER
AUTOMATIC TRANSMISSION NUMBER
ENGINE NUMBER
Technical Information
Specifications
*1 LX *2 EX
page 131.
Technical Information
engine. Reserve tank capacity: 0.6 U.S. qt. (.06
*1 Including the coolant in the reserve tank and that remaining in the , 0.13 Imp gal.) *2 LX *3 EX *4 Excluding the oil remaining in the engine.
Specifications
*1 LX *2 EX
Technical Information
Tire Information
Tire Size Designation A tire's sidewall is marked with a tire size designation. You will need this information when selecting replacement tires for your car. The following explains what the letters and numbers in the tire size designation mean.
Example tire size designation: 195/60R15 88H 195 — Tire width in millimeters. 60 — Aspect ratio. The tire's section height as a percentage of its width. R —Tire construction code (Radial). 15 — Rim diameter in inches. 88 — Load Index, a numerical code associated with the maximum load the tire can carry.
Technical Information
H — Speed Rating Symbol. See the speed rating chart in this section for additional information.
Wheel Size Designation Wheels are also marked with important information that you need if you ever have to replace one. The following explains what the letters and numbers in the wheel size designation mean.
Example wheel size designation: 15 X 51/ 2 JJ 15 — Rim diameter in inches. 51/2 — Rim width in inches. JJ — Rim contour designation.
Tire Speed Ratings The chart shows many of the different speed ratings currently being used for passenger car
tires. The speed rating symbol is part of the tire size designation on the sidewall of the tire. This symbol corresponds to that tire's designed maximum safe operating speed.
Tire Pressure Adjustment for High Speed Driving Honda strongly recommends that you not drive faster than posted speed limits and conditions
allow. If you decide it is safe to drive at high speeds, be sure to adjust the cold tire pressures as shown below. If you do not adjust the tire pressure, excessive heat can build up and cause sudden tire failure.
Be sure to readjust the pressure for normal driving speeds. You should wait until the tires are cold before adjusting the tire pressure (see page 137).
DOT Tire Quality Grading The tires on your car meet all U.S. Federal Safety Requirements. All tires are also graded for treadwear, traction, and temperature performance according to Department of Transportation (DOT) standards. The following explains these gradings.
Treadwear The treadwear grade is a comparative rating based on the wear rate of the tire when tested under controlled conditions on a specified government test course. For example, a tire graded 150 would wear one-and-one-half (1-1/2) times as well on the government course as a tire graded 100. The relative performance of tires depends upon the actual conditions of their use, however, and may depart significantly from the
Tire Information
norm due to variations in driving habits, service practices, and differences in road characteristics and climate.
Traction The traction grades, from highest to lowest, are A, B, and C, and they represent the tire's ability to stop on wet pavement as measured under controlled conditions on specified government test surfaces of asphalt and concrete. A tire marked C may have poor traction performance.
Warning: The traction grade assigned to this tire is based on braking (straight ahead) traction tests and does not include cornering (turning) traction.
Technical Information
Tire Information, Emissions Controls
Temperature The temperature grades are A (the highest), B, and C, representing the tire's resistance to the generation of heat and its ability to dissipate heat when tested under controlled conditions on a specified indoor laboratory test wheel. Sustained high temperature can cause the material of the tire to degenerate and reduce tire life, and excessive temperature can lead to sudden tire failure. The grade C corresponds to a level of performance which all passenger car tires must meet under the Federal Motor Vehicle Safety Standard No. 109. Grades B and A represent higher levels of performance on the laboratory test wheel than the minimum required by law.
Technical Information
Warning: The temperature grade for this tire is established for a tire that is properly inflated and not overloaded. Excessive speed, underinflation, or excessive loading, either separately or in combination, can cause heat buildup and possible tire failure.
Emissions Controls The burning of gasoline in your car's engine produces several byproducts. Some of these are carbon monoxide (CO), oxides of nitrogen (NOx), and hydrocarbons (HC). Gasoline evaporating from the tank also produces hydrocarbons. Controlling the production of CO, NOx, and HC is important to the environment. Under certain conditions of sunlight and climate, NOx and HC react to form photochemical "smog."
Carbon monoxide does not contribute to smog creation, but it is a poisonous gas.
The Clean Air Act The Clean Air Act sets standards for automobile emissions. It also requires that automobile manufacturers explain to owners how their emissions controls work and what to do to maintain them. This section summarizes how the emissions controls work. Scheduled maintenance is on page 112 - 113.
Crankcase Emissions Control System Your car has a Positive Crankcase Ventilation (PCV) System. This keeps gasses that build up in the engine's crankcase from going into the atmosphere. The PCV valve routes them from the crankcase back to the intake manifold. They are then drawn into the engine and burned.
Evaporative Emissions Control System As fuel evaporates in the fuel tank, an evaporative emissions control canister filled with charcoal adsorbs the vapor. It is stored in this canister while the engine is off. After the engine is started and warmed up, the vapor is drawn into the engine and burned during driving.
Exhaust Emissions Controls The exhaust emissions controls include three systems: PGM-FI, ignition timing control, and three-way catalytic converter. These three systems work together to control the engine's combustion and minimize the amount of HC, CO, and NOx that comes out the tailpipe. The exhaust emissions control systems are separate from the crankcase and evaporative emissions control systems.
PGM-FI System The PGM-FI system uses a sequential multiport fuel injection. It has three sub-systems: air intake, engine control, and fuel control. The engine control module (ECM) uses various sensors to determine how much air is going into the engine. It then controls
Emissions Controls
how much fuel to inject under all operating conditions.
Ignition Timing Control System This system constantly adjusts the ignition timing, reducing the amount of HC, CO and NOx produced.
Three-Way Catalytic Converter The three-way catalytic converter is in the exhaust system. Through chemical reactions, it converts HC, CO, and NOx in the engine's exhaust to carbon dioxide (CO2), dinitrogen (N2), and water vapor.
Technical Information
Emission Controls, Three-Way Catalytic Converter
Exhaust Gas Recirculation (EGR) System The Exhaust Gas Recirculation (EGR) system takes some of the exhaust gas and routes it back into the intake manifold. Adding exhaust gas to the air/fuel mixture reduces the amount of NOx produced when the fuel is burned.
Replacement Parts The emissions control systems are designed and certified to work together in reducing emissions to levels that comply with the Clean Air Act. To make sure the emissions remain low, you should use only new Genuine Honda replacement parts or their equivalent for repairs. Using lower quality parts may increase the emissions from your car.
The emissions control systems are covered by warranties
Technical Information
separate from the rest of your car. Read your warranty manual for more information.
Three-Way Catalytic Converter
THREE-WAY CATALYTIC CONVERTER The three-way catalytic converter contains precious metals that serve as catalysts, promoting chemical reactions to convert the exhaust gases without affecting the metals. The catalytic converter is referred to as a three-way catalyst, because
it acts on HC, CO, and NOx. A replacement unit must be an original Honda part or its equivalent.
The three-way catalytic converter must operate at a high temperature for the chemical reactions to take place. It can set on fire any combustible materials that come near it. Park your car away from high grass, dry leaves, or other flammables.
Always use unleaded gasoline. Even a small amount of leaded gasoline can contaminate the catalyst metals, making the converter ineffective. Keep the engine tuned up. Have your car diagnosed and repaired if it is misfiring, backfiring, continuing to run after you turn off the engine, stalling, or otherwise not running properly.
Anti-Lock Brake System The Anti-Lock Brake System (ABS) works by measuring how fast the wheels are turning during braking and comparing their speeds. If any wheel is rotating much slower than the others (on the verge of locking up and skidding), the system reduces hydraulic pressure to that wheel's brake caliper. When that wheel's speed matches the other wheels, the system applies normal hydraulic pressure. This can take place several times per second at each wheel. You feel the ABS working as rapid pulsations in the brake pedal.
Each wheel has a wheel speed sensor assembly. As the wheel rotates, the sensor sends electrical pulses to the ABS control unit. The pulse frequency varies with the wheel speed.
The electrical output of the ABS control unit is connected to the modulator/solenoid unit. During braking, the ABS control unit monitors the pulse frequencies from the four wheels. When the control unit detects a wheel locking up, it energizes the appropriate solenoid in the modulator/solenoid unit. There are three solenoids: one for each front wheel, and one for the rear wheels. The energized solenoid reduces hydraulic pressure to one side of a modulator valve. This, in turn, reduces hydraulic pressure in the brake line going to the affected wheel. When that wheel speeds up because of the reduced braking effort, the control unit de-energizes the solenoid. This builds hydraulic pressure on the modulator valve. The pressure increases in the hydraulic line to the wheel.
Anti-Lock Brake System
For the system to react quickly, the modulator/solenoid unit must have brake fluid under high pressure. This is supplied by a diaphragm-type accumulator that is pressurized by an electric pump. A pressure-sensing switch on the accumulator controls this pump.
The control unit also contains error detection circuitry. It monitors the operation of the wheel sensors, solenoids, pump, and electronics. If the control unit detects any faults, it shuts off power to the pump motor and solenoids. The light on the instrument panel comes on. The brakes then work like a conventional system without anti-lock capabilities.
Technical Information
Warranty and Customer Relations
Warranty Coverages . . . . . . .. 188
Customer RelationsInformation . . . . . . . . . . . . .. 189
Reporting Safety Defects . . .. 189
U.S. Zone Office Map . . . . . .. 190
Authorized Manuals . . . . . . .. 191Warranty and Customer Relations
Warranty Coverages
Your new Honda is covered by these warranties:
New Car Limited Warranty — Covers your new car, except for the battery, emissions control systems and accessories, against defects in materials and workmanship.
Emission Control Systems Defects Warranty and Emissions Performance Warranty — These two warranties cover your car's emission control systems. Time, mileage, and coverage are conditional. Please read the warranty manual for exact information.
Original Equipment Battery Limited Warranty — This warranty gives up to 100 percent credit toward a replacement battery.
Seat Belt Limited Warranty — A seat belt that fails to function properly is covered for the useful life of the car.
Rust Perforation Limited Warranty — All exterior body panels are covered for rust-through from the inside for the specified time period with no mileage limit.
Accessory Limited Warranty — Genuine Honda Accessories are covered under this warranty. Time and mileage limits depend on the type of accessory and other factors. Please read your warranty manual for details.
Replacement Parts Limited Warranty — Covers all Genuine Honda replacement parts against defects in materials and workmanship.
Replacement Battery Limited Warranty — Provides prorated coverage for a replacement battery purchased from a Honda dealer.
Replacement Muffler Lifetime Limited Warranty — Provides coverage for as long as the purchaser of the muffler owns the car.
Restrictions and exclusions apply to all these warranties. Please read the 1996 Honda Warranty booklet that came with your car for precise information on warranty coverages. Your Honda's original tires are covered by their manufacturer. Tire warranty information is in a separate booklet.
Warranty and Customer Relations
Customer Relations Information, Reporting Safety Defects
Customer Relations Information Honda dealership personnel are trained professionals. They should be able to answer all your questions. If you encounter a problem that your dealership does not solve to your satisfaction, please discuss it with the dealership's management. The Service Manager or General Manager can help. Almost all problems are solved in this way.
If you are dissatisfied with the decision made by the dealership's management, contact your Honda Customer Relations Zone Office. Refer to the U.S. and Canada Zone Office maps on the following pages.
When you call or write, please give us this information:
(NHTSA) in addition to notifying American Honda Motor Co., Inc.
Vehicle Identification Number (see page 176) Name and address of the dealer who services your car Date of purchase Mileage on your car Your name, address, and telephone number A detailed description of the problem Name of the dealer who sold the car to you
Reporting Safety Defects If you believe that your vehicle has a defect that could cause a crash or could cause injury or death, you should immediately inform the National Highway Traffic Safety Administration
If NHTSA receives similar complaints, it may open an investigation, and if it finds that a safety defect exists in a group of vehicles, it may order a recall and remedy campaign. However, NHTSA cannot become involved in individual problems between you, your dealer, or American Honda Motor Co., Inc.
To contact NHTSA, you may either call the Auto Safety Hotline toll-free at (800) 424-9393, or (202) 366-0123 in the Washington, D.C. area, or write to this address: NHTSA, U.S. Department of Transportation, Washington, D.C. 20590. You can also obtain other information about motor vehicle safety from the Hotline.
Warranty and Customer Relations
U.S. Zone Office Map
Western Zone P.O. Box 2260
700 Van Ness Avenue Torrance, California 90501-2260
(310) 781-4565Northwestern Zone P.O. Box 20186
12439 N.E. Airport Way Portland, Oregon 97220
(503) 256- 0943
(also includes Alaska and Hawaii)South Central Zone 4529 Royal Lane
Irving, Texas 75063
(214) 929-5481Mid-Atlantic Zone 902 Wind River Ln., Suite 200
Gaithersburg, Maryland 20878
(301)990-2020Southeastern Zone 1500 Morrison Parkway
Alpharetta, Georgia 30201
(404) 442-2045North Central Zone 601 Campus Drive, Suite A-9
Arlington Heights, Illinois 60004
(708) 870-5600New England Zone 555 Old County Road
Windsor Locks, Connecticut 06096
(203)623-3310
See Zone 5 for: NYC Metro area and Fairfield County, CT areaCentral Zone 101 South Stanfield Road
Troy, Ohio 45373
(513) 332-6250Northeastern Zone P.O. Box 337
Eastgate Industrial Park 115 Gaither Drive Moorestown, New Jersey 08057
(609) 235-5533
Includes: NYC Metro area and Fairfield County, CT areaWest Central Zone 1600 South Abilene Street, Suite D
Aurora, Colorado 80012
(303) 696-3935Puerto Rico and U.S. V.I. Bella International
P.O. Box 190816
San Juan, PR 00919-0816
(809) 250-8070The above addresses and telephone numbers are subject to change. If you cannot reach your Zone office, ask your Honda dealer for the current information.
Warranty and Customer Relations
Seat-Back Position . . . . . .. 16
Storing Cargo Safely . . . .. 16
Additives, Engine Oil . . . .. 119
AdjustmentsHead Restraints . . . . . . . .. 49
Mirrors . . . . . . . . . . . . . . . .. 53
Seats . . . . . . . . . . . . . . . . . .. 48
Steering Wheel . . . . .. 35, 40
129Air Cleaner Element . . . . .. Air Conditioning
Maintenance . . . . . . . . .. 135
Usage . . . . . . . . . . . . . . . . .. 63Air Filter. See Air Cleaner
Element
Air Outlets (Vents) . . . . . . . .. 60
Air Pressure, Tires . . . . . .. 179
Airbag(SRS) . . . . . . . . . . . . .. 10
Alcohol and Drugs . . . . . . . .. 23
Alcohol in Gasoline . . . . . . .. 82Index
Alternator Belt. See
Engine Belts
Antenna Cleaning . . . . . . .. 150
Anti-Lock BrakesIndicator Light . . . . . . . . .. 31
Operation . . . . . . . . . . .. 102Anti-Theft Steering
Column Lock . . . . . . . . . . . .. 44
A n t i f r e e z e . . . . . . . . . . . . . .. 121
Appearance Care . . . . . . .. 149
Ashtrays . . . . . . . . . . . . . . . . .. 57
Audio System . . . . . . . . . . . .. 66
Automatic Transmission . . .. 97
Capacity, Fluid . . . . . . .. 178
Checking Fluid Level . .. 125
Shift Lever PositionIndicator . . . . . . . . . . . . .. 97
Shift Lever Positions . . . .. 98
Shift Lock Release . . . .. 100
Shifting. . . . . . . . . . . . . . . .... 98ABS (Anti-lock Brake
System) . . . . . . . . . .. 102, 185
Accessories . . . . . . . . . . . . . .. 91
Accessory,(Ignition Key Position) . . .. 44
Adding
Automatic Transmission
Fluid . . . . . . . . . . . . . . .. 125
Brake Fluid . . . . . . . . . .. 127
Clutch Fluid . . . . . . . . .. 128
Engine Coolant . . . . . . .. 121
Engine Oil . . . . . . . . . . .. 118
Manual TransmissionFluid . . . . . . . . . . . . . . .. 126
Power Steering Fluid . .. 129
Radiator Coolant . . . . .. 121
Windshield Washer Fluid 125
Additional Safety Information 16
Door Locks . . . . . . . . . . . .. 16
Driving With Pets . . . . . . .. 17
Head Restraint Position .. 16Index
Battery . . . . . . . . . . . . . . . .. 132
Charging System
Indicator . . . . . . . . . . . . .. 30
Jump Starting . . . . . . . .. 162
Maintenance . . . . . . . . .. 132
Specifications . . . . . . . .. 179
Before Driving . . . . . . . . . . . .. 81
Belts, Seat . . . . . . . . . . . . . . . .. 5
Beverage Holder . . . . . . . . . .. 55
Body Repair . . . . . . . . . . . .. 154
BrakesAnti-Lock
Brake System . . .. 102, 185
Break-in . . . . . . . . . . . . . . .. 82
Fluid . . . . . . . . . . . . . . . .. 127
Light, Burned-out . . . .. 142
P a r k i n g . . . . . . . . . . . . . . . .. 54
System Indicator . . . . . . .. 30
Wear Indicators . . . . . . .. 101Brakes, ABS
Operation . . . . . . .. 102, 185
System Indicator . . . . . . .. 31
Braking System . . . . . . . . .. 101
Break-in, New Car . . . . . . . . .. 82
Brightness Control,Instruments . . . . . . . . . . . . .. 37
Brights, Headlights . . . . . . .. 36
Bulb ReplacementBack-up Lights . . . . . . .. 144
Brake Lights . . . . . . . . .. 144
Front Parking Lights . .. 143
Front Side Marker Lights 143
Headlights . . . . . . . . . . .. 142
High-Mount Brake Light 145
Interior Courtesy Lights 146
License Plate Lights . .. 146
Parking Light Bulbs . . .. 143
Specifications . . . . . . . .. 179
Turn Signal Lights . . . .. 143
Bulbs, Halogen . . . . . . . . .. 142Cables, Jump Starting With 162
Capacities Chart . . . . . . . .. 178
Carbon Monoxide Hazard . .. 24
Cargo, Loading . . . . . . . . . . .. 88
Cassette PlayerCare . . . . . . . . . . . . . . . . . .. 74
CLEAN Indicator . . . . . . .. 74
Operation . . . . . . . . . . . . .. 72Catalytic Converter,
Three-Way . . . . . . . . . . . ..
184
ii CAUTION, Explanation of . .. CD Player . . . . . . . . . . . . . . . .. 75
Certification Label . . . . . .. 176
Chains, Tire . . . . . . . . . . . .. 141
Change OilHow to . . . . . . . . . . . . . .. When . . . . . . . . . . . . . . ..
119
112
Changing a Flat Tire . . . . .. 156Changing Engine Coolant . 122
Charging System Indicator .. 30
Charging System Light . .. 166
CheckingAutomatic Transmission
Fluid . . . . . . . . . . . . . . .. 125
Battery Condition . . . .. 132
Brake Fluid . . . . . . . . . .. 127
Clutch Fluid . . . . . . . . .. 127
Drive Belts . . . . . . . . . .. 136
Engine Coolant . . . . . . .. 121
Engine Oil . . . . . . . .. 86, 119
Fuses . . . . . . . . . . . . . . .. 169
Manual TransmissionFluid . . . . . . . . . . . . . . .. 126
Power Steering Fluid . .. 129
Radiator Coolant . . . . .. 121
Tire Pressure . . . . . . . .. 137
Windshield Wipers . . .. 134
Checklist, Before Driving . .. 94Child Safety . . . . . . . . . . . . . .. 17
Guidelines for Restraining
Infants/Children Important Safety
. . . . . .. 19
Reminders . . . . . . . . . . .. 18
Where Should
Children S i t . . . . . . . . . . .. 18
Child Seat, Securing . . . . . .. 21
Cigarette Lighter . . . . . . . . .. 56
CLEAN Indicator . . . . . . . . . .. 74
Cleaner, Air . . . . . . . . . . . .. 129
CleaningAluminum Wheels . . . .. 151
Antenna . . . . . . . . . . . . .. 150
C a r p e t i n g . . . . . . . . . . . .. 152
. . . . . . . . . . . . .. 150
Exterior I n t e r i o r . . . . . . . . . . . . . .. 152
. . . . . . . . . . .. 152
Seat Belts Vinyl . . . . . . . . . . . . . . . .. 152
Clock, Setting the . . . . . . . . .. 54
Clutch Fluid . . . . . . . . . . . .. 128Index
CO in the Exhaust..... 24, 183
Coin Box . . . . . . . . . . . . . . . . .. 56
Cold Weather, Starting in . .. 95
Compact Disc Player . . . . . .. 75
Console Compartment . . . .. 56
Consumer Information . .. 189
Control Locations . . . . . . . . .. 28
Controls Near the Steering Wheel . . . . . . . . . . . . . . . . . .. 35
Hazard Warning . . . . . . . .. 39
Headlights . . . . . . . . . . . . .. 36
Instrument PanelBrightness
. . . . . . . . . . .. 37
Rear Window Defogger . .. 39
Steering WheelAdjustment . . . . . . . . . . .. 40
Turn Signals . . . . . . . . . . .. 37
Windshield Washers . . . .. 38
Windshield Wipers . . . . .. 37
Controls, Instruments and .. 27Index
Coolant
Adding . . . . . . . . . . . . . .. 121
Capacity . . . . . . . . . . . .. 178
Checking . . . . . . . . . . . .. 121
Proper Solution . . . . . .. 121
Tempeature Gauge . . . . .. 34
Corrosion Protection . . . .. 153
Crankcase EmissionControl System . . . . . . . .. 183
Cruise Control Operation 40, 41
Cup Holder. See BeverageHolder
Customer Relations
Information . . . . . . . . . . .. 189
Customer Relations Office 190DANGER, Explanation of . . .. ii Dashboard . . . . . . . . . . . . . . .. 28
Dead Battery, What to Do . 162
Defects, Reporting Safety . 189
Defogger, Rear Window . . . .. 39
Defrosting the Windows . . .. 65
DEXRON II AutomaticTransmission Fluid . . . .. 126
Dimensions . . . . . . . . . . . .. 178
Dimming the Headlights . . .. 36
Dipstick, AutomaticTransmission . . . . . . . . .. 126
Directional Signals . . . . . . . .. 32
Disabled, Towing YourGlove Box . . . . . . . . . . . . .. 47
Locking and Unlocking . .. 45
Power Door Locks . . . . . .. 45
Tailgate . . . . . . . . . . . . . . .. 47
DOT Tire Quality Grading . 181
Downshifting, 5-Speed ManualTransmission . . . . . . . . . . .. 96
Drive, Belts . . . . . . . . . . . .. 136
DrivingFuel Economy . . . . . . . . . .. 87
In Foreign Countries . . . .. 83Car If . . . . . . . . . . . . . . . . .. 174
Disc Brake Wear Indicators 101
Disposal of Used O i l . . . . .. 121
Door and Brake LampMonitor . . . . . . . . . . . . . . . .. 31
Doors
Childproof Door Locks . .. 46
Economy, Fuel . . . . . . . . . . . .. 87
Emergencies on the Road . 155
Battery, Jump Starting . 162
Changing a Flat Tire . .. 156
Charging SystemIndicator . . . . . . . . . . .. 166
Checking the Fuses . . .. 169Malfunction Indicator
Lamp . . . . . . . . . . . . . . . .. 31
Manually Closing
Moonroof . . . . . . . . . .. 168
Oil Pressure Indicator . . .. 30
Overheated Engine . . .. 163
Emergency Brake . . . . . . . . .. 54
Emergency Flashers . . .. 32, 39
Emissions Control . . . . . .. 182
EngineCoolant Temperature
Gauge . . . . . . . . . . . . . . . .. 34
Drive Belts . . . . . . . . . .. 136
Identification Number . 177
Malfunction IndicatorLamp . . . . . . . . . . . . . . . .. 31
Oil
Capacity . . . . . . . . . .. 178
What Kind to Use . . .. 118
Oil Pressure Indicator . . .. 30
Overheating . . . . . . . . .. 163
Ethanol in Gasoline . . . . . . .. 83Evaporative Emissions
Control . . . . . . . . . . . . . . .. 183
Exhaust Fumes . . . . . . . . . . .. 24
Expectant Mothers, Use ofSeat Belts by . . . . . . . . . . . . .. 9
Exterior, Cleaning the . . .. 150Fabric, Cleaning . . . . . . . .. 152
Fan, Interior . . . . . . . . . . . . . .. 61
Features, Comfort andConvenience . . . . . . . . . . . .. 59
Filling the Fuel Tank . . . . . . .. 84
FiltersAir. See Air Cleaner Element Oil . . . . . . . . . . . . . . . . . ..
119
5-Speed Manual Transmission
Shifting . . . . . . . . . . . . . . .. 95
Checking Fluid Level . .. 126Index
Flashers, Hazard Warning . .. 32
Flat Tire, Changing a . . . .. 156
FluidsAutomatic
Transmission . . . . . . .. 125
Brake . . . . . . . . . . . . . . .. 127
Clutch . . . . . . . . . . . . . .. 128
5-Speed ManualTransmission . . . . . . .. 126
Power Steering . . . . . . .. 129
Windshield Washer . . .. 125
Folding Rear Seat . . . . . . . . .. 50
Foreign Countries, Driving in 83
Four-Way Flashers . . . . . . . .. 39
Front End, Towing byEmergency Wrecker . . .. 174
Fuel
Fill Door and Cap . . . . . . .. 84
Filling the Fuel Tank . . . .. 84
Gauge . . . . . . . . . . . . . . . . .. 34
Octane Requirement . . . .. 82Index
Oxygenated . . . . . . . . . . . .. 82
Tank, Capacity . . . . . . .. 178
169