- 2016 GMC Acadia Owners Manuals
- GMC Acadia Owners Manuals
- 2010 GMC Acadia Owners Manuals
- GMC Acadia Owners Manuals
- 2007 GMC Acadia Owners Manuals
- GMC Acadia Owners Manuals
- 2013 GMC Acadia Owners Manuals
- GMC Acadia Owners Manuals
- 2012 GMC Acadia Owners Manuals
- GMC Acadia Owners Manuals
- 2014 GMC Acadia Owners Manuals
- GMC Acadia Owners Manuals
- 2009 GMC Acadia Owners Manuals
- GMC Acadia Owners Manuals
- 2008 GMC Acadia Owners Manuals
- GMC Acadia Owners Manuals
- 2011 GMC Acadia Owners Manuals
- GMC Acadia Owners Manuals
- 2015 GMC Acadia Owners Manuals
- GMC Acadia Owners Manuals
- Download PDF Manual
-
desired button. Direct sunlight or very bright light could affect the ability of the RSE transmitter to receive signals from the remote control. If the remote control does not seem to be working, the batteries might need to be replaced. See “Battery Replacement” later in this section. Objects blocking the line of sight could also affect the function of the remote control.
7-40
Infotainment System
If a CD or DVD is in the Radio DVD slot, the remote control O button can be used to turn on the video screen display and start the disc. The radio can also turn on the video screen display. See Operation on page 7‑2 for more information. Notice: Storing the remote control in a hot area or in direct sunlight can damage it, and the repairs will not be covered by the warranty. Storage in extreme cold can weaken the batteries. Keep the remote control stored in a cool, dry place.
Remote Control Buttons O (Power): Press to turn the video screen on and off. P (Illumination): Press to turn the remote control backlight on. The backlight automatically times out after seven to ten seconds if no other button is pressed while the backlight is on.
v (Title): Press to return the DVD to the main menu of the DVD. This function could vary for each disc. y (Main Menu): Press to access the DVD menu. The DVD menu is different on every DVD. Use the navigation arrows to move the cursor around the DVD menu. After making a selection press the enter button. This button only operates when using a DVD. n , q, p, o (Menu Navigation Arrows): Use the arrow buttons to navigate through a menu. r (Enter): Press to select the choice that is highlighted in any menu. z (Display Menu): Press to adjust the brightness, screen display mode (normal, full, or zoom), and display the language menu. q (Return): Press to exit the current active menu and return to the previous menu. This button operates only when the display menu or a DVD menu is active.
c (Stop): Press to stop playing, rewinding, or fast forwarding a DVD. Press twice to return to the beginning of the DVD. s (Play/Pause): Press to start playing a DVD. Press while a DVD is playing to pause it. Press again to continue playing the DVD. When the DVD is playing, depending on the radio, play may be slowed down by pressing s then [ . The DVD continues playing in a slow play mode. Depending on the radio, perform reverse slow play by pressing s then r . To cancel slow play mode, press s again. t (Previous Track/Chapter): Press to return to the start of the current track or chapter. Press again to go to the previous track or chapter. This button might not work when the DVD is playing the copyright information or the previews.
Infotainment System 7-41
e (Audio): Press to change audio tracks on DVDs that have this feature when the DVD is playing. The format and content of this function vary for each disc. { (Subtitles): Press to turn ON/ OFF subtitles and to move through subtitle options when a DVD is playing. The format and content of this function vary for each disc. AUX (Auxiliary): Press to switch the system between the DVD player and an auxiliary source. d (Camera): Press to change camera angles on DVDs that have this feature when a DVD is playing. The format and content of this function vary for each disc.
1 through 0 (Numeric Keypad): The numeric keypad provides the capability of direct chapter or track number selection. \ (Clear): Press within three seconds after entering a numeric selection, to clear all numerical inputs. } 10 (Double Digit Entries): Press to select chapter or track numbers greater than nine. Press this button before entering the number. If the remote control becomes lost or damaged, a new universal remote control can be purchased. If this happens, make sure the universal remote control uses a Toshiba® code set.
u (Next Track/Chapter): Press to go to the beginning of the next chapter or track. This button might not work when the DVD is playing the copyright information or the previews. r (Fast Reverse): Press to quickly reverse the DVD or CD. To stop fast reversing a DVD video, press s . To stop fast reversing a DVD audio or CD, release r . This button might not work when the DVD is playing the copyright information or the previews. [ (Fast Forward): Press to fast forward the DVD or CD. To stop fast forwarding a DVD video, press s . To stop fast forwarding a DVD audio or CD, release [ . This button might not work when the DVD is playing the copyright information or the previews.
7-42
Infotainment System
Battery Replacement To change the remote control batteries: 1. Slide the rear cover back, on the
remote control.
2. Replace the two batteries in the
compartment. Make sure that they are installed correctly, using the diagram on the inside of the battery compartment.
3. Replace the battery cover. If the remote control is to be stored for a long period of time, remove the batteries and keep them in a cool, dry place.
Tips and Troubleshooting Chart
Problem
Recommended Action
No power.
The picture does not fill the screen. There are black borders on the top and bottom or on both sides or it looks stretched out. In auxiliary mode, the picture moves or scrolls. The remote control does not work.
The ignition might not be turned ON/RUN or in ACC/ACCESSORY. Check the display mode settings in the setup menu by pressing the display menu button on the remote control. Check the auxiliary input connections at both devices. Check to make sure there is no obstruction between the remote control and the transmitter window. Check the batteries to make sure they are not dead or installed incorrectly.
Tips and Troubleshooting Chart (cont'd) Problem
Recommended Action
After stopping the player, I push Play but sometimes the DVD starts where I left off and sometimes at the beginning.
The auxiliary source is running but there is no picture or sound.
Sometimes the wireless headphone audio cuts out or buzzes.
I lost the remote and/or the headphones. The DVD is playing, but there is no picture or sound.
If the stop button was pressed one time, the DVD player resumes playing where the DVD was stopped. If the stop button was pressed two times the DVD player begins to play from the beginning of the DVD. Check that the RSE video screen is in the auxiliary source mode. Check the auxiliary input connections at both devices. Check for obstructions, low batteries, reception range, and interference from cellular telephone towers or by using a cellular telephone in the vehicle. Check that the headphones are on correctly using the L (left) and R (right) on the headphones. See your dealer/retailer for assistance. Check that the RSE video screen is sourced to the DVD player.
Infotainment System 7-43
DVD Display Error Messages The DVD display error message depends on which radio the vehicle has. The video screen might display one of the following: Disc Load/Eject Error: This message displays when there are disc load or eject problems. Disc Format Error: This message displays if the disc is inserted with the disc label wrong side up, or if the disc is damaged. Disc Region Error: This message displays if the disc is not from a correct region. No Disc Inserted: This message displays if no disc is present when the Z EJECT button is pressed on the radio.
7-44
Infotainment System
DVD Distortion Video distortion can occur when operating cellular phones, scanners, CB radios, Global Position Systems (GPS)*, two-way radios, mobile fax, or walkie talkies. It might be necessary to turn off the DVD player when operating one of these devices in or near the vehicle. *Excludes the OnStar® System. Cleaning the RSE Overhead Console When cleaning the RSE overhead console surface, use only a clean cloth dampened with clean water. Cleaning the Video Screen Use only a clean cloth dampened with clean water. Use care when directly touching or cleaning the screen, as damage could result.
Rear Seat Audio (RSA) System For vehicles with Rear Seat Audio (RSA), rear seat passengers can listen to and control any of the music sources: radio, CDs, DVDs, or other auxiliary sources. The rear seat passengers can only control the music sources the front seat passengers are not listening to (except on some radios where dual control is allowed). For example, rear seat passengers can control a CD and listen to it through the headphones, while the driver listens to the radio through the front speakers. The rear seat passengers have control of the volume for each set of headphones. The RSA functions operate even when the main radio is off. The front audio system displays X when the RSA is on, and disappears from the display when it is off.
Audio can be heard through wired headphones (not included) plugged into the jacks on the RSA. If the vehicle has this feature, audio can also be heard on Channel 2 of the wireless headphones. The audio system mutes the rear speakers when the RSA audio is active through the headphones. To listen to an iPod or portable audio device through the RSA, attach the iPod or portable audio device to the front auxiliary input (if available), located on the front audio system. Turn the iPod on, then choose the front auxiliary input with the RSA SRCE button.
Infotainment System 7-45
While listening to a disc, press ¨ to go to the next track or chapter on the disc. Press © to go back to the start of the current track or chapter (if more than ten seconds have played). This function is inactive, with some radios, if the front seat passengers are listening to the disc. When a DVD video menu is being displayed, press © or ¨ to perform a cursor up or down on the menu. Hold © or ¨ to perform a cursor left or right on the menu. PROG (Program): Press to go to the next preset radio station or channel set on the main radio. This function is inactive, with some radios, if the front seat passengers are listening to the radio. When a CD or DVD audio disc is playing, press PROG to go to the beginning of the CD or DVD audio. This function is inactive, with some radios, if the front seat passengers are listening to the disc.
P (Power): Press to turn the RSA on or off. Volume: Turn to increase or to decrease the volume of the wired headphones. The left knob controls the left headphones and the right knob controls the right headphones. SRCE (Source): Press to select between the radio (AM/FM/XM™), CD, and if the vehicle has these features, DVD, front auxiliary, and rear auxiliary.
© ¨ (Seek): Press to go to the previous or to the next station and stay there. This function is inactive, with some radios, if the front seat passengers are listening to the radio. Press and hold © or ¨ until the display flashes to tune to an individual station. The display stops flashing after the buttons have not been pushed for more than two seconds. This function is inactive, with some radios, if the front seat passengers are listening to the radio.
7-46
Infotainment System
When a disc is playing in the CD or DVD changer, press PROG to select the next disc, if multiple discs are loaded. This function is inactive, with some radios, if the front seat passengers are listening to the disc. When a DVD video menu is being displayed, press PROG to perform the ENTER menu function.
Rear Audio Controller (RAC)
The vehicle may have the Rear Audio Controller (RAC). Certain radio functions can be controlled with RAC.
x w (Next/Previous): Press the down or up arrows to go to the next or to the previous radio station stored as a favorite. When a CD/DVD is playing, press the down or up arrows to go to the next or previous track or chapter. © SEEK ¨ : Press the SEEK arrows to go to the previous or to the next radio station while in AM, FM, or XM™, if equipped. Press the SEEK arrows to go to the previous or to the next track or chapter while sourced to a CD or DVD slot. SRCE (Source): Press this button to switch between the radio, CD, and if the vehicle has these features, DVD, front auxiliary, and rear auxiliary. > (Mute): Press this button to silence the system. Press this button again, or any other radio button, to turn the sound on. + / − x (Volume): Press the plus or minus volume buttons to increase or to decrease the volume.
Phone
Bluetooth Vehicles with a Bluetooth system can use a Bluetooth capable cell phone with a Hands Free Profile to make and receive phone calls. The system can be used while the key is in ON/RUN or ACC/ACCESSORY position. The range of the Bluetooth system can be up to 9.1 m (30 ft.). Not all phones support all functions, and not all phones are guaranteed to work with the in-vehicle Bluetooth system. See gm.com/bluetooth for more information on compatible phones. Voice Recognition The Bluetooth system uses voice recognition to interpret voice commands to dial phone numbers and name tags. Noise: Keep interior noise levels to a minimum. The system may not recognize voice commands if there is too much background noise.
When to Speak: A short tone sounds after the system responds indicating when it is waiting for a voice command. Wait until the tone and then speak. How to Speak: Speak clearly in a calm and natural voice. Audio System When using the in‐vehicle Bluetooth system, sound comes through the vehicle's front audio system speakers and overrides the audio system. Use the audio system volume knob, during a call, to change the volume level. The adjusted volume level remains in memory for later calls. To prevent missed calls, a minimum volume level is used if the volume is turned down too low.
Infotainment System 7-47
Pairing Information: . Up to five cell phones can be
paired to the in‐vehicle Bluetooth system. The pairing process is disabled when the vehicle is moving. The in‐vehicle Bluetooth system automatically links with the first available paired cell phone in the order the phone was paired.
. Only one paired cell phone can be connected to the in‐vehicle Bluetooth system at a time.
. Pairing should only need to be
completed once, unless changes to the pairing information have been made or the phone is deleted.
To link to a different paired phone, see Linking to a Different Phone later in this section.
Bluetooth Controls Use the buttons located on the steering wheel to operate the in‐vehicle Bluetooth system. See Steering Wheel Controls on page 5‑2 for more information. b g (Push To Talk) : Press to answer incoming calls, to confirm system information, and to start speech recognition. c x (Phone On Hook): Press to end a call, reject a call, or to cancel an operation. Pairing A Bluetooth enabled cell phone must be paired to the in‐vehicle Bluetooth system first and then connected to the vehicle before it can be used. See the cell phone manufacturers user guide for Bluetooth functions before pairing the cell phone. If a Bluetooth phone is not connected, calls will be made using OnStar® Hands‐Free Calling, if available. Refer to the OnStar owner's guide for more information.
7-48
Infotainment System
Pairing a Phone 1. Press and hold b g for
two seconds. The system responds with “Ready” followed by a tone.
2. Say “Bluetooth”. The system
responds with “Bluetooth ready” followed by a tone.
3. Say “Pair”. The system responds with instructions and a four digit PIN number. The PIN number will be used in Step 4.
4. Start the Pairing process on the cell phone that will be paired to the vehicle. Reference the cell phone manufacturers user guide for information on this process. Locate the device named “General Motors” in the list on the cellular phone and follow the instructions on the cell phone to enter the four digit PIN number that was provided in Step 3.
5. The system prompts for a name
for the phone. Use a name that best describes the phone.
This name will be used to indicate which phone is connected. The system then confirms the name provided.
6. The system responds with “
has been successfully paired” after the pairing process is complete. 7. Repeat Steps 1 through 7 for additional phones to be paired.
Listing All Paired and Connected Phones 1. Press and hold b g for
two seconds. The system responds with “Ready” followed by a tone.
2. Say “Bluetooth”. The system
responds with “Bluetooth ready” followed by a tone.
3. Say “List”. The system lists all the paired Bluetooth devices. If a phone is connected to the vehicle, the system will say “Is connected” after the connected phone.
Deleting a Paired Phone 1. Press and hold b g for
two seconds. The system responds with “Ready” followed by a tone.
2. Say “Bluetooth”. The system
responds with “Bluetooth ready” followed by a tone.
3. Say “Delete”. The system asks which phone to delete followed by a tone.
4. Say the name of the phone
to be deleted. If the phone name is unknown, use the “List” command for a list of all paired phones. The system responds with “Would you like to delete
? Yes or No” followed by a tone. 5. Say “Yes” to delete the phone.
The system responds with “OK, deleting
”. Linking to a Different Phone 1. Press and hold b g for
two seconds. The system responds with “Ready” followed by a tone.
2. Say “Bluetooth”. The system
responds with “Bluetooth ready” followed by a tone.
3. Say “Change phone”. The
system responds with “Please wait while I search for other phones”.
If another phone is found, the response will be “
is now connected”. If another phone is not found, the original phone remains connected. Infotainment System 7-49
3. Say the complete phone number
to be stored at once with no pauses.
If the system recognizes the number it responds with “OK, Storing” and repeats the phone number. If the system is unsure it recognizes the phone number, it responds with “Store” and repeats the number followed by “Please say yes or no”. If the number is correct, say “Yes”. If the number is not correct, say “No”. The system will ask for the number to be re‐entered.
4. After the system stores the
phone number, it responds with “Please say the name tag” followed by a tone.
Storing Name Tags The system can store up to thirty phone numbers as name tags that are shared between the Bluetooth and OnStar systems. The system uses the following commands to store and retrieve phone numbers: . Store . Digit Store . Directory
Using the Store Command The store command allows a phone number to be stored without entering the digits individually. 1. Press and hold b g for
two seconds. The system responds with “Ready” followed by a tone.
2. Say “Store”. The system
responds with “Store, number please” followed by a tone.
7-50
Infotainment System
5. Say a name tag for the phone
number. The name tag is recorded and the system responds with “About to store
. Does that sound OK?”. If the name tag does not sound correct, say “No” and repeat Step 5. If the name tag sounds correct, say “Yes” and the name tag is stored. After the number is stored the system returns to the main menu.
Using the Digit Store Command The digit store command allows a phone number to be stored by entering the digits individually. 1. Press and hold b g for
two seconds. The system responds with “Ready” followed by a tone.
2. Say “Digit Store”. The system responds with “Please say the first digit to store” followed by a tone.
3. Say the first digit to be stored.
The system will repeat back the digit it heard followed by a tone. Continue entering digits until the number to be stored is complete.
If an unwanted number is recognized by the system, say “Clear” at any time to clear the last number. To hear all of the numbers recognized by the system, say “Verify” at any time and the system will repeat them.
4. After the complete number has been entered, say “Store”. The system responds with “Please say the name tag” followed by a tone.
5. Say a name tag for the phone
number. The name tag is recorded and the system responds with “About to store
. Does that sound OK?”. If the name tag does not sound correct, say “No” and repeat Step 5. If the name tag sounds correct, say “Yes” and the name tag is stored. After the number is stored the system returns to the main menu.
Using the Directory Command The directory command lists all of the name tags stored by the system. To use the directory command: 1. Press and hold b g for
two seconds. The system responds with “Ready” followed by a tone.
2. Say “Directory”. The system
2. Say “Delete”. The system
responds with “Directory” and then plays back all of the stored name tags. When the list is complete, the system returns to the main menu.
Deleting Name Tags The system uses the following commands to delete name tags: . Delete . Delete all name tags
Using the Delete Command The delete command allows specific name tags to be deleted. To use the delete command: 1. Press and hold b g for
two seconds. The system responds with “Ready” followed by a tone.
responds with “Delete, please say the name tag” followed by a tone.
3. Say the name tag to be deleted.
The system responds with “Would you like to delete,
? Please say yes or no”. If the name tag is correct, say “Yes” to delete the name tag. The system responds with “OK, deleting
, returning to the main menu.” If the name tag is incorrect, say “No”. The system responds with “No. OK, let's try again, please say the name tag.” Infotainment System 7-51
Using the Delete All Name Tags Command The delete all name tags command deletes all stored phone book name tags and route name tags for OnStar (if present). To use the delete all name tags command: 1. Press and hold b g for
two seconds. The system responds with “Ready” followed by a tone.
2. Say “Delete all name tags”. The system responds with “You are about to delete all name tags stored in your phone directory and your route destination directory. Are you sure you want to do this? Please say yes or no.”
Say “Yes” to delete all name tags. Say “No” to cancel the function and return to the main menu.
7-52
Infotainment System
Making a Call Calls can be made using the following commands: . Dial . Digit Dial . Call . Re‐dial
Using the Dial Command 1. Press and hold b g for
two seconds. The system responds with “Ready” followed by a tone.
2. Say “Dial”. The system responds with “Dial using
”. “Number please” followed by a tone. 3. Say the entire number without
pausing.
If the system recognizes the number, it responds with “OK, Dialing” and dials the number.
If the system does not recognize the number, it confirms the numbers followed by a tone. If the number is correct, say “Yes”. The system responds with “OK, Dialing” and dials the number. If the number is not correct, say “No”. The system will ask for the number to be re‐entered.
Using the Digit Dial Command 1. Press and hold b g for
two seconds. The system responds with “Ready” followed by a tone.
2. Say “Digit Dial”. The system
responds with “Digit dial using
, please say the first digit to dial” followed by a tone. 3. Say the digit to be dialed one at a time. Following each digit, the system will repeat back the digit it heard followed by a tone.
4. Continue entering digits until the number to be dialed is complete. After the whole number has been entered, say “Dial”. The system responds with “OK, Dialing” and dials the number. If an unwanted number is recognized by the system, say “Clear” at any time to clear the last number. To hear all of the numbers recognized by the system, say “Verify” at any time and the system will repeat them.
Using the Call Command 1. Press and hold b g for
two seconds. The system responds with “Ready” followed by a tone.
2. Say “Call”. The system responds with “Call using
. Please say the name tag” followed by a tone. 3. Say the name tag of the person
to call.
If the system clearly recognizes the name tag it responds with “OK, calling,
” and dials the number. If the system is unsure it recognizes the right name tag, it confirms the name tag followed by a tone. If the name tag is correct, say “Yes”. The system responds with “OK, calling, ” and dials the number. If the name tag is not correct, say “No”. The system will ask for the name tag to be re‐entered. Once connected, the person called will be heard through the audio speakers. Infotainment System 7-53
Call Waiting Call waiting must be supported on the Bluetooth phone and enabled by the wireless service carrier to work. . Press b g to answer an
incoming call when another call is active. The original call is placed on hold.
. Press b g again to return to the
original call. To ignore the incoming call, continue with the original call with no action.
. Press c x to disconnect the
current call and switch to the call on hold.
Using the Re‐dial Command 1. Press and hold b g for
two seconds. The system responds with “Ready” followed by a tone.
2. After the tone, say “Re‐dial”. The
system responds with “Re‐dial using
” and dials the last number called from the connected Bluetooth phone. Once connected, the person called will be heard through the audio speakers. Receiving a Call When an incoming call is received, the audio system mutes and a ring tone is heard in the vehicle. . Press b g and begin speaking
to answer the call.
. Press c x to ignore a call.
7-54
Infotainment System
Three‐Way Calling Three‐Way Calling must be supported on the Bluetooth phone and enabled by the wireless service carrier to work. 1. While on a call press b g . The system responds with “Ready” followed by a tone.
2. Say “Three‐way call”.
The system responds with “Three‐way call, please say dial or call”.
3. Use the dial or call command to dial the number of the third party to be called.
4. Once the call is connected,
press b g to link all the callers together.
Ending a Call Press c x to end a call.
Muting a Call During a call, all sounds from inside the vehicle can be muted so that the person on the other end of the call cannot hear them.
To Mute a call 1. Press b g . The system
responds with “Ready” followed by a tone.
2. Say “Mute Call”. The system responds with “Call muted”.
To Cancel Mute 1. Press b g . The system
responds with “Ready” followed by a tone.
2. After the tone, say “Mute Call”.
The system responds with “Resuming call”.
Transferring a Call Audio can be transferred between the in‐vehicle Bluetooth system and the cell phone.
To Transfer Audio to the Cell Phone During a call with the audio in the vehicle: 1. Press b g . The system
responds with “Ready” followed by a tone.
2. Say “Transfer Call.” The system responds with “Transferring call” and the audio will switch from the vehicle to the cell phone.
To Transfer Audio to the In-Vehicle Bluetooth System The cellular phone must be paired and connected with the Bluetooth system before a call can be transferred. The connection process can take up to two minutes after the key is turned to the ON/RUN or ACC/ACCESSORY position. During a call with the audio on the cell phone, press b g for more than two seconds. The audio switches from the cell phone to the vehicle.
Infotainment System 7-55
3. Say the number to send. If the system clearly recognizes the number it responds with “OK, Sending Number” and the dial tones are sent and the call continues. If the system is not sure it recognized the number properly, it responds “Dial Number, Please say yes or no?” followed by a tone. If the number is correct, say “Yes”. The system responds with “OK, Sending Number” and the dial tones are sent and the call continues.
Dual Tone Multi-Frequency (DTMF) Tones The in‐vehicle Bluetooth system can send numbers and numbers stored as name tags during a call. This is used when calling a menu driven phone system. Account numbers can be programmed into the phonebook for retrieval during menu driven calls.
Sending a Number During a Call 1. Press b g . The system
responds with “Ready” followed by a tone.
2. Say “Dial”. The system responds
with “Say a number to send tones” followed by a tone.
Voice Pass-Thru Voice Pass‐Thru allows access to the voice recognition commands on the cell phone. See the cell phone manufacturers user guide to see if the cell phone supports this feature. This feature can be used to verbally access contacts stored in the cell phone. 1. Press and hold b g for
two seconds. The system responds with “Ready” followed by a tone.
2. Say “Bluetooth”. The system
responds with “Bluetooth ready” followed by a tone.
3. Say “Voice”. The system
responds with “OK, accessing
”. The cell phone's normal prompt messages will go through its cycle according to the phone's operating instructions.
7-56
Infotainment System
Sending a Stored Name Tag During a Call 1. Press b g . The system
responds with “Ready” followed by a tone.
2. Say “Send name tag.”
The system responds with “Say a name tag to send tones” followed by a tone.
3. Say the name tag to send.
If the system clearly recognizes the name tag it responds with “OK, Sending
” and the dial tones are sent and the call continues. If the system is not sure it recognized the name tag properly, it responds “Dial
, Please say yes or no?” followed by a tone. If the name tag is correct, say “Yes”. The system responds with “OK, Sending ” and the dial tones are sent and the call continues. Clearing the System Unless information is deleted out of the in‐vehicle Bluetooth system, it will be retained indefinitely. This includes all saved name tags in the phonebook and phone pairing information. For information on how to delete this information, see the above sections on Deleting a Paired Phone and Deleting Name Tags.
Other Information The Bluetooth® word mark and logos are owned by the Bluetooth® SIG, Inc. and any use of such marks by General Motors is under license. Other trademarks and trade names are those of their respective owners. See Radio Frequency Statement on page 13‑17 for FCC information.
Climate Controls
Climate Control Systems
Climate Control Systems
The heating, cooling, and ventilation in the vehicle can be controlled with this system.
Climate Controls
8-1
Climate Control Systems . . . . . . 8-1
Dual Automatic ClimateControl System . . . . . . . . . . . . . 8-4
Rear Climate Control
System (Rear Climate Control Only) . . . . . . . . . . . . . . . 8-10
Rear Climate Control
System (Rear Climate with Rear Seat Audio) . . . .
. 8-11
Air Vents
Air Vents . . . . . . . . . . . . . . . . . . . . . 8-12
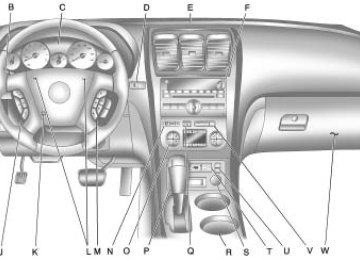
A. Fan Control B. Temperature Control C. Air Delivery Mode Control D. Air Conditioning E. REAR (Rear Climate Control) F. Recirculation G. Rear Window Defogger
9 (Off): Turn the fan control all the way counterclockwise to turn the front climate control system off. 9 (Fan Control): Turn clockwise or counterclockwise to increase or decrease the fan speed.
8-2
Climate Controls
Temperature Control: Turn clockwise or counterclockwise to increase or decrease the temperature of the air flowing from the system. Air Delivery Mode Control: Turn clockwise or counterclockwise to change the current airflow mode. By positioning the right knob between two modes, a combination of those two modes is selected. H (Vent): Air is directed to the instrument panel outlets. ) (Bi-Level): Air is divided between the instrument panel and floor outlets. Some air is directed towards the windshield and side window outlets. Cooler air is directed to the upper outlets and warmer air to the floor outlets. 6 (Floor): Air is directed to the floor outlets, with some of the air directed to the windshield, side window, and second row floor outlets. In this mode, the system
automatically selects outside air. Recirculation cannot be selected while in floor mode. - (Defog): This clears the windows of fog or moisture. Air is directed to the windshield, floor outlets, and side window vents. When this mode is selected, the system turns off recirculation and runs the air conditioning unless the outside temperature is less than 4°C (40°F). Recirculation cannot be selected while in the defog mode. Do not drive the vehicle until all the windows are clear. 0 (Defrost): This clears the windshield of fog or frost, more quickly. Air is directed to the windshield and side window vents, with some to the floor vents. In this mode, outside air is pulled inside the vehicle. Recirculation cannot be selected while in the defrost mode. The air conditioning system runs automatically in this setting, unless the outside temperature is less than 4°C (40°F). Do not drive the vehicle until all the windows are clear.
# (Air Conditioning): Press to turn the air conditioning system on or off. An indicator light comes on when A/C is on. The air conditioning system does not operate when the outside temperature is below 4°C (40°F). The indicator light flashes three times and turns off when outside conditions affect air conditioning operation. This is normal. For quicker cool down on hot days: 1. Open the windows to let hot air
escape.
2. Select H mode. 3. Select # . 4. Select the coolest temperature. 5. Select the highest fan speed. 6. Close the windows after the hot
air has escaped.
7. Once the vehicle's interior
temperature is below the outside temperature, select @ mode for faster cooling.
Using recirculation for long periods of time could cause the air inside of the vehicle to become too dry. To prevent this from happening, after the inside of the vehicle has cooled, turn the recirculation mode off. The air conditioning system removes moisture from the air, so water might drip under the vehicle while idling or after turning off the engine. This is normal. @ (Recirculation): Press to turn the recirculation mode on or off. An indicator light comes on when recirculation is on. When the engine is turned off, the recirculation mode automatically turns off and must be re‐selected when the engine is turned on again. This mode recirculates and helps to quickly cool the air inside the vehicle. It can be used to prevent outside air and odors from entering the vehicle.
The recirculation mode cannot be used with floor, defrost, or defogging modes. If recirculation is selected in these modes, the indicator flashes three times and turns off. The air conditioning also comes on when this mode is activated unless the outside air temperature is less than 4°C (40°F). While in recirculation mode the windows can fog when the weather is cold and damp. To clear the fog, select either the defog or defrost mode and increase the fan speed. REAR (Rear Climate Control): Press to turn the rear heating and air conditioning on or off. See Rear Climate Control System (Rear Climate Control Only) on page 8‑10
or Rear Climate Control System (Rear Climate with Rear Seat Audio) on page 8‑11 . Rear Window Defogger The rear window defogger uses a warming grid to remove fog from the rear window.Climate Controls
8-3
< (Rear Window Defogger): Press to turn the rear window defogger on or off. The rear window defogger stays on for about 10 minutes, before automatically turning off. The defogger will also turn off when the engine is turned off. Do not drive the vehicle until all the windows are clear. For vehicles with heated outside rearview mirrors, fog or frost is cleared from the surface of the mirror when < is pressed. Notice: Do not use anything sharp on the inside of the rear window. If you do, you could cut or damage the warming grid, and the repairs would not be covered by the vehicle warranty. Do not attach a temporary vehicle license, tape, a decal or anything similar to the defogger grid.
8-4
Climate Controls
Dual Automatic Climate Control System
The heating, cooling, and ventilation in the vehicle can be controlled with this system.
A. Fan Control B. AUTO C. Defrost D. Recirculation E. REAR (Rear Climate Control) F. Air Delivery Mode Control G. Driver Side Temperature Control H. Display
I. Power (On/Off) J. Rear Window Defogger K. Air Conditioning L. PASS (Passenger) M. Passenger Side Temperature
Control
Display Function Each time the temperature, mode, or fan control buttons are pressed, the climate control display shows that function along with the inside temperature setting. The outside temperature is displayed on the instrument panel cluster. O (On/Off): Press to turn the climate control system on or off. While the system is off, outside air still enters through the floor outlets, but the air delivery mode can be adjusted. The climate control system will also turn on if either the fan control, defrost, AUTO, or air conditioning buttons are pressed.
Automatic Operation AUTO (Automatic): The system automatically controls the inside temperature, the air delivery, and the fan speed. To use automatic mode: 1. Press the AUTO button.
When AUTO is selected, the current temperature(s) selected and AUTO is shown on the display. The current air delivery mode and fan speed also appear for approximately five seconds. When AUTO is selected, the air conditioning and air inlet are automatically controlled. The air conditioning runs when the outside temperature is over 4°C (40°F). The system is automatically set to outside air, unless it is hot outside and then the air inlet changes to recirculation mode to help
quickly cool the vehicle. The recirculation indicator light will come on.
2. Set the temperature for the
driver and passenger. To find a comfortable setting, start with a 22°C (73°F) temperature setting and allow about 20 minutes for the system to regulate. Use the driver's side or passenger side temperature buttons to adjust the temperature setting as necessary. The system will remain at the selected setting. Choosing the warmest or coolest temperatures does not cause the vehicle to heat or cool more quickly. To avoid blowing cold air in cold weather, the system delays turning on the fan until warm air is available. Press the fan control to override this delay and select the fan speed.
Climate Controls
8-5
Temperature Control The driver and passenger side temperature buttons are used to adjust the temperature of the air coming through the system. The temperature can be adjusted even if the system is turned off since outside air still enters the vehicle, unless the recirculation mode is selected. See “Recirculation” later in this section. Driver Side Temperature Control: Press the + or − buttons to increase or decrease the driver side temperature. The driver side temperature display will show the temperature setting. Passenger Side Temperature Control: Press the + or − buttons to increase or decrease the passenger side temperature. The passenger side display will show the temperature setting.
8-6
Climate Controls
PASS (Passenger): Press to set the passenger temperature to match the driver temperature setting. The PASS indicator will turn off. When the passenger temperature setting is different than the driver setting, the PASS indicator comes on. Manual Operation The air delivery mode or fan speed can be manually adjusted. D / C (Fan Control): Press to increase or decrease the fan speed.
Pressing D or C while in automatic control places the fan speed under manual control. The air delivery mode remains in automatic control. The fan setting still displays, but the word AUTO no longer displays, and the AUTO button indicator light turns off.
H / G (Air Delivery Mode Control): Press to change the direction of the airflow in the vehicle. Repeatedly press H or G until the desired mode appears on the display. Pressing a mode button while the system is off changes the air delivery mode without turning the system on. Press a mode button while in automatic control to place the system into manual control. The air delivery mode setting still displays, but the word AUTO no longer displays, and the AUTO button indicator light turns off. H (Vent): Air is directed to the instrument panel outlets. ) (Bi-Level): Air is divided between the instrument panel and floor outlets. Some air is directed towards the windshield and side window outlets. Cooler air is directed to the upper outlets and warmer air to the floor outlets.
6 (Floor): Air is directed to the floor outlets, with some of the air directed to the windshield, side window, and second row floor outlets. In this mode, the system uses outside air. - (Defog): This mode clears the windows of fog or moisture. Air is directed to the windshield, floor outlets, and side window vents. When this mode is selected, the system turns off recirculation and runs the air conditioning compressor unless the outside temperature is less than 4°C (40°F). Do not drive the vehicle until all the windows are clear.
0 (Defrost): Press to turn the defrost on or off. This mode quickly clears the windshield of fog or frost. Air is directed to the windshield, side window, and floor vents. In this mode, outside air is pulled inside the vehicle. The air conditioning system runs automatically in this setting, unless the outside temperature is less than 4°C (40°F). Do not drive the vehicle until all the windows are clear.
While in defrost mode, if the PASS button is pressed, the PASS button indicator flashes three times to show that the passenger climate control system cannot be activated. If the passenger temperature buttons are adjusted while in defrost mode, the driver temperature indicator will change. The passenger temperature will not be displayed. When returning to bi-level, vent, or floor mode, the previous temperature settings displays in place of any change made while in defrost mode.
Climate Controls
8-7
Air Conditioning # (Air Conditioning): Press to turn the air conditioning (A/C) on and off. An indicator light comes on when A/C is on. The A/C does not work when the outside temperature is below 4°C (40°F). If # is pressed the indicator flashes three times and turns off to show that the A/C mode is not available. If the A/C is on and the outside temperature drops below a temperature which is too cool for air conditioning to be effective, the A/C indicator turns off to show that the A/C mode has been canceled.
8-8
Climate Controls
On hot days, open the windows briefly to let hot inside air escape. This helps reduce the time it takes for the interior of the vehicle to cool down. The air conditioning system removes moisture from the air, so water might drip under the vehicle while idling or after turning off the engine. This is normal. @ (Recirculation): Press to turn the recirculation mode on or off. An indicator light comes on when recirculation is on. When the engine is turned off, the recirculation mode automatically turns off and must be re‐selected when the engine is turned on again. This mode recirculates and helps to quickly cool the air inside the vehicle. It can be used to prevent outside air and odors from entering the vehicle.
The recirculation mode cannot be used with floor, defog, or defrosting modes. If recirculation is selected in these modes, the indicator flashes three times and turns off. The air conditioning compressor also comes on when this mode is activated. While in recirculation mode the windows can fog when the weather is cold and damp. To clear the fog, select either the defog or defrost mode and increase the fan speed. REAR: Press to turn the rear heating and air conditioning on or off. See Rear Climate Control System (Rear Climate Control Only) on page 8‑10 or Rear Climate Control System (Rear Climate with Rear Seat Audio) on page 8‑11.
Rear Window Defogger The rear window defogger uses a warming grid to remove fog from the rear window. < (Rear Window Defogger): Press to turn the rear window defogger on or off. The rear window defogger stays on for about 10 minutes, before turning off. The defogger also turns off when the engine is turned off. Do not drive the vehicle until all the windows are clear. For vehicles with heated outside rearview mirrors, fog or frost is cleared from the surface of the mirror when the rear window defog button is pressed. Notice: Do not use a razor blade or sharp object to clear the inside rear window. Do not adhere anything to the defogger grid lines in the rear glass. These actions may damage the rear defogger. Repairs would not be covered by your warranty.
Sensors
The solar sensor, located in the defrost grille in the middle of the instrument panel, monitors the solar heat. Do not cover the solar sensor or the system will not work properly.
The interior temperature sensor located on the instrument panel to the right of the steering column, measures the temperature of the air inside the vehicle.
Climate Controls
8-9
There is also an exterior temperature sensor located behind the front grille. This sensor reads the outside air temperature and helps maintain the temperature inside the vehicle. Any cover on the front of the vehicle could cause a false reading in the displayed temperature. The climate control system uses the information from these sensors to maintain comfort settings by adjusting the temperature, fan speed, and the air delivery mode. The system may also supply cooler air to the side of the vehicle facing the sun. The recirculation mode will also be used as needed to maintain cool outlet temperatures.
8-10
Climate Controls
Rear Climate Control System (Rear Climate Control Only)
A. Fan Control B. Temperature Control C. Air Delivery Mode Control For vehicles with the rear climate control system, the controls are located on the rear of the center console. The system can also be controlled with the front controls.
Press the REAR button on the front climate control system to turn the rear climate control system on or off. An indicator comes on when the rear system is on. The system also turns on if any of the rear controls are adjusted. Mimic Mode: This mode matches the rear climate control to the front climate control settings. It comes on when REAR is pressed.
Independent Mode: This mode directs rear seating airflow according to the settings of the rear controls. It comes on when any rear control is adjusted. Fan Control: Turn clockwise or counterclockwise to increase or decrease the fan speed. Turn the knob to 9 to turn the fan off. Temperature Control: Turn clockwise or counterclockwise to increase or decrease the airflow temperature. Air Delivery Mode Control: Turn to the desired mode to change the airflow direction. H (Vent): Air is directed through the overhead outlets. ) (Bi-Level): Air is directed through the rear floor outlets, as well as the overhead outlets. 6 (Floor): Air is directed through the floor outlets. The rear system floor outlets are located under the third row seats.
Rear Climate Control System (Rear Climate with Rear Seat Audio)
A. Fan Control B. Air Delivery Mode Control C. Temperature Control For vehicles with the rear climate control system, the controls are located on the rear of the center console.
Press the REAR button on the front climate control system to turn the rear climate control system on or off. The system also turns on if any of the rear controls, except for the C are pressed. An indicator comes on when the rear system is on. The system can also be turned off, by pressing and holding the C button.
Climate Controls
8-11
Mimic Mode: This mode matches the rear climate control to the front climate control settings. It comes on when REAR is pressed. Independent Mode: This mode directs rear seating airflow according to the settings of the rear controls. It comes on when any rear control is adjusted. D C (Fan Control): Press the fan up or down buttons to increase or decrease the fan speed. Temperature Control: Press + or − to increase or decrease the air temperature. The temperature settings will display in 0‐12 increments, going from the coolest (0) to the warmest (12) setting.
8-12
Climate Controls
N (Air Delivery Mode Control): Press to manually change the direction of the airflow. Repeatedly press the button until the desired mode appears on the display. H (Vent): Air is directed through the overhead outlets. ) (Bi-Level): Air is directed through the rear floor outlets, as well as the overhead outlets. 6 (Floor): Air is directed through the floor outlets. The rear system floor outlets are located under the third row seats.
Air Vents Use the slider switch in the center of the outlet, to change the direction of the air flow. Use the thumbwheel near the outlet to control the amount of air flow or to shut off the airflow. Keep all outlets open whenever possible for best system performance.
Operation Tips . Clear away any ice, snow, or leaves from the air inlets at the base of the windshield that can block the flow of air into the vehicle.
. Use of non-GM approved hood deflectors can adversely affect the performance of the system.
. Keep the path under all seats
clear of objects to help circulate the air inside the vehicle more effectively. If fogging reoccurs while in vent or bi-level modes with mild temperature throughout the vehicle, turn on the air conditioner to reduce windshield fogging.
Driving and Operating
Shifting Into Park . . . . . . . . . . . . 9-21
Shifting Out of Park . . . . . . . . . . 9-22
Parking Over ThingsThat Burn . . . . . . . . . . . . . . . . . . 9-23
Object Detection Systems
Ultrasonic Parking Assist . . . . 9-35
Rear VisionCamera (RVC) . . . . . . . . . . . . . 9-36
Driving and Operating
9-1
Driving Information
Defensive Driving . . . . . . . . . . . . . 9-2
Drunk Driving . . . . . . . . . . . . . . . . . 9-2
Control of a Vehicle . . . . . . . . . . . 9-3
Braking . . . . . . . . . . . . . . . . . . . . . . . 9-3
Steering . . . . . . . . . . . . . . . . . . . . . . . 9-4
Off-Road Recovery . . . . . . . . . . . . 9-5
Loss of Control . . . . . . . . . . . . . . . . 9-6
Driving on Wet Roads . . . . . . . . . 9-7
Highway Hypnosis . . . . . . . . . . . . 9-8
Hill and Mountain Roads . . . . . . 9-8
Winter Driving . . . . . . . . . . . . . . . . . 9-9
If the Vehicle is Stuck . . . . . . . . 9-11
Vehicle Load Limits . . . . . . . . . . 9-12Starting and Operating
New Vehicle Break-In . . . . . . . . 9-17
Ignition Positions . . . . . . . . . . . . 9-18
Retained AccessoryPower (RAP) . . . . . . . . . . . . . . . 9-19
Starting the Engine . . . . . . . . . . 9-19
Engine Heater . . . . . . . . . . . . . . . 9-20Engine Exhaust
Engine Exhaust . . . . . . . . . . . . . . 9-23
Running the Vehicle WhileParked . . . . . . . . . . . . . . . . . . . . . 9-24
Automatic Transmission
Automatic Transmission . . . . . 9-24
Manual Mode . . . . . . . . . . . . . . . . 9-26
Tow/Haul Mode . . . . . . . . . . . . . . 9-27Drive Systems
All-Wheel Drive . . . . . . . . . . . . . . 9-28
Brakes
Antilock Brake
System (ABS) . . . . . . . . . . . . . . 9-28
Parking Brake . . . . . . . . . . . . . . . 9-29
Brake Assist . . . . . . . . . . . . . . . . . 9-30Ride Control Systems
StabiliTrak System . . . . . . . . . . . 9-30
Cruise Control
Cruise Control . . . . . . . . . . . . . . . 9-32
Fuel
Fuel . . . . . . . . . . . . . . . . . . . . . . . . . 9-42
Recommended Fuel . . . . . . . . . 9-43
Gasoline Specifications . . . . . . 9-43
California FuelRequirements . . . . . . . . . . . . . . 9-43
Fuels in Foreign Countries . . . 9-44
Fuel Additives . . . . . . . . . . . . . . . 9-44
Filling the Tank . . . . . . . . . . . . . . 9-45
Filling a Portable FuelContainer . . . . . . . . . . . . . . . . . . . 9-47
Towing
General Towing
Information . . . . . . . . . . . . . . . . . 9-47
Driving Characteristics and
Towing Tips . . . . . . . . . . . . . . . . 9-48
Trailer Towing . . . . . . . . . . . . . . . . 9-53
Towing Equipment . . . . . . . . . . . 9-57Conversions and Add-Ons
Add-On Electrical
Equipment . . . . . . . . . . . . . . . . . 9-59
9-2
Driving and Operating
Driving Information
Defensive Driving Defensive driving means “always expect the unexpected.” The first step in driving defensively is to wear your safety belt, see Safety Belts on page 3‑16 .
{ WARNING
Assume that other road users (pedestrians, bicyclists, and other drivers) are going to be careless and make mistakes. Anticipate what they might do and be ready. In addition:
. Allow enough following
distance between you and the driver in front of you.
. Focus on the task of driving.
(Continued)
WARNING (Continued)
Driver distraction can cause collisions resulting in injury or possible death. These simple defensive driving techniques could save your life.
Drunk Driving
{ WARNING Drinking and then driving is very dangerous. Your reflexes, perceptions, attentiveness, and judgment can be affected by even a small amount of alcohol. You can have a serious — or even fatal — collision if you drive after drinking. Do not drink and drive or ride with a driver who has been drinking. Ride home in a cab; or if you are with a group, designate a driver who will not drink.
Death and injury associated with drinking and driving is a global tragedy. Alcohol affects four things that anyone needs to drive a vehicle: judgment, muscular coordination, vision, and attentiveness. Police records show that almost 40 percent of all motor vehicle-related deaths involve alcohol. In most cases, these deaths are the result of someone who was drinking and driving. In recent years, more than 17,000 annual motor vehicle-related deaths have been associated with the use of alcohol, with about 250,000 people injured. For persons under 21, it is against the law in every U.S. state to drink alcohol. There are good medical, psychological, and developmental reasons for these laws. The obvious way to eliminate the leading highway safety problem is for people never to drink alcohol and then drive.
Medical research shows that alcohol in a person's system can make crash injuries worse, especially injuries to the brain, spinal cord, or heart. This means that when anyone who has been drinking — driver or passenger — is in a crash, that person's chance of being killed or permanently disabled is higher than if the person had not been drinking.
Control of a Vehicle The following three systems help to control the vehicle while driving — brakes, steering, and accelerator. At times, as when driving on snow or ice, it is easy to ask more of those control systems than the tires and road can provide. Meaning, you can lose control of the vehicle. See StabiliTrak System on page 9‑30 . Adding non‐dealer/non‐retailer accessories can affect vehicle performance. See Accessories and Modifications on page 10‑3.
Braking See Brake System Warning Light on page 5‑19 . Braking action involves perception time and reaction time. Deciding to push the brake pedal is perception time. Actually doing it is reaction time. Average reaction time is about three‐fourths of a second. But that is only an average. It might be less with one driver and as long as two or three seconds or more with another. Age, physical condition, alertness, coordination, and eyesight all play a part. So do alcohol, drugs, and frustration. But even in three‐fourths of a second, a vehicle moving at 100 km/h (60 mph) travels 20 m (66 ft). That could be a lot of distance in an emergency, so keeping enough space between the vehicle and others is important.
Driving and Operating
9-3
And, of course, actual stopping distances vary greatly with the surface of the road, whether it is pavement or gravel; the condition of the road, whether it is wet, dry, or icy; tire tread; the condition of the brakes; the weight of the vehicle; and the amount of brake force applied. Avoid needless heavy braking. Some people drive in spurts — heavy acceleration followed by heavy braking — rather than keeping pace with traffic. This is a mistake. The brakes might not have time to cool between hard stops. The brakes will wear out much faster with a lot of heavy braking. Keeping pace with the traffic and allowing realistic following distances eliminates a lot of unnecessary braking. That means better braking and longer brake life.
9-4
Driving and Operating
If the engine ever stops while the vehicle is being driven, brake normally but do not pump the brakes. If the brakes are pumped, the pedal could get harder to push down. If the engine stops, there will still be some power brake assist but it will be used when the brake is applied. Once the power assist is used up, it can take longer to stop and the brake pedal will be harder to push. Adding non‐dealer/non‐retailer accessories can affect vehicle performance. See Accessories and Modifications on page 10‑3.
Steering
Power Steering If power steering assist is lost because the engine stops or the power steering system is not functioning, the vehicle can be steered but it will take more effort. Variable Effort Steering The vehicle has a steering system that continuously adjusts the effort felt when steering at all vehicle speeds. It provides ease when parking, yet a firm, solid feel at highway speeds.
Steering Tips It is important to take curves at a reasonable speed. Traction in a curve depends on the condition of the tires and the road surface, the angle at which the curve is banked, and vehicle speed. While in a curve, speed is the one factor that can be controlled. If there is a need to reduce speed, do it before entering the curve, while the front wheels are straight. Try to adjust the speed so you can drive through the curve. Maintain a reasonable, steady speed. Wait to accelerate until out of the curve, and then accelerate gently into the straightaway.
Steering in Emergencies There are times when steering can be more effective than braking. For example, you come over a hill and find a truck stopped in your lane, or a car suddenly pulls out from nowhere, or a child darts out from between parked cars and stops right in front of you. These problems can be avoided by braking — if you can stop in time. But sometimes you cannot stop in time because there is no room. That is the time for evasive action — steering around the problem. The vehicle can perform very well in emergencies like these. First apply the brakes. See Braking on page 9‑3 . It is better to remove as much speed as possible from a collision. Then steer around the problem, to the left or right depending on the space available.
Driving and Operating
9-5
Off-Road Recovery The vehicle's right wheels can drop off the edge of a road onto the shoulder while driving.
An emergency like this requires close attention and a quick decision. If holding the steering wheel at the recommended 9 and 3 o'clock positions, it can be turned a full 180 degrees very quickly without removing either hand. But you have to act fast, steer quickly, and just as quickly straighten the wheel once you have avoided the object. The fact that such emergency situations are always possible is a good reason to practice defensive driving at all times and wear safety belts properly.
If the level of the shoulder is only slightly below the pavement, recovery should be fairly easy.
9-6
Driving and Operating
Ease off the accelerator and then, if there is nothing in the way, steer so that the vehicle straddles the edge of the pavement. Turn the steering wheel 8 to 13 cm (3 to 5 inches), about one-eighth turn, until the right front tire contacts the pavement edge. Then turn the steering wheel to go straight down the roadway.
Loss of Control Let us review what driving experts say about what happens when the three control systems — brakes, steering, and acceleration — do not have enough friction where the tires meet the road to do what the driver has asked. In any emergency, do not give up. Keep trying to steer and constantly