- 2016 GMC Acadia Owners Manuals
- GMC Acadia Owners Manuals
- 2010 GMC Acadia Owners Manuals
- GMC Acadia Owners Manuals
- 2007 GMC Acadia Owners Manuals
- GMC Acadia Owners Manuals
- 2013 GMC Acadia Owners Manuals
- GMC Acadia Owners Manuals
- 2012 GMC Acadia Owners Manuals
- GMC Acadia Owners Manuals
- 2014 GMC Acadia Owners Manuals
- GMC Acadia Owners Manuals
- 2009 GMC Acadia Owners Manuals
- GMC Acadia Owners Manuals
- 2008 GMC Acadia Owners Manuals
- GMC Acadia Owners Manuals
- 2011 GMC Acadia Owners Manuals
- GMC Acadia Owners Manuals
- 2015 GMC Acadia Owners Manuals
- GMC Acadia Owners Manuals
- Download PDF Manual
-
department headquarters the next day and you can get a copy of the report for a nominal fee. In some states/provinces with “no fault” insurance laws, a report may not be necessary. This is especially true if there are no injuries and both vehicles are driveable.
(cid:129) (cid:129) (cid:129) (cid:129) (cid:129) Choose a reputable collision repair facility for your vehicle. Whether you select a dealer/ retailer or a private collision repair facility to fix the damage, make sure you are comfortable with them. Remember, you will have to feel comfortable with their work for a long time.
(cid:129) Once you have an estimate, read
it carefully and make sure you understand what work will be performed on your vehicle. If you have a question, ask for an explanation. Reputable shops welcome this opportunity.
Customer Assistance Information
7-13
Managing the Vehicle Damage Repair Process In the event that your vehicle requires damage repairs, GM recommends that you take an active role in its repair. If you have a pre-determined repair facility of choice, take your vehicle there, or have it towed there. Specify to the facility that any required replacement collision parts be original equipment parts, either new Genuine GM parts or recycled original GM parts. Remember, recycled parts will not be covered by your GM vehicle warranty. Insurance pays the bill for the repair, but you must live with the repair. Depending on your policy limits, your insurance company may initially value the repair using aftermarket parts.
Discuss this with your repair professional, and insist on Genuine GM parts. Remember if your vehicle is leased you may be obligated to have the vehicle repaired with Genuine GM parts, even if your insurance coverage does not pay the full cost. If another party’s insurance company is paying for the repairs, you are not obligated to accept a repair valuation based on that insurance company’s collision policy repair limits, as you have no contractual limits with that company. In such cases, you can have control of the repair and parts choices as long as cost stays within reasonable limits.
7-14
Customer Assistance Information
Reporting Safety Defects Reporting Safety Defects to the United States Government If you believe that your vehicle has a defect which could cause a crash or could cause injury or death, you should immediately inform the National Highway Traffic Safety Administration (NHTSA) in addition to notifying General Motors. If NHTSAreceives similar complaints, it may open an investigation, and if it finds that a safety defect exists in a group of vehicles, it may order a recall and remedy campaign. However, NHTSA cannot become involved in individual problems between you, your dealer/retailer, or General Motors.
To contact NHTSA, you may call the Vehicle Safety Hotline toll-free at 1-888-327-4236
(TTY: 1-800-424-9153); go to safercar.gov; or write to: Administrator, NHTSA 1200 New Jersey Avenue, S.E. Washington D.C., 20590
You can also obtain other information about motor vehicle safety from safercar.gov. Reporting Safety Defects to the Canadian Government If you live in Canada, and you believe that your vehicle has a safety defect, notify Transport Canada immediately, in addition to notifying General Motors of Canada Limited. Call them at 1-800-333-0510 or write to: Transport Canada Road Safety Branch 2780 Sheffield Road Ottawa, Ontario K1B 3V9Reporting Safety Defects to General Motors In addition to notifying NHTSA (or Transport Canada) in a situation like this, please notify General Motors. Call 1-800-GMC-8782
(1-800-462-8782), or write: GMC Customer Assistance Center P.O. Box 33172
Detroit, MI 48232-5172
In Canada, call 1-800-263-3777
(English) or 1-800-263-7854
(French), or write: General Motors of Canada Limited Customer Communication Centre, CA1-163-005
1908 Colonel Sam Drive Oshawa, Ontario L1H 8P7Customer Assistance Information
7-15
Or you can write to: Helm, Incorporated P.O. Box 07130
Detroit, MI 48207
Prices are subject to change without notice and without incurring obligation. Allow ample time for delivery. Note to Canadian Customers: All listed prices are quoted in U.S. funds. Canadian residents are to make checks payable in U.S. funds.Service Publications Ordering Information Service Manuals Service Manuals have the diagnosis and repair information on engines, transmission, axle suspension, brakes, electrical, steering, body, etc.
Service Bulletins Service Bulletins give additional technical service information needed to knowledgeably service General Motors cars and trucks. Each bulletin contains instructions to assist in the diagnosis and service of your vehicle.
Owner Information Owner publications are written specifically for owners and intended to provide basic operational information about the vehicle. The owner manual includes the Maintenance Schedule for all models.
In-Portfolio: Includes a Portfolio, Owner Manual, and Warranty Booklet. RETAIL SELL PRICE: $35.00 (U.S.) plus processing fee Without Portfolio: Owner Manual only. RETAIL SELL PRICE: $25.00 (U.S.) plus processing fee Current and Past Model Order Forms Technical Service Bulletins and Manuals are available for current and past model GM vehicles. To request an order form, specify year and model name of the vehicle. ORDER TOLL FREE: 1-800-551-4123 Monday-Friday 8:00 AM - 6:00 PM Eastern Time For Credit Card Orders Only (VISA-MasterCard-Discover), visit Helm, Inc. on the World Wide Web at: helminc.com
7-16
Customer Assistance Information
Vehicle Data Recording and Privacy Your GM vehicle has a number of sophisticated computers that record information about the vehicle’s performance and how it is driven. For example, your vehicle uses computer modules to monitor and control engine and transmission performance, to monitor the conditions for airbag deployment and deploy airbags in a crash and, if so equipped, to provide antilock braking to help the driver control the vehicle. These modules may store data to help your dealer/retailer technician service your vehicle. Some modules may also store data about how you operate the vehicle, such as rate of fuel consumption or average speed. These modules may also retain the owner’s personal preferences, such as radio pre-sets, seat positions, and temperature settings.
Event Data Recorders This vehicle has an Event Data Recorder (EDR). The main purpose of an EDR is to record, in certain crash or near crash-like situations, such as an airbag deployment or hitting a road obstacle, data that will assist in understanding how a vehicle’s systems performed. The EDR is designed to record data related to vehicle dynamics and safety systems for a short period of time, typically 30 seconds or less. The EDR in this vehicle is designed to record such data as: (cid:129) How various systems in your
vehicle were operating
(cid:129) Whether or not the driver and passenger safety belts were buckled/fastened
(cid:129) How far, if at all, the driver was pressing the accelerator and/or brake pedal
(cid:129) How fast the vehicle was traveling
This data can help provide a better understanding of the circumstances in which crashes and injuries occur. Important: EDR data is recorded by your vehicle only if a non-trivial crash situation occurs; no data is recorded by the EDR under normal driving conditions and no personal data (e.g., name, gender, age, and crash location) is recorded. However, other parties, such as law enforcement, could combine the EDR data with the type of personally identifying data routinely acquired during a crash investigation. To read data recorded by an EDR, special equipment is required, and access to the vehicle or the EDR is needed. In addition to the vehicle manufacturer, other parties, such as law enforcement, that have the special equipment, can read the information if they have access to the vehicle or the EDR.
GM will not access this data or share it with others except: with the consent of the vehicle owner or, if the vehicle is leased, with the consent of the lessee; in response to an official request of police or similar government office; as part of GM’s defense of litigation through the discovery process; or, as required by law. Data that GM collects or receives may also be used for GM research needs or may be made available to others for research purposes, where a need is shown and the data is not tied to a specific vehicle or vehicle owner.
Customer Assistance Information
7-17
OnStar® If your vehicle has OnStar and you subscribe to the OnStar services, please refer to the OnStar Terms and Conditions for information on data collection and use. See also OnStar® System on page 2-41 in this manual for more information.
Navigation System If your vehicle has a navigation system, use of the system may result in the storage of destinations, addresses, telephone numbers, and other trip information. Refer to the navigation system operating manual for information on stored data and for deletion instructions.
Radio Frequency Identification (RFID) RFID technology is used in some vehicles for functions such as tire pressure monitoring and ignition system security, as well as in connection with conveniences such as key fobs for remote door locking/ unlocking and starting, and in-vehicle transmitters for garage door openers. RFID technology in GM vehicles does not use or record personal information or link with any other GM system containing personal information.
7-18
Customer Assistance Information
✍ NOTES
A
Accessories and
Modifications ...................... 5-3
Accessory Power ................. 2-21
Accessory Power Outlets ...... 3-20
Adding Equipment to YourAirbag-Equipped Vehicle .... 1-62
Additional Required Services,
Scheduled Maintenance ....... 6-6
...................... 5-6Additives, Fuel Add-On Electrical
Equipment ....................... 5-88
Air Cleaner/Filter, Engine ....... 5-17
Air Conditioning ................... 3-22
AirbagReadiness Light ................ 3-36
Airbag System ..................... 1-50Adding Equipment to
Your Airbag-Equipped Vehicle ........................ 1-62
How Does an Airbag
Restrain? ..................... 1-55
Passenger Sensing
System ........................ 1-57
Servicing Your
Airbag-Equipped Vehicle ........................ 1-61
Airbag System (cont.)
What Makes an Airbag
Inflate? ........................ 1-55
What Will You See After
an Airbag Inflates? ........ 1-56
When Should an Airbag
Inflate? ........................ 1-53
Where Are the Airbags? ..... 1-52Airbags
Passenger Status
Indicator ....................... 3-36
All-Wheel Drive .................... 5-35
All-Wheel-Drive (AWD)System ............................. 4-7
Antilock Brake System (ABS) ... 4-4
Warning Light ................... 3-39Appearance Care
Aluminum or Chrome-Plated
Wheels ........................ 5-85
Care of Safety Belts .......... 5-82
Chemical Paint Spotting ..... 5-86
Cleaning ExteriorLamps/Lenses ............... 5-83
Fabric/Carpet ................... 5-81
Finish Care ...................... 5-84
Finish Damage ................. 5-86
Instrument Panel, Vinyl,and Other Plastic Surfaces ...................... 5-82
INDEX
i-1
Appearance Care (cont.)
Interior Cleaning ............... 5-80
Leather ........................... 5-82
Sheet Metal Damage ........ 5-86
Tires ............................... 5-85
Underbody Maintenance .... 5-86
Washing Your Vehicle ........ 5-83
Weatherstrips ................... 5-83
Windshield, Backglass,and Wiper Blades .......... 5-84
Assistance Program,
Roadside .......................... 7-6
Audio System ...................... 3-76Audio Steering Wheel
Controls ..................... 3-128
Navigation/Radio System,
see Navigation Manual ....................... 3-105
Rear Audio
Controller (RAC) .......... 3-127
Setting the Clock .............. 3-76
Audio System(s) .................. 3-77
Audio SystemsRadio Reception ............. 3-128
Rear Seat (RSA) ............. 3-125
Theft-Deterrent Feature .... 3-127Automatic Transmission
Fluid ............................... 5-18
Operation ........................ 2-24i-2
INDEX
Battery ............................... 5-30
Electric Power
Management ................. 3-15
Run-Down Protection ......... 3-16
Belt Routing, Engine ............. 6-15
Bluetooth® ......................... 3-105
BrakeEmergencies ...................... 4-5
Brake Fluid ......................... 5-27
Brakes ............................... 5-27
Antilock ............................. 4-4
Parking ........................... 2-27
System Warning Light ....... 3-38
Braking ................................ 4-3
Braking in Emergencies .......... 4-5
Break-In, New Vehicle .......... 2-20
Bulb Replacement ................ 5-36
Fog Lamp ........................ 3-13
Halogen Bulbs .................. 5-35
Headlamp Aiming .............. 5-35
Headlamps ...................... 5-35
License Plate Lamps ......... 5-36
Buying New Tires ................. 5-52Calibration .......................... 3-56
CaliforniaPerchlorate Materials
Requirements ................. 5-4
California Fuel ....................... 5-6
California Proposition65 Warning ........................ 5-4
Camera, Rear Vision ............ 2-37
Canadian Owners ..................... ii Capacities andSpecifications ................... 5-94
Carbon Monoxide ................. 2-11
Engine Exhaust ................ 2-30
Liftgate ............................ 2-10
Winter Driving .................. 4-13Care of
Cargo
Safety Belts ..................... 5-82
Tie Downs ....................... 2-52
Cargo Cover ....................... 2-52
Cargo Management System ... 2-52
CD, MP3 .................... 3-94, 3-99Center Console Storage ........ 2-50
Chains, Tire ........................ 5-56
Charging System Light .......... 3-37
CheckEngine Lamp ................... 3-42
Checking Things Under
the Hood ......................... 5-10
Chemical Paint Spotting ........ 5-86
Child RestraintsInfants and Young
Children ....................... 1-32
Lower Anchors and Tethers
for Children .................. 1-38
Older Children .................. 1-30
Securing a Child Restraintin a Rear Seat Position .... 1-45
Securing a Child Restraint in the Right Front Seat Position ....................... 1-47
Systems .......................... 1-35
Where to Put theRestraint ...................... 1-36
Circuit Breakers ................... 5-88Cleaning
Aluminum or Chrome-Plated
Wheels ........................ 5-85
Exterior Lamps/Lenses ...... 5-83
Fabric/Carpet ................... 5-81
Finish Care ...................... 5-84
Instrument Panel, Vinyl,and Other Plastic Surfaces ...................... 5-82
Interior ............................ 5-80
Leather ........................... 5-82
Tires ............................... 5-85
Underbody Maintenance .... 5-86
Washing Your Vehicle ........ 5-83
Weatherstrips ................... 5-83
Windshield, Backglass,and Wiper Blades .......... 5-84
Climate Control System ......... 3-22
............. 3-30Outlet Adjustment Rear Air Conditioning and
Heating System ............. 3-31
Rear Air Conditioning
and Heating System, Electronic ..................... 3-32
Climate Control Systems
Dual Automatic ................. 3-25
Clock, Setting ...................... 3-76
Collision Damage Repair ....... 7-10
Compact Spare Tire ............. 5-79Compass ............................ 3-56
Compressor Kit,Tire Sealant ...................... 5-58
Content Theft-Deterrent ......... 2-16
Control of a Vehicle ............... 4-3
Convenience Net ................. 2-52
CoolantEngine ............................ 5-19
EngineTemperature Gage ......... 3-41
Engine Temperature
Warning Light
............... 3-40
Cooled Seats ........................ 1-6
Cooling System ................... 5-19
Courtesy Lamps ................... 3-13
Courtesy Transportation .......... 7-9
Cruise Control ....................... 3-9
Cruise Control Light .............. 3-45
Cupholders ......................... 2-49
Customer Assistance .............. 7-4
Offices .............................. 7-5
Text Telephone (TTY)Users ............................ 7-4
Customer Information Service Publications
Ordering Information ...... 7-15
Customer Satisfaction
Procedure ......................... 7-1
INDEX
i-3
Damage Repair, Collision ...... 7-10
Data RecordersEvent .............................. 7-16
Daytime Running Lamps/
Automatic Headlamp System ........................... 3-12
Defensive Driving ................... 4-2
Delayed Entry Lighting .......... 3-14
Delayed Exit Lighting ............ 3-15
Delayed Headlamps ............. 3-12
Delayed Locking .................... 2-8
DIC Compass ...................... 3-56
Disc, MP3 ................... 3-94, 3-99
DisplaysHead-Up ......................... 3-16
Doing Your Own
Service Work ..................... 5-4
Dome Lamp Override ........... 3-14
Dome Lamps ....................... 3-14
DoorDelayed Locking ................. 2-8
Locks ............................... 2-8
Power Door Locks .............. 2-8
Programmable AutomaticDoor Locks .................... 2-9
Rear Door Security Locks .... 2-9i-4
INDEX
Drive Systems
Driver
All-Wheel Drive ................ 5-35
Economy ........................... 4-1
Driving for Better Fuel
Engine
Seat Height Adjuster ........... 1-3
Control System ................. 3-25
Driver Information
DVD
Dual Automatic Climate
Driving
Center (DIC) .................... 3-47
DIC Operation andDisplays ............... 3-47, 3-53
DIC Vehicle
Customization ............... 3-67
DIC Warnings and
Messages .................... 3-58
At Night .......................... 4-11
Before a Long Trip ............ 4-12
Defensive .......................... 4-2
Drunk ............................... 4-2
Highway Hypnosis ............ 4-12
Hill and Mountain Roads .... 4-13
In Rain and onWet Roads ................... 4-11
Loss of Control ................ 4-10
Off-Road Recovery ............. 4-9
Rocking Your Vehicle toGet it Out
.................... 4-16
Winter ............................. 4-13Rear Seat Entertainment
System ...................... 3-116
EDR .................................. 7-16
Electrical EquipmentAdd-On Equipment ............ 5-88
Electrical System
Fuses and Circuit
Breakers ...................... 5-88
Instrument Panel Fuse
Block ........................... 5-88
Power Windows and Other
Power Options .............. 5-88
Underhood Fuse Block ...... 5-90
Windshield Wiper Fuses .... 5-88Electronic Immobilizer
PASS-Key® III+ ................ 2-17
Electronic Immobilizer
Operation PASS-Key® III+ ................ 2-18
Air Cleaner/Filter ............... 5-17
Check and Service EngineSoon Lamp .................. 3-42
Compartment Overview ...... 5-12
Coolant ........................... 5-19
Coolant Heater ................. 2-23
CoolantTemperature Gage ......... 3-41
Coolant Temperature
Warning Light
............... 3-40
Cooling System ................ 5-19
Drive Belt Routing ............. 6-15
Exhaust ........................... 2-30
Oil .................................. 5-13
Oil Life System ................. 5-15
Overheated ProtectionOperating Mode ............ 5-25
Overheating ..................... 5-24
Starting ........................... 2-22
Entry Lighting ...................... 3-14
Event Data Recorders .......... 7-16
Extender, Safety Belt ............ 1-29
Exterior Lamps .................... 3-11F
Filter
Engine Air Cleaner ............ 5-17
Finish Damage .................... 5-86
Flashers, Hazard Warning ....... 3-5
Flash-to-Pass ........................ 3-7
Flat Tire .............................. 5-57
Flat Tire, Changing ............... 5-66
Flat Tire, Storing .................. 5-76
Floor Mats .......................... 2-51
FluidAutomatic Transmission ..... 5-18
Power Steering ................. 5-26
Windshield Washer ........... 5-26Fog Lamp
Fog ................................ 3-13
Fog Lamp Light ................... 3-45
Fuel ..................................... 5-5
Additives ........................... 5-6
California Fuel ................... 5-6
Economy Driving ................ 4-1
Filling a Portable FuelContainer ..................... 5-10
Filling the Tank .................. 5-8
Fuels in Foreign Countries ... 5-7Fuel (cont.)
Gage .............................. 3-46
Gasoline Octane ................ 5-5
Gasoline Specifications ........ 5-5Fuses
Fuses and Circuit
Breakers ...................... 5-88
Instrument Panel
Fuse Block ................... 5-88
Underhood Fuse Block ...... 5-90
Windshield Wiper .............. 5-88Gage
Speedometer ................... 3-35
Tachometer ...................... 3-35
Voltmeter Gage ................ 3-38Gages
Engine Coolant
Temperature ................. 3-41
Fuel ................................ 3-46
Garage Door Opener ............ 2-45
GasolineOctane ............................. 5-5
Specifications ..................... 5-5
Glove Box ........................... 2-49
GM Mobility ReimbursementProgram ............................ 7-5
INDEX
i-5
Halogen Bulbs ..................... 5-35
Hazard Warning Flashers ........ 3-5
Head Restraints ..................... 1-2
HeadlampAiming ............................ 5-35
Headlamps
Bulb Replacement ............. 5-35
Daytime Running Lamps/Automatic Headlamp System ........................ 3-12
Delayed .......................... 3-12
Exterior Lamps ................. 3-11
Flash-to-Pass ..................... 3-7
High/Low Beam Changer ..... 3-7
Head-Up Display (HUD) ........ 3-16
Heated Seats ................. 1-5, 1-6
Heater ................................ 3-22
Engine Coolant ................. 2-23
.... 1-3Height Adjuster, Driver Seat High Voltage Devices and
Wiring ............................. 5-87
Highbeam On Light .............. 3-46
Highway Hypnosis ................ 4-12
Hill and Mountain Roads ....... 4-13i-6
INDEX
Hood
Checking Things Under ..... 5-10
Release .......................... 5-11
Horn .................................... 3-5
How to Wear Safety BeltsProperly .......................... 1-19
Ignition Positions .................. 2-20
Infants and Young Children,Restraints ........................ 1-32
Inflation - Tire Pressure ......... 5-43
Instrument PanelBrightness ....................... 3-13
Cluster ............................ 3-34
Overview ........................... 3-4
Storage Area .................... 2-49
Introduction ........................... 6-1Jump Starting ...................... 5-30
Keyless Entry, Remote
Operation .......................... 2-4
Keyless Entry System ............ 2-3
Keys .................................... 2-2Labeling, Tire Sidewall .......... 5-38
LampMalfunction Indicator ......... 3-42
Lamps
Courtesy ......................... 3-13
Dome ............................. 3-14
Dome Lamp Override ........ 3-14
License Plate ................... 5-36
Reading .......................... 3-15
................ 1-24Lap-Shoulder Belt LATCH System for Child
Restraints ........................ 1-38
Liftgate
Carbon Monoxide ............. 2-10
Liftgate, Power .................... 2-11
LightingDelayed Entry .................. 3-14
Delayed Exit .................... 3-15
Entry .............................. 3-14
Parade Dimming ............... 3-15Lights
Airbag Readiness ............. 3-36
Antilock Brake System(ABS) Warning .............. 3-39
Brake System Warning ...... 3-38
Charging System .............. 3-37Lights (cont.)
Cruise Control .................. 3-45
Engine CoolantTemperature Warning ..... 3-40
Exterior Lamps ................. 3-11
Flash-to-Pass ..................... 3-7
Fog Lamp ........................ 3-45
Highbeam On ................... 3-46
High/Low Beam Changer ..... 3-7
Oil Pressure ..................... 3-44
Passenger Airbag StatusIndicator ....................... 3-36
Safety Belt Reminders ....... 3-35
Security ........................... 3-45
StabiliTrak® Indicator ......... 3-40
Tire Pressure ................... 3-41
Tow/Haul Mode ................ 3-46
Loading Your Vehicle ............ 4-16
LocksDelayed Locking ................. 2-8
Door ................................. 2-8
Lockout Protection .............. 2-9
Power Door ....................... 2-8
Programmable AutomaticDoor Locks .................... 2-9
Rear Door Security Locks .... 2-9
Loss of Control .................... 4-10Lower Anchors and Tethers
for Children ...................... 1-38
Luggage Carrier ................... 2-51
LumbarManual Controls ................. 1-4
Power Controls .................. 1-5Maintenance
Footnotes .......................... 6-7
Maintenance Schedule Additional Required
Services ........................ 6-6
At Each Fuel Fill ................ 6-9
At Least Once a Month ....... 6-9
At Least Once a Year ....... 6-10
Maintenance Record ......... 6-16
Maintenance ReplacementParts ........................... 6-14
Maintenance Requirements ... 6-1
Owner Checks andServices ........................ 6-9
Recommended Fluids and
Lubricants .................... 6-12
Scheduled Maintenance ....... 6-3
Using ............................... 6-2
Your Vehicle and theEnvironment ................... 6-1
Malfunction Indicator Lamp .... 3-42
Manual Lumbar Controls ......... 1-4
Manual Seats ........................ 1-3
Memory Seat and Mirrors ....... 1-6
MessageDIC Warnings and
Messages .................... 3-58
Mirrors
Automatic Dimming
Rearview ...................... 2-31
Manual Rearview Mirror ..... 2-31
Outside Convex Mirror ....... 2-34
Outside Heated Mirrors ...... 2-34
Outside Power FoldawayMirrors ......................... 2-33
Outside Power Mirrors ....... 2-32
Park Tilt .......................... 2-34
MP3 ........................... 3-94, 3-99Navigation System, Privacy ... 7-17
Navigation/Radio System, see Navigation Manual.... 3-105
Net
Convenience .................... 2-52
New Vehicle Break-In ........... 2-20INDEX
i-7
Odometer ........................... 3-35
Off-RoadRecovery .......................... 4-9
Oil
Engine ............................ 5-13
Engine Oil Life System ...... 5-15
Pressure Light .................. 3-44
Older Children, Restraints ...... 1-30
Online Owner Center .............. 7-3
OnStar, Privacy .................... 7-17
OnStar® System, seeOnStar® Manual ............... 2-41
Operation, Universal Home
Remote System ................ 2-45
Outlet Adjustment ................. 3-30
OutletsAccessory Power .............. 3-20
Outside
Convex Mirror .................. 2-34
Heated Mirrors ................. 2-34
Power Foldaway Mirrors .... 2-33
Power Mirrors .................. 2-32Overheated Engine Protection
Operating Mode ................ 5-25
Owner Checks and Services ... 6-9
Owners, Canadian .................... iii-8
INDEX
Paint, Damage ..................... 5-86
Parade Dimming .................. 3-15
ParkShifting Into ..................... 2-28
Shifting Out of .................. 2-29
Park Aid ............................. 2-34
Park Tilt Mirrors ................... 2-34
Parking Assist ............................. 2-34
Over Things That Burn ...... 2-29
Parking Brake ...................... 2-27
Passenger Airbag StatusIndicator .......................... 3-36
Passenger Sensing System ... 1-57
Passing ................................ 4-9
PASS-Key® III+ ElectronicImmobilizer ...................... 2-17
PASS-Key® III+ Electronic
Immobilizer Operation ........ 2-18
Perchlorate Materials
Requirements, California ...... 5-4
Phone
Bluetooth® ..................... 3-105
Power
Door Locks ........................ 2-8
Electrical System .............. 5-88
Liftgate ............................ 2-11
Lumbar Controls ................. 1-5
Outlet 115 Volt AlternatingCurrent ........................ 3-21
Retained
Accessory (RAP) ........... 2-21
Seat ................................. 1-4
Steering Fluid ................... 5-26
Windows ......................... 2-14Pregnancy, Using
Safety Belts ..................... 1-29
Privacy ............................... 7-16
Navigation System ............ 7-17
OnStar ............................ 7-17
Radio FrequencyIdentification (RFID) ....... 7-17
Programmable Automatic
Door Locks ........................ 2-9
Proposition 65 Warning,
California .......................... 5-4
Radio Frequency Identification
(RFID), Privacy ................. 7-17
Radio(s) ............................. 3-77
RadiosNavigation/Radio System,
see Navigation Manual ....................... 3-105
Rear Audio
Controller (RAC) .......... 3-127
Reception ...................... 3-128
Setting the Clock .............. 3-76
Theft-Deterrent ............... 3-127
Reading Lamps ................... 3-15
Rear Air Conditioning andHeating System ................ 3-31
Rear Air Conditioning and
Heating System and Electronic Climate Controls .......................... 3-32
Rear Audio
Controller (RAC) ............. 3-127
Rear Door Security Locks ....... 2-9Rear Seat Armrest ............... 2-52
Rear Seat Audio (RSA)System .......................... 3-125
Rear Seat Entertainment
System .......................... 3-116
Rear Seat Operation ............ 1-10
Rear Vision Camera (RVC) .... 2-37
Rear Window Washer/Wiper .... 3-9
Rearview Mirror, AutomaticDimming .......................... 2-31
Rearview Mirrors .................. 2-31
Reclining Seatbacks ............... 1-8
Recommended Fluids andLubricants ........................ 6-12
Recreational Vehicle Towing ... 4-21
Reimbursement Program,GM Mobility ....................... 7-5
Remote Keyless Entry (RKE)
System ............................. 2-3
Remote Keyless Entry (RKE)
System, Operation .............. 2-4
............. 2-6Remote Vehicle Start Removing the Flat Tire and
Installing the Spare Tire ..... 5-70
Removing the Spare
Replacement Bulbs .............. 5-36
Replacement Parts,Maintenance .................... 6-14
Reporting Safety Defects
Canadian Government ....... 7-14
General Motors ................ 7-14Reporting Safety Defects
to the Canadian Government ..................... 7-14
Reporting Safety Defects
to the United States Government ..................... 7-14
Restraint System Check Checking the Restraint
Systems ....................... 1-63
Replacing Restraint System
Parts After a Crash ........ 1-64
Retained Accessory
Power (RAP) .................... 2-21
Roadside Assistance
Program ............................ 7-6
Rocking Your Vehicle to
Get it Out ........................ 4-16
Roof
Sunroof ........................... 2-54
Parked ............................ 2-30
Tire and Tools .................. 5-67
Running the Vehicle While
INDEX
i-9
Safety Belt Reminders .......... 3-35
Safety BeltsCare of ........................... 5-82
Extender ......................... 1-29
How to Wear Safety BeltsProperly ....................... 1-19
Lap-Shoulder Belt ............. 1-24
Safety Belts Are forEveryone ..................... 1-15
Use During Pregnancy ...... 1-29Safety Defects Reporting to
General Motors ............. 7-14
Reporting to the United
States Government ........ 7-14
Safety Warnings and Symbols .... iii Scheduled Maintenance .......... 6-3Additional Required
Services ........................ 6-6
Scheduling Appointments ........ 7-8
Sealant Kit, Tire ................... 5-58i-10
INDEX
Seats
Driver Seat Height
Adjuster ......................... 1-3
Head Restraints ................. 1-2
Heated and Cooled Seats .... 1-6
Heated Seats ..................... 1-5
Manual Lumbar .................. 1-4
Memory, Mirrors ................. 1-6
Power Lumbar ................... 1-5
Power Seats ...................... 1-4
Rear Seat Operation ......... 1-10
Reclining Seatbacks ............ 1-8
Third Row Seat ................ 1-12Second Row Center
Console .......................... 2-50
Secondary Latch System ....... 5-74
Securing a Child RestraintRear Seat Position ............ 1-45
Right Front Seat Position ... 1-47
Security Light ...................... 3-45
Service ................................ 5-3Accessories and
Service (cont.)
Engine Soon Lamp ........... 3-42
Publications OrderingInformation ................... 7-15
Scheduling Appointments ..... 7-8Start Vehicle, Remote ............. 2-6
Starting the Engine .............. 2-22
Steering ............................... 4-8
Steering Wheel Controls,Audio ............................ 3-128
Service Parts Identification
Steering Wheel,
Label .............................. 5-87
Tilt and Telescopic .............. 3-6
Servicing Your
Airbag-Equipped Vehicle .... 1-61
Setting the Clock ................. 3-76
Sheet Metal Damage ............ 5-86
ShiftingOut of Park ..................... 2-29
Shifting Into Park ................. 2-28
Signals, Turn andLane-Change ..................... 3-6
Spare Tire Compact ......................... 5-79
Installing .......................... 5-70
Removing ........................ 5-67
Storing ............................ 5-76Specifications and
Storage Areas
Cargo Management
System ........................ 2-52
Center Console ................ 2-50
Convenience Net .............. 2-52
Cupholders ...................... 2-49
Glove Box ....................... 2-49
Instrument Panel .............. 2-49
Luggage Carrier ............... 2-51
Rear Seat Armrest ............ 2-52
Second Row CenterConsole ....................... 2-50
Storing the Tire Sealant and
Compressor Kit
................ 5-66
Stuck in Sand, Mud, Ice,
or Snow .......................... 4-15
Sun Visors .......................... 2-16
Sunroof .............................. 2-54Modifications .................. 5-3
Adding Equipment to the
Outside of the Vehicle ..... 5-5
Doing Your Own Work ........ 5-4Capacities ....................... 5-94
Speedometer ....................... 3-35
StabiliTrak® Indicator Light ..... 3-40
StabiliTrak® System ............... 4-5T
Tachometer ......................... 3-35
Telescopic Wheel ................... 3-6
Text Telephone (TTY) Users .... 7-4
Theft-Deterrent Feature ....... 3-127
Theft-Deterrent Systems ........ 2-16
..... 2-16Content Theft-Deterrent PASS-Key® III+ Electronic
Immobilizer ................... 2-17
PASS-Key® III+ Electronic
Immobilizer Operation .... 2-18
Third-Row Seats .................. 1-12
Tilt Wheel ............................. 3-6
Time, Setting ....................... 3-76
TirePressure Light .................. 3-41
Tire Sealant and Compressor Kit
................ 5-66
Tires .................................. 5-37Aluminum or
Chrome-Plated Wheels, Cleaning ...................... 5-85
Buying New Tires ............. 5-52
Chains ............................ 5-56
Changing a Flat Tire ......... 5-66
Cleaning .......................... 5-85
Compact Spare ................ 5-79Tires (cont.)
Different Size ................... 5-53
If a Tire Goes Flat ............ 5-57
Inflation - Tire Pressure ..... 5-43
Inspection and Rotation ..... 5-50
Installing the Spare Tire ..... 5-70
Pressure MonitorOperation ..................... 5-46
Pressure Monitor System .... 5-44
Removing the Flat Tire ...... 5-70
Removing the SpareTire and Tools ............... 5-67
Sealant and
Compressor Kit ............. 5-58
Secondary Latch System ... 5-74
Sidewall Labeling .............. 5-38
Storing a Flat or SpareTire and Tools ............... 5-76
Terminology and
Definitions .................... 5-40
Uniform Tire Quality
Grading ....................... 5-54
Wheel Alignment and
Tire Balance ................. 5-55
Wheel Replacement .......... 5-55
When It Is Time forNew Tires .................... 5-51
INDEX
i-11
Tow/Haul Mode .................... 2-26
Tow/Haul Mode Light ............ 3-46
TowingRecreational Vehicle .......... 4-21
Towing a Trailer ................ 4-24
Your Vehicle ..................... 4-20Traction
Transmission
StabiliTrak® System ............ 4-5
Fluid, Automatic ................ 5-18
Transmission Operation,
Automatic ........................ 2-24
Transportation, Courtesy ......... 7-9
Turn and Lane-ChangeSignals ............................. 3-6
Turn Signal/Multifunction
Lever ................................ 3-6
Ultrasonic Rear Parking
Assist (URPA) .................. 2-34
Uniform Tire Quality
Grading ........................... 5-54
Universal Home Remote
System ........................... 2-45
Operation ........................ 2-45i-12
INDEX
Vehicle
Control ............................. 4-3
Loading ........................... 4-16
Running While Parked ....... 2-30
Symbols .............................. iii Vehicle Customization, DIC .... 3-67
Vehicle Data Recording andPrivacy ............................ 7-16
Vehicle Data Recording,
Radio Frequency (RFID) .... 7-17
Vehicle Identification
Number (VIN) ................... 5-87
Service Parts IdentificationLabel ........................... 5-87
Vehicle, Remote Start ............. 2-6
Ventilation Adjustment ........... 3-30
Visors ................................. 2-16
Voltage Devices, and Wiring ... 5-87
Voltmeter Gage .................... 3-38Warning Lights, Gages, and
Indicators ........................ 3-33
Warnings
DIC Warnings and
Messages .................... 3-58
Hazard Warning Flashers .... 3-5
Safety and Symbols .............. iiiWheels
Alignment and
Tire Balance ................. 5-55
Different Size ................... 5-53
Replacement .................... 5-55When It Is Time for
New Tires ........................ 5-51
Where to Put the Child Restraint
................. 1-36
Windows ............................. 2-14
Power ............................. 2-14Windshield
Backglass, and Wiper
Blades, Cleaning ........... 5-84
Washer ............................. 3-8
Washer Fluid .................... 5-26
Wiper BladeReplacement
................ 5-36
Wiper Fuses .................... 5-88
Wipers .............................. 3-7
Winter Driving ...................... 4-13
WipersRear Washer ..................... 3-9
Wiring, High Voltage
Devices ........................... 5-87
XM Radio Messages ........... 3-104
Your Vehicle and the
Environment ...................... 6-1
2009 Acadia, Enclave, Equinox, Lucerne, OUTLOOK, Torrent,
Traverse, VUE/VUE Two-Mode Hybrid Navigation M
Overview
Overview ........................................................ 1-1
.................................................. 1-2
Features and Controls ..................................... 2-1
................................ 2-2Features and Controls
Navigation Audio System ................................ 3-1
Navigation Audio System ............................ 3-2
Voice Recognition ........................................... 4-1
...................................... 4-2
Index ................................................................ 1Voice Recognition
GENERAL MOTORS, GM, the GM Emblem, CHEVROLET, the CHEVROLET Emblem, BUICK, the BUICK Emblem, GMC and the GMC Truck Emblem, PONTIAC, the PONTIAC Emblem, and the names EQUINOX, LUCERNE and TORRENT are registered trademarks; the names ENCLAVE, TRAVERSE, and ACADIA are trademarks of General Motors Corporation.
Litho in U.S.A. Part No. 15910137 B Second Printing
©2008 General Motors Corporation. All Rights Reserved.
ii
SATURN, the SATURN Emblem and the name VUE and VUE Two-Mode Hybrid are registered trademarks; the name OUTLOOK is a trademark of Saturn Corporation.
DTS and DTS Digital Surround are registered trademarks of Digital Theater Systems, Inc.
Dolby® is manufactured under license from Dolby® Laboratories. Dolby® and the double-D symbol are trademarks of Dolby® Laboratories. The information in this manual supplements the owner manual. This manual includes the latest information available at the time it was printed. We reserve the right to make changes in the product after that time without notice. For vehicles first sold in Canada, substitute
the name General Motors of Canada Limited for Buick Motor Division, Chevrolet Motor Division, GMC, or Pontiac Division whenever it appears in this manual. Keep this manual with the owner manual in the vehicle, so it will be there if it is needed. If the vehicle is sold, leave this manual in the vehicle. Canadian Owners A French language copy of this manual can be obtained from your dealer/retailer or from:
Helm, Incorporated P.O. Box 07130
Detroit, MI 48207
1-800-551-4123
www.helminc.comPropriétaires Canadiens On peut obtenir un exemplaire de ce guide en français auprès de concessionnaire ou à l’adresse suivante:
Helm, Incorporated P.O. Box 07130
Detroit, MI 48207
1-800-551-4123
www.helminc.comiii
✍ NOTES
iv
Section 1
Overview
Overview .........................................................1-2
Navigation System Overview ............................1-2Getting Started ...............................................1-4
Cleaning the Video Screen .............................1-121-1
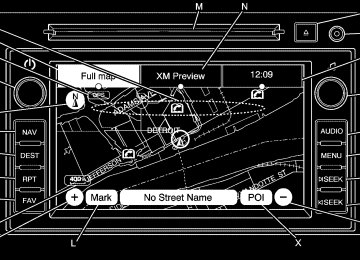
Overview Navigation System Overview
Screen shown with Map Disc Inserted
1-2
A. Map DVD Slot. See “Installing the Map DVD” under
Maps on page 2-4 for more information.
B. FULL MAP Touch Screen Button. See “NAV” under
“Hard Keys” under Using the Navigation System on page 2-2 for more information.
C. No GPS Symbol. See Symbols on page 2-7 for more
information.
D. O (Power/Volume) Knob. See Navigation Audio
System on page 3-2 for more information.
E. North Up/Heading Up Symbol. See Symbols on
page 2-7 for more information.
F. NAV (Navigation) Key. See “Hard Keys” under Using
the Navigation System on page 2-2 for more information.
G. DEST (Destination) Key. See Destination on
page 2-13 for more information.
K. 0 (Zoom In) Touch Screen Button. See “Map
Scales” under Maps on page 2-4 for more information.
L. Mark Touch Screen Button. See “Adding
Destinations to the Address Book” under Destination on page 2-13 for more information.
M. CD/DVD Slot. See CD Player on page 3-10 or DVD
Player on page 3-16 for more information.
N. Source (AM, FM, XM, CD, etc.) Touch Screen
Button. See Navigation Audio System on page 3-2
for more information.O. Z (CD/DVD Eject) Key. See “Hard Keys” under
Using the Navigation System on page 2-2 for more information.
P. Auxiliary Jack. See Auxiliary Devices on page 3-22
for more information.
H. RPT (Repeat) Key. See “Hard Keys” under Using
the Navigation System on page 2-2 for more information.
Q. Clock Touch Screen Button. See “Setting the Clock”
under Configure Menu on page 2-27 for more information.
I. FAV (Favorite) Key. See “Storing Radio Station
Presets” under Navigation Audio System on page 3-2
for more information.J. Map Scale. See “Map Scales” under Maps on
page 2-4 for more information.
R. f (Tune/Sound) Knob. See Navigation Audio
System on page 3-2 for more information.
S. AUDIO Key. See Navigation Audio System on
page 3-2 for more information.
T. MENU Key. See Configure Menu on page 2-27 for
more information.
1-3
U. ¨ SEEK Key (Next). See Navigation Audio System
on page 3-2 for more information.
V. © SEEK Key (Previous). See Navigation Audio
System on page 3-2 for more information.
W. 1 (Zoom Out) Touch Screen Button. See “Map
Scales” under Maps on page 2-4 for more information.
X. POI (Point of Interest) Touch Screen Button. See
“Displaying Points of Interest (POI) on the Map Screen” under Symbols on page 2-7 for more information.
Getting Started Read this manual thoroughly to become familiar with how the navigation system operates. The navigation system includes navigation and audio functions. While entering the vehicle or when turning the vehicle off, some DVD Map Disc noise is normal. Keeping your eyes on the road and your mind on the drive is important for safe driving. The navigation system has built-in features intended to help keep your eyes on the road and mind on the drive. Some features may be disabled while driving. Note that these functions will be grayed-out. A grayed-out function indicates it is not available when the vehicle is moving.
1-4
All functions are available when the vehicle is parked. Do the following before driving: (cid:129) Become familiar with the navigation system operation, hard keys on the faceplate, and touch-sensitive screen buttons of the navigation system.
(cid:129) Set up the audio by presetting favorite stations,
setting the tone, and adjusting the speakers.
(cid:129) Set up the navigation features before beginning driving, such as entering an address or a preset destination.
(cid:129) Set up your phone numbers in advance so they can be called easily with the press of a single button or a single voice command (for navigation systems equipped with phone capability).
{ CAUTION:
Taking your eyes off the road too long or too often while using the navigation system could cause a crash resulting in injury or death to you or others. Focus your attention on driving.
{ CAUTION:
Avoid looking too long or too often at the moving map on the navigation screen. This could cause a crash and you or others can be injured or killed. Use the turn-by-turn voice guidance directions whenever possible.
Use the navigation system to: (cid:129) Plan a route. (cid:129) Select a destination using various methods and
choices. Follow turn-by-turn route and map guidance with voice prompts, only if permitted by traffic laws, controls, and conditions.
You should always be alert and obey traffic and roadway laws and instructions, regardless of the guidance from the navigation system. Because the navigation system uses street map information that does not include all traffic restrictions or the latest road changes, it may suggest using a road that is now closed for construction or a turn that is prohibited by signs at the intersection. Because the
system uses limited information, you must always evaluate whether following the system’s directions is safe and legal for the current conditions. When the navigation system is turned on, a screen may appear with the information below, and you must read and acknowledge the information it contains.
{ CAUTION:
Taking your eyes off the road for extended periods could cause a crash resulting in injury or death to you or others.
To help avoid a crash in which you or others could be killed: (cid:129) Always concentrate on your driving first by keeping
your eyes and mind on the road, and your hands on the wheel. Follow system directions only if permitted by traffic laws, controls, and conditions.
(cid:129) Before using this system, read the owner’s manual
and learn how it operates.
(cid:129) Some system controls cannot be used the when
vehicle is moving.
1-5
(cid:129) (cid:129) When getting started, set the navigation system to your preference or delete information you may have entered using various options. Language For vehicles with a Driver Information Center (DIC), see “DIC Vehicle Customization” in the Index of the vehicle’s owner manual to change the language of the navigation screens. For vehicles without a Driver Information Center (DIC), the radio can be used to change the language of the navigation screens: 1. Press the O (power) knob to turn the system on. 2. Press the MENU hard key and select the Display
screen button.
3. Select the language; English, Francais, Espanol. English/Metric Units To change the navigation screens from English or metric, see “DIC Operation and Displays” in the Index of the vehicle’s owner manual.
After you acknowledge the start up information you will be able to access the NAV (navigation) and DEST (destination) functions. Once accessed, you can enter or delete information in the navigation system or access other functions. See instructions later in this section.
Every fifty times the vehicle is started and the navigation system is turned on, the Caution screen appears. After reading the caution, select OK to load the map DVD information. If OK is not selected, all hard keys except for NAV (Navigation) and DEST (Destination) can be accessed. You can also press the NAV hard key to have this Caution screen appear.
1-6
Limit Features While Driving The navigation system may have this feature. Touch the Limit Features While Driving screen button to turn on and off the ability to limit functions while driving. When this screen button is highlighted, the following functions are limited while driving: (cid:129) Music Navigator Scrolling (cid:129) Radio Category Scrolling (cid:129) Navigation Menu Scrolling and some functions See “Category” under Navigation Audio System on page 3-2 for more information. See “From Map” under Destination on page 2-13 for more information. Some functions remain limited regardless of the setting. Deleting Personal Information This navigation system can record and store personal information such as names and addresses. It is recommended that stored personal information is deleted when disposing the vehicle. See “Edit Address Book — Edit/View” under Configure Menu on page 2-27
for deleting information from the address book.Storing Radio Station Presets To set preset radio stations: 1. Press O to turn the system on. 2. Press the AUDIO hard key and select the desired band (AM, FM1, FM2, XM1, or XM2 (if equipped)). 3. Use the f (tune) knob or the SEEK arrows to go to
the desired station.
4. Press and hold one of the five preset screen buttons,
at the bottom of the screen, until a beep is heard or see the station displayed on the selected preset button.
5. Repeat the steps for each preset. See “Storing Radio Station Presets” under Navigation Audio System on page 3-2 for more information. Setting the Clock 1. Press O to turn the system on. 2. Press the MENU key to enter the configure menu options, then press the MENU key repeatedly until the time is selected or select the time screen button.
3. Press the Set screen button. 4. Press the Hours and Minutes − (minus) and + (plus)
signs to decrease or to increase the time.
See “Setting the Clock” under Configure Menu on page 2-27 for more information.
1-7
Entering a Destination by Using Address, Point of Interest, Previous Destination, or the Map Method and Storing Preset Destinations Entering an Address To enter a destination by entering the city name first: 1. If the radio is on with a map disc inserted, skip
to Step 5.
2. Press O to turn the system on. 3. Insert the DVD map disc. See “Installing the Map
DVD” under Maps on page 2-4 for more information. 4. A caution may appear. Select the OK screen button
to proceed.
5. Press the DEST hard key. If guidance is already active, or if an entry is in place, you will have to select either the “Add Stopover” button or the “ADD” buttons above or below the entry, depending on where you would like to place the next waypoint.
6. Select the 2 Address Entry screen button. 7. Select the state/province screen button, if needed,
to change the current state or province. (cid:129) Enter the name or enter the two-letter
abbreviation. A list displays.
(cid:129) Select the List screen button and select the state
or province.
1-8
8. Select the City name button and start entering the
city name.
If five or less names are available, a list displays. If more than five are available, the List screen button has a number in it that represents the number of available cities. Select this button to view the list and select a city.
9. Once a city has been selected, the Street name
category is automatically selected for entry. Do not enter directional information or street type. Use the space symbol screen button ( U ) between street or city names. For example, the street name N. Royal Oak Rd. should be entered as royal U oak. Use the backspace ( V ) screen button if an incorrect character has been entered.
If five or less streets are available for the selected city, the system displays the list of streets. If more than five streets are available the system displays the alpha keyboard. Start entering the street name. If five or less names are available, a list displays. If more than five are available, the List screen button has a number in it that represents the number of available streets. Select this button to view the list and select a street.
(cid:129) (cid:129) (cid:129) (cid:129) 10. Once a street has been selected, select the
House # screen button to enter the house number. The system displays the house number range that is available for the street.
11. Select the Go screen button. A map screen, with
the destination marked appears.
12. Select the route preference (Fastest, Shortest, or Other). The system calculates and highlights the route.
13. Select the Start Guidance screen button. The
fastest route will automatically begin if the car starts moving forward.
See “Address Entry” under Destination on page 2-13 for more information. Entering a Point of Interest (POI) To set a destination by entering a Point of Interest (POI): 1. If the radio is on with a map disc inserted, skip to
Step 5.
2. Press O to turn the system on. 3. Insert the DVD map disc. See “Installing the Map
DVD” under Maps on page 2-4 for more information. 4. A caution may appear. Select the OK screen button
to proceed.
5. Press the DEST hard key. If guidance is already active, or if an entry is in place, you will have to select either the “Add Stopover” button or the “ADD” buttons above or below the entry, depending on where you would like to place the next waypoint.
6. Select the i Point of Interest screen button. 7. Select the state/province screen button, if needed,
to change the current state or province. (cid:129) Enter the name or enter the two-letter
abbreviation. A list displays.
(cid:129) Select the List screen button and select the state
or province.
8. Enter the specific title of the POI in the POI name
space (i.e. Washington Monument).
If five or less names are available, a list displays. If more than five are available, the List screen button has a number in it, it represents the number of available POIs. Select this button to view the list.
9. Select the Go screen button next to the POI. A map
screen, with the destination marked appears.
1-9
(cid:129) (cid:129) 10. Select the route preference (Fastest, Shortest, or
Other). The system calculates and highlights the route.
11. Select the Start Guidance screen button. The
fastest route will automatically begin if the car starts moving forward.
See “Point of Interest (POI)” under Destination on page 2-13 for more information. Entering Previous Destination Choose from a list of recent destinations with this method: 1. Press the “DEST” hardkey. Press the “Previous
Destination” button to show a list of previous destinations. This list is empty at first when the radio is new or is erased when the battery is disconnected.
2. Touch your selection. You may not be able to scroll
down the list while the vehicle is in motion, depending on the settings. See “Limit Features While Driving” later in this manual.
3. Select the route preference (Fastest, Shortest, or Other). The system calculates and highlights the route.
4. Select the Start Guidance screen button. The
fastest route will automatically begin if the car starts moving forward.
1-10
Map Method 1. Touch the screen where you want to go. The system shows the location, and possibly an address as well. You can scroll out to a larger view by first using the + (plus) or − (minus) buttons at the lower left and right of the map to select an appropriate viewing range.
2. Press the “GO” button that appears when you are
ready to begin routing.
3. Select the route preference (Fastest, Shortest, or
Other). The system calculates and highlights the route.
4. Select the Start Guidance screen button.
The fastest route will automatically begin if the car starts moving forward.
Storing Preset Destinations 1. If the radio is on with a map disc inserted, skip to
Step 5.
2. Press O to turn the system on. 3. Insert the DVD map disc. See “Installing the Map
DVD” under Maps on page 2-4 for more information. 4. A caution may appear. Select the OK screen button
to proceed.
5. Press the DEST hard key.
Enter a destination. See Destination on page 2-13
for more information on how to enter a destination.6. Select the Map screen button after entering the
destination.
7. Select the Mark screen button from the map. The
address book screen appears. Five preset destinations can be stored, but you must set them from the Address Book screen. There are other ways to get to the Address Book as well.
8. Select the Name screen button. An alpha-keyboard
displays. Enter the name. If you have stored the location with a name automatically assigned by the system, use the “BACKSPACE” button (not “BACK”) to erase the letters and begin typing your preferred title for this destination. For example, choosing a destination by address and storing it to the Address Book will store the actual address, which may not be easy to display in a short Preset button that has 8 digits, so name it something shorter.
9. Press and hold one of the screen buttons at the
bottom of the screen until the name appears in the screen button on the display. A beep may be heard. The name appears in that preset destination screen button and is now available to select from the Destination Entry screen. See “Using Your Stored Preset Destinations” next in this section to select it as a destination. See “Adding or Changing Preset Destinations” under Destination on page 2-13 for more information on how to add preset destinations.
Using Your Stored Preset Destinations These destinations are available for selection while driving. 1. If the radio is on with a map disc inserted, skip to
Step 5.
2. Press O to turn the system on. 3. Insert the DVD map disc. See “Installing the Map
DVD” under Maps on page 2-4 for more information. 4. A caution may appear. Select the OK screen button
to proceed.
5. Press the DEST hard key. 6. Select one of the available preset destination
screen buttons. A map screen, with the destination marked, appears and the system immediately begins to route to that destination. The preset destination buttons overwrite and provides guidance to the selected destination even if the guidance is in place. Pressing a preset destination cancels the current route and then, routes to the single preset destination. If more waypoints or stops are desired after the preset is used, follow the adding stopover method to load a total of four additional waypoints.
1-11
7. Select the route preference (Fastest, Shortest, or Other). The system calculates and highlights the route.
8. Select the Start Guidance screen button. The
fastest route will automatically begin if the car starts moving forward.