- Download PDF Manual
-
Because MAX A/C uses recirculated air, MAX is usually more efficient than NORM A/C. You can switch to outside air NORM A/C at any time, especially after the vehicle has cooled down. You may notice a slight odor when using the MAX A/C position. This is normal. If the odor becomes annoying, switch the function selector to NORM A/C. To provide the most quiet operation when using MAX A/C, reduce the fan speed after a comfortable temperature has been reached. NORM A/C When maximum air conditioning is not needed, you can use the NORM A/C position to cool your vehicle with outside air. Cooling your vehicle this way brings in outside air and is quieter, but it is less efficient.
54
File:05prcfp.ex Update:Tue Jun 11 11:03:33 1996
*[CF08500(ALL)01/96] [CF08600(ALL)01/96]
[CF08700(ALL)01/96]
[CF08800(ALL)04/96]
[CF08900(ALL)01/96]
*[CF09000(ALL)01/96] *[CF09100(ALL)01/96]
[CF09200(ALL)01/96]
To cool your vehicle using outside air: 1. Turn the function selector control to NORM
A/C.
2. Turn the temperature control all the way to
left to the blue (cool) area.
3. Set the fan at the desired speed. In mild weather, setting the function selector control in the VENT position will add cool air to your vehicle without using the air conditioning. You will get better fuel economy without using the air conditioning. Engine Idle Speed Control System Genuine Ford air conditioning (either factory-installed or dealer-installed) has an engine idle speed control system that compensates for engine speed loss that may occur when the air conditioning compressor is running. This idle speed control holds the engine idle essentially constant, regardless of whether the air conditioning system is on or off. NOTE: Whenever service to the air
conditioning system is required, make sure the service facility uses a refrigerant recycling system. These systems will capture the refrigerant for reuse. Releasing certain refrigerants into the atmosphere is hazardous to the environment.
55
File:05prcfp.ex Update:Tue Jun 11 11:03:33 1996
*[CF09300(ALL)01/96] [CF09400(ALL)01/96]
quarter page art:0032068-D
[CF09500(ALL)01/96]
*[CF09600(ALL)03/96] [CF09700(ALL)03/96]
*[CF09800(ALL)03/96] [CF09900(ALL)01/96]
[CF10000(ALL)01/96]
%*[CF10100(ALL)03/96]
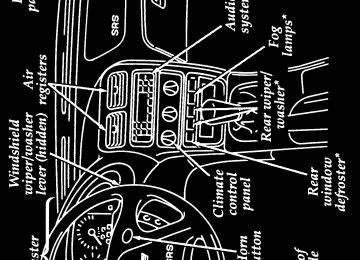
Rear Window Defroster (If equipped)
Rear window defroster button The defroster for the rear window clears frost, fog, or thin ice from both the inside and outside of the rear window. The rear window defroster button is located on the lower right of the instrument panel below the climate control panel. This button is also used to activate your heated power mirrors (if equipped). To defrost the rear window: 1. Clear any snow and/or ice from the rear
window.
2. Get in your vehicle and start the engine. 3. Press the rear defrost button. The indicator
light turns on.
The defroster turns off automatically after 15 to 25 minutes. If the window is not clear, turn on the defroster again. It will also automatically shut off any time the engine is shut off. NOTE: Never use sharp instruments or
window cleaners with abrasives to clean the inside of your rear window. If you do, you may damage the heating elements that are bonded to the inside of the rear window and cause damage to the rear window defroster.
56
File:05prcfp.ex Update:Tue Jun 11 11:03:33 1996
[CF10120(ALL)05/96]
[CF10140(ALL)05/96]
[CF10160(ALL)05/96]
one inch art:0032069-D
[CF10180(ALL)05/96]
%*[CF10182(ALL)05/96] [CF10184(ALL)05/96]
[CF10186(ALL)05/96]
quarter page art:0032079-E
Rear Window Wiper and Washer The rear window wiper and washer buttons are located on the instrument panel below the climate control panel.
To operate the rear wiper, push the rear window wiper button. Push the button a second time to turn the wiper off. To operate the rear washer, push and hold the rear window washer button in. The washer will spray until the button is released. Fog Lamps (If equipped) The fog lamps only operate when the headlamps are on low beam. To activate fog lamps, push the button on the control panel below the climate controls. An indicator light on the button will illuminate. Push the button again to turn the fog lamps off.
Fog lamp button
57
File:05prcfp.ex Update:Tue Jun 11 11:03:33 1996
*[CF10200(ALL)01/96] %*[CF10300(ALL)01/96] *[CF10400(ALL)01/96]
*[CF10500(ALL)01/96]
[CF10600(ALL)01/96]
quarter page art:0030050-B
[CF10700(ALL)01/96]
[CF10800(ALL)01/96]
[CF10900(ALL)01/96]
Interior Lights Lighting Up the Interior and Instrument Panel With the parking lamps or headlamps on, the brightness of the instrument panel lighting can be adjusted. To brighten or dim the instrument panel lighting, rotate the dimmer control thumbwheel as desired.
Dimmer control thumbwheel The dimmer control thumbwheel is located to the left of the steering wheel on the instrument panel. Dome Lamp The dome lamp illuminates whenever one of the front doors is opened and turns off automatically when the doors are closed. You may turn the dome lamp on and off while the doors are closed by using the ON/OFF switch located on the interior/map lamp control panel.
58
File:05prcfp.ex Update:Tue Jun 11 11:03:33 1996
[CF11000(ALL)01/96]
half page art:0030286-L
[CF11100(ALL)01/96]
[CF11200(ALL)01/96]
[CF11300(ALL)01/96]
Interior/map lamp control panel Map lamps (if equipped) The map lamps can be turned on by using the interior/map lamp control panel located between the sun visors. There are two map lamps, one for the driver and one for the passenger. To turn on the map lamp, push the button that is next to the lamp. Push the buttons again to turn the map lamps off.
59
File:05prcfp.ex Update:Tue Jun 11 11:03:33 1996
[CF11400(ALL)05/96]
half page art:0032392-A
*[CF11800(ALL)01/96] *[CF11900(ALL)01/96]
*[CF12000(ALL)01/96]
*[CF12100(ALL)01/96]
Radio For information about the radio in your vehicle, refer to the Electronic Sound Systems chapter in this Owner Guide. Clock Controls on Electronic Radios The electronic radios have a built-in clock. For complete operating instructions, refer to the Electronic Sound Systems chapter in this Owner Guide.
60
File:05prcfp.ex Update:Tue Jun 11 11:03:33 1996
*[CF15100(ALL)01/96] %*[CF15200(ALL)01/96] [CF15300(ALL)01/96]
one third page art:0032054-A
*[CF15400(ALL)01/96] *[CF15500(ALL)01/96]
[CF15600(ALL)01/96]
*[CF15700(ALL)01/96]
[CF15800(ALL)01/96]
*[CF15900(ALL)01/96]
Ignition Understanding the Positions of the Ignition
Ignition lock cylinder LOCK locks the steering wheel. It also locks the gearshift lever in P (Park) (automatic transaxle). LOCK is the only position that allows you to remove the key. The LOCK feature helps to protect your vehicle from theft. To remove the key if you have a manual transaxle, push the key in while turning it to the LOCK position. If your key is stuck in the LOCK position and will not turn, move your steering wheel left or right until the key turns freely. ACC (Accessory) allows some of your vehicle’s electrical accessories to operate while the engine is not running. ON allows you to test your vehicle’s warning lights (except the brake system warning light) to make sure they work before you start the engine. The key returns to the ON position once the engine is started and remains in this position while the engine runs.
61
File:05prcfp.ex Update:Tue Jun 11 11:03:33 1996
*[CF16000(ALL)01/96]
%*[CF16010(ALL)02/96] *[CF16020(ALL)02/96] *[CF16030(ALL)02/96] *[CF16040(ALL)02/96] *[CF16050(ALL)03/96] *[CF16060(ALL)03/96] *[CF16070(ALL)02/96] *[CF16080(ALL)02/96]
[CF16100(ALL)01/96]
[CF16200(ALL)03/96]
[CF16300(ALL)01/96]
quarter page art:0032032-A
START cranks the engine. Release the key once the engine starts so that you do not damage the starter. The key should return to ON when you release it. The START position also allows you to test the brake warning light. The Turn Signal Lever You can use the turn signal lever on the left side of the steering column to:
operate the headlamps and parking lamps operate the turn signals and cornering lamps turn the high beams on/off flash the lamps
Headlamps and Parking Lamps To turn the parking lamps or headlamps on, twist the knob at the end of the turn signal lever. FIRST STOP — Turning the knob to the first stop (g) will turn on the the license plate lamps, parking lamps, side marker lamps, tail lamps and instrument panel lamps. SECOND STOP — Turning the knob to the second stop (B) will turn on the headlamps, license plate lamps, parking lamps, side marker lamps, tail lamps, and instrument panel lamps.
Headlamp control
62
File:05prcfp.ex Update:Tue Jun 11 11:03:33 1996
%*[CF16400(ALL)03/96] *[CF16500(ALL)03/96] *[CF16600(ALL)04/96]
*[CF16700(ALL)01/96] *[CF16800(ALL)01/96] *[CF16900(ALL)01/96] *[CF17000(ALL)03/96]
[CF17100(ALL)01/96]
[CF17200(ALL)01/96]
[CF17300(ALL)01/96]
Daytime Running Light System (Canadian vehicles only) In Canada, the lights illuminate during daytime operation. The Daytime Running Light system (DRL) automatically illuminates when the ignition switch is turned to the ON position. The daytime running lights are switched off under the following conditions: q when the headlamps are switched on q when the parking brake is applied q when the flash-to-pass system is used
WARNING
The Daytime Running Light (DRL) system will not illuminate the tail lamps and parking lamps. Turn on your headlamps at dusk. Failure to do so may result in a collision.
Raising the Headlamps Manually If the power headlamp door system becomes inoperative, your vehicle has a manual retractor system that allows you to raise the headlamps manually (the headlamps will not turn on). The retractors are located under the hood and behind each headlamp. Remove the cap and turn the knob. Each headlamp must be raised separately. Before using the manual retractors to raise your headlamps, the RETRA fuse must be removed.
63
File:05prcfp.ex Update:Tue Jun 11 11:03:33 1996
[CF17400(ALL)01/96]
[CF17500(ALL)01/96]
[CF17600(ALL)01/96]
[CF17700(ALL)01/96]
Open the main fuse panel. Refer to the underhood fuse panel in Servicing Your Probe later in this owner guide. Pull the RETRA (20A) fuse straight out. Inspect the removed fuse. If it is blown, replace it with a new one of the same rating. If it isn’t blown or if a new fuse does not solve the problem, remove it and operate the headlamp manually.
WARNING
Always remove the RETRA (20A) fuse before manually operating a headlamp retractor or attempting to remove anything from the headlamp. Failure to remove the RETRA fuse could cause injury to a hand or fingers.
WARNING
When reinstalling the RETRA fuse, make sure nothing is near the headlamp retractor. It may move suddenly while the fuse is being inserted, causing injury to hands and fingers.
64
File:05prcfp.ex Update:Tue Jun 11 11:03:33 1996
[CF17800(ALL)01/96]
half page art:0032085-B
*[CF17900(ALL)08/95] *[CF18000(ALL)01/96]
*[CF18100(ALL)01/96]
Manual headlamp retractors located behind the headlamps High Beams and Flashing the Lamps To turn on the high beams, turn the headlamp control knob to the headlamp ON position and push the turn signal lever away from you until it latches. When the high beams are ON, the high beam indicator light on the instrument panel comes on. To turn off the high beams, pull the lever toward you until it latches. The high beam indicator light turns off.
65
File:05prcfp.ex Update:Tue Jun 11 11:03:33 1996
%*[CF18200(ALL)01/96] *[CF18300(ALL)01/96]
[CF18400(ALL)01/96]
quarter page art:0032034-A
[CF18500(ALL)01/96]
Flashing the Lights To flash the headlamps, pull the lever toward you for a moment and then release it. The headlamps will flash whether the headlamp knob is in the on or off position.
Highbeam and flash-to-pass operation If the headlamps are retracted when you pull the lever toward you, they will pop up and flash.
66
File:05prcfp.ex Update:Tue Jun 11 11:03:33 1996
%*[CF18600(ALL)01/96] *[CF18700(ALL)01/96]
[CF18800(ALL)01/96]
*[CF18900(ALL)01/96]
[CF19000(ALL)01/96]
half page art:0032033-A
Turn Signals Move the lever up to signal a right turn. Move it down to signal a left turn. The corresponding indicator light in the instrument cluster will flash. If the turn signal stays on after you turn, move the lever back to the center (OFF) position. For lane changes, move the lever far enough to signal but not to latch. The lever will return to the off position when you release it.
Turn signal
67
File:05prcfp.ex Update:Tue Jun 11 11:03:33 1996
%*[CF19100(ALL)01/96] *[CF19200(ALL)01/96]
[CF19300(ALL)01/96]
[CF19400(ALL)01/96]
quarter page art:0032071-C
[CF19500(ALL)01/96]
[CF19600(ALL)01/96]
quarter page art:0032058-B
Windshield Wipers and Washer To operate the windshield wipers and washers, make sure your ignition key is turned to the ON position. The windshield wipers have two speeds. To operate the wipers, pull down the lever on the right side of your steering column. The first position is LO (Low) and the second position is HI (High). To turn the wipers off, return the lever to the uppermost position.
Windshield wiper control ONE-TOUCH WIPER CONTROL (If equipped) — For one wiping cycle, push the lever away from you and release it with the lever in the OFF or interval position. The ignition switch must be in the ON position for this operation.
One touch wiper control
68
File:05prcfp.ex Update:Tue Jun 11 11:03:33 1996
[CF19700(ALL)01/96]
[CF19800(ALL)01/96]
[CF19900(ALL)01/96]
quarter page art:0032035-B
[CF19950(ALL)01/96]
*[CF20000(ALL)01/96] [CF20100(ALL)01/96]
[CF20200(ALL)02/96]
quarter page art:0032057-B
Interval Wipers (If equipped) In addition to two speed wipers, your vehicle may have wipers that you can set to operate at varying intervals. For example, you can set the interval so they wipe less often when it drizzles and more often in heavier rain.
Variable interval wiper control To set the interval wipers, pull the lever down to the first position. Turn the ring on the lever to the frequency of wiper operation you desire. Windshield Washer To clean the windshield, pull the wiper lever toward you. Washer fluid sprays until the lever is released.
Windshield washer/control
69
File:05prcfp.ex Update:Tue Jun 11 11:03:33 1996
[CF20300(ALL)01/96]
*[CF20400(ALL)08/95]
*[CF20500(ALL)01/96]
If the washer does not work, check the washer fluid level visually and fill if needed. See Servicing Your Probe later in this owner guide. If there is fluid in the reservoir, and your washer doesn’t work, consult your Ford or Lincoln-Mercury dealer. Do not try to clean the windshield when the washer fluid container is empty or activate the washers at any time for more than 15 seconds continuously. This could damage the washer pump system.
WARNING
Always warm up the windshield with the defroster before you use the washer fluid. In freezing weather, the washer solution may freeze on the windshield and obscure your vision.
70
File:05prcfp.ex Update:Tue Jun 11 11:03:33 1996
[CF20900(ALL)04/96]
*[CF21000(ALL)02/96]
*[CF21100(ALL)01/96]
[CF21200(ALL)01/96]
half page art:0032044-A
Tilt Steering Column (If equipped)
WARNING
Never adjust the steering wheel when the vehicle is moving.
To change the position of the steering column/wheel, pull the release lever on the column toward you. Tip the steering wheel to the desired position. Release the lever to lock the steering wheel in place.
Tilt steering column
71
File:05prcfp.ex Update:Tue Jun 11 11:03:33 1996
%*[CF21300(ALL)03/96] [CF21600(ALL)01/96]
half page art:0032031-C
%*[CF21610(ALL)05/96] [CF21612(ALL)05/96]
[CF21614(ALL)05/96] *[CF21616(ALL)05/96] *[CF21620(ALL)05/96] [CF21640(ALL)05/96] *[CF21740(ALL)05/96] [CF21760(ALL)05/96]
*[CF21780(ALL)05/96]
Speed Control (If equipped)
Speed control switches on the steering wheel To Turn Speed Control Off Press OFF, or Turn off the vehicle ignition. Once speed control is switched off, the previously programmed set speed will be erased. To Turn Speed Control On Press ON To Set a Speed Press SET ACC. For speed control to operate, the speed control must be ON and the vehicle speed must be greater than 30 mph (48 km/h). If you drive up or down a steep hill, your vehicle speed may vary slower or faster than the set speed. This is normal.
72
File:05prcfp.ex Update:Tue Jun 11 11:03:33 1996
*[CF21800(ALL)05/96]
*[CF21820(ALL)05/96]
*[CF21840(ALL)05/96] [CF21860(ALL)05/96]
[CF21880(ALL)05/96]
[CF21900(ALL)05/96]
*[CF21920(ALL)05/96]
*[CF21940(ALL)05/96] [CF21960(ALL)05/96]
[CF21980(ALL)05/96]
[CF22000(ALL)05/96]
Speed control cannot reduce the vehicle speed if it increases above the set speed on a downhill. If your vehicle speed is faster than the set speed while driving on a downhill in j (Overdrive), you may want to shift to the next lower gear to reduce your vehicle’s speed.
WARNING
To keep your vehicle under control, do not use speed control in heavy traffic or on roads that are winding, slippery, or unpaved.
To Set a Higher Speed Press and hold SET ACC. Release the switch when the desired vehicle speed is reached, or Press and release SET ACC. Each press will increase the set speed by 1 mph (1.6 km/h) (2.0L with automatic transmission only), or Accelerate with your accelerator pedal, then press SET ACC. You may accelerate with the accelerator pedal at any time during speed control usage. Releasing the accelerator pedal will return your vehicle speed to the previously programmed set speed. To Set a Lower Set Speed Press and hold CST. Release the switch when the desired vehicle speed is reached, or Press and release CST. Each press will decrease the set speed by 1 mph (1.6 km/h) (2.0L with automatic transmission only), or Depress the brake pedal. When the desired vehicle speed is reached, press SET ACC.
73
File:05prcfp.ex Update:Tue Jun 11 11:03:33 1996
*[CF22020(ALL)05/96] [CF22040(ALL)05/96]
[CF22060(ALL)05/96] *[CF22080(ALL)05/96] *[CF22100(ALL)05/96] [CF22120(ALL)05/96]
%*[CF25200(ALL)01/96] [CF25300(ALL)01/96]
[CF25400(ALL)01/96]
To Disengage Speed Control Depress the brake pedal, or Depress the clutch pedal (if equipped). Disengaging the speed control will not erase the previously programmed set speed. To Return to a Set Speed Press RSM. For RSM to operate, the vehicle speed must be faster than 30 mph (48 km/h). Moon Roof (If equipped) The control switch for the sliding moon roof is on the interior/map lamp control panel located above the windshield and between the sun visors. The ignition must be in the ON position for the moon roof to be operational. To open the sliding moon roof to the vent position, push the recessed part of the moon roof switch until the back of the moon roof tilts into the vent position. You must release the switch after opening the vent before pressing it again to slide the moon roof open. To close, push the other side of the switch until the moon roof sets back into place.
74
File:05prcfp.ex Update:Tue Jun 11 11:03:33 1996
[CF25500(ALL)05/96]
half page art:0032055-C
[CF25600(ALL)01/96]
Sliding moon roof control switch Press the switch until the moon roof is opened to the desired position. When you release the switch, the moon roof will stop sliding open. To close the moon roof, press the other side of the switch and hold it until the roof is closed to the desired position.
75
File:05prcfp.ex Update:Tue Jun 11 11:03:33 1996
%*[CF26000(ALL)02/96] [CF26200(ALL)01/96]
Doors
one third page art:0030073-C
[CF26300(ALL)01/96]
%*[CF26400(ALL)01/96] [CF26500(ALL)01/96]
[CF26600(ALL)01/96]
The inside of the door If you close the door with the lock button depressed, the door will remain locked. Power Door Locks (If equipped) If your vehicle has power door locks, the controls to lock the doors are below the inside door handles on each door. When you close the doors after you set the door locks, the doors remain locked. If the power mechanism ever fails, the manual door locks will override the power controls. NOTE: Vehicles equipped with power locks
have a safety feature which allows you to unlock one or both front doors from either door key lock cylinder. To unlock the driver’s or passenger door only, insert the key in the door lock cylinder and turn to the left (counterclockwise) to the first position. To unlock the other door at the same time, simply continue turning the key to the left to the second position. Both doors are locked by turning the key to the right (clockwise).
76
File:05prcfp.ex Update:Tue Jun 11 11:03:33 1996
[CF26700(ALL)01/96]
half page art:0030079-C
%*[CF27000(ALL)04/96] %*[CF27400(ALL)01/96] [CF27450(ALL)01/96]
[CF27500(ALL)01/96]
% [CF27550(ALL)01/96]
Power locks on the driver’s door Windows Using the Power Windows (If equipped) Each door has a power control that opens and closes the window on that door. The driver’s door has a master control panel that operates both windows. To use your power windows, your ignition switch must be placed in the ON position. Press the recessed end of the power window switch to lower a window, press the raised end of the switch to raise a window. NOTE: Your vehicle is equipped with a “one
touch down” feature. This feature allows the driver to fully open the driver’s window by firmly pressing the switch and then releasing. The switch will release when the window has fully opened.
77
File:05prcfp.ex Update:Tue Jun 11 11:03:33 1996
*[CF27600(ALL)01/96]
[CF27700(ALL)01/96]
half page art:0030081-C
%*[CF28000(ALL)03/96] *[CF28100(ALL)05/96]
WARNING
Do not let children play with the power windows.
Master window control on the driver’s door Mirrors
WARNING
The right side view mirror makes objects appear smaller and farther away than they actually are.
78
File:05prcfp.ex Update:Tue Jun 11 11:03:33 1996
[CF28200(ALL)01/96]
[CF28300(ALL)01/96]
*[CF28400(ALL)01/96] [CF28500(ALL)01/96]
[CF28600(ALL)01/96]
[CF28700(ALL)01/96]
[CF28800(ALL)01/96]
[CF28900(ALL)01/96]
half page art:0030108-C
Dual-Electric Remote Control Mirrors (If equipped) Dual-electric remote control mirrors are collapsible. The mirror heads can be folded rearward to prevent damage when using an automatic car wash. To adjust the side mirrors: 1. Locate the control switch in the power
control panel on the driver’s door.
2. Select the right or left mirror by moving the
selector switch right or left.
3. Push the control switch in the direction you
want to move the mirror.
4. Return the selector switch to the middle OFF
position to keep the mirror in place.
Dual-electric side mirror control switches
79
File:05prcfp.ex Update:Tue Jun 11 11:03:33 1996
%*[CF30000(ALL)01/96] [CF30100(ALL)01/96]
[CF30200(ALL)01/96]
[CF30300(ALL)01/96]
[CF30400(ALL)01/96]
%*[CF30500(ALL)05/96] *[CF30600(ALL)03/96]
[CF30700(ALL)01/96]
*[CF30800(ALL)01/96]
[CF30900(ALL)01/96]
*[CF31000(ALL)01/96] *[CF31100(ALL)05/96]
Console A fully-equipped console on your vehicle will include the following items:
ashtray and lighter q parking brake lever
cupholder or storage compartment with cupholder
Storage Compartments Your vehicle may have several small storage compartments:
a glove compartment that locks and unlocks using the ignition key two map pockets on the door panels (if equipped) storage compartment below the climate controls a storage bin in the center console
WARNING
Do not put objects on the ledge between the back seat and the rear window, as they can become dangerous projectiles and injure someone.
80
File:05prcfp.ex Update:Tue Jun 11 11:03:33 1996
[CF31200(ALL)01/96]
[CF31300(ALL)01/96]
[CF31400(ALL)01/96]
[CF31500(ALL)01/96]
*[CF31600(ALL)04/96]
[CF31700(ALL)01/96]
half page art:0032378-A
Center Console Storage (If equipped) To open the center console storage bin, push the button and slide the lid back. When it is back as far as it will go, push the button and lift the lid. Cupholders The cupholders are located inside the center console storage bin. The driver cupholder is integrated in the storage bin. To use the passenger cupholder, rotate it upward then twist the cupholder until it is in a horizontal position. When the passenger cupholder is not in use, twist it back to the vertical position and rotate it into the storage bin. NOTE: Do not place heavy objects in the
cupholders.
Using the cupholders
81
File:05prcfp.ex Update:Tue Jun 11 11:03:33 1996
%*[CF31800(ALL)01/96] *[CF31900(ALL)01/96] [CF32000(ALL)01/96]
[CF32100(ALL)01/96]
[CF32200(ALL)01/96]
[CF32300(ALL)01/96]
[CF32400(ALL)01/96]
*[CF32500(ALL)01/96] *[CF32600(ALL)01/96] *[CF32700(ALL)01/96]
*[CF32800(ALL)01/96]
*[CF32900(ALL)01/96]
Hatchback Opening and Closing the Hatchback To open the hatchback from the outside: 1. Put the key into the lock located on the right side, in the tail lamp just above the bumper.
2. Turn the key to the right to unlock. 3. Remove the key before you close the
hatchback.
NOTE: When the hatch is unlocked the cargo
lamp will illuminate.
4. Using both hands, shut the hatchback
completely. Do not slam it.
5. Pull up on the hatchback to make sure it is
securely latched.
To prevent premature wear or damage to the hatchback lift cylinders and attaching hardware, the hatchback must be fully closed before you drive your vehicle.
WARNING
If you drive with the hatchback lid open, you will draw dangerous exhaust fumes into your vehicle.
If you must drive like this, keep the vents open so outside air comes into the vehicle.
82
File:05prcfp.ex Update:Tue Jun 11 11:03:33 1996
[CF33000(ALL)01/96]
[CF33100(ALL)01/96]
[CF33200(ALL)01/96]
half page art:0032060-A
[CF33300(ALL)01/96]
[CF33400(ALL)01/96]
*[CF33500(ALL)05/96]
Using the Remote Control for the Hatchback To release the hatchback from inside the vehicle, simply pull up on the remote release lever, which is located in front of the driver’s seat, near the door.
Remote control for the hatchback Using the Luggage Compartment Cover This cover lets you conceal cargo in the luggage compartment. The cover will lift automatically when the hatchback lid is opened.
WARNING
Do not put objects on the ledge between the back seat and the rear window, as they can become dangerous projectiles and injure someone.
83
File:05prcfp.ex Update:Tue Jun 11 11:03:33 1996
[CF33600(ALL)04/96]
[CF34700(ALL)04/96]
[CF34800(ALL)01/96]
[CF34900(ALL)01/96]
[CF35000(ALL)01/96]
[CF35100(ALL)01/96]
two third page art:0032088-D
To remove the luggage compartment cover: 1. Raise the hatchback to the fully open
position.
2. Standing outside the vehicle, unfasten the lift
cords from the hatchback lid.
3. Disconnect the two front package tray lift
cords from the lower trunk side trim.
4. Lower the cover and slide it rearward to
disengage it from the sockets and remove it.
The luggage compartment and cover
84
File:05prcfp.ex Update:Tue Jun 11 11:03:33 1996
[CF35200(ALL)04/96]
[CF35300(ALL)04/96]
[CF35400(ALL)04/96]
[CF35500(ALL)01/96]
[CF35600(ALL)01/96]
[CF35700(ALL)01/96]
[CF35800(ALL)04/96]
[CF35900(ALL)01/96]
*[CF50000(ALL)01/96]
[CF50100(ALL)01/96]
[CF50200(ALL)01/96]
WARNING
The cover may cause injury in a sudden stop or accident if it is not securely installed.
To install the luggage compartment cover: 1. Raise the hatchback to the fully open
position.
2. From outside the vehicle, position the cover
in its sockets.
3. Attach the lift cords to the hatchback lid. 4. Connect the two front luggage compartment cover lift cords to the lower trunk side trim.
5. Close the hatchback.
WARNING
Do not push down on the luggage compartment cover when the lift cords are attached to the open hatchback lid. This could cause the hatchback lid to close unexpectedly.
Remote Keyless Entry System (If equipped) Your vehicle may be equipped with a remote keyless entry system. This option will allow you to open your vehicle using a remote transmitter from distances of up to 33 feet (10 meters) away. The remote feature will operate only when the ignition is in the OFF position. The transmitter can unlock the driver’s door, unlock all doors, lock all doors, or activate the vehicle’s horn and hazard warning lamps for the panic alarm feature.
85
File:05prcfp.ex Update:Tue Jun 11 11:03:33 1996
[CF50300(ALL)01/96]
[CF50400(ALL)01/96]
[CF50500(ALL)01/96]
[CF50600(ALL)01/96]
[CF50700(ALL)05/96]
one third page art:0090226-A
By pressing the UNLOCK button on the transmitter once, you can unlock the driver side door. Pressing the UNLOCK button a second time within five seconds of unlocking the driver’s door will unlock the other doors. You can lock all your vehicle doors by pressing the LOCK button. If you press the LOCK button a second time within five (5) seconds, the horn will sound briefly to verify that the doors have been locked. When the PANIC button is pressed, the horn will sound and the hazard warning lamps will flash. This will continue for up to approximately two minutes and 45 seconds unless it is turned off by pressing the PANIC button a second time. The panic mode can also be cancelled by turning the ignition key to ON or ACC. Up to four transmitters can be programmed for your vehicle. Your vehicle comes with two transmitters. Additional transmitters can be ordered from your dealer.
Remote keyless entry transmitter
86
File:05prcfp.ex Update:Tue Jun 11 11:03:33 1996
[CF50800(ALL)03/96]
[CF50900(ALL)03/96]
%*[CF51000(ALL)03/96] *[CF51100(ALL)01/96]
*[CF51200(ALL)01/96]
[CF51300(ALL)01/96]
one third page art:0032393-A
The remote keyless entry system is equipped with an illuminated entry system. When the system is activated, the dome lamp will illuminate and will stay lit for approximately 25 seconds. The dome lamp will shut off when the doors are closed. Replacing the Batteries The remote entry transmitter is powered by two coin type three-volt lithium 1616
batteries (included) that should last for several years of normal use. If you notice a significant decrease in operating range, the batteries should be replaced. Replacement batteries can be purchased at most pharmacies, watch stores or at your Ford or Lincoln-Mercury dealer. NOTE: The operating range of the remoteentry system can also be affected by weather conditions (such as very cold temperatures) or structures around the vehicle (buildings, other vehicles, radio and TV towers, etc.). Typical operating range will allow you to be up to 33
feet (10 meters) away from your vehicle.Opening the remote transmitter
87
File:05prcfp.ex Update:Tue Jun 11 11:03:33 1996
[CF51400(ALL)01/96]
%*[CF51500(ALL)02/96] [CF51600(ALL)01/96]
*[CF51700(ALL)01/96]
[CF51800(ALL)01/96]
*[CF51900(ALL)01/96]
quarter page art:0060566-B
The transmitter can be snapped apart to replace the batteries by twisting a thin coin between the two halves of the transmitter. DO NOT TAKE THE FRONT PART OF THE TRANSMITTER APART. Carefully remove the old batteries. When installing the new batteries, be sure to place the positive (+) side down as marked. Snap the two halves back together. Replacement/additional transmitters In the event a transmitter is lost, return the remaining transmitter(s) to your dealer for reprogramming of your remote entry system. This is necessary to prevent unauthorized use of the lost transmitter. Additional transmitters may be purchased from your dealer (remote entry system will work with up to four transmitters). Follow the same programming procedure as above. All transmitters must be programmed (or reprogrammed) at the same time. If the programming mode is entered and the transmitters are not programmed (or reprogrammed) at the same time, they will not operate with the system.
88
File:06prssp.ex Update:Mon Jun 3 10:07:19 1996
%*[SS00200(ALL)05/96] *[SS00300(ALL)05/96]
*[SS00400(ALL)02/96]
*[SS00500(ALL)02/96]
%*[SS00600(ALL)05/96] [SS00700(ALL)02/96]
[SS00800(ALL)02/96]
[SS00900(ALL)02/96]
Seating and Safety Restraints
Seats
RWARNING
Never adjust the driver’s seat or seatback when the vehicle is moving.
RWARNING
Always drive and ride with your seatback upright and the lap belt snug and low across the hips.
RWARNING
Children should always ride with the seatback in the fully upright position.
Head Restraints
Head restraints help protect your head and neck in a collision. The head restraints on your vehicle are not adjustable. Manual Seat Adjustments
You can move the front seats forward or backward or tilt the back of the seat forward or backward. The driver’s seat also has controls for lumbar support (if equipped) and side bolster support (if equipped).
89
File:06prssp.ex Update:Mon Jun 3 10:07:19 1996
[SS01000(ALL)02/96]
half page art:0032072-F
90
To move the seat forward or backward:
File:06prssp.ex Update:Mon Jun 3 10:07:19 1996
*[SS01100(ALL)08/95] [SS01200(ALL)02/96]
three fourths page art:00
Manual seat controls for front seats
91
File:06prssp.ex Update:Mon Jun 3 10:07:19 1996
*[SS01300(ALL)08/95] [SS01400(ALL)01/96]
To recline the seatback:
three fourths page art
92
File:06prssp.ex Update:Mon Jun 3 10:07:19 1996
[SS01500(ALL)01/96]
[SS01600(ALL)01/96]
one third page art:0032066-D
[SS01700(ALL)01/96]
*[SS01800(ALL)02/96]
To gain access to the rear seat on the driver’s or passenger’s side:
Seatback release lever for rear seat access The seatback will return to its set reclined position when pushed back.
RWARNING
Check to see that the seat and seatback are latched securely in position. Keep floor area free of objects that would prevent proper seat engagement. Never attempt to adjust the seat while the vehicle is in motion.
93
File:06prssp.ex Update:Mon Jun 3 10:07:19 1996
[SS01900(ALL)01/96]
[SS02000(ALL)02/96]
half page art:0032390-A
To inflate the driver’s seatback lumbar support (if equipped) for lower back support, or to inflate the driver’s seatback side bolster supports (if equipped):
94
Six-Way Power Seat Adjustment (if equipped) The six-way power seat control lever is located on the outermost side of the driver’s seat.
File:06prssp.ex Update:Mon Jun 3 10:07:19 1996
[SS02100(ALL)02/96]
[SS02200(ALL)02/96]
[SS02300(ALL)02/96]
three fourths pag
95
File:06prssp.ex Update:Mon Jun 3 10:07:19 1996
[SS02400(ALL)01/96]
[SS02500(ALL)01/96]
%*[SS02600(ALL)01/96] *[SS02700(ALL)01/96]
[SS02800(ALL)02/96]
Your seat cushion power adjust lever is operated by a motor. To avoid damage to the motor, you should avoid operating this feature for an extended period of time. You should also avoid using the six-way power adjust lever continuously with the engine stopped. This could run down the battery. Use the lever to make only one adjustment at a time. Using the Split-Folding Rear Seat Your vehicle is equipped with split-folding rear seats. One or both rear seatbacks can be folded down to provide additional cargo space. NOTE: When folding down the rear seatback, the seat belt tongue should be hanging on the hook of the lower, side trim panel, near the edge of the side of the seat cushion.
96
File:06prssp.ex Update:Mon Jun 3 10:07:19 1996
[SS02900(ALL)04/96]
[SS03000(ALL)01/96]
To lower the rear seatback:
half page art:0030099-D
[SS03100(ALL)04/96]
*[SS03200(ALL)02/96]
To raise the seatback, lift the seatback rearward until it latches. Make sure the seatback is locked in position by pushing it forward and backward.
RWARNING
Check to see that the seat and seatback are latched securely in position. Keep floor area free of objects that would prevent proper seat engagement. Never attempt to adjust the seat while the vehicle is in motion.
97
File:06prssp.ex Update:Mon Jun 3 10:07:19 1996
*[SS03300(ALL)05/96]
*[SS03400(ALL)01/96]
[SS03500(ALL)01/96]
[SS03600(ALL)03/96]
%*[SS03700(ALL)02/96] *[SS03800(ALL)05/96]
*[SS03900(ALL)02/96] *[SS04000(ALL)02/96] *[SS04100(ALL)02/96] *[SS04200(ALL)02/96] *[SS04300(ALL)02/96] *[SS04400(ALL)02/96]
RWARNING
Cargo should always be secured to prevent it from shifting and causing damage to the vehicle or harm to passengers.
RWARNING
Do not remove the floor carpet in your vehicle. Emission controls cause high exhaust temperatures under the floor.
NOTE: When returning the folding seats to the
upright position, remember to return rear shoulder belts to their proper position.
NOTE: Your vehicle has stowage hooks on the lower rear side trim panel on which to hook the safety belts when not in use. Simply hook the tongue slot over the stowage hook.
Important Safety Belt Information The use of safety belts helps to restrain you and your passengers in case of a collision. In most states and in Canada, the law requires their use. Safety belts provide best restraint when:
the seatback is upright the occupant is sitting upright (not slouched) the lap belt is snug and low on the hips the shoulder belt is snug against the chest the knees are straight forward
98
File:06prssp.ex Update:Mon Jun 3 10:07:19 1996
[SS04500(ALL)05/96]
*[SS04600(ALL)02/96]
*[SS04700(ALL)02/96]
*[SS04800(ALL)05/96]
*[SS04900(ALL)02/96]
To help you remember to fasten your safety belt, a warning light may come on and a chime may sound. See Safety Belt Warning Light/Chime in the Instrumentation chapter. See the following sections in this chapter for directions on how to properly use these safety belts. Also see Safety Restraints for Children in this chapter for special instructions about using safety belts for children.
RWARNING
Always drive and ride with your seatback upright and the lap belt snug and low across the hips.
RWARNING
Each seating position in your vehicle has a specific safety belt assembly which is made up of one buckle and one tongue that are designed to be used as a pair. 1) Use the shoulder belt on the outside shoulder only. Never wear the shoulder belt under the arm. 2) Never swing it around your neck over the inside shoulder. 3) Never use a single belt for more than one person.
RWARNING
Ford recommends that all safety belt assemblies and attaching hardware should be inspected by a qualified technician after any collision. Safety belt assemblies not in use during a collision should also be inspected and replaced if either damage or improper operation is noted.
99
File:06prssp.ex Update:Mon Jun 3 10:07:19 1996
*[SS05000(ALL)02/96]
*[SS05100(ALL)02/96]
*[SS05200(ALL)02/96]
%*[SS05300(ALL)02/96]
*[SS05400(ALL)02/96]
[SS05500(ALL)04/96]
*[SS05600(ALL)02/96]
RWARNING
Children should always ride with the seatback in the fully upright position.
RWARNING
Never let a passenger hold a child on his or her lap while the vehicle is moving. The passenger cannot protect the child from injury in a collision.
RWARNING
Lock the doors of your vehicle before driving to lessen the risk of the door coming open in a collision.
Combination Lap and Shoulder Belts While your vehicle is in motion, the combination lap and shoulder belt adjusts to your movement. However, if you brake hard, turn hard, or if your vehicle receives an impact of 5 mph (8 km/h) or more, the lap/shoulder belt locks and helps reduce your forward movement. After you get into your vehicle, close the door and lock it. Then adjust the driver or passenger seat to the position that suits you best. Pull the combination lap/shoulder belt from the retractor so that the shoulder portion of the belt crosses your shoulder and chest. Be sure the belt is not twisted. If it is, remove the twist. Insert the belt tongue into the proper buckle until you hear a snap and feel it latch. Make sure the tongue is securely fastened to the buckle by pulling on tongue.
100
File:06prssp.ex Update:Mon Jun 3 10:07:19 1996
[SS05700(ALL)02/96]
one third page art:0030008-B
*[SS05800(ALL)02/96]
[SS05900(ALL)02/96]
one third page art:0032083-A
*[SS06000(ALL)02/96]
Fastening the front seat combination lap and shoulder belt NOTE: Be sure to read and understand
Important Safety Belt Information in this chapter.
Unfastening the combination lap and shoulder belt — front and rear seating positions While the belt retracts, guide the tongue to its original position to prevent it from striking you or the vehicle.
101
File:06prssp.ex Update:Mon Jun 3 10:07:19 1996
[SS06100(ALL)02/96]
*[SS06200(ALL)04/96]
*[SS06300(ALL)02/96] *[SS06400(ALL)02/96] *[SS06500(ALL)02/96]
%*[SS06600(ALL)02/96] *[SS06700(ALL)01/96]
*[SS06800(ALL)01/96] *[SS06900(ALL)01/96] *[SS07000(ALL)05/96]
Lap/Shoulder Belt Retractors (Dual Locking Modes) Your vehicle is equipped with a dual locking mode retractor on the shoulder belt portion of the combination lap/shoulder safety belt for passengers. Dual locking mode retractors operate in two ways: Vehicle sensitive (emergency) locking mode In this operating mode, the shoulder belt retractor will allow the occupant freedom of movement, locking tight only on hard braking, hard cornering or impacts of approximately 5 mph (8 km/h) or more. The retractor can also be made to lock by pulling the belt out quickly. Automatic locking mode In this operating mode, the shoulder belt retractor will be automatically locked and will remain locked when the combination lap/shoulder safety belt is buckled, and does not allow the occupant freedom of movement. This mode provides the following: q A tight lap/shoulder belt on the occupant. q Child safety seat installation.
RWARNING
Rear-facing child seats or infant carriers should never be placed in the front seats.
102
File:06prssp.ex Update:Mon Jun 3 10:07:19 1996
[SS07100(ALL)02/96]
*[SS07200(ALL)02/96] [SS07300(ALL)02/96]
*[SS07400(ALL)02/96]
*[SS07500(ALL)02/96]
%*[SS10000(ALL)02/96] [SS10100(ALL)02/96]
*[SS10200(ALL)01/96]
This mode must be used when installing a child seat. To switch the retractor from the emergency locking mode to the automatic locking mode, perform the following steps: 1. Buckle the lap/shoulder combination belt. 2. Pull on the belt until all of the stored belt is
out of the retractor and a click is heard.
3. A clicking sound will continue to be heard
as the belt is allowed to retract. This indicates that the retractor is in the automatic locking mode.
NOTE: When the combination lap/shoulder
belt is unbuckled and allowed to retract completely, the retractor will switch to the vehicle sensitive (emergency) locking mode. See the detailed instructions under Safety Seats for Children in this chapter. Safety Belt Extension Assembly A safety belt that is too short even when fully extended can be lengthened. You can add about eight inches (20 cm) to the belt length with a safety belt extension assembly. Safety belt extensions are available at no cost from your dealer. Use only extensions manufactured by the same supplier as the safety belt. Manufacturer identification is located at the end of the webbing on the label. Also, use the safety belt extension only if the safety belt is too short for you when fully extended. Do not use extension to change the fit of the shoulder belt across the torso.
103
File:06prssp.ex Update:Mon Jun 3 10:07:19 1996
*[SS10300(ALL)02/96]
%*[SS10400(ALL)03/96] *[SS10500(ALL)02/96]
%*[SS10600(ALL)05/96]
%*[SS10900(ALL)05/96]
*[SS11000(ALL)05/96] *[SS11100(ALL)05/96]
RWARNING
Failure to follow these instructions will affect the performance of the safety belts and increase the risk of personal injury.
Safety Belt Maintenance Check the safety belt systems periodically to make sure that they work properly and are not damaged. All safety belt assemblies, including retractors, buckles, front seat belt buckle support assemblies (slide bar) (if equipped), shoulder belt height adjusters (if equipped), child safety seat tether bracket assemblies (if equipped), and attaching hardware, should be inspected after any collision. Ford recommends that all safety belt assemblies used in vehicles involved in a collision be replaced. However, if the collision was minor and a qualified technician finds that the belts do not show damage and continue to operate properly, they do not need to be replaced. Safety belt assemblies not in use during a collision should also be inspected and replaced if either damage or improper operation is noted. Air Bag Supplemental Restraint System (SRS) Important Air Bag Precautions Your vehicle is equipped with a supplemental restraint system designed to work with the safety belts to help protect you and your right front seat passenger in the event of a collision. The Air Bag Supplemental Restraint System is primarily designed to reduce certain upper body injuries.
104
File:06prssp.ex Update:Mon Jun 3 10:07:19 1996
*[SS11200(ALL)05/96]
*[SS11250(ALL)05/96]
*[SS11300(ALL)05/96]
*[SS11350(ALL)05/96]
RWARNING
All occupants of the vehicle, including the driver, should always wear their safety belts, failure to do so may increase the risk of personal injury in the event of a collision.
RWARNING
Do not place objects or mount equipment on or near the air bag covers that may come into contact with an inflating air bag. Failure to follow these instructions may increase the risk of personal injury in the event of a collision.
RWARNING
Do not attempt to service, repair, or modify the air bag Supplemental Restraint System or its fuses. See your Ford or Lincoln-Mercury dealer.
RWARNING
If you are close to an inflating air bag, it could seriously injure you. Position your seat such that it is as far back from the steering wheel as possible but still allows you to properly control the vehicle.
105
File:06prssp.ex Update:Mon Jun 3 10:07:19 1996
*[SS11400(ALL)05/96] *[SS11450(ALL)05/96]
*[SS11500(ALL)05/96]
[SS11550(ALL)05/96]
%*[SS11600(ALL)05/96]
[SS11650(ALL)05/96]
Children and Air Bags NOTE: For additional important safety
information on the proper use of seat belts, child seats, and infant seats, please read the entire Safety Restraints chapter in this owner guide.
RWARNING
Children should always wear their safety belts. Failure to follow these instructions may increase the risk of personal injury in the event of a collision.
RWARNING
Rear-facing child seats or infant carriers should never be placed in the front seats.
How Does the Air Bag Supplemental Restraint System Work? The Air Bag Supplemental Restraint System is designed to activate when the vehicle is in a collision similar to hitting a fixed barrier head on at 8-14 mph. The fact that the air bags did not inflate in a collision does not mean that something is wrong with the system. Rather, it means the forces were not of the type sufficient to cause activation.
106
File:06prssp.ex Update:Mon Jun 3 10:07:19 1996
[SS11675(ALL)05/96]
half page art:0032207-D
*[SS11700(ALL)05/96]
If the vehicle is in a moderate or severe frontal collision, the system is activated and the air bags inflate rapidly. After the air bag inflates, it will quickly deflate. After the air bag deployment, you may notice a smoke-like, powdery residue or smell the burnt propellant. This is normal. The residue may consist of cornstarch or talcum powder (which is used to lubricate the air bag) or sodium compounds, such as sodium carbonates (e.g. baking soda) that result from the combustion process that inflates the air bag. Small amounts of sodium hydroxide may be present which may irritate the skin and eyes, but none of the residue is toxic. The Air Bag Supplemental Restraint System will reduce, but not eliminate all injuries in an accident.
107
File:06prssp.ex Update:Mon Jun 3 10:07:19 1996
*[SS11750(ALL)05/96]
*[SS11800(ALL)05/96]
*[SS11850(ALL)05/96] *[SS11900(ALL)05/96] *[SS11950(ALL)05/96] *[SS12000(ALL)05/96] *[SS12050(ALL)05/96] *[SS12100(ALL)05/96] *[SS12150(ALL)05/96]
RWARNING
Several air bag system components get hot after inflation. Do not try to touch them after inflation.
RWARNING
The air bag will inflate only once. The system is designed to function on a one-time-only basis. If the air bag is inflated, THE AIR BAG WILL NOT FUNCTION AGAIN AND MUST BE REPLACED IMMEDIATELY. If the air bag is not replaced, this will increase the risk of injury in a subsequent collision.
The Air Bag Supplemental Restraint System consists of: q driver and passenger air bag modules (which
include the inflators and air bags), one or more impact and safing sensors, a system diagnostic module, a readiness light and tone, and the electrical wiring which connects the components.
The diagnostic module monitors its own circuits, the air bag electrical system, the air bag readiness light, the air bag power and the air bag inflators.
108
File:06prssp.ex Update:Mon Jun 3 10:07:19 1996
[SS12160(ALL)05/96]
half page art:0032152-A
[SS12170(ALL)05/96]
Inflated driver-side air bag
half page art:0032153-A
Inflated passenger-side air bag
109
File:06prssp.ex Update:Mon Jun 3 10:07:19 1996
*[SS12200(ALL)05/96] *[SS12250(ALL)05/96]
%*[SS12300(ALL)05/96] *[SS12350(ALL)05/96] *[SS12400(ALL)05/96] %*[SS12450(ALL)05/96]
*[SS12500(ALL)05/96]
*[SS12550(ALL)05/96] *[SS12600(ALL)05/96]
Determining if System Is Operational The Air Bag Supplemental Restraint System uses a readiness light and a tone to indicate the condition of the system. The readiness light is in the instrument cluster. When you turn the ignition key to ON, this light will illuminate for approximately six (6) seconds and then turn off. This indicates that the system is operating normally. NOTE: Routine maintenance of the air bag system is not required. A problem with the system is indicated by one or more of the following:
the readiness light will either flash or stay lit, the readiness light will not light immediately after ignition is turned on, a group of five beeps will be heard. The tone pattern will repeat periodically until the problem and light are repaired. If any of these things happen, even intermittently, have the Air Bag Supplemental Restraint System serviced at your Ford or Lincoln-Mercury dealer immediately. Unless serviced, the system may not function properly in the event of a collision. Disposal of Air Bags and Air Bag Equipped Vehicles For disposal of air bags or air bag equipped vehicles, see your local Ford or Lincoln-Mercury dealer. Air bags MUST BE disposed of by qualified personnel.
110
File:06prssp.ex Update:Mon Jun 3 10:07:19 1996
%*[SS15900(ALL)01/96] *[SS16000(ALL)01/96]
*[SS16100(ALL)02/96]
*[SS16200(ALL)01/96]
*[SS16300(ALL)05/96]
Safety Restraints for Children In the U.S. and Canada, you are required by law to use safety restraints for children. If small children ride in your vehicle — this generally includes children who are four years old or younger and who weigh 40 pounds (18 kg) or less — you must put them in safety seats that are made specially for children. Safety belts alone do not provide maximum protection for these children. Check your local and state laws for specific requirements.
RWARNING
Never let a passenger hold a child on his or her lap while the vehicle is moving. The passenger cannot protect the child from injury in a collision.
RWARNING
To prevent the risk of injury, make sure children sit where they can be properly restrained.
RWARNING
It is extremely dangerous to ride in a cargo area, inside or outside of a vehicle. In a collision, people riding in these areas are more likely to be seriously injured or killed. Do not allow people to ride in any area of your vehicle that is not equipped with seats and safety belts. Be sure everyone in your vehicle is in a seat and using a safety belt properly.
111
File:06prssp.ex Update:Mon Jun 3 10:07:19 1996
*[SS16400(ALL)05/96]
[SS16450(ALL)05/96]
*[SS16500(ALL)03/96]
*[SS16600(ALL)01/96]
*[SS16700(ALL)03/96]
When possible, put children in the rear seat of your vehicle. Accident statistics suggest that children are safer when properly restrained in the rear seating positions than in the front seating positions.
RWARNING
Failure to follow all instructions on the proper use of child seats or the vehicle restraint systems can result in serious injury or death in the event of a sudden stop or collision.
RWARNING
Carefully follow all of the manufacturer’s instructions included with the safety seat you put in your vehicle. If you do not install and use the safety seat properly, the child may be injured in a sudden stop or collision.
RWARNING
Safety belts and seats can become hot in a vehicle that has been closed up in sunny weather; they could burn a small child. Check seat covers and buckles before you place a child anywhere near them.
RWARNING
Do not leave children, unreliable adults, or pets unattended in your vehicle.
112
File:06prssp.ex Update:Mon Jun 3 10:07:19 1996
%*[SS16800(ALL)01/96] [SS16900(ALL)01/96]
*[SS17000(ALL)01/96]
*[SS17100(ALL)05/96]
%*[SS17300(ALL)05/96]
*[SS17400(ALL)05/96]
*[SS17500(ALL)05/96]
Safety Seats for Children Use a safety belt that is recommended for the size and weight of the child. Always follow the safety seat manufacturer’s instructions when installing and using the safety seat. Ford recommends the use of a child safety seat having a top tether strap. Install the child safety seat in a seating position which is capable of providing a tether anchorage. For more information on top tether straps see Attaching Safety Seats With Tether Straps in this chapter. When installing a child safety seat, be sure to use the correct safety belt buckle for that seating position, and make sure the tongue is securely fastened in the buckle. For a shoulder/lap belt combination with a sliding tongue, make sure the retractor is in the automatic locking mode.
RWARNING
When using forward-facing child seats move the passenger seat as far back from the instrument panel as possible. Never secure rear-facing child seats or infant carriers in the front seat.
The force of the rapidly inflating passenger air bag could push the top of the rear-facing seat against the vehicle seatback, armrests or console. Rear-facing infant seats must always be secured in the rear seat. All child restraint systems are designed to be secured in vehicle seats by lap belts or by the lap portion of a lap-shoulder belt.
113
File:06prssp.ex Update:Mon Jun 3 10:07:19 1996
*[SS17600(ALL)03/96]
*[SS17700(ALL)03/96]
*[SS17800(ALL)01/96] *[SS17900(ALL)02/96]
*[SS18000(ALL)05/96]
RWARNING
If you do not properly secure the safety seat, the child occupying the seat may be injured during a collision or sudden stop. An unsecured safety seat could also injure other passengers.
RWARNING
Carefully follow all of the manufacturer’s instructions included with the safety seat you put in your vehicle. If you do not install and use the safety seat properly, the child may be injured in a sudden stop or collision.
Installing Child Safety Seats Your vehicle is equipped with a dual locking mode retractor on the shoulder belt portion of the front passenger seat and both rear seats. The automatic locking mode must be used when installing a child seat or infant carrier in the front passenger seat or rear seats.
RWARNING
Rear-facing child seats or infant carriers should never be placed in the front seats.
114
File:06prssp.ex Update:Mon Jun 3 10:07:19 1996
*[SS18100(ALL)01/96]
[SS18200(ALL)01/96]
[SS18300(ALL)01/96]
[SS18400(ALL)01/96]
half page art:0032385-B
If you choose to install a child safety seat in the front seat, move the seat as far back as possible. 1. Position the child seat or infant carrier on
the passenger seat of the vehicle.
2. Pull down on the shoulder belt, then grasp
the shoulder belt and lap belt together.
Grasping lap and shoulder belt together
115
File:06prssp.ex Update:Mon Jun 3 10:07:19 1996
[SS18500(ALL)01/96]
[SS18600(ALL)03/96]