- 2013 Chrysler TOWN and Country Owners Manuals
- Chrysler TOWN and Country Owners Manuals
- 2006 Chrysler TOWN and Country Owners Manuals
- Chrysler TOWN and Country Owners Manuals
- 2011 Chrysler TOWN and Country Owners Manuals
- Chrysler TOWN and Country Owners Manuals
- 2007 Chrysler TOWN and Country Owners Manuals
- Chrysler TOWN and Country Owners Manuals
- 2010 Chrysler TOWN and Country Owners Manuals
- Chrysler TOWN and Country Owners Manuals
- 2005 Chrysler TOWN and Country Owners Manuals
- Chrysler TOWN and Country Owners Manuals
- 2009 Chrysler TOWN and Country Owners Manuals
- Chrysler TOWN and Country Owners Manuals
- 2004 Chrysler TOWN and Country Owners Manuals
- Chrysler TOWN and Country Owners Manuals
- 2012 Chrysler TOWN and Country Owners Manuals
- Chrysler TOWN and Country Owners Manuals
- 2008 Chrysler TOWN and Country Owners Manuals
- Chrysler TOWN and Country Owners Manuals
- Download PDF Manual
-
replaced immediately! Eventual deterioration of the hose can take place resulting in a possibility of a burst failure.
WARNING!
Worn brake hoses can burst and cause brake failure. You could have an accident. If you see any signs of cracking, scuffing, or worn spots, have the brake hoses replaced immediately.
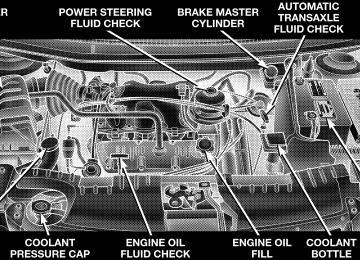
Master Cylinder — ABS Brakes Brake Fluid Level Check The fluid level in the master cylinder should be checked when performing underhood services, or immediately if the brake system warning light indicates system failure. Clean the top of the master cylinder area before removing the cap. Add fluid to bring the level up to the top of the “FULL” mark on the side of the master cylinder reservoir.
402 MAINTAINING YOUR VEHICLE
Overfilling of fluid is not recommended because it may cause leaking in the system. Add enough fluid to bring the level up to the require- ments described on the brake fluid reservoir. With disc brakes, fluid level can be expected to fall as the brake pads wear. However, low fluid level may be caused by a leak and a checkup may be needed. Use only manufacturers recommended brake fluid, refer to Recommended Fluids, Lubricants and Genuine Parts for correct fluid type.
WARNING!
Use of brake fluid that may have a lower initial boiling point or unidentified as to specification, may result in sudden brake failure during hard pro- longed braking. You could have an accident.
WARNING!
Overfilling the brake fluid reservoir can result in spilling brake fluid on hot engine parts and the brake fluid catching fire.
Use only brake fluid that has been in a tightly closed container to avoid contamination from foreign matter or moisture.
CAUTION!
Do not allow petroleum base fluid to contaminate the brake fluid — all brake seal components could be damaged causing partial or complete brake fail- ure.
Fuel System Hoses Electronic Fuel Injection high pressure fuel systems are designed with hoses which have unique material charac- teristics to provide adequate sealing and resist attack by deteriorated gasoline. Use only the manufacturers specified hoses in any fuel system servicing. It is mandatory to replace all clamps that have been loosened or removed during service. Care should be taken in installing new clamps to insure they are properly torqued. Automatic Transmission The automatic transmission and differential assembly are contained within a single housing. All automatic transmissions are equipped with a conven- tional filler tube and dipstick. If fluid is added, it should be added through the dipstick hole in the case.
MAINTAINING YOUR VEHICLE 403
The dipstick is located just behind the radiator, lower right side. Selection of Lubricant It is important that the proper lubricant is used in the transmission to assure optimum transmission perfor- mance. Use only manufacturers recommended transmis- sion fluid, refer to Recommended Fluids, Lubricants and Genuine Parts for correct fluid type. It is important that the transmission fluid be maintained at the prescribed level using the recommended fluid.
404 MAINTAINING YOUR VEHICLE
CAUTION!
Using a transmission fluid other than the manufac- turers recommended fluid may cause deterioration in transmission shift quality and/or torque converter shudder. Using a transmission fluid other than the manufacturers recommended fluid will result in more frequent fluid and filter changes. Refer to Recommended Fluids, Lubricants and Genuine Parts for correct fluid type.
Procedure For Checking Fluid Level The fluid level in the automatic transmission should be checked whenever the vehicle is serviced. Operation with an improper fluid level will greatly reduce the life of the transmission and of the fluid. To properly check the automatic transmission fluid level, the following procedure must be used: 1. The vehicle must be on level ground. 2. The engine should be running at curb idle speed for a minimum of 60 seconds. 3. Fully apply parking brake. 4. Place the gear selector momentarily in each gear position ending with the lever in P (PARK). Wipe the area around the dipstick clean to eliminate the possibility of dirt entering the transmission.
5. Remove the dipstick and determine if the fluid is hot or warm. Hot fluid is approximately 180°F (82°C), which is the normal operating temperature after the vehicle has been driven at least 15 miles (24 km). The fluid cannot be comfortably held between the finger tips. Cold is when the fluid is below 80°F (27°C). 6. Wipe the dipstick clean and reinsert until seated. Remove dipstick and note reading.
a. If the fluid is hot, the reading should be in the crosshatched area marked “HOT” (between the upper two holes in the dipstick). b. If the fluid is cold, the fluid level should be between the lower two holes in the area marked “COLD”.
If the fluid level indicates low, add sufficient fluid to bring to the proper level.
MAINTAINING YOUR VEHICLE 405
CAUTION!
Do not overfill. Dirt and water in the transmission can cause serious damage. To prevent dirt and water from entering the transmission after checking or replenishing fluid, make certain that the dipstick cap is reseated properly.
Fluid and Filter Changes Automatic transmission fluid should be changed on all transmissions as follows: Normal Usage — No change necessary Severe Usage (fluid and filter) — Refer to Maintenance Schedule “B” Severe Usage is defined as:
406 MAINTAINING YOUR VEHICLE
• Police, taxi, limousine, commercial type operation, or trailer towing where the vehicle is driven regularly for more than 45 minutes of continuous operation.
NOTE: Refer to Section 8 of this manual for Mainte- nance Schedules. If the transmission is disassembled for any reason, the fluid and filter should be changed. Special Additives Do not add any fluid additives to the transmission. The only exception to this policy is the use of special dyes to aid in detecting fluid leaks. The use of transmission sealers should be avoided as they may adversely affect seals.
Front And Rear Wheel Bearings Front and rear wheel bearings are permanently sealed. No regular maintenance is required for these compo- nents. Appearance Care and Protection from Corrosion
Protection of Body and Paint from Corrosion Vehicle body care requirements vary according to geo- graphic locations and usage. Chemicals that make roads passable in snow and ice, and those that are sprayed on trees and road surfaces during other seasons, are highly corrosive to the metal in your vehicle. Outside parking, which exposes your vehicle to airborne contaminants, road surfaces on which the vehicle is operated, extreme hot or cold weather and other extreme conditions will have an adverse effect on paint, metal trim, and under- body protection.
The following maintenance recommendations will enable you to obtain maximum benefit from the corrosion resistance built into your vehicle. What Causes Corrosion? Corrosion is the result of deterioration or removal of paint and protective coatings from your vehicle. The most common causes are: • Road salt, dirt and moisture accumulation. • Stone and gravel impact. • Insects, tree sap and tar. • Salt in the air near seacoast localities. • Atmospheric fallout/industrial pollutants.
MAINTAINING YOUR VEHICLE 407
lated on your vehicle, wash it as soon as possible.
Washing • Wash your vehicle regularly. Always wash your ve- hicle in the shade using a mild car wash soap, and rinse the panels completely with clear water. • If insects, tar or other similar deposits have accumu- • Use Mopar auto polish to remove road film and stains and to polish your vehicle. Take care never to scratch the paint. • Avoid using abrasive compounds and power buffing that may diminish the gloss or thin out the paint finish.
408 MAINTAINING YOUR VEHICLE
CAUTION!
Do not use abrasive or strong cleaning materials such as steel wool or scouring powder, which will scratch metal and painted surfaces.
Special Care • If you drive on salted or dusty roads or if you drive near the ocean, hose off the undercarriage at least once a month. • It is important that the drain holes in the lower edges of the doors, rocker panels and liftgate be kept clear and open. • If you detect any stone chips or scratches in the paint, touch them up immediately. The cost of such repairs is considered the responsibility of the owner.
• If your vehicle is damaged due to an accident or similar cause which destroys the paint and protective coating have your vehicle repaired as soon as possible. The cost of such repairs is considered the responsibil- ity of the owner. • All wheels and wheel trim, especially aluminum and chrome plated wheels should be cleaned regularly with mild soap and water to prevent corrosion. To remove heavy soil, select a nonabrasive, non-acidic cleaner. Do not use scouring pads, steel wool, a bristle brush or metal polishes. Only Mopar cleaners are recommended. Do not use oven cleaner. Avoid auto- matic car washes that use acidic solutions or harsh brushes that may damage the wheels’ protective fin- ish. • If you carry special cargo such as chemicals, fertilizers, de-icer salt, etc., be sure that such materials are well packaged and sealed.
mud or stone shields behind each wheel.
• If a lot of driving is done on gravel roads, consider • Use Mopar touch up paint on scratches as soon as possible. Your dealer has touch up paint to match the color of your vehicle.
Interior Care Use Mopar Fabric Cleaner to clean fabric upholstery and carpeting. Use Mopar Vinyl Cleaner to clean vinyl upholstery and trim. Mopar Total Clean is specifically recommended for leather upholstery. Your leather upholstery can be best preserved by regular cleaning with a damp soft cloth. Small particles of dirt can act as an abrasive and damage the leather upholstery and should be removed promptly with a damp cloth. Stubborn soils can be removed easily with a soft cloth
MAINTAINING YOUR VEHICLE 409
and Mopar Total Clean. Care should be taken to avoid soaking your leather upholstery with any liquid. Please do not use polishes, oils, cleaning fluids, solvents, deter- gents, or ammonia based cleaners to clean your leather upholstery. Application of a leather conditioner is not required to maintain the original condition.
WARNING!
Do not use volatile solvents for cleaning purposes. Many are potentially flammable, and if used in closed areas they may cause respiratory harm.
Cleaning High Gloss Front Door B-pillar Appliques When cleaning the front door B-pillar appliques, care must be taken to avoid scratching the plastic.
410 MAINTAINING YOUR VEHICLE
1. Remove all dirt with a wet soft rag. A mild soap solution may be used, do not use high alcohol content or abrasive cleaners. Glass cleaners are not recommended. If soap is used, wipe clean with a clean damp rag. 2. To maintain the high gloss shine, apply a scratch and swirl remover onto a damp cloth and apply to door applique. Rub the applique with a firm pressure then buff lightly with a clean cotton cloth until a high gloss shine is achieved. Glass Surfaces All glass surfaces should be cleaned on a regular basis with any commercial household-type glass cleaner. Never use an abrasive type cleaner. Use caution when cleaning inside rear windows equipped with electric defrosters or windshields equipped with a windshield wiper de-icer. Do not use scrapers or other sharp instru- ments which may scratch the elements.
When cleaning the rear view mirror, spray cleaner on the towel or rag that you are using. Do not spray cleaner directly on the mirror. Cleaning Plastic Instrument Cluster Lenses The lenses in front of the instruments in this vehicle are molded in clear plastic. When cleaning the lenses, care must be taken to avoid scratching the plastic. 1. Clean with a wet soft rag. A mild soap solution may be used, but do not use high alcohol content or abrasive cleaners. If soap is used, wipe clean with a clean damp rag. 2. Dry with a soft tissue. Seat Belt Maintenance Do not bleach, dye or clean the belts with chemical solvents or abrasive cleaners. This will weaken the fabric. Sun damage will also weaken the fabric.
If the belts need cleaning, use a mild soap solution or lukewarm water. Do not remove the belts from the car to wash them. Replace the belts if they appear frayed or worn or if the buckles do not work properly. Cleaning The Instrument Panel and Underseat Cup Holders
Removal Remove the ash receiver from the convenience tray if there is a smoker’s package in your vehicle. With your index finger, locate the stop tab located at the rear of the convenience tray.
MAINTAINING YOUR VEHICLE 411
Removing Front Cupholder
Press the stop tab, slide the entire drawer out and remove it from the instrument panel.
412 MAINTAINING YOUR VEHICLE
Cleaning Soak the drawer, with the drawer front facing up, in a mixture of medium hot tap water and one teaspoon of mild liquid dish soap. Let soak for approximately one hour. After one hour pull the drawer from the water and dip it back into the water about six times. This will loosen any remaining debris. Rinse the drawer thoroughly un- der warm running water. Shake the excess water from the drawer and dry the outer surfaces with a clean soft cloth. Let the drawer sit in a dish drainer overnight to allow the inside mechanism to dry. Installation Align the drawer so the plastic tracks on the drawer fit into the steel retainer in the instrument panel. Push the drawer forward. You may want to cycle the drawer open and closed a few times to ensure proper operation.
INTEGRATED POWER MODULE (IPM)
Integrated Power module (IPM)
An Integrated Power Module is located in the engine compartment near the battery. This center contains maxi fuses, mini fuses and relays. A label that identifies each component is printed on the inside of the cover.
Cavity Maxi Fuse
Description
Cavity Maxi Fuse
Description
MAINTAINING YOUR VEHICLE 413
F4
F9
F10
F13
F19
F20
F22
F27
30 Amp Pink 40 Amp Green 40 Amp Green 40 Amp Green 40 Amp Green 30 Amp Pink 30 Amp Pink 40 Amp Green
Front Wipers
Anti-Lock Brake System (ABS) Pump Front Blower
Electronic Back Light (EBL)
Body Control Module (BCM) Feed 1
Central AmplifierSeats
Radiator Fan
F28
F30
F31
F32
40 Amp Green 40 Amp Green 40 Amp Green 40 Amp Green
Power Windows
Headlight Washers (Export Only) Power Sliding Door
Power Liftgate
414 MAINTAINING YOUR VEHICLE
Cavity
F1
F2
F3
F5F6
F8
F11
F12
F14F15
Fog Lights
Description
RDO/IP Ignition
Mini Fuse 20 Amp Yel- low 15 Amp Blue Left Park/Tail Light 15 Amp Blue Right Park/Tail Light 20 Amp Yel- low 20 Amp Yel- low 20 Amp Yel- low 20 Amp Yel- low 25 Amp Clear Rear Blower 20 Amp Yel- low 20 Amp Yel- low
12 Volt Out Ignition or Battery Horn
EWD/ Rear Wiper
Electronic Automatic Transaxle (EATX) Battery
Ignition Off Draw (IOD)
Cavity
Mini Fuse
Description
F15
F17F18
F21F23
F24F26
F33
Fuel Pump
25 Amp Clear ASD 20 Amp Yel- low 15 Amp Blue A/C Clutch 25 Amp Clear Anti-Lock Brake System
(ABS) Module Ignition Switch Hazard
10 Amp Red 20 Amp Yel- low 20 Amp Yel- low 15 Amp Blue Front/Rear Washer 20 Amp Yel- low
Spare (IOD)
Stop Lamp
CAUTION!
• When installing the Integrated Power Module cover, it is important to ensure the cover is prop- erly positioned and fully latched. Failure to do so may allow water to get into the Integrated Power Module, and possibly result in a electrical system failure. • When replacing a blown fuse, it is important to use only a fuse having the correct amperage rating. The use of a fuse with a rating other than indicated may result in a dangerous electrical system overload. If a properly rated fuse contin- ues to blow, it indicates a problem in the circuit that must be corrected.
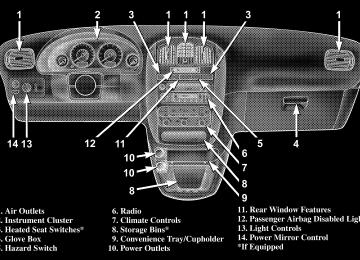
The Heated Mirrors, Lower Instrument Panel Power Outlet and Removable Floor Console, when in the front
MAINTAINING YOUR VEHICLE 415
position are fused with self resetting fuses that are only serviceable by an authorized dealer. The power seats are fused by a 30 Amp circuit breaker located under the driver’s seat. The Power Windows are fused by a 25 Amp circuit breaker located under the instrument panel near the steering column. If you experience temporary or permanent loss of these systems see your authorized dealer for service.
VEHICLE STORAGE If you are leaving your vehicle dormant for more than 21
days you may want to take steps to protect your battery. You may: • Remove the 20 Amp mini fuse in the Integrated Power • Or, disconnect the negative cable from the battery. • Anytime you store your vehicle, or keep it out of service (i.e. vacation) for two weeks or more, run theModule labeled Ignition-Off Draw (IOD).
416 MAINTAINING YOUR VEHICLE
air conditioning system at idle for about five minutes in the fresh air and high blower setting. This will insure adequate system lubrication to minimize the possibility of compressor damage when the system is started again.
NOTE: For lighted switches, see your dealer for replace- ment instructions. All of the interior bulbs are glass wedge base or glass cartridge types. Aluminum base bulbs are not approved and should not be used for replacement.
REPLACEMENT LIGHT BULBS
LIGHT BULBS — Interior Bulb Number Center & Rear Dome Light. . . . . . . . . . . . . . . . . . 578
Center & Rear Reading Lights . . . . . . . . . . . . . . . 578
Front Door Courtesy Light . . . . . . . . . . . . . . . . . . 578
Front Header Reading Lights — If Equipped . . . . . 578
Instrument Cluster Lights . . . . . . . . . . . . . . . . . PC74
Liftgate Light(s). . . . . . . . . . . . . . . . . . . . . . . . . . 578
Overhead Console Reading Lights . . . . . . . . . . PC579
Removable Console Light — If Equipped . . . . . . . 194
Visor Vanity Lights . . . . . . . . . . . . . . . . . . . . 6501966Bulb Number LIGHT BULBS — Exterior Back-up, Tail, Stop, Turn Signal, & Sidemarker . . . 3057
Center High-Mounted Stop Light . . . . . . . . . . . . . 921
Fog Light — If Equipped . . . . . . . . . . . . . . . . . . 9145
Front Side marker, Park/Turn Signal . . . . . . . . 3457AK Headlight . . . . . . . . . . . . . . . . . . . . . . . . . . . . . 9007
Headlight (Long Wheel Base) . . . . . . . . . . . . . . . H13
License. . . . . . . . . . . . . . . . . . . . . . . . . . . . . . . . 168BULB REPLACEMENT
Headlights
1. Remove the three screws securing the headlight mod- ule.
MAINTAINING YOUR VEHICLE 417
2. Turn the bulb socket retaining ring or the bulb assem- bly counterclockwise.
3. Disconnect the electrical connector and replace the bulb. NOTE: On some vehicles it may be necessary to slide the red release lock rearward and push forward on the connector while depressing the release tab.
418 MAINTAINING YOUR VEHICLE
CAUTION!
Do not touch the new bulb with your fingers. Oil contamination will severely shorten bulb life. If the bulb comes in contact with an oily surface, clean the bulb with rubbing alcohol.
Front Park/Turn Signal and Sidemarker Lights
1. Remove the three screws securing the headlight mod- ule.
2. Twist the turn signal socket to remove from the headlight module and pull bulb from socket.
3. Replace bulb, reinstall socket and then reinstall the headlight module.
MAINTAINING YOUR VEHICLE 419
Front Fog Light
1. Reach behind the front fascia from under the vehicle. 2. Twist the front fog light bulb to remove from the fog light housing. 3. Disconnect the electrical connector and replace the bulb.
CAUTION!
Do not touch the new bulb with your fingers. Oil contamination will severely shorten bulb life. If the bulb comes in contact with an oily surface, clean the bulb with rubbing alcohol.
420 MAINTAINING YOUR VEHICLE
Rear Tail, Stop, Turn Signal, Side Marker and Back-up Lights
3. Squeeze the socket assembly tabs to remove it from the housing.
1. Raise the liftgate. 2. Remove the two tail light assembly push-in type fasteners, by prying under the fastener head with a large flat screwdriver.
4. Pull the bulb to remove it from the socket. 5. Replace the bulb, reinstall the socket, and reattach the light assembly.
Center High Mounted Stop Light (CHMSL)
1. Remove the two screws securing the CHMSL.
MAINTAINING YOUR VEHICLE 421
2. Twist the bulb socket to remove from the CHMSL housing. 3. Pull the bulb out of the socket. 4. Replace the bulb, reinstall the socket and reattach the CHMSL. License Light
1. Remove the two lens assembly mounting screws. 2. Pull the bulb out of the socket. Replace the bulb and reattach the lens assembly.
422 MAINTAINING YOUR VEHICLE
FLUIDS AND CAPACITIES
Fuel (Approximate) 87
Octane Engine Oil-with filterCooling System *
U.S.
20 Gallons
Metric 76 Liters
3.3 & 3.8 Liter Engines (SAE 5W-20, API Certified)
5.0 qts
4.7 Liters
3.3 & 3.8 Liter Engines (Mopar威 Antifreeze/Coolant 5 Year/ 100,000 Mile Formula)
13.4 qts
12.6 Liters
* Includes heater and coolant recovery bottle filled to MAX level. * Add 2.9 quarts (2.8 liters) if equipped with a rear heater.
MAINTAINING YOUR VEHICLE 423
RECOMMENDED FLUIDS, LUBRICANTS AND GENUINE PARTS Engine Component Engine Coolant
Engine Oil
Oil Filter 3.3/3.8 liter engines Spark Plugs
Fuel Selection
Fluids, Lubricants and Genuine Parts Mopar威 Antifreeze/Coolant 5 Year/100,000 Mile Formula HOAT (Hybrid Or- ganic Additive Technology) Use API Certified SAE 5W-20 engine oil. Refer to your oil filler cap for cor- rect SAE grade, meeting DaimlerChrysler Material Standard MS-6395. Mopar 5281090 or equiv. Refer to the Vehicle Emission Control Information label in the engine com- partment. 87 Octane
424 MAINTAINING YOUR VEHICLE
Chassis Component Automatic Transmission Brake Master Cylinder
Power Steering Reservoir
Fluids, Lubricants and Genuine Parts. Mopar威 ATF+4 Automatic Transmission Fluid. Mopar威 DOT 3, SAE J1703 should be used. If DOT 3, SAE J1703 brake fluid is not available, then DOT 4 is acceptable. Use only recommended brake fluids. Mopar威 ATF+4 Automatic Transmission Fluid.
MAINTENANCE SCHEDULES
CONTENTS
䡵 Emission Control System Maintenance . . . . . . . . 426
䡵 Maintenance Schedules . . . . . . . . . . . . . . . . . . . 426▫ Schedule “B” . . . . . . . . . . . . . . . . . . . . . . . . 429
▫ Schedule “A” . . . . . . . . . . . . . . . . . . . . . . . . 437M
426 MAINTENANCE SCHEDULES
EMISSION CONTROL SYSTEM MAINTENANCE The “Scheduled” maintenance services, listed in bold type must be done at the times or mileages specified to assure the continued proper functioning of the emission control system. These, and all other maintenance services included in this manual, should be done to provide best vehicle performance and reliability. More frequent main- tenance may be needed for vehicles in severe operating conditions such as dusty areas and very short trip driving. Inspection and service also should be done any time a malfunction is suspected. NOTE: Maintenance, replacement, or repair of the emis- sion control devices and systems on your vehicle may be performed by any automotive repair establishment or individual using any automotive part which has been certified pursuant to U.S. EPA or, in the State of Califor- nia, California Air Resources Board regulations.
MAINTENANCE SCHEDULES There are two maintenance schedules that show the required service for your vehicle. First is Schedule “B”. It is for vehicles that are operated under the conditions that are listed below and at the beginning of the schedule. • Day or night temperatures are below 32° F (0° C). • Stop and go driving. • Extensive engine idling. • Driving in dusty conditions. • Short trips of less than 10 miles (16 km). • More than 50% of your driving is at sustained high • Trailer towing.〫
speeds during hot weather, above 90° F (32° C).
vice).〫
• Taxi, police, or delivery service (commercial ser- • Off-road or desert operation. NOTE: Most vehicles are operated under the conditions listed for Schedule ⬙B⬙. Second is Schedule “A”. It is for vehicles that are not operated under any of the conditions listed under Sched- ule ⬙B⬙. Use the schedule that best describes your driving condi- tions. Where time and mileage are listed, follow the interval that occurs first.
CAUTION!
Failure to perform the required maintenance items may result in damage to the vehicle.
MAINTENANCE SCHEDULES 427
At Each Stop for Fuel • Check the engine oil level about 5 minutes after a fully warmed engine is shut off. Checking the oil level while the vehicle is on level ground will improve the accu- racy of the oil level reading. Add oil only when the level is at or below the ADD or MIN mark. • Check the windshield washer solvent and add if
required.
428 MAINTENANCE SCHEDULES
damage.
Once a Month • Check tire pressure and look for unusual wear or • Inspect the battery and clean and tighten the terminals • Check the fluid levels of coolant reservoir, brake • Check all lights and all other electrical items for correct
master cylinder and transmission, add as needed.
as required.
operation.
At Each Oil Change • Change the engine oil filter. • Inspect the exhaust system. • Inspect the brake hoses. • Inspect the CV joints and front suspension compo- • Check the automatic transmission fluid level. • Check the coolant level, hoses, and clamps.
nents.
SCHEDULE “B” Follow schedule “B” if you usually operate your vehicle under one or more of the following conditions. Change the automatic transmission fluid and filter every 60,000
miles (96 000 km) if the vehicle is usually operated under one or more of the conditions marked with an 〫. • Day or night temperatures are below 32° F (0° C). • Stop and go driving. • Extensive engine idling.SCHEDULE “B” 429
speeds during hot weather, above 90° F (32° C).
• Driving in dusty conditions. • Short trips of less than 10 miles (16 km). • More than 50% of your driving is at sustained high • Trailer towing.〫 • Taxi, police, or delivery service (commercial ser- • Off-road or desert operation.
vice).〫
430 SCHEDULE “B”
Miles (Kilometers) Change engine oil and engine oil filter. Rotate Tires Inspect the brake linings. Inspect the engine air cleaner filter, replace if necessary. * Replace the engine air cleaner filter. * Replace the air conditioning filter.
3, 000
(5 000 )6, 000
(10 000 )9, 000
(14 000)12, 000
(19 000)15, 000
(24 000)18, 000
(29 000)Miles (Kilometers) Change engine oil and engine oil filter. Rotate Tires Inspect the brake linings. Inspect the engine air cleaner filter, replace if necessary. * Replace the engine air cleaner filter. Inspect the tie rod ends and boot seals. Inspect the PCV valve and replace as neces- sary.* Replace the air conditioning filter.
21, 000
(34 000)24, 000
(38 000)27, 000
(43 000)30, 000
(48 000)33, 000
(53 000)36, 000
(58 000)SCHEDULE “B” 431
432 SCHEDULE “B”
Miles (Kilometers) Change engine oil and engine oil filter. Rotate Tires Inspect the brake linings. Inspect the engine air cleaner filter, replace if necessary. * Replace the engine air cleaner filter. * Replace the air conditioning filter.
39, 000
(62 000)42, 000
(67 000)45, 000
(72 000)48, 000
(77 000)51, 000
(82 000)54, 000
(86 000)Miles (Kilometers) Change engine oil and engine oil filter. Rotate Tires Inspect the brake linings. Inspect the engine air cleaner filter, replace if necessary. * Replace the engine air cleaner filter. Inspect the tie rod ends and boot seals. Inspect the PCV valve and replace if neces- sary.* Inspect the serpentine drive belt on 3.3 liter and 3.8 liter engines, replace if necessary. ‡ Change the automatic transmission fluid and filter. 〫 Replace the air conditioning filter.
57, 000
(91 000)60, 000
(96 000)63, 000
(101 000)66, 000
(106 000)69, 000
(110 000)72, 000
(115 000)SCHEDULE “B” 433
M
434 SCHEDULE “B”
Miles (Kilometers) Change engine oil and engine oil filter. Rotate Tires Inspect the brake linings. Inspect the engine air cleaner filter, replace if necessary. * Replace the engine air cleaner filter Replace the spark plugs on 3.3 liter and 3.8
liter engines. Replace the ignition cables 3.3 liter and 3.8
liter engines. Inspect the tie rod ends and boot seals. Check the PCV valve and replace if necessary. Not required if previously changed.* Inspect the serpentine drive belt on 3.3 liter and 3.8 liter engines, replace if necessary. ‡ Replace the air conditioning filter.75, 000
(120 000)78, 000
(125 000)81, 000
(130 000)84, 000
(134 000)87, 000
(139 000)90, 000
(144 000)Miles (Kilometers) Change engine oil and engine oil filter. Rotate Tires Inspect the brake linings. Inspect the engine air cleaner filter, replace if necessary. * Replace the engine air cleaner filter * Inspect the serpentine drive belt on 3.3 liter and 3.8 liter engines, replace if necessary. ‡ Flush and replace the engine coolant at 60
months or 100,000 miles. Replace the air conditioning filter.93, 000
(149 000)96, 000
(154 000)99, 000
(158 000)100, 000
(160 000)102, 000
(163 000)105, 000
(168 000)SCHEDULE “B” 435
M
436 SCHEDULE “B”
Miles (Kilometers) Change engine oil and engine oil filter. Rotate Tires Inspect the brake linings. Inspect the engine air cleaner filter, replace if necessary. * Replace the engine air cleaner filter. Inspect the tie rod ends and boot seals. Inspect the PCV valve and replace as necessary.* Inspect the serpentine drive belt on 3.3 liter and 3.8 liter engines, replace if necessary. ‡ Change the automatic transmission fluid and filter. 〫 Replace the air conditioning filter. * This maintenance is recommended by the manufacture to the owner but is not required to maintain the emis- sions warranty. ‡ This maintenance is not required if previously replaced.
108, 000
(173 000)111, 000
(178 000)114, 000
(182 000)117, 000
(187 000)120, 000
(192 000)〫 This maintenance is required only for police, taxi, limousine type operation, or trailer towing. Inspection and service should also be performed anytime a malfunction is observed or suspected. Retain all re- ceipts.
SCHEDULE “A” 437
SCHEDULE “A” Miles (Kilometers) [Months] Change engine oil and engine oil filter. Rotate Tires Inspect the brake linings. Inspect the engine air cleaner filter, replace if necessary. * Replace the engine air cleaner filter. Inspect the tie rod ends and boot seals. Replace the air conditioning filter.
6, 000
(10 000)12, 000
(19 000)18, 000
(29 000)24, 000
(38 000 )30, 000
(48 000)36, 000
(58 000)[6]
[18]
[12]
[24]
[30]
[36]
M
438 SCHEDULE “A”
Miles (Kilometers) [Months] Change engine oil and engine oil filter. Rotate Tires Inspect the brake linings. Inspect the engine air cleaner filter, replace if necessary. * Replace the engine air cleaner filter. Inspect the tie rod ends and boot seals. Check the PCV valve and replace, if neces- sary.* Inspect the serpentine drive belt on 3.3 liter and 3.8 liter engines, replace if necessary. ‡ Flush and replace the engine coolant at 60
months, regardless of mileage. Replace the air conditioning filter.42, 000
(67 000)48, 000
(77 000)54, 000
(86 000)60, 000
(96 000)66, 000
(106 000)72, 000
(115 000)[42]
[48]
[54]
[60]
[66]
[72]
Miles (Kilometers) [Months] Change engine oil and engine oil filter. Rotate Tires Inspect the brake linings. Inspect the engine air cleaner filter, replace if neces- sary. * Replace the engine air cleaner filter. Inspect the tie rod ends and boot seals. Check and replace the PCV valve , if necessary.* Inspect the serpentine drive belt on 3.3 liter and 3.8
liter engines, replace if necessary. ‡ Replace the spark plugs 3.3 liter and 3.8 liter en- gines. Replace the ignition cables 3.3 liter and 3.8 liter engines.SCHEDULE “A” 439
78, 000
(125 000)84, 000
(134 000)90, 000
(144 000)96, 000
(154 000)100, 000
(160 000)[78]
[84]
[96]
[90]
440 SCHEDULE “A”
Miles (Kilometers) [Months] Flush and replace the engine coolant at 100,000
miles, if not done at 60 months. Replace the air conditioning filter.78, 000
(125 000)[78]
84, 000
(134 000)[84]
90, 000
(144 000)[90]
96, 000
(154 000)[96]
100, 000
(160 000)Miles (Kilometers) [Months] Change engine oil and engine oil filter. Rotate Tires Inspect the brake linings. Inspect the engine air cleaner filter, replace if necessary. * Replace the engine air cleaner filter. Inspect the tie rod ends and boot seals. Check the PCV valve and replace, if necessary.* Inspect the serpentine drive belt on 3.3 liter and 3.8 liter engines, replace if necessary. ‡ Flush and replace the engine coolant at 120 months, if not done at 100,000 miles (160 000 km). Replace the air conditioning filter.
SCHEDULE “A” 441
102, 000
(163 000)[102]
108, 000
(173 000)[108]
114, 000
(182 000)[114]
120, 000
(192 000)[120]
442 SCHEDULE “A”
* This maintenance is recommended by the manufacture to the owner but is not required to maintain the emis- sions warranty. ‡ This maintenance is not required if previously replaced. Inspection and service should also be performed anytime a malfunction is observed or suspected. Retain all re- ceipts.
WARNING!
You can be badly injured working on or around a motor vehicle. Do only that service work for which you have the knowledge and the right equipment. If you have any doubt about your ability to perform a service job, take your vehicle to a competent me- chanic.
IF YOU NEED CONSUMER ASSISTANCE
CONTENTS
䡵 Suggestions For Obtaining Service
For Your Vehicle . . . . . . . . . . . . . . . . . . . . . . . 444
▫ Prepare For The Appointment . . . . . . . . . . . . 444
▫ Prepare A List . . . . . . . . . . . . . . . . . . . . . . . . 444
▫ Be Reasonable With Requests . . . . . . . . . . . . . 444
䡵 If You Need Assistance . . . . . . . . . . . . . . . . . . . 445
䡵 Warranty Information . . . . . . . . . . . . . . . . . . . . 447
䡵 Mopar威 Parts . . . . . . . . . . . . . . . . . . . . . . . . . 449䡵 Reporting Safety Defects . . . . . . . . . . . . . . . . . . 449
▫ In Canada . . . . . . . . . . . . . . . . . . . . . . . . . . 449
䡵 Publication Order Forms . . . . . . . . . . . . . . . . . . 450
䡵 Department Of Transportation Uniform TireQuality Grades . . . . . . . . . . . . . . . . . . . . . . . . 451
▫ Treadwear . . . . . . . . . . . . . . . . . . . . . . . . . . 451
▫ Traction Grades . . . . . . . . . . . . . . . . . . . . . . 451
▫ Temperature Grades . . . . . . . . . . . . . . . . . . . 452 9444 IF YOU NEED CONSUMER ASSISTANCE
SUGGESTIONS FOR OBTAINING SERVICE FOR YOUR VEHICLE
Prepare For The Appointment If you’re having warranty work done, be sure to have the right papers with you. Take your warranty folder. All work to be performed may not be covered by the warranty, discuss additional charges with the service manager. Keep a maintenance log of your vehicle’s service history. This can often provide a clue to the current problem. Prepare A List Make a written list of your vehicle’s problems or the specific work you want done. If you’ve had an accident, or work done that is not on your maintenance log, let the service advisor know.
Be Reasonable With Requests If you list a number of items, and you must have your vehicle by the end of the day, discuss the situation with the service advisor and list the items in order of priority. At many dealers you may obtain a rental vehicle at a minimal daily charge. If you need a rental, it is advisable to make these arrangements when you call for an ap- pointment.
IF YOU NEED ASSISTANCE The manufacturer and its dealers are vitally interested in your satisfaction. We want you to be happy with our products and services. Warranty service must be done by an authorized Chrysler, Dodge, or Jeep dealer. We strongly recommend that you take your vehicle to you selling dealer. They know you and your vehicle best, and are most concerned that you get prompt and high quality service. The manufacturer’s dealers have the facilities, factory-trained technicians, special tools, and the latest information to assure your vehicle is fixed correctly and in a timely manner. This is why you should always talk to your dealer’s service manager first. Most matters can be resolved with this process.
IF YOU NEED CONSUMER ASSISTANCE 445
• If for some reason you are still not satisfied, talk to the general manager or owner of the dealership. They want to know if you need assistance. • If your dealership is unable to resolve the concern, you
may contact the Manufacturer’s Customer Center.
Any communication to the Manufacturer’s Customer Center should include the following information: • Owner’s name and address • Owner’s telephone number (home and office) • Dealership name • Vehicle identification number • Vehicle delivery date and mileage
446 IF YOU NEED CONSUMER ASSISTANCE
DaimlerChrysler Motors Corporation Customer Center P.O. Box 21–8004
Auburn Hills, MI 48321–8004
Phone: (800) 992-1997
DaimlerChrysler Canada Inc. Customer Center P.O. Box 1621
Windsor, Ontario N9A 4H6
Phone —(800) 465–2001
In Mexico contact: Av. Prolongacion Paseo de la Reforma, 1240
Sante Fe C.P. 05109
Mexico, D. F. In Mexico (915) 729–1248 or 729–1240
Outside Mexico (525) 729–1248 or 729–1240Customer Assistance For The Hearing Or Speech Impaired (TDD/TTY) To assist customers who have hearing difficulties, the manufacturer has installed special TDD (Telecommuni- cation Devices for the Deaf) equipment at its Customer Center. Any hearing or speech impaired customer who has access to a TDD or a conventional teletypewriter (TTY) in the United States can communicate with the manufacturer by dialing 1–800–380–CHRY. Service Contract You may have purchased a service contract for your vehicle to help protect you from the high cost of unex- pected repairs after your manufacturer’s new vehicle limited warranty expires. The manufacturer stands be- hind only the manufacturer’s Service Contracts. If you purchased a manufacturer’s Service Contract, you will receive Plan Provisions and an Owner Identification Card in the mail within three weeks of your vehicle delivery date. If you have any questions about your service
contract, call the manufacturer’s Service Contract Na- tional Customer Hotline at 1-800-521-9922. The manufacturer will not stand behind any service contract that is not the manufacturer’s Service Contract. It is not responsible for any service contract other than the manufacturer’s Service Contract. If you purchased a service contract that is not a manufacturer’s Service Contract, and you require service after your manufactur- er’s new vehicle limited warranty expires, please refer to your contract documents, and contact the person listed in those documents. We appreciate that you have made a major investment when you purchased your new vehicle. Your dealer has
IF YOU NEED CONSUMER ASSISTANCE 447
also made a major investment in facilities, tools, and training to assure that you are absolutely delighted with your ownership experience. You’ll be pleased with their sincere efforts to resolve any warranty issues or related concerns.
WARRANTY INFORMATION See your manufacturer’s Warranty Information Booklet for information on warranty coverage and transfer of warranty.
448 IF YOU NEED CONSUMER ASSISTANCE
U.S. ONLY
MOPAR姞 PARTS Mopar威 fluids, lubricants, parts, and accessories are available from your dealer. They will help you keep your vehicle operating at its best.
REPORTING SAFETY DEFECTS In the 50 United States and Washington D.C.: If you believe that your vehicle has a defect which could cause a crash or cause injury or death, you should immediately inform the National Highway Traffic Safety Administra- tion (NHTSA) in addition to notifying the manufacturer. If NHTSA receives similar complaints, it may open an investigation, and if it finds that a safety defect exists in a group of vehicles, it may order a recall and remedy campaign. However, NHTSA cannot become involved in individual problems between you, your dealer, and the manufacturer.
IF YOU NEED CONSUMER ASSISTANCE 449
To contact NHTSA, you may either call the Auto Safety Hotline toll free at 1-800-424-9393 (or 366-0123 in Wash- ington DC area) or write to: NHTSA, U.S. Dept. of Transportation, Washington DC 20590. You can also obtain other information about motor vehicle safety from the Hotline. In Canada: If you believe that your vehicle has a safety defect, you should contact the Customer Service Department imme- diately. Canadian customers who wish to report a safety defect to the Canadian government should write to Transport Canada, Motor Vehicle Defect Investigations and Recalls, 2780 Sheffield Road, Ottawa, Ontario K1B 3V9.
450 IF YOU NEED CONSUMER ASSISTANCE
PUBLICATION ORDER FORMS To order the following manuals, you may use either the website or the phone numbers listed below. Visa, Mas- tercard, American Express, and Discover orders are ac- cepted. If you prefer mailing your payment, please call for an order form. NOTE: A street address is required when ordering manuals. (No P.O. Boxes). • Service Manuals.
These comprehensive service manuals provide the information that students and professional technicians need in diagnosing/troubleshooting, problem solving, maintaining, servicing and repairing DaimlerChrysler Corporation vehicles. A complete working knowledge of the vehicle, system and/or components is written in straightforward language with illustrations, diagrams and charts.
• Diagnostic Procedure Manuals.
Filled with diagrams, charts and detailed illustrations, these practical manuals make it easy for students and technicians to find and fix problems on computer- controlled vehicle systems and features. They show exactly how to find and correct problems the first time, using step-by-step troubleshooting and driveability procedures, proven diagnostic tests and a complete list of all tools and equipment.
• Owner’s Manuals.
These manuals have been prepared with the assistance of service and engineering specialists to acquaint you with specific Chrysler group vehicles. Included are starting, operating, emergency and maintenance pro- cedures as well as specifications, capabilities and safety tips.
Call Toll Free at 1–800–890–4038 (U.S.) or 1–800–387–1143
(Canada) Or Visit us on the World Wide Web at: www.techauthority.daimlerchrysler.com or www.daimlerchrysler.ca/manualsDEPARTMENT OF TRANSPORTATION UNIFORM TIRE QUALITY GRADES The following describes the tire grading categories estab- lished by the National highway Traffic Safety Adminis- tration. The specific grade rating assigned by the tire’s manufacturer in each category is shown on the sidewall of the tires on your car. All Passenger Car Tires Must Conform to Federal Safety Requirements in Addition to These Grades.
IF YOU NEED CONSUMER ASSISTANCE 451
Treadwear The treadwear grade is a comparative rating based on the wear rate of the tire when tested under controlled con- ditions on a specified government test course. For ex- ample, a tire graded 150 would wear one and a half (1
1/2) times as well on the government course as a tire graded 100. The relative performance of tires depends upon the actual conditions of their use, however, and may depart significantly from the norm due to variations in driving habits, service practices and differences in road characteristics and climate. Traction Grades The traction grades, from highest to lowest, are A, B, and C, and they represent the tire’s ability to stop on wet pavement as measured under controlled conditions on specified government test surfaces of asphalt and con- crete. A tire marked C may have poor traction perfor- mance.452 IF YOU NEED CONSUMER ASSISTANCE
WARNING!
WARNING!
The temperature grade is established for a tire that is properly inflated and not overloaded. Excessive