- 2005 Chevrolet Equinox Owners Manuals
- Chevrolet Equinox Owners Manuals
- 2006 Chevrolet Equinox Owners Manuals
- Chevrolet Equinox Owners Manuals
- 2012 Chevrolet Equinox Owners Manuals
- Chevrolet Equinox Owners Manuals
- 2009 Chevrolet Equinox Owners Manuals
- Chevrolet Equinox Owners Manuals
- 2010 Chevrolet Equinox Owners Manuals
- Chevrolet Equinox Owners Manuals
- 2008 Chevrolet Equinox Owners Manuals
- Chevrolet Equinox Owners Manuals
- 2014 Chevrolet Equinox Owners Manuals
- Chevrolet Equinox Owners Manuals
- 2015 Chevrolet Equinox Owners Manuals
- Chevrolet Equinox Owners Manuals
- 2013 Chevrolet Equinox Owners Manuals
- Chevrolet Equinox Owners Manuals
- 2011 Chevrolet Equinox Owners Manuals
- Chevrolet Equinox Owners Manuals
- 2007 Chevrolet Equinox Owners Manuals
- Chevrolet Equinox Owners Manuals
- 2016 Chevrolet Equinox Owners Manuals
- Chevrolet Equinox Owners Manuals
- Download PDF Manual
-
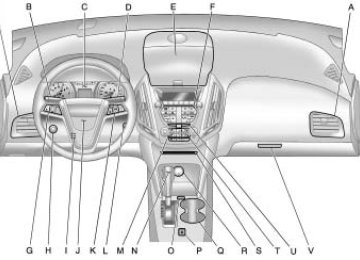
Selects a connected external audio source.
E. Buttons 1 to 6
Radio: Saves and selects favorite stations.
6-4
Infotainment System
F. FAV
Radio: Opens the favorites list.
G. TONE
Opens the tone menu.
H. CONFIG
Opens the settings menu.
I. MENU/SEL
Press: Opens the menus and selects menu items. Turn: Highlights menu items or sets values while in a menu. Manually selects radio stations while listening to the radio.
J. CD Slot
Insert a CD.
K. k
O. INFO
CD: Pauses the CD.
L. CD
Selects the CD player when listening to a different audio source. M. Z CD Eject
Removes a disc from the CD slot.
N. l SEEK
Radio: Seeks the next station. CD: Selects the next track or fast forwards within a track.
Radio: Shows available information about the current station. CD: Shows available information about the current track.
P. 5 / 0
Opens the phone main menu. Mutes the audio system.
Q. H
Opens the clock menu.
R. 0 BACK
Menu: Moves one level back. Character Input: Deletes the last character.
Overview (Radio with CD/DVD/MEM)
A. VOL/ O
Infotainment System 6-5
Turns the system on or off and adjusts the volume.
B. g SEEK
Radio: Seeks the previous station. CD/DVD: Selects the previous track or rewinds within a track. MEM: Selects the previous track or rewinds within a track.
C. RADIO/BAND
Changes the band while listening to the radio. Selects the radio when listening to a different audio source.
D. MEM/DVD/AUX
Selects MEM, CD/DVD, USB, or a connected front or rear auxillary audio source.
6-6
Infotainment System
E. Buttons 1 to 6
Radio: Saves and selects favorite stations. MEM: Saves and selects favorite tracks and playlists.
F. FAV
Radio: Opens the favorites list. MEM: Opens the favorites list.
G. TONE
J. CD/DVD Slot
Insert a disc. K. k (Play/Pause)
Radio: Pauses time shifted content. CD/DVD: Pauses CD/DVD‐A and DVD‐V playback. Stops DVD‐V playback. MEM: Pauses MEM playback.
Opens the tone menu.
L. O REC
H. CONFIG
Opens the settings menu.
I. MENU/SEL
Press: Opens menus and selects menu items. Turn: Highlights menu items or sets values while in a menu. Manually selects radio stations while listening to the radio.
CD/DVD: Records content from audio CDs and MP3/WMA CDs. AUX: Records content from USB mass storage devices.
M. Z CD Eject
Removes a disc from the CD/DVD slot.
N. l SEEK
Radio: Seeks the next station. CD/DVD: Selects the next track or fast forwards within a track. MEM: Selects the next track or fast forwards within a track.
O. INFO
Radio: Shows available information about the current station. CD/DVD: Shows available information about the current track. MEM: Shows available information about the current track.
P. 5 / 0 (Phone/Mute)
Opens the phone main menu. Mutes the audio system.
Q. DEL
MEM: Deletes the current track from MEM.
R. 0 BACK
Menu: Moves one level back. Character Input: Deletes the last character.
Operation
Controls The infotainment system is operated by using the pushbuttons, multifunction knobs, menus that are shown on the display, and steering wheel controls, if equipped. Turning the System On or Off VOL/ O (Volume/Power): Press to turn the system on and off.
Automatic Switch‐Off If the infotainment system has been turned on after the ignition is turned off, the system will turn off automatically after ten minutes. Volume Control VOL/ O (Volume/Power): Turn to adjust the volume. 5 / 0 (Mute): For vehicles with OnStar®, press and hold 5 / 0 to mute the infotainment system. Press and hold 5 / 0 again, or turn the VOL/ O knob to cancel mute. For vehicles without OnStar®, press 5 / 0 to mute the infotainment system. Press 5 / 0
again, or turn the VOL/ O knob to cancel mute.Infotainment System 6-7
Menu System
Controls The MENU/SEL knob and the 0 BACK button are used to navigate the menu system. MENU/SEL (Menu/Select): Press to: . Enter the menu system. . Select or activate the highlighted
menu option.
. Confirm a set value.
Turn a system setting on or off.
Turn to: . Highlight a menu option. . Select a value. 0 BACK: Press to: . Exit a menu. . Return from a submenu screen
to the previous menu screen. . Delete the last character in a
sequence.
6-8
Infotainment System
Selecting a Menu Option
Activating a Setting
Turning a Function On or Off
1. Turn the MENU/SEL knob to
move the highlighted bar.
1. Turn the MENU/SEL knob to
1. Turn the MENU/SEL knob to
highlight the setting.
highlight the function.
2. Press the MENU/SEL button to
2. Press the MENU/SEL button to
2. Press the MENU/SEL button to
select the highlighted option.
activate the setting.
turn the function on or off.
Submenus
Setting a Value
Entering a Character Sequence
An arrow on the right‐hand edge of the menu indicates that it has a submenu with other options.
1. Turn the MENU/SEL knob to
1. Turn the MENU/SEL knob to
change the current value of the setting.
highlight the character.
2. Press the MENU/SEL button to
2. Press the MENU/SEL button to
select the character.
confirm the setting.
Infotainment System 6-9
Adjusting the Treble, Midrange, and Bass
Adjusting the Fader and Balance
1. Press the TONE button. 2. Select Treble, Midrange,
or Bass.
3. Select the value. Press the 0 BACK button to go back to the Tone Settings menu.
1. Press the TONE button. 2. Select Fader or Balance. 3. Select the value. Press the 0 BACK button to go back to the Tone Settings menu.
Press the 0 BACK button to delete the last character in the sequence or press and hold to delete the entire character sequence. Audio Settings The audio settings can be set for each radio band and each audio player source. To quickly reset an audio setting value to 0: 1. Press the TONE button. 2. Select the audio setting. 3. Press and hold the MENU/SEL
button until the value changes to 0.
Press the 0 BACK button to go back to the Tone Settings menu.
6-10
Infotainment System
Adjusting the EQ (Equalizer) For vehicles that have an equalizer:
System Settings
Configuring the Number of Favorite Pages
1. Press the TONE button. 2. Select EQ. 3. Select the setting. Press the 0 BACK button to go back to the Tone Settings menu.
To configure the number of available favorite pages: 1. Press the CONFIG button. 2. Select Radio Settings. 3. Select Radio Favorites. 4. Select the number of available
favorite pages.
5. Press the 0 BACK button to go back to the System Configuration menu.
Auto Volume The auto volume feature automatically adjusts the radio volume to compensate for road and wind noise as the vehicle speeds up or slows down, so that the volume level is consistent. The level of volume compensation can be selected, or the auto volume feature can be turned off.
1. Press the CONFIG button. 2. Select Radio Settings. 3. Select Auto Volume. 4. Select the setting. 5. Press the 0 BACK button to go back to the System Configuration menu.
Maximum Startup Volume The maximum volume played when the Radio with CD is first turned on can be set.
1. Press the CONFIG button. 2. Select Radio Settings. 3. Select Maximum Startup
Volume.
4. Select the setting. 5. Press the 0 BACK button to go back to the System Configuration menu.
Radio
AM-FM Radio
Control Buttons The buttons used to control the radio are: RADIO/BAND: Press to turn the radio on and choose between AM, FM, and XM™, if equipped. MENU/SEL: Turn to manually search for stations. FAV: Press to open the favorites list. l SEEK or g SEEK: Press to search for stations. Press and hold to fast forward and rewind time shifted data. See “Time Shifting (Radio with CD/DVD and MEM)” later in this section.
Infotainment System 6-11
k : Press to pause and resume time shifted data. See “Time Shifting (Radio with CD/DVD and MEM)” later in this section. 1 to 6: Press to select preset stations. RDS (Radio Data System) The radio may have RDS. The RDS feature is available for use only on FM stations that broadcast RDS information. This feature only works when the information from the radio station is available. In rare cases, a radio station could broadcast incorrect information that causes the radio features to work improperly. If this happens, contact the radio station. While the radio is tuned to an FM-RDS station, the station name or call letters display.
6-12
Infotainment System
Radio Menus Radio menus are available for AM and FM. Press the MENU/SEL knob to open the main radio menu for that band. Selecting a Band Press the RADIO/BAND button to choose AM, FM, or XM™, if equipped. The last station that was playing starts playing again. Selecting a Station
Seek Tuning (Radio with CD) If the radio station is not known: Briefly press g SEEK or l SEEK, to automatically search for the next available station. If a station is not found, the radio switches to a more sensitive search level. If a station still is not found, the frequency that was last active begins to play.
If the radio station is known: Press and hold g SEEK or l SEEK until the station on the display is reached, then release the button.
Seek Tuning (Radio with CD/DVD and MEM) Briefly press l SEEK or g SEEK, to automatically search for the next available station. If a station is not found, the radio switches to a more sensitive search level. If a station still is not found, the frequency that was last active begins to play.
Manual Tuning Turn the MENU/SEL knob to select the frequency on the display.
Favorites List 1. Press the MENU/SEL knob. 2. Select Favorites List. 3. Select the station.
Station Lists 1. Press the MENU/SEL knob. 2. Select AM or FM Station List. All receivable stations in the current reception area are displayed. If a station list has not been created, an automatic station search is done.
3. Select the station.
Category Lists Most stations that broadcast an RDS program type code specify the type of programming transmitted. Some stations change the program type code depending on the content. The system stores the RDS stations sorted by program type in the FM category list. To search for a programming type determined by station: 1. Press the MENU/SEL knob. 2. Select FM category list. A list of all programming types available displays.
3. Select the programming type. A list of stations that transmit programming of the selected type displays.
4. Select the station.
The category lists are updated when the station lists are updated.
Updating Station & Category Lists If stations stored in the station list can no longer be received. 1. Press the MENU/SEL knob. 2. Select Update AM or FM Station
List, if the stations stored in the station list are no longer received. A station search will be completed and the first station in the updated list will play.
To cancel the station search, press the MENU/SEL knob.
Storing a Station as a Favorite Stations from all bands can be stored in any order in the favorite pages. Up to six stations can be stored in each favorite page and the number of available favorite pages can be set.
Storing a Station as a Favorite To store the station to a position in the list, press the corresponding button 1 to 6 until a beep is heard.
Retrieving stations Press the FAV button to open a favorite page or to switch to another favorite page. Briefly press one of the 1 to 6 buttons to retrieve the station.
Infotainment System 6-13
Time Shifting (Radio with CD/DVD and MEM) The radio with MEM time shift feature can rewind 20 minutes of FM/AM content. While listening to the radio, the content from the current station is always being buffered. Press the k button to pause the radio. The radio displays the time shift status bar. The status bar shows the amount of content that is stored in the buffer and the current pause point. To resume playback from the current pause point, press the k button again. The radio is no longer live, but played from the time shift buffer. A status bar displays below the station number. Press and hold the g SEEK or l SEEK buttons to fast forward or rewind through the time shift buffer. Hold l SEEK until the end of the recorded buffer resumes live playback.
6-14
Infotainment System
Press and release the g SEEK or l SEEK buttons to jump forward or back 30 seconds in the time shift buffer. When the radio station is changed, the buffer is cleared and automatically restarted for the current station. Content from a previously tuned station is no longer available. The time shift feature is not available while recording or with other sources of playback.
Pausing AM/FM with the Vehicle Turned Off If AM/FM is paused when the vehicle is turned off, the radio continues to buffer the current radio station for up to 20 minutes. If the vehicle is turned back on within 20 minutes, the radio resumes playback from the paused point.
Satellite Radio Vehicles with an XM™ Satellite Radio tuner and a valid XM Satellite Radio subscription can receive XM programming. XM Satellite Radio Service XM is a satellite radio service that is based in the 48 contiguous United States and 10 Canadian provinces. XM Satellite Radio has a wide variety of programming and commercial-free music, coast-to-coast, and in digital-quality sound. A service fee is required to receive the XM service. For more information, contact XM at www.xmradio.com or call 1-800-929-2100 in the U.S. and www.xmradio.ca or call 1-877-438-9677 in Canada.
Control Buttons The buttons used to control the XM radio are: RADIO/BAND: Press to turn the radio on and choose between AM, FM, and XM™, if equipped. g SEEK / l SEEK: Press to go to the previous or next station. FAV: Press to open the favorites list. k : Press to pause and resume time shifted data. See “Time Shifting (Radio with CD/DVD and MEM)” later in this section. 1 to 6: Press to select preset stations. MENU/SEL: Turn to select stations. Press to open the XM Satellite Radio menu.
Selecting the XM Band Press the RADIO/BAND button to choose between the AM, FM and XM bands. The last channel played in that band begins to play when that band is selected. XM Categories XM channels are organized in categories.
Removing or Adding Categories Channels in a category that have been removed can still be accessed by using the g SEEK or l SEEK buttons, or the MENU/SEL knob. To add or remove categories: 1. Press the CONFIG button. 2. Select Radio Settings. 3. Select XM Categories. 4. Turn the MENU/SEL knob to
highlight the category.
5. Press the MENU/SEL knob to
remove or add the category.
Selecting an XM Channel XM channels can be selected by using g SEEK, l SEEK, the MENU/SEL knob, or the menu system.
Selecting a Channel Using g SEEK or l SEEK (Radio with CD) . Press and release g SEEK or l SEEK to go to the previous or next channel.
. Press and hold g SEEK or
l SEEK to scroll through the previous or next channel until the channel is reached.
Selecting a Channel Using g SEEK or l SEEK (Radio with CD/DVD and MEM) Press and release g SEEK or l SEEK to go to the previous or next channel.
Infotainment System 6-15
Selecting a Channel Using the MENU/SEL Knob To select an XM channel using the MENU/SEL knob: Turn the MENU/SEL knob to highlight an XM channel, the channel is selected after a short delay. To select a channel using the menu: 1. Turn the menu knob and select
Channel List.
2. Select the desired channel.
Selecting a Channel Using the Menu System 1. Turn the MENU/SEL knob. 2. Select XM Category List. 3. Select the category. 4. Select the channel.
6-16
Infotainment System
Storing an XM Channel as a Favorite Channels from all bands can be stored in any order in the favorite pages. Up to six channels can be stored in each favorite page and the number of available favorite pages can be set.
Storing a Channel as a Favorite To store the channel to a position in the list, press and hold the corresponding 1 to 6 button until the channel can be heard again.
Retrieving Channels Press the FAV button to open a favorite page or to change to another favorite page. Briefly press one of the 1 to 6 buttons to retrieve the channel.
Time Shifting (Radio with CD/DVD and MEM) The radio with MEM time shift feature can rewind 20 minutes of XM content. While listening to the radio, the content from the current channel is always being buffered. Press the k button to pause the radio. The radio displays the time shift status bar. The status bar shows the amount of content that is stored in the buffer and the current pause point. To resume playback from the current pause point, press the k button again. The radio is no longer live, but played from the time shift buffer. A status bar displays below the channel number. Press and hold the g SEEK or l SEEK buttons to fast forward or rewind through the time shift buffer. Hold l SEEK until the end of the recorded buffer resumes live playback.
Press and release the g SEEK or l SEEK buttons to go to the next or previous song in the time shift buffer. When the channel is changed, the buffer is cleared and automatically restarted for the current channel. Content from a previously tuned station is no longer available. The time shift feature is not available while recording or with other sources of playback.
Pausing XM with the Vehicle Turned Off If XM is paused when the vehicle is turned off, the radio continues to buffer the current radio station for up to 20 minutes. If the vehicle is turned back on within 20 minutes, the radio resumes playback from the paused point.
XM Messages XL (Explicit Language Channels): These channels, or any others, can be blocked by request, by calling 1-800-852-XMXM (9696). XM Updating: The encryption code in the receiver is being updated, no action is required. This process should take no longer than 30 seconds. Loading XM: The audio system is acquiring and processing audio and text data, no action is needed. This message should disappear shortly. Channel Off Air: This channel is not currently in service. Tune in to another channel. Channel Unauth: This channel is blocked or cannot be received with your XM Subscription package. Channel Unavailable: This previously assigned channel is no longer assigned. Tune to another station.
No Artist Info: The system is working properly. No artist information is available at this time on this channel. No Title Info: The system is working properly. No song title information is available at this time on this channel. No CAT Info: The system is working properly. No category information is available at this time on this channel. No Information: The system is working properly. No text or informational messages are available at this time on this channel. No XM Signal: The system is working properly. The vehicle may be in a location where the XM signal is being blocked. When the vehicle is moved into an open area, the signal should return.
Infotainment System 6-17
If tuned to channel 0,
If this message is
CAT Not Found: The system is working properly. There are no channels available for the selected category. XM Radio ID: this message alternates with the XM Radio 8 digit radio ID label. This label is needed to activate the service. Unknown: received when tuned to channel 0, there could be a receiver fault. Consult with your dealer/retailer. Check Antenna: does not clear within a short period of time, the receiver could have a fault. Consult with your dealer/ retailer. If this message XM Not Available: does not clear within a short period of time, the receiver could have a fault. Consult with your dealer/ retailer.
If this message
6-18
Infotainment System
Radio Reception Frequency interference and static can occur during normal radio reception if items such as cell phone chargers, vehicle convenience accessories, and external electronic devices are plugged into the accessory power outlet. If there is interference or static, unplug the item from the accessory power outlet. FM FM signals only reach about 16 to 65 km (10 to 40 miles). Although the radio has a built-in electronic circuit that automatically works to reduce interference, some static can occur, especially around tall buildings or hills, causing the sound to fade in and out.
AM The range for most AM stations is greater than for FM, especially at night. The longer range can cause station frequencies to interfere with each other. Static can occur when things like storms and power lines interfere with radio reception. When this happens, try reducing the treble on the radio. XM™ Satellite Radio Service XM Satellite Radio Service gives digital radio reception from coast-to-coast in the 48 contiguous United States, and in Canada. Just as with FM, tall buildings or hills can interfere with satellite radio signals, causing the sound to fade in and out. In addition, traveling or standing under heavy foliage, bridges, garages, or tunnels may cause loss of the XM signal for a period of time.
Cellular Phone Usage Cellular phone usage can cause interference with the vehicle's radio.
Multi-Band Antenna The multi-band antenna is located on the roof of the vehicle. The antenna is used for the AM/FM radio, OnStar, the XM Satellite Radio Service System, and GPS (Global Positioning System); if the vehicle has these features. Keep the antenna clear of obstructions for clear reception. If the vehicle has a sunroof and it is open, the performance of the AM/FM radio, OnStar, XM system, and GPS can be affected.
Audio Players
CD Player The CD player can play audio CDs and MP3 CDs. The CD player will not play 8 cm (3 in.) CDs.
Care of CDs Sound quality can be reduced due to disc quality, recording method, quality of the music recorded, and how the disc has been handled. Handle discs carefully and store them in their original cases or other protective cases away from direct sunlight and dust. If the bottom surface of a disc is damaged, the disc may not play properly or at all. Do not touch the bottom surface of a disc while handling it; this could damage the surface. Pick up discs by grasping the outer edges or the edge of the hole and the outer edge.
If the bottom surface of a disc is dirty, take a soft lint free cloth, or dampen a clean soft cloth in a mild neutral detergent solution mixed with water, and clean it. Wipe the disc from the center to the outer edge.
Care of the CD Player Do not add a label to a disc, as it could get caught in the CD player. If a label is needed, label the top of the recorded disc with a marking pen. Do not use disc lens cleaners because they could contaminate the lens of the disc optics and damage the CD player. Notice: If a label is added to a CD, or more than one CD is inserted into the slot at a time, or an attempt is made to play scratched or damaged CDs, the CD player could be damaged.
Infotainment System 6-19
While using the CD player, use only CDs in good condition without any label, load one CD at a time, and keep the CD player and the loading slot free of foreign materials, liquids, and debris. Control Buttons The buttons used to control the CD player are: CD: Press to choose between the CD and AUX player. l SEEK or g SEEK : Press to select tracks or to fast forward or rewind within a track. INFO: Press to display additional information about the CD that may be available. MENU/SEL: Turn to select tracks. Z (Eject): Press to remove the CD. k : Press to pause a CD or MP3
track, press again to resume playback.6-20
Infotainment System
Inserting a CD With the printed side facing up, insert a disc into the CD slot until it is drawn in. Removing a CD Press the Z button. The disc is pushed out of the CD slot. If the disc is not removed after it is ejected, it is pulled back in after a few seconds. Playing a CD or MP3 CD Press the CD button, if there is a disc in the player it begins playing. Information about the disc and current track is shown on the display depending on the data stored.
Selecting a CD Track Using the control buttons: . Press the g SEEK or l SEEK
button to select the previous or next track. Turn the MENU/SEL knob.
Using the CD Menu: 1. Press the MENU/SEL knob. 2. Select Tracks list. 3. Select the track.
Playing Tracks in Random Order Press the MENU/SEL knob and then set Shuffle Songs to On.
Fast Forward and Rewind Press and hold l SEEK or g SEEK to fast forward or rewind within the current track.
Selecting an MP3 Track Using the control buttons: . Press the g SEEK or l SEEK
button to select the previous or next track. Turn the MENU/SEL knob.
Using the CD Menu: 1. Press the MENU/SEL knob. 2. Select Playlists / Folders. 3. Select the playlist or folder. 4. Select the track.
Searching for MP3 Tracks The search feature may take some time to display the information after reading the disc due to the amount of information stored on the disc. FM automatically plays while the disc is being read. Tracks can be searched by: . Playlists . Artists . Albums . Song Titles . Genres
Folder View
To search for tracks: 1. Press the MENU/SEL knob. 2. Select Search. 3. Select: Playlists, Artists, Albums,
Song Titles, Genres, or Folder View. 4. Select the track.
CD/DVD Player The CD/DVD player can play CDs, DVD‐As, MP3/WMA CDs, MP3/WMA DVDs, and DVD‐Vs. The CD/DVD player will not play 8 cm (3 in.) discs.
Care of CDs and DVDs Sound quality can be reduced due to disc quality, recording method, quality of the music recorded, and how the disc has been handled. Handle discs carefully and store them in their original cases or other protective cases away from direct sunlight and dust. If the bottom surface of a disc is damaged, the disc may not play properly or at all. Do not touch the bottom surface of a disc while handling it; this could damage the surface. Pick up discs by grasping the outer edges or the edge of the hole and the outer edge. If the bottom surface of a disc is dirty, take a soft lint free cloth, or dampen a clean soft cloth in a mild neutral detergent solution
Infotainment System 6-21
mixed with water, and clean it. Wipe the disc from the center to the outer edge.
Care of the CD/DVD Player Do not add a label to a disc, as it could get caught in the CD/DVD player. If a label is needed, label the top of the recorded disc with a marking pen. Do not use disc lens cleaners because they could contaminate the lens of the disc optics and damage the CD/DVD player. Notice: If a label is added to a CD, or more than one CD is inserted into the slot at a time, or an attempt is made to play scratched or damaged CDs, the CD player could be damaged. While using the CD player, use only CDs in good condition without any label, load one CD at a time, and keep the CD player and the loading slot free of foreign materials, liquids, and debris.
6-22
Infotainment System
Control Buttons The buttons used to control the CD/DVD player are: MEM/DVD/AUX: Press to choose between the MEM, CD/DVD, and AUX. l SEEK or g SEEK : Press to select tracks or to fast forward or rewind within a track. INFO: Press to display additional information about the disc that may be available. MENU/SEL: Turn to select tracks. Z (Eject): Press to remove a disc. k : Press to pause a CD, DVD‐A, or DVD‐V, press again to resume playback. Press and hold to stop a DVD‐V disc. Inserting a CD or DVD With the printed side facing up, insert a disc into the slot until it is drawn in.
Removing a CD or DVD Press the Z button. The disc is pushed out of the CD/DVD slot. If the disc is not removed after it is ejected, it is pulled back in after a few seconds. Playing a CD or DVD‐A Disc Press the MEM/DVD/AUX button if there is a disc in the player, it begins playing. Information about the disc and current track is shown on the display depending on the data stored.
Selecting CD or DVD‐A Tracks Using the control buttons: . Press the g SEEK or l SEEK
button to select the previous or next track. Turn the MENU/SEL knob.
Using the menu: 1. Press the MENU/SEL knob. 2. Select Tracks List. 3. Select the track.
Pausing a CD or DVD‐A Track Press the k button to pause a CD or DVD‐A track. Press the k button again to continue playing the track.
Playing CD or DVD‐A Tracks in Random Order Press the MENU/SEL knob and then set Shuffle Songs to On.
Fast Forward and Rewind Press and hold the l SEEK or g SEEK button to fast forward or rewind within the current track.
Playing an MP3 CD or DVD Files that are not stored in folders are displayed in the root directory (disc). The search rate increases if the MENU/SEL knob is continuously turned while searching in a list.
Selecting an MP3 Track Using the control buttons: . Press the g SEEK or l SEEK
button to select the previous or next track. Turn the MENU/SEL knob.
Using the CD or DVD Menu: 1. Press the MENU/SEL knob. 2. Select Folder List. 3. Select the folder. 4. Select the track.
Searching for MP3s on a CD or DVD It is normal for the search feature to take some time to display the information after reading the disc due to the amount of information stored on the disc. The infotainment system automatically switches to FM while the disc is being read. Files that do not have any meta data stored in the ID3 tag display as Unknown. Tracks can be searched for by: . Playlists . Artists . Albums . Song Titles . Genres The number of objects in each category is shown in parentheses after the category.
Infotainment System 6-23
To search for tracks: 1. Press the MENU/SEL knob. 2. Select Search. 3. Select: Playlists, Artists, Albums,
Song Titles, or Genres.
4. Select the track. The search
rate increases if the menu MENU/SEL knob is continuously turned while searching in a list.
Playing MP3 Tracks in Random Order Press the MENU/SEL knob and then set Shuffle Songs to On. Recording an Audio or MP3
CD to MEM See Mass Storage Media (MEM) on page 6‑25 for more information.6-24
Infotainment System
Playing a DVD‐V See Rear Seat Entertainment (RSE) System on page 6‑33 for information about how to control a Video DVD using the wireless remote control.
Selecting a Chapter Using the control buttons: . Press the g SEEK or l SEEK
button to select the previous or next track. Turn the MENU/SEL knob.
Using DVD Menu: 1. Press the MENU/SEL knob. 2. Select Chapter List. 3. Select the chapter.
Selecting a Title 1. Press the MENU/SEL knob. 2. Select Title List. 3. Select the title.
Changing the Audio Stream 1. Press the MENU/SEL knob. 2. Select Audio Stream. 3. Select Change Audio Stream. 4. Press MENU/SEL to change the
selection.
Select Cancel to exit the menu.
Pausing a DVD 1. Press the MENU/SEL knob. 2. Select Pause, to pause the
disc. Select Unpause to start playback.
Navigating the DVD‐V Disc Menu Use the following actions to navigate the title menu on a DVD‐V Disc. . Select / Enter . Cursor UP . Cursor DOWN
. Cursor RIGHT . Cursor LEFT . Up Menu Use the following actions to navigate the menu on a DVD‐V Disc while playing chapters. . Pause (Play) . Chapter List
Title List
. DVD/DVD . DVD/AUX . AUX/DVD . AUX/AUX To navigate the menu: 1. Press the MENU/SEL knob. 2. Select the action.
Mass Storage Media (MEM) Infotainment systems with MEM storage are able to record up to 1.1 GB (gigabyte) of music from Audio CDs, MP3/WMA/AAC discs, and USB storage devices. The MEM player can also time shift audio from AM, FM, and XM™ radio. Music or content that is stored in MEM that you did not create, or have the right to distribute, must be deleted before the sale or end of the lease of the vehicle. Control Buttons The buttons used to control the MEM player are: MEM/DVD/AUX: Press to select the MEM player. l SEEK or g SEEK : Press to select tracks or to fast forward or rewind within a track.
INFO: Press to display additional information about the MEM track that may be available. k : Press to pause the track currently playing, press again to resume playback. O REC: Press to record music from a CD, DVD-A, or USB drive. FAV (Favorites): Press to display MEM favorites. 1‐6: Press to select a track or a stored playlist. MENU/SEL: Turn to select tracks. Recording From Audio CDs The infotainment system can record the current song playing or all songs from an audio CD to MEM. A status bar appears on the top of the display when the recording process starts and disappears when the process has ended. Copy protected CDs cannot be recorded to MEM.
Infotainment System 6-25
Recording to MEM Press O REC, then select Record Current Song or Record All Songs on Disc. If the track has started playing, the system will restart the track and begin recording from the beginning of the track. When the song recording is completed, the message Song Recorded to MEM displays, and there may be a slight pause. Songs recorded to MEM are stored as the current date, disc and track number.
Re-recording a Previously Recorded Disc If the disc or track has already been recorded to MEM, the message The Song(s) is Already Recorded displays.
6-26
Infotainment System
Stopping the Recording Press the O REC button while recording from an audio CD to display the stop recording option. Select Stop Recording Song to MEM.
Renaming Recorded Discs Discs that have been recorded to MEM can be renamed. 1. Press the MENU/SEL knob. 2. Select Rename Recorded Discs. 3. Select the disc. 4. Select Album or Artist to rename
either one.
5. Use the menu knob to enter the character sequence. See Operation on page 6‑7 for more information.
Recording From MP3/WMA Discs or USB Storage Devices
USB Host Support The USB connector uses the USB standards, 1.1 and 2.0.
USB Supported Devices . USB Flash Drives . Portable USB Hard Drives
Recording to MEM Press O REC, then select Record Current Song or Record Current Folder. The information stored by MEM is titled according to the ID3 tag associated with it.
Re-recording a Previously Recorded Disc If the disc or track has already been recorded to MEM, the message The Song(s) is Already Recorded displays.
Stopping the Recording Press the O REC button while recording from an MP3/WMA CD or USB storage device to display the stop recording option. Select Stop Recording Song to MEM. Deleting Tracks From MEM Individual tracks and all tracks can be deleted from MEM. To delete individual tracks, press and release the DEL button while the track is playing. To delete all tracks from MEM, press and hold the DEL button while a track is playing.
Playing From MEM
Playing Back a Previously Recorded CD Turn the MENU/SEL knob to select a track if MEM is already playing from the previously recorded disc. 1. Select Recorded Disc List. 2. Select the disc. 3. Select the track.
Searching For a Track Tracks can be searched for by: . Playlists . Artists . Albums . Song Titles . Genres The number of objects in each category is shown in parentheses after the category.
To search for tracks: 1. Press the MENU/SEL knob. 2. Select Search. 3. Select: Playlists, Artists, Albums,
Song Titles, or Genres.
4. Select the track. The search rate
increases if the menu knob is continuously turned while searching in a list.
Shuffle Songs Select the Shuffle Songs option from the MEM menu to randomly play back tracks stored in MEM. Configuring MEM Favorites During MEM playback, press the FAV button to change between favorite categories. The favorite categories are: . Playlists . Artists . Albums . Genres
Infotainment System 6-27
To remove MEM favorites categories: 1. Press the CONFIG button. 2. Select Radio Settings. 3. Select MEM Favorites. 4. Remove the check mark from the box to remove that MEM favorites category.
Replace the check mark to re-add the removed category. Saving MEM Tracks as Favorites Favorites can be saved by pressing and holding one of the 1 to 6 buttons. Favorites can be stored according to the following list: Playlist: Adds currently playing track to the playlist selected. Artist: Saves the artist associated with the currently playing track in the indicated favorites position.
6-28
Infotainment System
Album: Saves the album associated with the currently playing track in the indicated favorites position. Genre: Saves the genre associated with the currently playing track in the indicated favorites position.
Creating Playlists To create a playlist using tracks stored in MEM: 1. Select Playlist from the MEM
favorites.
2. Select the track to be stored in
the playlist.
3. Press and hold one of the
1 to 6 buttons until the track can be heard again to store the track.
4. Repeat steps 1 though 3 to store
additional tracks in the playlist.
Auxiliary Devices (Radio with CD) The auxiliary input allows portable devices to be connected using the 3.5 mm (1/8 in) input jack or the optional USB port. Portable devices are controlled by using the menu system described in Operation on page 6‑7.
The auxiliary input is located in the center console.
3.5 mm Auxiliary Input Jack Playback of an audio device that is connected to the 3.5 mm auxiliary input jack can only be controlled using the controls on the device.
Adjusting the Volume Turn the VOL/ O knob to adjust the volume of the infotainment system after the volume level has been set on the portable audio device. USB Port For vehicles with a USB port, the following devices may be connected and controlled by the infotainment system.
iPod's
. PlaysForSure Devices (PFD) . USB Drives
Zune's
Not all iPod's, PFD's, USB Drives, and Zune's are compatible with the infotainment system.
Connecting and Controlling an iPod™ Not all iPod's can be controlled by the Infotainment System.
Connecting an iPod Connect the iPod to the USB port.
Searching For a Track Tracks can be searched for by: . Playlists . Artists . Albums . Song Titles . Podcasts . Genres . Audiobooks . Composers
To search for tracks: 1. Press the MENU/SEL knob. 2. Select Search. 3. Select: Playlists, Artists, Albums,
Song Titles, Podcasts, Genres, Audiobooks, or Composers.
4. Select the track.
Shuffle Press the MENU/SEL knob and set Shuffle Songs (Random) to On or Off, then press the 0 BACK button to return the main screen. On: Plays tracks in the current folder in random order. Off: Plays tracks in the current folder in sequential order.
Repeat Press the MENU/SEL knob and set Repeat to On or Off, then press the 0 BACK button to return the main screen.
Infotainment System 6-29
On: Repeats the current track. Off: Playback starts from the beginning of the current track after the last track finishes. Connecting and Controlling a PlaysForSure Device (PFD) or Zune™
Connecting a PFD or Zune Connect the PFD or Zune to the USB port.
Searching For a Track Tracks can be searched for by: . Playlists . Artists . Albums . Song Titles . Podcasts . Genres
6-30
Infotainment System
To search for tracks: 1. Press the MENU/SEL knob. 2. Select Search. 3. Select: Playlists, Artists, Albums,
Song Titles, Podcasts, or Genres.
4. Select the track.
Shuffle Functionality Press the MENU/SEL knob and set Shuffle Songs (Random) to On or Off. On: Plays current tracks in random order. Off: Plays current tracks in sequential order.
Repeat Functionality Press the MENU/SEL knob and set Repeat to On or Off. Repeat On: Repeats the current track. Repeat Off: Playback starts from the beginning of the current track after the last track finishes.
Connecting and Controlling a USB Drive The infotainment system can only play back .mp3 and .wma files from a USB drive. Only the first 2,500 songs are recognized on the device. When a device is not supported, the message “No supported data found. You can safely disconnect the device” appears.
Connecting a USB Drive Connect the USB drive to the USB port.
Searching For a Track It is normal for the search feature to take some time to display the information after reading the disc due to the amount of information stored on the disc. Files that do not have any meta data stored in the ID3 tag display as Unknown.
Tracks can be searched for by: . Playlists* . Artists . Albums . Song Titles . Genres
Folder View
*This only displays if a playlist is found on the device. To search for tracks: 1. Press the MENU/SEL knob. 2. Select Search. 3. Select: Playlists, Artists, Albums,
Song Titles, Genres, or Folder View. 4. Select the track.
Auxiliary Devices (Radio with CD/DVD/MEM) The auxiliary input allows portable devices to be connected using the 3.5 mm (1/8 in) input jack or the optional USB port. Portable devices are controlled by using the menu system described in Operation on page 6‑7.
Shuffle Functionality Press the MENU/SEL knob and set Shuffle Songs (Random) to On or Off. On: Plays current tracks in random order. Off: Plays current tracks in sequential order.
Repeat Functionality Press the MENU/SEL knob and set Repeat to On or Off. Repeat On: Repeats the current track. Repeat Off: Playback starts from the beginning of the current track after the last track finishes.
The auxiliary input is located in the center console.
Infotainment System 6-31
3.5 mm Auxiliary Input Jack Playback of an audio device that is connected to the 3.5 mm auxiliary input jack can only be controlled using the controls on the device.
Adjusting the Volume Turn the VOL/ O knob to adjust the volume of the infotainment system after the volume level has been set on the portable audio device. USB Port The following devices may be connected to the USB port and controlled by the infotainment system.
iPod's
. USB Mass Storage Devices Not all iPod's or USB Mass Storage Devices are compatible with the infotainment system.
6-32
Infotainment System
Connecting and Controlling an iPod™ Not all iPod's can be controlled by the Infotainment System.
Connecting an iPod Connect the iPod to the USB port.
Selecting a Track Using the control buttons: . Press g SEEK or l SEEK to select the previous or next track. Turn the MENU/SEL knob to select the track in the current sub menu. The track will start to play.
Playing Tracks in Random Order Press the MENU/SEL knob and set Shuffle Songs to On or Off. Shuffle On: Plays current tracks in random order. Shuffle Off: Plays current tracks in sequential order.
Searching For a Track Tracks can be searched for by: . Playlists . Artists . Albums . Song Titles . Genres . Composers . Audiobooks The number of objects in each category is shown in parentheses after the category. To search for tracks: 1. Press the MENU/SEL knob. 2. Select Search. 3. Select: Playlists, Artists,
Albums, Song Titles, Genres, Composers, or Audiobooks.
4. Select the track. The search rate increases if the MENU/SEL knob is continuously turned while searching in a list.
Connecting and Controlling a USB Drive Files that are not stored in folders are displayed in the root directory (USB).
Connecting a USB Drive Connect the USB drive to the USB port.
Disconnecting a USB Drive A USB drive should be ejected from the USB port before disconnecting it. To eject a USB drive: 1. Press the MENU/SEL knob. 2. Select USB Eject.
Playing Tracks in Random Order Press the MENU/SEL knob and then set Shuffle Songs to On.
Selecting a Track Using the control buttons: . Press g SEEK or l SEEK to select the previous or next track. Turn the MENU/SEL knob to select a track in the current sub menu. The track will start to play.
Selecting a track in a different folder: 1. Press the MENU/SEL knob. 2. Select Folder List. 3. Select the folder. 4. Select the track.
Searching for Tracks It is normal for the search feature to take some time to display the information after reading the device due to the amount of information stored. Files that do not have any meta data stored in the ID3 tag display as Unknown.
Tracks can be searched by: . Playlists . Artists . Albums . Song Titles . Genres The number of objects in each category is shown in parentheses after the category. To search for tracks: 1. Press the MENU/SEL knob. 2. Select Search. 3. Select: Playlists, Artists,
Albums, Song Titles, Genres, Composers, or Audiobooks.
4. Select the track. The search rate increases if the MENU/SEL knob is continuously turned while searching in a list.
Recording Tracks to MEM See Mass Storage Media (MEM) on page 6‑25 for more information.
Infotainment System 6-33
Rear Seat Infotainment
Rear Seat Entertainment (RSE) System The vehicle may have a DVD Rear Seat Entertainment (RSE) system. The RSE system works with the vehicle's infotainment system. The DVD player is part of the front radio. The RSE system includes a radio with a DVD player, two rear seat video display screens, audio/video jacks, two wireless headphones, and a remote control. See CD/DVD Player on page 6‑21 or the separate navigation system manual for more information on the vehicle's DVD system.
6-34
Infotainment System
Before Driving The RSE is for rear seat passengers only. The driver cannot safely view the video screen while driving. In severe or extreme weather conditions, the RSE system may not work until the temperature is within the operating range. The operating range is above −20°C (−4°F) and below 60°C (140°F). If the temperature is outside of this range, heat or cool the vehicle until it is within the operating range. Global Off Depending on the infotainment system, the RSE system may have a Global Off feature. The Global Off feature disables all RSE system features. Press and hold the radio power button for more than three seconds for Global Off to disable the RSE features.
On some infotainment systems, the Global Off feature can be turned off by performing one of the following: . Press and hold the radio power
button for more than three seconds. Insert or eject any disc. Insert a DVD video disc.
. Press the Remote Control power
button.
. Press the MEM/DVD/AUX button
or the k button when a DVD video disc is in the player.
. Press the SRC button on the steering wheel when a DVD video disc is in the player.
. Cycle the ignition.
Headphones RSE includes two 2-channel wireless headphones. Channel 1
is dedicated to the DVD player, and Channel 2 is dedicated to any external auxiliary device connected to the A/V jacks. The headphones are used to listen to various multi‐media. The wireless headphones have an On/Off button, channel 1/2 switch, and a volume control. Turn the headphones off when not in use. Push the On/Off button to turn on the headphones. A light on the headphones comes on. If the light does not come on, check the batteries. Intermittent sound or static can also indicate weak batteries. See “Battery Replacement” later in this section for more information.Infrared transmitters are on the top of the left seatback video screen. The headphones shut off automatically to save the battery power if the RSE system is shut off or if the headphones are out of range of the transmitters for more than three minutes. Moving too far forward or stepping out of the vehicle, can cause the headphones to lose the signal or have static. The headphones may automatically turn off after four hours of continuous use. To adjust the volume on the headphones, use the volume control. For best audio performance, the headphones must be worn correctly, with the headband over the top of the head. L (Left) and R (Right) are above the ear pads and are indicators as to how the headphones should be placed on the head.
Notice: Do not store the headphones in heat or direct sunlight. This could damage the headphones and repairs will not be covered by the warranty. Storage in extreme cold can weaken the batteries. Keep the headphones stored in a cool, dry place. If the foam ear pads become worn or damaged, they can be replaced separately from the headphones. See your dealer/retailer for more information.
Battery Replacement To change the batteries: 1. Loosen the screw to the battery door located on the left side of the headphones.
2. Slide the battery door open. 3. Replace the two AAA batteries. 4. Replace the battery door and
tighten the screw.
Infotainment System 6-35
Remove the batteries if the headphones are not going to be used for a long period of time. Audio/Video (A/V) Jacks If available, the A/V jacks are located on the rear of the floor console. They allow audio or video cables to be connected from an auxiliary device such as a camcorder or a video game system. The A/V jacks are color coded: . Yellow for video input. . White for left audio input. . Red for right audio input. Power for auxiliary devices is not supplied by the radio system. To use the auxiliary inputs of the RSE system: 1. Connect the auxiliary device
cables to the A/V jacks.
2. Power on both the auxiliary device and the RSE video screen.
6-36
Infotainment System
Changing the Source on the Video Display Screens The image from the auxiliary device can be switched between the video display screens. To change the display: 1. Press the AUX button on the remote control to change the source of both video screens from the DVD player to the auxiliary device.
2. Press the AUX button a second
time to change the left video screen source to the DVD player and the right video screen to the auxiliary device.
3. Press the AUX button a third time to change the left video screen source to the auxiliary device and the right video screen to the DVD player.
4. Press the AUX button a fourth
time to change the source of both video screens to the DVD player.
How to Change the RSE Video Screen Settings The screen display mode, brightness, and language can be changed from the setup menu using the remote control. To change a setting: 1. Press z . 2. Use n , q , p , o and r to
select the settings.
3. Press z again to exit the
setup menu.
Audio Output Audio from the DVD player or auxiliary inputs can be heard through the following: . Wireless Headphones . Vehicle Speakers The RSE system transmits the audio signal to the wireless headphones if an audio signal is available. See “Headphones” earlier in this section for more information. The front seat passengers are able to listen to playback from the A/V jacks through the vehicle speakers by selecting Rear A/V as the source on the radio.
Video Screens The video screens are located in the back of the driver and front passenger seats.
To use the video screen: 1. Push the release button located
on the seatback console.
2. Move the screen to the desired
viewing position.
Push the video screen down into its locked position when it is not in use, the screen turns off automatically. Only the left RSE seatback console contains the infrared transmitters for the wireless headphones, they may be visible as eight illuminated LEDs. These LEDs are not on the right video screen. Both seatback consoles contain an infrared receiver for the remote control. They are located at the top of each console. Notice: Avoid directly touching the video screen, as damage may occur. See “Cleaning the Video Screen” later in this section for more information.
Infotainment System 6-37
Video Screen Input Jack Each video screen is equipped with a video input jack to allow video cables to be connected from an auxiliary device such as a camcorder or a video game system. This signal will override any video provided by the RSE system; either the DVD or Auxiliary A/V jack