- 2008 Cadillac XLR Owners Manuals
- Cadillac XLR Owners Manuals
- 2004 Cadillac XLR Owners Manuals
- Cadillac XLR Owners Manuals
- 2007 Cadillac XLR Owners Manuals
- Cadillac XLR Owners Manuals
- 2006 Cadillac XLR Owners Manuals
- Cadillac XLR Owners Manuals
- 2005 Cadillac XLR Owners Manuals
- Cadillac XLR Owners Manuals
- 2009 Cadillac XLR Owners Manuals
- Cadillac XLR Owners Manuals
- Download PDF Manual
-
hot days, it could read as low as 6 psi (40 kPa) and still be considered normal. It may vary with engine speed, outside temperature and oil viscosity.
The Driver Information Center (DIC) may display messages regarding the oil condition. See DIC Warnings and Messages on page 3-67 and Engine Oil on page 6-13.
{CAUTION:
Do not keep driving if the oil pressure is low. If you do, your engine can become so hot that it catches fire. You or others could be burned. Check your oil as soon as possible and have your vehicle serviced.
Notice: Lack of proper engine oil maintenance may damage the engine. The repairs would not be covered by your warranty. Always follow the maintenance schedule in this manual for changing engine oil.
3-61
Security Light
Lights On Reminder
For information regarding this light, see Theft-Deterrent Systems on page 2-18.
This light comes on whenever the headlamps are on.
Fog Lamp Light
The fog lamps light will come on when the fog lamps are in use.
United States Only
Highbeam On Light
This light will come on when the high-beam headlamps are in use.
The light will go out when the fog lamps are turned off. See Fog Lamps on page 3-31 for more information.
See Headlamp High/Low-Beam Changer on page 3-8.
3-62
Fuel Gage
Your fuel gage tells you about how much fuel you have left when the ignition is on.
When the needle approaches the low fuel symbol, LOW FUEL will appear on the Driver Information Center (DIC) display. At this time, you still have a little fuel left, but you should get more soon. Press RESET to acknowledge a DIC message(s). Pressing RESET will also turn off a DIC message but the LOW FUEL message will come on again in 10 minutes if you have not added fuel to the vehicle.
Here are five things that some owners ask about. All these things are normal and do not indicate that anything is wrong with the fuel gage. (cid:127) At the gas station, the gas pump shuts off before
the gage reads the full symbol. It takes more (or less) fuel to fill up than the gage reads. For example, the gage reads half full, but it took more (or less) than half of the tank’s capacity to fit it. The gage pointer may move while cornering, braking or speeding up. The gage may not indicate the tank is empty when the ignition is turned off. The gage reading may change slightly within the first several minutes after starting the vehicle.
3-63
(cid:127) (cid:127) (cid:127) (cid:127) You can use the Driver Information Center (DIC) to display more detailed fuel information. While scrolling through the DIC, you will also find: (cid:127) AVERAGE XX.X MPG (Average Miles Per Gallon):
The fuel economy calculated for the last 20 gallons (76 L) of fuel used, or since you last reset the display. INST XX.X MPG (Instantaneous Miles Per Gallon): The fuel economy calculated for your current driving conditions.
(cid:127) RANGE XXX MI: The approximate distance you can
drive before refueling.
See DIC Controls and Displays on page 3-64 for more information. You should reset the fuel information display every time you refuel. To reset AVERAGE, use the information up or down button to scroll to AVE FUEL ECON and hold the reset button. RANGE will automatically reset.
Driver Information Center (DIC) This display gives you the status of many of your vehicle’s systems. The DIC is also used to display driver personalization features and warning/status messages. All messages will appear in the DIC display, located at the bottom of the instrument panel cluster.
DIC Controls and Displays
The Driver Information Center (DIC) buttons are located to the right of the steering wheel on the instrument panel, near the air outlets.
3-64
(cid:127) « 4 ª (Information): Press the top or bottom of this button to scroll through the available features which include the odometer, trip odometers, fuel range, miles per gallon, average speed, timer, tire pressure, and remaining oil life. + (Interior Lamps): Press this button to turn the interior lamps on and off.
OPTIONS: Press this button to choose personal options that are available on your vehicle.
RESET: Press this button to reset a feature. It is also used to switch between English and Metric options.
Use the information button to scroll through the following options:
ODOMETER: This feature shows how far the vehicle has been driven in either miles (mi) or kilometers (km). Use the ENG/METRIC feature to switch between English and Metric units. TRIP A: This feature will record the distance traveled since the last time it was reset. Press and hold the RESET button to return to zero. If your vehicle is first sold in the United States, the trip odometer will return to zero after 999.9 miles (1 609 km). If your vehicle is first sold in Canada, the trip odometer will return to zero after 1,242 miles (1 999 km).
TRIP B: This feature allows you to record the distance traveled during a second trip and functions the same as TRIP A.
RANGE xxx MI: This feature shows about how many miles (mi) or kilometers (km) you can drive without refilling your fuel tank. Once the range drops below 40 miles (64 km) remaining, the display will show LOW.
If the vehicle has been idling for a long time, the range displayed on the DIC could be abnormally low. The vehicle must be driven 5-10 miles (8-16 km) to get an accurate reading.
AVERAGE xx.x MPG (Average Miles Per Gallon): This feature shows the approximate fuel economy the vehicle has averaged since the last time the value was reset. To reset the average miles per gallon, press the information button to display AVERAGE xx.x MPG, then press and hold the RESET button until AVERAGE 00.0 MPG is displayed.
INST xx.x MPG (Instantaneous Miles Per Gallon): This feature shows the instantaneous fuel economy which varies with your driving conditions, such as acceleration, braking, and the grade of the road being traveled. The RESET button does not function in this mode.
3-65
AVERAGE SPEED: This feature shows the average speed the vehicle has traveled since the last time the value was reset. To reset the value, press the information button to display AVERAGE SPEED, then press and hold the RESET button until AVERAGE SPEED 00.0 is displayed.
ELAPSED TIME: This feature is like a stopwatch, in that you can clock the time it takes to get from one point to another.
To operate, press the information button to display ELAPSED TIME. Each of the fields for the hours, minutes, and seconds are two numeric digits.
Once ELAPSED TIME 00:00:00 is displayed, press the RESET button to start the timing feature. Press the RESET button again to stop it. If you will be starting and stopping your vehicle, during a trip for instance, the ELAPSED TIME feature will automatically start timing where it left off when you last stopped. To reset it, press and hold the RESET button until the display reads ELAPSED TIME 00:00:00. Press the information button to exit from the ELAPSED TIME display.
FRONT Lxx Rxx PSI: This feature shows the tire pressure for the front left and right tires.
REAR Lxx Rxx PSI: This feature shows the tire pressure for the rear left and right tires.
OIL LIFE: This feature shows the estimated oil life remaining. See Oil Life Indicator on page 3-82 for more information. To reset the engine oil life system, see Engine Oil Life System on page 6-16. This only needs to be reset after you have had the oil changed.
In addition to the engine oil life system monitoring oil life, additional maintenance is recommended in the Maintenance Schedule in this manual. See Scheduled Maintenance on page 7-4 and Engine Oil on page 6-13
for more information.ENG/METRIC (English/Metric): This feature allows you to switch the DIC displays between English and Metric. Press the RESET button to switch the display between English and Metric. There will be an arrow next to the option that is selected.
3-66
DIC Warnings and Messages These messages will appear if there is a problem detected in one of your vehicle’s systems. You must then press RESET to clear the display screen for further use. However, be sure to take any message that appears on the display screen seriously and remember that pressing the RESET button will only make the message disappear, not the problem. DIC messages can also be displayed in English, French, German, Italian, and Spanish.
ABS (Anti-Lock Brake System) ACTIVE: When your anti-lock system is adjusting brake pressure to help avoid a braking skid, the ABS ACTIVE message will be displayed.
Slippery road conditions may exist if this message is displayed, so adjust your driving accordingly. The message may stay on for a few seconds after the system stops adjusting brake pressure.
BATTERY SAVER ACTIVE: This message is displayed when the vehicle has detected that the battery voltage is dropping beyond a reasonable point. The battery saver system will start reducing certain features of the vehicle that you may not be able to notice. At the point that features are disabled, this message is displayed. It means that the vehicle is trying to save the charge in the battery. Turn off unnecessary accessories to allow the battery to recharge.
BUCKLE PASSENGER: This message reminds you to buckle the passenger’s seat belt.
This message will display and a chime will sound when the ignition is on, the driver’s seat belt is buckled, the passenger’s seat belt is unbuckled with the passenger airbag enabled, and the vehicle is in motion. You should have the passenger buckle their seat belt.
The reminder will be repeated if the ignition is on, the vehicle is in motion, the driver is buckled and the passenger is still unbuckled, and the passenger airbag is enabled. If the passenger’s seat belt is already buckled, this message and chime will not come on.
3-67
BUCKLE SEAT BELT: This message reminds you to buckle the driver’s seat belt.
This message will display and a chime will sound when the ignition is on, the driver’s seat belt is unbuckled, and the vehicle is in motion. You should buckle your seat belt.
If the driver remains unbuckled when the ignition is on and the vehicle is in motion, the reminder will be repeated. If the driver’s seat belt is already buckled, this message and chime will not come on.
This message is an additional reminder to the Safety Belt Reminder Light in the instrument panel cluster. See Safety Belt Reminder Light on page 3-50 for more information.
CHANGE OIL NOW: This means that the life of the engine oil has expired. See Scheduled Maintenance on page 7-4. After an oil change, the Oil Life Indicator must be reset. See Oil Life Indicator on page 3-82 and Engine Oil Life System on page 6-16.
CHARGE SYSTEM FAULT: This message will display when a problem with the charging system has been detected. Have your vehicle serviced by your GM dealer.
CHECK GAS CAP: This message will appear if the gas cap has not been fully tightened. You should recheck your gas cap to ensure that it is on properly.
CLEAN RADAR CRUISE: This message indicates the Adaptive Cruise Control (ACC) system is disabled because the radar is blocked and cannot detect vehicles in your path. It may also activate during heavy rain or due to road spray. To clean the system, see “Adaptive Cruise Control (ACC)” under Turn Signal/Multifunction Lever on page 3-7.
CLOSE CARGO DIVIDER: This message indicates that the cargo divider is not in place. Open the trunk and make sure the cargo divider is secure and no objects are on the divider. See Rear Storage Area on page 2-45
for more information.COOLANT OVER TEMP (Temperature): This message will appear when the engine coolant temperature is too hot. Stop and allow your vehicle to idle in PARK (P) until it cools down and the message is removed. Do not increase engine speed above a normal idle. If it does not cool down, turn off the engine and have it serviced by your GM dealer before driving it again. Severe engine damage can result from an overheated engine. See Engine Overheating on page 6-23.
3-68
CRUISE NOT READY: This message indicates that ACC will not activate due to a temporary condition. Your vehicle does not require service. If this message appears when you attempt to activate the system, continue driving for several minutes then try again to activate the system.
DRIVER NO. X (1 OR 2): This message will be displayed when the vehicle is started or when there is a change of driver. The message will show which driver is activating the personalization feature. It will only stay on for five seconds.
ENGINE HOT, STOP ENGINE: This message will appear when the engine has overheated. Stop and turn the engine off immediately to avoid severe engine damage. See Engine Overheating on page 6-23. A multiple chime will also sound when this message is displayed.
ENGINE PROTECTION REDUCE ENGINE RPM: If this message appears, the control system has determined that continued operation at the existing engine speed may lead to engine overheating. Therefore, you should lower the engine speed by upshifting the transmission or drive at a lower speed.
HEADLAMPS SUGGESTED: If it is dark enough outside and the headlamps and Twilight Sentinel® controls are off, this message will display on the DIC. This message informs the driver that turning on the exterior lamps is recommended. It has become dark enough outside to require the headlamps and/or other exterior lamps. This message will also appear if the optional Rainsense™ wiping feature is on and the Twilight Sentinel® is off.
HIGH TRANS (Transmission) TEMP (Temperature): This message indicates that the transmission fluid in your vehicle is too hot. Stop and allow your vehicle to idle until it cools down or until this message is removed.
HIGH VOLTAGE: This message shows that the electrical charging system is overcharging. To avoid being stranded, have the electrical system checked by your GM dealer. You can reduce the charging overload by using the accessories. Turn on the lamps and radio, set the climate control on AUTO and the fan speed on HI, and turn the rear window defogger on. You can monitor battery voltage on the DIC by pressing the information button. The normal range is 11.5 to 15.5 volts when the engine is running.
3-69
HOT ENGINE–A/C OFF: This message displays when the engine coolant becomes hotter than the normal operating temperature. To avoid added strain on a hot engine, the air conditioning compressor is automatically turned off. When the coolant temperature returns to normal, the A/C operation will automatically resume. You can continue to drive your vehicle. If this message continues to appear, have the system repaired by your GM dealer as soon as possible to avoid compressor damage.
ICE POSSIBLE: This message appears when the outside air temperature is cold enough to create icy road conditions.
LEFT DOOR AJAR: This message will display anytime the vehicle engine is running, the transmission is not in PARK (P) and the driver’s door is open or ajar. A chime will sound when the vehicle’s speed is greater than 3 mph (4.8 km/h).
LOW BRAKE FLUID: This message will display if the vehicle is running to inform the driver that the brake fluid level is low. Have the brake system serviced by your GM dealer as soon as possible. See “Brake Fluid” under Brakes on page 6-33.
LOW COOLANT: This message will appear when there is a low level of engine coolant. Have the cooling system serviced by your GM dealer as soon as possible. See Engine Coolant on page 6-20.
LOW FUEL: This message will appear when the fuel supply is less than 5 gallons (18.9 L) and the display is turned off. A single chime will also sound when this message is displayed.
LOW OIL LEVEL: For correct operation of the low oil sensing system, your vehicle should be on a level surface. A false LOW OIL LEVEL message may appear if the vehicle is parked on a grade. The oil level sensing system does not check for actual oil level if the engine has been off for a short period of time, and the oil level is never checked while the engine is running. If the LOW OIL LEVEL message appears, and your vehicle has been parked on level ground with the engine off for at least 30 minutes, the oil level should be checked by observing the oil dipstick. Prior to checking the oil level, be sure the engine has been off for a few minutes and your vehicle is on a level surface. Then check the dipstick and add oil if necessary. See Engine Oil on page 6-13.
3-70
LOW OIL PRESSURE: If this message appears while the engine is running, stop the engine and do not operate it until the cause of low oil pressure is corrected. Severe damage to the engine can result. A multiple chime will sound when this message is displayed.
To help the generator recharge the battery quickly, you can reduce the load on the electrical system by turning off the accessories. You can monitor battery voltage on the DIC by pressing the INFO button. The normal range is 11.5 to 15.5 volts.
LOW VOLTAGE: This message will appear when the electrical system is charging less than 10 volts or if the battery has been drained. If this message appears immediately after starting, it is possible that the generator can still recharge the battery. The battery should recharge while driving but may take a few hours to do so. Consider using an auxiliary charger to boost the battery after returning home or to a final destination. Be sure to follow the manufacturer’s instructions. If this message appears while driving or after starting your vehicle and stays on, have it checked immediately by your GM dealer to determine the cause of this problem.
LOW WASHER FLUID: This message means that your vehicle is low on windshield washer fluid. See Windshield Washer Fluid on page 6-32.
MAX (Maximum) SPEED XX MPH (XX KM/H): A failure in the magnetic ride control system has occurred when this message appears. The Powertrain Control Module (PCM) determines the speed to which your vehicle is limited. Have your vehicle serviced by your GM dealer if this message appears.
3-71
NO FOB DETECTED: This message is displayed if the vehicle does not detect the presence of a keyless access transmitter when you have attempted to start the vehicle or a vehicle door has just closed. The following conditions may cause this message to appear: (cid:127) Driver-added equipment plugged into the accessory
power outlet on the center console is causing interference. Examples of these devices are cell phones and cell phone chargers, two-way radios, power inverters, or similar items. Try moving the keyless access transmitter away from these devices when starting the vehicle. In addition, PDA devices and remote garage and gate openers may also generate Electromagnetic Interference (EMI) that may interfere with the keyless access transmitter. Do not carry the keyless access transmitter in the same pocket or bag as these devices.
3-72
The vehicle is experiencing Electromagnetic Interference (EMI). Some locations, such as airports, automatic toll booths, and some gas stations, have EMI fields which may interfere with your keyless access transmitter.
If moving the transmitter to different locations within the vehicle does not help, place the transmitter in the glove box transmitter pocket with the buttons facing to the right and then press the START button.
(cid:127) NO FOB, OFF OR RUN?: When this message displays, it means that the keyless access transmitter is not detected inside the vehicle while you are trying to turn the ignition off. Your vehicle may be near a strong radio antenna signal causing the keyless access system to be jammed. The vehicle will remain in ACC until off or START has been pressed or five minutes has expired. If you turn the ignition off and you cannot find the keyless access transmitter, you will not be able to restart the vehicle. The keyless access transmitter needs to be inside of the vehicle in order for the vehicle to start. See Starting the Engine on page 2-22 for more information.
OVER SPEED WARNING: This message is displayed when the vehicle speed exceeds a certain limit as required by some export countries. A chime will sound when this message is displayed.
PRESS BRAKE TO START: The brake pedal must be applied to start the vehicle. Make sure you are pressing the brake pedal all the way down.
REDUCED ENGINE POWER: This message informs you that the vehicle is reducing engine power because the transmission is being placed in gear under conditions that may cause damage to the vehicle’s engine, transmission, or ability to accelerate.
RIGHT DOOR AJAR: The passenger’s door is open or ajar when this message appears. The vehicle must be running and the transmission not in PARK (P) for this message to display. A chime will sound if the vehicle’s speed is greater than 3 mph (5 km/h). SERVICE A/C: This message appears when the electronic sensors that control the air conditioning and heating systems are no longer working. Have the climate control system serviced by your GM dealer if you notice a drop in heating and air conditioning efficiency. SERVICE ABS (Anti-Lock Brake System): If the SERVICE ABS message is displayed when you are driving, stop as soon as possible and turn the ignition off. Then start the engine again to reset the system. If the message stays on, or comes back on again while you are driving, your vehicle is in need of service. See your GM dealer.
If the SERVICE ABS message is being displayed, your Traction Control System and StabiliTrak® System will also be disabled. The Driver Information Center will scroll three messages: SERVICE ABS, SERVICE TRACTION SYS and SERVICE STABILITRAK, and the anti-lock brake system and traction control warning lights on the instrument panel cluster will be illuminated. See Anti-Lock Brake System Warning Light on page 3-55
and Traction Control System (TCS) Warning Light on page 3-56. The driver can acknowledge these messages by pressing the RESET button three times.3-73
When the service message is displayed, the computer controlled systems will not assist the driver and you should have the system repaired by your GM dealer as soon as possible. Adjust your driving accordingly.
SERVICE TRACTION SYS (System): This message indicates there is a problem with the Traction Control System (TCS). Have your vehicle serviced by your GM dealer.
SERVICE AFS LAMPS: This message indicates that the Adaptive Forward Lighting System (AFS) is disabled and needs service. See your GM dealer. See Adaptive Forward Lighting System on page 3-31 for more information.
SERVICE ELECT (Electrical) SYSTEM: This message will display if an electrical problem has occurred within the Powertrain Control Module (PCM). Have your vehicle serviced by your GM dealer.
SERVICE FUEL SYSTEM: The Powertrain Control Module (PCM) has detected a problem within the fuel system when this message appears. Have your vehicle serviced by your GM dealer. This message will also be displayed when the cluster is not getting fuel information from the PCM.
SERVICE RADAR CRUISE: This message indicates that the Adaptive Cruise Control (ACC) system is disabled and needs service. See your GM dealer.
SERVICE RIDE CONTROL: This message indicates there is a problem with the Magnetic Ride Control System. Have your vehicle serviced by your GM dealer.
SERVICE STABILITRAK: If this message appears, it means there may be a problem with your stability enhancement system. If you see this message, try to reset the system. Stop, turn off the engine, then start the engine again. If the SERVICE STABILITRAK message still comes on, it means there is a problem. You should see your GM dealer for service. Reduce your speed and drive accordingly. A single chime will also sound when this message is displayed.
SERVICE TRANSMISSION: This message indicates that there is a problem with the transmission. Have your vehicle serviced by your GM dealer.
SERVICE VEHICLE SOON: This message is displayed when a non-emissions related powertrain malfunction occurs. Have your vehicle serviced by your GM dealer as soon as possible.
SHIFT TO PARK: This message indicates that the vehicle is not in PARK (P) when the engine is being turned off. The vehicle will be in accessory mode. Once the shifter is moved to PARK (P), the vehicle will turn off.
3-74
STABILITRAK ACTIVE: You may see the STABILITRAK ACTIVE message on the DIC. It means that an advanced, computer-controlled system has come on to help your vehicle continue to go in the direction in which you are steering. This stability enhancement system activates when the computer senses that your vehicle is just starting to spin, as it might if you hit a patch of ice or other slippery spot on the road. When the system is on, you may hear a noise or feel a vibration in the brake pedal. This is normal.
When the STABILITRAK ACTIVE message is on, you should continue to steer in the direction you want to go. The system is designed to help you in bad weather or other difficult driving situations by making the most of whatever road conditions will permit. If the STABILITRAK ACTIVE message comes on, you will know that something has caused your vehicle to start to spin, so you should consider slowing down. A single chime will also sound when this message is displayed.
STABILITRAK READY: If this message appears and a chime sounds, the system has completed the functional check of the StabiliTrak® System.
STABILITRAK WARMING: When you first start your vehicle and drive away, especially during cold winter weather, the STABILITRAK WARMING message may be displayed in the DIC along with a chime and the traction control warning light. This is normal. You can acknowledge this message by pressing the RESET button. The StabiliTrak® performance is affected until the STABILITRAK READY message is displayed in the DIC, which can take up to 15 minutes.
SVC (Service) TIRE MONITOR: If this message comes on, a part on the Tire Pressure Monitor (TPM) is not working properly. If you drive your vehicle while any of the four sensors are missing or inoperable, the warning will come on in approximately 10 minutes. If all four sensors are missing, the warning will come on in approximately 15 to 20 minutes. All the sensors would be missing, for example, if you put different wheels on your vehicle without transferring the sensors. If the warning comes on and stays on, there may be a problem with the TPM. See your GM dealer.
TOO COLD TO MOVE TOP: This message will display when the retractable hardtop button is pressed and the hardtop pump motor temperature is below −4°F (−20°C). Wait for the hardtop pump motor to warm up before using the retractable hardtop.
3-75
TOP INOP (Inoperative) – VALET ON: This message will display when the retractable hardtop button is pressed and the valet switch is on. Turn off the valet switch before using the retractable hardtop.
TRAC (Traction)/STABILITRAK OFF: This message indicates that both the Traction Control System (TCS) and StabiliTrak® are off. The message will remain until the systems are turned on again.
TOP INOP (Inoperative) OUT OF PARK: This message will display if the retractable hardtop button is pressed while the vehicle is not in PARK (P).
TRAC (Traction)/STABILITRAK ON: This message indicates that both the Traction Control System (TCS) and the StabiliTrak® are on.
TOP MOTOR OVER TEMP (Temperature): This message will display when the retractable hardtop button is pressed and the hardtop pump motor temperature is over 221°F (105°C). Wait for the hardtop pump motor to cool down before using the retractable hardtop.
TOP NOT SECURE: This message will display when the retractable hardtop button is released before the top open or close operation is complete. Press and hold the retractable hardtop button to fully open or close the top.
TRAC (Traction) SYSTEM ACTIVE: When your traction control system is limiting wheel spin, the TRACTION SYSTEM ACTIVE message will be displayed. Slippery road conditions may exist if this message is displayed, so adjust your driving accordingly. This message will stay on for a few seconds after the traction control system stops limited wheel spin.
TRACTION SYSTEM OFF: This message indicates that the Traction Control System (TCS) is off but StabiliTrak® remains on.
TRACTION SYSTEM ON: This message indicates that the Traction Control System (TCS) is on.
TRUNK AJAR: This message indicates that the trunk is open while the vehicle is running and not in PARK (P).
WAIT FOR STABILITRAK: This message will be displayed after driving 19 mph (30 km/h) for 10 seconds if the steering is not centered. StabiliTrak® is not available until the steering centers itself and the STABILITRAK READY message is displayed in the DIC.
3-76
Other Messages Here are more messages that you can receive on your Driver Information Center (DIC). To acknowledge a message and read another message that may have come on at the same time, press the RESET button. (cid:127) ACCESSORY MODE ON (cid:127) CHANGE OIL SOON
(See Engine Oil on page 6-13 and Engine Oil Life System on page 6-16.) FOB BATTERY LOW
(cid:127) HIGH TIRE PRESS LF (cid:127) HIGH TIRE PRESS RF (cid:127) HIGH TIRE PRESS LR (cid:127) HIGH TIRE PRESS RR
INTRUSION SENSOR OFF INTRUSION SENSOR ON
(cid:127) KNOWN FOB
LEFT FRONT TIRE FLAT MAX SPD 55, REDUCED HNDLG LEFT REAR TIRE FLAT MAX SPD 55, REDUCED HNDLG LOW TIRE PRESS LF LOW TIRE PRESS RF LOW TIRE PRESS LR LOW TIRE PRESS RR
(cid:127) MAX # FOBS LEARNED (cid:127) OFF-ACC TO LEARN (cid:127) READY FOR FOB #X (cid:127) RIGHT FRT TIRE FLAT MAX SPD 55,
REDUCED HNDLG
(cid:127) RIGHT REAR TIRE FLAT MAX SPD 55,
REDUCED HNDLG (cid:127) WAIT XX MINUTES
3-77
(cid:127) (cid:127) (cid:127) (cid:127) (cid:127) (cid:127) (cid:127) (cid:127) (cid:127) DIC Vehicle Personalization Your vehicle is equipped with personalization capabilities that allows you to program certain features to a preferred setting for up to two drivers. The back of the keyless access transmitters are labelled 1 or 2. The current driver’s preferences are recalled when one of the following occurs:
The lock or unlock button on the keyless access transmitter, programmed as 1 or 2, is pressed. The appropriate memory button, 1 or 2, located on the driver’s seat is pressed. See Memory Seat, Mirrors and Steering Wheel on page 2-56 for more information.
(cid:127) A valid keyless access transmitter is detected upon
opening the driver’s door.
If more than one valid keyless access transmitter is detected upon opening the driver’s door, the driver preferences for the lowest driver number will be recalled. If a keyless access transmitter is programmed as #3 or #4, the personalization system will not recognize the transmitter. The Driver Information Center (DIC) will not display a current driver number and the features that are normally programmed through the DIC will be set to the default states. Also, if the OPTIONS button
is pressed, the DIC does not display the menus used to set personalizations, but instead displays OPTIONS UNAVAILABLE for a few seconds. Feature Programming To change feature preferences, make sure the vehicle is running and in PARK (P). Press the OPTIONS button and the Driver Information Center (DIC) will display the current driver for a few seconds, then display the first personalization menu item. You can now use the OPTIONS button to change the setting of the displayed feature. Press the top or bottom of the information button to scroll up or down the list of features. When you get to a feature you want to change, press the OPTIONS button again. When you are finished, press the RESET button to exit the personalization menu. If no button is pressed within 45 seconds, the DIC will exit the personalization menu. The following are DIC options that will be available in the personalization menu. Auto Recall This feature allows the steering column, outside mirrors and the driver’s seat to automatically move to the current driver’s set position when the engine starts. The DIC will display AUTO RECALL OFF or AUTO RECALL ON. Press the OPTIONS button to change the setting.
3-78
(cid:127) (cid:127) Auto Exit Recall This feature allows the steering column and driver’s seat to automatically move to the current driver’s exit position when one of the following occurs:
The vehicle is turned off or in RAP or accessory mode and the driver’s door is opened. The vehicle is turned off or in RAP and the unlock button on the keyless access transmitter is pressed.
The DIC will display AUTO EXIT RECALL OFF or AUTO EXIT RECALL ON. Press the OPTIONS button to change the setting. Approach Lights This feature activates the parking lamps, front fog lamps and back-up lamps during low light periods when the unlock button on the keyless access transmitter is pressed, both doors are closed and the vehicle is off or in RAP. The lamps remain on for 20 seconds or until a door is opened, the lock button on the keyless access transmitter is pressed or the vehicle is no longer off or in RAP. The DIC will display APPROACH LIGHTS OFF or APPROACH LIGHTS ON. Press the OPTIONS button to change the setting.
Exit Lights This feature activates the parking lamps and front fog lamps for 15, 30 or 90 seconds. This will occur when the vehicle is off or in RAP and the headlamps are on due to the automatic headlamp system. The parking lamps and front fog lamps will remain on until the driver selected time period expires, the exterior lamp control is activated or the vehicle is no longer off or in RAP. The DIC will display EXIT LIGHTS OFF, EXIT LIGHTS - 15 SEC, EXIT LIGHTS - 30 SEC or EXIT LIGHTS - 90 SEC. Press the OPTIONS button to change the setting. Flash at Unlock This feature activates the front and rear turn signals for two short flashes when the unlock or trunk button on the keyless access transmitter is pressed or when OnStar® unlocks the doors. This will only occur when the vehicle is off. The DIC will display NO FLASH AT UNLOCK or FLASH AT UNLOCK. Press the OPTIONS button to change the setting.
3-79
(cid:127) (cid:127) Flash at Lock This feature activates the front and rear turn signals for one long flash when the lock button on the keyless access transmitter is pressed. This will only occur when the vehicle is off. If the lock button is pressed again within five seconds, the horn will sound regardless of which setting you have selected. The DIC will display NO FLASH AT LOCK or FLASH AT LOCK. Press the OPTIONS button to change the setting. FOB Reminder This feature sounds the horn three times when the driver door is closed and there is a keyless access transmitter inside the interior of the vehicle. This will only occur when the vehicle is off. The DIC will display FOB REMINDER OFF or FOB REMINDER HORN. Press the OPTIONS button to change the setting. Passive Locking This feature allows you to select whether the doors automatically lock when the ignition is turned off, the keyless access transmitter has been removed from the interior of the vehicle, and the doors have been closed for eight seconds. If a keyless access transmitter is left inside of the vehicle, the doors will not lock.
3-80
You may temporarily disable the passive door locking feature by pressing a door unlock switch for three seconds while a door is open. Passive door locking will then remain disabled until a door lock switch is pressed or until the power mode transitions from the off power mode. You can select to not have the horn sound when the passive lock occurs. If you choose this setting, the doors will automatically lock eight seconds after you turn the ignition off, remove the keyless access transmitter from the interior of the vehicle and close both doors. You can also select to have the horn sound once when the passive lock occurs. If you choose this setting, the doors will automatically lock and the horn will chirp eight seconds after you turn the ignition off, remove the keyless access transmitter from the interior of the vehicle and close both doors. If you are parking in a quiet area and do not want the horn to sound when the doors lock, press the lock button on the keyless access transmitter immediately after removing it from the interior and closing the doors. This will lock the doors and cancel the passive locking for this ignition cycle. The DIC will display PASSIVE LOCKING OFF, SILENT PASSIVE LOCK or HORN AT PASSIVE LOCK. Press the OPTIONS button to change the setting.
Passive Unlocking This feature allows you to select which doors will automatically unlock when you approach and open the driver’s door with your keyless access transmitter. You can choose to have the driver’s door unlock or both doors unlock. See Door Locks on page 2-9 for more information. The DIC will display PASSIVE UNLK DRIVER or PASSIVE UNLK BOTH. Press the OPTIONS button to change this setting. Auto Unlock This feature automatically unlocks either the driver’s door or both doors, depending on the setting, when the shift lever is moved to PARK (P). The DIC will display AUTO UNLOCK OFF, AUTO UNLOCK DRIVER or AUTO UNLOCK BOTH. Press the OPTIONS button to change the setting.
Park Assist This feature tilts the passenger’s side mirror downward when the shifter is moved to REVERSE (R). This can help you to see the curb while backing up. If you adjust the mirror while in REVERSE (R), the new position will be saved as the park assist position. The DIC will display PARK ASSIST OFF or PARK ASSIST ON. Language This feature allows you to select the language the DIC and Head-Up Display (HUD), uses to display messages. The DIC will display ENGLISH, FRENCH, GERMAN, ITALIAN, JAPANESE or SPANISH. Press the OPTIONS button to change the setting. If you become stuck in a language that you do not understand, hold the OPTIONS and RESET button for five seconds. The DIC will scroll through all available languages for as long as the buttons are held. Each language option will display in its own language. For example, English will be displayed as ENGLISH, Spanish as ESPANOL, etc. When the desired language is available, release the buttons and the DIC will set to this language.
3-81
Trip Computer
Oil Life Indicator This feature lets you know when to change the engine oil. It is based on the engine oil temperatures and your driving patterns. To see the display, press the information button several times until OIL LIFE appears. If you see 99% OIL LIFE, 99 percent of your current oil life remains. The DIC may display a CHANGE OIL NOW message. If you see CHANGE OIL NOW, it means the oil life is gone. For more information, see Scheduled Maintenance on page 7-4 and Engine Oil on page 6-13. When the oil is changed, you will need to reset the system. See Engine Oil Life System on page 6-16. Always keep a written record of the mileage and date when you changed your oil.
Audio System(s) Determine which radio your vehicle has and then read the pages following to familiarize yourself with its features. Driving without distraction is a necessity for a safer driving experience. See Defensive Driving on page 5-2. By taking a few moments to read this manual and get familiar with your vehicle’s audio system, you can use it with less effort, as well as take advantage of its features. While your vehicle is parked, set up your audio system by presetting your favorite radio stations, setting the tone and adjusting the speakers. Then, when driving conditions permit, you can tune to your favorite stations using the presets and steering wheel controls (if equipped).
{CAUTION:
This system provides you with a far greater access to audio stations and song listings. Giving extended attention to entertainment tasks while driving can cause a crash and you or others can be injured or killed. Always keep your eyes on the road and your mind on the drive — avoid engaging in extended searching while driving.
3-82
Keeping your mind on the drive is important for safe driving. For more information, see Defensive Driving on page 5-2. Get familiar with your vehicle’s audio system so you can use it with less effort and take full advantage of its features. Here are some ways in which you can help avoid distraction while driving. While your vehicle is parked:
Familiarize yourself with all of its controls. Familiarize yourself with its operation.
(cid:127) Set up your audio system by presetting your favorite radio stations, setting the tone, and adjusting the speakers. Then, when driving conditions permit, you can tune to your favorite radio stations using the presets and steering wheel controls (if equipped).
Notice: Before adding any sound equipment to your vehicle, such as an audio system, CD player, CB radio, mobile telephone, or two-way radio, make sure that it can be added by checking with your dealer. Also, check federal rules covering mobile radio and telephone units. If sound equipment can be added, it is very important to do it properly. Added sound equipment may interfere with the operation of your vehicle’s engine, radio, or other systems, and even damage them. Your vehicle’s systems may interfere with the operation of sound equipment that has been added. Your vehicle has a feature called Retained Accessory Power (RAP). With RAP, the audio system can be played even after the ignition is turned off. See Retained Accessory Power (RAP) on page 2-22 for more information.
3-83
(cid:127) (cid:127) Theft-Deterrent Feature THEFTLOCK® is designed to discourage theft of your vehicle’s radio. The feature works automatically by learning a portion of the Vehicle Identification Number (VIN). If the radio is moved to a different vehicle, it will not operate. If the radio is removed from your vehicle, the original VIN in the radio can be used to trace the radio back to your vehicle. With THEFTLOCK® activated, the radio will not operate if stolen.
Audio Steering Wheel Controls
Some audio controls can be adjusted at the steering wheel. They include the following: g (Voice Recognition): See “OnStar® Steering Wheel Controls” under OnStar® System on page 2-37
or OnStar® System on page 4-47 for more information.SRCE (Source): Press this button to switch between FM1, FM2, AM, or XM1 or XM2 (if equipped), CD, or DVD. + u− (Volume): Press this button to increase or to decrease the volume. + 1-6 − (Preset Stations): Press this button to play stations that are programmed on the radio preset pushbuttons. The radio will only seek preset stations with a strong signal that are in the selected band.
When a CD is playing, press this button to go to the next track.
3-84
Radio Reception You may experience frequency interference and static during normal radio reception if items such as cellphone chargers, vehicle convenience accessories, and external electronic devices are plugged into the accessory power outlet. If there is interference or static, unplug the item from the accessory power outlet. AM The range for most AM stations is greater than for FM, especially at night. The longer range can cause station frequencies to interfere with each other. For better radio reception, most AM radio stations will boost the power levels during the day, and then reduce these levels during the night. Static can also occur when things like storms and power lines interfere with radio reception. When this happens, try reducing the treble on your radio. FM Stereo FM stereo will give the best sound, but FM signals will reach only about 10 to 40 miles (16 to 65 km). Tall buildings or hills can interfere with FM signals, causing the sound to fade in and out.
XM™ Satellite Radio Service XM™ Satellite Radio Service gives digital radio reception from coast-to-coast in the 48 contiguous United States, and in Canada (if available). Just as with FM, tall buildings or hills can interfere with satellite radio signals, causing the sound to fade in and out. In addition, traveling or standing under heavy foliage, bridges, garages, or tunnels may cause loss of XM signal for a period of time. The radio may display NO XM SIGNAL to indicate interference. Cellular Phone Usage Cellular phone usage may cause interference with your vehicle’s radio. This interference may occur when making or receiving phone calls, charging the phone’s battery, or simply having the phone on. This interference is an increased level of static while listening to the radio. If static is received while listening to the radio, unplug the cellular phone and turn it off.
3-85
Care of Your CDs Handle CDs carefully. Store them in their original cases or other protective cases and away from direct sunlight and dust. The CD player scans the bottom surface of the disc. If the surface of a CD is damaged, such as cracked, broken, or scratched, the CD will not play properly or not at all. If the surface of a CD is soiled, take a soft, lint free cloth or dampen a clean, soft cloth in a mild, neutral detergent solution mixed with water, and clean it. Make sure the wiping process starts from the center to the edge. Do not touch the bottom side of a CD while handling it; this could damage the surface. Pick up CDs by grasping the outer edges or the edge of the hole and the outer edge.
Care of the CD Player The use of CD lens cleaners for CD players is not advised, due to the risk of contaminating the internal lens of the CD optics with lubricants.
Diversity Antenna System The AM-FM antennas are located under the decklid surface in the trunk compartment. the antennas are hidden from view and are not accessible. If adding an aftermarket cellular telephone to your vehicle, do not attach the antenna to the rear glass. This would interfere with the convertible top retraction operation and could cause damage to the finished/painted surfaces.
XM™ Satellite Radio Antenna System (Trunk Mounted) Your vehicle may have the XM™ Satellite Radio antenna that is located on the trunk of your vehicle. Keep this antenna clear of snow and ice build up for clear radio reception.
XM™ Satellite Radio Antenna System (Diversity System) Your vehicle may have the XM™ Satellite Radio antennas that are located in the outside rear view mirrors. These antennas are hidden from view and are not accessible.
3-86
Section 4
Navigation System
Overview .........................................................4-2
Navigation System Overview ............................4-2
Getting Started ...............................................4-4
Features and Controls ....................................4-10
Using the Navigation System ..........................4-10
Setup Menu .................................................4-13
Plan Route ..................................................4-18
Edit Memory Point ........................................4-19
Edit Waypoint ...............................................4-23
Edit Avoid Point/Area ....................................4-25
Enter Destination ..........................................4-27
Route Preference ..........................................4-36
Maps ..........................................................4-38
Symbols ......................................................4-42Keyless Access System .................................4-47
OnStar® System ...........................................4-47
Global Positioning System (GPS) ....................4-48
Vehicle Positioning ........................................4-49
Problems with Route Guidance .......................4-50
If the System Needs Service ..........................4-50
Ordering Map DVDs ......................................4-50
Database Coverage Explanations ....................4-50
Navigation Audio System ................................4-51
Six-Disc CD Changer ....................................4-66
CD/DVD Player ............................................4-69
Radio Personalization with Home andAway Feature ...........................................4-74
Voice Recognition ..........................................4-754-1
Overview Navigation System Overview
4-2
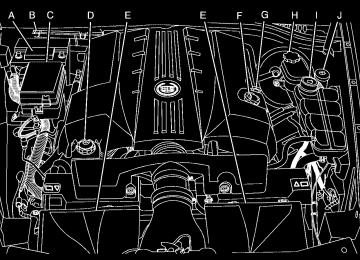
A. BAND Key. See “Finding a Station” under Navigation
Audio System on page 4-51.
B. CD Key. See Navigation Audio System on page 4-51
or CD/DVD Player on page 4-69.
C. DVD Key. See “Playing a DVD” under CD/DVD
Player on page 4-69.
D. TUNE/SEEK Key. See “Playing the Radio” under
Navigation Audio System on page 4-51.
E. Audio/Adjust Key. See “Main Audio Menu” under
Navigation Audio System on page 4-51.
F. Power-Volume Knob. See “Hard Keys” under Using
the Navigation System on page 4-10.
G. Navigation System Screen H. RPT (Repeat) Key. See “Hard Keys” under Using
the Navigation System on page 4-10.
I. MAP Key. See “Hard Keys” under Using the
Navigation System on page 4-10.
J. ROUTE Key. See “Hard Keys” under Using the
Navigation System on page 4-10.
K. MENU Key. See “Hard Keys” under Using the
Navigation System on page 4-10.
L. TILT Key. See “Hard Keys” under Using the
Navigation System on page 4-10.
4-3
Getting Started Before you begin to operate the navigation system, read this manual thoroughly to become familiar with it and to understand how the system works. Keeping your mind on the drive is important for safe driving. See Defensive Driving on page 5-2 for more information. Get familiar with your vehicle’s navigation system so you can use it with less effort and take full advantage of its features. Your navigation system includes not only navigation, but also audio functions. While your vehicle is parked:
Familiarize yourself with all of its controls: hard keys on the faceplate and touch-sensitive screen buttons. Familiarize yourself with its operation.
(cid:127) Set up your audio by presetting your favorite stations,
setting the tone, and adjusting the speakers. Then, when driving conditions permit, you can tune to your favorite stations using the presets and steering wheel controls (if equipped).
(cid:127) Set up the navigation features that can only be done
before you begin driving, such as entering an address or a preset destination.
Entering a destination or alphanumeric text requires many steps, so you can only perform these operations when the vehicle is in PARK (P). You will notice that touch-sensitive screen buttons leading to the alphanumeric keyboard are dimmed out while driving. Other functions may also be locked out while driving and they too will appear grayed out on the screen — but all functions are available when parked. Some functions can be performed while driving, as long as you can do so without diverting too much of your attention from your driving.
{CAUTION:
This system provides you with a far greater access to audio stations and song listings. Giving extended attention to entertainment tasks while driving can cause a crash and you or others can be injured or killed. Always keep your eyes on the road and your mind on the drive — avoid engaging in extended searching while driving.
4-4
(cid:127) (cid:127) {CAUTION:
Looking at the moving map on the navigation screen frequently or for too long while driving can cause a crash and you or others can be injured or killed. Keep your eyes and mind on the road and avoid looking too long or too often at the moving map on the navigation screen. Use the voice guidance directions whenever possible.
The navigation system allows you to do the following: (cid:127) Plan a route with provided turn-by-turn route and map guidance with voice prompts. See Plan Route on page 4-18 for more information. (cid:127) Select a destination using various methods and
choices.
(cid:127) Receive broadcast announcements on traffic and
emergency alert communications.
The information in the system may not always be complete. Road conditions such as prohibited turns, detours, and construction zones, change frequently. It is important to consider whether you can follow the directions given by the system for the current conditions. When getting started, you may set the navigation system to your preference using various options. You will also need to know how to perform various functions to begin route guidance. Reference the following topics for further information:
To adjust screen appearance, language, clock, English/metric measurements, or other options, see “Main Audio Menu” under Navigation Audio System on page 4-51. To adjust voice guidance volume or other navigation settings, see Setup Menu on page 4-13.
4-5
(cid:127) (cid:127) Setting Radio Station Presets To set preset radio stations, do the following: 1. Press the PWR/VOL knob to turn the system on. 2. Press the audio source screen button (AM, FM1,
FM2, etc.) and select the desired band (AM, FM1, FM2, XM1, or XM2 (if equipped), or WX (weather) (if equipped)).
3. Use the TUNE/SEEK arrows to tune to the desired
station.
4. Press and hold one of the six preset screen buttons,
at the bottom of the screen, until you hear a beep or see the station displayed on the selected preset button.
5. Repeat the steps for each preset. See “Preset Station Menu” under Navigation Audio System on page 4-51 for more information.
Setting the Time To set the time, do the following: 1. Press the PWR/VOL knob to turn the system on. 2. Press the e / z (Audio/Adjust) hard key. 3. Press the 8 clock symbol screen button. 4. Select the 12H or 24H screen button to display the
time in standard or military time.
5. Press and hold the HOUR and MIN. (minute) arrow
buttons to increase or to decrease the time.
6. Select the appropriate time zone screen button. 7. Select the Daylight Saving Time screen button,
if necessary.
The radio will use the GPS satellite to set the time. The vehicle needs to be in an open area to receive the signal. See “Clock Adjust Menu” under Navigation Audio System on page 4-51 for more information.
4-6
Setting the Search Area, Entering an Address and Point of Interest, Storing a Home Destination, and Using Your Home or Previous Destinations Before entering an Address, Point of Interest, Home, or Preset Destination, select the appropriate region that contains the final destination. Your vehicle must be stopped to perform this operation.
Setting the Search Area To set the search area, do the following: 1. Press the PWR/VOL knob to turn the system on. 2. Insert the DVD map disc. See “Regional Maps” under Maps on page 4-38 for more information.
3. A notice may appear. Touch the I AGREE screen
button to proceed. If the radio is already on with a map disc inserted, press the ROUTE hard key.
5. Press the Change screen button. 6. Select the appropriate region numbered screen
button that contains your final destination. The system will return to the Destination menu. See Enter Destination on page 4-27 for more information. Entering an Address To set a destination by entering a street address, do the following: 1. Press the PWR/VOL knob to turn the system on. 2. Insert the DVD map disc. See “Regional Maps” under Maps on page 4-38 for more information.
3. A notice may appear. Touch the I AGREE screen
button to proceed. If the radio is already on with a map disc inserted, press the ROUTE hard key.
4. Press the Enter Destination screen button. Verify
that the selected Search Area is correct.
4. Press the Enter Destination screen button.
5. Press the Address screen button.
4-7
6. Press the Street screen button, then enter the
street name using the alpha keypad on the screen. Do not enter directional information or street type, and use the space screen button between street or city names. For example, the street name N. Royal Oak Rd. should be entered as royal oak. Use the backspace ( V ) screen button if an incorrect character has been entered.
7. Select the desired street name with the correct
designation (Dr., Ln., St., etc.) from the list.
8. If there is more than one city, the system will
display the list of cities that have that street name. Select a city from the list or select the City screen button to input the city name.
9. Enter the house number using the numeric keypad
on the screen and touch the Enter screen button. The system will list the house number range that is available for the street.
10. Press the Enter screen button to plan your route. See “Address” under Enter Destination on page 4-27 for more information.
Entering a Point of Interest (POI) To set a destination by entering a Point of Interest (POI), do the following: 1. Press the power/volume knob to turn the system on. 2. Insert the DVD map disc. See “Regional Maps” under Maps on page 4-38 for more information.
3. A notice may appear. Touch the I AGREE screen
button to proceed. If the radio is already on with a map disc inserted, press the ROUTE hard key.
4. Press the Enter Destination screen button.
Verify that the selected Search Area is correct.
5. Press the All Points of Interest screen button. 6. Enter the specific title of the POI in the Name space
(i.e. Washington Monument) using the alpha keypad on the screen.
7. Select the POI from the list. 8. Press the Enter screen button to plan your route. Using the Category or City selections will aid the system in finding your POI by limiting the search options.
See “All Points of Interest” under Enter Destination on page 4-27 for more information.
4-8
Storing a Home Destination 1. Press the power/volume knob to turn the system on. 2. Insert the DVD map disc. See “Regional Maps” under Maps on page 4-38 for more information.
3. A notice may appear. Touch the I AGREE screen
button to proceed. If the radio is already on with a map disc inserted, press the ROUTE hard key.
4. Press the Edit Memory Point screen button. 5. Press the Home screen button. 6. Press the Register screen button.
Select a method for entering a destination. See Enter Destination on page 4-27 for more information.
7. Press the Enter screen button to store the Home
destination. The L Home icon will be highlighted on the DESTINATION screen. See “Using Your Home or Previous Destinations” next to use the home or previous destinations as a route.
Using Your Home or Previous Destinations These destinations are available for selection while driving. 1. Press the power/volume knob to turn the system on. 2. Insert the DVD map disc. See “Regional Maps” under Maps on page 4-38 for more information.
3. A notice may appear. Touch the I AGREE screen
button to proceed. If the radio is already on with a map disc inserted, press the ROUTE hard key.
4. Press the Enter Destination screen button.
Verify that the selected Search Area is correct.
5. Select the L (Home symbol) or the Previous
Destination screen button. If the Previous Destination screen button is selected, a list of the last 10 previous destinations will appear. Select the screen button next to the desired destination.
6. Press the Enter screen button to plan your route. See “Home” and “Previous Destination” under Enter Destination on page 4-27 for more information.
4-9
Canceling Your Current Route Guidance will be canceled once you arrive at your final destination. To cancel the current route prior to arrival at the final destination, do the following: 1. Press the ROUTE hard key. 2. Press the Route Preference screen button. 3. Press the Cancel Route screen button. 4. Press the Yes screen button to confirm cancellation. Guidance Volume To adjust the volume of voice guidance prompts, do the following: 1. Press the MENU hard key. 2. Press the ON screen button to turn voice volume on. 3. Select the desired volume or select the OFF screen button. The system will play back the new volume level.
See “Voice Guidance Volume Settings” under Setup Menu on page 4-13 for more information.
Features and Controls
Using the Navigation System This section presents basic information you will need to know to operate the navigation system. Use the keys located on each side of the navigation screen, as well as the available touch-sensitive screen buttons, to operate the system. See Navigation System Overview on page 4-2 for more information on location. Once the vehicle is moving, various functions will be disabled to reduce driver distraction. Hard Keys The following hard keys are located to the left of the navigation screen:
BAND: Press the BAND key to access the band screen and switch between AM, FM1, FM2, XM1, XM2, and WX, if equipped. See “Finding a Station” under Navigation Audio System on page 4-51.
CD: Press the CD key to play a CD. The CD screen will be displayed. See Six-Disc CD Changer on page 4-66 or CD/DVD Player on page 4-69.
4-10
DVD: Press the DVD key to play a DVD. The DVD screen will be displayed. See CD/DVD Player on page 4-69. y TUNE/SEEK z: Press the TUNE/SEEK up or down arrows to go to the next or previous radio station and stay there. See “Finding a Station” under Navigation Audio System on page 4-51. e/ z: Press the audio/adjust key to view the main audio menu. See “Main Audio Menu” under Navigation Audio System on page 4-51.
PWR-VOL (Power/Volume Knob): Press the power/volume knob to turn the audio and navigation systems on and off. Turn the knob to increase or decrease the volume to the audio system. The following hard keys are located to the right of the navigation screen:
RPT: Press the repeat key to repeat the current voice guidance navigation prompt.
MAP: Press the MAP key to view the map screen showing current vehicle position.
The map screen can also display the following information: (cid:127) North or Heading Up symbol. See Symbols on
page 4-42.
(cid:127) Map scale. See Maps on page 4-38. (cid:127) Distance to destination. (cid:127) GPS symbol if GPS signal is not being received.
See Global Positioning System (GPS) on page 4-48.
(cid:127) Options you have selected for reaching your current
destination.
(cid:127) Driver Information. (cid:127) Radio band and presets.
ROUTE: Press the ROUTE key to display the PLAN ROUTE menu. See Plan Route on page 4-18.
MENU: Press the MENU key to display the SETUP MENU. See Setup Menu on page 4-13. TILTX: Press the TILT key to open the navigation system faceplate for loading or removing the map DVD, a video DVD, or an audio CD. This key can only be used while the vehicle is in PARK (P).
4-11
Alpha-Numeric Keypad Letters of the alphabet, symbols, punctuation, and numbers, when available to you, will be displayed on the navigation screen as an alpha or numeric keypad. The alpha keypad will be displayed when the system needs you to input a city or street name. You can also touch Char at the bottom of the alpha keypad to access the numeric keypad when inputting a house address, punctuation mark, or other character. Touch A - Z to return to the alpha keypad. All characters are touch-sensitive screen buttons. Touch a character to select it. Select the space symbol to enter a space between characters or the words of a name. V: Select the backspace symbol if you have selected an incorrect character.
To make your name selections easier, the system will only allow you to select a character which can follow the last one entered. For example, if you enter Z, you would not be allowed to follow it with T. The system will highlight the available characters and darken the unavailable characters. If you are unsuccessful when inputting a name, it may need to be selected differently. It is also possible that the map DVD database may not contain that information or the correct search area has not been selected. See Database Coverage Explanations on page 4-50
for more information. Touch Sensitive Buttons Touch-sensitive buttons, or screen buttons, are located on the screen. When you have successfully selected a screen button, a beep will be heard. These buttons will be highlighted when a feature is available and dim when they are unavailable. There are some toggle screen buttons that will be light blue when active and dark blue when inactive.4-12
Setup Menu
MENU: Press the MENU key located to the right of the navigation screen to access the SETUP MENU.
Navigation Settings This menu allows you to change the following options for the navigation system.
The SETUP MENU allows you to adjust such things as map appearance, navigation settings, and voice guidance volume.
Restore Default Settings This feature will automatically reset the system to the default values. To restore the default settings, do the following: 1. Touch the Restore Default Settings screen button. 2. Touch Enter. 3. Touch Return to exit this menu.
4-13
System Configuration This feature allows you to reconfigure the navigation system. If you begin to drive your vehicle during this procedure, the system will not be able to adjust the position or direction of your vehicle. Touch the System Configuration screen button to view the following choices: Adjust Vehicle Position: To correct the position of your vehicle on the map or to change vehicle position, do the following: 1. Touch the Adjust Vehicle Position screen button.
The system will display Position Adjustment. The vehicle location symbol and the scroll symbol will appear on the map.
2. Use the scroll symbol and the zoom in/zoom out feature to locate the vehicle position on the map.
3. Touch Enter to set the vehicle position. The system will display Position Adjustment and two arrows will appear on the map screen.
4. Touch the arrows to adjust the direction of the vehicle. As you touch the arrows, you will see the vehicle symbol direction changing.
5. When you have set the vehicle to the correct
direction, touch Enter. Relocation Complete will be displayed.
6. Touch Return to exit this menu.
Calibrate Vehicle Speed Signal: If there are tire pressure differences or if a spare tire is installed, the navigation system will automatically recalibrate the system. You may also choose to calibrate it yourself by doing the following: 1. Touch Start to begin calibration. 2. Touch Return to exit this menu. Time to Destination This feature allows you to view the estimated time to travel from your current position to the destination, and to reset the average speed to factory default settings. Estimated travel time is based on calculated route information and the vehicle’s average speed. Touch ON to turn this feature on, OFF to turn this feature off, or Reset to restore vehicle speed default settings. With this feature on, the estimated travel time to destination will display along with the distance to destination.
4-14
Quick POI (Point of Interest) Selection This menu allows you to choose a point of interest (POI), such as gas stations, restaurants, hotels, etc. to be displayed on the map screen. You can also set a destination to a specific POI.
Setting the Quick POI menu To set the Quick POI list displayed on the map screen, do the following: 1. Select the category you would like to replace.
2. Select a Quick POI category from the Quick POI selection menu list. The system will return to the Quick POI selection screen when a POI is selected.
3. Touch Return to save the setting and return
to previous menu.
Displaying Quick POI Icons To display POI icons of a category on the map screen, do the following: 1. Touch the map screen once. 2. Touch the POI button. The Quick POI Selection list
will be displayed.
3. Select a category type or touch List Categories Or All Local POIs to display the icons of the selected category on the map screen.
Removing Quick POI Icons To remove POI icons from the map screen, do the following: 1. Touch the map screen once. 2. Touch the POI OFF screen button. The current POI
icons will be removed from the map screen.
4-15
Setting a Destination Using Quick POI This feature will allow you to choose a POI as your destination. To set a destination using a POI, do the following: 1. Touch the POI icon on the map screen that you
wish to set as a destination. The selected icon will be surrounded by a blinking box, and the name of the icon will be displayed. You may also touch INFO to view the POI name, address, city, and phone number, if available.
2. Touch the ENT DEST screen button.
If a final destination has already been entered, you can add the POI as a waypoint. See Edit Waypoint on page 4-23 for more information.
3. Touch Enter to start planning your route. 4. To start route guidance, touch Start or begin driving the vehicle. Route guidance will automatically begin after a short distance.
If you wish to cancel the route you have just set, do the following: 1. Press the ROUTE hard key. 2. Touch the Route Preference screen button. 3. Touch the Cancel Route screen button. 4. Select YES to cancel or NO to continue.
4-16
Guidance Appearance This menu allows you to set the guidance appearance screen options. This screen is displayed on the map while on a planned route. The current settings will appear as light blue.
Split Map: Select this feature to display the guidance screen on the map at all times.
Full Screen: Select this feature to display the guidance screen on the map when approaching a maneuver.
Map Appearance This menu allows you to set the map appearance screen options. The current setting will appear as light blue.
Turn List: Select this feature to have the guidance screen display several upcoming turns. Directional arrows, street name, and distance to the next turn will be displayed. As you approach the next turn, the system will display a closer view of the upcoming maneuver.
Arrow: Select this feature to have the guidance screen display the next turn. A directional arrow, street name, and distance to the turn will be displayed. As you approach the turn, the system will display a closer view of the upcoming maneuver.
2D: Select this feature to display the guidance screen as a two-dimensional view.
3D: Select this feature to display the guidance screen as a three-dimensional view.
2D: Select this feature to display the map as a two-dimensional view.
3D: Select this feature to display the map as a three-dimensional view.
4-17
Plan Route To plan a route, press the ROUTE key. The PLAN ROUTE menu will be displayed.
You may use one of several destination entry methods to plan a route. See Enter Destination on page 4-27
for more information.Set 3D Viewing Angle: This feature allows you to adjust the 3D viewing angle. To do so, do the following: 1. Touch 3D on the MAP APPEARANCE menu. 2. Touch Set 3D Viewing Angle.
The map screen with the 3D viewing angle bar will be displayed.
3. Touch the up or down arrows to set the viewing angle. 4. Touch Return to save your settings and to exit this menu or touch Reset to restore the viewing angle to the default setting.
Voice Guidance Volume Settings This feature allows you to set the voice prompt volume level or to turn voice prompts on or off. Set the voice prompt volume level by touching the numbered buttons to increase or decrease the volume level. You may also choose to turn the voice prompts off. Then touch Return to save your setting and to return to the SETUP MENU. If a voice prompt is active while the audio system is on, the audio system volume will decrease and the voice prompt will be heard through the driver’s side front speaker. Voice prompts will not be heard while using voice recognition.
4-18
Edit Memory Point This feature allows you to store, delete, and edit memory points. Touch the Edit Memory Point screen button from the PLAN ROUTE menu to access the EDIT MEMORY POINT screen.
You can store memory points in four different categories, personal, business, entertainment, and marked point.
Memory points are stored when you select either START or MARK when setting a destination on the map or when you are storing destinations in memory. A total of 60 locations can be stored. The last 10 destinations entered will be stored under Previous Destination. In addition, one memory point can be stored under the Home category. If all 60 stored points are entered, the system will notify you that there is no available storage left in memory points. A memory point must be removed before storing additional memory points. Registering Memory Points To store a memory point, do the following: 1. Select a category from the EDIT MEMORY
POINT menu.
2. Touch REGISTER. 3. Select a method for entering a destination. A map will appear displaying the memory point’s location.
4. If available, touch INFO to view the address
information for the memory point.
5. Touch Enter to store the point.
4-19
Editing Memory Points This feature allows you to edit the contents stored in memory. The following options are available: Icon Editing of a Memory Point Each memory point is displayed with a default icon. To edit an icon, do the following: 1. Select the category of the memory point. 2. Select the item you want to edit. 3. Touch the icon. The EDIT MEMORY POINT icon
screen will appear.
4. Touch the icon you would like to use. The system
will then return to the EDIT MEMORY POINT menu.
5. Touch Return to go back to the previous screen. You will see the new memory point icon on the map. When selecting an icon, you can choose from 18 different icons, three of which are sound icons. The same icon may be used for other memory points as well.
Name Editing of a Memory Point To modify the name of a stored memory point, do the following: 1. Select the category of the memory point. 2. Select the item you want to edit. 3. Touch the NAME screen button and use the alpha keypad to edit the name. Names may contain up to 15 alpha and/or numeric characters.
4. Touch Return to go to the previous screen. Moving Memory Points To move a memory point from one category to another, do the following: 1. Select the category of the memory point. 2. Select the memory point you want to edit. 3. Touch CATEGORY. A list of categories will appear. The current category for the item will be highlighted and cannot be selected.
4. Touch the screen button for the category you want the memory point placed in. A pop-up window will appear displaying the change in category.
5. Touch Return to go back to the previous screen.
4-20
Adjusting a Memory Point To relocate a memory point’s location, do the following: 1. Select the category of the memory point. 2. Select the memory point you want to edit. 3. Touch POSITION. A map screen with the position
of this memory point will appear.
4. Touch anywhere on the screen to activate the scroll
feature and relocate the memory point. See Maps on page 4-38.
5. Touch Enter to save the memory point’s new
location.
6. Touch Return to go back to the previous screen. Changing the Phone Number of a Memory Point To edit or add the phone number of a memory point, do the following: 1. Select the category of the memory point. 2. Select the memory point you want to edit. 3. Touch PHONE and use the numeric keypad to edit
or add the number.
4. Touch the RETURN button to take you back to the
previous screen when you have finished.
Deleting Single Memory Points To delete a single memory point, do the following: 1. Press the ROUTE key. 2. Touch EDIT MEMORY POINT. 3. Select the category of the memory point. 4. Touch DELETE. 5. Select the memory point you want to delete.
A confirmation window will appear.
6. Touch YES to delete the memory point or NO
to return to the previous menu.
7. Touch Return to go back to the previous screen. Deleting All Memory Points To delete all of the memory points in a category, do the following: 1. Press the ROUTE key. 2. Touch EDIT MEMORY POINT. 3. Select the desired category. 4. Touch the DELETE ALL screen button.
A confirmation window will appear.
5. Touch YES to delete the memory points or NO to
return to the previous menu.
6. Touch Return to go back to the previous screen.
4-21
Edit Category To edit the name of a category, do the following: 1. Press the ROUTE key. 2. Touch EDIT MEMORY POINT. 3. Select the category you want to edit. 4. Touch the EDIT CATEGORY screen button and use the alpha keypad to edit the category name. The name can consist of up to 15 alpha and/or numeric characters.
5. Touch Return to go back to the previous screen. Marked Point A marked point is a memory point which has been stored by selecting the MARK screen button while traveling on a planned route. You can also use the scroll feature to plan a destination on the map after reaching the destination, or by moving a memory point to a marked point category. See “Editing Memory Points” earlier in this section for more information.
Previous Destination Memory Each time you select Start from the map screen, that destination will be stored as a memory point under PREVIOUS DESTINATION. This category will store up to 10 destinations. When the Previous Destination category contains more than 10 destinations, the system will remove the oldest destination stored and add the most recent one selected to the list. If you do not want a previous destination to be lost, you must move the destination into a memory point category. See “Moving Memory Points” earlier in this section for more information. Home Memory This memory point is stored by selecting Home from the EDIT MEMORY POINT screen. See “Registering Memory Points” earlier in this section and “Home” under Enter Destination on page 4-27 for more information.
4-22
Edit Waypoint Waypoints are destinations you can set along the way to your final destination. This feature allows you to add, edit, and delete waypoints.
Adding a Waypoint To add a waypoint to your route, do the following: 1. Touch Add Waypoint. 2. Enter a destination. See Enter Destination on
page 4-27. A map will appear showing the location of the waypoint.
3. Touch Enter to add your waypoint. 4. Touch the ADD screen button to insert the waypoint
in the desired order.
5. The system will display the ROUTE INFORMATION
screen. From this screen, several options are available.
You may set up to five waypoints on the way to your final destination. To access the WAYPOINT menu, do the following: 1. Press the ROUTE key. 2. Touch Edit Waypoint.
4-23
Delete: Touch Delete to delete a waypoint or the final destination. A confirmation window will appear. Touch YES to delete the point or NO to return to the previous screen.
Delete All: Touch Delete All to delete all of the waypoints and the final destination. A confirmation window will appear. Touch YES to delete all waypoints or NO to return to the previous screen.
Change: Touch Change to change the final destination. Enter a destination. See Enter Destination on page 4-27.
Add: Touch Add to add additional waypoints. Refer to the steps for adding a waypoint listed previously in this section.
Calculate: Touch Calculate to begin route calculation. This feature will only be available if the final destination has been set.
List: Touch List to view the waypoint on the map or to change the order of the waypoints and final destination. To change the order, touch CHG ORDER, then touch the blank screen button next to the destination to select the order of the waypoints and final destination. Press the MAP key to view the destination and waypoints on the map screen.
4-24
Editing a Waypoint This feature allows you to edit waypoints that have already been set. To edit a waypoint, do the following: 1. Touch Edit Waypoint. 2. Touch the MAP key to view the destination location
on the map screen.
3. Touch CHANGE ORDER to change the order of the
waypoints and the final destination. You can also use the map scroll to change a waypoint from one location to another.
Deleting a Waypoint To delete a waypoint from your route, do the following: 1. Touch Delete Waypoint. 2. Select the waypoint you want to delete.
A confirmation window will appear.
3. Touch YES to delete the waypoint or NO to return
to the previous menu.
Edit Avoid Point/Area From this menu you can register, edit, and delete an area to be avoided while planning a route. These areas can also be saved so the system can automatically avoid them when planning a route.
To access the AVOID POINT/AREA menu, do the following: 1. Press the ROUTE key. 2. Touch Edit Avoid Point/Area.
4-25
Registering an Avoid Point/Area To store an avoid point/area, do the following: 1. Touch Register Avoid Point/Area. 2. Enter a location. See Enter Destination on
page 4-27.
3. If desired, reduce or enlarge the area around the point you want to avoid by using the REDUCE or ENLARGE screen buttons. If an avoid point cannot be avoided, the system will display “Avoid Point and Area Stored. Route May Not Avoid the Avoid Point and Areas.”
4. Touch Enter to set the area as an avoid point area.
When using the REDUCE or ENLARGE buttons, a box will appear to represent the area or an X will appear to represent the area avoided. When an avoid point is set, the square will appear as green.
5. Touch Return to go back to the previous screen.
Editing an Avoid Point/Area To edit an avoid point/area, do the following: 1. Touch Edit Avoid Point/Area. A list of avoided
points will appear.
2. Select the avoided point/area you want to change.
A map of the avoided area will appear.
3. Use REDUCE or ENLARGE to edit the avoided point. 4. Touch Enter to set your new avoided area.
The system will display “Area Adjusted.”
5. Touch Return to go back to the previous screen. Deleting an Avoid Point/Area To delete an avoid point/area, do the following: 1. Touch Delete Avoid Point/Area. A list of avoided
points will appear.
2. Select the avoided point/area you want to delete. 3. The system will ask you to confirm your selection. Touch Yes to delete the avoid point/area or No to cancel. If Yes is selected, the area will no longer be avoided when traveling on a planned route.
4. Touch Return to go back to the previous screen.
4-26
Enter Destination The DESTINATION menu will give you several ways to plan a route. Touch the Enter Destination screen button from the PLAN ROUTE menu to display the DESTINATION menu.
For destination entry methods listed on the second page of the DESTINATION menu, touch the Next Page arrow. Touch the Prev. Page arrow to return to the first page.
To enter a destination, choose from one of the destination entry methods following in this section. After entering a destination, If available, the system will display up to three routes in a pop-up window indicating the total mileage and time to destination for each route. Select a route by touching NEXT. The map will display each route in a different color. The selected route will be highlighted in red. To start route guidance, touch Start or begin driving your vehicle. Route guidance will automatically begin after a short distance. If you touch CHG ROUTE before touching Start, you will be able to change route preferences. See Route Preference on page 4-36 for more information. When a route has been planned, it will be highlighted and a bulls-eye symbol will appear on the map to show your final destination. If you wish to cancel a route that has been set, see “Cancel Route” under Route Preference on page 4-36.
4-27
Easy Planning Route With this destination entry method, you can select a destination using the scroll symbol on the map screen. See Maps on page 4-38.
To use this destination entry method, do the following: 1. Press the MAP key. 2. Touch the map screen twice for the scroll symbol to
appear. Touch the map or drag the scroll symbol toward your destination.
3. Touch the map screen continuously to scroll
through the map faster. The address of the location on the map will appear at the top of the screen. If needed, use the zoom feature to locate your destination. See “Map Scales” under Maps on page 4-38 for more information.
4. Touch ENT DEST to set this location as your
destination. You may also touch MARK to store this location as a memory point.
5. Touch Enter to plan your route.
4-28
Address This destination entry method allows you to input an address by providing the system with a house number, street name, and city. Select Street to begin entering the desired address.
To use this destination entry method, do the following: 1. Enter the street name using the alpha keypad. See “Alpha-Numeric Keypad” under Using the Navigation System on page 4-10 for more information. Do not include name extensions such as N. or Drive. For example, the street name N. Civic Center Drive should be entered as Civic Center. As information is entered, the system will automatically search for available names, and List will become available. 2. Touch List to view name choices or continue to
spell the street name to further reduce the number of available items. Select a street name.
3. If the street name you entered exists in more than one
city on the DVD database, a list of cities will appear. You can select a city from the list, or enter the city name by selecting City. As you begin to enter the city name, you can select the desired city from the list which will appear, or continue to spell the city name to further reduce the number of available items.
4. Once the city name has been selected, enter the
house number using the numeric keypad. The system will list the house number range that is available for the street.
5. When you have finished entering all of the address
information, touch Enter to plan your route.
4-29
All Points of Interest This destination entry method allows you to choose a destination from the point of interest (POI) list. Selecting All Points Of Interest from the DESTINATION menu will bring up the alpha keypad. While inputting a POI or city name, the List option will become available. As information is entered, the system will search for available POI and city names based on the information given. The system will supply a list of names to make a selection from when the choices are five or less.