- 2007 Cadillac STS Owners Manuals
- Cadillac STS Owners Manuals
- 2006 Cadillac STS Owners Manuals
- Cadillac STS Owners Manuals
- 2008 Cadillac STS Owners Manuals
- Cadillac STS Owners Manuals
- 2009 Cadillac STS Owners Manuals
- Cadillac STS Owners Manuals
- 2005 Cadillac STS Owners Manuals
- Cadillac STS Owners Manuals
- 2010 Cadillac STS Owners Manuals
- Cadillac STS Owners Manuals
- 2011 Cadillac STS Owners Manuals
- Cadillac STS Owners Manuals
- Download PDF Manual
-
transmitter, the front door power lock switch or by lifting the rear door manual lock.
2. Then open the door from the outside. To cancel the rear door security lock, do the following: 1. Unlock the door and open it from the outside. 2. Insert your key into the slot next to the rear
door security lock label and turn it to disengage the lock.
3. Repeat the steps for the other lock. The rear door locks will now work normally.
Lockout Protection Your vehicle can be programmed to sound the horn three times and unlock the driver’s door when both doors are closed and there is a keyless access transmitter inside the interior of the vehicle. When the driver’s door is reopened, the key in reminder chime will sound continuously. The vehicle will remain locked only when at least one transmitter has been removed from the vehicle and both doors are closed. See Vehicle Personalization on page 2-47.
Trunk
{CAUTION:
It can be dangerous to drive with the trunk lid open because carbon monoxide (CO) gas can come into your vehicle. You cannot see or smell CO. It can cause unconsciousness and even death. If you must drive with the trunk lid open or if electrical wiring or other cable connections must pass through the seal between the body and the trunk lid:
(cid:127) Make sure all other windows are shut. (cid:127) Turn the fan on your heating or cooling
system to its highest speed and select the control setting that will force outside air into your vehicle. See Climate Control System in the Index. If you have air outlets on or under the instrument panel, open them all the way.
See Engine Exhaust on page 2-33.
2-13
(cid:127) Trunk Lid Release There are several ways to release the trunk lid. (cid:127) V (Trunk Lid Release): Press this button located
on the driver’s door. The vehicle must be in PARK (P) or NEUTRAL (N) and the valet mode turned off. To disable valet mode, see Valet Lockout Switch on page 2-22.
(cid:127) Press the trunk lid release button on the keyless access transmitter. See Keyless Access System Operation on page 2-4. The vehicle must be in PARK (P) or NEUTRAL (N) and the valet mode turned off.
2-14
(cid:127) Squeeze the trunk release button located on the
rear of the trunk lid above the license plate, as long as you have your keyless access transmitter with you. Entry occurs when the button is being pressed and the vehicle recognizes the transmitter. The vehicle must be in PARK (P) and the valet mode turned off.
If your vehicle has lost battery power, you can still access the trunk by unlocking and lowering the rear seat pass-through door and pulling the emergency trunk release handle.
Emergency Trunk Release Handle
Rear Seat Pass-Through Door This feature allows you to access the trunk without opening the trunk lid. To open the door, do the following: 1. Pull down the rear seat armrest. 2. If it is locked, insert and turn the key
counterclockwise in the lock on the door.
3. Press the button above the lock. 4. Lower the door. To open the trunk lid, pull down the emergency trunk release handle located in the trunk. See “Emergency Trunk Release Handle” following.
Notice: Using the emergency trunk release handle as a tie-down or anchor point when securing items in the trunk may damage it. Use the emergency trunk release handle only to help you open the trunk lid. There is a glow-in-the-dark trunk release handle located inside the trunk near the back of the rear seats. This handle will glow following exposure to light. Pull down the release handle to open the trunk from the inside of the vehicle.
2-15
Windows
{CAUTION:
Leaving children, helpless adults, or pets in a vehicle with the windows closed is dangerous. They can be overcome by the extreme heat and suffer permanent injuries or even death from heat stroke. Never leave a child, a helpless adult, or a pet alone in a vehicle, especially with the windows closed in warm or hot weather.
2-16
Power Windows
The power window switches are located on the armrest near each window. Press the front of the switch to the first position to open the window to the desired level. Lift up the front of the switch to the first position to close the window. Your vehicle has Retained Accessory Power (RAP) that allows you to use the power windows once the engine has been turned off. For more information, see Retained Accessory Power (RAP) on page 2-24.
Express-Down Window This feature is on all windows. It allows you to lower the window all the way without continuously pressing the switch. Press the front of the switch to the second position and release. If you want to stop the window as it is lowering, briefly pull up the switch. Express-Up Window This feature is on all windows. It allows you to raise the window all the way without continuously lifting the switch. Lift the front of the switch briefly to activate the express-up feature. If you want to stop the window as it is raising, briefly press the switch.
2-17
Programming the Power Windows If the battery on your vehicle has been recharged, disconnected or is not working, you will need to reprogram each window for the express-up feature to work. To program each window, follow these steps: 1. With the ignition in ACC or ON, or while RAP is
active, close all doors.
2. Press and hold the power window switch until the
window has fully opened.
3. Continue holding the switch for approximately
two seconds.
4. Pull up the power window switch until the window is
fully closed.
The window is now programmed. Repeat the process for all windows.
Anti-Pinch Feature If any object is in the path of the window when the express-up is active, the window will stop at the obstruction and auto-reverse to a preset factory position. Weather conditions such as severe icing may also cause the window to auto-reverse. The window will return to normal operation once the obstruction or condition is removed.
{CAUTION:
If express override is activated, the window will not reverse automatically. You or others could be injured and the window could be damaged. Before you use express override, make sure that all people and obstructions are clear of the window path.
2-18
Express Window Override A condition may exist that causes auto-reversal of the window due to weather or an obstruction. In an emergency, the anti-pinch feature can be overridden in a supervised mode. Hold the window switch all the way down in the express position. The window will rise for as long as the switch is held. Once the switch is released, the express mode is re-activated. In this mode, the window can still close on an object in its path. Use care when using the override mode. Window Lockout The rear window lockout button is located on the driver’s door armrest near the window switches. Press this button to disable the rear window controls. The light on the button will illuminate, indicating that the feature is in use. The rear windows can be raised or lowered using the driver’s window switches when the lockout feature is on. To restore power to the rear windows, press the button again. The light on the button will go out. The front passenger window can be programmed to be disabled using the window lockout button. See Vehicle Personalization on page 2-47.
Secure Car Feature The windows can be closed by pressing the lock button on the keyless access transmitter. See Keyless Access System Operation on page 2-4 for more information. The windows, if down, will express-up. If any window was unable to completely close, it will reverse and the horn will chirp. See “Anti-Pinch Feature” previously.
Sun Visors Swing down the visor or detach it from the center mount and move to the side to block out glare. The visors also have side-to-side slide capability for greater coverage. Lighted Visor Vanity Mirrors Pull the visor down and lift the cover. Move the slide switch up or down to brighten or dim the lamp.
2-19
Theft-Deterrent Systems Vehicle theft is big business, especially in some cities. Although your vehicle has a number of theft-deterrent features, we know that nothing we put on it can make it impossible to steal.
Theft-Deterrent System Your vehicle has a theft-deterrent alarm system.
The security light is located on the instrument panel cluster.
If the ignition is off and a door is open, the security light will flash, reminding you to arm the theft-deterrent system.
2-20
To arm the system, do one of the following: (cid:127) Press the lock button on the keyless access
transmitter. If the door is closed when the lock button is pressed, the security light will stay illuminated for 30 seconds. After the security light goes off, the theft-deterrent system is armed. Pressing the lock button twice will arm the system immediately.
(cid:127) Open the door. Lock the door with the power door
lock switch or lock button on the keyless access transmitter. The security light should flash. Close the door. The security light will stop flashing and stay on. After 30 seconds the light should turn off, the theft-deterrent system is armed.
(cid:127) Passive Arming, if activated through the vehicle
personalization feature, will arm the system automatically after you close the door and take at least one keyless access transmitter with you. The security light will turn on. After 60 seconds the light should turn off. The theft-deterrent system is armed. See Vehicle Personalization on page 2-47.
If a door, hood or the trunk is opened without the keyless access transmitter, the horn will sound for 30 seconds and the lamps will flash for two minutes. The vehicle cannot be started without a keyless access transmitter.
The Theft-Deterrent system will not arm if:
The key is used to lock the driver’s door. The driver’s door is locked using the power door lock switch after the doors are closed.
If the vehicle is locked using the keyless access transmitter and a door, trunk lid or hood is open or not closed completely, the security light will flash for 60
seconds and then go off. At this time the theft-deterrent system will be armed but door, trunk lid or hood that was open or not completely closed will not trigger an alarm event. The door, trunk lid or hood that was completely closed will still be armed and will trigger a theft event if they are opened or tampered with. The vehicle can be programmed to automatically unlock the doors when you approach the vehicle and the keyless access transmitter is with you. See Vehicle Personalization on page 2-47. Pressing the unlock button on the keyless access transmitter or using the key to unlock the driver’s door disarms the theft-deterrent system. Unlocking a door any other way while the system is armed will activate the alarm.Testing the Alarm 1. From inside the vehicle, roll down the window, then
get out of the vehicle, keeping the door open.
2. From outside of the vehicle, with the door open, lock the vehicle using the power door lock switch or the Keyless Access transmitter and close the door. Wait approximately 30 seconds until the security light goes off.
3. Reach in and unlock the door using the power door lock switch and open the door. The horn will sound and the exterior lamps will flash.
You can turn off the alarm by pressing the unlock button on the keyless access transmitter or by starting the car. If the alarm does not sound when it should, check to see if the horn works. The horn fuse may be blown. To replace the fuse, see Fuses and Circuit Breakers on page 5-93. If the fuse does not need to be replaced, you may need to have your vehicle serviced. To reduce the possibility of theft, always arm the Theft-Deterrent system when leaving your vehicle.
2-21
(cid:127) (cid:127) Valet Lockout Switch
The valet lockout switch is located inside the glove box.
R (On): Press the right side of the valet lockout switch to turn the lockout feature on. When the lockout feature is turned on, the trunk cannot be unlocked with the keyless access transmitter or the trunk release button located on the driver’s door. If the valet lockout feature is on it will also disable the remote start feature and the HomeLink® transmitter, if equipped. Locking the glove box with your key will also help to secure your vehicle. See Keyless Access System Operation on page 2-4 and Trunk on page 2-13 for additional information.
9 (Off): Press the left side of the valet lockout switch to turn the lockout feature off. When the lockout feature is off, you can open the trunk using either the keyless access transmitter or the trunk release button located on the driver’s door.
2-22
Starting and Operating Your Vehicle New Vehicle Break-In Notice: Your vehicle does not need an elaborate break-in. But it will perform better in the long run if you follow these guidelines: (cid:127) Do not drive at any one speed — fast or
slow — for the first 500 miles (805 km). Do not make full-throttle starts.
(cid:127) Avoid making hard stops for the first 200 miles
(322 km) or so. During this time your new brake linings are not yet broken in. Hard stops with new linings can mean premature wear and earlier replacement. Follow this breaking-in guideline every time you get new brake linings.
(cid:127) Do not tow a trailer during break-in. See Towing
a Trailer on page 4-38 for more information.
Ignition Positions
Your vehicle has an electronic keyless ignition with pushbutton start.
/ (START): Press this button while your foot is on the brake to start the engine. The shifter must be in PARK (P) or NEUTRAL (N) to start the engine and the keyless access transmitter must be in the vehicle for the ignition to work. 9 ACC (OFF/ACCESSORY): When the engine is on or in accessory mode, press this button to turn the engine off and place the vehicle in RAP. See Retained Accessory Power (RAP) on page 2-24 for more information. The shifter must be in PARK (P) for the engine to turn off.
2-23
When the engine is off, press this button to place the vehicle in accessory mode. ACCESSORY ACTIVE will display on the Driver Information Center (DIC). This mode allows you to use things like the radio and the windshield wipers while the engine is off. Use accessory mode if you must have your vehicle in motion while the engine is off, for example, if your vehicle is being pushed or towed. If the door is open while in accessory mode, the key in reminder chime will sound continuously. Retained Accessory Power (RAP) The following accessories on your vehicle may be used for up to 10 minutes after the engine is turned off: (cid:127) Radio (cid:127) Power Windows (cid:127) Audio Steering Wheel Controls Power to these accessories stops after 10 minutes or if one of the front doors is opened. If you want power for another 10 minutes, close all the doors and press the OFF/ACCESSORY button to place the vehicle in accessory mode. Press the button again and the vehicle will return to RAP.
Starting Your Engine Move your shift lever to PARK (P) or NEUTRAL (N). Your engine will not start in any other position — that is a safety feature. To restart when you are already moving, use NEUTRAL (N) only. The keyless access transmitter must be in the vehicle for the ignition to work. Notice: Do not try to shift to PARK (P) if your vehicle is moving. If you do, you could damage the transmission. Shift to PARK (P) only when your vehicle is stopped. 1. With your foot on the brake pedal, press the
START button. If no keyless access transmitter is present, the DIC will display NO FOB DETECTED. When the engine begins cranking, let go of the button. The idle speed will go down as your engine gets warm. If the battery in the keyless access transmitter is weak, the DIC will display FOB BATTERY LOW. You can still drive the vehicle. See “Battery Replacement” under Keyless Access System Operation on page 2-4 for more information.
2-24
Notice: Holding the button in for longer than 15 seconds at a time will cause the vehicle’s battery to be drained much sooner. This can also cause damage to the starter motor. Wait 15 seconds between each try to avoid draining your vehicle’s battery or damaging the starter. 2. If the engine does not start and no DIC message is
displayed, wait 15 seconds before trying again.
Notice: Your engine is designed to work with the electronics in your vehicle. If you add electrical parts or accessories, you could change the way the engine operates. Before adding electrical equipment, check with your dealer. If you do not, your engine might not perform properly. Stopping Your Engine Move the shift lever to PARK (P) and press the OFF/ACCESSORY button. If the shifter is not in PARK (P), the vehicle will go into accessory mode and the DIC will display SHIFT TO PARK. Once the shifter is moved to PARK (P), the vehicle will turn off. If the keyless access transmitter is not detected while going to off, the DIC will display NO FOB – OFF OR RUN?. See DIC Warnings and Messages on page 3-74 for more information.
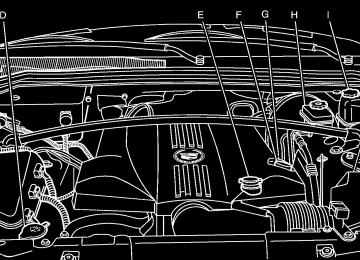
Engine Coolant Heater Your vehicle may be equipped with an engine coolant heater. In very cold weather, 0°F (−18°C) or colder, the engine coolant heater can help. You will get easier starting and better fuel economy during engine warm-up. Usually, the coolant heater should be plugged in a minimum of four hours prior to starting your vehicle. At temperatures above 32°F (0°C), use of the coolant heater is not required. To Use the Engine Coolant Heater 1. Turn off the engine. 2. Open the hood and unwrap the electrical cord. The
cord is located in the engine compartment on the driver’s side of the vehicle near the engine oil dipstick. See Engine Compartment Overview on page 5-12 for more information on location. You must remove the plastic cap to access the plug.
2-25
Automatic Transmission Operation The shift lever is located on the center console between the front seats.
There are several different positions for the shift lever.
PARK (P): This position locks the rear wheels. It is the best position to use when you start the engine because your vehicle cannot move easily.
3. Plug it into a normal, grounded 110-volt AC outlet.
{CAUTION:
Plugging the cord into an ungrounded outlet could cause an electrical shock. Also, the wrong kind of extension cord could overheat and cause a fire. You could be seriously injured. Plug the cord into a properly grounded three-prong 110-volt AC outlet. If the cord will not reach, use a heavy-duty three-prong extension cord rated for at least 15 amps.
4. Before starting the engine, be sure to unplug and
store the cord as it was before to keep it away from moving engine parts. If you do not, it could be damaged.
How long should you keep the coolant heater plugged in? The answer depends on the outside temperature, the kind of oil you have, and some other things. Instead of trying to list everything here, we ask that you contact your dealer in the area where you will be parking your vehicle. The dealer can give you the best advice for that particular area.
2-26
{CAUTION:
It is dangerous to get out of your vehicle if the shift lever is not fully in PARK (P) with the parking brake firmly set. Your vehicle can roll. Do not leave your vehicle when the engine is running unless you have to. If you have left the engine running, the vehicle can move suddenly. You or others could be injured. To be sure your vehicle will not move, even when you are on fairly level ground, always set your parking brake and move the shift lever to PARK (P). See Shifting Into Park (P) on page 2-31. If you are pulling a trailer, see Towing a Trailer on page 4-38.
Ensure the shift lever is fully in PARK (P) before starting the engine. Your vehicle has an automatic transmission shift lock control system. You must fully apply your regular brakes before you can shift from PARK (P) when the ignition is on. If you cannot shift out of PARK (P), ease pressure on the shift lever. Push the shift lever all the way into PARK (P) while pressing the button on the shift lever as you maintain brake application. Then move the shift lever into the gear you wish. See Shifting Out of Park (P) on page 2-32. Notice: Shifting to REVERSE (R) while your vehicle is moving forward could damage the transmission. The repairs would not be covered by your warranty. Shift to REVERSE (R) only after your vehicle is stopped.
REVERSE (R): Use this gear to back up.
At low vehicle speeds, you can also use REVERSE (R) to rock your vehicle back and forth to get out of snow, ice or sand without damaging your transmission. See If You Are Stuck: In Sand, Mud, Ice or Snow on page 4-30 for additional information.
2-27
NEUTRAL (N): In this position, the engine does not connect with the wheels. To restart when you are already moving, use NEUTRAL (N) only. You can also use NEUTRAL (N) when your vehicle is being towed.
{CAUTION:
Shifting into a drive gear while your engine is running at high speed is dangerous. Unless your foot is firmly on the brake pedal, your vehicle could move very rapidly. You could lose control and hit people or objects. Do not shift into a drive gear while your engine is running at high speed.
Notice: Shifting out of PARK (P) or NEUTRAL (N) with the engine running at high speed may damage the transmission. The repairs would not be covered by your warranty. Be sure the engine is not running at high speed when shifting your vehicle.
AUTOMATIC OVERDRIVE (D): This position is for normal driving. If you need more power for passing, and you are: (cid:127) Going less than 35 mph (55 km/h), push the
accelerator pedal about halfway down.
(cid:127) Going about 35 mph (55 km/h) or more, push the
accelerator all the way down. The transmission will shift down to a lower gear and have more power.
Notice: Spinning the tires or holding the vehicle in one place on a hill using only the accelerator pedal may damage the transmission. If you are stuck, do not spin the tires. When stopping on a hill, use the brakes to hold the vehicle in place.
FOURTH (4): This position is also used for normal driving. However, it offers more power and lower fuel economy than AUTOMATIC OVERDRIVE (D). Here are examples for using FOURTH (4) instead of AUTOMATIC OVERDRIVE (D): (cid:127) When driving on hilly, winding roads. (cid:127) When going down a steep hill. This position may also offer improved trailer towing performance in certain driving conditions.
2-28
If you drive your vehicle at high rpms
Driver Shift Control (DSC) Notice: without upshifting while using Driver Shift Control (DSC), you could damage your vehicle. Always upshift when necessary while using DSC. Your automatic transmission has a Driver Shift Control (DSC) feature that allows you to change gears similar to a manual transmission. To use the DSC feature: 1. Slide the shift lever over from AUTOMATIC
OVERDRIVE (D) to the right into the DSC area. The DIC will display which mode the transmission is in. See Driver Information Center (DIC) on page 3-69. If you do not move the shift lever forward or rearward, the vehicle will be in sport mode. While driving in sport mode, the transmission may remain in a gear longer than it would in normal driving mode based on braking, throttle input and vehicle lateral acceleration.
2. Press the shift lever forward to upshift or rearward
to downshift.
The odometer on the instrument panel cluster will change to show the requested gear range when moving the shift lever forward or rearward. While using the DSC feature the vehicle will have firmer shifting and increased performance. You can use this for sport driving or when climbing hills to stay in gear longer or to down shift for more power or engine braking. The transmission will only allow you to shift into gears appropriate for the vehicle speed and rpm. The transmission will not automatically shift to the next higher gear if the engine rpm is too high.
All-Wheel Drive If your vehicle is equipped with this feature, engine power is sent to all four wheels all the time. This is like four-wheel drive, but it is fully automatic.
2-29
Parking Brake
The parking brake pedal is located on the lower portion of the instrument panel to the left of the steering wheel.
This vehicle has a push-to-release parking brake pedal. To set the parking brake, hold the regular brake pedal down with your right foot and push the parking brake pedal down with your left foot.
If the ignition is on, the brake system warning light on the instrument panel cluster should come on. If it does not, you need to have your vehicle serviced. See Brake System Warning Light on page 3-60 for more information. To release the parking brake, hold the brake pedal down with your right foot and push the parking brake pedal with your left foot. When you lift your left foot, the parking brake pedal will follow it to the released position. Notice: Driving with the parking brake on can overheat the brake system and cause premature wear or damage to brake system parts. Verify that the parking brake is fully released and the brake warning light is off before driving. A warning chime will sound if the parking brake is set, the ignition is on and the vehicle begins to move. To stop the chime, fully release the parking brake. If you are towing a trailer and parking on a hill, see Towing a Trailer on page 4-38 for more information.
2-30
Shifting Into Park (P)
{CAUTION:
It can be dangerous to get out of your vehicle if the shift lever is not fully in PARK (P) with the parking brake firmly set. Your vehicle can roll. If you have left the engine running, the vehicle can move suddenly. You or others could be injured. To be sure your vehicle will not move, even when you are on fairly level ground, use the steps that follow. If you are pulling a trailer, see Towing a Trailer on page 4-38.
To shift into PARK (P), use the following steps: 1. Hold the brake pedal down with your right foot. 2. Move the shift lever into PARK (P) by pressing the button on the front of the shift lever while pushing the lever all the way toward the front of the vehicle. Release the button.
3. With your right foot still holding the brake pedal down, set the parking brake with your left foot. See Parking Brake on page 2-30 for more information.
4. Turn the ignition off.
Leaving Your Vehicle With the Engine Running
{CAUTION:
It can be dangerous to leave your vehicle with the engine running. Your vehicle could move suddenly if the shift lever is not fully in PARK (P) with the parking brake firmly set. And, if you leave the vehicle with the engine running, it could overheat and even catch fire. You or others could be injured. Do not leave your vehicle with the engine running.
If you have to leave your vehicle with the engine running, be sure your vehicle is in PARK (P) and your parking brake is firmly set before you leave it. After you have moved the shift lever into PARK (P), hold the regular brake pedal down. Then, see if you can move the shift lever away from PARK (P) without first pushing the button on the shift lever. If you can, it means that the shift lever was not fully locked into PARK (P).
2-31
Torque Lock If you are parking on a hill and you do not shift your transmission into PARK (P) properly, the weight of the vehicle may put too much force on the parking pawl in the transmission. You may find it difficult to pull the shift lever out of PARK (P). This is called “torque lock.” To prevent torque lock, set the parking brake and then shift into PARK (P) properly before you leave the driver’s seat. To find out how, see “Shifting Into PARK (P)” listed previously. If torque lock does occur, you may need to have another vehicle push yours a little uphill to take some of the pressure from the parking pawl in the transmission, so you can pull the shift lever out of PARK (P).
Shifting Out of Park (P) Your vehicle has an automatic transmission shift lock control system. You have to fully apply your regular brake before you can shift from PARK (P) when the vehicle is running. See Automatic Transmission Operation on page 2-26. If you cannot shift out of PARK (P), ease pressure on the shift lever – push the shift lever all the way into PARK (P) and release the shift lever button as you maintain brake application. Then press the shift lever button and move the shift lever into the gear you wish. If you ever hold the brake pedal down but still cannot shift out of PARK (P), try this: 1. Press the OFF/ACCESSORY button twice to place
the ignition in accessory mode.
2. Apply and hold the brake until the end of Step 4. 3. Shift to NEUTRAL (N). 4. Start the engine and then shift to the drive gear
you want.
5. Have your vehicle inspected by your dealer as soon
as possible.
2-32
Parking Over Things That Burn
Engine Exhaust
{CAUTION:
Engine exhaust can kill. It contains the gas carbon monoxide (CO), which you cannot see or smell. It can cause unconsciousness and death. You might have exhaust coming in if:
(cid:127) Your exhaust system sounds strange or
different.
(cid:127) Your vehicle gets rusty underneath. (cid:127) Your vehicle was damaged in a collision. (cid:127) Your vehicle was damaged when driving
over high points on the road or over road debris.
(cid:127) Repairs were not done correctly. (cid:127) Your vehicle or exhaust system had been
modified improperly.
If you ever suspect exhaust is coming into your vehicle:
(cid:127) Drive it only with all the windows down to
blow out any CO; and
(cid:127) Have your vehicle fixed immediately.
2-33
{CAUTION:
Things that can burn could touch hot exhaust parts under your vehicle and ignite. Do not park over papers, leaves, dry grass or other things that can burn.
{CAUTION:
It can be dangerous to get out of your vehicle if the shift lever is not fully in PARK (P) with the parking brake firmly set. Your vehicle can roll. Do not leave your vehicle when the engine is running unless you have to. If you have left the engine running, the vehicle can move suddenly. You or others could be injured. To be sure your vehicle will not move, even when you are on fairly level ground, always set your parking brake after you move the shift lever to PARK (P).
Follow the proper steps to be sure your vehicle will not move. See Shifting Into Park (P) on page 2-31. If you are parking on a hill and if you are pulling a trailer, also see Towing a Trailer on page 4-38.
Running Your Engine While You Are Parked It is better not to park with the engine running. But if you ever have to, here are some things to know.
{CAUTION:
Idling the engine with the climate control system off could allow dangerous exhaust into your vehicle. See the earlier caution under Engine Exhaust on page 2-33. Also, idling in a closed-in place can let deadly carbon monoxide (CO) into your vehicle even if the climate control fan is at the highest setting. One place this can happen is a garage. Exhaust — with CO — can come in easily. NEVER park in a garage with the engine running. Another closed-in place can be a blizzard. See Winter Driving on page 4-26.
2-34
Mirrors
Automatic Dimming Rearview Mirror with OnStar® The vehicle may have an automatic dimming inside rearview mirror with OnStar® controls. For more information about OnStar®, see OnStar® System on page 2-39. O (On/Off): The on/off button, located on the lower left side of the mirror, is used for the automatic dimming functions of the rearview mirror. If the vehicle has the SmartBeam Intelligent High-Beam Headlamp Control System, the on/off button can also be used to turn off or reset this system. See “SmartBeam Intelligent High-Beam Headlamp Control System” under Headlamps on page 3-31. Mirror Operation The automatic dimming feature comes on each time the vehicle is started. Automatic dimming reduces the glare of lights from behind the vehicle. To turn the automatic dimming feature on or off, press and release the on/off button. The indicator light will illuminate when this feature is on.
Cleaning the Mirror When cleaning the mirror, use a paper towel or similar material dampened with glass cleaner. Do not spray glass cleaner directly on the mirror as that may cause the liquid cleaner to enter the mirror housing.
Automatic Dimming Rearview Mirror with OnStar® and Compass The vehicle may have an automatic dimming inside rearview mirror with OnStar® and a compass. For more information about OnStar®, see OnStar® System on page 2-39. The mirror has an eight-point compass display in the upper right corner of the mirror. When on, the compass automatically calibrates, or sets the driving direction, as the vehicle is driven. If the vehicle has the navigation option, the direction the vehicle is facing will be displayed on the navigation screen. O (On/Off): The on/off button is located on the lower left side of the mirror and is used for the automatic dimming and compass functions of the rearview mirror. If the vehicle has the SmartBeam Intelligent High-Beam Headlamp Control System, the on/off button can also be used to turn off or reset this system. See “SmartBeam Intelligent High-Beam Headlamp Control System” under Headlamps on page 3-31.
2-35
The mirror can be calibrated by driving the vehicle in circles at 5 mph (8 km/h) or less until the display reads a direction. The compass can be calibrated by pressing and holding the on/off button until a C is shown in the compass display. Compass Variance Compass variance is the difference between earth’s magnetic north and true geographic north. If the mirror is not adjusted for compass variance, the compass could give false readings. The mirror is set in zone eight upon leaving the factory. It will be necessary to adjust the compass to compensate for compass variance if the vehicle is driven outside zone eight. Under certain circumstances, such as a long distance, cross-country trip, it will be necessary to adjust the compass variance.
Mirror Operation The automatic dimming feature comes on each time the vehicle is started. To turn the automatic dimming feature on or off, press the on/off button. The indicator light will illuminate when this feature is on. Compass Operation Press the on/off button once to turn the compass on or off. When the ignition and the compass feature are on, the compass will show two character boxes for approximately two seconds. After two seconds, the mirror will display the current compass direction. Compass Calibration If after two seconds the display does not show a compass direction, (N for North for example), there may be a strong magnetic field interfering with the compass. Such interference may be caused by a magnetic antenna mount, note pad holder, or similar object. If the letter C appears in the compass window, the compass may need to be reset or calibrated.
2-36
To adjust for compass variance, do the following: 1. Find your current location and variance zone
number on the zone map that follows.
Cleaning the Mirror When cleaning the mirror, use a paper towel or similar material dampened with glass cleaner. Do not spray glass cleaner directly on the mirror as that may cause the liquid cleaner to enter the mirror housing.
Outside Power Heated Mirrors
The power mirror control is on the driver’s door armrest and controls the driver’s side and passenger’s side mirrors.
2. Press and hold the on/off button until a zone
number appears on the display.
3. Once the zone number appears on the display,
press the on/off button quickly until you reach the correct zone number. If C appears in the compass window, the compass may need calibration. See “Compass Calibration” listed previously.
Press the left or right mirror symbol on the selector control to choose the driver’s side or passenger’s side mirror. Use the arrows located on the control pad to adjust the position of each mirror. Adjust each mirror so you can see the side of your vehicle and the area behind your vehicle. Return the selector switch to the center position when finished adjusting. This will prevent unwanted mirror movement in case the control pad is accidentally bumped while driving.
2-37
The preferred mirror positions can be stored with the memory option. See Memory Seat, Mirrors and Steering Wheel on page 2-64. The mirrors can be manually folded inward to prevent damage when going through car washes or confined spaces. To fold, push the mirror toward the vehicle. To return the mirror to its original position, push outward. Be sure to return both mirrors to their original unfolded position before driving. When the rear window defogger is turned on, both outside rear view mirrors are heated to help clear them of ice, snow, or condensation. See “Rear Window Defogger” under Dual Climate Control System on page 3-47. Outside Automatic Dimming Mirror The driver’s side mirror will adjust for the glare of headlamps behind you. This feature is controlled by the on and off settings on the automatic dimming rearview mirror. See Automatic Dimming Rearview Mirror with OnStar® on page 2-35.
Outside Convex Mirror
{CAUTION:
A convex mirror can make things (like other vehicles) look farther away than they really are. If you cut too sharply into the right lane, you could hit a vehicle on your right. Check your inside mirror or glance over your shoulder before changing lanes.
The passenger’s side mirror is convex. A convex mirror’s surface is curved so more can be seen from the driver’s seat. This mirror does not have a dimming feature.
2-38
Outside Parallel Park Assist Mirror This feature assists the driver by improving rear obstacle detection and is useful in viewing the curb when parallel parking. Press the left or right mirror symbol on the selector control to choose the driver or passenger outside mirror. When the vehicle is shifted into REVERSE (R), the selected mirror will tilt to a factory programmed position. If further mirror adjustment is needed press the arrows located on the outside mirror control pad. If the outside mirror selector switch is in the middle position, neither outside mirror will move. When the vehicle is shifted out of REVERSE (R), and a five-second delay has occurred, the mirror will return to its original position. The delay prevents movement of the mirror if multiple gear transitions REVERSE (R) to AUTOMATIC OVERDRIVE (X) to REVERSE (R) occur during a parallel parking maneuver.
OnStar® System OnStar® uses global positioning system (GPS) satellite technology, wireless communications, and call centers to provide you with a wide range of safety, security, information, and convenience services. A complete OnStar® user’s guide and the terms and conditions of the OnStar® Subscription Service Agreement are included in the vehicle’s glove box literature. For more information, visit www.onstar.com or www.onstarcanada.com. Contact OnStar® at 1-888-4-ONSTAR (1-888-466-7827), or press the OnStar® button to speak to an OnStar® advisor 24 hours a day, 7 days a week. Terms and conditions of the Subscription Service Agreement can be found at www.onstar.com or www.onstarcanada.com. OnStar® Services The Directions and Connections Plan is included on new vehicles for one year from the date of purchase. The OnStar® subscription can be extended for time beyond the first year to meet your needs. For more information, press the OnStar® button to speak with an advisor.
2-39
Directions and Connections Plan (cid:127) Advanced Automatic Collision Notification (cid:127) Automatic Notification of Airbag Deployment (cid:127) Emergency Services (cid:127) Roadside Assistance (cid:127) Stolen Vehicle Tracking (cid:127) AccidentAssist (cid:127) Remote Door Unlock/Vehicle Alert (cid:127) Remote Diagnostics (cid:127) Online Concierge (cid:127) Driving Directions (cid:127) RideAssist
Information and Convenience Services
OnStar® Personal Calling As an OnStar® subscriber, the Personal Calling capability is a hands-free wireless phone that is integrated into the vehicle. Calls can be placed nationwide using simple voice commands with no additional contracts and no additional roaming charges. To find out more about OnStar® Personal Calling, refer to the OnStar® user’s guide in the vehicle’s glove box, visit www.onstar.com or www.onstarcanada.com; or speak to an OnStar® advisor by pressing the OnStar® button or calling 1-888-4-ONSTAR (1-888-466-7827).
2-40
OnStar® Virtual Advisor Virtual Advisor is a feature of OnStar® Personal Calling that uses minutes to access up-to-date weather and traffic reports for your area, news and sports updates, stock quotes, entertainment, and more. You are also able to listen and reply to E-mail through the vehicle’s audio system. Customize your information profile at www.myonstar.com. See the OnStar® user’s guide for more information. OnStar® Steering Wheel Controls A steering wheel control can be used to interact with the OnStar® personal calling feature.
Press the control with this symbol on the steering wheel to make a phone call.
When calling into voice mail systems, or to dial directory numbers, press the control, say the number (s), then say “dial”. See the OnStar® user’s guide for more information.
(cid:127) HomeLink® Transmitter
HomeLink®, a combined universal transmitter and receiver, provides a way to replace up to three hand-held transmitters used to activate devices such as gate operators, garage door openers, entry door locks, security systems and home lighting. Additional HomeLink® information can be found on the internet at www.homelink.com or by calling 1-800-355-3515.
If your vehicle is equipped with the HomeLink® Transmitter, it complies with Part 15 of the FCC Rules. Operation is subject to the following two conditions: (1) this device may not cause harmful interference, and (2) this device must accept any interference received, including interference that may cause undesired operation. This device complies with RSS-210 of Industry Canada. Operation is subject to the following two conditions: (1) this device may not cause interference, and (2) this device must accept any interference, including interference that may cause undesired operation of the device. Changes and modifications to this system by other than an authorized service facility could void authorization to use this equipment. If the Valet Lockout feature is on, it will disable the HomeLink® transmitter. See Valet Lockout Switch on page 2-22, for additional information.
2-41
Programming the HomeLink® Transmitter Do not use the HomeLink® Transmitter with any garage door opener that does not have the “stop and reverse” feature. This includes any garage door opener model manufactured before April 1, 1982. If you have a newer garage door opener with rolling codes, please be sure to follow steps 6 through 8 to complete the programming of your HomeLink® Transmitter. Read the instructions completely before attempting to program the HomeLink® Transmitter. Because of the steps involved, it may be helpful to have another person available to assist you in programming the transmitter. Keep the original transmitter for use in other vehicles as well as for future HomeLink® programming. It is also recommended that upon the sale of the vehicle, the programmed HomeLink® buttons should be erased for security purposes. Refer to “Erasing HomeLink® Buttons” or, for assistance, contact HomeLink® on the internet at: www.homelink.com or by calling 1-800-355-3515. Be sure that people and objects are clear of the garage door or gate operator you are programming. When programming a garage door, it is advised to park outside of the garage. It is recommended that a new battery be installed in your hand-held transmitter for quicker and more accurate transmission of the radio frequency.
2-42
Programming HomeLink® Your vehicle’s engine should be turned off while programming the transmitter. Follow these steps to program up to three channels: 1. Press and hold down the two outside buttons,
releasing only when the indicator light begins to flash, after 20 seconds. Do not hold down the buttons for longer than 30 seconds and do not repeat this step to program a second and/or third transmitter to the remaining two HomeLink® buttons. 2. Position the end of your hand-held transmitter about 1 to 3 inches (3 to 8 cm) away from the HomeLink® buttons while keeping the indicator light in view. 3. Simultaneously press and hold both the desired
button on HomeLink® and the hand-held transmitter button. Do not release the buttons until Step 4
has been completed. Some entry gates and garage door openers may require you to substitute Step 3 with the procedure noted in “Gate Operator and Canadian Programming” later in this section.4. The indicator light will flash slowly at first and then rapidly after HomeLink® successfully receives the frequency signal from the hand-held transmitter. Release both buttons.
5. Press and hold the newly-trained HomeLink® button
and observe the indicator light. If the indicator light stays on constantly, programming is complete and your device should activate when the HomeLink® button is pressed and released. To program the remaining two HomeLink® buttons, begin with Step 2 under “Programming HomeLink®.” Do not repeat Step 1 as this will erase all of the programmed channels. If the indicator light blinks rapidly for two seconds and then turns to a constant light, continue with Steps 6 through 8 following to complete the programming of a rolling-code equipped device (most commonly, a garage door opener).
6. Locate in the garage, the garage door opener receiver (motor-head unit). Locate the “Learn” or “Smart” button. This can usually be found where the hanging antenna wire is attached to the motor-head unit.
7. Firmly press and release the “Learn” or “Smart”
button. The name and color of the button may vary by manufacturer. You will have 30 seconds to start Step 8.
8. Return to the vehicle. Firmly press and hold the programmed HomeLink® button for two seconds, then release. Repeat the press/hold/release sequence a second time, and depending on the brand of the garage door opener (or other rolling code device), repeat this sequence a third time to complete the programming. HomeLink® should now activate your rolling-code equipped device.
To program the remaining two HomeLink® buttons, begin with Step 2 of “Programming HomeLink®.” You do not want to repeat step 1, as this will erase all previous programming. Gate Operator and Canadian Programming Canadian radio-frequency laws require transmitter signals to “time out” or quit after several seconds of transmission. This may not be long enough for HomeLink® to pick up the signal during programming. Similarly, some U.S. gate operators are manufactured to “time out” in the same manner.
2-43
HomeLink® is now in the train (learning) mode and can be programmed at any time beginning with Step 2
under “Programming HomeLink®” shown earlier in this section. Individual buttons cannot be erased, but they can be reprogrammed. See “Reprogramming a Single HomeLink® Button” following this section. Reprogramming a Single HomeLink® Button To program a device to HomeLink® using a HomeLink® button previously trained, follow these steps: 1. Press and hold the desired HomeLink® button. Donot release the button.
2. The indicator light will begin to flash after
20 seconds. While still holding the HomeLink® button, proceed with Step 2 under “Programming HomeLink®” shown earlier in this section.
If you live in Canada, or you are having difficulty programming a gate operator by using the “Programming HomeLink®” procedures (regardless of where you live), replace Step 3 under “Programming HomeLink®” with the following: Continue to press and hold the HomeLink® button while you press and release every two seconds (cycle) your hand-held transmitter until the frequency signal has been successfully accepted by HomeLink®. The indicator light will flash slowly at first and then rapidly. Proceed with Step 4 under “Programming HomeLink®” to complete. Using HomeLink® Press and hold the appropriate HomeLink® button for at least half of a second. The indicator light will come on while the signal is being transmitted. Erasing HomeLink® Buttons To erase programming from the three buttons do the following: 1. Press and hold down the two outside buttons until the indicator light begins to flash, after 20 seconds. Do not hold the two outside buttons for longer than 30 seconds.
2. Release both buttons.
2-44
Resetting Defaults To reset HomeLink® to default settings do the following: 1. Hold down the two outside buttons for about
20 seconds until the indicator light begins to flash. 2. Continue to hold both buttons until the HomeLink®
indicator light turns off. 3. Release both buttons. For questions or comments, contact HomeLink® at 1-800-355-3515, or on the internet at www.homelink.com. Storage Areas
Glove Box To open the glove box, lift up on the lever. The glove box has a light inside.
Cupholder(s) Your vehicle has two cupholders in the center console area.
Center Console Storage Area Your vehicle has a center console storage area located between the front seats. It includes storage areas, and accessory power outlet(s) on the rear of the console.
Convenience Net If your vehicle has a convenience net, the convenience net attaches to the floor or back wall of the rear of the vehicle using six anchor points. The net can be used like a hammock across the rear of the vehicle or hooked on the floor. Put small loads, like grocery bags, behind the net. It can help keep them from falling over during sharp turns or quick starts and stops. The net is not for larger, heavier loads. Store them in the rear of the vehicle as far forward as you can.
2-45
Vent Open: To open the power sunroof to the vent position from the closed position, press and hold the passenger’s side sunroof switch forward. The rear of the sunroof panel will tilt upward to the full vent position. The sunshade must be opened manually. Close: To close the power sunroof, operate the controls according to one of the following:
From the open position, press and hold the driver’s side sunroof switch forward. The sunshade must be closed manually. From the vent position, press and hold the passenger’s side sunroof switch rearward.
Anti-Pinch: If an object is in the path of the sunroof while it is closing, the anti-pinch feature will detect the object and stop the sunroof from closing at the point of the obstruction. The sunroof will then return to the full-open or vent position. To close the sunroof once it has re-opened, refer to the two options previously described under the “Close” feature instructions.
Sunroof The vehicle may have a power sunroof.
The switches that operate the sunroof are located on the overhead console.
To open or close the sunroof, the ignition must be ON or Retained Accessory Power (RAP) must be active. See Retained Accessory Power (RAP) on page 2-24. Express Open: The express open feature will operate from the closed or partially open position. To express open the power sunroof, press the driver’s side sunroof switch rearward once. To stop the sunroof glass in a desired position other than to the express open position, press the switch again, in either direction, to stop the movement. If the sunshade is in the closed position, it will open with the sunroof, or it can be opened manually.
2-46
(cid:127) (cid:127) Vehicle Personalization Your vehicle is equipped with personalization that allows you to program certain features to a preferred setting for up to two people. The number of programmable features varies depending upon which vehicle options are purchased. On all vehicles, features such as climate control settings, radio and XM™ preset settings, exterior lighting at unlock and remote lock, unlock confirmation and language have already been programmed for your convenience. Your vehicle also has an automatic door locking feature that is always on. You cannot turn the automatic door locking feature off. See Programmable Automatic Door Locks on page 2-12. Some vehicles are equipped with additional features that can be programmed including the seat, steering column, and outside rearview mirror position. If your vehicle has the base audio system, the following information explains the vehicle personalization on your vehicle. If your vehicle has the Navigation system, see “Personalization” in the Index of the STS Navigation System manual for information on vehicle personalization.
If your vehicle is equipped with the ability to program additional personalization features, the driver’s preferences are recalled by pressing any button on the keyless access transmitter, 1 or 2 or by selecting Driver 1 or 2 on the radio display. Certain features can be programmed not to recall until the ignition is turned off. To change feature preferences, use the following procedure. Entering the Personal Settings Menu To enter the feature programming mode, use the following procedure: 1. Be sure the ignition is either on, in ACC position, or
in RAP and place the transmission in PARK (P) or the vehicle speed is less than 6 mph (9 km/h).
2. Press any button on the appropriate keyless access
transmitter to identify yourself as Driver 1 or Driver 2.
3. Turn on the radio by pressing the
power/volume knob.
4. Press the CNFG radio button or the tune/select
knob located on the right side of the radio to enter the radio’s main menu.
5. Turn the tune/select knob and scroll to SETUP. 6. Press the tune/select knob to enter the
SETUP menu.
2-47
7. Turn the tune/select knob and scroll to PERSONAL SETTINGS MENU, then press the tune/select knob to turn the feature on. A check mark appears after this selection when it is turned on and the entire list of personalization features will appear.
8. Turn the tune/select knob and scroll to the feature
you want to change, then press the tune/select knob to turn the feature on or off. If the feature is turned on, a check mark will appear next to the feature name. Some features have submenus that show additional features that can be turned on or off. After entering a submenu, turn the tune/select knob and scroll to the feature you want to change, then press the tune/select knob to turn the feature on or off.
Personal Settings Menu Items The PERSONAL SETTINGS MENU must be selected with a check mark to program the personalization features. If it is not selected, press the tune/select knob until the check mark appears. If it is selected, the entire list of features will be available to program.
DRIVER GREETING This feature allows you to type in a customized name or greeting that will appear on the display whenever the corresponding keyless access transmitter, 1 or 2, is used or Driver 1 or Driver 2 is selected on the radio display. If a customized name or greeting is not programmed, the system will show Driver 1 or Driver 2 to correspond with the numbers on the back of the keyless access transmitters. In this case, the customized driver greeting feature is factory shipped as off. To turn the driver greeting feature on and to program a customized name or greeting, use the following procedure: 1. Enter the PERSONAL SETTINGS MENU by
following the instructions listed previously under “Entering the Personal Settings Menu.”
2. Turn the tune/select knob until DRIVER GREETING
is highlighted.
3. Press the tune/select knob to turn on the DRIVER
GREETING feature. You will see a cursor on the screen.
2-48
4. Turn the tune/select knob until you reach the first
letter you want; the letter will be highlighted. There is a complete alphabet with both upper and lower case letters and the numbers zero through nine. Also included are spaces and other non-letter characters such as the ampersand (&).
5. Press the tune/select knob once to select the letter.
The letter will then appear on the display and the cursor will advance to the next letter. If you make a mistake, press the F5 button, located on the radio, repeatedly to cycle back through all of the characters until you reach the character you wish to change. Then turn the tune/select knob until the letter you want is highlighted and press the tune/select knob to select the new letter.
6. Repeat Steps 4 and 5 until the name or greeting
you want is complete. You can program up to 16 characters.
The name or greeting you programmed is now set. You can either exit the programming mode by following the instructions later in this section or program the next feature available on your vehicle by pressing the
F6 (BACK) button, located on the radio, to return to the PERSONAL SETTINGS MENU. You will now see a check mark next to the driver greeting menu item, which means that the driver greeting feature is on and a customized driver greeting is being used. To turn off the customized driver greeting, and go back to displaying either Driver 1 or Driver 2, use the following procedure: 1. Enter the PERSONAL SETTINGS MENU by
following the instructions listed previously under “Entering the Personal Settings Menu.”
2. Turn the tune/select knob until DRIVER GREETING
is highlighted.
3. Press the tune/select knob to turn on the DRIVER
GREETING feature. The check mark will be cleared and the customized driver greeting is off.
The only way to correct a customized driver greeting once you have exited the screen to spell the name, is to turn the driver greeting feature off, and then turn it back on.
2-49
KEY FOB REMINDER This feature chirps the horn three times when the driver’s door is closed and there is a keyless access transmitter left inside of the vehicle. This will only occur when the vehicle is off. Programmable Modes Mode 1: ON Mode 2: OFF Before your vehicle was shipped from the factory, it was programmed to Mode 1. The mode to which the vehicle was programmed may have been changed since it left the factory. To program the vehicle to a different mode, use the following procedure: 1. Enter the PERSONAL SETTINGS MENU by
following the instructions listed previously under “Entering the Personal Settings Menu.”
2. Turn the tune/select knob until KEY FOB
REMINDER is highlighted.
3. Press the tune/select knob to switch back and forth
between on and off. When the mode is turned on, a check mark will appear next to the feature name.
The mode you selected is now set. You can either exit the programming mode by following the instructions later in this section or program the next feature available on your vehicle.
2-50
REMOTE START This feature (if equipped) allows you to choose the features you would like to have activated when you engage the remote start on your vehicle. These features include the climate control system, the rear defogger and the seat temperature (if equipped). Activating these features helps provide a more comfortable vehicle upon entry. See “Remote Vehicle Start” under Keyless Access System Operation on page 2-4 for more information.
Mode 1: ON
Mode 2: OFF Before your vehicle was shipped from the factory, it was programmed to Mode 1. The mode to which the vehicle was programmed may have been changed since it left the factory. To program the vehicle to a different mode, use the following procedure: 1. Enter the PERSONAL SETTINGS MENU by
following the instructions listed previously under “Entering the Personal Settings Menu.”
2. Turn the tune/select knob until REMOTE START
is highlighted.
3. Press the tune/select knob to switch back and forth
between on and off.
When REMOTE START is on, a check mark will appear next to the feature name. You can then choose to activate any or all of the following features by turning the tune/select knob to highlight the feature, then pressing the knob to turn it on.
CLIMATE CONTROL: The climate control system will engage when the vehicle is started using the remote start feature. It will be at the same climate control setting that was last used by the driver using that keyless entry transmitter.
REAR WINDOW DEFOG: If this feature is active, the rear defogger will engage when the vehicle is started using the remote start feature.
SEAT TEMP (Temperature) CONTROL: If this feature is active, the seats will be heated or cooled, if equipped, when the vehicle is started using the remote start feature. The mode you selected is now set. You can either exit the programming mode by following the instructions later in this section or program the next feature available on your vehicle by pressing the F6 (BACK) button, located on the radio, to return to the PERSONAL SETTINGS MENU.
REMOTE RECALL MEMORY If your vehicle has the optional memory package, you will have this feature. When this feature is turned on, you can recall any previously programmed seat position and mirror position when the unlock button on the keyless access transmitter is pressed. Programmable Modes
Mode 1: ON
Mode 2: OFF Before your vehicle was shipped from the factory, it was programmed to Mode 2 with the exception of recall seat to driver position which is on. The mode to which the vehicle was programmed may have been changed since it left the factory. To program the vehicle to a different mode, use the following procedure: 1. Enter the PERSONAL SETTINGS MENU by
following the instructions listed previously under “Entering the Personal Settings Menu.”
2. Turn the tune/select knob until REMOTE RECALL
MEMORY is highlighted.
3. Press the tune/select knob to switch back and forth
between on and off. When the mode is turned on, a check mark will appear next to the feature name.
2-51
The mode you selected is now set. You can either exit the programming mode by following the instructions later in this section or program the next feature available on your vehicle. START BUTTON RECALL If your vehicle has the optional memory package, you will have this feature. When this feature is turned on, you can recall any previously programmed seat, mirror and steering column position when the start button on the ignition is pressed. Programmable Modes
Mode 1: ON
Mode 2: OFF Before your vehicle was shipped from the factory, it was programmed to Mode 2. The mode to which the vehicle was programmed may have been changed since it left the factory. To program the vehicle to a different mode, use the following procedure: 1. Enter the PERSONAL SETTINGS MENU by
following the instructions listed previously under “Entering the Personal Settings Menu.”
2. Turn the tune/select knob until START BUTTON
RECALL is highlighted.
2-52
3. Press the tune/select knob to switch back and forth
between on and off. When the mode is turned on, a check mark will appear next to the feature name.
The mode you selected is now set. You can either exit the programming mode by following the instructions later in this section or program the next feature available on your vehicle. AUTO EXIT SEAT If your vehicle has the optional memory package, you will have this feature. When this feature is turned on, you can recall any previously programmed exit position for the driver’s seat when the vehicle is off, the shift lever is in PARK (P) and the driver’s door is opened. Programmable Modes
Mode 1: ON
Mode 2: OFF Before your vehicle was shipped from the factory, it was programmed to Mode 2. The mode to which the vehicle was programmed may have been changed since it left the factory.
To program the vehicle to a different mode, use the following procedure: 1. Enter the PERSONAL SETTINGS MENU by
following the instructions listed previously under “Entering the Personal Settings Menu.”
2. Turn the tune/select knob until AUTO EXIT SEAT
is highlighted.
3. Press the tune/select knob to switch back and forth
between on and off. When the mode is turned on, a check mark will appear in the box next to the feature name.
The mode you selected is now set. You can either exit the programming mode by following the instructions later in this section or program the next feature available on your vehicle. AUTO EXIT COLUMN If your vehicle has the optional memory package, you will have this feature. When this feature is turned on, you can recall any previously programmed exit position for the steering column when the vehicle is off, the shift lever is in PARK (P) and the driver’s door is opened.
Programmable Modes
Mode 1: ON
Mode 2: OFF Before your vehicle was shipped from the factory, it was programmed to Mode 2. The mode to which the vehicle was programmed may have been changed since it left the factory. To program the vehicle to a different mode, use the following procedure: 1. Enter the PERSONAL SETTINGS MENU by
following the instructions listed previously under “Entering the Personal Settings Menu.”
2. Turn the tune/select knob until AUTO EXIT
COLUMN is highlighted.
3. Press the tune/select knob to switch back and forth
between on and off. When the mode is turned on, a check mark will appear in the box next to the feature name.
The mode you selected is now set. You can either exit the programming mode by following the instructions later in this section or program the next feature available on your vehicle.
2-53
LIGHTS FLASH AT UNLOCK This feature allows the exterior lamps to flash when the keyless access transmitter is used to unlock the vehicle. All doors must be closed for this feature to work, and the lamps will not flash if the parking lamps or headlamps are on. If LIGHTS FLASH AT UNLOCK is turned on and either KEYLESS FT DOOR UNLOCK or KEYLESS DOORS UNLOCK is turned on, the exterior lamps will flash when the doors are passively unlocked. See “KEYLESS FT (Front) DOOR UNLOCK” and “KEYLESS DOORS UNLOCK” later in this section for more information. Programmable Modes
Mode 1: ON
Mode 2: OFF Before your vehicle was shipped from the factory, it was programmed to Mode 1. The mode to which the vehicle was programmed may have been changed since it left the factory. To program the vehicle to a different mode, use the following procedure: 1. Enter the PERSONAL SETTINGS MENU by
following the instructions listed previously under “Entering the Personal Settings Menu.”
2-54
2. Turn the tune/select knob until LIGHTS FLASH AT
UNLOCK is highlighted.
3. Press the tune/select knob to switch back and forth
between on and off. When the mode is turned on, a check mark will appear next to the feature name.
The mode you selected is now set. You can either exit the programming mode by following the instructions later in this section or program the next feature available on your vehicle. LIGHTS FLASH AT LOCK This feature allows the exterior lamps to flash once when the keyless access transmitter is used to lock the vehicle. All doors must be closed for this feature to work, and the lamps will not flash if the parking lamps or headlamps are on. If LIGHTS FLASH AT LOCK is turned on and either KEYLESS FT DOOR UNLOCK or KEYLESS DOORS UNLOCK is turned on, the exterior lamps will flash when the doors are passively unlocked. See “KEYLESS FT (Front) DOOR UNLOCK” and “KEYLESS DOORS UNLOCK” later in this section for more information.
Programmable Modes Mode 1: ON Mode 2: OFF Before your vehicle was shipped from the factory, it was programmed to Mode 1. The mode to which the vehicle was programmed may have been changed since it left the factory. To program the vehicle to a different mode, use the following procedure: 1. Enter the PERSONAL SETTINGS MENU by
following the instructions listed previously under “Entering the Personal Settings Menu.”
2. Turn the tune/select knob until LIGHTS FLASH AT
LOCK is highlighted.
3. Press the tune/select knob to switch back and forth
between on and off. When the mode is turned on, a check mark will appear next to the feature name.
You can select this feature by itself, or you can combine it with Horn Chirps At Lock so that both the exterior lamps flash and the horn chirps when you lock your vehicle. The mode you selected is now set. You can either exit the programming mode by following the instructions later in this section or program the next feature available on your vehicle.
EXT. (Exterior) LIGHTS AT UNLOCK This feature turns on the exterior lamps when the keyless access transmitter is used to unlock the vehicle. The lamps will remain on for about 20 seconds unless a door is opened, the ignition is turned to ACC, ON or START or the keyless access transmitter is used to lock the vehicle. Programmable Modes
Mode 1: ON
Mode 2: OFF Before your vehicle was shipped from the factory, it was programmed to Mode 1. The mode to which the vehicle was programmed may have been changed since it left the factory. To program the vehicle to a different mode, use the following procedure: 1. Enter the PERSONAL SETTINGS MENU by
following the instructions listed previously under “Entering the Personal Settings Menu.”
2. Turn the tune/select knob until EXT. LIGHTS AT
UNLOCK is highlighted.
2-55
3. Press the tune/select knob to switch back and forth
between on and off. When the mode is turned on, a check mark will appear next to the feature name.
The mode you selected is now set. You can either exit the programming mode by following the instructions later in this section or program the next feature available on your vehicle. HORN CHIRPS AT LOCK This feature sounds the horn once when the keyless access transmitter is used to lock the vehicle. All doors must be closed for this feature to work. Programmable Modes
Mode 1: ON
Mode 2: OFF Before your vehicle was shipped from the factory, it was programmed to Mode 2. The mode to which the vehicle was programmed may have been changed since it left the factory. To program the vehicle to a different mode, use the following procedure: 1. Enter the PERSONAL SETTINGS MENU by
following the instructions listed previously under “Entering the Personal Settings Menu.”
2. Turn the tune/select knob until HORN CHIRPS AT
LOCK is highlighted.
3. Press the tune/select knob to switch back and forth
between on and off. When the mode is turned on, a check mark will appear next to the feature name.
The mode you selected is now set. You can either exit the programming mode by following the instructions later in this section or program the next feature available on your vehicle. TWILIGHT DELAY This feature allows you to set the amount of time you want the exterior lamps to remain on after you exit the vehicle. Programmable Modes Mode 1: 0:00 seconds (off) Mode 2: 0:05 seconds Mode 3: 0:15 seconds Mode 4: 0:30 seconds Mode 5: 1:30 minutes Mode 6: 2:00 minutes Mode 7: 3:00 minutes Mode 8: 4:00 minutes
2-56
Before your vehicle was shipped from the factory, it was programmed to Mode 2. The mode to which the vehicle was programmed may have been changed since the vehicle left the factory. To determine the mode to which the vehicle is programmed or to program the vehicle to a different mode, use the following procedure: 1. Enter the PERSONAL SETTINGS MENU by
following the instructions listed previously under “Entering the Personal Settings Menu.”
2. Turn the tune/select knob until TWILIGHT DELAY
is highlighted.
3. Press the tune/select knob to scroll through the available delay settings and set your selection. If you choose Mode 1, the exterior lamps will not illuminate when you exit the vehicle. Only one mode can be selected at a time.
The mode you selected is now set. You can either exit the programming mode by following the instructions later in this section or program the next feature available on your vehicle.
DRIVER UNLOCK AT OFF This feature allows the driver’s door to automatically unlock when the ignition is turned off. Programmable Modes
Mode 1: ON
Mode 2: OFF Before your vehicle was shipped from the factory, it was programmed to Mode 2. The mode to which the vehicle was programmed may have been changed since it left the factory. To program the vehicle to a different mode, use the following procedure: 1. Enter the PERSONAL SETTINGS MENU by
following the instructions listed previously under “Entering the Personal Settings Menu.”
2. Turn the tune/select knob until DRIVER UNLOCK
AT OFF is highlighted.
3. Press the tune/select knob to switch between on
and off. When the mode is turned on, a check mark will appear next to the feature name.
The mode you selected is now set. You can either exit the programming mode by following the instructions later in this section or program the next feature available on your vehicle.
2-57
DOORS UNLOCK AT OFF This feature allows all of the doors to automatically unlock when the ignition is turned off. Programmable Modes
DRIVER UNLOCK IN PARK The feature allows the driver’s door to automatically unlock when the transmission is shifted into PARK (P). Programmable Modes
Mode 1: ON
Mode 1: ON
Mode 2: OFF Before your vehicle was shipped from the factory, it was programmed to Mode 2. The mode to which the vehicle was programmed may have been changed since it left the factory. To program the vehicle to a different mode, use the following procedure: 1. Enter the PERSONAL SETTINGS MENU by
following the instructions listed previously under “Entering the Personal Settings Menu.”
2. Turn the tune/select knob until DOORS UNLOCK
AT OFF is highlighted.
3. Press the tune/select knob to switch between on
and off. When the mode is turned on, a check mark will appear next to the feature name.
Mode 2: OFF Before your vehicle was shipped from the factory, it was programmed to Mode 1. The mode to which the vehicle was programmed may have been changed since it left the factory. To program the vehicle to a different mode, use the following procedure: 1. Enter the PERSONAL SETTINGS MENU by
following the instructions listed previously under “Entering the Personal Settings Menu.”
2. Turn the tune/select knob until DRIVER UNLOCK
IN PARK is highlighted.
3. Press the tune/select knob to switch back and forth
between on and off. When the mode is turned on, a check mark will appear next to the feature name.
The mode you selected is now set. You can either exit the programming mode by following the instructions later in this section or program the next feature available on your vehicle.
The mode you selected is now set. You can either exit the programming mode by following the instructions later in this section or program the next feature available on your vehicle.
2-58
DOORS UNLOCK IN PARK The feature allows all of the doors to automatically unlock when the transmission is shifted into PARK (P). Programmable Modes
Mode 1: ON
Mode 2: OFF Before your vehicle was shipped from the factory, it was programmed to Mode 1. The mode to which the vehicle was programmed may have been changed since it left the factory. To program the vehicle to a different mode, use the following procedure: 1. Enter the PERSONAL SETTINGS MENU by
following the instructions listed previously under “Entering the Personal Settings Menu.”
2. Turn the tune/select knob until DOORS UNLOCK
IN PARK is highlighted.
3. Press the tune/select knob to switch back and forth
between on and off. When the mode is turned on, a check mark will appear next to the feature name.
KEYLESS FT (Front) DOOR UNLOCK This feature automatically unlocks the appropriate front door when you approach the vehicle with your keyless access transmitter and pull the respective door handle. See Door Locks on page 2-11 for more information. Programmable Modes Mode 1: ON Mode 2: OFF Before your vehicle was shipped from the factory, it was programmed to Mode 2. The mode to which the vehicle was programmed may have been changed since it left the factory. To program the vehicle to a different mode, use the following procedure: 1. Enter the PERSONAL SETTINGS MENU by
following the instructions listed previously under “Entering the Personal Settings Menu.”
2. Turn the tune/select knob until KEYLESS FT DOOR
UNLOCK is highlighted.
3. Press the tune/select knob to switch back and forth
between on and off. When the mode is turned on, a check mark will appear next to the feature name.
The mode you selected is now set. You can either exit the programming mode by following the instructions later in this section or program the next feature available on your vehicle.
The mode you selected is now set. You can either exit the programming mode by following the instructions later in this section or program the next feature available on your vehicle.
2-59
KEYLESS DOORS UNLOCK This feature automatically unlocks all of the doors when you approach the vehicle with your keyless access transmitter and pull either front door handle. See Door Locks on page 2-11 for more information. Programmable Modes
Mode 1: ON
Mode 2: OFF Before your vehicle was shipped from the factory, it was programmed to Mode 1. The mode to which the vehicle was programmed may have been changed since it left the factory. To program the vehicle to a different mode, use the following procedure: 1. Enter the PERSONAL SETTINGS MENU by
following the instructions listed previously under “Entering the Personal Settings Menu.”
2. Turn the tune/select knob until KEYLESS DOORS
UNLOCK is highlighted.
3. Press the tune/select knob to switch back and forth
between on and off. When the mode is turned on, a check mark will appear next to the feature name.
The mode you selected is now set. You can either exit the programming mode by following the instructions later in this section or program the next feature available on your vehicle. LOCK DELAY This feature delays the locking of the vehicle’s doors for up to five seconds after a power door lock switch or the lock button on the keyless access transmitter is pressed. The five second delay occurs after the last door is closed. If the keyless access transmitter is left inside of the vehicle, the doors will not lock. Programmable Modes
Mode 1: ON
Mode 2: OFF Before your vehicle was shipped from the factory, it was programmed to Mode 1. The mode to which the vehicle was programmed may have been changed since it left the factory.
2-60
To program the vehicle to a different mode, use the following procedure: 1. Enter the PERSONAL SETTINGS MENU by
following the instructions listed previously under “Entering the Personal Settings Menu.”
2. Turn the tune/select knob until LOCK DELAY
is highlighted.
3. Press the tune/select knob to switch back and forth
between on and off. When the mode is turned on, a check mark will appear next to the feature name.
The mode you selected is now set. You can either exit the programming mode by following the instructions later in this section or program the next feature available on your vehicle. KEYLESS LOCK DELAY This feature delays the locking of the vehicle’s doors for up to five seconds after the lock button on the keyless access transmitter is pressed. The five second delay occurs after the last door is closed. If the keyless access transmitter is left inside of the vehicle, the doors will not lock.
Programmable Modes
Mode 1: ON
Mode 2: OFF Before your vehicle was shipped from the factory, it was programmed to Mode 2. The mode to which the vehicle was programmed may have been changed since it left the factory. To program the vehicle to a different mode, use the following procedure: 1. Enter the PERSONAL SETTINGS MENU by
following the instructions listed previously under “Entering the Personal Settings Menu.”
2. Turn the tune/select knob until KEYLESS LOCK
DELAY is highlighted.
3. Press the tune/select knob to switch back and forth
between on and off. When the mode is turned on, a check mark will appear next to the feature name.
The mode you selected is now set. You can either exit the programming mode by following the instructions later in this section or program the next feature available on your vehicle.
2-61
3. Press the tune/select knob to switch back and forth
between on and off. When the mode is turned on, a check mark will appear next to the feature name.
The mode you selected is now set. You can either exit the programming mode by following the instructions later in this section or program the next feature available on your vehicle. CHIME VOLUME HIGH This feature allows you to adjust the volume level of the vehicle’s warning chimes. The chime volume cannot be turned off, only adjusted. Programmable Modes
Mode 1: NORMAL
Mode 2: HIGH Before your vehicle was shipped from the factory, it was programmed to Mode 1. The mode to which the vehicle was programmed may have been changed since it left the factory.
FRONT PASS (Passenger) WINDOW LOCK This feature allows you to choose whether or not to have the front passenger window deactivated as part of the window lockout button. If you would like the front passenger window to be deactivated when the window lockout button is pushed, turn this feature on. If this feature is left off, the window lockout button located on the door will deactivate only the rear windows. See Power Windows on page 2-17 for more information. Programmable Modes
Mode 1: ON
Mode 2: OFF Before your vehicle was shipped from the factory, it was programmed to Mode 2. The mode to which the vehicle was programmed may have been changed since it left the factory. To program the vehicle to a different mode, use the following procedure: 1. Enter the PERSONAL SETTINGS MENU by
following the instructions listed previously under “Entering the Personal Settings Menu.”
2. Turn the tune/select knob until FRONT PASS
WINDOW LOCK is highlighted.
2-62
To program the vehicle to a different mode, use the following procedure: 1. Enter the PERSONAL SETTINGS MENU by
following the instructions listed previously under “Entering the Personal Settings Menu.”
2. Turn the tune/select knob until CHIME VOLUME
HIGH is highlighted.
3. Press the tune/select knob to switch back and forth
between the normal and high settings. A check mark indicates that the chime volume is set to HIGH.
The mode you selected is now set. You can either exit the programming mode by following the instructions later in this section or program the next feature available on your vehicle. SUSPENSION MODE If your vehicle has this feature, you can select between performance or touring modes. Performance mode is used where road conditions or personal preference demand more control. This setting provides more “feel” or response to road conditions. Touring mode is used for normal city and highway driving. This setting provides a smooth, soft ride.
Programmable Modes
Mode 1: PERFORMANCE
Mode 2: TOURING Before your vehicle was shipped from the factory, it was programmed to Mode 2. The mode to which the vehicle was programmed may have been changed since